Page 127 of 496

3-32 Features and controls
3
NOTE�The opening or closing operation of the top cannot be per-
formed when the vehicle is in motion.
�For information about the cleaning of the top, refer to the
section “Convertible top” on page 7-77.
�When leaving the vehicle unattended, be sure to close the
top and remove the ignition key.
�To avoid damage, do not sit or place luggage or any heavy
objects on the top itself, or the area around it.
�Make sure nothing is in the top storage area (top and
behind the rear seats) when raising or lowering the top.
Even a small article may interfere with the operation of
the top and may damage the top or cause it to malfunction.
�Always be sure the top is completely dry before it is low-
ered. Lowering the top while wet or damp may cause inte-
rior water damage, water stains or mildew of the top. It
can also cause the top to deteriorate and shrink.
�Never operate the top when temperatures are 32 °F (0 °C)
or below. The fabric of the top may be damaged. If neces-
sary, allow the vehicle to set for a while in a heated garage
prior to operating the convertible top mechanism.
�A roof top or luggage carrier of any type or design MUST
NOT be used on the ECLIPSE SPYDER’s top. This
includes, but is not limited to ski, bicycle or luggage
racks. Damage to the top may result.
�Before opening or closing the top, make sure there are no
obstructions above the vehicle. For opening and closing of
the top, there must be upward clearance of approximately
6.6 feet (2 m) as measured from the ground.
�The trunk lid cannot be opened until opening or closing of
the electric convertible top is complete.�The power windows cannot be operated until opening or
closing of the electric convertible top is complete.
Normal operation
N00504900015
The top can be opened and closed using the top switches.Requirements for operation
N00505000026
The top can be opened and closed when the following require-
ments are all satisfied.
�The ambient temperature is 32 °F (0 °C) or higher.
�The vehicle is stationary.
�The ignition switch is in the “ON” position.
�The trunk lid is closed.
�The latch handles are unlocked.NOTE�If either of the top switches is operated when the require-
ments for operation are not all satisfied, the operation
indicator lamp will flash slowly (approximately one flash
per second) and a tone will sound intermittently and rap-
idly (approximately three times per second) to indicate
that opening/closing operation is not possible.
If you are not able to perform opening/closing operation
when the requirements are all satisfied, have the vehicle
inspected by an authorized Mitsubishi Motors dealer.
BK0098300US.book 32 ページ 2008年12月8日 月曜日 午前11時37分
Page 129 of 496
3-34 Features and controls
3
5. Push the left and right release buttons (A) to unlock the
latch handles (B) and cause them to slightly rise.6. Pull the latch handles (B) toward you until they lock in
position.
NOTE�Make sure the latch handles (B) are securely locked in
place. Operating the electric convertible top without first
locking the latch handles in position could cause the elec-
tric convertible top to malfunction.
�If you pull the driver’s-side latch handle (B) while listen-
ing to the audio system, an audible beep will sound and
the audio system’s sound equalization will change to set-
tings that are optimized for operation with the electric
convertible top open.
A
B
B
BK0098300US.book 34 ページ 2008年12月8日 月曜日 午前11時37分
Page 133 of 496
 until they click and
lock into position. Return the sun visors to their original
positions.NOTE�If you")
3-38 Features and controls
3
2. Pull down both sun visors.
3. Firmly return the latch handles (B) until they click and
lock into position. Return the sun visors to their original
positions.NOTE�If you lock the driver’s-side latch handle (B) while listen-
ing to the audio system, an audible beep will sound and
the audio system’s sound equalization will change to set-
tings that are optimized for operation with the electric
convertible top closed.
Part-open warning buzzer
N00505400033
If you start to drive the vehicle with the top partly open, the
operation indicator lamp will flash rapidly (approximately two
flashes per second) and a tone will sound for approximately 5
seconds to indicate that the top is partly open. Stop the vehicle
in a safe place and completely open or close the top.If the electric convertible top malfunctions
N00505500018
If the electric convertible top malfunctions, the operation indi-
cator lamp will flash rapidly (approximately two flashes per
second) and a tone will sound intermittently and slowly
(approximately once per second) to indicate the system fault
when either top switch is operated. If the operation indicator
lamp does not go off when a period of 10 minutes or longer has
elapsed, have the vehicle inspected by an authorized Mitsub-
ishi Motors dealer.
WA R N I N G
!�Make sure the latch handles (B) are securely locked
in place. Driving the vehicle without first locking the
latch handles in position could cause the top to open,
resulting in a serious accident.
B
BK0098300US.book 38 ページ 2008年12月8日 月曜日 午前11時37分
Page 135 of 496
3-40 Features and controls
3
2. While pushing the slide (C) in the direction of the arrow,
install the top and bottom frames, then release the slide
(C). Make sure both of the frames are securely engaged.3. Move the locking pin (D) to the position (2).
C
1- Stowed position
2- Installation position
3- Locked position
1 2 3 D
BK0098300US.book 40 ページ 2008年12月8日 月曜日 午前11時37分
Page 136 of 496
Features and controls
3-41
3
4. From inside the vehicle, insert the two retainer pegs (E)
all the way into mountings provided (F). 5. Align the locking pins (D) with the holes (G) in the vehi-
cle. Slide the locking pins (D) toward the outside and
insert them in the holes to retain the wind deflector. Make
sure that the wind deflector is securely installed in the
vehicle.
EF
D
G
BK0098300US.book 41 ページ 2008年12月8日 月曜日 午前11時37分
Page 137 of 496
3-42 Features and controls
3
NOTE�When you insert the locking pins (D) into the holes (G),
they may be stiff. If this happens, adjust each locking pin
(D) to a length that enables secure retention of the wind
deflector. To adjust the length of each locking pin (D),
turn the end of the locking pin using a screwdriver.6. Raise the top frame to the full upright position as illus-
trated.
BK0098300US.book 42 ページ 2008年12月8日 月曜日 午前11時37分
Page 138 of 496
Features and controls
3-43
3
Removing the wind deflectorTrying to remove the wind deflector improperly will cause
damage or destruction.NOTE�Follow the removal procedure exactly to avoid damage or
destruction of the wind deflector.
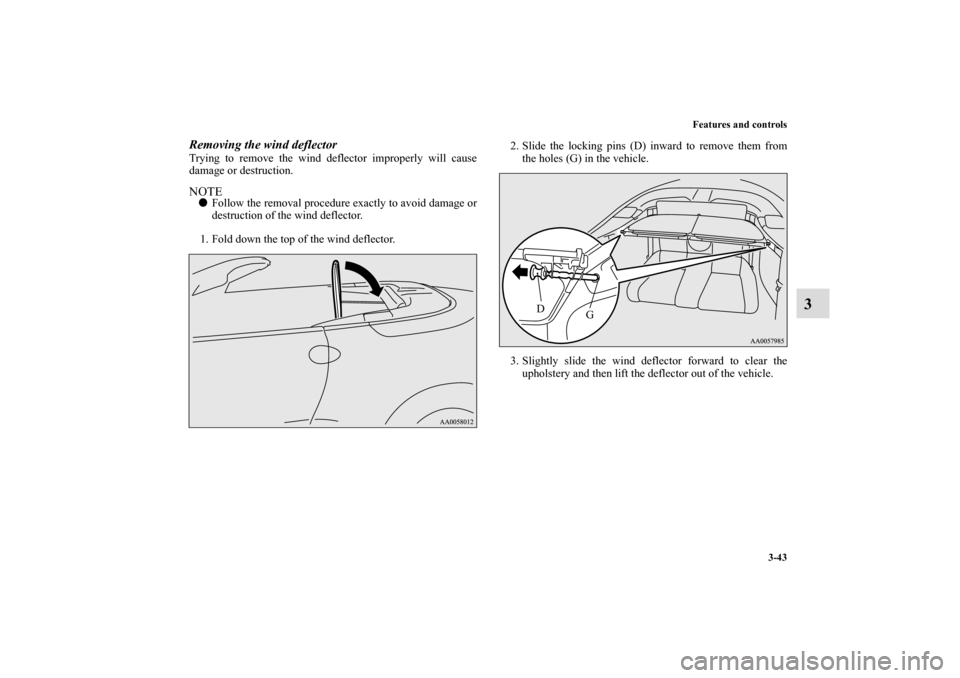
1. Fold down the top of the wind deflector.2. Slide the locking pins (D) inward to remove them from
the holes (G) in the vehicle.
3. Slightly slide the wind deflector forward to clear the
upholstery and then lift the deflector out of the vehicle.
D
G
BK0098300US.book 43 ページ 2008年12月8日 月曜日 午前11時37分
Page 139 of 496
3-44 Features and controls
3
4. Slide the slide (C) toward the middle to unlock the bottom
frame (A) and the top frame (B).5. Move the locking pin (D) to the position (1).
C
1- Stowed position
2- Installation position
3- Locked position
D321
BK0098300US.book 44 ページ 2008年12月8日 月曜日 午前11時37分
 to unlock the
latch handles (B) and cause them to slightly rise.6. Pull the latch handles (B) toward you until they lock in")
 in the direction of the arrow,
install the top and bottom frames, then release the slide
(C). Make sure both of the frames are securely enga")

all the way into mountings provided (F). 5. Align the locking pins (D) with the holes (G) in the vehi-
cle. Sl")

 toward the middle to unlock the bottom
frame (A) and the top frame (B).5. Move the locking pin (D) to the position (1).
C
1- Stowed position
2- Inst")