Page 248 of 330

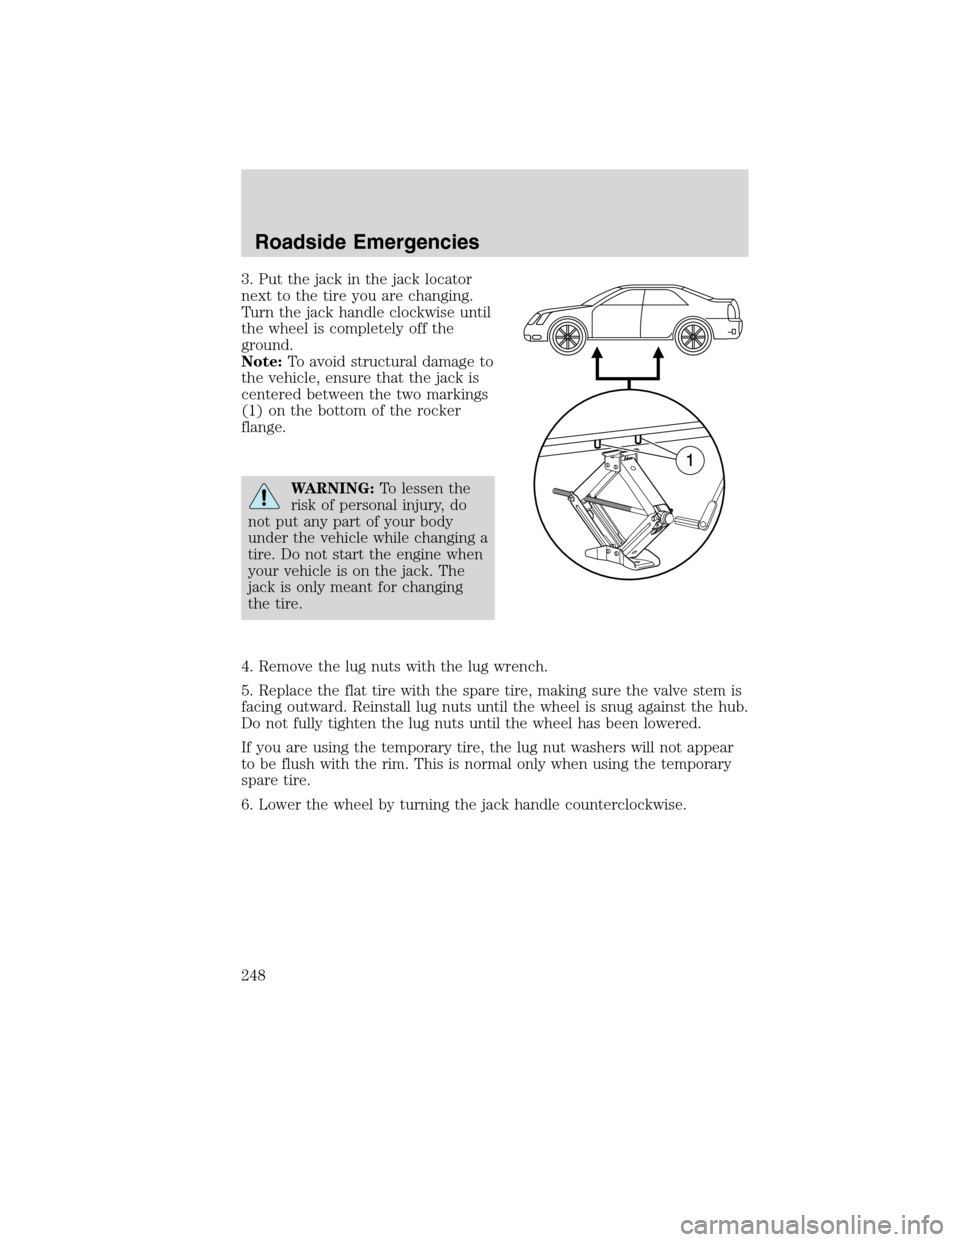
3. Put the jack in the jack locator
next to the tire you are changing.
Turn the jack handle clockwise until
the wheel is completely off the
ground.
Note:To avoid structural damage to
the vehicle, ensure that the jack is
centered between the two markings
(1) on the bottom of the rocker
flange.
WARNING:To lessen the
risk of personal injury, do
not put any part of your body
under the vehicle while changing a
tire. Do not start the engine when
your vehicle is on the jack. The
jack is only meant for changing
the tire.
4. Remove the lug nuts with the lug wrench.
5. Replace the flat tire with the spare tire, making sure the valve stem is
facing outward. Reinstall lug nuts until the wheel is snug against the hub.
Do not fully tighten the lug nuts until the wheel has been lowered.
If you are using the temporary tire, the lug nut washers will not appear
to be flush with the rim. This is normal only when using the temporary
spare tire.
6. Lower the wheel by turning the jack handle counterclockwise.
Roadside Emergencies
248
2010 Milan(mln)
Owners Guide, 3rd Printing
USA(fus)
Page 249 of 330

7. Remove the jack and fully tighten
the lug nuts in the order shown.
Refer toWheel lug nut torque
specificationslater in this chapter
for the proper lug nut torque
specification.
8. Unblock the wheels.
Stowing the wheel and jack
1. Fully collapse the jack and place it back in the storage area in the
trunk.
2. Replace the jack retention bolt to secure the jack.
3. Place the tire in the storage bin in the trunk.
4. Replace the cover plate and bolt.
•When storing a flat road tire, flip the cover plate over and use the long
bolt.
•When storing the temporary spare tire, replace the cover plate and
use the short bolt.
5. Secure the bolt using the lug wrench.
6. Insert the lug wrench and bolt in the tool bag and place over the jack.
7. Replace the carpeted load floor panel.
WHEEL LUG NUT TORQUE SPECIFICATIONS
Retighten the lug nuts to the specified torque at 500 miles (800 km)
after any wheel disturbance (tire rotation, changing a flat tire, wheel
removal, etc.).
Bolt size Wheel lug nut torque*
ft-lb N•m
M12 x 1.5 100 135
* Torque specifications are for nut and bolt threads free of dirt and
rust. Use only Ford recommended replacement fasteners.
1
4 3
2 5
Roadside Emergencies
249
2010 Milan(mln)
Owners Guide, 3rd Printing
USA(fus)
Page 299 of 330

When filling the vehicle’s fuel tank from a portable fuel container, use the
included funnel.
1. Locate the white plastic funnel. It
is attached to the underside of the
spare tire cover or is included with
the tire changing tools.
2. Slowly insert the funnel into the Easy Fuel™ system.
3. Fill the vehicle with fuel from the portable fuel container.
4. When done, clean the funnel or properly dispose of it. Extra funnels
can be purchased from your authorized dealer if you choose to dispose
of the funnel.Do notuse aftermarket funnels; they will not work with
the Easy Fuel™ system and can damage it. The included funnel has
been specially designed to work safely with your vehicle.
ESSENTIALS OF GOOD FUEL ECONOMY
Measuring techniques
Your best source of information about actual fuel economy is you, the
driver. You must gather information as accurately and consistently as
possible. Fuel expense, frequency of fill-ups or fuel gauge readings are
NOT accurate as a measure of fuel economy. We do not recommend taking
fuel economy measurements during the first 1,000 miles (1,600 km) of
driving (engine break-in period). You will get a more accurate
measurement after 2,000 miles–3,000 miles (3,000 km–5,000 km).
Filling the tank
The advertised fuel capacity of the fuel tank on your vehicle is equal to
the rated refill capacity of the fuel tank as listed in theMaintenance
product specifications and capacitiessection of this chapter.
The advertised capacity is the amount of the indicated capacity and the
empty reserve combined. Indicated capacity is the difference in the
amount of fuel in a full tank and a tank when the fuel gauge indicates
empty. Empty reserve is the small amount of fuel remaining in the fuel
tank after the fuel gauge indicates empty.
Maintenance and Specifications
299
2010 Milan(mln)
Owners Guide, 3rd Printing
USA(fus)
Page 330 of 330

Starting your
vehicle ........................196–197, 199
jump starting ..........................251
Steering
speed sensitive .......................208
Steering wheel
controls ......................................82
tilting .........................................71
Stereo
CD-MP3 .....................................29
SYNC�..........................................45
T
Tilt steering wheel ......................71
Tire Pressure Monitoring
System (TPMS)
Tires, Wheels and Loading ....182
Tires ...........................167–168, 243
alignment ................................175
care ..........................................171
changing ..................................243
checking the pressure ............171
inflating ...................................169
label .........................................181
replacing ..................................173
rotating ....................................176
safety practices .......................174
sidewall information ...............177
snow tires and chains ............186
spare tire .................................244
terminology .............................168
tire grades ...............................168
treadwear ........................167, 172
Towing .......................................193
recreational towing .................193
trailer towing ..........................193
wrecker ....................................256Transmission .............................210
brake-shift interlock (BSI) ....209
fluid, checking and adding
(automatic) .............................306
fluid, checking and adding
(manual) .........................306, 310
fluid, refill capacities ..............314
lubricant specifications ..........314
manual operation ....................215
Trunk ...........................................91
remote release ....................85, 95
Turn signal ..................................60
U
USB port ......................................39
V
Vehicle Identification Number
(VIN) ..........................................318
Vehicle loading ..........................187
Ventilating your vehicle ...........199
W
Warning lights (see Lights) .......12
Washer fluid ..............................277
Water, Driving through .............233
Windows
power .........................................76
Windshield washer fluid and
wipers ..........................................70
checking and adding fluid .....277
replacing wiper blades ...........277
Wrecker towing .........................256
Index
330
2010 Milan(mln)
Owners Guide, 3rd Printing
USA(fus)
Page:
< prev 1-8 9-16 17-24