Page 244 of 330

theTires, Wheels and Loadingchapter. Replace the spare tire with a road
tire as soon as possible. During repairing or replacing of the flat tire, have
the authorized dealer inspect the TPMS sensor for damage.
WARNING:The use of tire sealants may damage your tire
pressure monitoring system and should not be used.
WARNING:Refer toTire pressure monitoring system (TPMS)
in theTires, Wheels and Loadingchapter for important
information. If the tire pressure monitor sensor becomes damaged, it
will no longer function.
Dissimilar spare tire/wheel information
WARNING:Failure to follow these guidelines could result in an
increased risk of loss of vehicle control, injury or death.
If you have a dissimilar spare tire/wheel, then it is intended for
temporary use only. This means that if you need to use it, you should
replace it as soon as possible with a road tire/wheel that is the same size
and type as the road tires and wheels that were originally provided by
Ford. If the dissimilar spare tire or wheel is damaged, it should be
replaced rather than repaired.
A dissimilar spare tire/wheel is defined as a spare tire and/or wheel that
is different in brand, size or appearance from the road tires and wheels
and can be one of three types:
1.T-type mini-spare:This spare tire begins with the letter “T” for tire
size and may have “Temporary Use Only” molded in the sidewall
2.Full-size dissimilar spare with label on wheel:This spare tire has
a label on the wheel that states: “THIS TIRE AND WHEEL FOR
TEMPORARY USE ONLY”
When driving with one of the dissimilar spare tires listed above,do not:
•Exceed 50 mph (80 km/h)
•Load the vehicle beyond maximum vehicle load rating listed on the
Safety Compliance Label
•Tow a trailer
•Use snow chains on the end of the vehicle with the dissimilar spare
tire
Roadside Emergencies
244
2010 Milan(mln)
Owners Guide, 3rd Printing
USA(fus)
Page 246 of 330

Stopping and securing the vehicle
1. Park on a level surface, set the parking brake and activate the hazard
flashers.
2. Place the gearshift lever in P (Park) (automatic transmission) or R
(Reverse) (manual transmission) and turn the engine off.
Removing the spare tire and jack
1. Remove the carpeted load floor
panel located in the rear of the
vehicle and remove the lug wrench
and long bolt from the tool bag.
2. Remove the bolt securing the
spare tire using the lug wrench,
then lift and remove the spare tire
from the trunk.
3. Remove the jack retention bolt by
turning it counterclockwise and
remove the jack from the vehicle.
Tire change procedure
WARNING:To help prevent the vehicle from moving when you
change a tire, be sure the parking brake is set, then block (in
both directions) the wheel that is diagonally opposite (other side and
end of the vehicle) to the tire being changed.
WARNING:If the vehicle slips off the jack, you or someone else
could be seriously injured.
Roadside Emergencies
246
2010 Milan(mln)
Owners Guide, 3rd Printing
USA(fus)
Page 247 of 330
WARNING:Do not attempt to change a tire on the side of the
vehicle close to moving traffic. Pull far enough off the road to
avoid the danger of being hit when operating the jack or changing the
wheel.
Note:Passengers should not remain in the vehicle when the vehicle is
being jacked.
1. Block both the front and rear of
the wheel diagonally opposite the
flat tire. For example, if the left
front tire is flat, block the right rear
wheel.
2. Remove the center ornament (if
equipped) from the wheel. Loosen
each wheel lug nut one-half turn
counterclockwise but do not remove
them until the wheel is raised off
the ground.
Roadside Emergencies
247
2010 Milan(mln)
Owners Guide, 3rd Printing
USA(fus)
Page 248 of 330

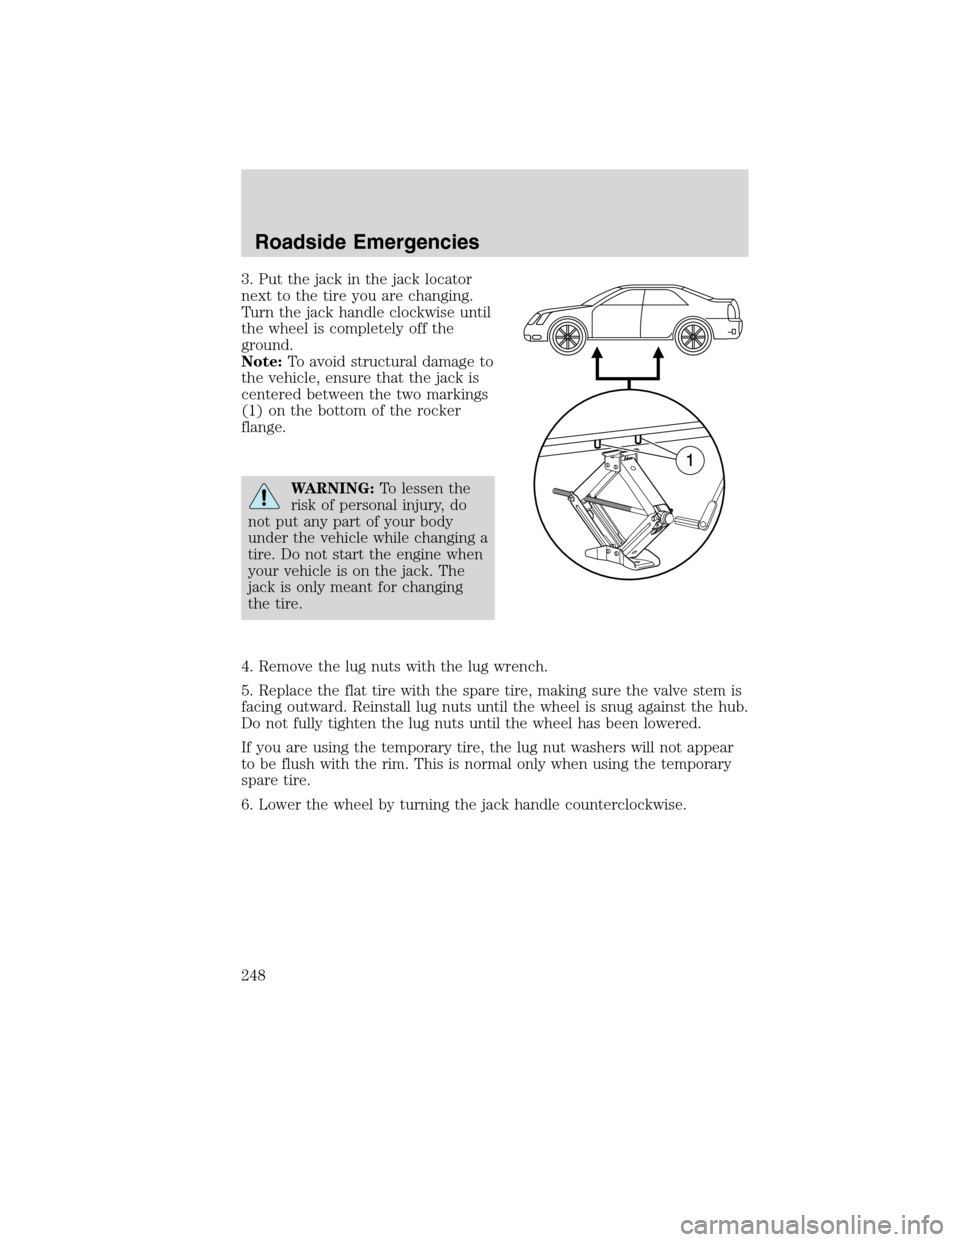
3. Put the jack in the jack locator
next to the tire you are changing.
Turn the jack handle clockwise until
the wheel is completely off the
ground.
Note:To avoid structural damage to
the vehicle, ensure that the jack is
centered between the two markings
(1) on the bottom of the rocker
flange.
WARNING:To lessen the
risk of personal injury, do
not put any part of your body
under the vehicle while changing a
tire. Do not start the engine when
your vehicle is on the jack. The
jack is only meant for changing
the tire.
4. Remove the lug nuts with the lug wrench.
5. Replace the flat tire with the spare tire, making sure the valve stem is
facing outward. Reinstall lug nuts until the wheel is snug against the hub.
Do not fully tighten the lug nuts until the wheel has been lowered.
If you are using the temporary tire, the lug nut washers will not appear
to be flush with the rim. This is normal only when using the temporary
spare tire.
6. Lower the wheel by turning the jack handle counterclockwise.
Roadside Emergencies
248
2010 Milan(mln)
Owners Guide, 3rd Printing
USA(fus)
Page 250 of 330

WARNING:When a wheel is installed, always remove any
corrosion, dirt or foreign materials present on the mounting
surfaces of the wheel or the surface of the wheel hub, brake drum or
brake disc that contacts the wheel. Ensure that any fasteners that
attach the rotor to the hub are secured so they do not interfere with
the mounting surfaces of the wheel. Installing wheels without correct
metal-to-metal contact at the wheel mounting surfaces can cause the
wheel nuts to loosen and the wheel to come off while the vehicle is in
motion, resulting in loss of control.
Note:Inspect the wheel pilot hole
prior to installation. If there is
visible corrosion in wheel pilot hole,
remove loose particles by wiping
with clean rag and apply grease.
Apply grease only to the wheel pilot
hole surface by smearing a “dime”
(1 square cm) sized glob of grease
around the wheel pilot surface (1)
with end of finger. DO NOT apply
grease to lugnut/stud holes or
wheel-to-brake surfaces.
RUNNING OUT OF FUEL
If you have run out of fuel and need to refill the vehicle with a portable
fuel container, seeRunning out of fuelin theMaintenance and
Specificationschapter for proper fuel filling method using a portable
fuel container and the included fuel filler funnel.Do notinsert the
nozzle of portable fuel containers or any type of aftermarket funnels into
the Easy Fuel™ “no cap” fuel system as it can be damaged. You must
use the included funnel in such circumstances.
WARNING:Do not insert the nozzle of portable fuel containers
or aftermarket funnels into the Easy Fuel™ system. This could
damage the fuel system and its seal, and may cause fuel to run onto
the ground instead of filling the tank, all of which could result in
serious personal injury.
Roadside Emergencies
250
2010 Milan(mln)
Owners Guide, 3rd Printing
USA(fus)
Page 251 of 330

JUMP STARTING
WARNING:The gases around the battery can explode if
exposed to flames, sparks, or lit cigarettes. An explosion could
result in injury or vehicle damage.
WARNING:Batteries contain sulfuric acid which can burn skin,
eyes and clothing, if contacted.
Do not attempt to push-start your automatic transmission
vehicle. Automatic transmissions do not have push-start
capability. Attempting to push-start a vehicle with an automatic
transmission may cause transmission damage.
Preparing your vehicle
When the battery is disconnected or a new battery is installed, the
automatic transmission must relearn its shift strategy. As a result, the
transmission may have firm and/or soft shifts. This operation is
considered normal and will not affect function or durability of the
transmission. Over time, the adaptive learning process will fully update
transmission operation.
1.Use only a 12–volt supply to start your vehicle.
2. Do not disconnect the battery of the disabled vehicle as this could
damage the vehicle’s electrical system.
3. Park the booster vehicle close to the hood of the disabled vehicle
making sure the two vehiclesdo nottouch. Set the parking brake on
both vehicles and stay clear of the engine cooling fan and other moving
parts.
4. Check all battery terminals and remove any excessive corrosion before
you attach the battery cables. Ensure that vent caps are tight and level.
5. Turn the heater fan on in both vehicles to protect from any electrical
surges. Turn all other accessories off.
Roadside Emergencies
251
2010 Milan(mln)
Owners Guide, 3rd Printing
USA(fus)
Page 253 of 330
3. Connect the negative (-) cable to the negative (-) terminal of the
assisting battery.
4. Make the final connection of the negative (-) cable to an exposed
metal part of the stalled vehicle’s engine, away from the battery and the
carburetor/fuel injection system.
Note:Do not attach the negative (-) cable to fuel lines, engine rocker
covers, the intake manifold or electrical components asgrounding
points.
WARNING:Do not connect the end of the second cable to the
negative (-) terminal of the battery to be jumped. A spark may
cause an explosion of the gases that surround the battery.
5. Ensure that the cables are clear of fan blades, belts, moving parts of
both engines, or any fuel delivery system parts.
+–+–
+–+–
Roadside Emergencies
253
2010 Milan(mln)
Owners Guide, 3rd Printing
USA(fus)
Page 269 of 330

•The wiper blades can be cleaned with isopropyl (rubbing) alcohol or
Motorcraft�Premium Windshield Washer Concentrate (ZC-32-A),
available from your authorized dealer. This washer fluid contains
special solution in addition to alcohol which helps to remove the hot
wax deposited on the wiper blade and windshield from automated car
wash facilities. Be sure to replace wiper blades when they appear
worn or do not function properly.
•Do not use abrasives, as they may cause scratches.
•Do not use fuel, kerosene, or paint thinner to clean any parts.
If you cannot remove those streaks after cleaning with the glass cleaner
or if the wipers chatter and move in a jerky motion, clean the outer
surface of the windshield and the wiper blades using a sponge or soft
cloth with a neutral detergent or mild-abrasive cleaning solution. After
cleaning, rinse the windshield and wiper blades with clean water. The
windshield is clean if beads do not form when you rinse the windshield
with water.
Do not use sharp objects, such as a razor blade, to clean the
inside of the rear window or to remove decals, as it may cause
damage to the rear window defroster’s heated grid lines.
INSTRUMENT PANEL/INTERIOR TRIM AND CLUSTER LENS
Clean the instrument panel, interior trim areas and cluster lens with a
clean, damp, white cotton cloth, then use a clean and dry white cotton
cloth to dry these areas.
•Avoid cleaners or polishes that increase the gloss of the upper portion
of the instrument panel. The dull finish in this area helps protect the
driver from undesirable windshield reflection.
•Be certain to wash or wipe your hands clean if you have been in
contact with certain products such as insect repellent and suntan
lotion in order to avoid possible damage to the interior painted
surfaces.
•Do not use household or glass cleaners as these may damage the
finish of the instrument panel, interior trim and cluster lens.
WARNING:Do not use chemical solvents or strong detergents
when cleaning the steering wheel or instrument panel to avoid
contamination of the airbag system.
Cleaning
269
2010 Milan(mln)
Owners Guide, 3rd Printing
USA(fus)