2010 MERCEDES-BENZ SLS COUPE child restraint
[x] Cancel search: child restraintPage 47 of 361

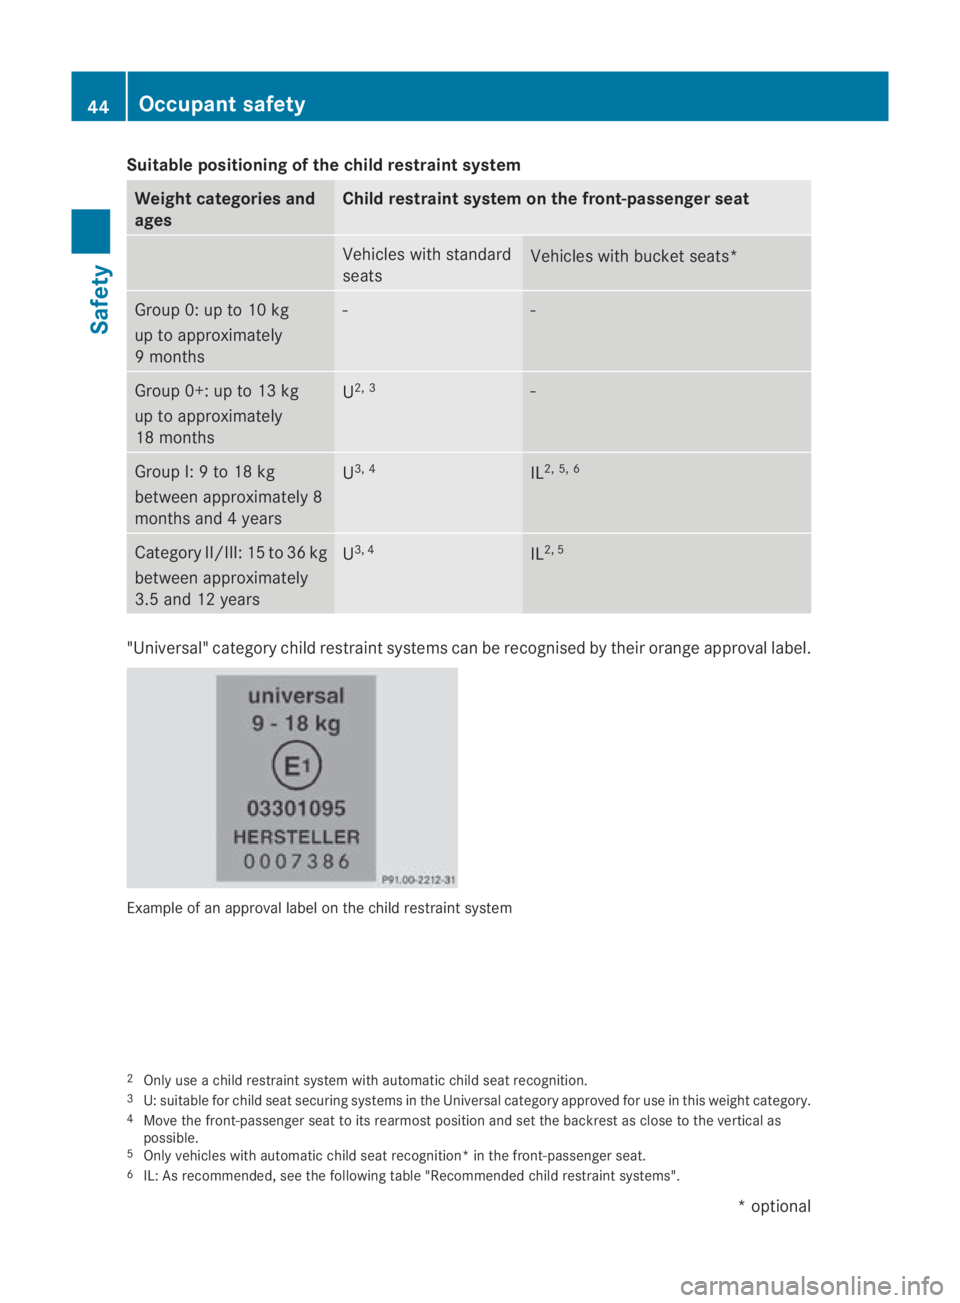
Suitable positioning of the child restraint system
Weight categories and
ages Child restraint system on the front-passenger seat
Vehicles with standard
seats
Vehicles with bucket seats*
Group 0: up to 10 kg
up to approximately
9 months - -
Group 0+: up to 13 kg
up to approximately
18 months
U
2, 3 -
Group I: 9 to 18 kg
between approximately 8
months and 4 years
U
3, 4 IL
2, 5, 6 Category II/III: 15 to 36 kg
between approximately
3.5 and 12 years
U
3, 4 IL
2, 5 "Universal" category child restraint systems can be recognised by their orange approval label.
Example of an approval label on the child restraint system
2 Only use a child restraint system with automatic child seat recognition.
3 U: suitable for child seat securing systems in the Universal category approved for use in this weight category.
4 Move the front-passenger seat to its rearmost position and set the backrest as close to the vertical as
possible.
5 Only vehicles with automatic child seat recognition* in the front-passenger seat.
6 IL: As recommended, see the following table "Recommended child restraint systems". 44
Occupant safetySafety
*o
ptional
BA 197 ECE RE 2010/6a; 1; 2, en-GB
sabbaeu
Version: 3.0.3.6 2010-05-07T14:19:43+02:00 - Seite 44
Page 48 of 361

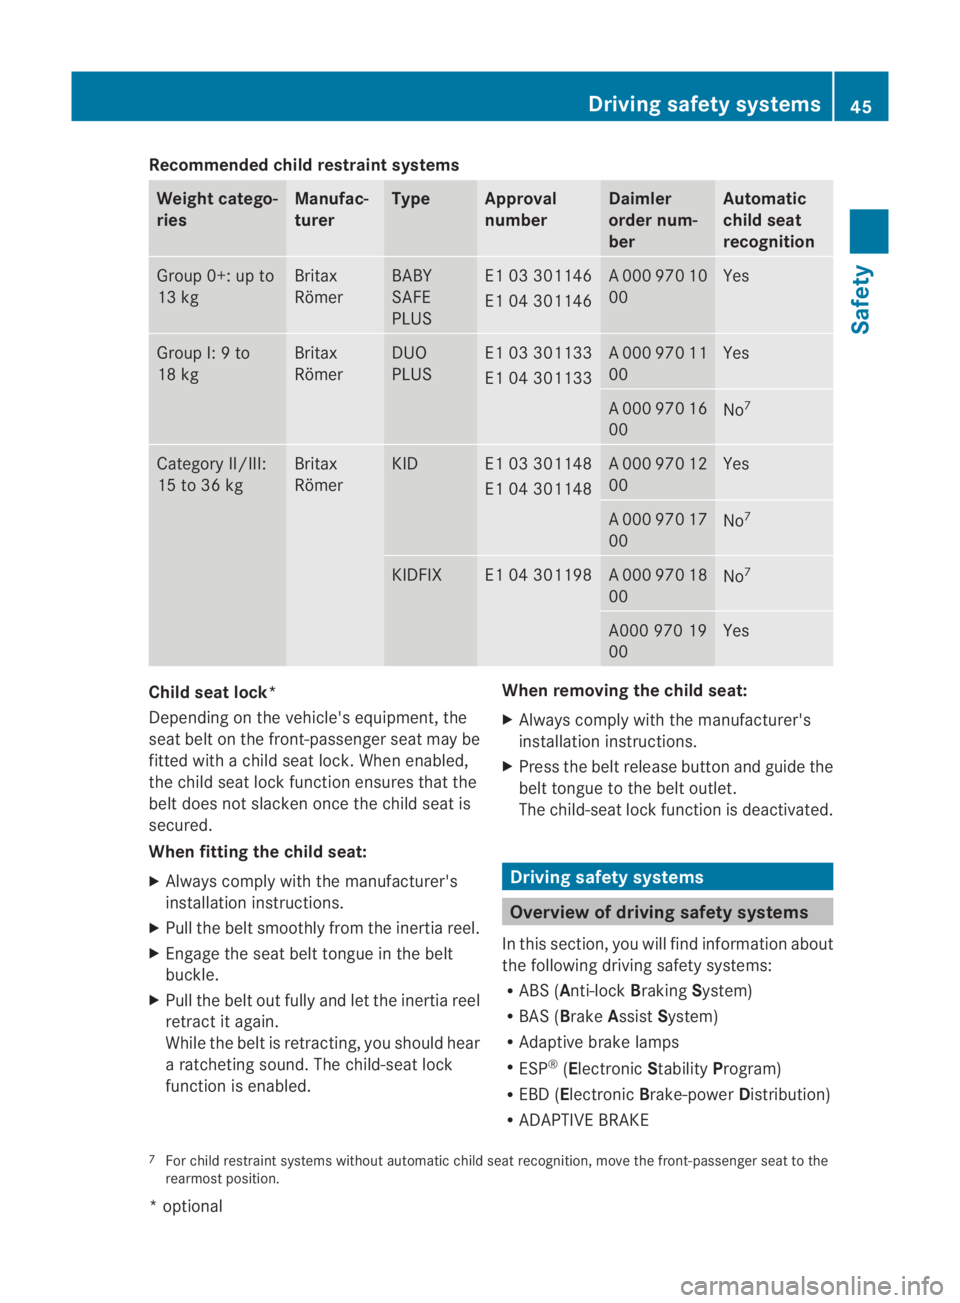
Recommended child restraint systems
Weight catego-
ries Manufac-
turer Type Approval
number Daimler
order num-
ber Automatic
child seat
recognition
Group 0+: up to
13 kg Britax
Römer BABY
SAFE
PLUS E1 03 301146
E1 04 301146 A 000 970 10
00 Yes
Group I: 9 to
18 kg Britax
Römer DUO
PLUS E1 03 301133
E1 04 301133 A 000 970 11
00 Yes
A 000 970 16
00
No
7 Category II/III:
15 to 36 kg Britax
Römer KID E1 03 301148
E1 04 301148 A 000 970 12
00 Yes
A 000 970 17
00
No
7 KIDFIX E1 04 301198 A 000 970 18
00
No
7 A000 970 19
00 Yes
Child seat lock*
Depending on the vehicle's equipment, the
sea
tbelt on the front-passenger seat may be
fitted with a child seat lock. When enabled,
the child seat lock function ensures that the
belt does not slacken oncet he child seat is
secured.
When fitting the child seat:
X Always comply with the manufacturer's
installation instructions.
X Pull the belt smoothly from the inertia reel.
X Engage the seat belt tongue in the belt
buckle.
X Pull the belt out fully and let the inertia reel
retract it again.
While the belt is retracting, you should hear
a ratcheting sound. The child-seat lock
function is enabled. When removing the child seat:
X
Always comply with the manufacturer's
installation instructions.
X Press the belt release button and guide the
belt tongue to the belt outlet.
The child-seat lock function is deactivated. Driving safety systems
Overview of driving safety systems
In this section, you will find information about
the following driving safety systems:
R ABS ( Anti-lock BrakingSystem)
R BAS ( Brake Assist System)
R Adaptive brake lamps
R ESP ®
(Electronic StabilityProgram)
R EBD ( Electronic Brake-power Distribution)
R ADAPTIVE BRAKE
7 For child restraint systems without automatic child seat recognition, move the front-passenger seat to the
rearmost position. Driving safety systems
45Safety
*optional
BA 197 ECE RE 2010/6a; 1; 2, en-GB
sabbaeu
Version: 3.0.3.6 2010-05-07T14:19:43+02:00 - Seite 45 Z
Page 214 of 361

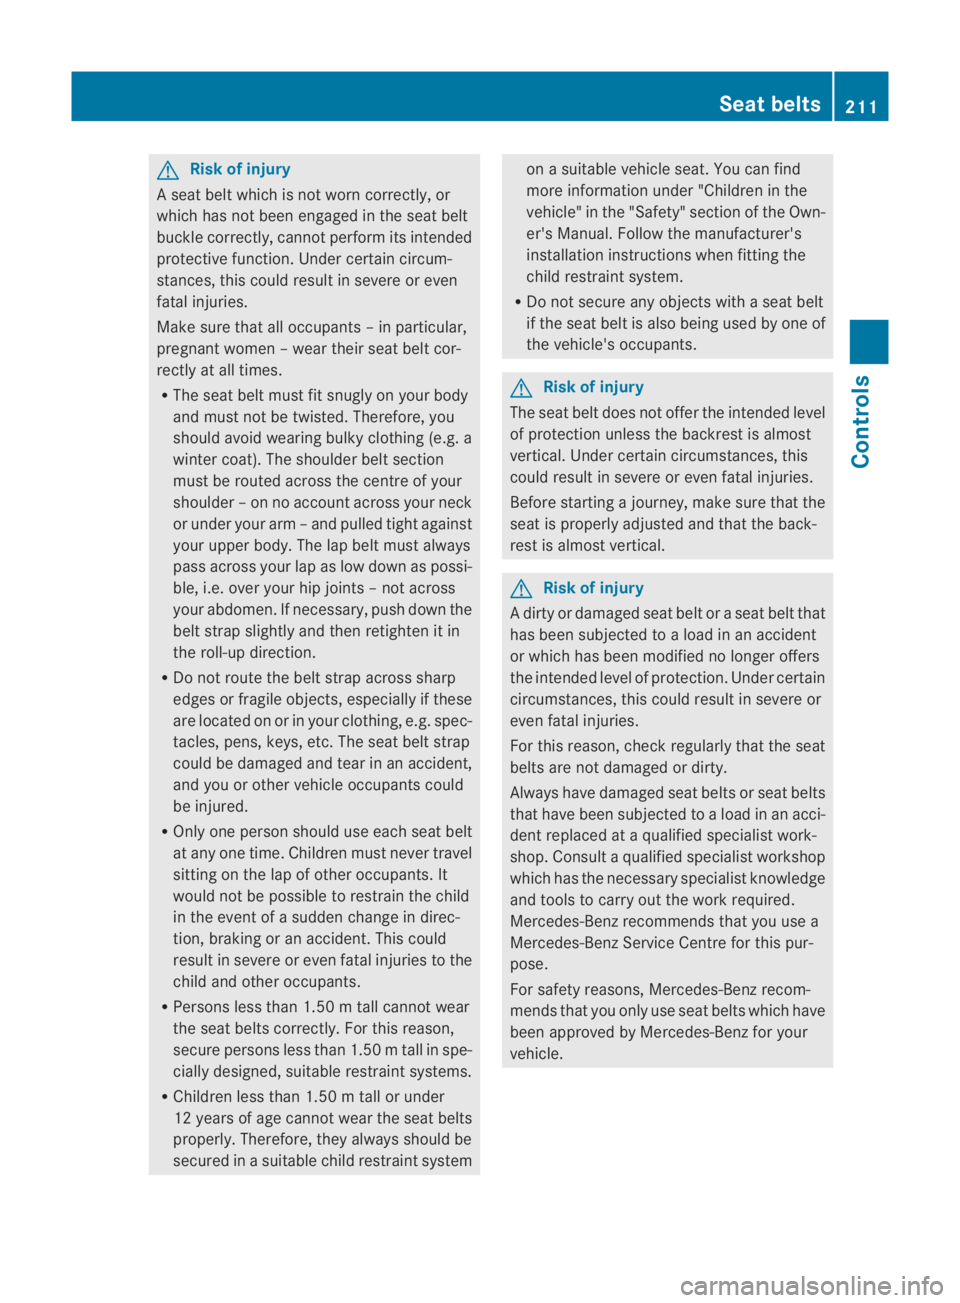
G
Risk of injury
A seat belt which is not worn correctly ,or
which has not been engaged in the seat belt
buckle correctly, cannot perform its intended
protective function. Under certain circum-
stances, this could result in severe or even
fatal injuries.
Make sure that all occupants –inparticular,
pregnant women – wear their seat belt cor-
rectly at all times.
R The seat belt must fit snugly on your body
and must no tbe twisted. Therefore, you
should avoid wearing bulky clothing (e.g. a
winter coat). The shoulder belt section
must be routed across the centre of your
shoulder –onno account across your neck
or under your arm –and pulled tight against
your uppe rbody. The lap belt must always
pass across your lap as low down as possi-
ble, i.e. over your hip joints – not across
your abdomen. If necessary, push down the
belt strap slightly and then retighten it in
the roll-up direction.
R Do not route the belt strap across sharp
edges or fragile objects, especially if these
are located on or in your clothing, e.g. spec-
tacles, pens, keys, etc. The seat belt strap
could be damaged and tear in an accident,
and you or other vehicle occupants could
be injured.
R Only one person should use each seat belt
at any one time. Children must never travel
sitting on the lap of other occupants. It
would not be possible to restrain the child
in the event of a sudden change in direc-
tion, braking or an accident .This could
result in severe or even fatal injuries to the
child and other occupants.
R Persons less than 1.50 m tall cannot wear
the seat belts correctly. For this reason,
secure persons less than 1.50 mtall in spe-
cially designed, suitable restraint systems.
R Children less than 1.50 m tall or under
12 years of age canno twear the seat belts
properly. Therefore, they always should be
secured in a suitable child restraint system on a suitable vehicle seat. You can find
more information under "Children in the
vehicle" in the "Safety" section of the Own-
er's Manual. Follow the manufacturer's
installation instructions when fitting the
child restraint system.
R Do not secure any objects with a seat belt
if the seat belt is also being used by one of
the vehicle's occupants. G
Risk of injury
The seat belt does not offer the intended level
of protection unless the backrest is almost
vertical. Under certain circumstances, this
could result in severe or even fatal injuries.
Before starting a journey, make sure that the
seat is properly adjusted and that the back-
rest is almost vertical. G
Risk of injury
Ad irty or damaged seat belt or a seat belt that
has been subjected to a load in an accident
or which has been modified no longer offers
the intended level of protection. Under certain
circumstances, this could result in severe or
even fatal injuries.
For this reason, chec kregularly that the seat
belts are not damaged or dirty.
Always have damaged seat belts or seat belts
that have been subjected to a load in an acci-
dent replaced at a qualified specialist work-
shop. Consult a qualified specialist workshop
which has the necessary specialist knowledge
and tools to carry out the work required.
Mercedes-Benz recommends that you use a
Mercedes-Benz Service Centre for this pur-
pose.
For safety reasons, Mercedes-Benz recom-
mends that you only use seat belts which have
been approved by Mercedes-Benz for your
vehicle. Seat belts
211Controls
BA 197 ECE RE 2010/6a; 1; 2, en-GB
sabbaeu Version: 3.0.3.6 2010-05-07T14:19:43+02:00 - Seite 211 Z
Page 243 of 361

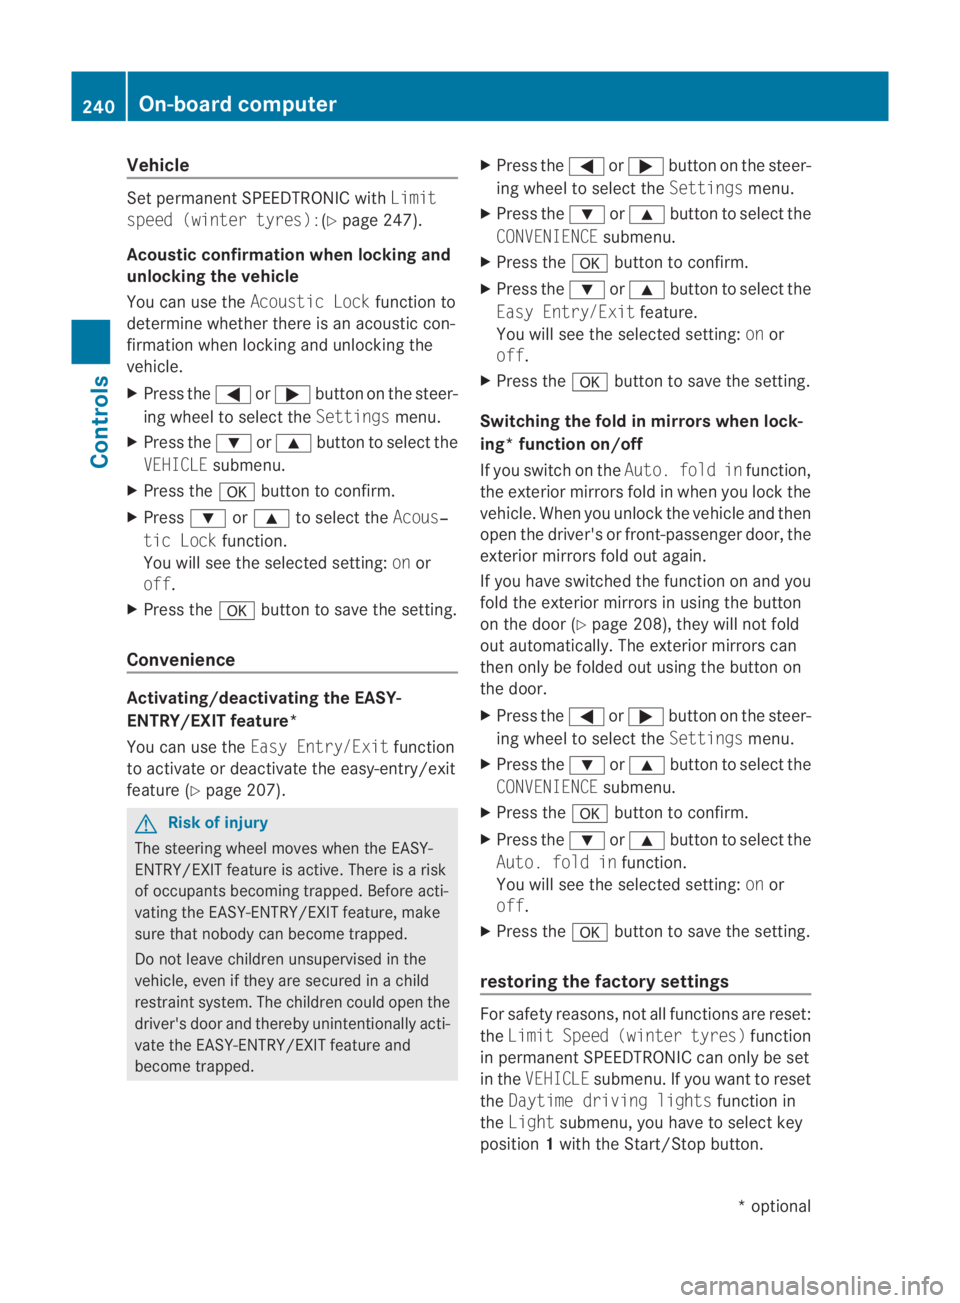
Vehicle
Set permanent SPEEDTRONIC with
Limit
speed (winter tyres):(Y page 247).
Acoustic confirmation when locking and
unlocking the vehicle
You can use the Acoustic Lock function to
determine whethe rthere is an acoustic con-
firmation when locking and unlocking the
vehicle.
X Press the 0008or000E button on the steer-
ing wheel to select the Settingsmenu.
X Press the 000Cor000F button to select the
VEHICLE submenu.
X Press the 000Abutton to confirm.
X Press 000Cor000F to select the Acous‐
tic Lock function.
You will see the selected setting: onor
off.
X Press the 000Abutton to save the setting.
Convenience Activating/deactivating the EASY-
ENTRY/EXIT feature*
You can use the Easy Entry/Exit function
to activate or deactivate the easy-entry/exit
feature (Y page 207). G
Risk of injury
The steering wheel moves when the EASY-
ENTRY/EXIT feature is active. There is a risk
of occupants becoming trapped. Before acti-
vating the EASY-ENTRY/EXIT feature, make
sure that nobody can become trapped.
Do not leave children unsupervised in the
vehicle, even if they are secured in a child
restraint system. The children could open the
driver's door and thereby unintentionally acti-
vate the EASY-ENTRY/EXIT feature and
become trapped. X
Press the 0008or000E button on the steer-
ing wheel to select the Settingsmenu.
X Press the 000Cor000F button to select the
CONVENIENCE submenu.
X Press the 000Abutton to confirm.
X Press the 000Cor000F button to select the
Easy Entry/Exit feature.
You will see the selected setting: onor
off.
X Press the 000Abutton to save the setting.
Switching the fold in mirrors when lock-
ing* function on/off
If you switch on the Auto. fold infunction,
the exterior mirrors fold in when you lock the
vehicle. When you unlock the vehicle and then
open the driver's or front-passenger door, the
exterior mirrors fold out again.
If you have switched the function on and you
fold the exterior mirrors in using the button
on the door (Y page 208), they will not fold
out automatically .The exterior mirrors can
then only be folded out using the button on
the door.
X Press the 0008or000E button on the steer-
ing wheel to select the Settingsmenu.
X Press the 000Cor000F button to select the
CONVENIENCE submenu.
X Press the 000Abutton to confirm.
X Press the 000Cor000F button to select the
Auto. fold in function.
You will see the selected setting: onor
off.
X Press the 000Abutton to save the setting.
restoring the factory settings For safety reasons, not all functions are reset:
the
Limit Speed (winter tyres) function
in permanent SPEEDTRONIC can only be set
in the VEHICLE submenu. If you want to reset
the Daytime driving lights function in
the Light submenu, you have to select key
position 1with the Start/Stop button. 240
On-board computerControls
*o
ptional
BA 197 ECE RE 2010/6a; 1; 2, en-GB
sabbaeu
Version: 3.0.3.6 2010-05-07T14:19:43+02:00 - Seite 240