2010 MERCEDES-BENZ SLK55AMG fuse
[x] Cancel search: fusePage 10 of 312
Consumption .................................
193
Messages in the multifunction
display
........................................... 250
Oil dipstick ..................................... 193
Recommended engine oils and oil
filter ............................................... 302
ESP ®
(Electronic Stability
Program) .............................................. 49
ETS .................................................. 50
Messages in the multifunction
display ........................................... 237
Warning lamp ................................. 260
ETD (Emergency Tensioning
Device) ................................................. 43
Safety guidelines ............................. 34
ETS (Electronic Traction System) ....... 50
Express operation Power windows ................................ 78
Exterior lamp switch ........................... 71
Exterior rear view mirrors ..................68
Parking position ............................... 69
Exterior view of vehicle ......................24 F
Fastening the seat belts .....................42
First aid kit .........................................
234
Flat tire ............................................... 273
Lowering the vehicle ......................281
Mounting the spare wheel ............. 277
Preparing the vehicle .....................273
Spare wheel ........................... 273, 300
TIREFIT (tire repair kit) ................... 273
Floormats ........................................... 187
Fluids
Automatic transmission fluid ......... 301
Brake fluid ..................................... 301
Capacities ...................................... 300
Engine coolant ............................... 301
Engine oil ....................................... 301
Hydraulic fluid ................................ 302
Manual transmission oil ................. 301
Power steering fluid ....................... 301
Washer and headlamp cleaning
system ........................................... 302
Fog lamps ............................................. 73
Messages in the multifunction
display ................................... 252, 254Front air bags
see Air bags
Front lamps
see Headlamps
Front seat head restraints
see Head restraints
Fuel ..................................................... 190
Additives ........................................ 304
Capacity, fuel tank ......................... 301
Drive sensibly–safe fuel .................221
Fuel consumption statistics ...........109
Fuel filler flap and cap ................... 191
Fuel tank reserve warning
lamp ........................................ 26, 261
Premium unleaded gasoline ...........303
Refueling ........................................ 190
Requirements ................................ 303
Fuel filler flap ..................................... 191
Fuels, coolants, lubricants etc. ........300
Fuel tank Capacity ........................................ 301
Fuel filler flap and cap ................... 191
Refueling ........................................ 190
Fuses .................................................. 288 G
Garage door opener .................... 30, 183
Gasoline see Fuel
GAWR (Gross Axle Weight Rating) ...218
Gear range ........................................... 88
Indicator .......................................... 88
Limiting ............................................ 89
Shifting into optimal ........................90
Gear selector lever .............................. 86
Cleaning ......................................... 231
Gearshift pattern ............................. 86
Lock ........................................... 80, 86
Shifting procedure ........................... 86
Transmission position indicator ....... 87
Transmission positions .................... 87
Gearshift lever ..................................... 84
Gearshift pattern ............................. 84
Generator
see Alternator
Global locking/unlocking
see Key, SmartKey 8
Index 171_AKB; 3; 60, en-US
d2ureepe,
Version: 2.11.8.1 2009-05-11T16:00:23+02:00 - Seite 8
Page 228 of 312

Clearing the maintenance service
indicator message
The maintenance service indicator message
is cleared automatically
R
after approximately 10 seconds when you
switch on the ignition
R after approximately 10 seconds when
reaching
the service threshold while driving
R after approximately 30 seconds, once the
suggested maintenance service term has
passed
X Clearing the maintenance service
indicator
message manually: Press reset
button . on the instrument cluster.
The standard display appears in the
multifunction display.
Maintenance service term exceeded If you have exceeded the suggested
maintenance service term, you will see the
following message in the multifunction
display:
Service A Exceeded By XXXXX Miles
(Km)
Service A Exceeded By XXX Days
Service A Exceeded By X Day
In addition, a signal sounds when the
message appears.
Any authorized Mercedes-Benz Center will
reset the maintenance service indicator
following a completed maintenance service.
Calling up the maintenance service
indicator display
i The menu overview can be found on
(Y page 96).
You can call up the maintenance service
indicator display at any time to check when
the next maintenance service is required. X
Switch on the ignition.
X Press button V or U on the
multifunction steering wheel repeatedly
until the standard display
(Y page 96)
appears in the multifunction display.
X Press button * or & on the
multifunction steering wheel until the
maintenance
service indicator display with
the service symbol ¯ and the
maintenance service deadline appears in
the multifunction display.
i If
the battery was disconnected, the days
of disconnection will not be included in the
count shown by the maintenance service
indicator. To arrive at the true maintenance
service deadline, you will need to subtract
these days from the days shown in the
maintenance service indicator message or
maintenance service indicator display.
Do not confuse the maintenance service
indicator with the engine oil level indicator
4. Resetting the maintenance service
indicator
In
the event that the maintenance service on
your vehicle is not carried out at an authorized
Mercedes-Benz Center, you can have the
maintenance service indicator reset.
The automotive maintenance facility carrying
out the maintenance service will find the
information for resetting the maintenance
service indicator in the maintenance-relevant
literature for your vehicle.
Such literature is available at any authorized
Mercedes-Benz Center or directly from
Mercedes-Benz.
! If the maintenance service indicator was
reset inadvertently, have an authorized
Mercedes-Benz Center correct it.
Only reset the maintenance service
indicator if the proper maintenance service
has been performed. Not following the
proper maintenance service as described 226
Maintenance
Operation
171_AKB; 3; 60, en-US
d2ureepe,
Version: 2.11.8.1 2009-05-11T16:00:23+02:00 - Seite 226
Page 230 of 312
Scratches, corrosive deposits, corrosion or
damage due to negligent or incorrect care
cannot always be removed or repaired with
the vehicle-care products recommended
here.
In such cases it is best to seek aid at an
authorized Mercedes-Benz Center.
The following topics deal with the cleaning
and care of your vehicle and give important
“how-to” information as well as references to
Mercedes-Benz approved vehicle-care
products.
Power washer !
Follow the instructions provided by the
power washer manufacturer on
maintaining
a distance between the vehicle
and the nozzle of the power washer.
Never use a round nozzle to power-wash
tires. The intense jet of water can result in
damage to the tire.
Always replace a damaged tire.
Always keep the jet of water moving across
the surface. Do not aim directly at electrical
parts, electrical connectors, seals, or other
rubber parts.
Tar stains Quickly remove tar stains before they dry and
become more difficult to remove. A tar
remover is recommended.
Paintwork, painted body components
!
Affixing stickers, magnets, adhesive tape
or similar materials to painted body
components may damage the paintwork.
Mercedes-Benz approved Paint Care should
be applied when water drops on the paint
surface do not “bead up”. This should
normally be done every 3 to 5 months,
depending on the climate and washing
detergent used.
Mercedes-Benz approved Paint Cleaner
should be applied if the paint surface shows
signs of embedded dirt (i.e. loss of gloss). Do not apply any of these products or wax if
your
vehicle is parked in the sun or if the hood
is still hot.
X Use the appropriate MB-Touch-Up Stick for
quick
and provisional repairs of minor paint
damage (i.e. chips from stones, vehicle
doors, etc.).
Engine cleaning Prior to cleaning the engine compartment,
make sure to protect electrical components
and connectors from contact with water and
cleaning agents.
Corrosion protection, such as MB
Anticorrosion Wax should be applied to the
engine compartment after every engine
cleaning. Before applying, all control linkage
bushings
and joints should be lubricated. The
poly-V-belt and all pulleys should be
protected from any wax.
Vehicle washing In the winter, thoroughly remove all traces of
road salt as soon as possible.
When
washing the vehicle underbody, do not
forget to clean the inner sides of the wheels.
Hand-wash
X Do not use hot water or wash your vehicle
in direct sunlight.
X Only use a soft, wet cloth or sponge to
clean the vehicle.
X Only use a mild vehicle wash detergent,
such as Mercedes-Benz approved Car
Shampoo.
X Thoroughly spray the vehicle with a
diffused jet of water.
X Do not spray directly towards the
ventilation intake.
X Use plenty of water and rinse the sponge
and chamois frequently.
X Rinse with clean water and dry with a
chamois thoroughly. 228
Vehicle care
Operation
171_AKB; 3; 60, en-US
d2ureepe,
Version: 2.11.8.1 2009-05-11T16:00:23+02:00 - Seite 228
Page 235 of 312
Vehicle equipment ............................
234
Where will I find ...? .......................... 234
Vehicle status messages in the
multifunction display ....................... 236
What to do if … .................................. 256
Unlocking/locking manually ...........264
Opening/closing manually ..............266
Replacing SmartKey batteries ......... 266
Replacing bulbs ................................. 267
Replacing wiper blades ....................271
Flat tire .............................................. 273
Battery ............................................... 282
Jump starting .................................... 283
Towing the vehicle ............................285
Fuses .................................................. 288 233Practical hints
171_AKB; 3; 60, en-US
d2ureepe,
Version: 2.11.8.1 2009-05-11T16:00:23+02:00 - Seite 233
Page 290 of 312
Towing with all wheels on the ground
G
Warning!
If circumstances require towing the vehicle
with all wheels on the ground, always tow with
a tow bar if:
R the engine will not run
R there is a malfunction in the brake system
R there is a malfunction in the power supply
or in the vehicle’s electrical system
This is necessary to adequately control the
towed vehicle.
Prior to towing the vehicle with all wheels on
the ground, make sure the SmartKey is in
starter switch position 2.
If the SmartKey is left in the starter switch
position 0 for an extended period of time, it
can no longer be turned in the switch. In this
case, the steering is locked. To unlock,
remove SmartKey from starter switch and
reinsert. G
Warning!
With the engine not running, there is no power
assistance for the brake and steering
systems. In this case, it is important to keep
in mind that a considerably higher degree of
effort is necessary to brake and steer the
vehicle. Adapt your driving accordingly.
X Make sure the ignition is switched on.
X With the vehicle at a standstill, depress the
brake pedal and keep it pressed.
X Vehicles with manual transmission: Shift
the manual transmission into the neutral
position (no gear selected).
or
X Vehicles with automatic transmission: Shift
the automatic transmission into neutral
position N.
X Release the brake pedal.
X If engaged, release the parking brake.
X Switch on the hazard warning flasher
(Y page 74). !
The vehicle may be towed only for
distances up to 30 miles (50 km) and at a
speed not to exceed 30 mph (50 km/h).
i While being towed with the hazard
warning
flasher in use, use the combination
switch in the usual manner to signal turns.
Only the selected turn signal will operate.
Upon canceling the turn signal, the hazard
warning flasher will operate again. Fuses
Introduction
The electrical fuses in your vehicle serve to
switch off malfunctioning power circuits.
If a fuse is blown, the components and
systems secured by that fuse will stop
operating. G
Warning!
Only use fuses approved by Mercedes-Benz
with
the specified amperage for the system in
question and do not attempt to repair or
bridge a blown fuse. Using other than
approved fuses or using repaired or bridged
fuses may cause an overload leading to a fire,
and/or cause damage to electrical
components and/or systems. Have the cause
determined and remedied by an authorized
Mercedes-Benz Center.
A blown fuse must be replaced by an
appropriate spare fuse (recognizable by its
color or the fuse rating given on the fuse) of
the amperage recommended in the fuse
chart. Any Mercedes-Benz Center will be glad
to advise you on this subject.
i In case of a blown fuse contact Roadside
Assistance or an authorized Mercedes-
Benz Center.
If a newly inserted fuse blows again, have the
cause determined and rectified by an
authorized Mercedes-Benz Center.
The fuse chart is located in the fuse box in the
passenger compartment. The fuse chart 288
Fuses
Practical hints
171_AKB; 3; 60, en-US
d2ureepe,
Version: 2.11.8.1 2009-05-11T16:00:23+02:00 - Seite 288
Page 291 of 312
explains the fuse allocation and fuse
amperages.
Before replacing fuses
X Engage the parking brake.
X Make sure the automatic transmission is in
park position P (manual transmission to
Neutral).
X Switch off all electrical consumers.
X Turn off the engine.
X Remove the SmartKey from the starter
switch. Fuse box in passenger compartment
! Do not use sharp objects such as a
screwdriver to open the fuse box cover in
the dashboard. You could damage the fuse
box cover or the dashboard. X
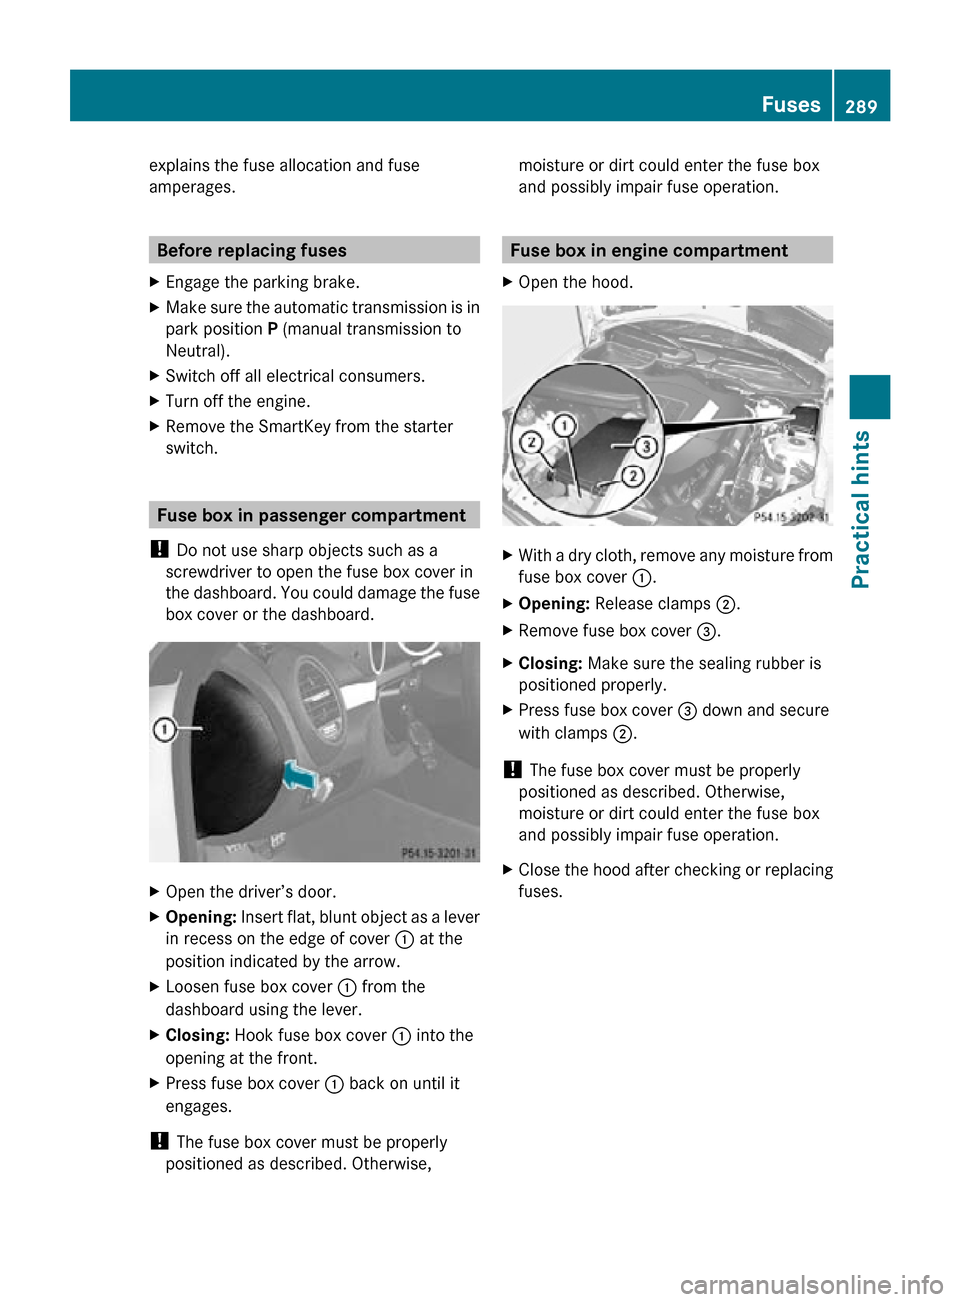
Open the driver’s door.
X Opening: Insert flat, blunt object as a lever
in recess on the edge of cover : at the
position indicated by the arrow.
X Loosen fuse box cover : from the
dashboard using the lever.
X Closing: Hook fuse box cover : into the
opening at the front.
X Press fuse box cover : back on until it
engages.
! The fuse box cover must be properly
positioned as described. Otherwise, moisture or dirt could enter the fuse box
and possibly impair fuse operation. Fuse box in engine compartment
X Open the hood. X
With a dry cloth, remove any moisture from
fuse box cover :.
X Opening: Release clamps ;.
X Remove fuse box cover =.
X Closing: Make sure the sealing rubber is
positioned properly.
X Press fuse box cover = down and secure
with clamps ;.
! The fuse box cover must be properly
positioned as described. Otherwise,
moisture or dirt could enter the fuse box
and possibly impair fuse operation.
X Close the hood after checking or replacing
fuses. Fuses
289Practical hints
171_AKB; 3; 60, en-US
d2ureepe, Version: 2.11.8.1 2009-05-11T16:00:23+02:00 - Seite 289 Z