2010 MERCEDES-BENZ SLK55AMG turn signal
[x] Cancel search: turn signalPage 62 of 312
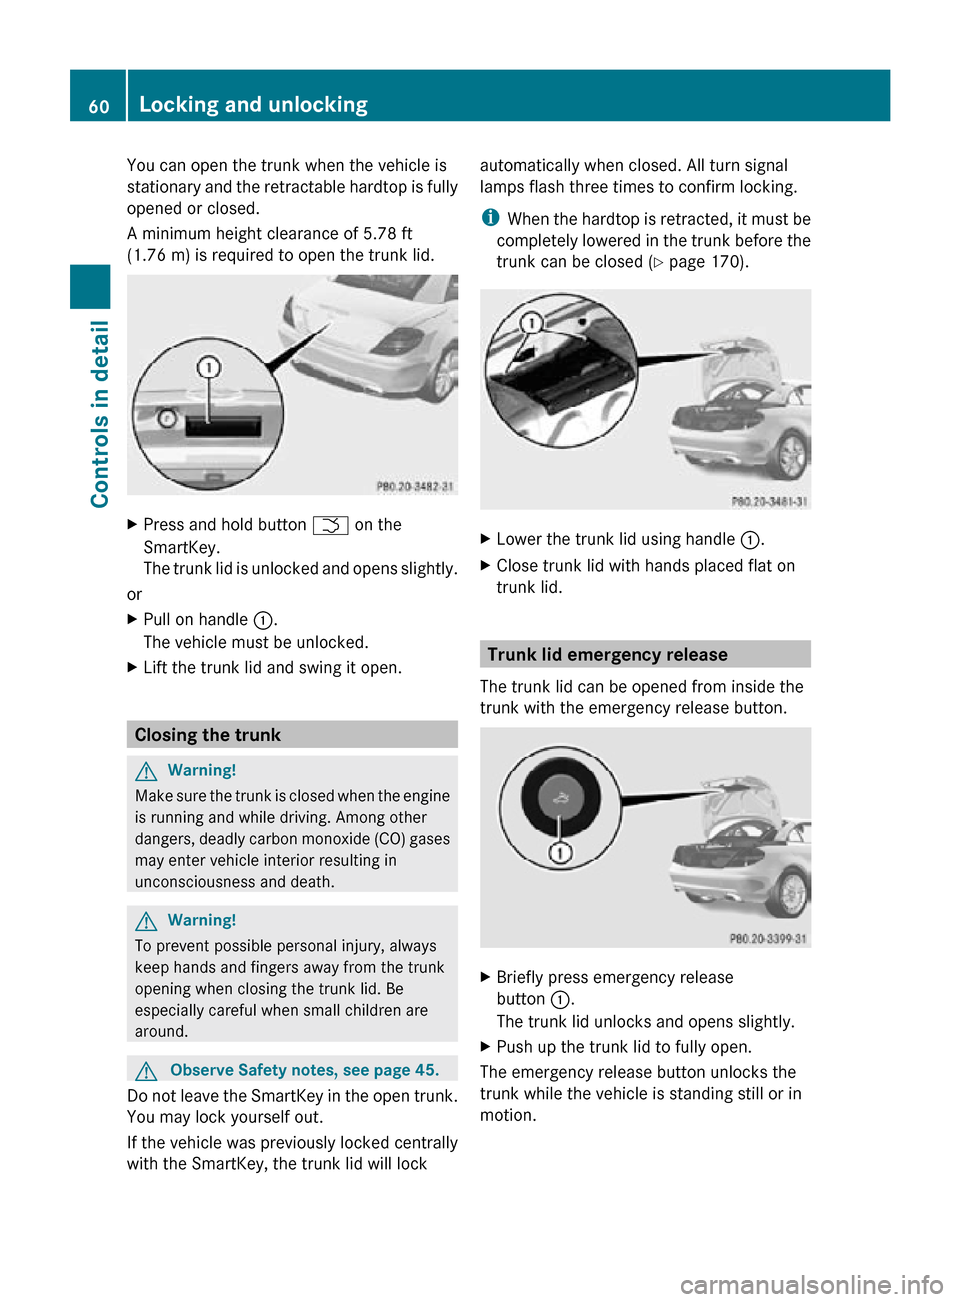
You can open the trunk when the vehicle is
stationary and the retractable hardtop is fully
opened or closed.
A minimum height clearance of 5.78 ft
(1.76 m) is required to open the trunk lid.
X
Press and hold button F on the
SmartKey.
The trunk lid is unlocked and opens slightly.
or
X Pull on handle :.
The vehicle must be unlocked.
X Lift the trunk lid and swing it open. Closing the trunk
G
Warning!
Make sure the trunk is closed when the engine
is running and while driving. Among other
dangers, deadly carbon monoxide (CO) gases
may enter vehicle interior resulting in
unconsciousness and death. G
Warning!
To prevent possible personal injury, always
keep hands and fingers away from the trunk
opening when closing the trunk lid. Be
especially careful when small children are
around. G
Observe Safety notes, see page 45.
Do not leave the SmartKey in the open trunk.
You may lock yourself out.
If the vehicle was previously locked centrally
with the SmartKey, the trunk lid will lock automatically when closed. All turn signal
lamps flash three times to confirm locking.
i
When the hardtop is retracted, it must be
completely lowered in the trunk before the
trunk can be closed ( Y page 170). X
Lower the trunk lid using handle :.
X Close trunk lid with hands placed flat on
trunk lid. Trunk lid emergency release
The trunk lid can be opened from inside the
trunk with the emergency release button. X
Briefly press emergency release
button :.
The trunk lid unlocks and opens slightly.
X Push up the trunk lid to fully open.
The emergency release button unlocks the
trunk while the vehicle is standing still or in
motion. 60
Locking and unlockingControls in detail
171_AKB; 3; 60, en-US
d2ureepe,
Version: 2.11.8.1 2009-05-11T16:00:23+02:00 - Seite 60
Page 63 of 312

Illumination of the emergency release button:
R
The button flashes for 30 minutes after
opening the trunk.
R The button flashes for 60 minutes after
closing the trunk.
The emergency release button does not
unlock the trunk, if the vehicle battery is
discharged or disconnected.
If the vehicle has previously been locked
centrally with the SmartKey, opening the
trunk from the inside using the emergency
release button will trigger the anti-theft alarm
system.
To cancel the alarm, see ( Y page 53).Valet locking
You can lock the trunk separately with the
mechanical key. This denies unauthorized
access to the trunk, e.g. when you valet park
the vehicle.
X Leave only the SmartKey less its
mechanical key with the vehicle. X
Valet locking: Close the trunk.
X Remove the mechanical key from the
SmartKey (Y page 264).
X Insert the mechanical key in the trunk lid
lock.
X Turn the mechanical key clockwise to
position 2 and remove the mechanical
key in that position to lock the trunk.
The trunk remains locked even when the
vehicle is centrally unlocked. You can then only open the trunk with the
mechanical key.
X
Canceling: Insert the mechanical key in
the trunk lid lock.
X Turn the mechanical key counterclockwise
to neutral position 1 and remove the
mechanical key in that position to unlock
the trunk.
You can now open the trunk. Starter switch positions
SmartKey
G
Observe Safety notes, see page 45. Starter switch
g
For removing SmartKey
Vehicles with automatic transmission:
Gear selector lever must be in park
position P.
1 Power supply for some electrical
consumers, e.g. wipers
2 Ignition (power supply for all electrical
consumers) and driving position
3 Starting position
When you switch on the ignition, all lamps in
the instrument cluster come on. The high-
beam headlamp indicator lamp and turn
signal indicator lamps will only come on if
activated. If a lamp in the instrument cluster
fails to come on when the ignition is switched
on, have it checked and replaced if necessary.
If a lamp in the instrument cluster remains on
after starting the engine or comes on while Starter switch positions
61Controls in detail
171_AKB; 3; 60, en-US
d2ureepe, Version: 2.11.8.1 2009-05-11T16:00:23+02:00 - Seite 61 Z
Page 72 of 312
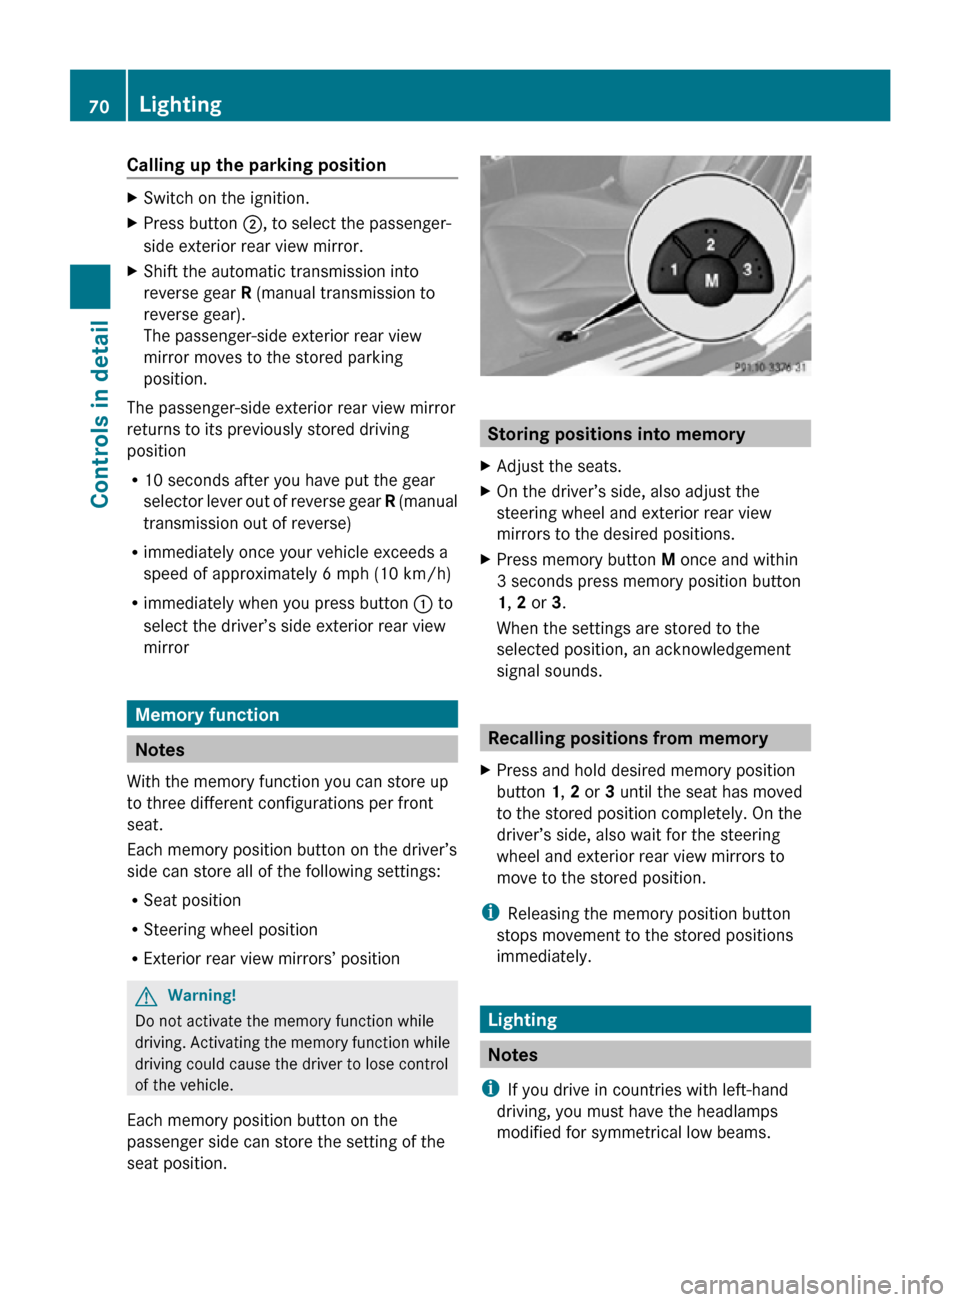
Calling up the parking position
X
Switch on the ignition.
X Press button ;, to select the passenger-
side exterior rear view mirror.
X Shift the automatic transmission into
reverse gear R (manual transmission to
reverse gear).
The passenger-side exterior rear view
mirror moves to the stored parking
position.
The passenger-side exterior rear view mirror
returns to its previously stored driving
position
R 10 seconds after you have put the gear
selector lever out of reverse gear R (manual
transmission out of reverse)
R immediately once your vehicle exceeds a
speed of approximately 6 mph (10 km/h)
R immediately when you press button : to
select the driver’s side exterior rear view
mirror Memory function
Notes
With the memory function you can store up
to three different configurations per front
seat.
Each memory position button on the driver’s
side can store all of the following settings:
R Seat position
R Steering wheel position
R Exterior rear view mirrors’ position G
Warning!
Do not activate the memory function while
driving. Activating the memory function while
driving could cause the driver to lose control
of the vehicle.
Each memory position button on the
passenger side can store the setting of the
seat position. Storing positions into memory
X Adjust the seats.
X On the driver’s side, also adjust the
steering wheel and exterior rear view
mirrors to the desired positions.
X Press memory button M once and within
3 seconds press memory position button
1, 2 or 3.
When the settings are stored to the
selected position, an acknowledgement
signal sounds. Recalling positions from memory
X Press and hold desired memory position
button 1, 2 or 3 until the seat has moved
to the stored position completely. On the
driver’s side, also wait for the steering
wheel and exterior rear view mirrors to
move to the stored position.
i Releasing the memory position button
stops movement to the stored positions
immediately. Lighting
Notes
i If you drive in countries with left-hand
driving, you must have the headlamps
modified for symmetrical low beams. 70
LightingControls in detail
171_AKB; 3; 60, en-US
d2ureepe,
Version: 2.11.8.1 2009-05-11T16:00:23+02:00 - Seite 70
Page 73 of 312
Relevant information can be obtained at
any authorized Mercedes-Benz Center.
i Vehicles equipped with active Bi-Xenon
headlamps:
The active Bi-Xenon headlamps increase
usable illumination over conventional
headlamps because they follow the
curvature of the road ahead. The beams of
the active Bi-Xenon headlamps shift to
either side according to the vehicle’s
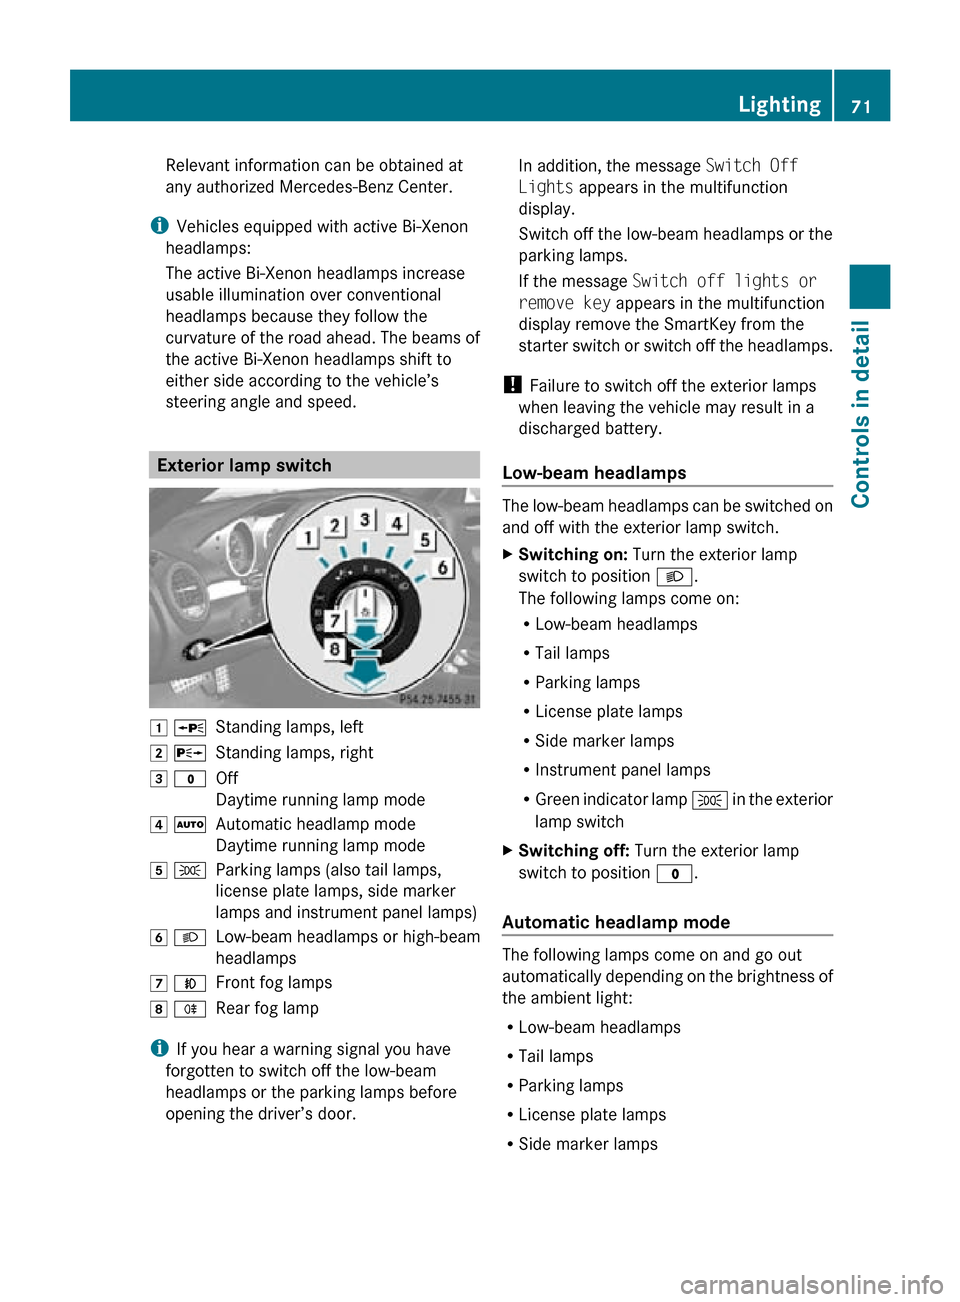
steering angle and speed. Exterior lamp switch
1 W
Standing lamps, left
2 X Standing lamps, right
3 $ Off
Daytime running lamp mode
4 Ã Automatic headlamp mode
Daytime running lamp mode
5 T Parking lamps (also tail lamps,
license plate lamps, side marker
lamps and instrument panel lamps)
6 L Low-beam headlamps or high-beam
headlamps
7 N Front fog lamps
8 R Rear fog lamp
i If you hear a warning signal you have
forgotten to switch off the low-beam
headlamps or the parking lamps before
opening the driver’s door. In addition, the message
Switch Off
Lights appears in the multifunction
display.
Switch off the low-beam headlamps or the
parking lamps.
If the message Switch off lights or
remove key appears in the multifunction
display remove the SmartKey from the
starter switch or switch off the headlamps.
! Failure to switch off the exterior lamps
when leaving the vehicle may result in a
discharged battery.
Low-beam headlamps The low-beam headlamps can be switched on
and off with the exterior lamp switch.
X
Switching on: Turn the exterior lamp
switch to position L.
The following lamps come on:
R Low-beam headlamps
R Tail lamps
R Parking lamps
R License plate lamps
R Side marker lamps
R Instrument panel lamps
R Green indicator lamp T in the exterior
lamp switch
X Switching off: Turn the exterior lamp
switch to position $.
Automatic headlamp mode The following lamps come on and go out
automatically depending on the brightness of
the ambient light:
R
Low-beam headlamps
R Tail lamps
R Parking lamps
R License plate lamps
R Side marker lamps Lighting
71Controls in detail
171_AKB; 3; 60, en-US
d2ureepe, Version: 2.11.8.1 2009-05-11T16:00:23+02:00 - Seite 71 Z
Page 75 of 312
USA only
With the exterior lamp switch in position
$ or
Ã, you cannot switch on the high-
beam headlamps.
The high-beam flasher is available at all times.
X For nighttime driving turn the exterior lamp
switch to position L to permit activation
of the high-beam headlamps.
When the engine is running, and you turn the
exterior lamp switch to position T or
L, the manual headlamp mode has
priority over the daytime running lamp mode.
The corresponding exterior lamps come on
(Y page 71).
Fog lamps Fog lamps cannot be switched on with the
exterior lamp switch in position Ã.
G
Warning!
In low ambient lighting or foggy conditions,
only switch from position à to L with
the vehicle at a standstill in a safe location.
Switching from à to L will briefly
switch off the headlamps. Doing so while
driving in low ambient lighting conditions may
result in an accident.
Fog lamps will operate with the parking lamps
and/or the low-beam headlamps on. Fog
lamps should only be used in conjunction with
low-beam headlamps. Consult your State or
Province Motor Vehicle Regulations
regarding permissible lamp operation.
X Turn the exterior lamp switch to position
T or L (Y page 71).
X Switching on front fog lamps: Pull out the
exterior lamp switch to first stop.
The green indicator lamp N in the
exterior lamp switch comes on. X
Switching on rear fog lamp: Pull out the
exterior lamp switch to second stop.
The rear fog lamp, the front fog lamps, the
green N and the yellow indicator lamp
R in the exterior lamp switch come on.
X Switching off front fog lamps/rear fog
lamp: Push in the exterior lamp switch to
its stop.
Locator lighting and night security
illumination Locator lighting and night security
illumination are described in the “Control
system” section, see “Switching locator
lighting on or off” (Y page 106) and
“Switching night security illumination
(Headlamps delayed shut-off feature) on or
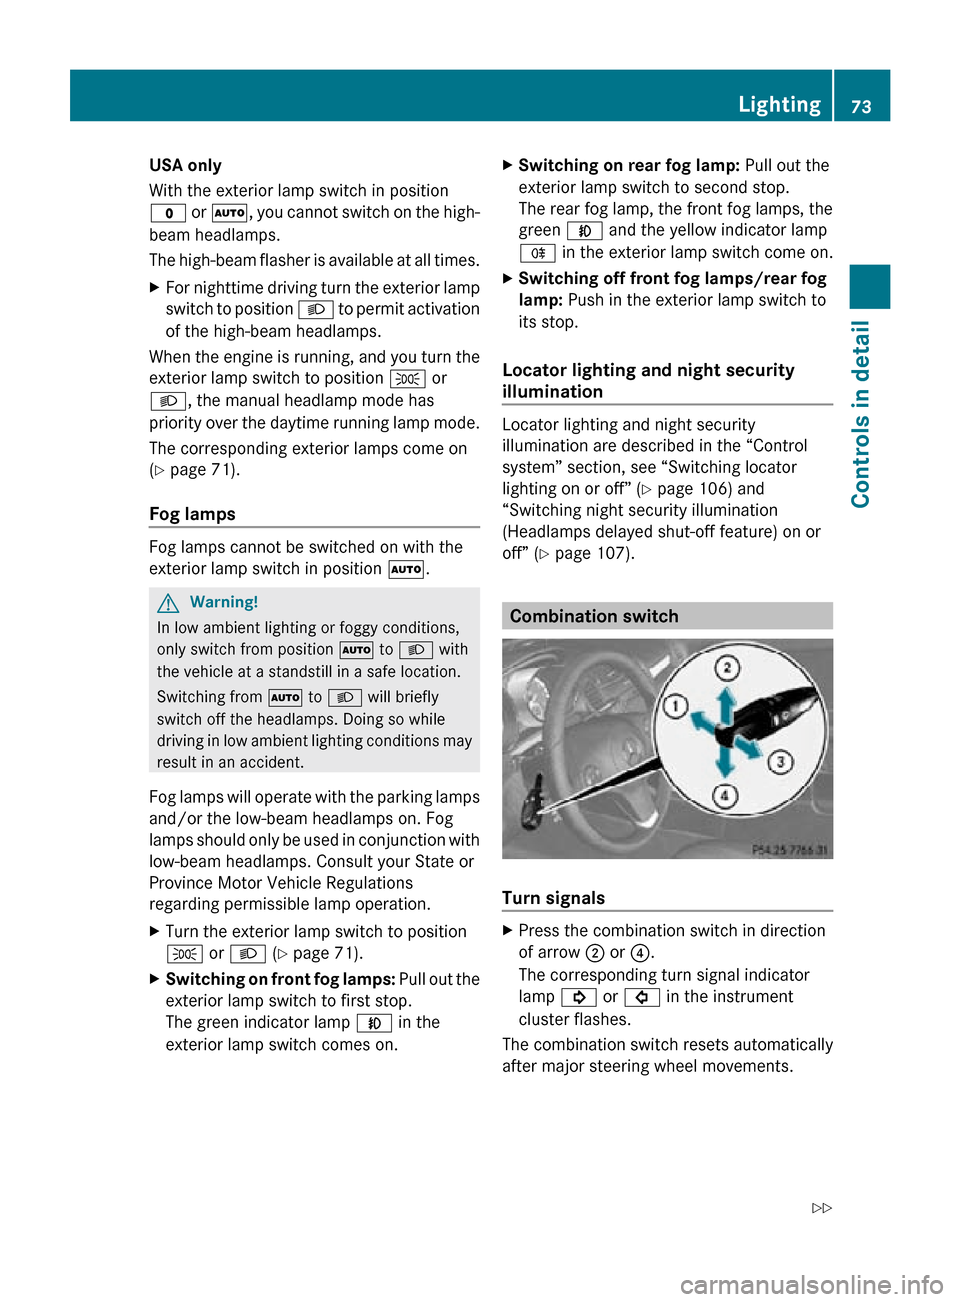
off” (Y page 107). Combination switch
Turn signals
X
Press the combination switch in direction
of arrow ; or ?.
The corresponding turn signal indicator
lamp ! or # in the instrument
cluster flashes.
The combination switch resets automatically
after major steering wheel movements. Lighting
73Controls in detail
171_AKB; 3; 60, en-US
d2ureepe, Version: 2.11.8.1 2009-05-11T16:00:23+02:00 - Seite 73 Z
Page 76 of 312
To signal minor directional changes:
X
Press the combination switch only to the
point of resistance in direction of
arrow ; or ? and release.
The corresponding turn signal lamps will
flash three times.
High beam X
Turn the exterior lamp switch to position
L (Y page 71).
X Switching on: Push the combination
switch in direction of arrow :.
The high-beam headlamp indicator lamp
K in the instrument cluster comes on.
X Switching off: Pull the combination switch
in direction of arrow = to its original
position.
i Also note the information on high-beam
headlamps with activated automatic
headlamp mode (Y page 71) or the daytime
running lamp mode ( Y page 72).
High-beam flasher X
Switching on: Pull the combination switch
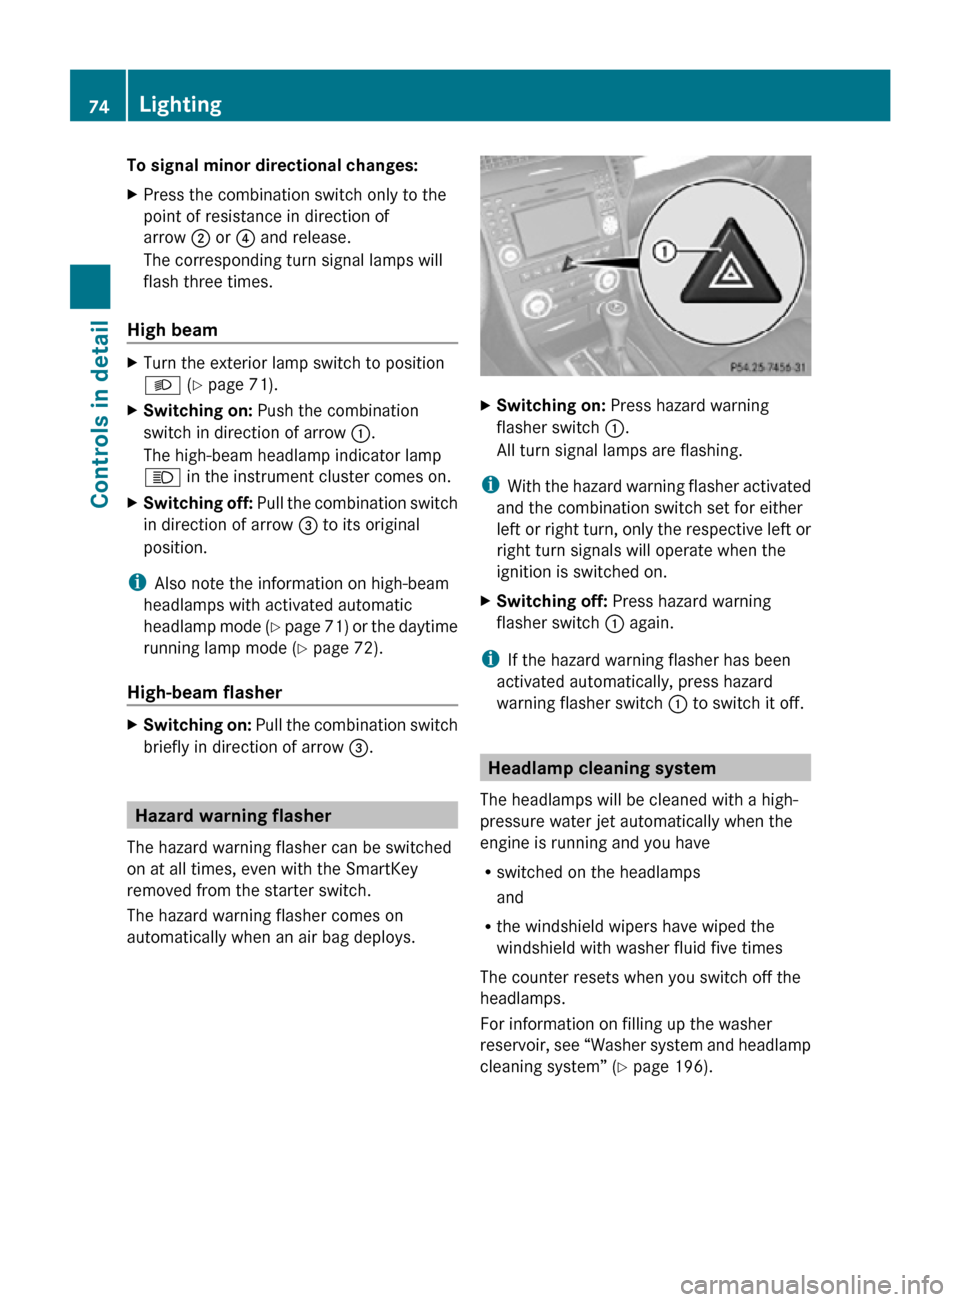
briefly in direction of arrow =.Hazard warning flasher
The hazard warning flasher can be switched
on at all times, even with the SmartKey
removed from the starter switch.
The hazard warning flasher comes on
automatically when an air bag deploys. X
Switching on: Press hazard warning
flasher switch :.
All turn signal lamps are flashing.
i With the hazard warning flasher activated
and the combination switch set for either
left or right turn, only the respective left or
right turn signals will operate when the
ignition is switched on.
X Switching off: Press hazard warning
flasher switch : again.
i If the hazard warning flasher has been
activated automatically, press hazard
warning flasher switch : to switch it off. Headlamp cleaning system
The headlamps will be cleaned with a high-
pressure water jet automatically when the
engine is running and you have
R switched on the headlamps
and
R the windshield wipers have wiped the
windshield with washer fluid five times
The counter resets when you switch off the
headlamps.
For information on filling up the washer
reservoir, see “Washer system and headlamp
cleaning system” ( Y page 196).74
LightingControls in detail
171_AKB; 3; 60, en-US
d2ureepe,
Version: 2.11.8.1 2009-05-11T16:00:23+02:00 - Seite 74
Page 77 of 312
Corner-illuminating front fog lamps
The corner-illuminating front fog lamps
improve illumination of the area in the
direction into which you are turning.
The corner-illuminating front fog lamps will
only operate
R in low ambient lighting conditions
R at vehicle speeds below 25 mph
(40 km/h)
R with the front fog lamps switched off
R when the engine is running
Switching on X
Turn the exterior lamp switch to position
L or Ã.
or
X Activate the daytime running lamp mode
(Y page 72).
X Switch on the left or right turn signal,
depending on whether you are turning left
or right.
The respective front fog lamp comes on. If
you have switched on the turn signal for
one side but turn the steering wheel in the
other direction, the corner-illuminating
front fog lamp on the side of the turn signal
comes on.
or
X Turn the steering wheel in the desired
direction.
Driving forward: The front fog lamp on the
side of your steering direction comes on.
Driving in reverse: The front fog lamp
opposite to your steering direction comes
on.
The corner-illuminating front fog lamps will
come on automatically depending on the
steering angle, even if you did not switch on
either turn signal. If the corner-illuminating
front fog lamps came on automatically, they
will also go out automatically depending on
the steering angle and vehicle speed. The corner-illuminating front fog lamps
temporarily come on on both sides of the
vehicle if you turn the steering wheel in one
direction and then again in the other direction
shortly thereafter.
The corner-illuminating front fog lamp
remains lit for a short time only. It then goes
out automatically.
Switching off
X
Switch off the left or right turn signal.
or
X Steer straight ahead.
i There may be a brief delay before the
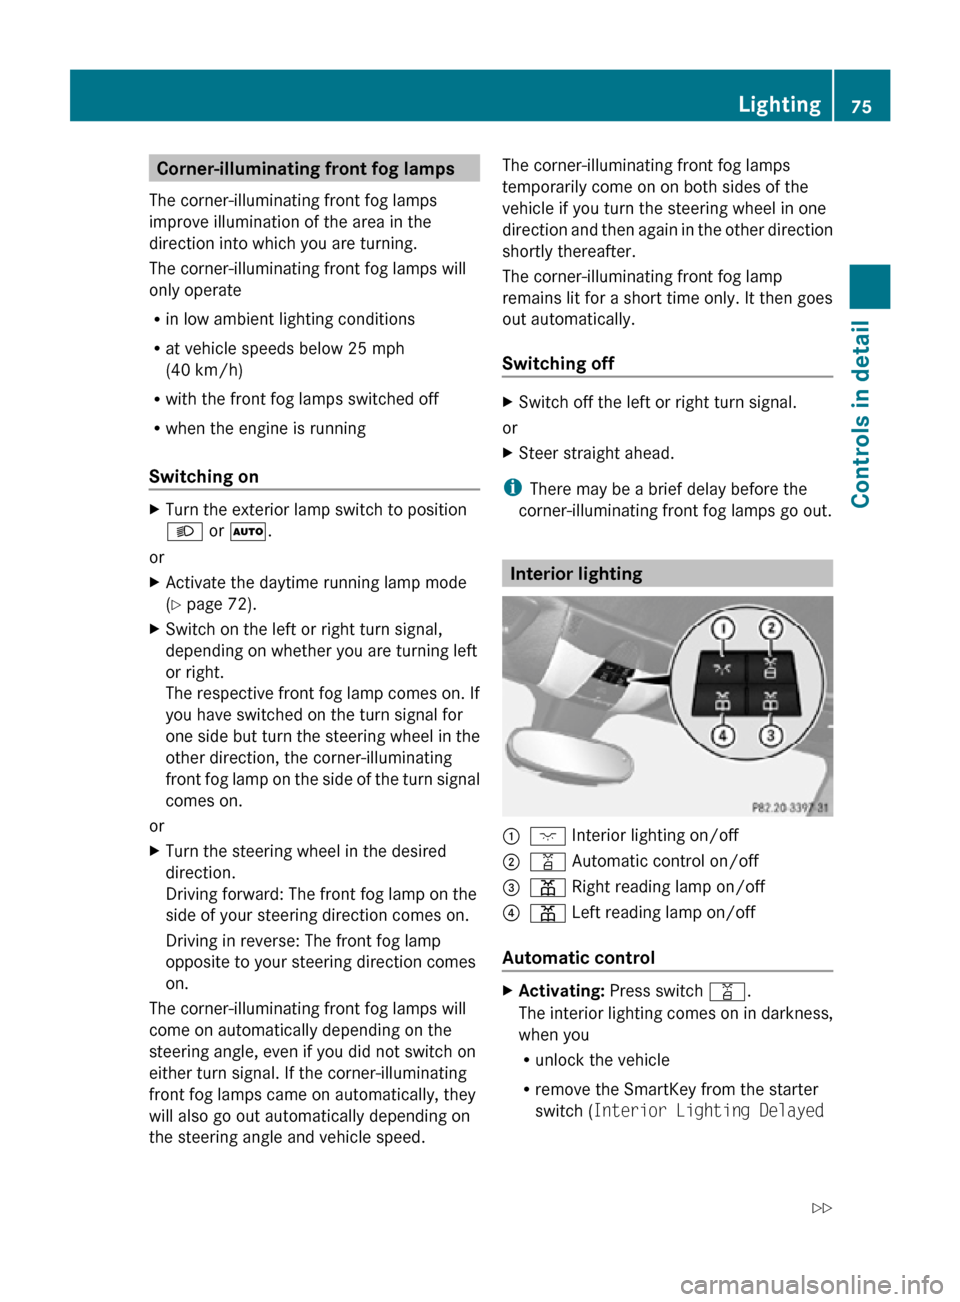
corner-illuminating front fog lamps go out. Interior lighting
:
c Interior lighting on/off
; q Automatic control on/off
= p Right reading lamp on/off
? p Left reading lamp on/off
Automatic control X
Activating: Press switch q.
The interior lighting comes on in darkness,
when you
R
unlock the vehicle
R remove the SmartKey from the starter
switch ( Interior Lighting Delayed Lighting
75Controls in detail
171_AKB; 3; 60, en-US
d2ureepe, Version: 2.11.8.1 2009-05-11T16:00:23+02:00 - Seite 75 Z
Page 185 of 312
(1-800-367-6372) (USA only) or
1-888-923-8367
(Canada only).
You will be asked to provide your password.
X Then return to your vehicle at the time
arranged with the Customer Assistance
Center and pull the trunk recessed handle
for a minimum of 20 seconds until the
indicator
lamp in the SOS button is flashing.
The message Connecting Call appears in
the multifunction display.
As an alternative, you may unlock the vehicle
via Internet in the “My Tele Aid” section of
“Owner’s
Online”, using your ID and password
(USA only).
i The remote door unlock feature is
available if the relevant cellular phone
network is available.
The SOS button will flash and the message
Connecting Call will appear in the
multifunction display to indicate receipt of
the door unlock command.
If the trunk recessed handle was pulled for
more than 20 seconds before door unlock
authorization was received by the
Customer Assistance Center, you must
wait 15 minutes before pulling the trunk
recessed handle again.
Stolen Vehicle Recovery Services In the event your vehicle was stolen:
X
Report the incident to the police.
The police will issue a numbered incident
report.
X Pass this number on to the Customer
Assistance Center along with your
password.
The Customer Assistance Center will then
attempt to covertly contact the vehicle’s
Tele Aid system. Once the vehicle is
located, the Customer Assistance Center
will contact the local law enforcement and
you. The vehicle’s location will only be
provided to law enforcement.
i If the anti-theft alarm or the tow-away
alarm stays on for more than 30 seconds, a call to the Customer Assistance Center is
initiated automatically by the Tele Aid
system provided Tele Aid service was
subscribed to and properly activated, and
that necessary cellular service and GPS
coverage are available. See “Anti-theft
alarm system”
(Y page 51) and “Tow-away
alarm” ( Y page 52). Garage door opener
The
integrated remote control can operate up
to three separately controlled devices
compatible with HomeLink ®
or some other
systems. G
Warning!
Before programming the integrated remote
control to a garage door opener or gate
operator, make sure people and objects are
out of the way of the device to prevent
potential harm or damage. When
programming
a garage door opener, the door
moves up or down. When programming a gate
operator, the gate opens or closes.
Do not use the integrated remote control with
any garage door opener that lacks safety stop
and reverse features as required by U.S.
federal safety standards (this includes any
garage door opener model manufactured
before April 1, 1982). A garage door that
cannot detect an object - signaling the door
to stop and reverse - does not meet current
U.S. federal safety standards.
When programming a garage door opener,
park vehicle outside the garage.
Do not run the engine while programming the
integrated remote control. Inhalation of
exhaust gas is hazardous to your health. All
exhaust gas contains carbon monoxide (CO),
and inhaling it can cause unconsciousness
and possible death. Useful features
183
Controls in detail
171_AKB; 3; 60, en-US
d2ureepe, Version: 2.11.8.1 2009-05-11T16:00:23+02:00 - Seite 183 Z