2010 MERCEDES-BENZ SLK55AMG change time
[x] Cancel search: change timePage 107 of 312
X
Press button W or X to select the
desired setting.
The selected display is then shown
continuously in the status indicator (lower
display).
The other display now appears in the
Standard display menu (Y page 96).
Time/Date submenu Access the
Time/Date submenu via the
Settings menu. Use the Time/Date
submenu to change the time and date display
settings.
The following functions are available:
R Setting the time ( Y page 105)
R Setting the date (Y page 105)
Setting the time
This function is only available in vehicles with
audio system.
Vehicles with COMAND system:
For information on setting the time in the
COMAND system, refer to the separate
COMAND system operating instructions.
X Press button V or U repeatedly until
the Settings menu appears in the
multifunction display.
X Press button &.
X Move the selection marker with button
W or X to the Time/Date submenu.
X Press button & or * repeatedly until
the message Time-Hours Press R To
Confirm or Time-Minute(s) Press R
To Confirm appears in the multifunction
display.
The selection marker is on the current
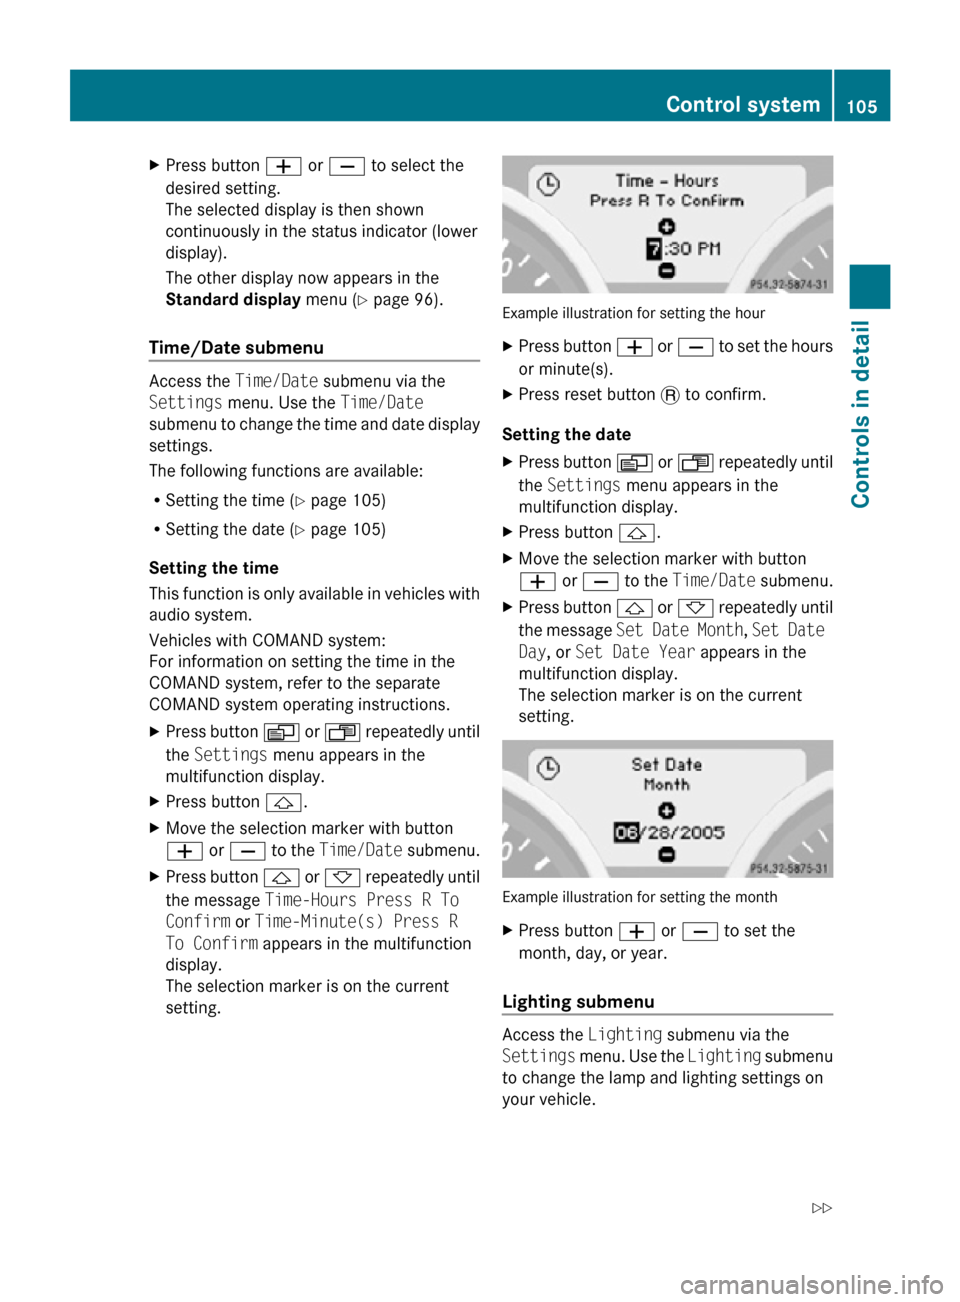
setting. Example illustration for setting the hour
X
Press button W or X to set the hours
or minute(s).
X Press reset button . to confirm.
Setting the date
X Press button V or U repeatedly until
the Settings menu appears in the
multifunction display.
X Press button &.
X Move the selection marker with button
W or X to the Time/Date submenu.
X Press button & or * repeatedly until
the message Set Date Month , Set Date
Day, or Set Date Year appears in the
multifunction display.
The selection marker is on the current
setting. Example illustration for setting the month
X
Press button W or X to set the
month, day, or year.
Lighting submenu Access the
Lighting submenu via the
Settings menu. Use the Lighting submenu
to change the lamp and lighting settings on
your vehicle. Control system
105Controls in detail
171_AKB; 3; 60, en-US
d2ureepe, Version: 2.11.8.1 2009-05-11T16:00:23+02:00 - Seite 105 Z
Page 128 of 312
i
Note that categories and channels shown
in illustrations are dependent on
programming content delivered by the
service provider. Programming content is
subject to change. Therefore, channels and
categories shown in illustrations and
descriptions contained in this manual may
differ from the channels and categories
delivered by the service provider.
i Satellite radio service may be unavailable
or interrupted from time to time for a
variety of reasons, such as environmental
or topographic conditions and other things
we cannot control. Service might also not
be available in certain places (e.g. in
tunnels, parking garages, under leafy trees,
or within or next to buildings) or near other
obstructions. In such situations, the
satellite radio’s main menu shows the No
Service screen. At this point, the radio’s
functions are restricted.
Subscribing to satellite radio X
Press button $ on audio control unit
repeatedly until Sat is selected.
The following conditions are possible:
R Satellite radio service is not activated
(only the preview channel is displayed).
R Satellite radio service is activated.
i If a satellite receiver is not installed or not
properly installed:
The message Device Unavailable will
appear.
If the satellite radio service is not activated,
the “SIRIUS Preview” display appears.
Satellite radio service is not activated
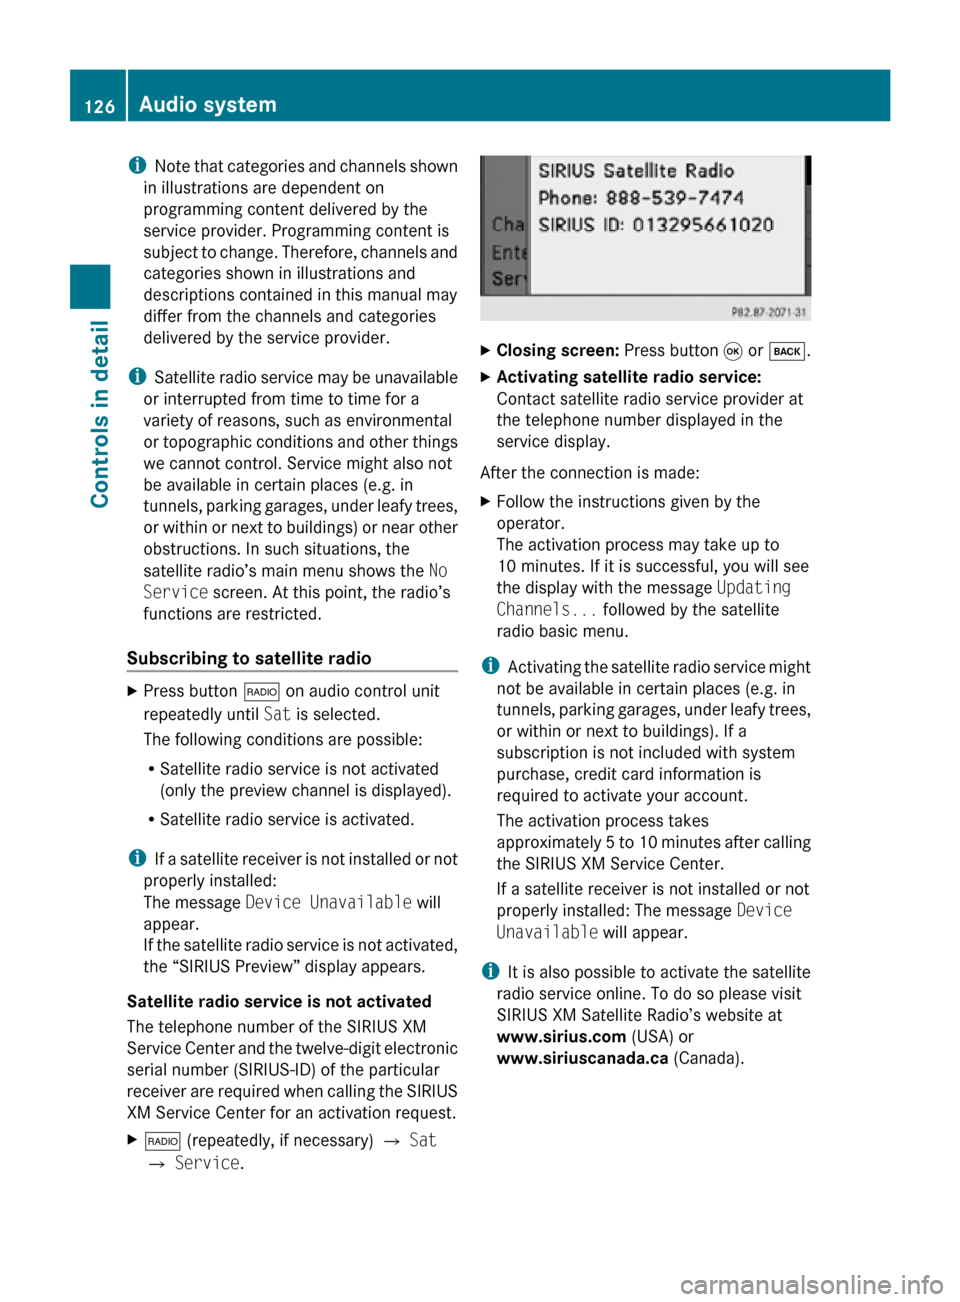
The telephone number of the SIRIUS XM
Service Center and the twelve-digit electronic
serial number (SIRIUS-ID) of the particular
receiver are required when calling the SIRIUS
XM Service Center for an activation request.
X $ (repeatedly, if necessary) Q Sat
Q Service. X
Closing screen: Press button 9 or k.
X Activating satellite radio service:
Contact satellite radio service provider at
the telephone number displayed in the
service display.
After the connection is made:
X Follow the instructions given by the
operator.
The activation process may take up to
10 minutes. If it is successful, you will see
the display with the message Updating
Channels... followed by the satellite
radio basic menu.
i Activating the satellite radio service might
not be available in certain places (e.g. in
tunnels, parking garages, under leafy trees,
or within or next to buildings). If a
subscription is not included with system
purchase, credit card information is
required to activate your account.
The activation process takes
approximately 5 to 10 minutes after calling
the SIRIUS XM Service Center.
If a satellite receiver is not installed or not
properly installed: The message Device
Unavailable will appear.
i It is also possible to activate the satellite
radio service online. To do so please visit
SIRIUS XM Satellite Radio’s website at
www.sirius.com (USA) or
www.siriuscanada.ca (Canada).126
Audio systemControls in detail
171_AKB; 3; 60, en-US
d2ureepe,
Version: 2.11.8.1 2009-05-11T16:00:23+02:00 - Seite 126
Page 134 of 312

!
Your CD changer has been designed to
play CDs which correspond to the
IEC 60908 standard. You can therefore
only
use CDs with a maximum thickness of
1.3 mm.
If you insert thicker discs, e.g. ones that
have data on both sides (one side with DVD
data, the other side with audio data), they
cannot be ejected and will damage the CD
changer.
Do not use CDs with a diameter of 8 cm.
Attempting to play CDs with a diameter of
8 cm or playing such CDs with an adapter may
cause damage to the CD changer. Such
damage is not covered by the Mercedes-Benz
Limited Warranty.
Only use round discs with a diameter of
12 cm.
Should excessively high or low temperatures
occur while in CD changer mode, a message
will appear in the display, and the CD will be
muted until the temperature has reached an
acceptable level for the system to continue
operation.
Tips on handling CDs
R Only touch the CDs at the edges.
R Handle CDs carefully to prevent
interference during playback.
R Avoid scratches, fingerprints and dust on
the CDs.
R The CDs must only be labeled using pens
specially designed for this purpose.
R Clean CDs from time to time with a
commercially available cleaning cloth.
Never wipe the CD in a circular motion;
instead, wipe it in a straight line starting in
the center and moving outward. Do not use
solvents, anti-static sprays, etc. for
cleaning.
R Replace the CD in its case after use.
R Protect CDs from heat and direct sunlight. Notes about MP3 mode The CD changer can play audio CDs as well
as CDs with MP3/WMA files.
i
Due to the branched data structure,
playback of the first track may be delayed
slightly.
Permissible media for MP3/WMA files
R CD-R
R CD-RW
Permissible file systems
R ISO9660/Joliet for CDs
Multisession CDs
For multisession CDs, the first session type
of the CD determines how the audio system
will process the CD.
For example, if the first session type is
according to the audio CD standard and the
second session type is according to the data
CD standard containing MP3/WMA tracks,
the audio system will treat the CD as a
conventional audio CD. This means that it is
only possible to access the audio CD tracks.
Access to the MP3/WMA tracks is not
possible.
Similarly,
if the first session type is according
to the data CD standard containing MP3/
WMA tracks and the second session type is
according to the audio CD standard, the audio
system will treat the CD as a data CD. This
means that it is only possible to access the
MP3/WMA tracks. Access to the audio CD
tracks is not possible.
File structure on a disc
When you create an MP3/WMA disc, the
MP3/WMA tracks can be organized in
folders.
A folder can also contain other folders.
A disc can contain a maximum of 255 folders.
A folder can contain a maximum of 255 tracks
and 255 subfolders. 132
Audio system
Controls in detail
171_AKB; 3; 60, en-US
d2ureepe,
Version: 2.11.8.1 2009-05-11T16:00:23+02:00 - Seite 132
Page 139 of 312
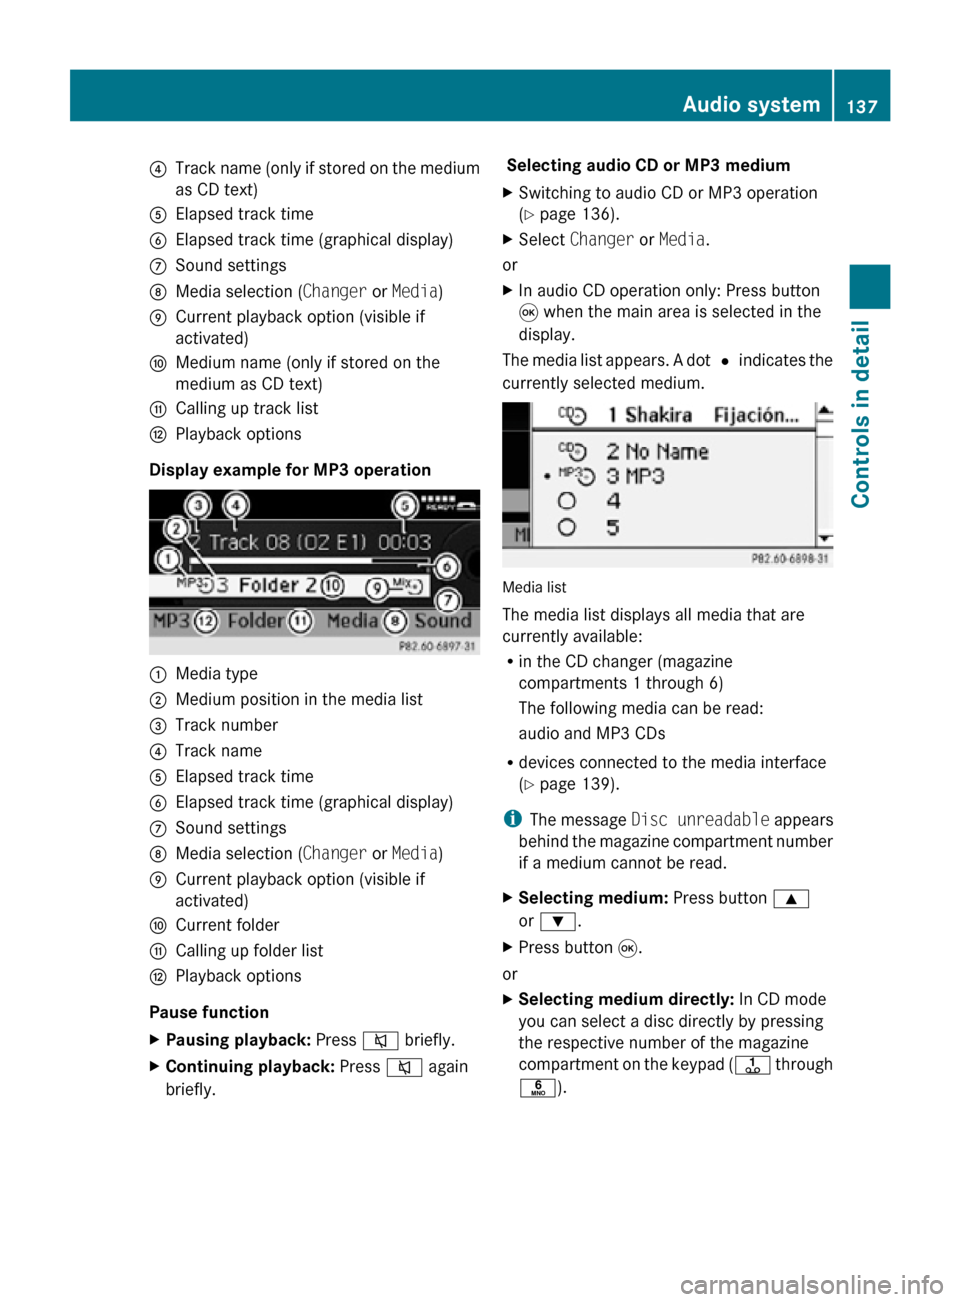
?
Track name (only if stored on the medium
as CD text)
A Elapsed track time
B Elapsed track time (graphical display)
C Sound settings
D Media selection ( Changer or Media)
E Current playback option (visible if
activated)
F Medium name (only if stored on the
medium as CD text)
G Calling up track list
H Playback options
Display example for MP3 operation :
Media type
; Medium position in the media list
= Track number
? Track name
A Elapsed track time
B Elapsed track time (graphical display)
C Sound settings
D Media selection ( Changer or Media)
E Current playback option (visible if
activated)
F Current folder
G Calling up folder list
H Playback options
Pause function
X Pausing playback: Press 8 briefly.
X Continuing playback: Press 8 again
briefly. Selecting audio CD or MP3 medium
X
Switching to audio CD or MP3 operation
(Y page 136).
X Select Changer or Media.
or
X In audio CD operation only: Press button
9 when the main area is selected in the
display.
The media list appears. A dot # indicates the
currently selected medium. Media list
The media list displays all media that are
currently available:
R
in the CD changer (magazine
compartments 1 through 6)
The following media can be read:
audio and MP3 CDs
R devices connected to the media interface
(Y page 139).
i The message Disc unreadable appears
behind the magazine compartment number
if a medium cannot be read.
X Selecting medium: Press button 9
or :.
X Press button 9.
or
X Selecting medium directly: In CD mode
you can select a disc directly by pressing
the respective number of the magazine
compartment on the keypad ( j through
p). Audio system
137Controls in detail
171_AKB; 3; 60, en-US
d2ureepe, Version: 2.11.8.1 2009-05-11T16:00:23+02:00 - Seite 137 Z
Page 161 of 312
i
You can also switch the microphone on or
off by pressing button 8.
Sending DTMF tones i
This function is not possible with all
mobile phones.
Answering
machines or other devices can be
controlled via DTMF tones, e.g. for remote
query functions.
X Transmitting individual characters:
During a call select the required
characters.
or
X Press the corresponding button on the
audio control unit.
Every selected character is transmitted
immediately.
X Transmitting a phone number of a
phone book entry as a sequence of
characters: Select Name.
X Select the desired phone book entry.
The entry is transmitted immediately as a
sequence of characters.
X Switching back to call display: Select
Back. Driving systems
Introduction
The
cruise control driving system is described
on the following pages.
The driving safety systems ABS, BAS and
ESP ®
are described in the “Safety and
security” section (Y page 47). Cruise control
The cruise control maintains the speed you
set for your vehicle automatically.
The
use of the cruise control is recommended
for driving at a constant speed for extended
periods of time. The currently set speed or last set speed
(“Resume” function) appears in the status
indicator of the multifunction display:
R
USA only: e.g. CRUISE 55 Miles
R Canada only: e.g. ¯ 90 Km/h G
Warning!
The cruise control is a convenience system
designed to assist the driver during vehicle
operation. The driver is and must always
remain responsible for the vehicle’s speed
and for safe brake operation.
Only
use the cruise control if the road, traffic,
and weather conditions make it advisable to
travel at a constant speed.
R The use of the cruise control can be
dangerous on winding roads or in heavy
traffic because conditions do not allow safe
driving at a constant speed.
R The use of the cruise control can be
dangerous on slippery roads. Rapid
changes in tire traction can result in wheel
spin and loss of control.
R Deactivate the cruise control when driving
in fog.
The “Resume” function should only be
operated if the driver is fully aware of the
previously set speed and wishes to resume
this particular preset speed. G
Warning!
When the cruise control is braking, the brake
pedal is retracted (i.e. depressed
automatically). The pedals’ range of motion
must not be impeded by any obstacles:
R Do not place any objects in the footwell.
R Make sure that the floormats and carpets
are securely in place.
R Do
not rest your foot underneath the brake
pedal, as it could otherwise be trapped.
You could otherwise cause an accident and
injure yourself and/or others. Driving systems
159
Controls in detail
171_AKB; 3; 60, en-US
d2ureepe, Version: 2.11.8.1 2009-05-11T16:00:23+02:00 - Seite 159 Z
Page 173 of 312
G
Warning!
Before operating the retractable hardtop,
make sure there is no danger of anyone being
injured by the moving parts (retractable
hardtop, roof frame, and trunk lid).
Hands must never be placed near the roof
frame, upper windshield area, hardtop, shelf
behind roll bars, or trunk lid while the
retractable hardtop is being raised or
lowered. Serious personal injury may occur.
If potential danger exists, release the
retractable hardtop switch or button % or
& on the SmartKey. This immediately
interrupts the raising or lowering procedure.
You then can operate the retractable hardtop
switch or press button % or & on the
SmartKey to raise or lower the retractable
hardtop away from the danger zone
! Never sit or place heavy objects on the
rear shelf. Doing so could cause damage to
the retractable hardtop and the rear shelf.
! Please keep in mind that weather
conditions can sometimes change rapidly.
Make sure to close the retractable hardtop
when leaving the vehicle. If water enters
the vehicle interior, vehicle electronics
could be damaged which is not covered by
the Mercedes-Benz Limited Warranty.
! When opening and closing the retractable
hardtop, make sure
R there is sufficient clearance for the
retractable hardtop to move up and for
the trunk lid to move back
R the luggage cover is installed, extended
and closed
R the trunk is loaded only to the height of
the luggage cover
R the luggage/cargo does not push up the
closed luggage cover R
the trunk lid is closed
R the outside temperature is above +5‡
(-15†)
Otherwise the retractable hardtop and
trunk as well as other parts of the vehicle
could be damaged. Opening and closing
With the retractable hardtop switch G
Observe Safety notes, see page 170.
X Engage the parking brake.
X Close the luggage cover ( Y page 173).
X Close the trunk lid.
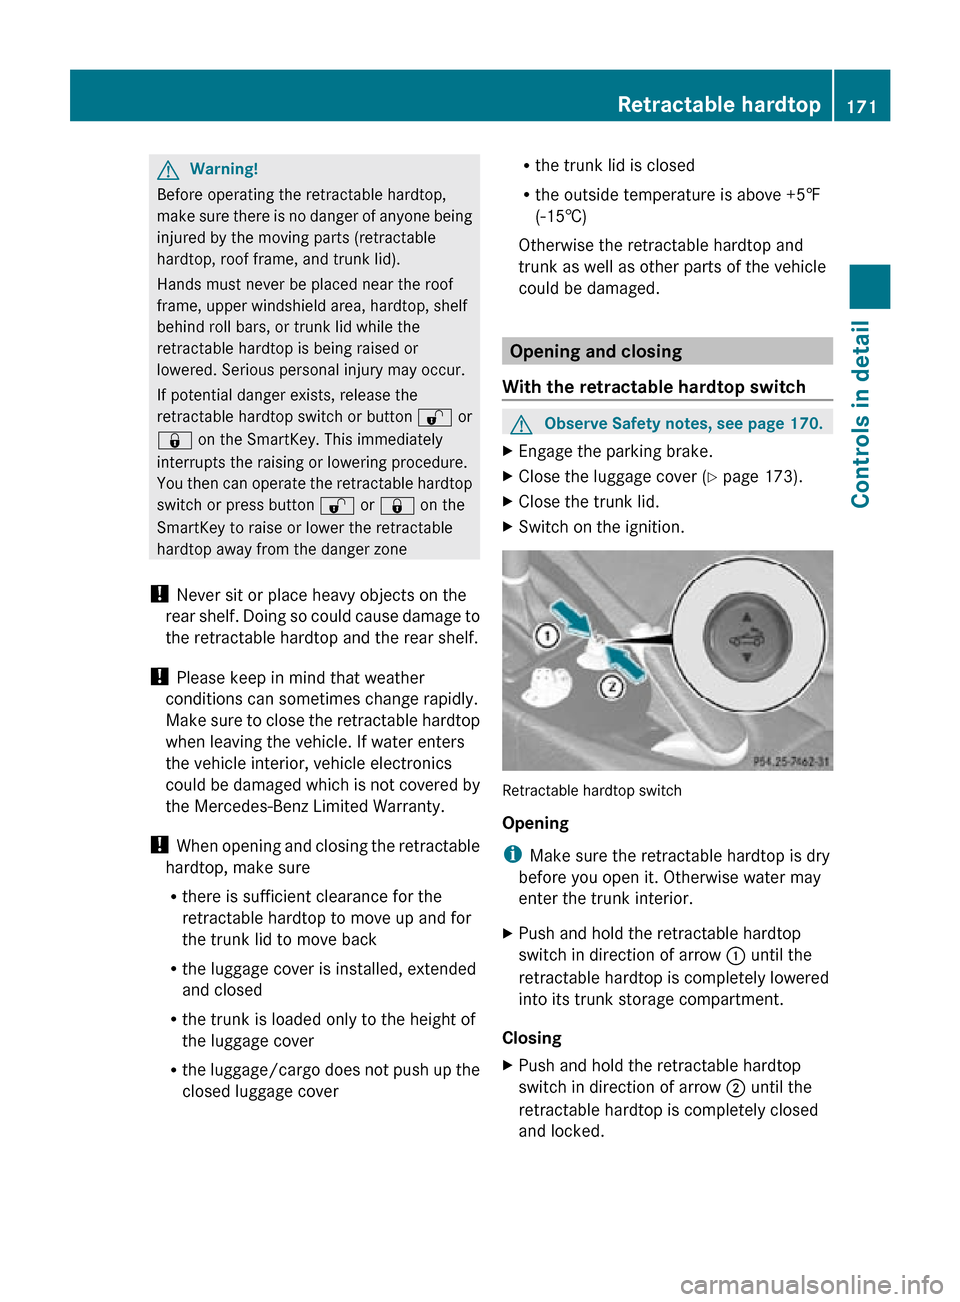
X Switch on the ignition. Retractable hardtop switch
Opening
i
Make sure the retractable hardtop is dry
before you open it. Otherwise water may
enter the trunk interior.
X Push and hold the retractable hardtop
switch in direction of arrow : until the
retractable hardtop is completely lowered
into its trunk storage compartment.
Closing
X Push and hold the retractable hardtop
switch in direction of arrow ; until the
retractable hardtop is completely closed
and locked. Retractable hardtop
171Controls in detail
171_AKB; 3; 60, en-US
d2ureepe, Version: 2.11.8.1 2009-05-11T16:00:23+02:00 - Seite 171 Z
Page 186 of 312
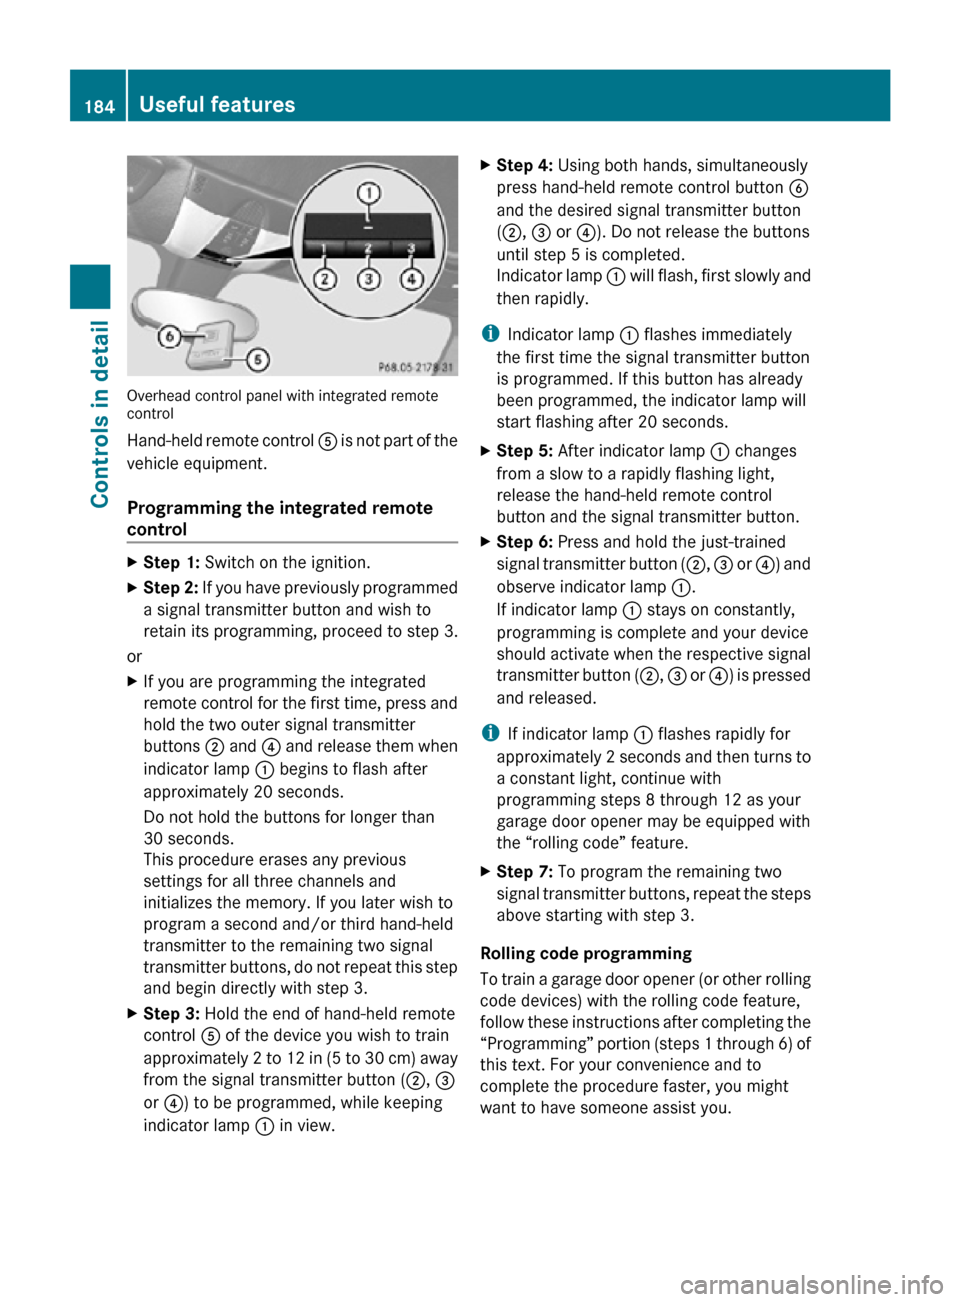
Overhead control panel with integrated remote
control
Hand-held remote control
A is not part of the
vehicle equipment.
Programming the integrated remote
control X
Step 1: Switch on the ignition.
X Step 2: If you have previously programmed
a signal transmitter button and wish to
retain its programming, proceed to step 3.
or
X If you are programming the integrated
remote control for the first time, press and
hold the two outer signal transmitter
buttons ; and ? and release them when
indicator lamp : begins to flash after
approximately 20 seconds.
Do not hold the buttons for longer than
30 seconds.
This procedure erases any previous
settings for all three channels and
initializes the memory. If you later wish to
program a second and/or third hand-held
transmitter to the remaining two signal
transmitter buttons, do not repeat this step
and begin directly with step 3.
X Step 3: Hold the end of hand-held remote
control A of the device you wish to train
approximately 2 to 12 in (5 to 30 cm) away
from the signal transmitter button ( ;, =
or ?) to be programmed, while keeping
indicator lamp : in view. X
Step 4: Using both hands, simultaneously
press hand-held remote control button B
and the desired signal transmitter button
(;, = or ?). Do not release the buttons
until step 5 is completed.
Indicator lamp : will flash, first slowly and
then rapidly.
i Indicator lamp : flashes immediately
the first time the signal transmitter button
is programmed. If this button has already
been programmed, the indicator lamp will
start flashing after 20 seconds.
X Step 5: After indicator lamp : changes
from a slow to a rapidly flashing light,
release the hand-held remote control
button and the signal transmitter button.
X Step 6: Press and hold the just-trained
signal transmitter button (;, = or ?) and
observe indicator lamp :.
If indicator lamp : stays on constantly,
programming is complete and your device
should activate when the respective signal
transmitter button ( ;, = or ?) is pressed
and released.
i If indicator lamp : flashes rapidly for
approximately 2 seconds and then turns to
a constant light, continue with
programming steps 8 through 12 as your
garage door opener may be equipped with
the “rolling code” feature.
X Step 7: To program the remaining two
signal transmitter buttons, repeat the steps
above starting with step 3.
Rolling code programming
To train a garage door opener (or other rolling
code devices) with the rolling code feature,
follow these instructions after completing the
“Programming” portion (steps 1 through 6) of
this text. For your convenience and to
complete the procedure faster, you might
want to have someone assist you. 184
Useful featuresControls in detail
171_AKB; 3; 60, en-US
d2ureepe,
Version: 2.11.8.1 2009-05-11T16:00:23+02:00 - Seite 184
Page 232 of 312
G
Warning!
For safety reasons, switch off wipers and
remove SmartKey from starter switch before
cleaning the windshield and/or the wiper
blades. Otherwise, the wiper motor could
suddenly turn on and cause injury.
! Do not pull on the wiper blade inserts.
They could tear.
X Fold the wiper arms forward until they snap
into place.
X Clean the windshield and the wiper blade
inserts with a clean cloth and mild
detergent solution.
X Use a soft, clean cloth and a mild window
cleaning solution on all outside and inside
glass surfaces.
An automotive glass cleaner is
recommended.
! Fold the windshield wiper arms back onto
the windshield before turning the SmartKey
in the starter switch.
Hold on to the wiper when folding the wiper
arm back. If released, the force of the
impact from the tensioning spring could
crack the windshield.
! To clean the window interior, do not use
a dry cloth, abrasives, solvents or cleaners
containing solvents. Do not touch the
inside of the windows with hard objects
such as an ice scraper or ring. Doing so may
damage the windows.
Rear window cleaning
Clean the rear window with the hardtop fully
raised and closed. G
Warning!
Do not clean the rear window with the hardtop
in a position other than the fully raised and
closed position. Otherwise, the hardtop may
move unexpectedly which may result in
personal injury to you or others. X
Use a soft, clean cloth and a mild window
cleaning solution on all outside and inside
glass surfaces.
An automotive glass cleaner is
recommended.
Light alloy wheels If possible, clean wheels once a week.
X
Use Mercedes-Benz approved Wheel Care,
a soft bristle brush and a strong spray of
water for cleaning the light alloy wheels.
! Only use acid-free cleaning materials.
Acid may cause corrosion or damage the
clear coat.
! The vehicle should not be parked for an
extended period of time immediately after
it
has been cleaned. This applies especially
after the wheel rims have been cleaned
with wheel rim cleaner. Wheel rim cleaners
can lead to increased corrosion of the
brake disks and brake pads. Non-approved
wheel cleaners may also damage the wheel
paint if the vehicle is not driven after
cleaning.
Therefore, the vehicle’s brake system
should always be warmed-up before it is
parked after cleaning. Drive your vehicle for
several minutes to allow the brakes to dry.
When applying Mercedes-Benz approved
Tire Care and Mercedes-Benz approved
Wheel Care products, take care not to
spray them on the brake disks.
Plastic and rubber parts X
Use a gentle dishwashing detergent or mild
detergent
for delicate fabrics as a washing
solution.
X Wipe with a cloth moistened in a lukewarm
solution.
The
surface may temporarily change color.
If this is the case, wait for it to dry. 230
Vehicle care
Operation
171_AKB; 3; 60, en-US
d2ureepe,
Version: 2.11.8.1 2009-05-11T16:00:23+02:00 - Seite 230