2010 MERCEDES-BENZ SLK55AMG brakes
[x] Cancel search: brakesPage 204 of 312

G
Warning!
The TPMS does not indicate a warning for
wrongly selected inflation pressures. Always
adjust
tire inflation pressure according to the
Tire and Loading Information placard or the
supplemental tire inflation pressure
information on the inside of the fuel filler flap.
The TPMS is not able to issue a warning due
to a sudden dramatic loss of pressure (e.g. tire
blowout caused by a foreign object). In this
case bring the vehicle to a halt by carefully
applying the brakes and avoiding abrupt
steering maneuvers. G
Warning!
Each tire, including the spare (if provided),
should be checked at least once a month
when cold and inflated to the inflation
pressure recommended by the vehicle
manufacturer on the Tire and Loading
Information placard on the driver’s door B-
pillar
or the tire inflation pressure label on the
inside of the fuel filler flap. If your vehicle has
tires of a different size than the size indicated
on the Tire and Loading Information placard
or the tire inflation pressure label, you should
determine the proper tire inflation pressure
for those tires.
As an added safety feature, your vehicle has
been equipped with a tire pressure monitoring
system (TPMS) that illuminates a low tire
pressure telltale when one or more of your
tires are significantly underinflated.
Accordingly, when the low tire pressure
telltale illuminates, you should stop and check
your tires as soon as possible, and inflate
them to the proper pressure. Driving on a
significantly underinflated tire causes the tire
to overheat and can lead to tire failure.
Underinflation also reduces fuel efficiency
and tire tread life, and may affect the vehicle’s
handling and stopping ability. Please note that
the TPMS is not a substitute for proper tire
maintenance, and it is the driver’s
responsibility to maintain correct tire
pressure, even if underinflation has not reached the level to trigger illumination of the
TPMS low tire pressure telltale.
Your vehicle has also been equipped with a
TPMS malfunction indicator to indicate when
the system is not operating properly. The
TPMS
malfunction indicator is combined with
the low tire pressure telltale. When the
system detects a malfunction, the telltale will
flash for approximately 1 minute and then
remain continuously illuminated. This
sequence will continue upon subsequent
vehicle start-ups as long as the malfunction
exists. When the malfunction indicator is
illuminated, the system may not be able to
detect or signal low tire pressure as intended.
TPMS malfunctions may occur for a variety of
reasons, including the installation of
incompatible replacement or alternate tires
or wheels on the vehicle that prevent the
TPMS from functioning properly. Always
check the TPMS malfunction telltale after
replacing one or more tires or wheels on your
vehicle to ensure that the replacement or
alternate tires and wheels allow the TPMS to
continue to function properly.
i If a condition causing the TPMS to
malfunction develops, it may take up to
10 minutes for the system to signal a
malfunction using the TPMS telltale
flashing and illumination sequence.
The telltale extinguishes after a few
minutes driving if the malfunction has been
corrected.
Tire pressure inquiries are made using the
multifunction display. The current tire
inflation pressure for each tire appears in the
multifunction display after a few minutes of
driving.
i Possible differences between the
readings of a tire pressure gauge of an air
hose, e.g. gas station equipment, and the
vehicle’s control system can occur. The tire
pressure displayed by the control system
apply to sea level. In high-altitude
locations, the reading on a tire pressure 202
Tires and wheels
Operation
171_AKB; 3; 60, en-US
d2ureepe,
Version: 2.11.8.1 2009-05-11T16:00:23+02:00 - Seite 202
Page 219 of 312

Tire type code
Tire type code
? may, at the option of the
manufacturer, be used as a descriptive code
for identifying significant characteristics of
the tire.
Date of manufacture The date of manufacture
A identifies the
week and year of manufacture.
The first two figures identify the week,
starting with “01” to represent the first full
week of the calendar year. The second two
figures represent the year.
For example, “3208” represents the 32nd
week of 2008. Tire ply material
i
For illustration purposes only. Actual data
on tires are specific to each vehicle and
may vary from data shown in above
illustration.
This marking tells you about the type of cord
and number of plies in the sidewall : and
under the tread ;. Tire and loading terminology
Accessory weight The combined weight (in excess of those
standard items which may be replaced) of
automatic transmission, power steering,
power brakes, power windows, power seats, radio, and heater, to the extent that these
items are available as factory-installed
equipment (whether installed or not).
Air pressure The amount of air inside the tire pressing
outward on each square inch of the tire. Air
pressure is expressed in pounds per square
inch (psi), kilopascal (kPa), or bar.
Aspect ratio
Dimensional relationship between tire
section height and section width expressed
in percentage.
Bar
Metric unit for air pressure. There are
14.5038 pounds per square inch (psi) to
1 bar; there are 100 kilopascals (kPa) to 1 bar.
Bead
The tire bead contains steel wires wrapped by
steel cords that hold the tire onto the rim.
Cold tire inflation pressure
Tire inflation pressure when your vehicle has
been sitting for at least 3 hours or driven no
more than 1 mile (1.6 km).
Curb weight
The weight of a motor vehicle with standard
equipment including the maximum capacity
of fuel, oil, and coolant, and, if so equipped,
air conditioning and additional optional
equipment, but without passengers and
cargo.
DOT (Department of Transportation)
A tire branding symbol which denotes the tire
meets requirements of the U.S. Department
of Transportation. Tires and wheels
217Operation
171_AKB; 3; 60, en-US
d2ureepe, Version: 2.11.8.1 2009-05-11T16:00:23+02:00 - Seite 217 Z
Page 220 of 312
GAWR (Gross Axle Weight Rating)
The GAWR is the maximum permissible axle
weight.
The gross vehicle weight on each axle
must never exceed the GAWR for the front
and rear axle indicated on the certification
label located on the driver’s door B-pillar.
GVW (Gross Vehicle Weight) The GVW comprises the weight of the vehicle
including fuel, tools, spare wheel, installed
accessories, passengers and cargo and, if
applicable,
trailer tongue load. The GVW must
never exceed the GVWR indicated on the
certification label located on the driver’s door
B-pillar.
GVWR (Gross Vehicle Weight Rating) This is the maximum permissible vehicle
weight of the fully loaded vehicle (weight of
the
vehicle including all options, passengers,
fuel, and cargo and, if applicable, trailer
tongue load). It is indicated on the
certification label located on the driver’s door
B-pillar.
Kilopascal (kPa) Metric unit for air pressure. There are 6.9 kPa
to 1 psi; another metric unit for air pressure
is bar. There are 100 kilopascals (kPa) to
1 bar.
Load index
Numerical code associated with the
maximum load a tire can support.
Maximum load rating
The maximum load in kilograms and pounds
that can be carried by the tire.
Maximum loaded vehicle weight
The sum of curb weight, accessory weight,
total load limit, and production options
weight. Maximum permissible tire inflation
pressure This number is the greatest amount of air
pressure that should ever be put in the tire.
Normal occupant weight
The number of occupants the vehicle is
designed to seat, multiplied by 68 kilograms
(150 lb).
Occupant distribution
The distribution of occupants in a vehicle at
their designated seating positions.
Production options weight
The combined weight of those installed
regular production options weighing over
5 lbs (2.3 kilograms) in excess of those
standard items which they replace, not
previously considered in curb weight or
accessory weight, including heavy duty
brakes, ride levelers, roof rack, heavy duty
battery, and special trim.
PSI (Pounds per square inch)
A standard unit of measure for air pressure.
Recommended tire inflation pressure
The recommended tire inflation pressure for
normal
driving conditions is listed on the Tire
and Loading Information placard located on
the driver’s door B-pillar. It provides best
handling, tread life and riding comfort.
Supplemental information pertaining to
special driving situations can be found on the
tire inflation pressure label on the inside of
the fuel filler flap.
Rim A metal support for a tire or a tire and tube
assembly upon which the tire beads are
seated.218
Tires and wheels
Operation
171_AKB; 3; 60, en-US
d2ureepe,
Version: 2.11.8.1 2009-05-11T16:00:23+02:00 - Seite 218
Page 224 of 312
Power assistance
G
Warning!
There is no power assistance for the steering
and the brake when the engine is not running.
Steering and braking requires significantly
more effort and you could lose control of the
vehicle and cause an accident as a result.
Do not turn off the engine while the vehicle is
in motion. Brakes
Downhill grades !
When driving down long and steep
grades, relieve the load on the brakes by
shifting into a lower gear to use the
engine’s
braking power. This helps prevent
overheating of the brakes and reduces
wear.
When using the engine’s braking power, a
drive wheel may not spin for an extended
period of time, e.g. on slippery road
surfaces. This may cause serious damage
to the drivetrain which is not covered by the
Mercedes-Benz Limited Warranty.
Continuous or hard braking G
Warning!
Resting your foot on the brake pedal will
cause excessive and premature wear of the
brake pads.
It can also result in the brakes overheating,
thereby significantly reducing their
effectiveness. It may not be possible to stop
the vehicle in sufficient time to avoid an
accident.
After hard braking, it is advisable to drive on
for
some time, rather than immediately park,
so that the air stream will cool down the
brakes faster. Wet roads G
Warning!
After driving in heavy rain for some time
without
applying the brakes or through water
deep enough to wet brake components, the
first braking action may be somewhat
reduced and increased pedal pressure may be
necessary to obtain expected brake effect.
Maintain a safe distance from vehicles in
front.
To help prevent brake disk corrosion after
driving on wet or salt-covered roads, it is
advisable to brake the vehicle with
considerable force prior to parking. The heat
generated serves to dry the brakes.
Salt-covered roads G
Warning!
A layer of salt on the brake discs and the brake
linings may cause a delay in the braking
effect, resulting in a significantly increased
braking distance, which could lead to an
accident.
To avoid this danger, you should:
R occasionally brake carefully when you are
driving on salt-covered roads, so that any
layer of salt that may have built up on the
brake discs and the brake linings is
removed without putting other road users
at risk
R maintain a greater distance to the vehicle
ahead and drive with particular care
R carefully apply the brakes at the end of a
trip and immediately after commencing a
new
trip, so that salt residues are removed
from the brake disc
Brake service !
The brake fluid level in the reservoir may
be
too low if the brake warning lamp in the
instrument cluster comes on and an
acoustic warning sounds although the 222
Driving instructions
Operation
171_AKB; 3; 60, en-US
d2ureepe,
Version: 2.11.8.1 2009-05-11T16:00:23+02:00 - Seite 222
Page 225 of 312
parking brake is released. Observe
additional messages in the multifunction
display that may appear.
Brake
pad wear or a leak in the system may
be the reason for low brake fluid in the
reservoir.
Have the brake system inspected
immediately. Contact an authorized
Mercedes-Benz Center.
All checks and service work on the brake
system should be carried out by qualified
technicians only. Contact an authorized
Mercedes-Benz Center.
Only install brake pads and use brake fluid
recommended by Mercedes-Benz. G
Warning!
If other than recommended brake pads are
installed, or other than recommended brake
fluid is used, the braking properties of the
vehicle
can be degraded to an extent that safe
braking is substantially impaired. This could
result in an accident.
! Because the ESP ®
operates
automatically, the engine and ignition must
be shut off (SmartKey in starter switch
position 0 or 1) when the parking brake is
being tested on a brake test dynamometer
or when the vehicle is being towed with the
front axle raised.
Active braking action through the ESP ®
may otherwise seriously damage the brake
system which is not covered by the
Mercedes-Benz Limited Warranty.
If your brake system is only subjected to
moderate loads, you should occasionally test
the effectiveness of the brakes by applying
above-normal braking pressure at higher
speeds. This will also enhance the grip of the
brake pads. G
Warning!
Make sure not to endanger any other road
users when carrying out these braking
maneuvers. Refer to the description of the Brake Assist
System (BAS) (
Y page 49).
High-performance brake system The high-performance brake system is only
available on SLK 55 AMG.
G
Warning!
New vehicle brake pads and discs, and
replacement brake pads and discs may take
several hundred miles of driving until they
provide
optimum braking efficiency. Until that
time, you may need to use increased brake
pedal pressure while braking. Please be aware
of this and adjust your driving and braking
accordingly during this break-in period.
Excessive high-demand braking will cause
correspondingly high brake wear. Please be
attentive to the brake warning lamp in the
instrument cluster and brake condition
messages in the multifunction display.
Especially for high performance driving, it is
important to maintain and have the brake
system checked regularly.
The high-performance brake system is
designed to operate under the extremely high
operating demands required to
accommodate the performance capabilities
of the vehicle.
The brakes may produce a squeaking-type
noise depending on the
R vehicle speed
R brake force applied
R ambient conditions, e.g. temperature and
humidity
As with any brake system, the wear of
individual brake system components such as
brake pads or disks strongly depends on your
driving style and the conditions under which
you operate the vehicle. Thus, a driving style
calling for high-demand braking will cause
your vehicle’s brakes to wear more quickly. Driving instructions
223
Operation
171_AKB; 3; 60, en-US
d2ureepe, Version: 2.11.8.1 2009-05-11T16:00:23+02:00 - Seite 223 Z
Page 226 of 312
Driving off
Warm up the engine smoothly. Do not place
full load on the engine until the operating
temperature has been reached.
! When
driving off on a slippery surface, do
not allow a drive wheel to spin for an
extended period with the ESP ®
switched
off. Doing so may cause serious damage to
the drivetrain which is not covered by the
Mercedes-Benz Limited Warranty.
! Simultaneously depressing the
accelerator pedal and applying the brakes
reduces engine performance and causes
premature brake and drivetrain wear which
is not covered by the Mercedes-Benz
Limited Warranty. Hydroplaning
Depending
on the depth of the water layer on
the road, hydroplaning may occur, even at low
speeds and with new tires. In heavy rain or
when conditions indicate possible
hydroplaning:
X Reduce vehicle speed.
X Avoid track grooves in the road.
X Apply brakes cautiously. Standing water
! Do not drive through flooded areas.
Before
driving through water, determine its
depth.
If you must drive through standing water,
drive slowly to prevent water from entering
the passenger compartment or the engine
compartment. Water in these areas could
cause damage to electrical components or
wiring of the engine or transmission, or
could result in water being ingested by the
engine through the air intake causing
severe internal engine damage. Any such damage is not covered by the Mercedes-
Benz Limited Warranty. Driving abroad
If
you plan to drive the vehicle outside the U.S.
or Canada, you should request dealer
network information for your destination from
any authorized Mercedes-Benz Center. Control and operation of radio
transmitter
Safety notes G
Warning!
Please do not forget that your primary
responsibility
is to drive the vehicle. A driver’s
attention to the road must always be his/her
primary focus when driving. For your safety
and the safety of others, we recommend that
you pull over to a safe location and stop
before placing or taking a telephone call.
If you choose to use the telephone 16
while
driving, please use the hands-free device and
only use the telephone when road, weather
and traffic conditions permit. Some
jurisdictions prohibit the driver from using a
mobile telephone while driving a vehicle.
Only operate the audio system or
COMAND 16
(Cockpit Management and Data
System) if road, weather and traffic
conditions permit. Otherwise, you may not be
able to observe traffic conditions and could
endanger yourself and others.
Bear in mind that at a speed of just 30 mph
(approximately 50 km/h), your vehicle is
covering a distance of 44 feet (approximately
14 m) every second.
16 Observe all legal requirements. 224
Driving instructions
Operation
171_AKB; 3; 60, en-US
d2ureepe,
Version: 2.11.8.1 2009-05-11T16:00:23+02:00 - Seite 224
Page 232 of 312
G
Warning!
For safety reasons, switch off wipers and
remove SmartKey from starter switch before
cleaning the windshield and/or the wiper
blades. Otherwise, the wiper motor could
suddenly turn on and cause injury.
! Do not pull on the wiper blade inserts.
They could tear.
X Fold the wiper arms forward until they snap
into place.
X Clean the windshield and the wiper blade
inserts with a clean cloth and mild
detergent solution.
X Use a soft, clean cloth and a mild window
cleaning solution on all outside and inside
glass surfaces.
An automotive glass cleaner is
recommended.
! Fold the windshield wiper arms back onto
the windshield before turning the SmartKey
in the starter switch.
Hold on to the wiper when folding the wiper
arm back. If released, the force of the
impact from the tensioning spring could
crack the windshield.
! To clean the window interior, do not use
a dry cloth, abrasives, solvents or cleaners
containing solvents. Do not touch the
inside of the windows with hard objects
such as an ice scraper or ring. Doing so may
damage the windows.
Rear window cleaning
Clean the rear window with the hardtop fully
raised and closed. G
Warning!
Do not clean the rear window with the hardtop
in a position other than the fully raised and
closed position. Otherwise, the hardtop may
move unexpectedly which may result in
personal injury to you or others. X
Use a soft, clean cloth and a mild window
cleaning solution on all outside and inside
glass surfaces.
An automotive glass cleaner is
recommended.
Light alloy wheels If possible, clean wheels once a week.
X
Use Mercedes-Benz approved Wheel Care,
a soft bristle brush and a strong spray of
water for cleaning the light alloy wheels.
! Only use acid-free cleaning materials.
Acid may cause corrosion or damage the
clear coat.
! The vehicle should not be parked for an
extended period of time immediately after
it
has been cleaned. This applies especially
after the wheel rims have been cleaned
with wheel rim cleaner. Wheel rim cleaners
can lead to increased corrosion of the
brake disks and brake pads. Non-approved
wheel cleaners may also damage the wheel
paint if the vehicle is not driven after
cleaning.
Therefore, the vehicle’s brake system
should always be warmed-up before it is
parked after cleaning. Drive your vehicle for
several minutes to allow the brakes to dry.
When applying Mercedes-Benz approved
Tire Care and Mercedes-Benz approved
Wheel Care products, take care not to
spray them on the brake disks.
Plastic and rubber parts X
Use a gentle dishwashing detergent or mild
detergent
for delicate fabrics as a washing
solution.
X Wipe with a cloth moistened in a lukewarm
solution.
The
surface may temporarily change color.
If this is the case, wait for it to dry. 230
Vehicle care
Operation
171_AKB; 3; 60, en-US
d2ureepe,
Version: 2.11.8.1 2009-05-11T16:00:23+02:00 - Seite 230
Page 281 of 312
X
Unscrew the uppermost wheel bolt and
remove it.
X Replace this wheel bolt with alignment
bolt :.
X Remove the remaining bolts.
! Do not place wheel bolts in sand or dirt.
This could result in damage to the wheel
bolts and wheel hub threads.
X Remove the wheel.
Attaching the spare wheel G
Warning!
Inflate collapsible tire only after the wheel is
properly attached.
Inflate the collapsible tire using the electric
air pump before lowering the vehicle.
G
Warning!
Always replace wheel bolts that are damaged
or rusted.
Never apply oil or grease to wheel bolts.
Damaged wheel hub threads should be
repaired immediately. Do not continue to
drive under these circumstances! Contact an
authorized Mercedes-Benz Center or call
Roadside Assistance.
Incorrect wheel bolts or improperly tightened
wheel bolts can cause the wheel to come off.
This could cause an accident. Make sure to
use the correct wheel bolts. G
Warning!
Only use genuine Mercedes-Benz wheel bolts.
Other wheel bolts may come loose.
Do not tighten the wheel bolts when the
vehicle is raised. Otherwise the vehicle could
fall off the jack. Wheel bolt
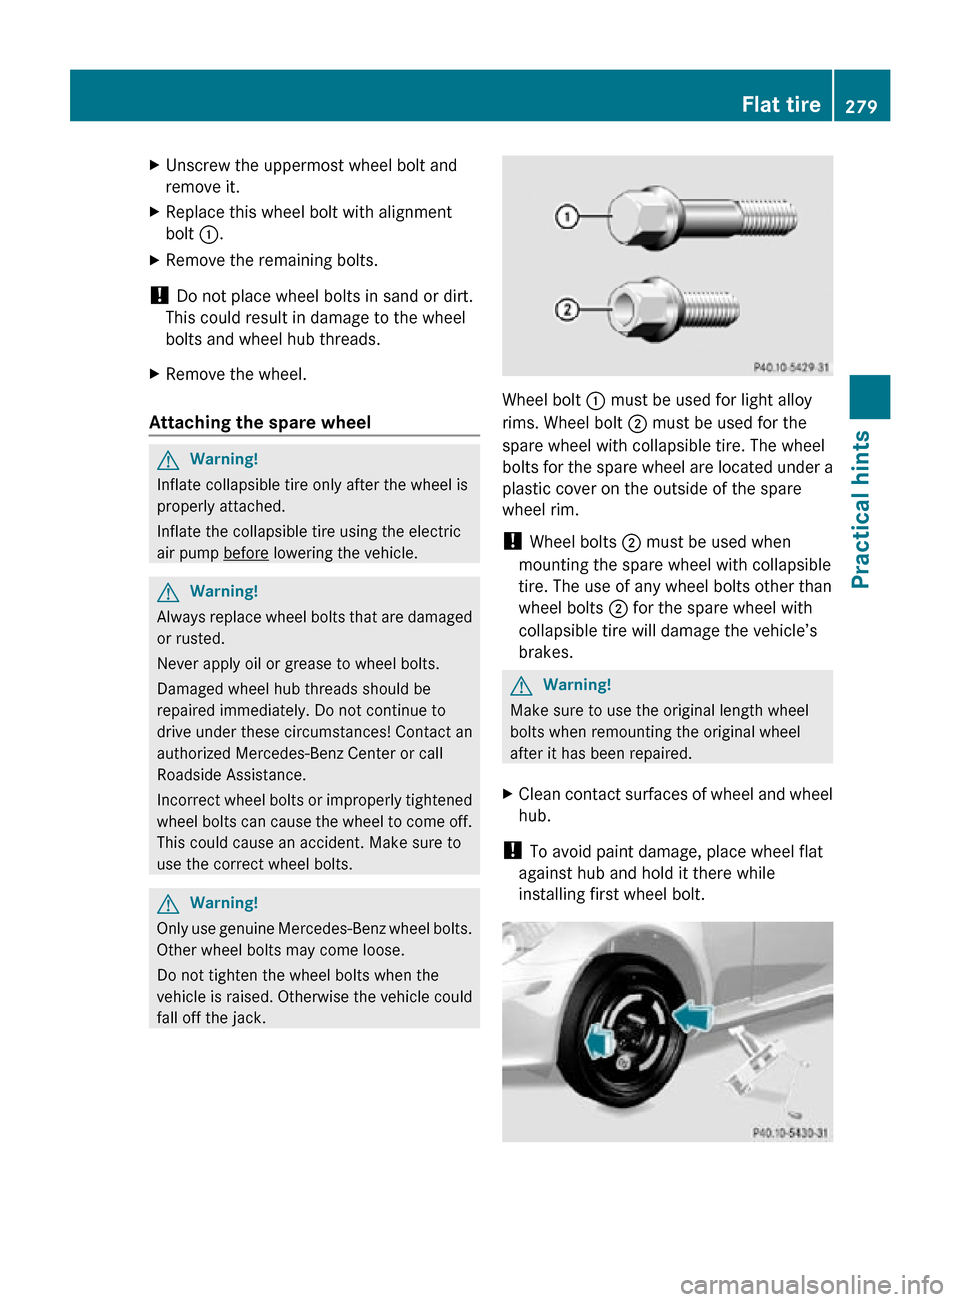
: must be used for light alloy
rims. Wheel bolt ; must be used for the
spare wheel with collapsible tire. The wheel
bolts for the spare wheel are located under a
plastic cover on the outside of the spare
wheel rim.
! Wheel bolts ; must be used when
mounting the spare wheel with collapsible
tire. The use of any wheel bolts other than
wheel bolts ; for the spare wheel with
collapsible tire will damage the vehicle’s
brakes. G
Warning!
Make sure to use the original length wheel
bolts when remounting the original wheel
after it has been repaired.
X Clean contact surfaces of wheel and wheel
hub.
! To avoid paint damage, place wheel flat
against hub and hold it there while
installing first wheel bolt. Flat tire
279Practical hints
171_AKB; 3; 60, en-US
d2ureepe, Version: 2.11.8.1 2009-05-11T16:00:23+02:00 - Seite 279 Z