2010 MERCEDES-BENZ SLK350 radio controls
[x] Cancel search: radio controlsPage 128 of 312
i
Note that categories and channels shown
in illustrations are dependent on
programming content delivered by the
service provider. Programming content is
subject to change. Therefore, channels and
categories shown in illustrations and
descriptions contained in this manual may
differ from the channels and categories
delivered by the service provider.
i Satellite radio service may be unavailable
or interrupted from time to time for a
variety of reasons, such as environmental
or topographic conditions and other things
we cannot control. Service might also not
be available in certain places (e.g. in
tunnels, parking garages, under leafy trees,
or within or next to buildings) or near other
obstructions. In such situations, the
satellite radio’s main menu shows the No
Service screen. At this point, the radio’s
functions are restricted.
Subscribing to satellite radio X
Press button $ on audio control unit
repeatedly until Sat is selected.
The following conditions are possible:
R Satellite radio service is not activated
(only the preview channel is displayed).
R Satellite radio service is activated.
i If a satellite receiver is not installed or not
properly installed:
The message Device Unavailable will
appear.
If the satellite radio service is not activated,
the “SIRIUS Preview” display appears.
Satellite radio service is not activated
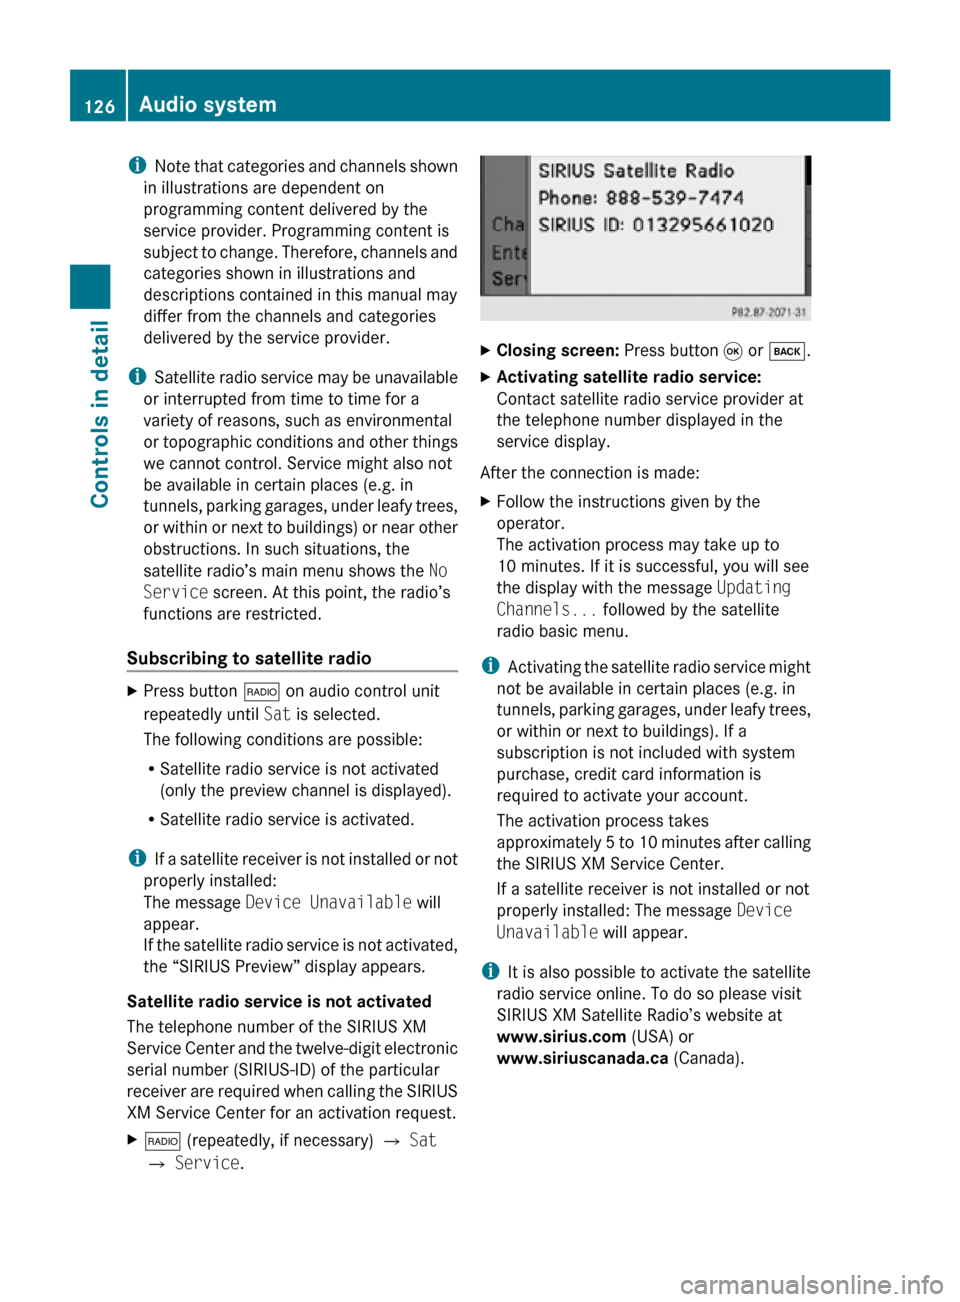
The telephone number of the SIRIUS XM
Service Center and the twelve-digit electronic
serial number (SIRIUS-ID) of the particular
receiver are required when calling the SIRIUS
XM Service Center for an activation request.
X $ (repeatedly, if necessary) Q Sat
Q Service. X
Closing screen: Press button 9 or k.
X Activating satellite radio service:
Contact satellite radio service provider at
the telephone number displayed in the
service display.
After the connection is made:
X Follow the instructions given by the
operator.
The activation process may take up to
10 minutes. If it is successful, you will see
the display with the message Updating
Channels... followed by the satellite
radio basic menu.
i Activating the satellite radio service might
not be available in certain places (e.g. in
tunnels, parking garages, under leafy trees,
or within or next to buildings). If a
subscription is not included with system
purchase, credit card information is
required to activate your account.
The activation process takes
approximately 5 to 10 minutes after calling
the SIRIUS XM Service Center.
If a satellite receiver is not installed or not
properly installed: The message Device
Unavailable will appear.
i It is also possible to activate the satellite
radio service online. To do so please visit
SIRIUS XM Satellite Radio’s website at
www.sirius.com (USA) or
www.siriuscanada.ca (Canada).126
Audio systemControls in detail
171_AKB; 3; 60, en-US
d2ureepe,
Version: 2.11.8.1 2009-05-11T16:00:23+02:00 - Seite 126
Page 129 of 312
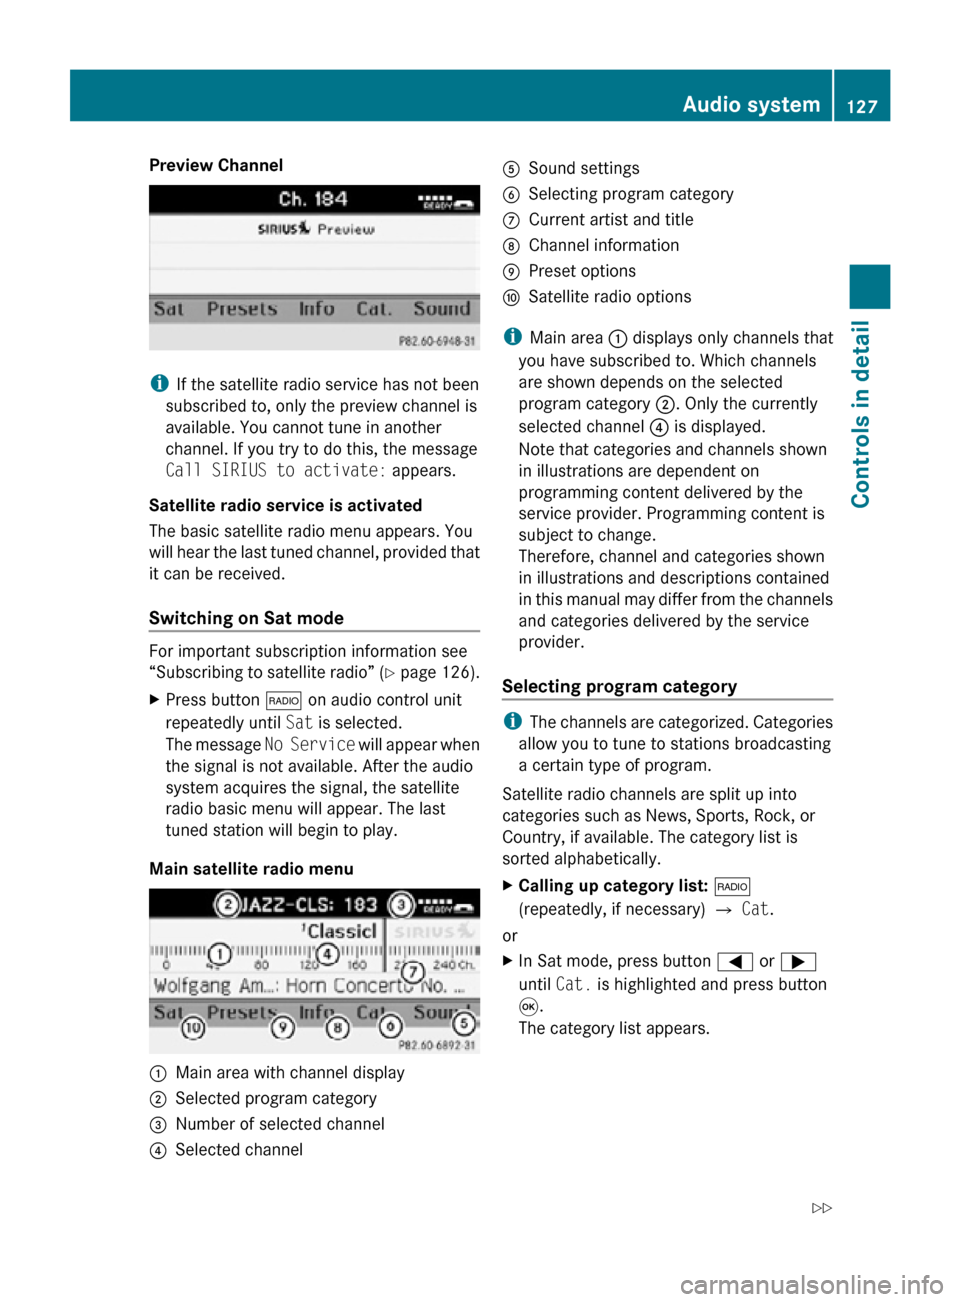
Preview Channel
i
If the satellite radio service has not been
subscribed to, only the preview channel is
available. You cannot tune in another
channel. If you try to do this, the message
Call SIRIUS to activate: appears.
Satellite radio service is activated
The basic satellite radio menu appears. You
will hear the last tuned channel, provided that
it can be received.
Switching on Sat mode For important subscription information see
“Subscribing to satellite radio” (Y page 126).
X
Press button $ on audio control unit
repeatedly until Sat is selected.
The message No Service will appear when
the signal is not available. After the audio
system acquires the signal, the satellite
radio basic menu will appear. The last
tuned station will begin to play.
Main satellite radio menu :
Main area with channel display
; Selected program category
= Number of selected channel
? Selected channel A
Sound settings
B Selecting program category
C Current artist and title
D Channel information
E Preset options
F Satellite radio options
i Main area : displays only channels that
you have subscribed to. Which channels
are shown depends on the selected
program category ;. Only the currently
selected channel ? is displayed.
Note that categories and channels shown
in illustrations are dependent on
programming content delivered by the
service provider. Programming content is
subject to change.
Therefore, channel and categories shown
in illustrations and descriptions contained
in this manual may differ from the channels
and categories delivered by the service
provider.
Selecting program category i
The channels are categorized. Categories
allow you to tune to stations broadcasting
a certain type of program.
Satellite radio channels are split up into
categories such as News, Sports, Rock, or
Country, if available. The category list is
sorted alphabetically.
X Calling up category list: $
(repeatedly, if necessary) Q Cat.
or
X In Sat mode, press button = or ;
until Cat. is highlighted and press button
9.
The category list appears. Audio system
127Controls in detail
171_AKB; 3; 60, en-US
d2ureepe, Version: 2.11.8.1 2009-05-11T16:00:23+02:00 - Seite 127 Z
Page 131 of 312
Tuning in channels using the satellite
radio channel list
X
$ (repeatedly, if necessary) Q Sat
Q Channel List.
The channel list appears. The dot # in
front of a list entry indicates the currently
selected channel.
X Select channel by pressing button 9
or :.
X Press button 9 to confirm.
i The contents of the channel list depends
on which channels are included in your
subscription and which program category
you have selected ( Y page 127). The
channel list contains only the preview
channel if the satellite radio service has not
been subscribed to.
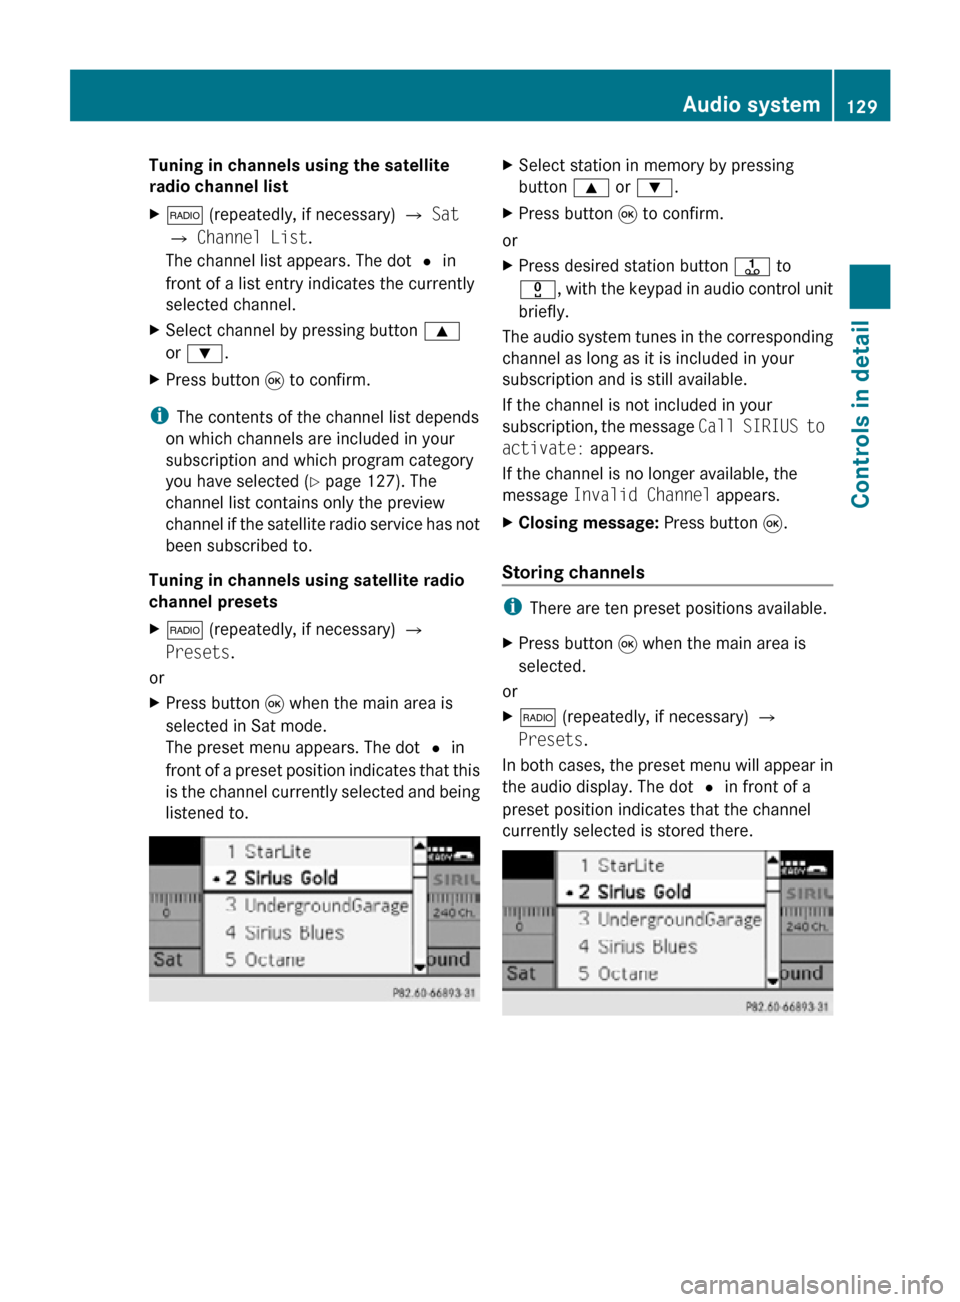
Tuning in channels using satellite radio
channel presets
X $ (repeatedly, if necessary) Q
Presets.
or
X Press button 9 when the main area is
selected in Sat mode.
The preset menu appears. The dot # in
front of a preset position indicates that this
is the channel currently selected and being
listened to. X
Select station in memory by pressing
button 9 or :.
X Press button 9 to confirm.
or
X Press desired station button j to
x, with the keypad in audio control unit
briefly.
The audio system tunes in the corresponding
channel as long as it is included in your
subscription and is still available.
If the channel is not included in your
subscription, the message Call SIRIUS to
activate: appears.
If the channel is no longer available, the
message Invalid Channel appears.
X Closing message: Press button 9.
Storing channels i
There are ten preset positions available.
X Press button 9 when the main area is
selected.
or
X $ (repeatedly, if necessary) Q
Presets.
In both cases, the preset menu will appear in
the audio display. The dot # in front of a
preset position indicates that the channel
currently selected is stored there. Audio system
129Controls in detail
171_AKB; 3; 60, en-US
d2ureepe, Version: 2.11.8.1 2009-05-11T16:00:23+02:00 - Seite 129 Z
Page 132 of 312
X
Selecting a preset position: Press button
9 or :.
X Storing a preset position:
Press and hold
button 9 until you hear a signal.
The channel is stored.
or
X Press and hold desired channel button
j
to x on keypad, until a brief signal
tone sounds.
The channel is stored.
Displaying information X
$
(repeatedly, if necessary) Q Info (if
available).
i If
the program provider does not offer any
information, the Info menu item cannot be
selected.
You will see a screen that may contain the
following information:
R the selected program category
R the selected channel
R the artist of the track currently being played
R the name of the current track
i SIRIUS XM determines what information
is displayed on the screen. If the
information is too long, the audio system
shortens it.
With the telephone keypad button m you
can call up a popup screen, if provided by
SIRIUS XM, that shows the artist and title of
the current track being played on the selected
channel.
X Closing screen: Press button k,
=, ;, or 9. Calling SIRIUS XM Service Center i
It
may be necessary to call the SIRIUS XM
Service Center if, for example:
RYou want to cancel the subscription or
re-subscribe at a later date.
R You have questions regarding billing.
R You sell the car.
X $ (repeatedly, if necessary) Q Sat
Q Service.
The telephone number of the SIRIUS XM
Service Center and the twelve-digit
electronic
serial number (SIRIUS-ID) of the
particular receiver are displayed.
X Closing screen: Press button k,
=, ;, or 9.
Channel update The service provider may conduct a channel
update.
During the update, the message
Updating
Channels... will appear on the audio
display.
The
last tuned channel will be muted until the
update is completed. You cannot operate the
satellite radio during the update.
After completion of the update, the satellite
radio basic menu will appear. The last tuned
station will begin to play. If not available, the
next subscribed channel starts beginning
with channel 1.
Sound settings For sound adjustment see:
R
Volume ( Y page 117)
R Balance control ( Y page 118)
R Bass and treble control (Y page 118)
R Surround sound ( Y page 119)130
Audio system
Controls in detail
171_AKB; 3; 60, en-US
d2ureepe,
Version: 2.11.8.1 2009-05-11T16:00:23+02:00 - Seite 130
Page 143 of 312
on USB Device SubClasses of storage
medium are available from the manufacturer
of the device.
Supported file formats on USB storage
media
The following file formats are supported:
R
mp3: CBR, VBR (up to 320 kbit/s)
R wma: CBR, VBR (up to 320 kbit/s)
R m4a: low complexity (LC) codec
R playlists: m3u, pls
ID3 Tags (version 1.x, 2.3, 2.4) and WMA tags
in ASCII and UTF16 coding are supported to
display meta data during playback.
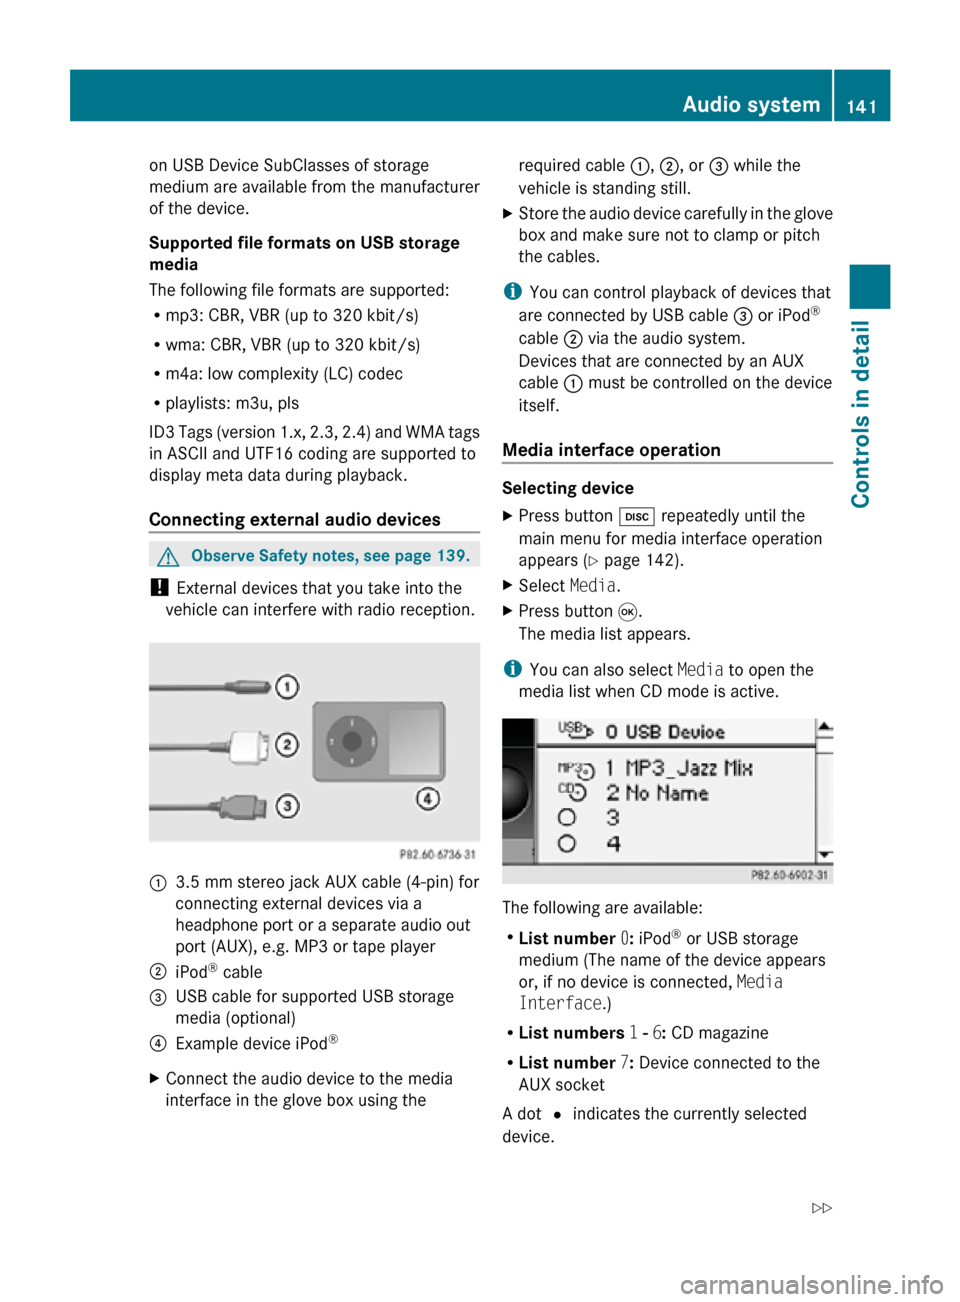
Connecting external audio devices G
Observe Safety notes, see page 139.
! External devices that you take into the
vehicle can interfere with radio reception. :
3.5 mm stereo jack AUX cable (4-pin) for
connecting external devices via a
headphone port or a separate audio out
port (AUX), e.g. MP3 or tape player
; iPod ®
cable
= USB cable for supported USB storage
media (optional)
? Example device iPod ®
X Connect the audio device to the media
interface in the glove box using the required cable
:, ;, or = while the
vehicle is standing still.
X Store the audio device carefully in the glove
box and make sure not to clamp or pitch
the cables.
i You can control playback of devices that
are connected by USB cable = or iPod ®
cable ; via the audio system.
Devices that are connected by an AUX
cable : must be controlled on the device
itself.
Media interface operation Selecting device
X
Press button h repeatedly until the
main menu for media interface operation
appears ( Y page 142).
X Select Media.
X Press button 9.
The media list appears.
i You can also select Media to open the
media list when CD mode is active. The following are available:
R
List number 0: iPod ®
or USB storage
medium (The name of the device appears
or, if no device is connected, Media
Interface.)
R List numbers 1 - 6: CD magazine
R List number 7: Device connected to the
AUX socket
A dot # indicates the currently selected
device. Audio system
141Controls in detail
171_AKB; 3; 60, en-US
d2ureepe, Version: 2.11.8.1 2009-05-11T16:00:23+02:00 - Seite 141 Z
Page 150 of 312
features available for your mobile phone of
choice.
i
In
order for the functions described in this
section to work correctly, the Bluetooth ®
telephone must be linked to the audio
system. Please make sure any other
Bluetooth ®
device linked with the mobile
phone is switched off before you use the
telephone functions with the audio system.
Changes or modifications not expressly
approved by the party responsible for
compliance could void the user’s authority to
operate the equipment.
The head unit internal Bluetooth ®
transmitter
must not be co-located or operated in
conjunction with any other antenna or
transmitter.
This equipment complies with FCC/IC
radiation exposure limits set forth for
uncontrolled equipment and meets the FCC
radio frequency (RF) Exposure Guidelines in
Supplement C to OET65 and RSS-102 of the
IC radio frequency (RF) Exposure rules. This
equipment has very low levels of RF energy
that it is deemed to comply without testing of
specific absorption ratio (SAR).
Unless otherwise indicated, the descriptions
and illustrations in this section refer to the
audio system.
Caller ID
The audio system can display the telephone
number and the name of the caller, e.g. for an
incoming call and also in other menus or
displays.
For the telephone number to be displayed,
the caller must transmit their telephone
number. Otherwise Unknown will be shown on
the audio display.
This is also the case for name displays. For
this, the telephone number and the name of
the caller must also be saved in the telephone
book. Functional restrictions
You
will not be able to use the mobile phone,
or you may have to wait a while, in the
following situations:
R If the mobile phone is switched off.
R If the mobile phone is not connected via the
Bluetooth ®
interface to the audio system.
R If the mobile phone is locked.
R If the mobile phone has not yet acquired a
network signal.
The mobile phone automatically tries to log
into a network. If no network is available,
you will also not be able to make a “911”
emergency call. If you attempt to make an
outgoing call, the No Service message will
appear for a short while.
R If you switch off the audio system in the
middle of a call, e.g. by switching off the
ignition, that call will be cut off. You can
prevent this from happening as follows:
-Switch the mobile phone to “private
mode” before switching the audio
system off (see mobile phone operating
instructions).
Activating the mobile phone Prerequisites for the mobile phone
For making calls using the audio system via
the Bluetooth
®
interface, you will need a
Bluetooth ®
enabled mobile phone.
Your mobile phone must support the
Bluetooth ®
hands-free profile 1.0 or higher to
make or receive calls (see mobile phone
operating instructions).
i For further information on suitable mobile
phones and connecting Bluetooth ®
-
enabled mobile phones to the audio system
R visit www.mbusa-mobile.com
R call the Mercedes-Benz Customer
Assistance Center at 148
Audio system
Controls in detail
171_AKB; 3; 60, en-US
d2ureepe,
Version: 2.11.8.1 2009-05-11T16:00:23+02:00 - Seite 148
Page 187 of 312
X
Step 8: Locate the “training” button on the
garage door opener motor head unit.
i Exact
location and color of the button may
vary by garage door opener brand.
Depending on manufacturer, the “training”
button may also be referred to as “learn” or
“smart” button. If there is difficulty locating
the transmitting button, refer to the garage
door opener Operator’s Manual.
X Step 9: Press the “training” button on the
garage door opener motor head unit.
The “training light” is activated.
You have 30 seconds to initiate the
following two steps.
X Step 10: Return to the vehicle and firmly
press, hold for 2 seconds and release the
programmed
signal transmitter button (;,
= or ?).
X Step 11: Press, hold for 2 seconds and
release same signal transmitter button a
second time to complete the training
process.
i Some garage door openers (or other
rolling
code equipped devices) may require
you to press, hold for 2 seconds and
release the same signal transmitter button
a third time to complete the training
process.
X Step 12: Confirm the garage door
operation by pressing the programmed
signal transmitter button ( ;, = or ?).
X Step 13: To program the remaining two
signal
transmitter buttons, repeat the steps
above starting with step 3.
Gate operator/Canadian programming
Canadian radio-frequency laws require
transmitter signals to “time-out” (or quit)
after several seconds of transmission which
may not be long enough for the integrated
signal
transmitter to pick up the signal during
programming. Similar to this Canadian law,
some U.S. gate operators are designed to
“time-out” in the same manner. If you live in Canada or if you are having
difficulties programming a gate operator
(regardless of where you live) by using the
programming
procedures, replace step 4 with
the following:
X Step 4: Press and hold the signal
transmitter button ( ;, = or ?). Do not
release this button until it has been
successfully trained.
X While still holding down the signal
transmitter button ( ;, = or ?), “cycle”
your hand-held remote control button B
as follows: Press and hold button B for
2 seconds, then release it for 2 seconds,
and again press and hold it for 2 seconds.
Repeat this sequence on the hand-held
remote control until the frequency signal
has been learned.
Upon successful training, indicator
lamp : will flash slowly and then rapidly
after several seconds.
X Proceed with programming step 5 and
step 6 to complete.
i Upon completion of programming the
integrated remote control, make sure you
retain the hand-held remote control that
came with the garage door opener, gate
operator or other device. You may need it
for use in other vehicles, for future
programming of an integrated remote
control, or simply for continued use as a
hand-held remote control to operate the
respective device in other situations.
Reprogramming a single signal
transmitter button To program a device using a signal
transmitter button previously trained, follow
these steps: Useful features
185
Controls in detail
171_AKB; 3; 60, en-US
d2ureepe, Version: 2.11.8.1 2009-05-11T16:00:23+02:00 - Seite 185 Z
Page 188 of 312
X
Switch on the ignition.
X Press and hold the desired signal
transmitter button ( ;, = or ?). Do not
release the button.
Indicator lamp : will begin to flash after
20 seconds.
X Without releasing the signal transmitter
button,
proceed with programming starting
with step 3.
Operation of integrated remote control X
Switch on the ignition.
X Select and press the appropriate
integrated signal transmitter button ( ;,
=
or ?) to activate the remote controlled
device.
The integrated remote control transmitter
continues to send the signal as long as the
button is pressed – up to 20 seconds.
Erasing the integrated remote control
memory i
If
you sell your vehicle, erase the codes of
all three channels.
X Switch on the ignition.
X Simultaneously press and hold outer signal
transmitter buttons ; and ?, for
approximately 20 seconds, until indicator
lamp : flashes rapidly. Do not hold for
longer than 30 seconds.
The
codes of all three channels are erased.
Programming tips If you are having difficulty programming the
integrated remote control, here are some
helpful tips:
R
Check the frequency of hand-held remote
control A
(typically located on the reverse
side of the remote). The integrated remote control is compatible with radio-frequency
devices operating between 280-390 MHz
.
R Put a new battery in hand-held remote
control A. This will increase the likelihood
of the hand-held remote control sending a
stronger and more accurate signal to the
integrated remote control.
R While performing step 3, hold hand-held
remote control A at different lengths and
angles from the signal transmitter button
(;, = or ?) you are programming.
Attempt varying angles at the distance of 2
to 12 inches (5 to 30 cm) away or the same
angle at varying distances.
R If another hand-held remote control is
available for the same device, try the
programming steps again using that other
hand-held remote control. Make sure new
batteries are in the hand-held remote
control before beginning the procedure.
R Straighten the antenna wire from the
garage door opener assembly. This may
help improve transmitting and/or receiving
signals.
i Certain types of garage door openers are
incompatible with the integrated remote
control. If you should experience further
difficulties with programming the
integrated remote control, contact an
authorized Mercedes-Benz Center, or call
the Mercedes-Benz Customer Assistance
Center (USA only) at
1-800-FOR-MERCedes, or the HomeLink ®
Hotline (USA only) at 1-800-355-3515, or
the Customer Service (Canada only) at
1-800-387-0100. 186
Useful features
Controls in detail
171_AKB; 3; 60, en-US
d2ureepe,
Version: 2.11.8.1 2009-05-11T16:00:23+02:00 - Seite 186