2010 MERCEDES-BENZ SLK350 key
[x] Cancel search: keyPage 248 of 312
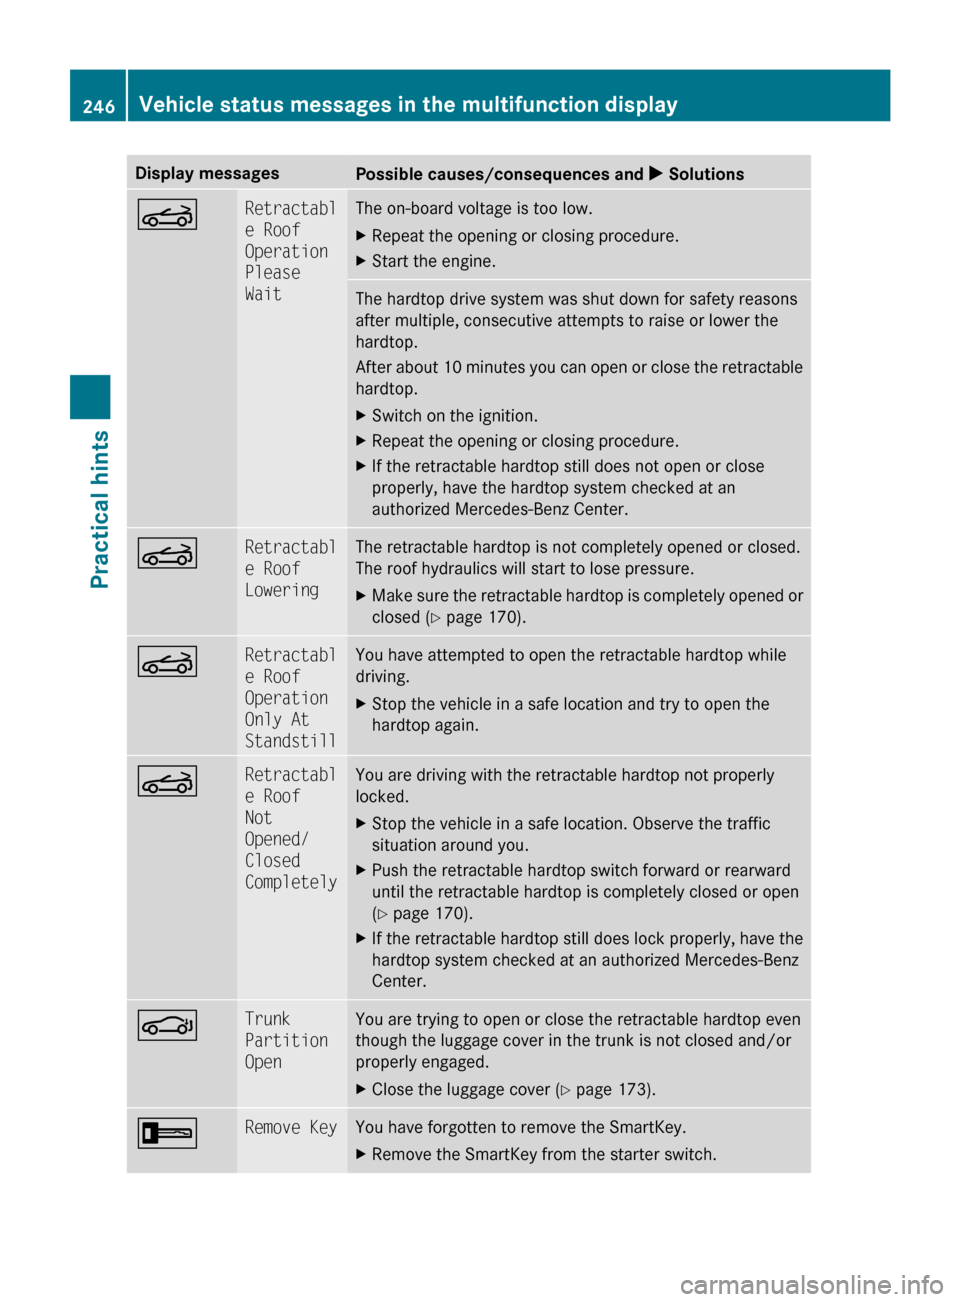
Display messages
Possible causes/consequences and
X SolutionsK Retractabl
e Roof
Operation
Please
Wait The on-board voltage is too low.
X
Repeat the opening or closing procedure.
X Start the engine. The hardtop drive system was shut down for safety reasons
after multiple, consecutive attempts to raise or lower the
hardtop.
After
about 10 minutes you can open or close the retractable
hardtop.
X Switch on the ignition.
X Repeat the opening or closing procedure.
X If the retractable hardtop still does not open or close
properly, have the hardtop system checked at an
authorized Mercedes-Benz Center. K Retractabl
e Roof
Lowering The retractable hardtop is not completely opened or closed.
The roof hydraulics will start to lose pressure.
X
Make sure the retractable hardtop is completely opened or
closed ( Y page 170). K Retractabl
e Roof
Operation
Only At
Standstill You have attempted to open the retractable hardtop while
driving.
X
Stop the vehicle in a safe location and try to open the
hardtop again. K Retractabl
e Roof
Not
Opened/
Closed
Completely You are driving with the retractable hardtop not properly
locked.
X
Stop the vehicle in a safe location. Observe the traffic
situation around you.
X Push the retractable hardtop switch forward or rearward
until the retractable hardtop is completely closed or open
(Y page 170).
X If the retractable hardtop still does lock properly, have the
hardtop system checked at an authorized Mercedes-Benz
Center. J Trunk
Partition
Open You are trying to open or close the retractable hardtop even
though the luggage cover in the trunk is not closed and/or
properly engaged.
X
Close the luggage cover ( Y page 173).+ Remove Key You have forgotten to remove the SmartKey.
X
Remove the SmartKey from the starter switch. 246
Vehicle status messages in the multifunction display
Practical hints
171_AKB; 3; 60, en-US
d2ureepe,
Version: 2.11.8.1 2009-05-11T16:00:23+02:00 - Seite 246
Page 249 of 312

Display messages
Possible causes/consequences and
X Solutions+ Please
get a new
key. The SmartKey is malfunctioning.
X
Contact an authorized Mercedes-Benz Center. ~ Bluetooth
Ready The telephone has not yet been connected to the audio
system or COMAND system via Bluetooth
®
.
X Connect the telephone to the audio system or COMAND
system via Bluetooth ®
. ¥ Top Up
Washer
Fluid The washer fluid in the washer fluid reservoir has fallen below
the minimum level.
X
Add washer fluid ( Y page 196). Engine
Display messages
Possible causes/consequences and
X Solutions=
(USA only)
;
(Canada
only) Engine
Service There may be a malfunction in
R
the fuel management system
R the ignition system
R the exhaust system
R the fuel system
X Have the engine checkedas soon as possible at an
authorized Mercedes-Benz Center. ; Display
Malfunctio
n
Drive To
Workshop Certain electronic systems are unable to relay information to
the control system. The coolant temperature display or the
tachometer may have failed.
X
Have the electronic systems checked at an authorized
Mercedes-Benz Center. + Top Up
Coolant
See
Operator’s
Manual The coolant level is too low.
X
Add coolant (Y page 196).
X If you have to add coolant frequently, have the cooling
system checked at an authorized Mercedes-Benz Center. G
Warning!
Do not spill antifreeze on hot engine parts. Antifreeze contains ethylene glycol which may burn
if it comes into contact with hot engine parts. You could be seriously burned. Vehicle status messages in the multifunction display
247Practical hints
171_AKB; 3; 60, en-US
d2ureepe,Version: 2.11.8.1 2009-05-11T16:00:23+02:00 - Seite 247 Z
Page 256 of 312
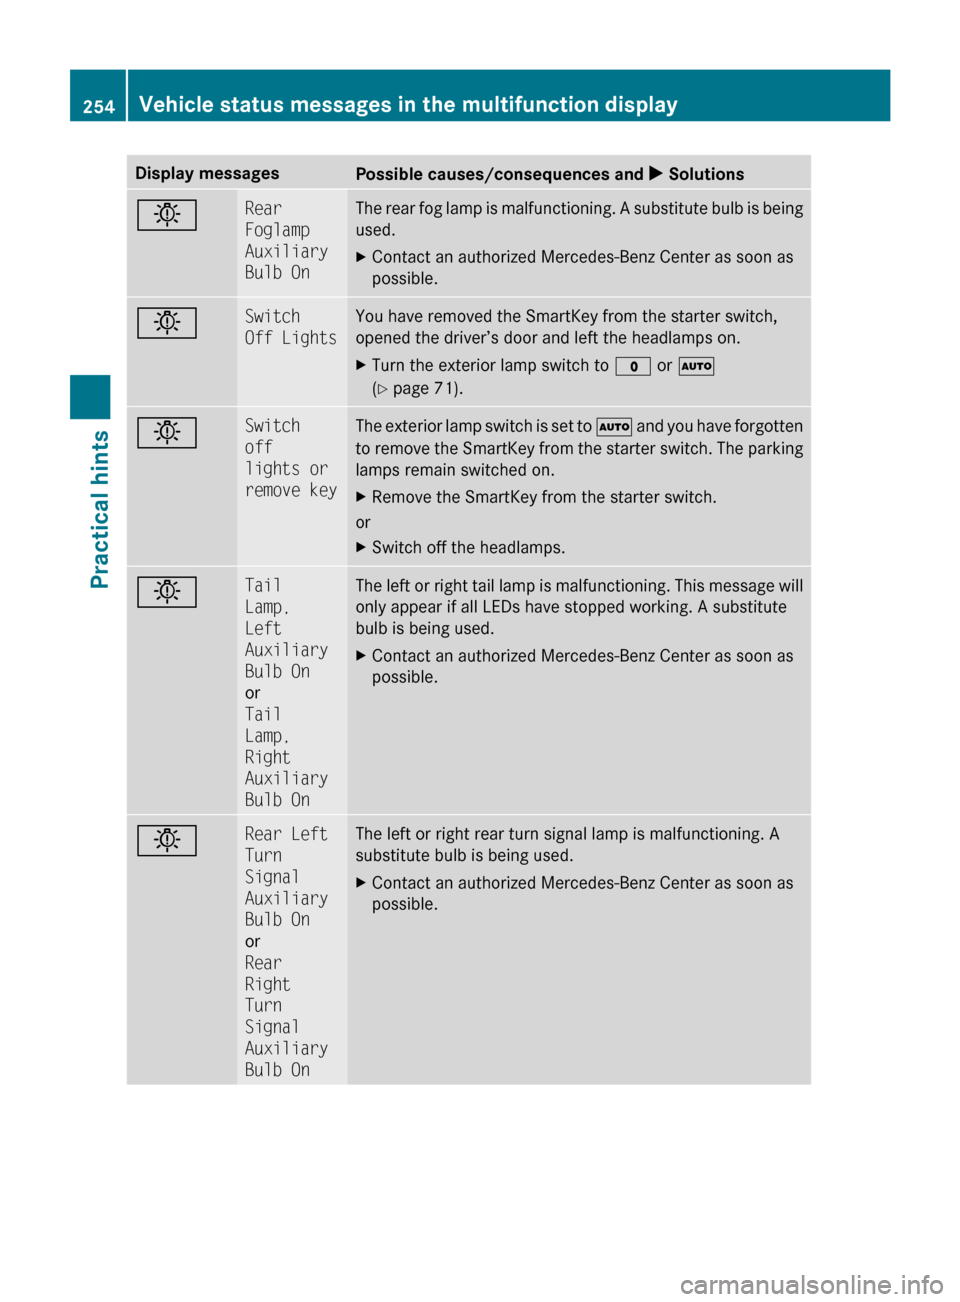
Display messages
Possible causes/consequences and
X Solutionsb Rear
Foglamp
Auxiliary
Bulb On The rear fog lamp is malfunctioning. A substitute bulb is being
used.
X
Contact an authorized Mercedes-Benz Center as soon as
possible. b Switch
Off Lights You have removed the SmartKey from the starter switch,
opened the driver’s door and left the headlamps on.
X
Turn the exterior lamp switch to $ or Ã
(Y page 71). b Switch
off
lights or
remove key The exterior lamp switch is set to
à and you have forgotten
to remove the SmartKey from the starter switch. The parking
lamps remain switched on.
X Remove the SmartKey from the starter switch.
or
X Switch off the headlamps. b Tail
Lamp,
Left
Auxiliary
Bulb On
or
Tail
Lamp,
Right
Auxiliary
Bulb On The left or right tail lamp is malfunctioning. This message will
only appear if all LEDs have stopped working. A substitute
bulb is being used.
X
Contact an authorized Mercedes-Benz Center as soon as
possible. b Rear Left
Turn
Signal
Auxiliary
Bulb On
or
Rear
Right
Turn
Signal
Auxiliary
Bulb On The left or right rear turn signal lamp is malfunctioning. A
substitute bulb is being used.
X
Contact an authorized Mercedes-Benz Center as soon as
possible. 254
Vehicle status messages in the multifunction display
Practical hints
171_AKB; 3; 60, en-US
d2ureepe,
Version: 2.11.8.1 2009-05-11T16:00:23+02:00 - Seite 254
Page 266 of 312
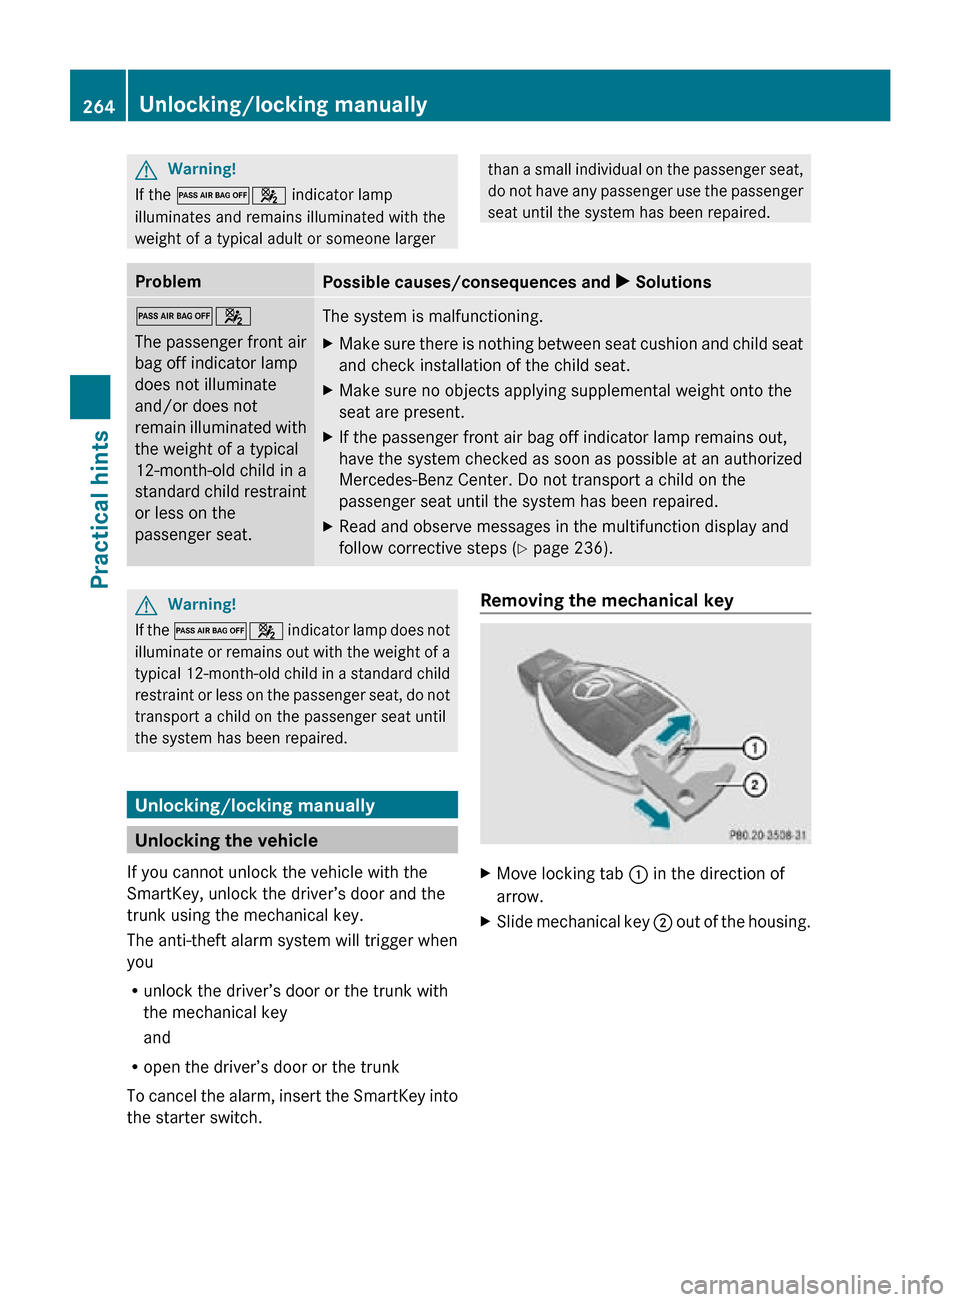
G
Warning!
If the 04 indicator lamp
illuminates and remains illuminated with the
weight of a typical adult or someone larger than a small individual on the passenger seat,
do not have any passenger use the passenger
seat until the system has been repaired.
Problem
Possible causes/consequences and
X Solutions04
The passenger front air
bag off indicator lamp
does not illuminate
and/or does not
remain illuminated with
the weight of a typical
12-month-old child in a
standard child restraint
or less on the
passenger seat.
The system is malfunctioning.
X
Make sure there is nothing between seat cushion and child seat
and check installation of the child seat.
X Make sure no objects applying supplemental weight onto the
seat are present.
X If the passenger front air bag off indicator lamp remains out,
have the system checked as soon as possible at an authorized
Mercedes-Benz Center. Do not transport a child on the
passenger seat until the system has been repaired.
X Read and observe messages in the multifunction display and
follow corrective steps (Y page 236). G
Warning!
If the 04 indicator lamp does not
illuminate or remains out with the weight of a
typical 12-month-old child in a standard child
restraint or less on the passenger seat, do not
transport a child on the passenger seat until
the system has been repaired. Unlocking/locking manually
Unlocking the vehicle
If you cannot unlock the vehicle with the
SmartKey, unlock the driver’s door and the
trunk using the mechanical key.
The anti-theft alarm system will trigger when
you
R unlock the driver’s door or the trunk with
the mechanical key
and
R open the driver’s door or the trunk
To cancel the alarm, insert the SmartKey into
the starter switch. Removing the mechanical key
X
Move locking tab : in the direction of
arrow.
X Slide mechanical key ; out of the housing.264
Unlocking/locking manuallyPractical hints
171_AKB; 3; 60, en-US
d2ureepe,
Version: 2.11.8.1 2009-05-11T16:00:23+02:00 - Seite 264
Page 267 of 312
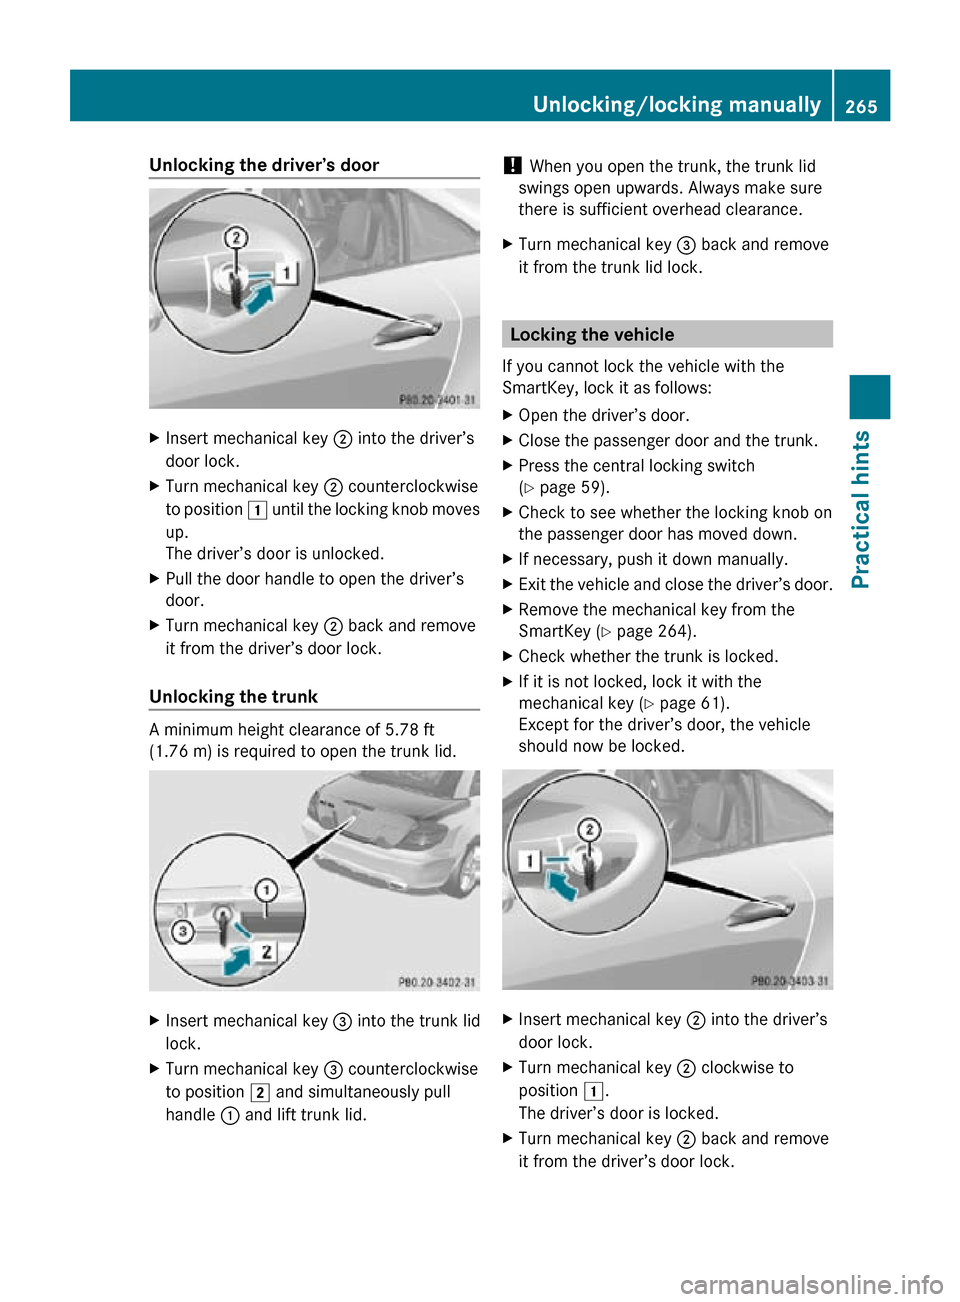
Unlocking the driver’s door
X
Insert mechanical key ; into the driver’s
door lock.
X Turn mechanical key ; counterclockwise
to position 1 until the locking knob moves
up.
The driver’s door is unlocked.
X Pull the door handle to open the driver’s
door.
X Turn mechanical key ; back and remove
it from the driver’s door lock.
Unlocking the trunk A minimum height clearance of 5.78 ft
(1.76 m) is required to open the trunk lid.
X
Insert mechanical key = into the trunk lid
lock.
X Turn mechanical key = counterclockwise
to position 2 and simultaneously pull
handle : and lift trunk lid. !
When you open the trunk, the trunk lid
swings open upwards. Always make sure
there is sufficient overhead clearance.
X Turn mechanical key = back and remove
it from the trunk lid lock. Locking the vehicle
If you cannot lock the vehicle with the
SmartKey, lock it as follows:
X Open the driver’s door.
X Close the passenger door and the trunk.
X Press the central locking switch
(Y page 59).
X Check to see whether the locking knob on
the passenger door has moved down.
X If necessary, push it down manually.
X Exit the vehicle and close the driver’s door.
X Remove the mechanical key from the
SmartKey (Y page 264).
X Check whether the trunk is locked.
X If it is not locked, lock it with the
mechanical key ( Y page 61).
Except for the driver’s door, the vehicle
should now be locked. X
Insert mechanical key ; into the driver’s
door lock.
X Turn mechanical key ; clockwise to
position 1.
The driver’s door is locked.
X Turn mechanical key ; back and remove
it from the driver’s door lock. Unlocking/locking manually
265Practical hints
171_AKB; 3; 60, en-US
d2ureepe, Version: 2.11.8.1 2009-05-11T16:00:23+02:00 - Seite 265 Z
Page 268 of 312
i
This procedure does not arm the anti-
theft alarm system, nor does it lock the fuel
filler flap and the storage compartments. Manually unlocking the gear selector
lever
If the vehicle’s electrical system is
malfunctioning, the gear selector lever could
remain locked in park position P. In this case
the gear selector lever can be unlocked
manually, e.g. to tow the vehicle.
X Engage the parking brake. !
Do not use sharp objects to loosen the
gear selector lever cover in the center
console, as this could damage the gear
selector lever cover or the center console.
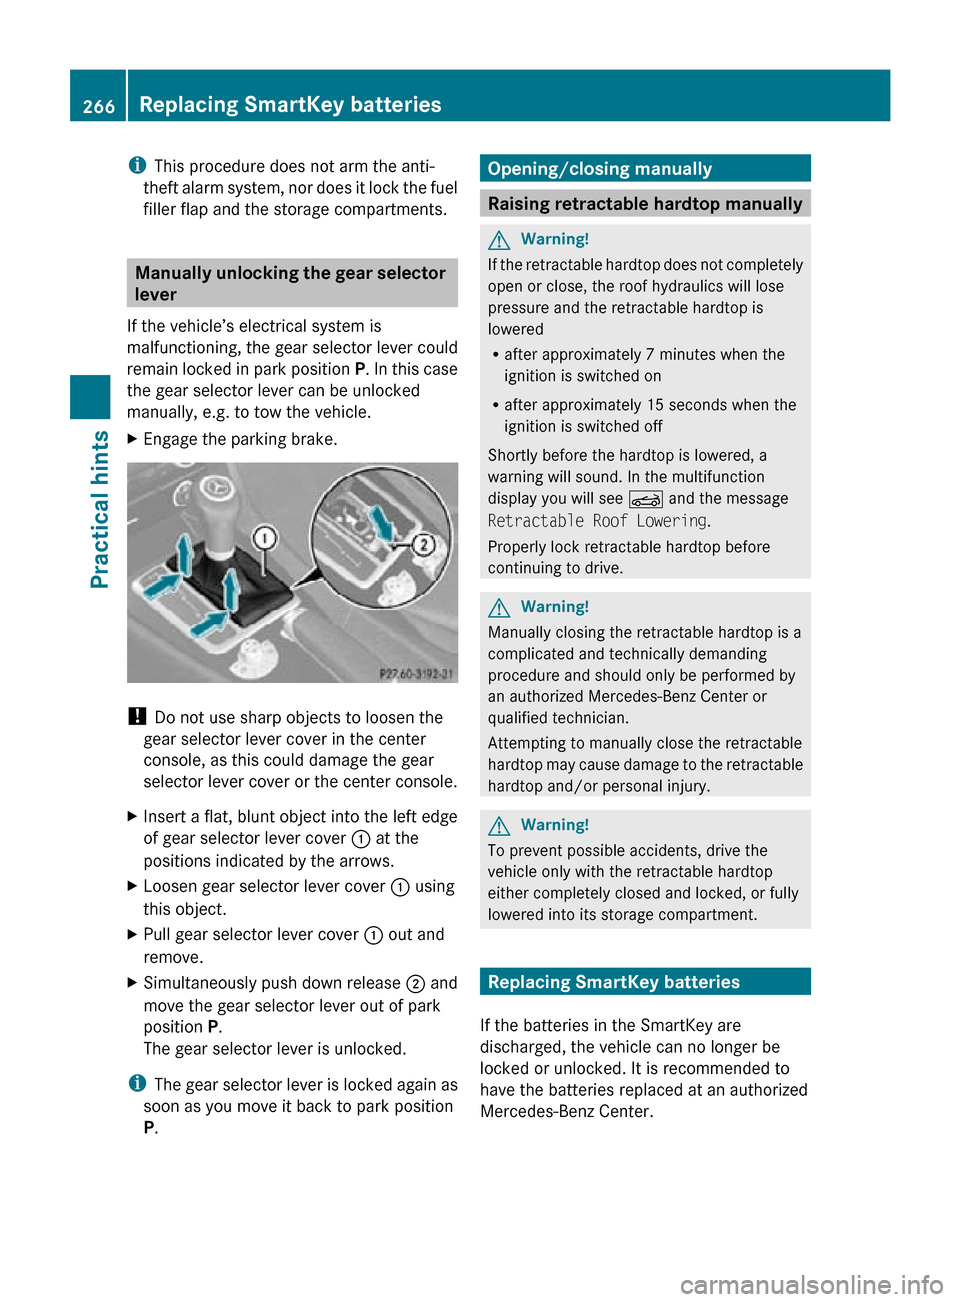
X Insert a flat, blunt object into the left edge
of gear selector lever cover : at the
positions indicated by the arrows.
X Loosen gear selector lever cover : using
this object.
X Pull gear selector lever cover : out and
remove.
X Simultaneously push down release ; and
move the gear selector lever out of park
position P.
The gear selector lever is unlocked.
i The gear selector lever is locked again as
soon as you move it back to park position
P. Opening/closing manually
Raising retractable hardtop manually
G
Warning!
If the retractable hardtop does not completely
open or close, the roof hydraulics will lose
pressure and the retractable hardtop is
lowered
R after approximately 7 minutes when the
ignition is switched on
R after approximately 15 seconds when the
ignition is switched off
Shortly before the hardtop is lowered, a
warning will sound. In the multifunction
display you will see K and the message
Retractable Roof Lowering.
Properly lock retractable hardtop before
continuing to drive. G
Warning!
Manually closing the retractable hardtop is a
complicated and technically demanding
procedure and should only be performed by
an authorized Mercedes-Benz Center or
qualified technician.
Attempting to manually close the retractable
hardtop may cause damage to the retractable
hardtop and/or personal injury. G
Warning!
To prevent possible accidents, drive the
vehicle only with the retractable hardtop
either completely closed and locked, or fully
lowered into its storage compartment. Replacing SmartKey batteries
If the batteries in the SmartKey are
discharged, the vehicle can no longer be
locked or unlocked. It is recommended to
have the batteries replaced at an authorized
Mercedes-Benz Center. 266
Replacing SmartKey batteriesPractical hints
171_AKB; 3; 60, en-US
d2ureepe,
Version: 2.11.8.1 2009-05-11T16:00:23+02:00 - Seite 266
Page 269 of 312

G
Warning!
Batteries contain poisonous and corrosive
substances. Therefore, keep the batteries out
of reach of children.
If a battery is swallowed, seek medical help
immediately. G
Warning!
SmartKey batteries contain perchlorate
material, which may require special handling
and regard for the environment. Check with
your local government’s disposal guidelines.
California residents, see www.dtsc.ca.gov/
HazardousWaste/Perchlorate/
index.cfm.
Batteries contain materials that can harm the
environment if disposed of improperly.
Recycling of batteries is the preferred method
of disposal. Many states (USA only) or
provinces (Canada only) require sellers of
batteries to accept old batteries for recycling.
When inserting the batteries, make sure they
are clean and free of lint.
When replacing batteries, always replace
both batteries.
i The required replacement batteries are
available at any authorized Mercedes-Benz
Center.
Replacement batteries: Lithium, type
CR 2025 or equivalent.
X Remove the mechanical key from the
SmartKey (Y page 264). X
Press mechanical key ; into the SmartKey
opening until battery compartment
cover : opens. Do not keep the cover
shut. X
Remove the battery compartment cover.
X Pat the SmartKey against the palm of your
hand until battery = falls out.
X Insert the new battery with the positive
terminal (+) facing up. Use a lint-free cloth.
X Insert the tabs of the battery compartment
cover into the housing and press the cover
closed.
X Check the operation of the SmartKey. Replacing bulbs
Safety notes
Safe vehicle operation depends on proper
exterior lighting and signaling to a large
degree.
Correct headlamp adjustment is extremely
important. Have headlamps checked and
readjusted at regular intervals and when a
bulb has been replaced. Contact an
authorized Mercedes-Benz Center for
headlamp adjustment. G
Warning!
Bulbs and bulb sockets can be very hot. Allow
the lamp to cool down before changing a bulb.
Keep bulbs out of reach of children. Replacing bulbs
267Practical hints
171_AKB; 3; 60, en-US
d2ureepe, Version: 2.11.8.1 2009-05-11T16:00:23+02:00 - Seite 267 Z
Page 273 of 312
X
Gently press the new bulb into bulb socket
=.
X Place bulb socket = back into the housing
and turn it clockwise until it engages.
Front turn signal lamp bulb X
Turn bulb socket ; with the bulb
counterclockwise and remove it.
X Gently press onto the bulb and turn it
counterclockwise out of bulb socket ;.
X Gently press the new bulb into bulb
socket ; and turn it clockwise until it
engages.
X Place bulb socket ; back into the housing
and turn it clockwise until it engages.
Parking and standing lamp bulb X
Turn bulb socket ? with the bulb
counterclockwise and remove it.
X Pull the bulb out of bulb socket ?.
X Gently press the new bulb into bulb
socket ?.
X Place bulb socket ? back into the housing
and turn it clockwise until it engages. Replacing bulbs for rear lamps
Tail lamp unit Since replacing bulbs in the tail lamp unit is a
technically highly demanding process, we
recommend to have them replaced at an
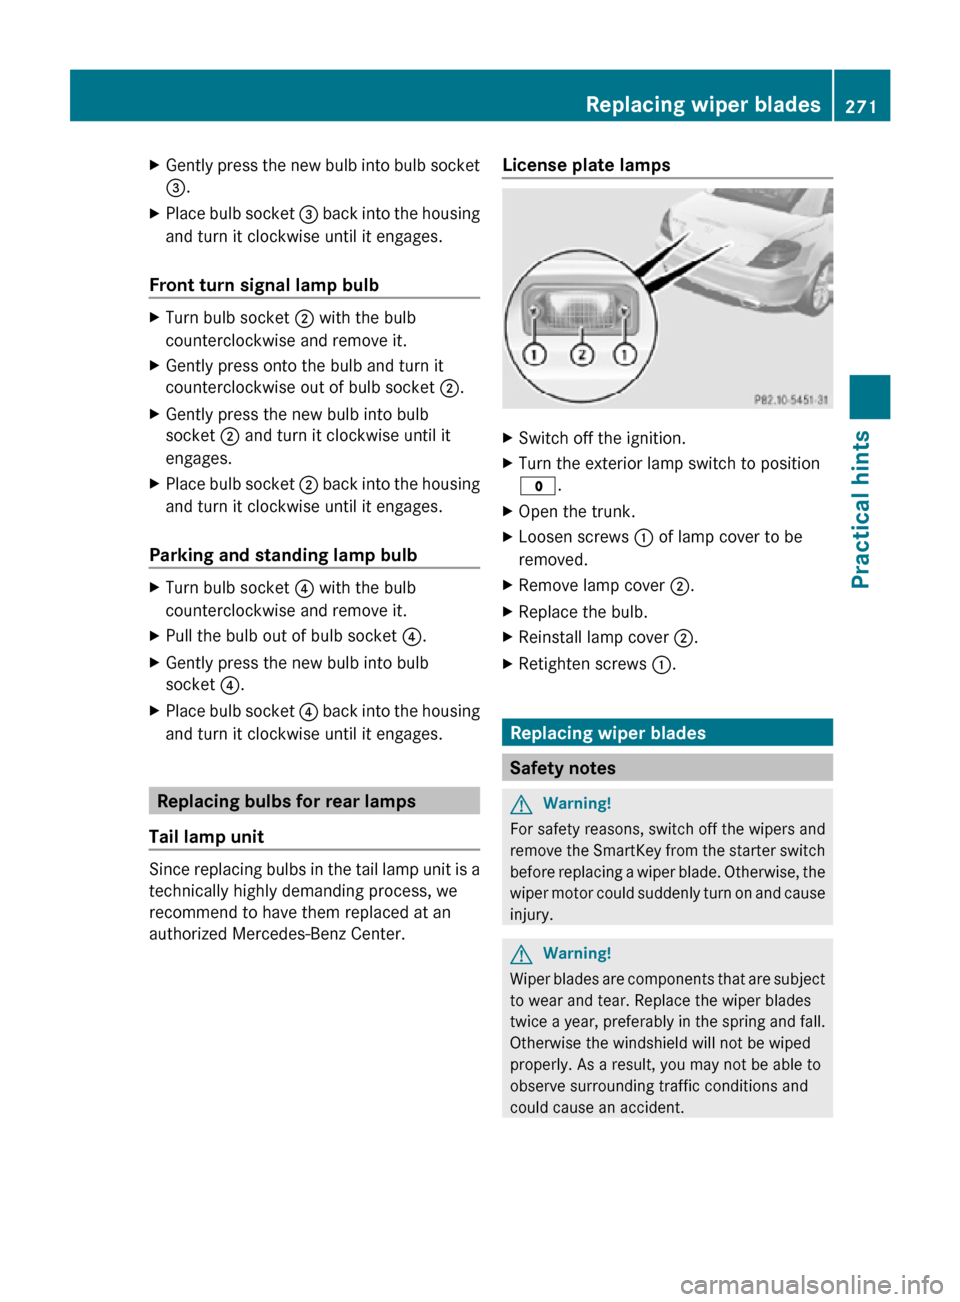
authorized Mercedes-Benz Center. License plate lamps X
Switch off the ignition.
X Turn the exterior lamp switch to position
$.
X Open the trunk.
X Loosen screws : of lamp cover to be
removed.
X Remove lamp cover ;.
X Replace the bulb.
X Reinstall lamp cover ;.
X Retighten screws :. Replacing wiper blades
Safety notes
G
Warning!
For safety reasons, switch off the wipers and
remove the SmartKey from the starter switch
before replacing a wiper blade. Otherwise, the
wiper motor could suddenly turn on and cause
injury. G
Warning!
Wiper blades are components that are subject
to wear and tear. Replace the wiper blades
twice a year, preferably in the spring and fall.
Otherwise the windshield will not be wiped
properly. As a result, you may not be able to
observe surrounding traffic conditions and
could cause an accident. Replacing wiper blades
271Practical hints
171_AKB; 3; 60, en-US
d2ureepe, Version: 2.11.8.1 2009-05-11T16:00:23+02:00 - Seite 271 Z