2010 MERCEDES-BENZ SLK300 lamps
[x] Cancel search: lampsPage 271 of 312
Bulbs
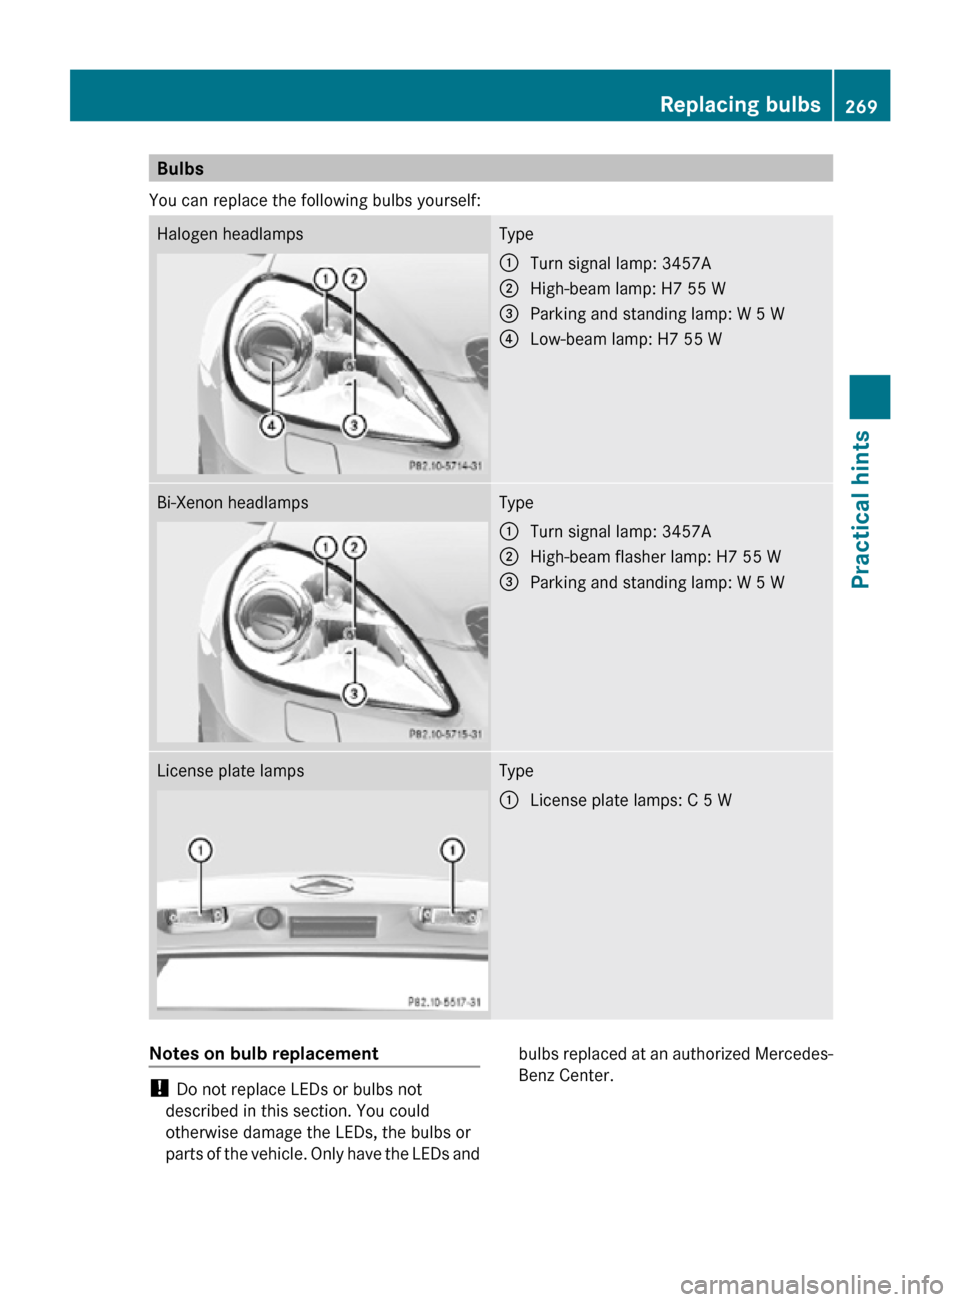
You can replace the following bulbs yourself: Halogen headlamps Type
:
Turn signal lamp: 3457A
; High-beam lamp: H7 55 W
= Parking and standing lamp: W 5 W
? Low-beam lamp: H7 55 W Bi-Xenon headlamps Type
:
Turn signal lamp: 3457A
; High-beam flasher lamp: H7 55 W
= Parking and standing lamp: W 5 W License plate lamps Type
:
License plate lamps: C 5 W Notes on bulb replacement
!
Do not replace LEDs or bulbs not
described in this section. You could
otherwise damage the LEDs, the bulbs or
parts of the vehicle. Only have the LEDs and bulbs replaced at an authorized Mercedes-
Benz Center. Replacing bulbs
269Practical hints
171_AKB; 3; 60, en-US
d2ureepe, Version: 2.11.8.1 2009-05-11T16:00:23+02:00 - Seite 269 Z
Page 272 of 312

G
Observe Safety notes, see page 267.
R Only use 12-volt bulbs of the same type and
with the specified watt rating.
R Switch the lights off before changing a bulb
to prevent short circuits.
R Always use a clean lint-free cloth when
handling bulbs.
R Your hands should be dry and free of oil and
grease.
R If the newly installed bulb does not come
on, contact an authorized Mercedes-Benz
Center.
i Mercedes-Benz recommends using
Longlife (LL) bulbs. Replacing bulbs for front lamps
Before you start to replace a bulb for a front
lamp, do the following:
X Switch off the ignition.
X Turn the exterior lamp switch to position
$.
X Open the hood (Y page 192). :
Housing cover for low beam (halogen
headlamps only)
Housing cover for Bi-Xenon headlamps.
Do not remove!
; Bulb socket for turn signal lamp
= Bulb socket for high beam/high-beam
flasher lamp
? Bulb socket for parking and standing lamp G
Warning!
Do not remove the cover for the Bi-Xenon
headlamp. Because of high voltage in Xenon
lamps, it is dangerous to replace the bulb or
repair the lamp and its components. It is
recommended to have such work done by a
qualified technician.
Low-beam bulb (halogen headlamps
only) A
Bulb socket for low-beam headlamp
X Turn housing cover : counterclockwise
and remove it.
X Turn bulb socket A with the bulb
counterclockwise and remove it.
X Pull the bulb out of bulb socket A.
X Gently press the new bulb into bulb socket
A.
X Place bulb socket A back into the housing
and turn it clockwise.
X Align housing cover : and turn it
clockwise until it engages.
High-beam and high-beam flasher bulb
(halogen headlamps only)/high-beam
flasher bulb (Bi-Xenon headlamps only) X
Turn bulb socket = with the bulb
counterclockwise and remove it.
X Pull the bulb out of bulb socket =.270
Replacing bulbsPractical hints
171_AKB; 3; 60, en-US
d2ureepe,
Version: 2.11.8.1 2009-05-11T16:00:23+02:00 - Seite 270
Page 273 of 312
X
Gently press the new bulb into bulb socket
=.
X Place bulb socket = back into the housing
and turn it clockwise until it engages.
Front turn signal lamp bulb X
Turn bulb socket ; with the bulb
counterclockwise and remove it.
X Gently press onto the bulb and turn it
counterclockwise out of bulb socket ;.
X Gently press the new bulb into bulb
socket ; and turn it clockwise until it
engages.
X Place bulb socket ; back into the housing
and turn it clockwise until it engages.
Parking and standing lamp bulb X
Turn bulb socket ? with the bulb
counterclockwise and remove it.
X Pull the bulb out of bulb socket ?.
X Gently press the new bulb into bulb
socket ?.
X Place bulb socket ? back into the housing
and turn it clockwise until it engages. Replacing bulbs for rear lamps
Tail lamp unit Since replacing bulbs in the tail lamp unit is a
technically highly demanding process, we
recommend to have them replaced at an
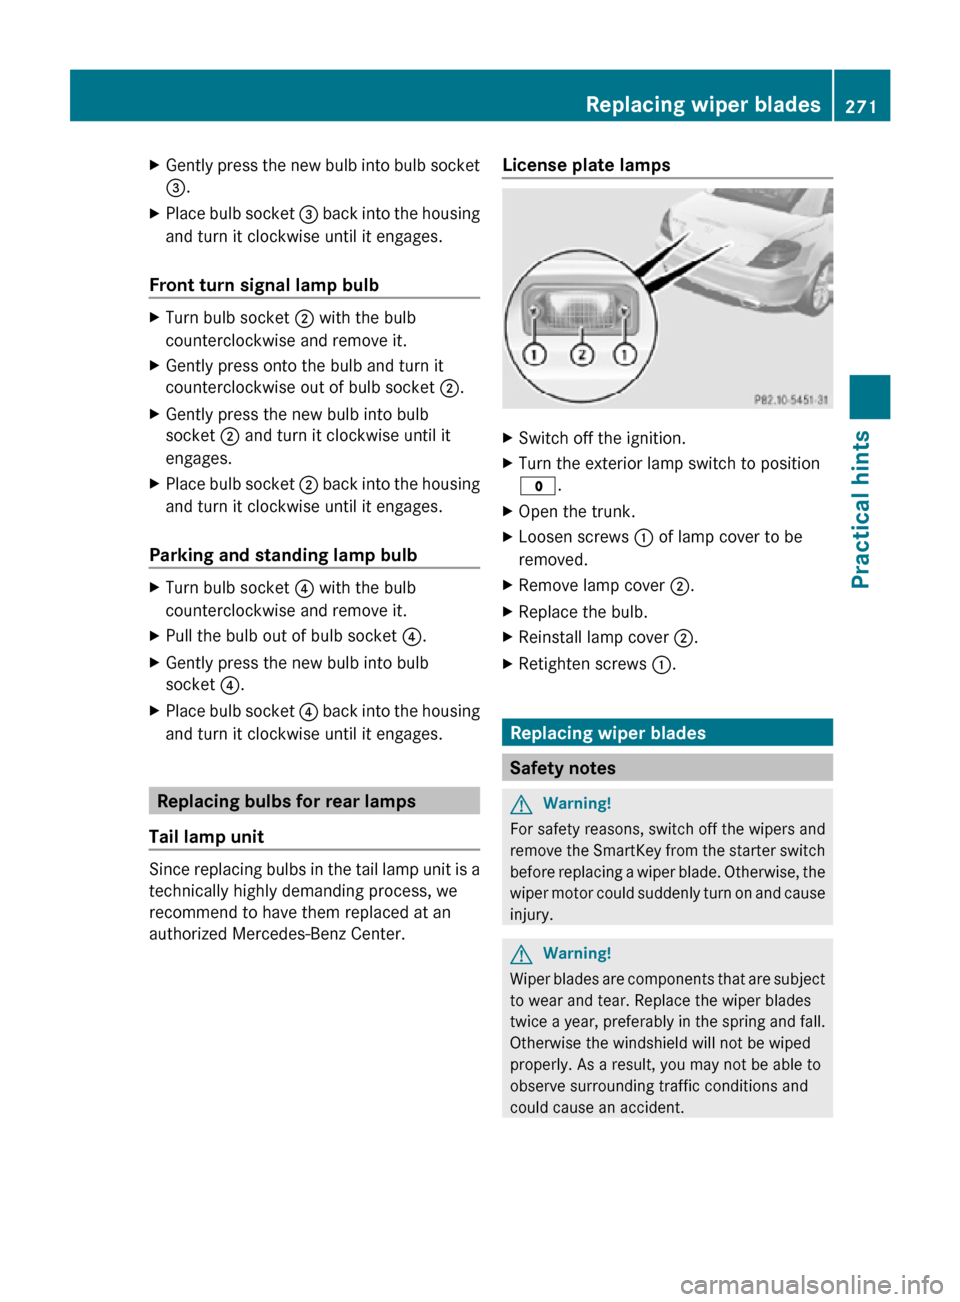
authorized Mercedes-Benz Center. License plate lamps X
Switch off the ignition.
X Turn the exterior lamp switch to position
$.
X Open the trunk.
X Loosen screws : of lamp cover to be
removed.
X Remove lamp cover ;.
X Replace the bulb.
X Reinstall lamp cover ;.
X Retighten screws :. Replacing wiper blades
Safety notes
G
Warning!
For safety reasons, switch off the wipers and
remove the SmartKey from the starter switch
before replacing a wiper blade. Otherwise, the
wiper motor could suddenly turn on and cause
injury. G
Warning!
Wiper blades are components that are subject
to wear and tear. Replace the wiper blades
twice a year, preferably in the spring and fall.
Otherwise the windshield will not be wiped
properly. As a result, you may not be able to
observe surrounding traffic conditions and
could cause an accident. Replacing wiper blades
271Practical hints
171_AKB; 3; 60, en-US
d2ureepe, Version: 2.11.8.1 2009-05-11T16:00:23+02:00 - Seite 271 Z
Page 285 of 312
G
Warning!
Do not place metal objects on the battery as
this could result in a short circuit.
Use
leak-proof batteries only to avoid the risk
of acid burns in the event of an accident.
Take care that you do not become statically
charged, e.g. by wearing synthetic clothing or
rubbing against textiles. For this reason, you
also should not pull or push the battery over
carpets or other synthetic materials.
Never touch the battery first. First touch the
outside body of the vehicle in order to release
any possible electrostatic charges.
Do not rub the battery with rags or cloths. The
battery could explode if touched due to
electrostatic charge or due to spark
formation.
! As any other battery, the battery may
discharge if you do not operate the vehicle
for an extended period of time. Have the
battery disconnected at a qualified
workshop or an authorized Mercedes-Benz
Center in such a case. You may also
connect an accessory battery charge unit
expressly approved by Mercedes-Benz for
your vehicle model to maintain the battery
charge. Contact an authorized Mercedes-
Benz Center for further information.
The battery, the battery ventilation hose
and the lateral plug must always be
securely installed when the vehicle is in
operation.
! Never loosen or detach battery terminal
clamps while the engine is running or the
SmartKey is in the starter switch.
Otherwise the alternator and other
electronic components could be severely
damaged.
Have the battery checked regularly at an
authorized Mercedes-Benz Center.
Refer to Maintenance Booklet for
maintenance intervals or contact an
authorized Mercedes-Benz Center for
further information. i
After battery power was interrupted, do
the following:
R Set the clock
(Y page 105).
R Synchronize the power windows
(Y page 79). Charging the battery
G
Warning!
Never charge a battery while still installed in
the vehicle unless the accessory battery
charge unit approved by Mercedes-Benz is
being used. Gases may escape during
charging and could cause an explosion that
may
result in personal injury, paint damage or
corrosion.
An accessory battery charge unit specially
adapted for Mercedes-Benz vehicles and
tested and approved by Mercedes-Benz is
available. It permits the charging of the
battery in its installed position. Contact an
authorized Mercedes-Benz Center for
information and availability.
Charge battery in accordance with the
separate instructions for the accessory
battery charger.
Have the battery charged at an authorized
Mercedes-Benz Center. If you charge the
battery yourself, follow the operating
instructions for your charging device.
Only use a battery charge unit with a
maximum charging voltage of 14.8 V.
X Charge battery in accordance with the
instructions of the battery charger
manufacturer. Jump starting
G
Warning!
Failure to follow these directions will cause
damage to the electronic components, and Jump starting
283
Practical hints
171_AKB; 3; 60, en-US
d2ureepe, Version: 2.11.8.1 2009-05-11T16:00:23+02:00 - Seite 283 Z
Page 286 of 312
can lead to a battery explosion and severe
injury or death.
Never
lean over batteries while connecting or
jump starting. You might get injured.
Battery fluid contains sulfuric acid. Do not
allow this fluid to come in contact with eyes,
skin or clothing. In case it does, immediately
flush affected area with water, and seek
medical help if necessary.
A battery will also produce hydrogen gas,
which is flammable and explosive. Keep
flames or sparks away from battery, avoid
improper connection of jumper cables,
smoking, etc.
Attempting to jump start a frozen battery can
result in it exploding, causing personal injury.
Read all instructions before proceeding.
! Vehicles with automatic transmission:
Do not tow-start the vehicle. You could
otherwise seriously damage the automatic
transmission which is not covered by the
Mercedes-Benz Limited Warranty.
! Jump starting should only be performed
using the jump-start terminals located in
the engine compartment.
Avoid repeated and lengthy starting
attempts.
Do not attempt to start the engine using a
battery quick-charge unit.
If the engine does not run after several
unsuccessful starting attempts, have it
checked at the nearest authorized
Mercedes-Benz Center.
Excessive unburned fuel generated by
repeated failed starting attempts may
damage the catalytic converter and may
present a fire risk.
Make sure the jumper cables do not have
loose or missing insulation.
Make sure the cable clamps do not touch
any other metal part while the other end is
still attached to a battery. If the battery is discharged, the engine can be
started with jumper cables and the fully
charged battery of another vehicle or an
equivalent starter pack. Observe the
following:
R
Access
to the battery is not possible on all
vehicles. If you cannot access the battery
of the other vehicle, provide jump start
power by an external battery or starter
pack.
R Jump starting should only be performed
when the engine and catalytic converter
are cold.
R Do not jump start the engine or charge the
battery if the battery is frozen. Let the
battery thaw out first.
R Only jump start from batteries with the
same voltage rating (12 V). Jump starting
with a more powerful battery could damage
the vehicle’s electrical system. Such
damage will not be covered by the
Mercedes-Benz Limited Warranty.
R Only use jumper cables with sufficient
cross-section and insulated terminal
clamps.
R Always make sure the jumper cables are
not on or near pulleys, fans or other parts
that move when an engine is started or
running.
R Should the battery be drained completely,
let the donating power source charge the
vehicle for several minutes before
reattempting the starting process.
The jump-start contacts are located in the
engine compartment on the passenger side.
X Make sure the two vehicles do not touch.
X Switch off all electrical consumers.
X Engage the parking brake.
X Make sure the automatic transmission is in
park position P (manual transmission to
Neutral).
X Open the hood (Y page 192). 284
Jump starting
Practical hints
171_AKB; 3; 60, en-US
d2ureepe,
Version: 2.11.8.1 2009-05-11T16:00:23+02:00 - Seite 284
Page 287 of 312
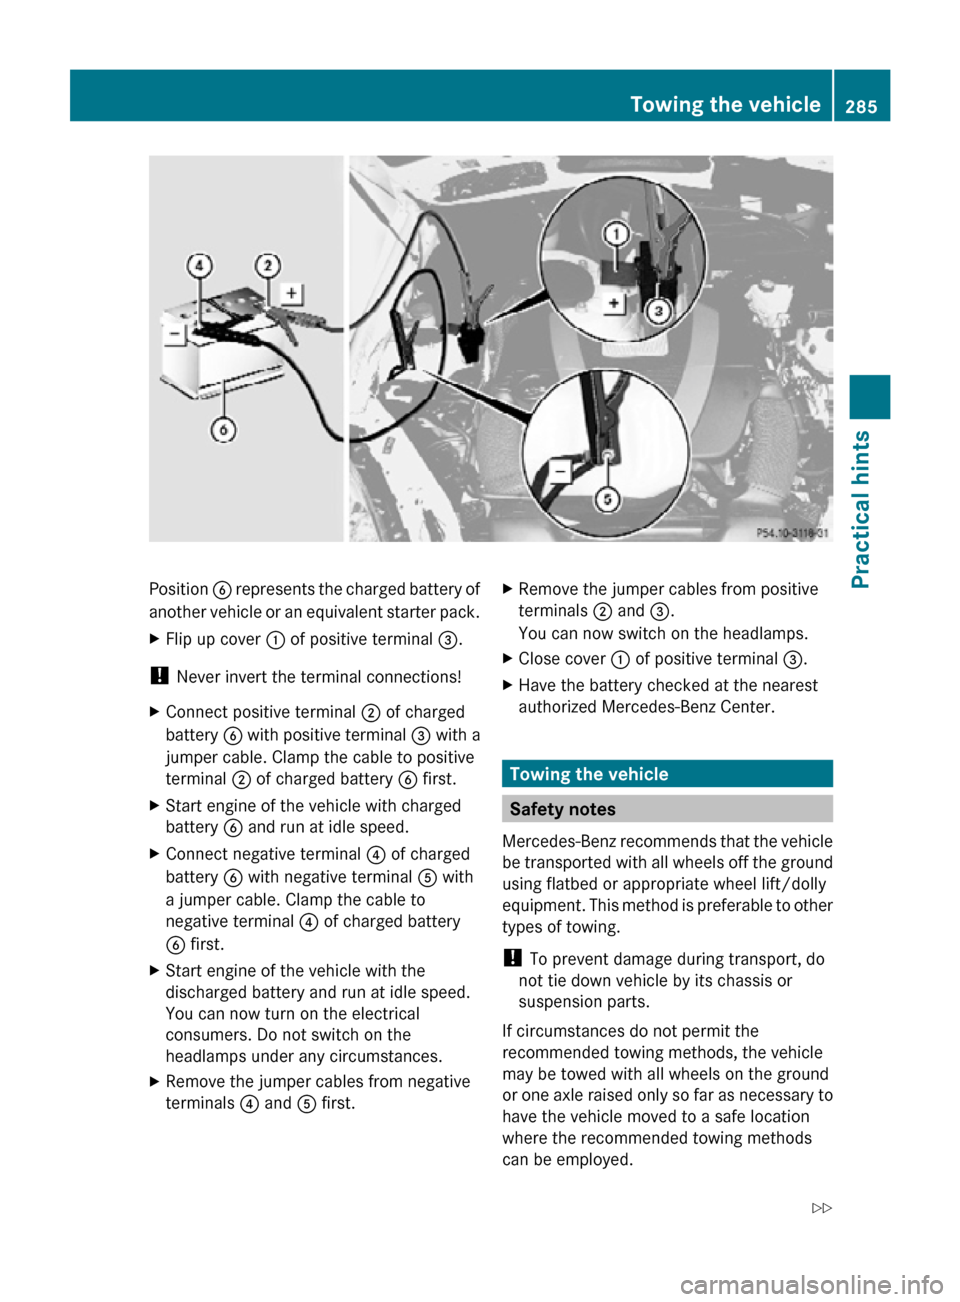
Position
B represents the charged battery of
another vehicle or an equivalent starter pack.
X Flip up cover : of positive terminal =.
! Never invert the terminal connections!
X Connect positive terminal ; of charged
battery B with positive terminal = with a
jumper cable. Clamp the cable to positive
terminal ; of charged battery B first.
X Start engine of the vehicle with charged
battery B and run at idle speed.
X Connect negative terminal ? of charged
battery B with negative terminal A with
a jumper cable. Clamp the cable to
negative terminal ? of charged battery
B first.
X Start engine of the vehicle with the
discharged battery and run at idle speed.
You can now turn on the electrical
consumers. Do not switch on the
headlamps under any circumstances.
X Remove the jumper cables from negative
terminals ? and A first. X
Remove the jumper cables from positive
terminals ; and =.
You can now switch on the headlamps.
X Close cover : of positive terminal =.
X Have the battery checked at the nearest
authorized Mercedes-Benz Center. Towing the vehicle
Safety notes
Mercedes-Benz recommends that the vehicle
be transported with all wheels off the ground
using flatbed or appropriate wheel lift/dolly
equipment. This method is preferable to other
types of towing.
! To prevent damage during transport, do
not tie down vehicle by its chassis or
suspension parts.
If circumstances do not permit the
recommended towing methods, the vehicle
may be towed with all wheels on the ground
or one axle raised only so far as necessary to
have the vehicle moved to a safe location
where the recommended towing methods
can be employed. Towing the vehicle
285Practical hints
171_AKB; 3; 60, en-US
d2ureepe, Version: 2.11.8.1 2009-05-11T16:00:23+02:00 - Seite 285 Z
Page 291 of 312
explains the fuse allocation and fuse
amperages.
Before replacing fuses
X Engage the parking brake.
X Make sure the automatic transmission is in
park position P (manual transmission to
Neutral).
X Switch off all electrical consumers.
X Turn off the engine.
X Remove the SmartKey from the starter
switch. Fuse box in passenger compartment
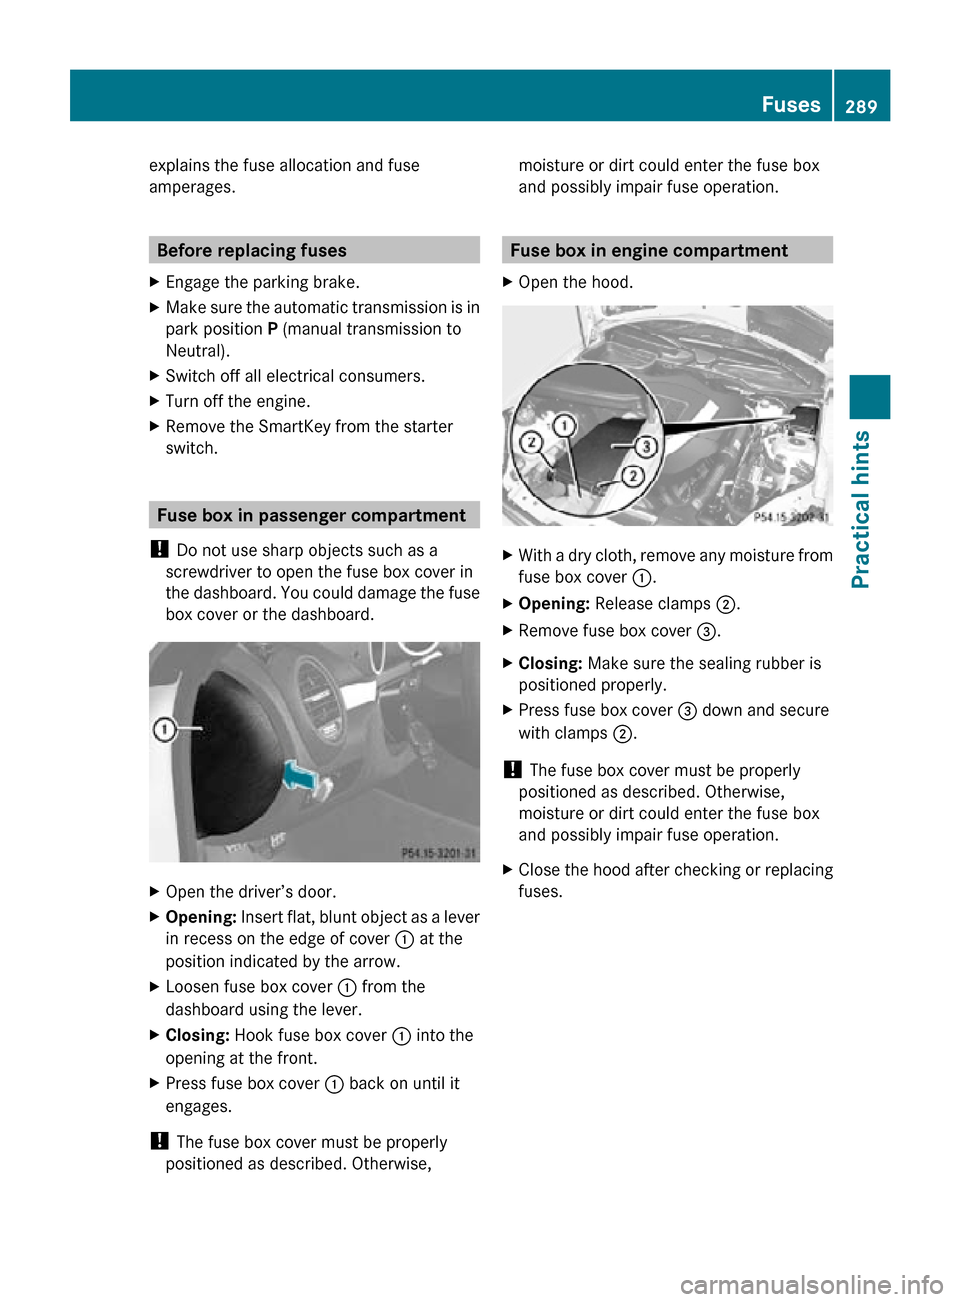
! Do not use sharp objects such as a
screwdriver to open the fuse box cover in
the dashboard. You could damage the fuse
box cover or the dashboard. X
Open the driver’s door.
X Opening: Insert flat, blunt object as a lever
in recess on the edge of cover : at the
position indicated by the arrow.
X Loosen fuse box cover : from the
dashboard using the lever.
X Closing: Hook fuse box cover : into the
opening at the front.
X Press fuse box cover : back on until it
engages.
! The fuse box cover must be properly
positioned as described. Otherwise, moisture or dirt could enter the fuse box
and possibly impair fuse operation. Fuse box in engine compartment
X Open the hood. X
With a dry cloth, remove any moisture from
fuse box cover :.
X Opening: Release clamps ;.
X Remove fuse box cover =.
X Closing: Make sure the sealing rubber is
positioned properly.
X Press fuse box cover = down and secure
with clamps ;.
! The fuse box cover must be properly
positioned as described. Otherwise,
moisture or dirt could enter the fuse box
and possibly impair fuse operation.
X Close the hood after checking or replacing
fuses. Fuses
289Practical hints
171_AKB; 3; 60, en-US
d2ureepe, Version: 2.11.8.1 2009-05-11T16:00:23+02:00 - Seite 289 Z