2010 MERCEDES-BENZ S65AMG warning
[x] Cancel search: warningPage 209 of 548
FunctionAutomatic Locking (Y page 210)Trunk Opening-height Restriction
(Y page 210)
You can select the individual vehicle
functions in two ways.
Approach 1: Selecting vehicle
functions via the main area of the
COMAND display
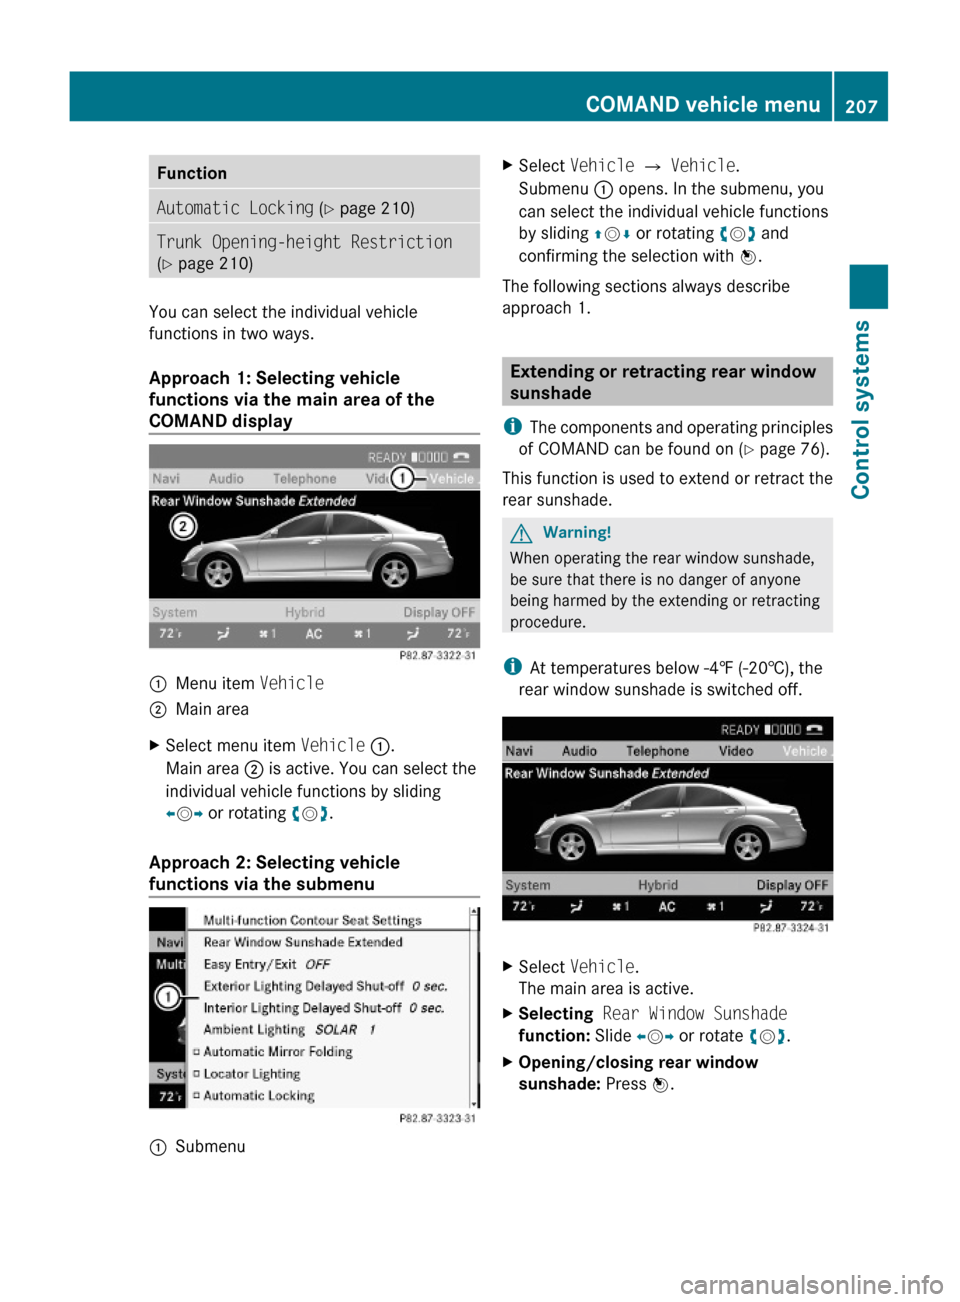
:Menu item Vehicle;Main areaXSelect menu item Vehicle :.
Main area ; is active. You can select the
individual vehicle functions by sliding
XVY or rotating cVd.
Approach 2: Selecting vehicle
functions via the submenu
:SubmenuXSelect Vehicle Q Vehicle.
Submenu : opens. In the submenu, you
can select the individual vehicle functions
by sliding ZVÆ or rotating cVd and
confirming the selection with W.
The following sections always describe
approach 1.
Extending or retracting rear window
sunshade
iThe components and operating principles
of COMAND can be found on (Y page 76).
This function is used to extend or retract the
rear sunshade.
GWarning!
When operating the rear window sunshade,
be sure that there is no danger of anyone
being harmed by the extending or retracting
procedure.
iAt temperatures below -4‡ (-20†), the
rear window sunshade is switched off.
XSelect Vehicle.
The main area is active.
XSelecting Rear Window Sunshade
function: Slide XVY or rotate cVd.
XOpening/closing rear window
sunshade: Press W.
COMAND vehicle menu207Control systems221_AKB; 6; 20, en-USd2ugruen,Version: 2.11.8.12009-09-24T13:28:17+02:00 - Seite 207Z
Page 210 of 548
Setting easy-entry/exit feature
iThe components and operating principles
of COMAND can be found on (Y page 76).
GWarning!
You must make sure no one can become
trapped or injured by the moving steering
wheel and driver’s seat when the easy-entry/
exit feature is activated.
To stop seat/steering wheel movement, do
one of the following:
RPress seat adjustment switch.
RMove steering wheel adjustment stalk.
RPress one of the memory position buttons
or the memory button M.
Do not leave children unattended in the
vehicle, or with access to an unlocked vehicle.
Children could open the driver’s door and
unintentionally activate the easy-entry/exit
feature, which could result in an accident
and/or serious personal injury.
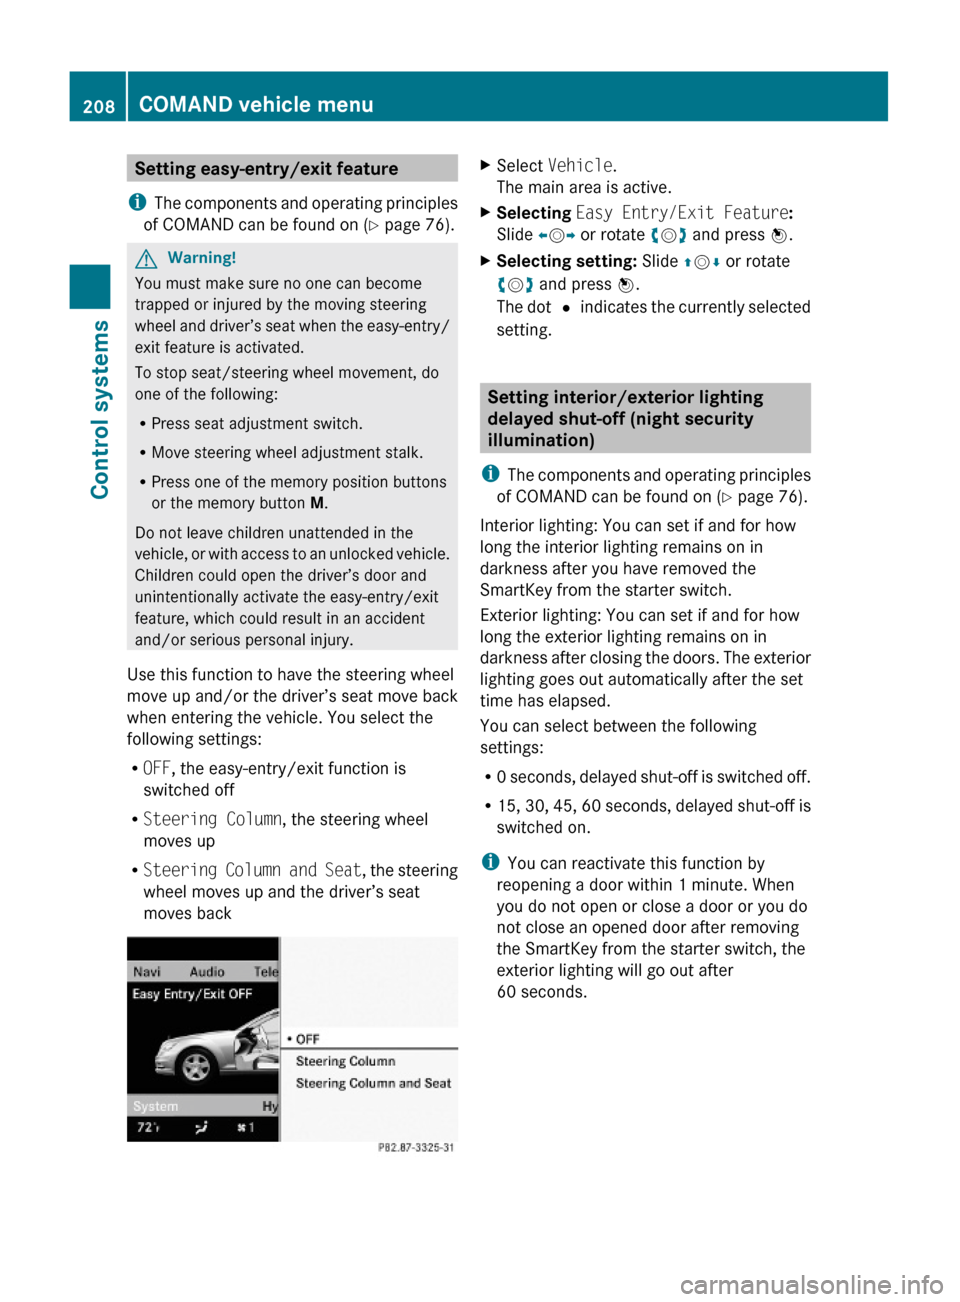
Use this function to have the steering wheel
move up and/or the driver’s seat move back
when entering the vehicle. You select the
following settings:
ROFF, the easy-entry/exit function is
switched off
RSteering Column, the steering wheel
moves up
RSteering Column and Seat, the steering
wheel moves up and the driver’s seat
moves back
XSelect Vehicle.
The main area is active.
XSelecting Easy Entry/Exit Feature:
Slide XVY or rotate cVd and press W.
XSelecting setting: Slide ZVÆ or rotate
cVd and press W.
The dot # indicates the currently selected
setting.
Setting interior/exterior lighting
delayed shut-off (night security
illumination)
iThe components and operating principles
of COMAND can be found on (Y page 76).
Interior lighting: You can set if and for how
long the interior lighting remains on in
darkness after you have removed the
SmartKey from the starter switch.
Exterior lighting: You can set if and for how
long the exterior lighting remains on in
darkness after closing the doors. The exterior
lighting goes out automatically after the set
time has elapsed.
You can select between the following
settings:
R0 seconds, delayed shut-off is switched off.
R15, 30, 45, 60 seconds, delayed shut-off is
switched on.
iYou can reactivate this function by
reopening a door within 1 minute. When
you do not open or close a door or you do
not close an opened door after removing
the SmartKey from the starter switch, the
exterior lighting will go out after
60 seconds.
208COMAND vehicle menuControl systems
221_AKB; 6; 20, en-USd2ugruen,Version: 2.11.8.12009-09-24T13:28:17+02:00 - Seite 208
Page 213 of 548
You can select whether the trunk lid should
open fully or only to the height of the roof.
XSelect Vehicle.
The main area is active.
XSelecting Trunk Opening-height
Restriction: Slide XVY or rotate cVd.
XSwitching trunk opening-height
restriction on or off: Press W.
COMAND automatic climate control
Introduction
iThe components and operating principles
of COMAND can be found on (Y page 76).
GWarning!
Follow the recommended settings for heating
and cooling given on the following pages and
pages in the “Controls in detail” chapter.
Otherwise the windows could fog up,
impairing visibility and endangering you and
others.
You can operate the climate control via
COMAND or via the buttons on the climate
control panel (Y page 363).
Some of the special climate control functions
can only be operated via COMAND.
The following climate control functions can
be operated via COMAND:
RTemperature (Y page 211)
RAir distribution (Y page 212)
RAir volume (Y page 212)
RSwitching off cooling (Æ)
(Y page 213)
RCentral climate control (Mono)
(Y page 214)
RFootwell temperature (Y page 214)
RAir flow from air vents (Y page 215)
RRear climate control (Y page 215)
The climate control menu is called up via the
climate control settings.
Climate control settings with functions (submenus)
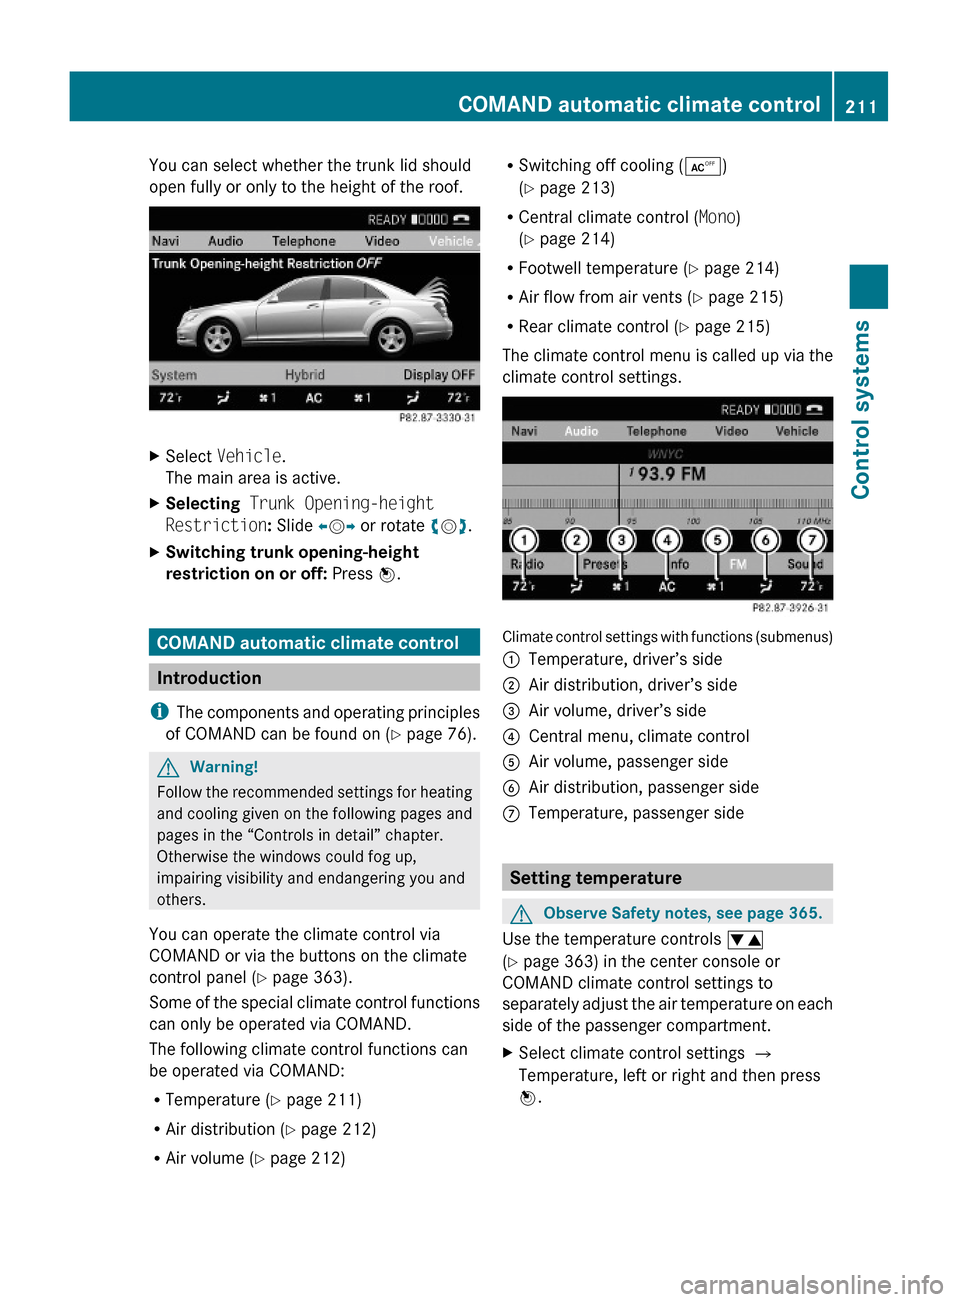
:Temperature, driver’s side;Air distribution, driver’s side=Air volume, driver’s side?Central menu, climate controlAAir volume, passenger sideBAir distribution, passenger sideCTemperature, passenger side
Setting temperature
GObserve Safety notes, see page 365.
Use the temperature controls w
(Y page 363) in the center console or
COMAND climate control settings to
separately adjust the air temperature on each
side of the passenger compartment.
XSelect climate control settings Q
Temperature, left or right and then press
W.
COMAND automatic climate control211Control systems221_AKB; 6; 20, en-USd2ugruen,Version: 2.11.8.12009-09-24T13:28:17+02:00 - Seite 211Z
Page 215 of 548

XChanging air volume: Slide ZVÆ or rotate
cVd.
or
XSwitching back to automatic mode:
Rotate cVd and select AUTO.
XExiting menu: Press W, back button
% in the center console (Y page 77) or
slide XVY.
The setting is saved.
Central climate control menu via
COMAND
The central climate control menu is in the
center of the climate control settings. When
the climate control is activated, you will see
AC in the central menu. The following
functions can only be operated in the central
climate control menu via COMAND:
RDeactivating cooling (Æ) (Y page 213)
RCentral climate control (Mono)
(Y page 214)
RFootwell temperature (Y page 214)
RAir flow from air vents (Y page 215)
XSelect climate control settings Q Central
menu.
Activating/deactivating air
conditioning
The air conditioning is operational while the
engine is running and cools the interior air to
the temperature set by the operator. In
addition, the air conditioning dehumidifies
the interior air and helps prevent window
fogging.
iCondensation may drip out from
underneath the vehicle. This is normal and
not an indication of a malfunction.
GWarning!
If you deactivate the air conditioning, the
vehicle will not be cooled when weather
conditions are warm. The windows can fog up
more quickly. Window fogging may impair
visibility and endanger you and others.
XSelect climate control settings Q Central
climate control menu.
XSelecting Æ: Slide ZVÆ or rotate
cVd.
XConfirming selection: Press W.
A checkmark appears when the cooling is
deactivated.
Æ appears in the central menu of the
climate control settings.
COMAND automatic climate control213Control systems221_AKB; 6; 20, en-USd2ugruen,Version: 2.11.8.12009-09-24T13:28:17+02:00 - Seite 213Z
Page 222 of 548
You can choose between:
R0: off
R1: level 1 (Less lateral support and slow
air pressure build-up in the air chambers
of the seat backrest side bolsters.)
R2: level 2 (Strong lateral support and fast
air pressure build-up in the air chambers
of the seat backrest side bolsters.)
XSlide ZVÆ or rotate cVd until desired
setting is reached.
XSaving setting: Press W.
Massage
XSelect seat (Y page 216).XSelecting Massage: Slide XVY or rotate
cVd.
XConfirming selection: Press W.
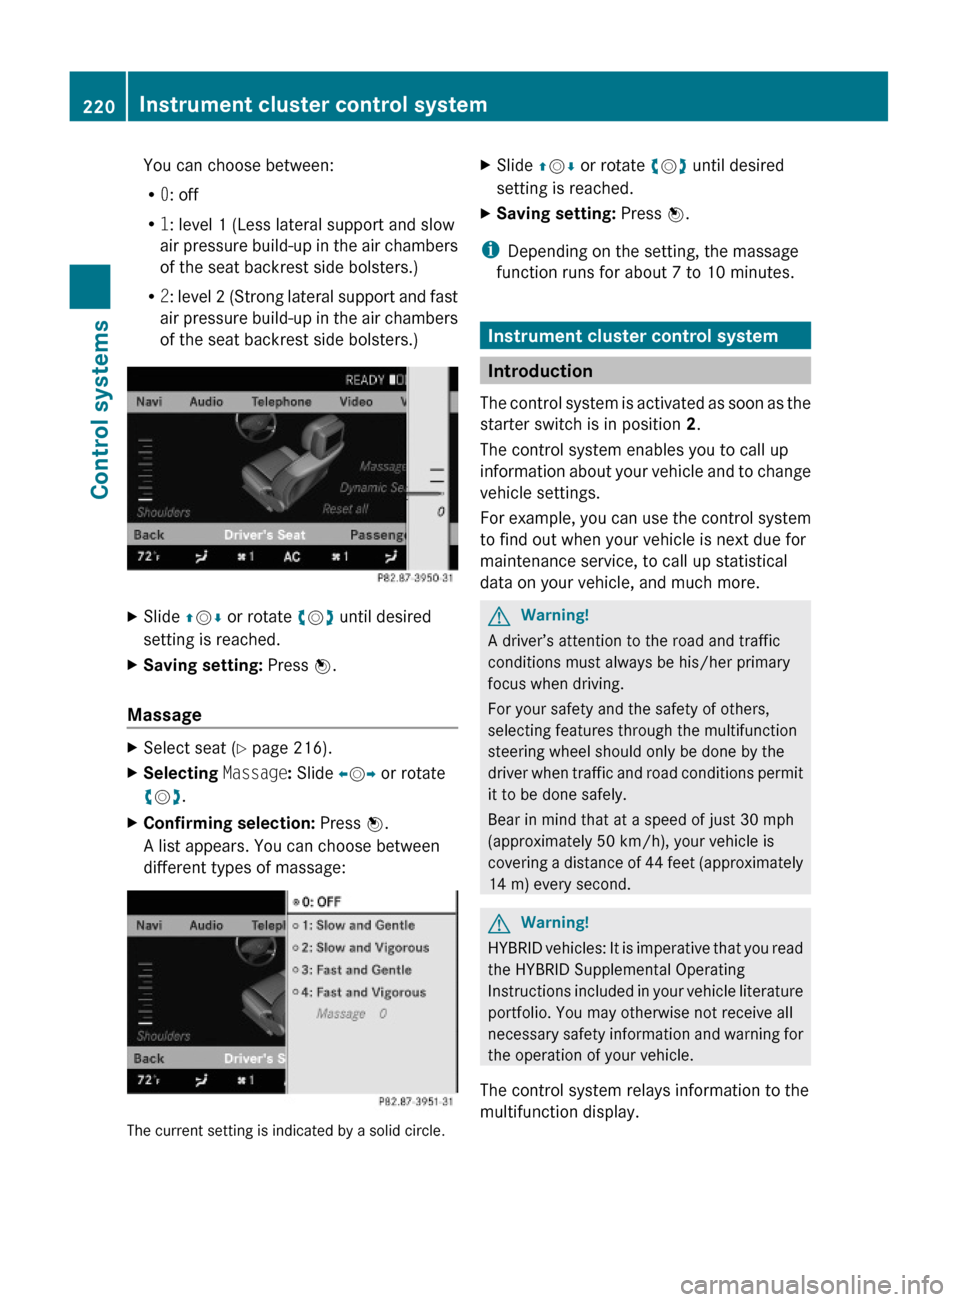
A list appears. You can choose between
different types of massage:
The current setting is indicated by a solid circle.
XSlide ZVÆ or rotate cVd until desired
setting is reached.
XSaving setting: Press W.
iDepending on the setting, the massage
function runs for about 7 to 10 minutes.
Instrument cluster control system
Introduction
The control system is activated as soon as the
starter switch is in position 2.
The control system enables you to call up
information about your vehicle and to change
vehicle settings.
For example, you can use the control system
to find out when your vehicle is next due for
maintenance service, to call up statistical
data on your vehicle, and much more.
GWarning!
A driver’s attention to the road and traffic
conditions must always be his/her primary
focus when driving.
For your safety and the safety of others,
selecting features through the multifunction
steering wheel should only be done by the
driver when traffic and road conditions permit
it to be done safely.
Bear in mind that at a speed of just 30 mph
(approximately 50 km/h), your vehicle is
covering a distance of 44 feet (approximately
14 m) every second.
GWarning!
HYBRID vehicles: It is imperative that you read
the HYBRID Supplemental Operating
Instructions included in your vehicle literature
portfolio. You may otherwise not receive all
necessary safety information and warning for
the operation of your vehicle.
The control system relays information to the
multifunction display.
220Instrument cluster control systemControl systems
221_AKB; 6; 20, en-USd2ugruen,Version: 2.11.8.12009-09-24T13:28:17+02:00 - Seite 220
Page 230 of 548
The engine oil temperature will be shown in
blue if the engine oil temperature has not yet
reached 176‡ (80†). During this time, avoid
driving at full engine speed.
If the engine reaches the overspeed range in
the manual shift program, you will see up next
to gear indicator : as a reminder to upshift.
Use buttons : or 9 to select the
following functions in the AMG menu:
RRACETIMER (Y page 228)
ROverall analysis (Y page 229)
RLap analysis (Y page 229)
RACETIMER
GWarning!
The RACETIMER feature is only for use on
roads and in conditions where high speed
driving is permitted. Racing on public roads is
prohibited under all circumstances. The driver
is and must always remain responsible for
following posted speed limits.
The RACETIMER allows you to time and save
driving stretches.
XPress button = or ; to select the
AMG menu.
XPress button 9 to select the
RACETIMER.
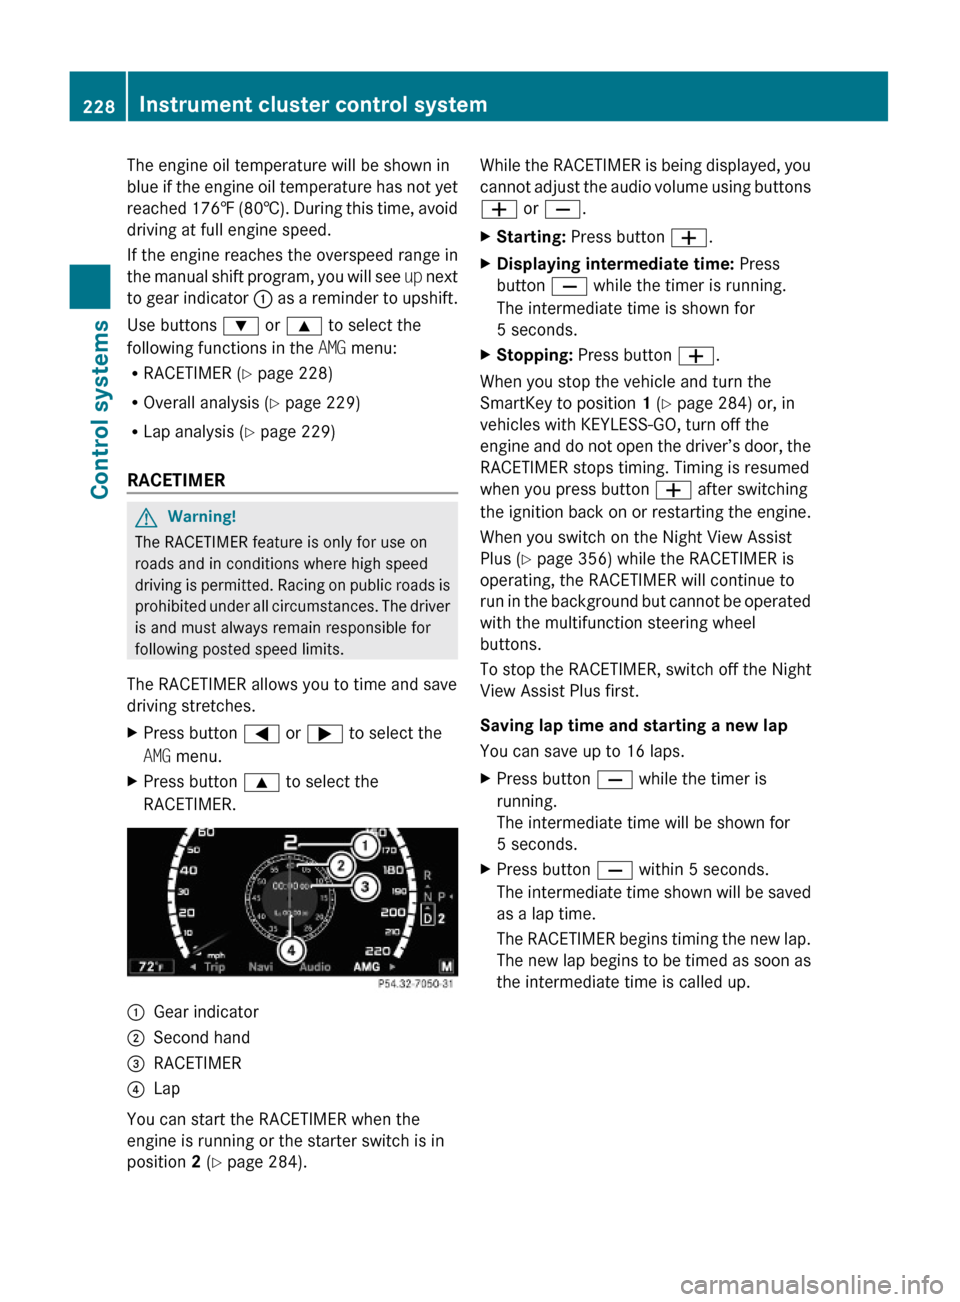
:Gear indicator;Second hand=RACETIMER?Lap
You can start the RACETIMER when the
engine is running or the starter switch is in
position 2 (Y page 284).
While the RACETIMER is being displayed, you
cannot adjust the audio volume using buttons
W or X.
XStarting: Press button W.XDisplaying intermediate time: Press
button X while the timer is running.
The intermediate time is shown for
5 seconds.
XStopping: Press button W.
When you stop the vehicle and turn the
SmartKey to position 1 (Y page 284) or, in
vehicles with KEYLESS-GO, turn off the
engine and do not open the driver’s door, the
RACETIMER stops timing. Timing is resumed
when you press button W after switching
the ignition back on or restarting the engine.
When you switch on the Night View Assist
Plus (Y page 356) while the RACETIMER is
operating, the RACETIMER will continue to
run in the background but cannot be operated
with the multifunction steering wheel
buttons.
To stop the RACETIMER, switch off the Night
View Assist Plus first.
Saving lap time and starting a new lap
You can save up to 16 laps.
XPress button X while the timer is
running.
The intermediate time will be shown for
5 seconds.
XPress button X within 5 seconds.
The intermediate time shown will be saved
as a lap time.
The RACETIMER begins timing the new lap.
The new lap begins to be timed as soon as
the intermediate time is called up.
228Instrument cluster control systemControl systems
221_AKB; 6; 20, en-USd2ugruen,Version: 2.11.8.12009-09-24T13:28:17+02:00 - Seite 228
Page 232 of 548
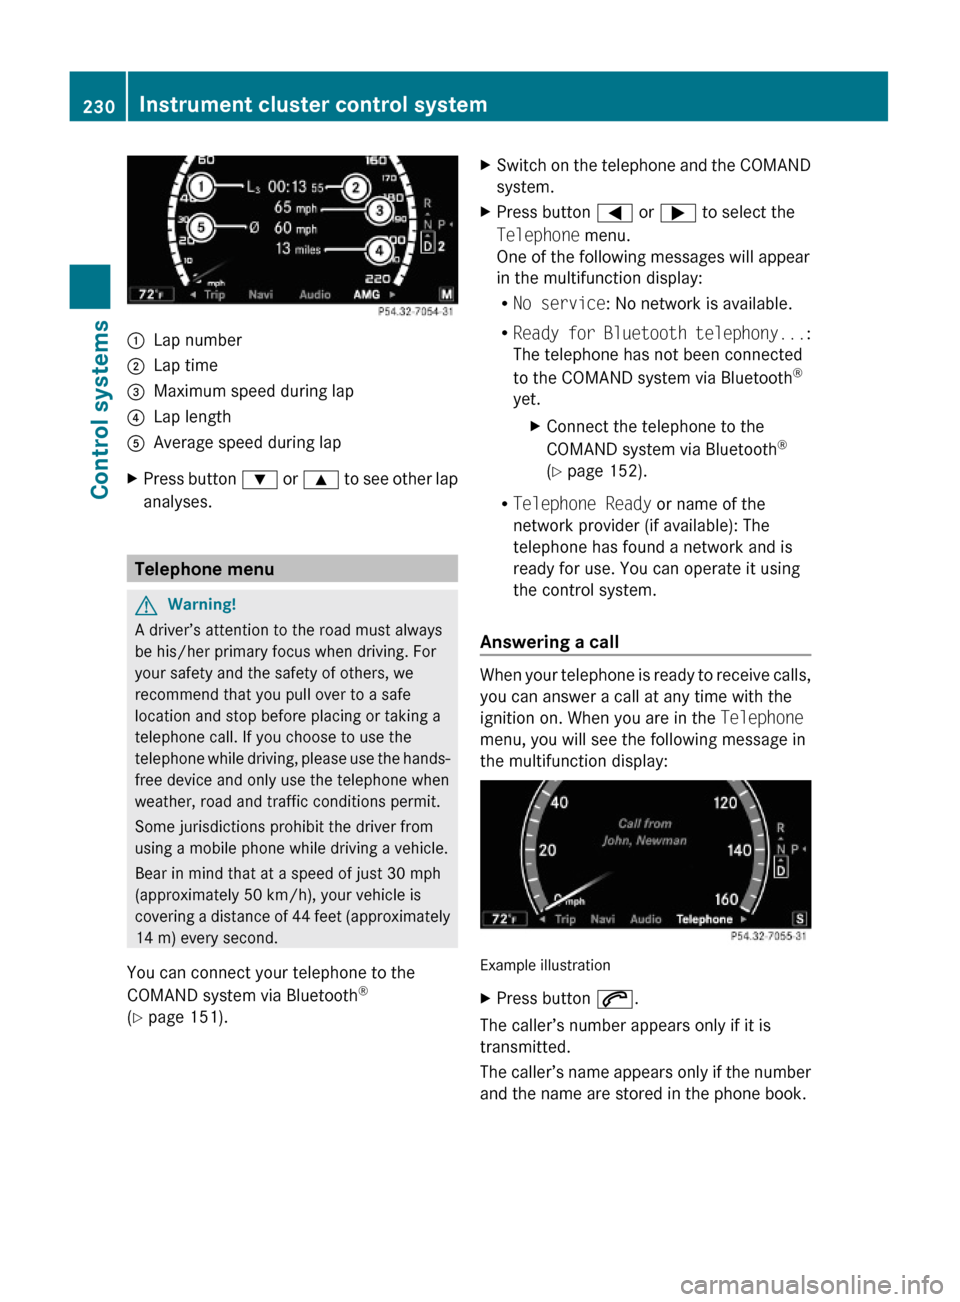
:Lap number;Lap time=Maximum speed during lap?Lap lengthAAverage speed during lapXPress button : or 9 to see other lap
analyses.
Telephone menu
GWarning!
A driver’s attention to the road must always
be his/her primary focus when driving. For
your safety and the safety of others, we
recommend that you pull over to a safe
location and stop before placing or taking a
telephone call. If you choose to use the
telephone while driving, please use the hands-
free device and only use the telephone when
weather, road and traffic conditions permit.
Some jurisdictions prohibit the driver from
using a mobile phone while driving a vehicle.
Bear in mind that at a speed of just 30 mph
(approximately 50 km/h), your vehicle is
covering a distance of 44 feet (approximately
14 m) every second.
You can connect your telephone to the
COMAND system via Bluetooth®
(Y page 151).
XSwitch on the telephone and the COMAND
system.
XPress button = or ; to select the
Telephone menu.
One of the following messages will appear
in the multifunction display:
RNo service: No network is available.
RReady for Bluetooth telephony...:
The telephone has not been connected
to the COMAND system via Bluetooth®
yet.
XConnect the telephone to the
COMAND system via Bluetooth®
(Y page 152).
RTelephone Ready or name of the
network provider (if available): The
telephone has found a network and is
ready for use. You can operate it using
the control system.
Answering a call
When your telephone is ready to receive calls,
you can answer a call at any time with the
ignition on. When you are in the Telephone
menu, you will see the following message in
the multifunction display:
Example illustration
XPress button 6.
The caller’s number appears only if it is
transmitted.
The caller’s name appears only if the number
and the name are stored in the phone book.
230Instrument cluster control systemControl systems
221_AKB; 6; 20, en-USd2ugruen,Version: 2.11.8.12009-09-24T13:28:17+02:00 - Seite 230
Page 234 of 548
Switching ESC on or offGWarning!
Never switch off the ESC when you see the
ESC warning lamp ÷ flashing in the
instrument cluster. In this case proceed as
follows:
RWhen driving off, apply as little throttle as
possible.
RWhile driving, ease up on the accelerator
pedal.
RAdapt your speed and driving style to the
prevailing road conditions.
Failure to observe these guidelines could
cause the vehicle to skid. The ESC cannot
prevent accidents resulting from excessive
speed.
For more Information, see (Y page 66)
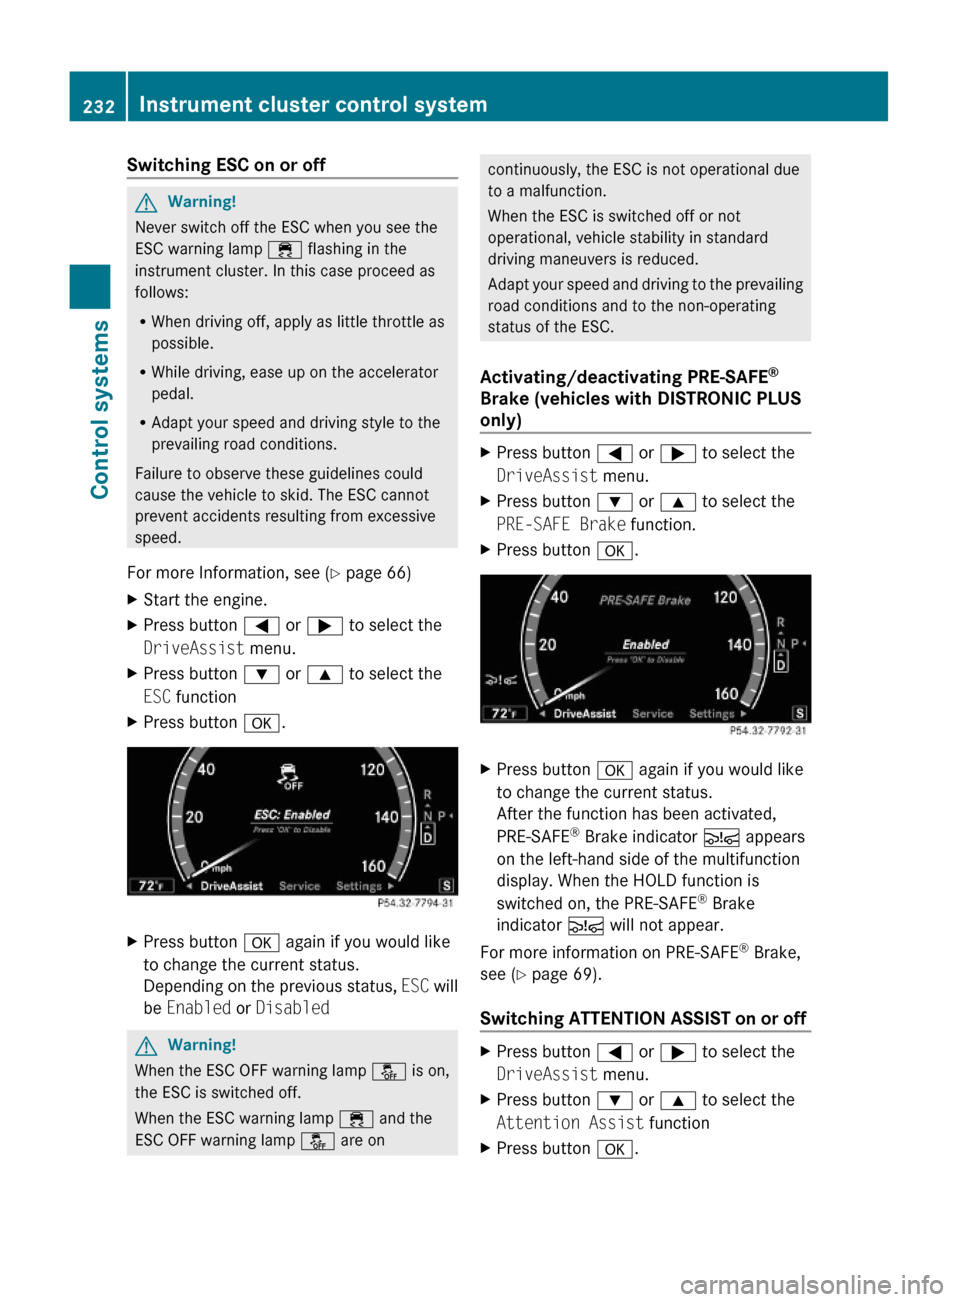
XStart the engine.XPress button = or ; to select the
DriveAssist menu.
XPress button : or 9 to select the
ESC function
XPress button a.XPress button a again if you would like
to change the current status.
Depending on the previous status, ESC will
be Enabled or Disabled
GWarning!
When the ESC OFF warning lamp å is on,
the ESC is switched off.
When the ESC warning lamp ÷ and the
ESC OFF warning lamp å are on
continuously, the ESC is not operational due
to a malfunction.
When the ESC is switched off or not
operational, vehicle stability in standard
driving maneuvers is reduced.
Adapt your speed and driving to the prevailing
road conditions and to the non-operating
status of the ESC.
Activating/deactivating PRE-SAFE®
Brake (vehicles with DISTRONIC PLUS
only)
XPress button = or ; to select the
DriveAssist menu.
XPress button : or 9 to select the
PRE-SAFE Brake function.
XPress button a.XPress button a again if you would like
to change the current status.
After the function has been activated,
PRE-SAFE® Brake indicator Ä appears
on the left-hand side of the multifunction
display. When the HOLD function is
switched on, the PRE-SAFE® Brake
indicator Ä will not appear.
For more information on PRE-SAFE® Brake,
see (Y page 69).
Switching ATTENTION ASSIST on or off
XPress button = or ; to select the
DriveAssist menu.
XPress button : or 9 to select the
Attention Assist function
XPress button a.232Instrument cluster control systemControl systems
221_AKB; 6; 20, en-USd2ugruen,Version: 2.11.8.12009-09-24T13:28:17+02:00 - Seite 232