2010 MERCEDES-BENZ S65AMG window
[x] Cancel search: windowPage 376 of 548

Sunroof switch
:Raising;Opening=Closing
With the sunroof closed or raised, you can
slide the sunroof screen forward and back.
XSwitch on the ignition.
Opening
XOpening manually: Press and hold the
sunroof switch to the resistance point in
direction of arrow ;.
XRelease the sunroof switch when the
desired position is reached.
XExpress operation: To open the tilt/
sliding sunroof completely, press the
sunroof switch past the resistance point in
direction of arrow ; and release.
XStopping during express operation:
Move the sunroof switch in any direction.
iExpress opening is not available when the
tilt/sliding sunroof is raised. The tilt/
sliding sunroof must be closed first.
iWhen the tilt/sliding sunroof is open,
resonance noises may result in addition to
the usual wind noises. They are caused by
minimal pressure changes in the passenger
compartment. To reduce or eliminate these
noises, change the position of the tilt/
sliding sunroof or open a window slightly.
RaisingXRaising manually: Press and hold the
sunroof switch to the resistance point in
direction of arrow :.
XRelease the sunroof switch when the
desired position is reached.
XExpress operation: To raise the tilt/
sliding sunroof completely, press the
sunroof switch past the resistance point in
direction of arrow : and release.
XStopping during express operation:
Move the sunroof switch in any direction.
iExpress raising is not available when the
tilt/sliding sunroof is open. The tilt/sliding
sunroof must be closed first.
Closing
XClosing manually: Pull and hold the
sunroof switch to the resistance point in
direction of arrow =.
XRelease the sunroof switch when the
desired position is reached.
XExpress operation: To close the tilt/
sliding sunroof completely, pull the sunroof
switch past the resistance point in
direction of arrow = and release.
XStopping during express operation:
Move the sunroof switch in any direction.
Closing when the tilt/sliding sunroof is
blocked
GWarning!
Make sure that nobody can become trapped
and be seriously or even fatally injured when
closing the tilt/sliding sunroof with greater
force or without automatic reversal function.
If the movement of the tilt/sliding sunroof is
blocked during the closing procedure (e.g. by
ice or pollution), the tilt/sliding sunroof will
stop and open slightly.
XImmediately after the tilt/sliding sunroof
has stopped and opened because it was
blocked, pull and hold the sunroof switch
374Power tilt/sliding sunroofControls in detail
221_AKB; 6; 20, en-USd2ugruen,Version: 2.11.8.12009-09-24T13:28:17+02:00 - Seite 374
Page 380 of 548
panel switch past the resistance point in
direction of arrow ; and release.XStopping during express operation:
Move the roof panel switch in any direction.
i When the tilt/sliding panel is open,
resonance noises may result in addition to
the usual wind noises. They are caused by
minimal pressure changes in the passenger
compartment. To reduce or eliminate these
noises, change the position of the tilt/
sliding panel or open a window slightly.
Raising
XRaising manually: Press and hold the roof
panel switch to the resistance point in
direction of arrow :.XRelease the roof panel switch when the
desired position is reached.XExpress operation: To raise the tilt/
sliding panel completely, press the roof
panel switch past the resistance point in
direction of arrow : and release.XStopping during express operation:
Move the roof panel switch in any direction.
i Express raising is not available when the
tilt/sliding panel is open. The tilt/sliding
panel must be closed first.
Closing
XClosing manually: Pull and hold the roof
panel switch to the resistance point in
direction of arrow =.XRelease the roof panel switch when the
desired position is reached.XExpress operation: To close the tilt/
sliding panel completely, pull the roof panel
switch past the resistance point in
direction of arrow = and release.XStopping during express operation:
Move the roof panel switch in any direction.Closing when the tilt/sliding panel is
blockedGWarning!
Make sure that nobody can become trapped
and be seriously or even fatally injured when
closing the tilt/sliding panel without
automatic reversal function.
If the movement of the tilt/sliding panel is
blocked during the closing procedure (e.g. by
ice or pollution), the tilt/sliding panel will stop
and open slightly.
XImmediately after the tilt/sliding panel has
stopped and opened because it was
blocked, pull and hold the roof panel switch
in direction of arrow = until the tilt/sliding
panel is fully closed.
If the tilt/sliding panel is blocked again and
opens slightly:
XImmediately after the tilt/sliding panel was
blocked and has opened, pull and hold the
roof panel switch in direction of arrow =
until the tilt/sliding panel is fully closed.
The tilt sliding panel closes without
automatic reversal function.GWarning!
Pulling and holding the roof panel switch to
close the tilt/sliding panel immediately after
it had been blocked two times will cause the
tilt/sliding panel to close without any reversal
function for as long as you hold the roof panel
switch.
Synchronizing the panorama roof
The tilt/sliding panel and front roller
sunblinds must be synchronized after a
malfunction or if the tilt/sliding panel does
not open smoothly.
! Do not attempt to open the tilt/sliding
panel before the tilt/sliding panel is
properly synchronized. The tilt/sliding
378Panorama roof with power tilt/sliding panelControls in detail
221_AKB; 6; 20, en-USd2ugruen,Version: 2.11.8.12009-09-24T13:28:17+02:00 - Seite 378
Page 381 of 548
panel could otherwise lock-up in the open
position.
If the tilt/sliding panel cannot be closed or
synchronized, contact an authorized
Mercedes-Benz Center or call Roadside
Assistance.
Tilt/sliding panel and front roller
sunblindXSwitch on the ignition.XPull and hold the roof panel switch several
times in direction of arrow =
( Y page 375) until the tilt/sliding panel is
fully closed.XKeep holding the roof panel switch in
direction of arrow = for approximately
1 second.XPull and hold the roof panel switch several
times in direction of arrow = until the front
roller sunblind is fully extended.XKeep holding the roof panel switch in
direction of arrow = for approximately
1 second.XCheck the express operation feature of the
front roller sunblind.
If the front roller sunblind retracts
completely, the front roller sunblind is
synchronized. Otherwise repeat the above
steps.XCheck the express operation feature of the
tilt/sliding panel ( Y page 377).
If the tilt/sliding panel opens completely,
the tilt/sliding panel is synchronized.
Otherwise repeat the above steps.
Rear roller sunblind
XSwitch on the ignition.XPull roller sunblind switch :
( Y page 376) in the rear door control panel
several times until the rear roller sunblind
is fully extended.XKeep holding roller sunblind switch : for
approximately 1 second.XCheck the express operation feature of the
front roller sunblind.
If the rear roller sunblind retracts
completely, the rear roller sunblind is
synchronized. Otherwise repeat the above
steps.
Loading and storing
Loading instructions
GWarning!
Always fasten items being carried as securely
as possible using cargo tie-down hooks and
fastening materials appropriate for the weight
and size of the load.
In an accident, during hard braking or sudden
maneuvers, loose items will be thrown around
inside the vehicle. This can cause injury to
vehicle occupants unless the items are
securely fastened in the vehicle.
To help avoid personal injury during a collision
or sudden maneuver, exercise care when
transporting cargo. Do not pile luggage or
cargo higher than the seat backrests.
The trunk is the preferred place to carry
objects. Always use cargo tie-down hooks
when transporting cargo. Do not place
anything on the rear-window shelf.
Never drive a vehicle with the trunk open.
Deadly carbon monoxide (CO) gases may
enter vehicle interior resulting in
unconsciousness and death.
Load distribution
The total load weight including vehicle
occupants and luggage/cargo should not
exceed the total load limit indicated on the
corresponding Tire and Loading Information
placard located on the driver’s door B-pillar
( Y page 418).
The handling characteristics of a fully loaded
vehicle depends greatly on the load
Loading and storing379Controls in detail221_AKB; 6; 20, en-USd2ugruen,Version: 2.11.8.12009-09-24T13:28:17+02:00 - Seite 379Z
Page 388 of 548
Sun visorsGWarning!
Do not use the vanity mirror while driving.
Keep the vanity mirrors in the sun visors
closed while vehicle is in motion. Reflected
glare can endanger you and others.
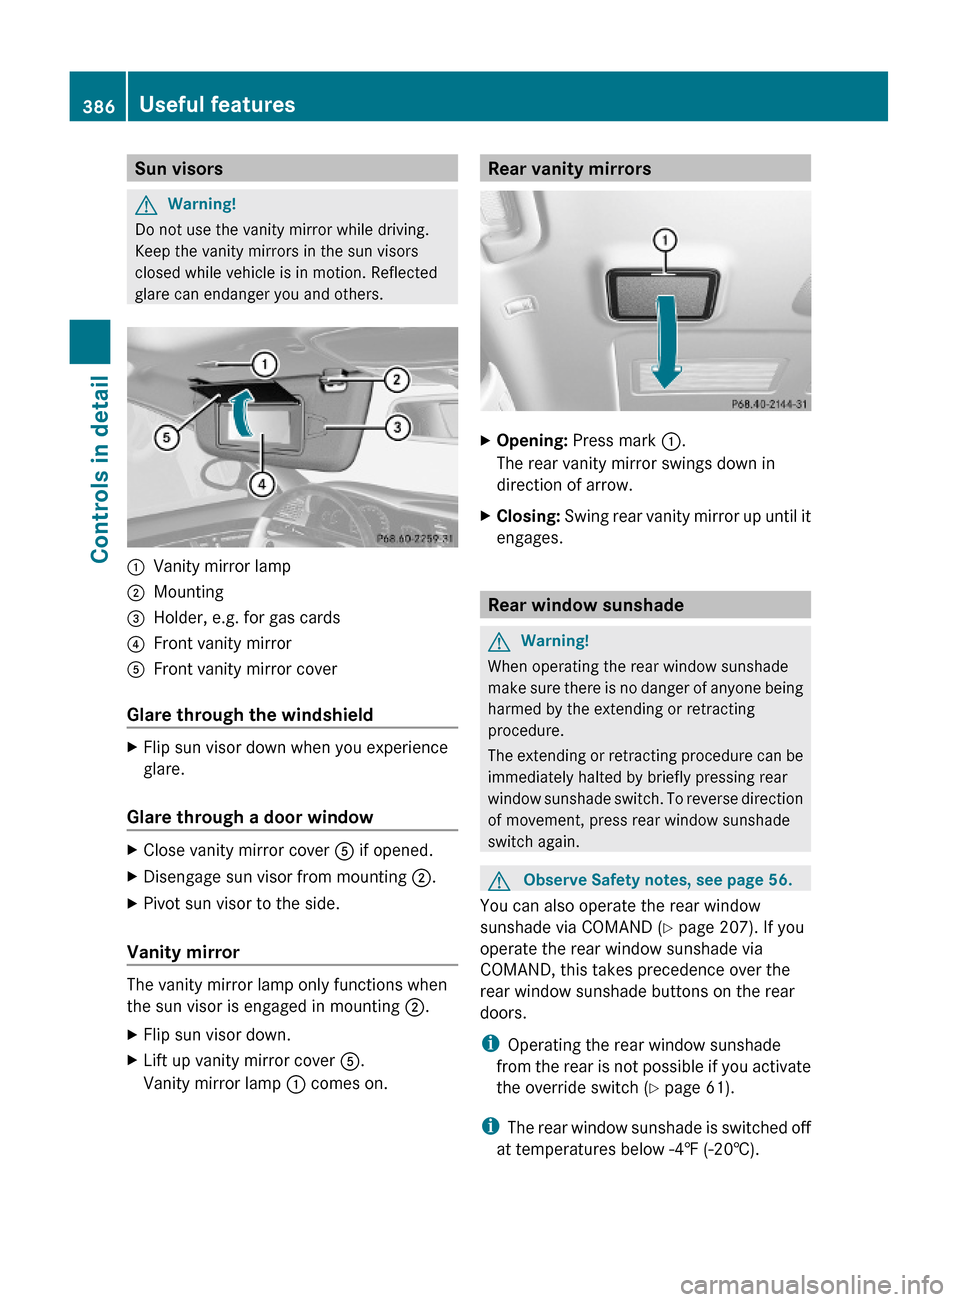
:Vanity mirror lamp;Mounting=Holder, e.g. for gas cards?Front vanity mirrorAFront vanity mirror cover
Glare through the windshield
XFlip sun visor down when you experience
glare.
Glare through a door window
XClose vanity mirror cover A if opened.XDisengage sun visor from mounting ;.XPivot sun visor to the side.
Vanity mirror
The vanity mirror lamp only functions when
the sun visor is engaged in mounting ;.
XFlip sun visor down.XLift up vanity mirror cover A.
Vanity mirror lamp : comes on.Rear vanity mirrorsXOpening: Press mark :.
The rear vanity mirror swings down in
direction of arrow.
XClosing: Swing rear vanity mirror up until it
engages.
Rear window sunshade
GWarning!
When operating the rear window sunshade
make sure there is no danger of anyone being
harmed by the extending or retracting
procedure.
The extending or retracting procedure can be
immediately halted by briefly pressing rear
window sunshade switch. To reverse direction
of movement, press rear window sunshade
switch again.
GObserve Safety notes, see page 56.
You can also operate the rear window
sunshade via COMAND (Y page 207). If you
operate the rear window sunshade via
COMAND, this takes precedence over the
rear window sunshade buttons on the rear
doors.
iOperating the rear window sunshade
from the rear is not possible if you activate
the override switch (Y page 61).
iThe rear window sunshade is switched off
at temperatures below -4‡ (-20†).
386Useful featuresControls in detail
221_AKB; 6; 20, en-USd2ugruen,Version: 2.11.8.12009-09-24T13:28:17+02:00 - Seite 386
Page 389 of 548
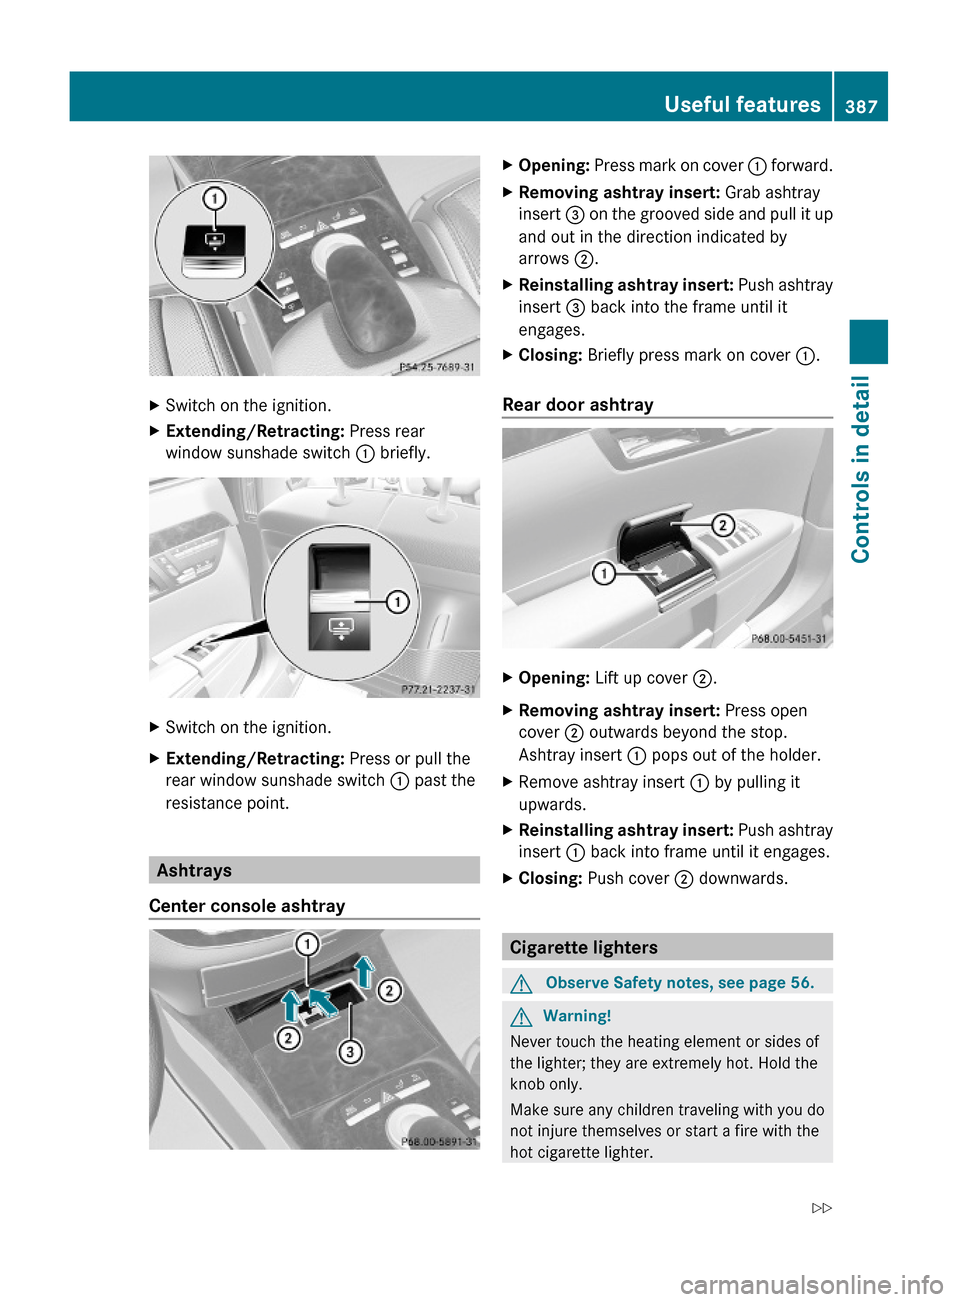
XSwitch on the ignition.XExtending/Retracting: Press rear
window sunshade switch : briefly.
XSwitch on the ignition.XExtending/Retracting: Press or pull the
rear window sunshade switch : past the
resistance point.
Ashtrays
Center console ashtray
XOpening: Press mark on cover : forward.XRemoving ashtray insert: Grab ashtray
insert = on the grooved side and pull it up
and out in the direction indicated by
arrows ;.
XReinstalling ashtray insert: Push ashtray
insert = back into the frame until it
engages.
XClosing: Briefly press mark on cover :.
Rear door ashtray
XOpening: Lift up cover ;.XRemoving ashtray insert: Press open
cover ; outwards beyond the stop.
Ashtray insert : pops out of the holder.
XRemove ashtray insert : by pulling it
upwards.
XReinstalling ashtray insert: Push ashtray
insert : back into frame until it engages.
XClosing: Push cover ; downwards.
Cigarette lighters
GObserve Safety notes, see page 56.GWarning!
Never touch the heating element or sides of
the lighter; they are extremely hot. Hold the
knob only.
Make sure any children traveling with you do
not injure themselves or start a fire with the
hot cigarette lighter.
Useful features387Controls in detail221_AKB; 6; 20, en-USd2ugruen,Version: 2.11.8.12009-09-24T13:28:17+02:00 - Seite 387Z
Page 401 of 548
iUSA only:
This device complies with Part 15 of the
FCC Rules. Operation is subject to the
following two conditions:
1. This device may not cause harmful
interference, and
2. this device must accept any
interference received, including
interference that may cause undesired
operation.
Any unauthorized modification to this
device could void the user’s authority to
operate the equipment.
iCanada only:
This device complies with RSS-210 of
Industry Canada. Operation is subject to
the following two conditions:
1.This device may not cause interference,
and
2. this device must accept any
interference received, including
interference that may cause undesired
operation of the device.
Any unauthorized modification to this
device could void the user’s authority to
operate the equipment.
Floormats
GWarning!
Whenever you are using floormats, make sure
there is enough clearance and that the
floormats are securely fastened.
Floormats should always be securely fastened
using the fastening equipment.
Before driving off, check that the floormats
are securely in place and adjust them if
necessary. A loose floormat could slip and
hinder proper functioning of the pedals.
Do not place several floormats on top of each
other as this may impair pedal movement.
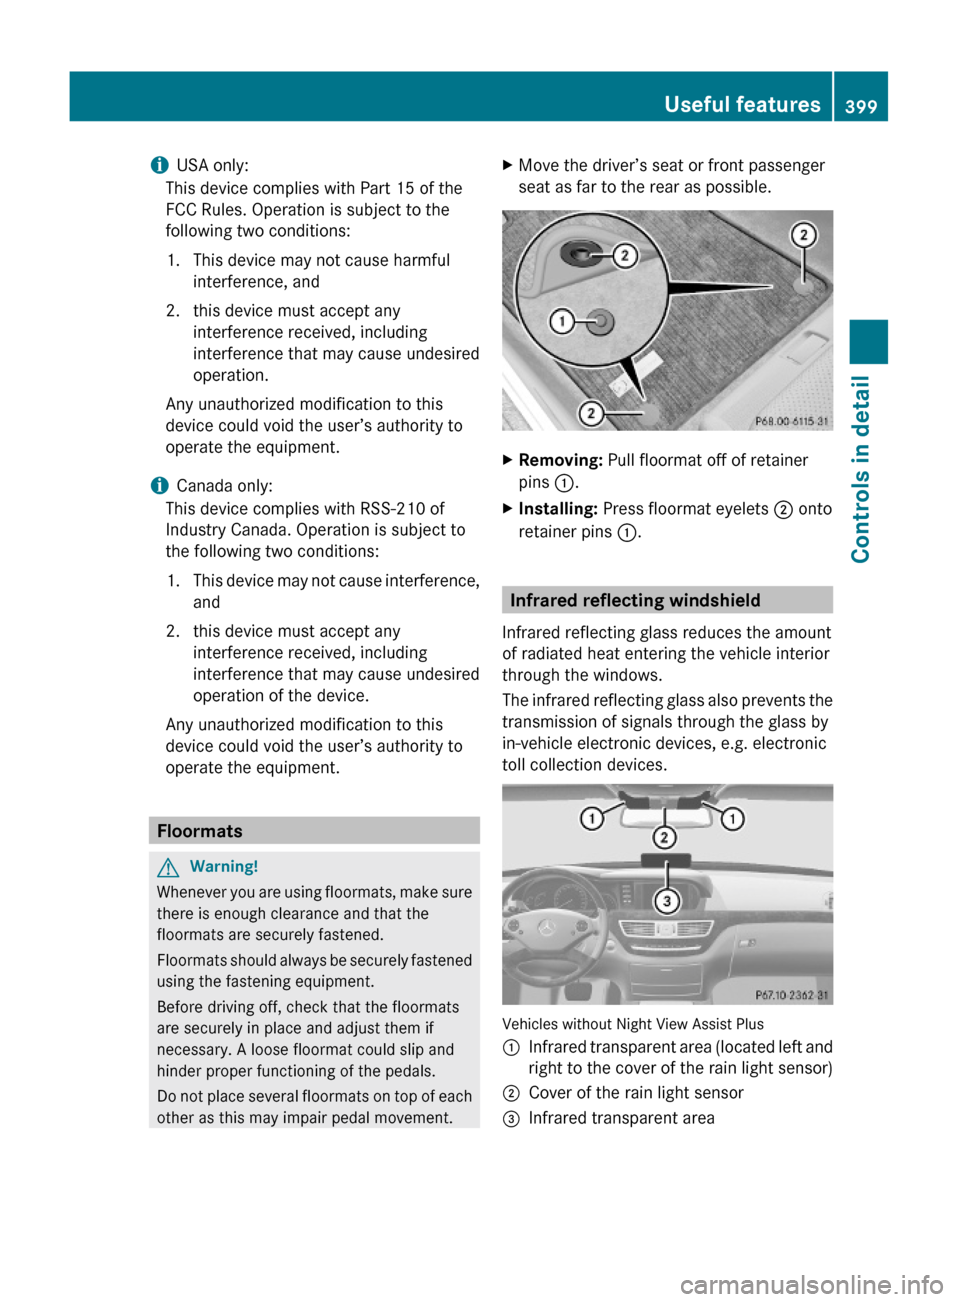
XMove the driver’s seat or front passenger
seat as far to the rear as possible.
XRemoving: Pull floormat off of retainer
pins :.
XInstalling: Press floormat eyelets ; onto
retainer pins :.
Infrared reflecting windshield
Infrared reflecting glass reduces the amount
of radiated heat entering the vehicle interior
through the windows.
The infrared reflecting glass also prevents the
transmission of signals through the glass by
in-vehicle electronic devices, e.g. electronic
toll collection devices.
Vehicles without Night View Assist Plus
:Infrared transparent area (located left and
right to the cover of the rain light sensor)
;Cover of the rain light sensor=Infrared transparent areaUseful features399Controls in detail221_AKB; 6; 20, en-USd2ugruen,Version: 2.11.8.12009-09-24T13:28:17+02:00 - Seite 399Z
Page 432 of 548
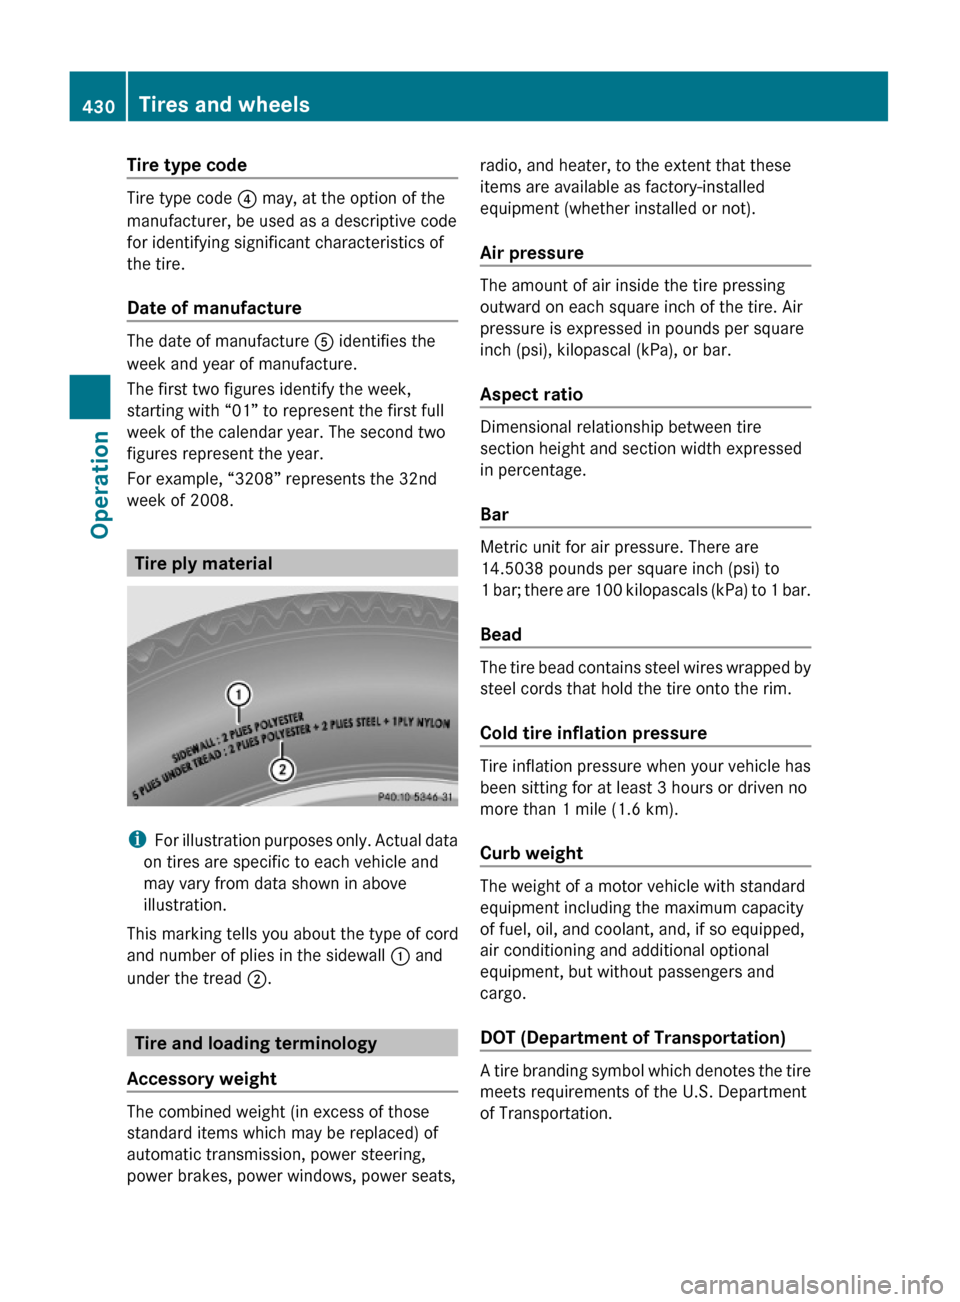
Tire type code
Tire type code ? may, at the option of the
manufacturer, be used as a descriptive code
for identifying significant characteristics of
the tire.
Date of manufacture
The date of manufacture A identifies the
week and year of manufacture.
The first two figures identify the week,
starting with “01” to represent the first full
week of the calendar year. The second two
figures represent the year.
For example, “3208” represents the 32nd
week of 2008.
Tire ply material
iFor illustration purposes only. Actual data
on tires are specific to each vehicle and
may vary from data shown in above
illustration.
This marking tells you about the type of cord
and number of plies in the sidewall : and
under the tread ;.
Tire and loading terminology
Accessory weight
The combined weight (in excess of those
standard items which may be replaced) of
automatic transmission, power steering,
power brakes, power windows, power seats,
radio, and heater, to the extent that these
items are available as factory-installed
equipment (whether installed or not).
Air pressure
The amount of air inside the tire pressing
outward on each square inch of the tire. Air
pressure is expressed in pounds per square
inch (psi), kilopascal (kPa), or bar.
Aspect ratio
Dimensional relationship between tire
section height and section width expressed
in percentage.
Bar
Metric unit for air pressure. There are
14.5038 pounds per square inch (psi) to
1 bar; there are 100 kilopascals (kPa) to 1 bar.
Bead
The tire bead contains steel wires wrapped by
steel cords that hold the tire onto the rim.
Cold tire inflation pressure
Tire inflation pressure when your vehicle has
been sitting for at least 3 hours or driven no
more than 1 mile (1.6 km).
Curb weight
The weight of a motor vehicle with standard
equipment including the maximum capacity
of fuel, oil, and coolant, and, if so equipped,
air conditioning and additional optional
equipment, but without passengers and
cargo.
DOT (Department of Transportation)
A tire branding symbol which denotes the tire
meets requirements of the U.S. Department
of Transportation.
430Tires and wheelsOperation
221_AKB; 6; 20, en-USd2ugruen,Version: 2.11.8.12009-09-24T13:28:17+02:00 - Seite 430
Page 435 of 548

Always use winter tires at temperatures
below 45‡ (7†) and whenever wintry road
conditions prevail. Not all M+S rated tires
provide special winter performance. Make
sure the tires you use show the mountain/
snowflake imarking on the tire sidewall.
These tires meet specific snow traction
performance requirements of the Rubber
Manufacturers Association (RMA) and the
Rubber Association of Canada (RAC) and
have been designed specifically for use in
snow conditions. Use of winter tires is the
only way to achieve the maximum
effectiveness of your vehicle’s driving safety
systems such as the ABS and the ESC in
winter operation.
For safe handling, make sure all mounted
winter tires are of the same make and have
the same tread design.
For information on winter tires for your
vehicle model, see the “Technical data”
section ( Y page 532).
Always observe the speed rating of the winter
tires installed on your vehicle.
After installing winter tires:XCheck the tire inflation pressure and adjust
it if necessary ( Y page 413).XRestart the Advanced Tire Pressure
Monitoring System ( Y page 414).
Snow chains
! When driving with snow chains, always
select the raised level of the vehicle level
control. Other settings may result in
damage to your vehicle.
! Some tire sizes do not leave adequate
clearance for snow chains. To help avoid
serious damage to your vehicle or tires,
make sure the use of snow chains is
permissible as specified in the “Technical
data” section of this Operator’s Manual.
Snow chains should only be driven on snow-
covered roads at speeds not to exceed
30 mph (50 km/h). Remove chains as soon
as possible when driving on roads without
snow.
Observe the following guidelines when using
snow chains:
R Use of snow chains is not permissible with
all wheel/tire combinations ( Y page 532).
R Use snow chains in pairs and on rear
wheels only. Follow the manufacturer’s
mounting instructions.
! If snow chains are mounted to the front
wheels, they may scrape against the body
or axle components. The tires or the vehicle
could be damaged as a result.
R Only use snow chains that are approved by
Mercedes-Benz. Any authorized Mercedes-
Benz Center will be glad to advise you on
this subject.
R Use of snow chains may be prohibited
depending on location. Always check local
and state laws before installing snow
chains.
R Do not use snow chains on the spare wheel.
i When driving with snow chains, you may
wish to switch off the ESC ( Y page 232)
before setting the vehicle in motion. This
will improve the vehicle’s traction.
Winter driving instructions
GWarning!
If the vehicle becomes stuck in snow, make
sure snow is kept clear of the exhaust pipe
and from around the vehicle with the engine
running. Otherwise, deadly carbon monoxide
(CO) gases may enter vehicle interior
resulting in unconsciousness and death.
To assure sufficient fresh air ventilation, open
a window slightly on the side of the vehicle
not facing the wind.
Winter driving433Operation221_AKB; 6; 20, en-USd2ugruen,Version: 2.11.8.12009-09-24T13:28:17+02:00 - Seite 433Z