2010 MERCEDES-BENZ S65AMG wheel
[x] Cancel search: wheelPage 80 of 548

Function?T Seat menu button
(Y page 216)
AS Shortcut button for:
RTelephone (Y page 148)
RNavigation (Y page 95)
Bu COMAND on/off button
(Y page 77)
CH Volume control (Y page 88)Dh Favorite button (Y page 94)
COMAND display
In the COMAND display, you will find the
function currently selected and the
corresponding menus. The COMAND display
is divided into several areas.
:Status line;Main functions=Main area?SubmenusAClimate control settings
The currently selected main function is
highlighted.
Once you have selected a main function, main
area = is active.
iThe layout of the menus may vary
depending on your vehicle’s equipment.
This manual shows the menus for a fully
equipped vehicle.
Adjusting COMAND display illuminationXIncreasing the illumination: Turn
knob : clockwise.
XDimming the illumination: Turn knob :
counterclockwise.
Swiveling COMAND display
iThis function is not available in vehicles
with SPLITVIEW.
With button : or ; you can swivel the
COMAND display to the left or right.
Instrument cluster multifunction
display
This section describes features and controls
via the COMAND controller, display and
shortcut buttons only.
Related COMAND features are described in
the “Instrument cluster control system”
section (Y page 220). It contains function
descriptions and operation of the instrument
cluster multifunction display and the
multifunction steering wheel buttons.
78COMAND introductionControl systems
221_AKB; 6; 20, en-USd2ugruen,Version: 2.11.8.12009-09-24T13:28:17+02:00 - Seite 78
Page 83 of 548
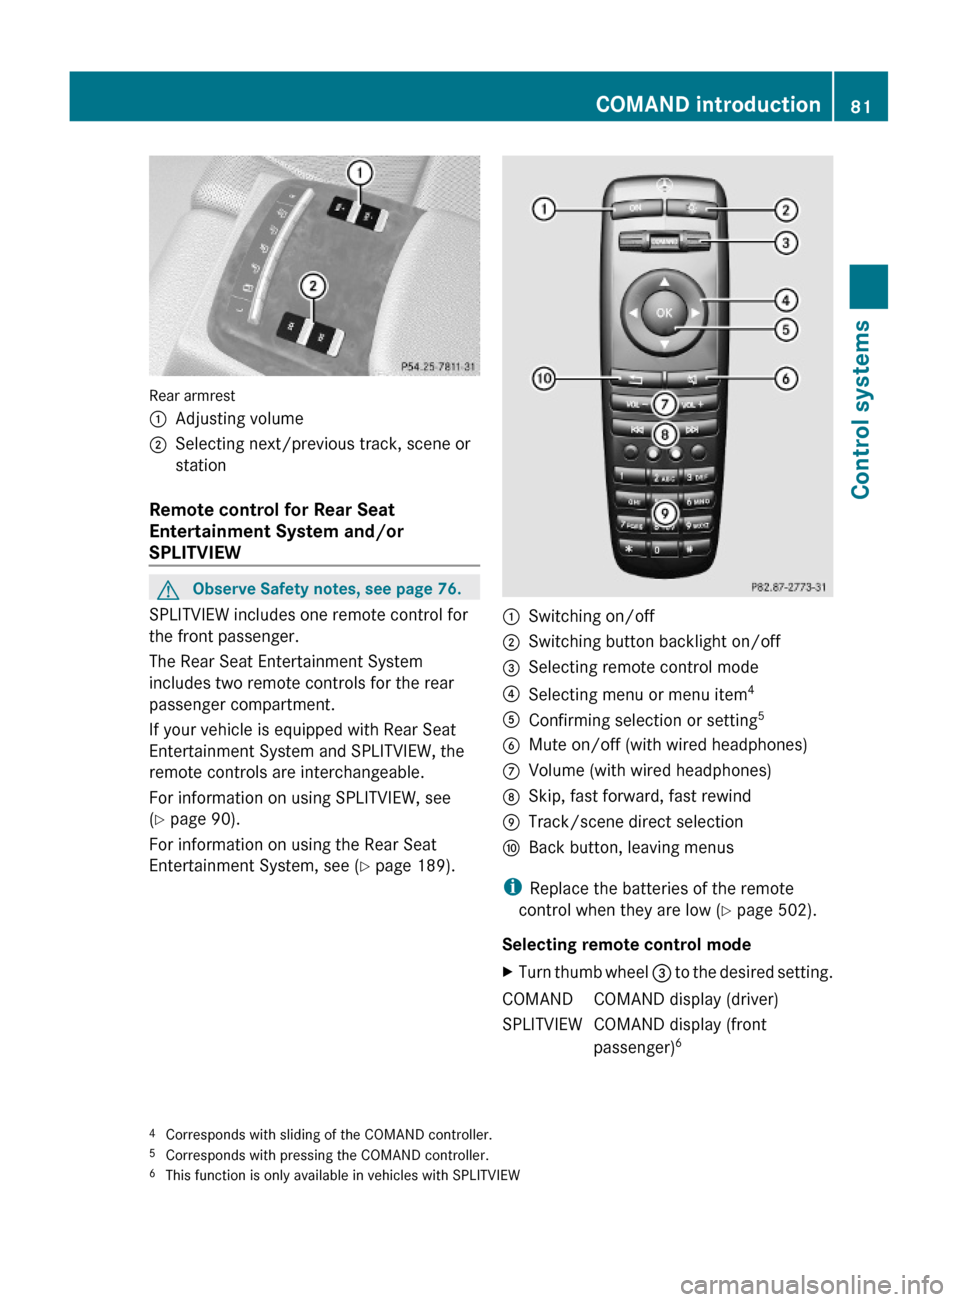
Rear armrest
:Adjusting volume;Selecting next/previous track, scene or
station
Remote control for Rear Seat
Entertainment System and/or
SPLITVIEW
GObserve Safety notes, see page 76.
SPLITVIEW includes one remote control for
the front passenger.
The Rear Seat Entertainment System
includes two remote controls for the rear
passenger compartment.
If your vehicle is equipped with Rear Seat
Entertainment System and SPLITVIEW, the
remote controls are interchangeable.
For information on using SPLITVIEW, see
(Y page 90).
For information on using the Rear Seat
Entertainment System, see (Y page 189).
:Switching on/off;Switching button backlight on/off=Selecting remote control mode?Selecting menu or menu item4AConfirming selection or setting5BMute on/off (with wired headphones)CVolume (with wired headphones)DSkip, fast forward, fast rewindETrack/scene direct selectionFBack button, leaving menus
iReplace the batteries of the remote
control when they are low (Y page 502).
Selecting remote control mode
XTurn thumb wheel = to the desired setting.COMANDCOMAND display (driver)SPLITVIEWCOMAND display (front
passenger)64Corresponds with sliding of the COMAND controller.5Corresponds with pressing the COMAND controller.6This function is only available in vehicles with SPLITVIEW
COMAND introduction81Control systems221_AKB; 6; 20, en-USd2ugruen,Version: 2.11.8.12009-09-24T13:28:17+02:00 - Seite 81Z
Page 85 of 548
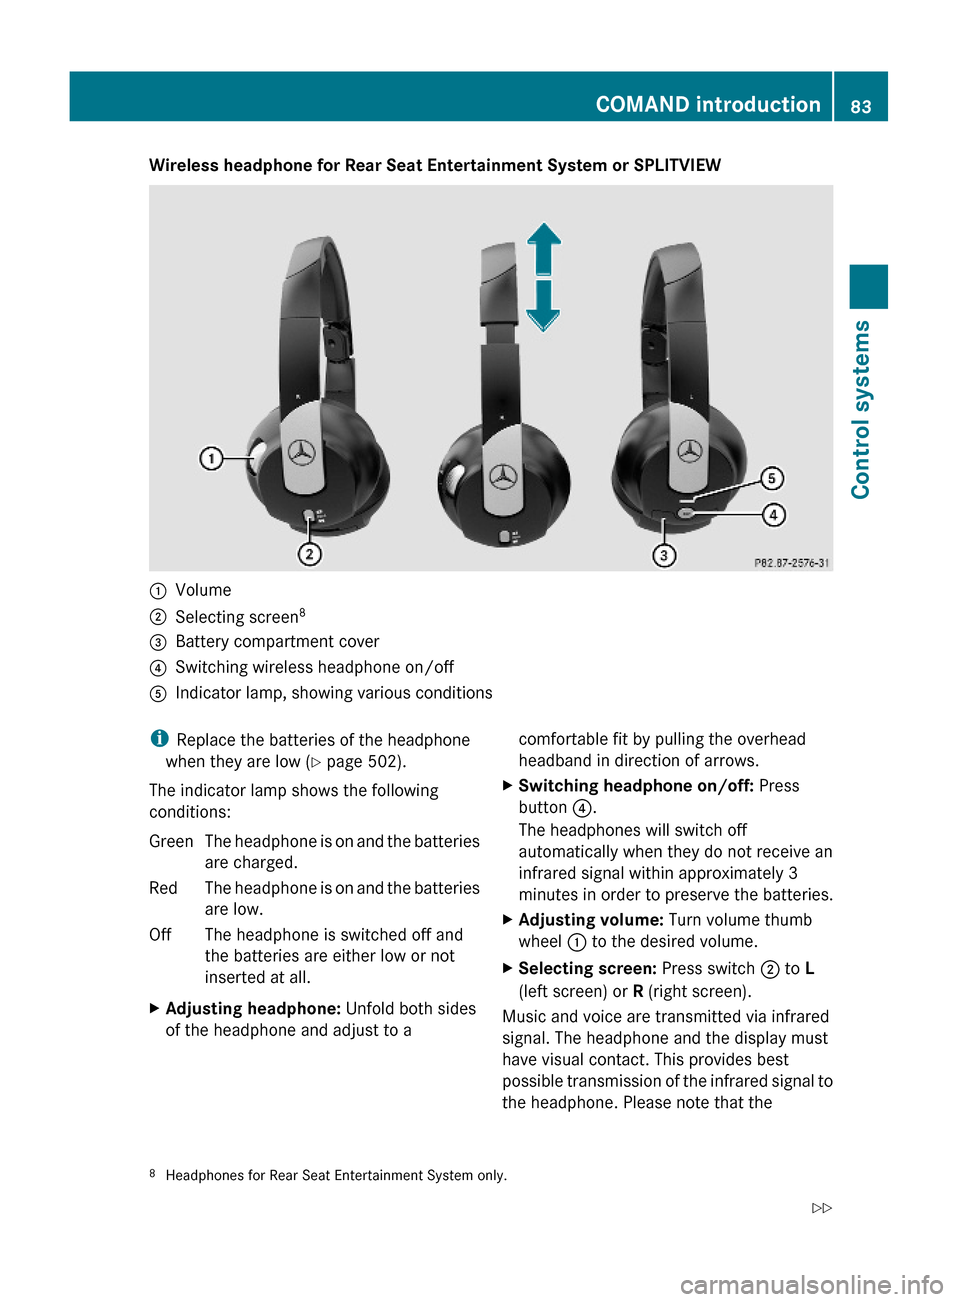
Wireless headphone for Rear Seat Entertainment System or SPLITVIEW:Volume;Selecting screen8=Battery compartment cover?Switching wireless headphone on/offAIndicator lamp, showing various conditionsiReplace the batteries of the headphone
when they are low (Y page 502).
The indicator lamp shows the following
conditions:
GreenThe headphone is on and the batteries
are charged.
RedThe headphone is on and the batteries
are low.
OffThe headphone is switched off and
the batteries are either low or not
inserted at all.
XAdjusting headphone: Unfold both sides
of the headphone and adjust to a
comfortable fit by pulling the overhead
headband in direction of arrows.
XSwitching headphone on/off: Press
button ?.
The headphones will switch off
automatically when they do not receive an
infrared signal within approximately 3
minutes in order to preserve the batteries.
XAdjusting volume: Turn volume thumb
wheel : to the desired volume.
XSelecting screen: Press switch ; to L
(left screen) or R (right screen).
Music and voice are transmitted via infrared
signal. The headphone and the display must
have visual contact. This provides best
possible transmission of the infrared signal to
the headphone. Please note that the
8Headphones for Rear Seat Entertainment System only.COMAND introduction83Control systems221_AKB; 6; 20, en-USd2ugruen,Version: 2.11.8.12009-09-24T13:28:17+02:00 - Seite 83Z
Page 89 of 548
Accepting first entryXPress W until you exit the character entry
window.
COMAND completes your entry as soon as
it can be clearly identified. In this case, you
do not need to switch to the list.
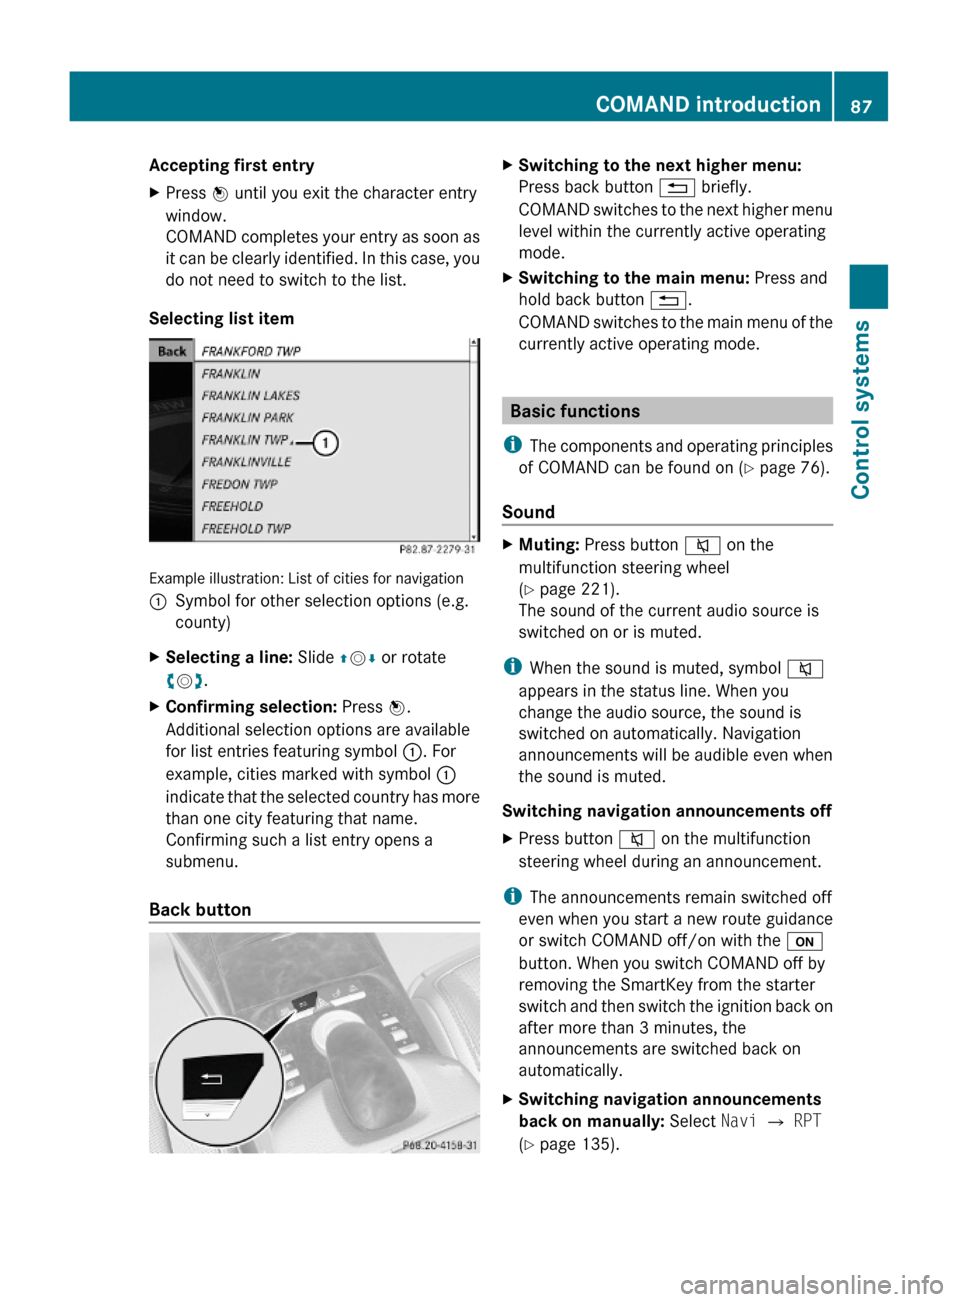
Selecting list item
Example illustration: List of cities for navigation
:Symbol for other selection options (e.g.
county)
XSelecting a line: Slide ZVÆ or rotate
cVd.
XConfirming selection: Press W.
Additional selection options are available
for list entries featuring symbol :. For
example, cities marked with symbol :
indicate that the selected country has more
than one city featuring that name.
Confirming such a list entry opens a
submenu.
Back button
XSwitching to the next higher menu:
Press back button % briefly.
COMAND switches to the next higher menu
level within the currently active operating
mode.
XSwitching to the main menu: Press and
hold back button %.
COMAND switches to the main menu of the
currently active operating mode.
Basic functions
iThe components and operating principles
of COMAND can be found on (Y page 76).
Sound
XMuting: Press button 8 on the
multifunction steering wheel
(Y page 221).
The sound of the current audio source is
switched on or is muted.
iWhen the sound is muted, symbol 8
appears in the status line. When you
change the audio source, the sound is
switched on automatically. Navigation
announcements will be audible even when
the sound is muted.
Switching navigation announcements off
XPress button 8 on the multifunction
steering wheel during an announcement.
iThe announcements remain switched off
even when you start a new route guidance
or switch COMAND off/on with the u
button. When you switch COMAND off by
removing the SmartKey from the starter
switch and then switch the ignition back on
after more than 3 minutes, the
announcements are switched back on
automatically.
XSwitching navigation announcements
back on manually: Select Navi Q RPT
(Y page 135).
COMAND introduction87Control systems221_AKB; 6; 20, en-USd2ugruen,Version: 2.11.8.12009-09-24T13:28:17+02:00 - Seite 87Z
Page 90 of 548
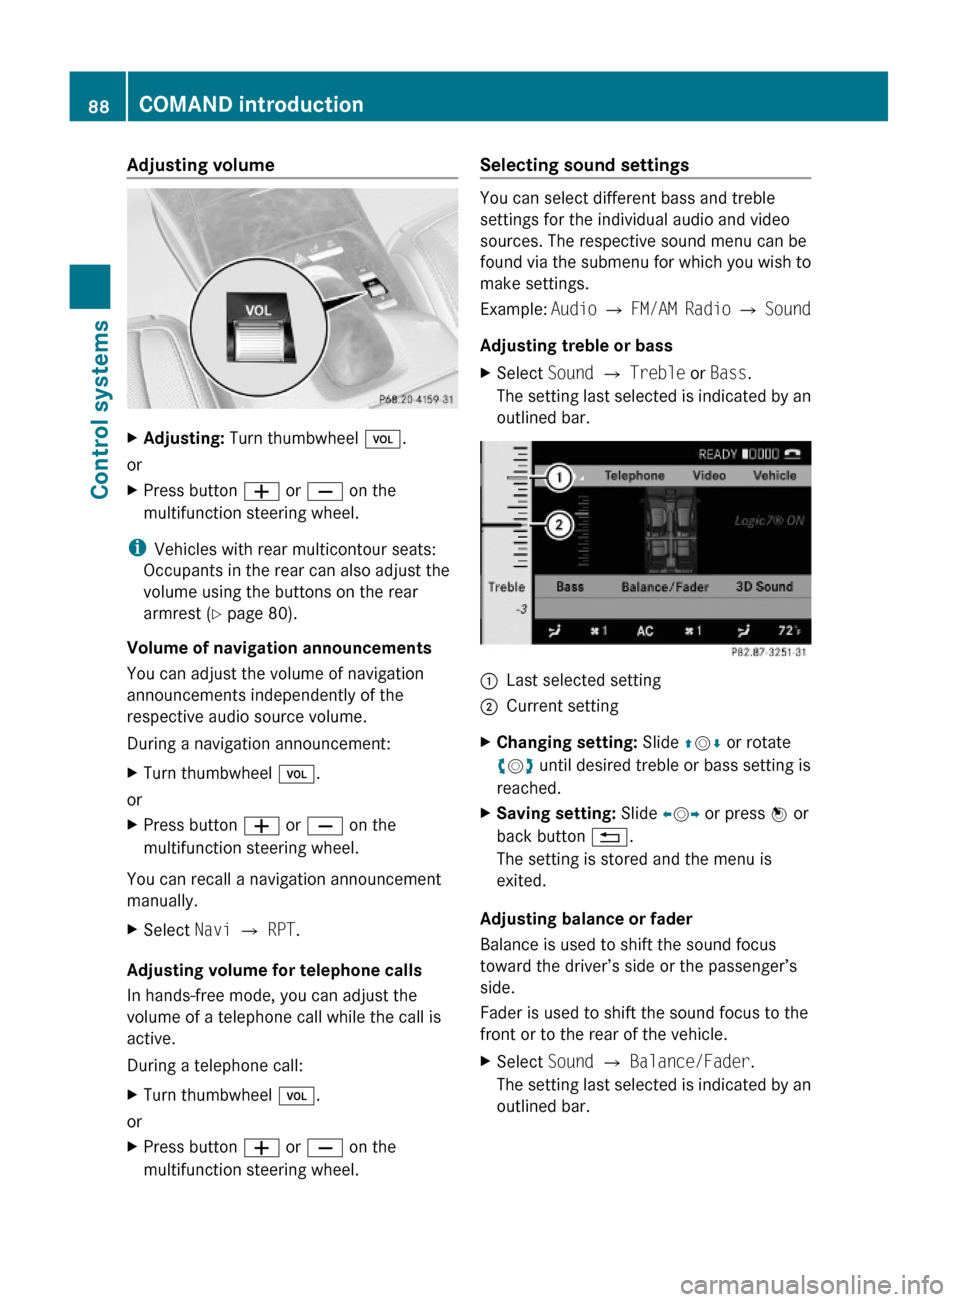
Adjusting volumeXAdjusting: Turn thumbwheel H.
or
XPress button W or X on the
multifunction steering wheel.
iVehicles with rear multicontour seats:
Occupants in the rear can also adjust the
volume using the buttons on the rear
armrest (Y page 80).
Volume of navigation announcements
You can adjust the volume of navigation
announcements independently of the
respective audio source volume.
During a navigation announcement:
XTurn thumbwheel H.
or
XPress button W or X on the
multifunction steering wheel.
You can recall a navigation announcement
manually.
XSelect Navi Q RPT.
Adjusting volume for telephone calls
In hands-free mode, you can adjust the
volume of a telephone call while the call is
active.
During a telephone call:
XTurn thumbwheel H.
or
XPress button W or X on the
multifunction steering wheel.
Selecting sound settings
You can select different bass and treble
settings for the individual audio and video
sources. The respective sound menu can be
found via the submenu for which you wish to
make settings.
Example: Audio Q FM/AM Radio Q Sound
Adjusting treble or bass
XSelect Sound Q Treble or Bass.
The setting last selected is indicated by an
outlined bar.
:Last selected setting;Current settingXChanging setting: Slide ZVÆ or rotate
cVd until desired treble or bass setting is
reached.
XSaving setting: Slide XVY or press W or
back button %.
The setting is stored and the menu is
exited.
Adjusting balance or fader
Balance is used to shift the sound focus
toward the driver’s side or the passenger’s
side.
Fader is used to shift the sound focus to the
front or to the rear of the vehicle.
XSelect Sound Q Balance/Fader.
The setting last selected is indicated by an
outlined bar.
88COMAND introductionControl systems
221_AKB; 6; 20, en-USd2ugruen,Version: 2.11.8.12009-09-24T13:28:17+02:00 - Seite 88
Page 93 of 548

control. Make sure the volume is not set
too high before putting on a headphone.
RThe DVD changer can playback only one
media source at a time. Example: if the
driver is playing an audio CD, the front
passenger can not play a different medium
(e.g. DVD video) from the DVD changer.
However, it is possible for the front
passenger to play media from radio,
memory card, MUSIC REGISTER, media
interface, USB, AUX or Rear Seat
Entertainment System.
RWhen driver and front passenger are using
the same medium, each can select
individual settings for that medium.
RCOMAND transmits music and voice to the
wireless headphone for the front passenger
side via infrared signal. The headphone and
the display must have visual contact. This
provides best possible transmission of the
infrared signal to the headphone. Please
note that the headphone has a left and right
side and must be used accordingly.
RWhen SPLITVIEW is on, the front passenger
can operate audio or video functions only.
RThe multifunction steering wheel lets you
operate functions for the driver’s side only.
Switching SPLITVIEW on/off
XSwitching on: Select Vehicle Q
SplitView ON.
or
XPress the SPLITVIEW remote control ON
button.
The SPLITVIEW symbol : appears and
status ; changes to SplitView OFF.
XSwitching off: Select Vehicle Q
SplitView OFF.
or
XPress the SPLITVIEW remote control ON
button.
Status ; changes to SplitView ON.
The SPLITVIEW screen remains on for
approximately 30 minutes after switching off
the ignition. After these 30 minutes or once
the SmartKey is removed from the starter
switch, the settings for the front passenger
side remain stored for approximately another
30 minutes.
COMAND system settings
System settings submenu overview
iThe components and operating principles
of COMAND can be found on (Y page 76).
System settings can be made in the following
submenus:
RDisplay Q Day Mode, Night Mode,
Automatic
RTime Q Time, Date, Format, Time Zone
RText Reader Q Speed Q Fast,
Medium or Slow:
Adjusts the reading speed of the Voice
Control System.
RVoice Control Q Help Window, Start
New Individualization, Delete
Individualization
RLanguage: Selecting system language
RFavorites Button *: Assigning the
favorite button
COMAND system settings 91Control systems221_AKB; 6; 20, en-USd2ugruen,Version: 2.11.8.12009-09-24T13:28:17+02:00 - Seite 91Z
Page 136 of 548
Off-road and off-map
Route guidance to an off-road
destination
GWarning!
The COMAND navigation system may direct
you to off-road routes that your vehicle may
not be capable of traversing through without
damaging your tires, wheels or vehicle. It is
the driver’s sole responsibility to determine
the suitability of the route. Off-road routes
may be of varying conditions and their
appropriateness for use may be affected by
various factors such as time of day, time of
year and immediate weather conditions that
cannot be judged or taken into consideration
by the COMAND system.
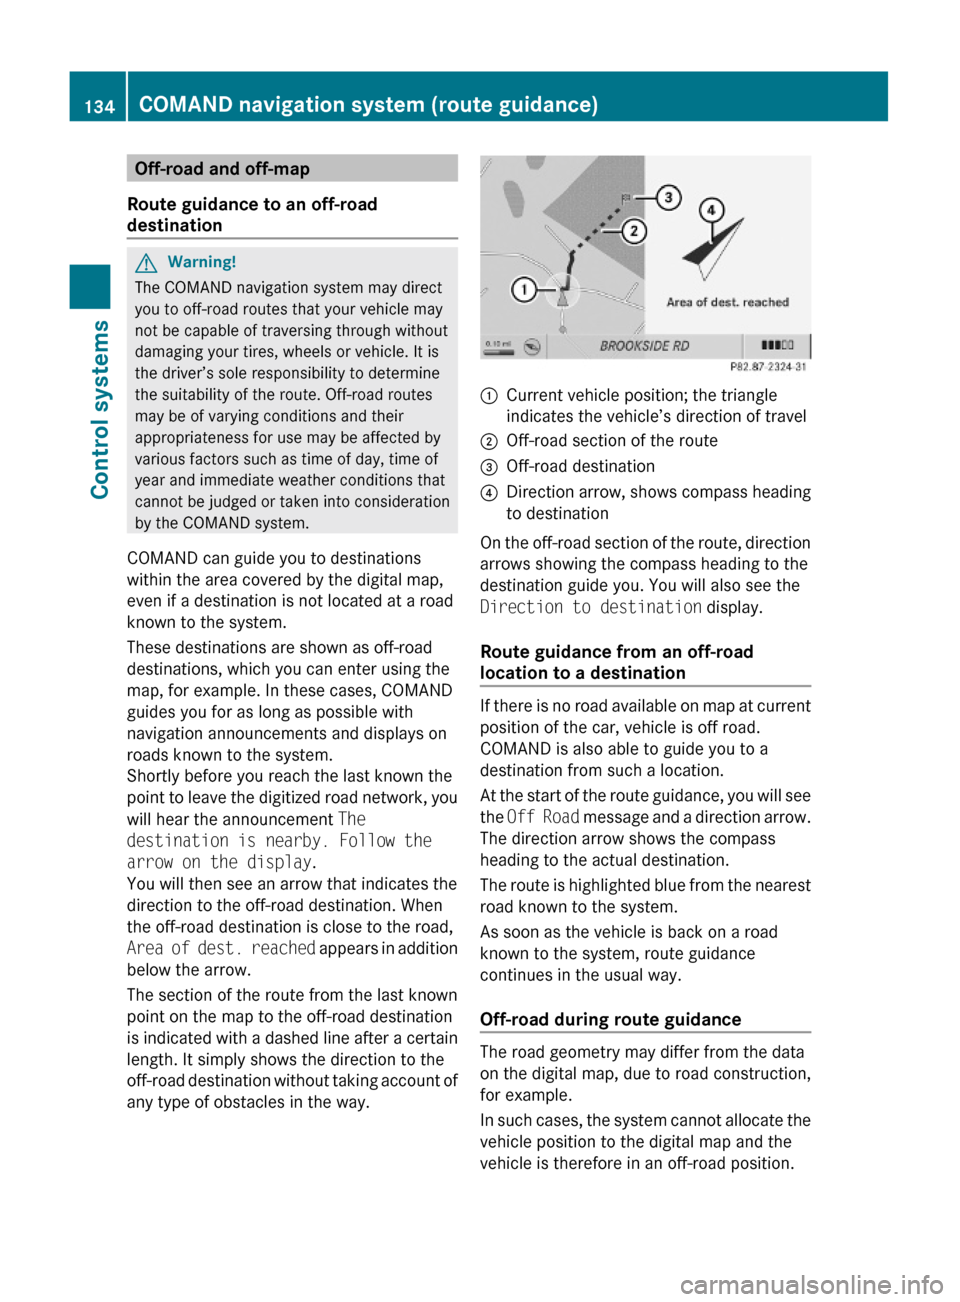
COMAND can guide you to destinations
within the area covered by the digital map,
even if a destination is not located at a road
known to the system.
These destinations are shown as off-road
destinations, which you can enter using the
map, for example. In these cases, COMAND
guides you for as long as possible with
navigation announcements and displays on
roads known to the system.
Shortly before you reach the last known the
point to leave the digitized road network, you
will hear the announcement The
destination is nearby. Follow the
arrow on the display.
You will then see an arrow that indicates the
direction to the off-road destination. When
the off-road destination is close to the road,
Area of dest. reached appears in addition
below the arrow.
The section of the route from the last known
point on the map to the off-road destination
is indicated with a dashed line after a certain
length. It simply shows the direction to the
off-road destination without taking account of
any type of obstacles in the way.
:Current vehicle position; the triangle
indicates the vehicle’s direction of travel
;Off-road section of the route=Off-road destination?Direction arrow, shows compass heading
to destination
On the off-road section of the route, direction
arrows showing the compass heading to the
destination guide you. You will also see the
Direction to destination display.
Route guidance from an off-road
location to a destination
If there is no road available on map at current
position of the car, vehicle is off road.
COMAND is also able to guide you to a
destination from such a location.
At the start of the route guidance, you will see
the Off Road message and a direction arrow.
The direction arrow shows the compass
heading to the actual destination.
The route is highlighted blue from the nearest
road known to the system.
As soon as the vehicle is back on a road
known to the system, route guidance
continues in the usual way.
Off-road during route guidance
The road geometry may differ from the data
on the digital map, due to road construction,
for example.
In such cases, the system cannot allocate the
vehicle position to the digital map and the
vehicle is therefore in an off-road position.
134COMAND navigation system (route guidance)Control systems
221_AKB; 6; 20, en-USd2ugruen,Version: 2.11.8.12009-09-24T13:28:17+02:00 - Seite 134
Page 151 of 548
Using the Bluetooth®
interface
COMAND provides telephony via the
Bluetooth ®
interface by connecting a
Bluetooth ®
-compatible mobile phone. The
following functions can be used when a
suitable mobile phone is connected to the
Bluetooth ®
interface:
R Hands-free phone operation
R Phone book
R Reception of electronic business cards
(vCards 10
)
i For further information on suitable mobile
phones and connecting Bluetooth ®
-
enabled mobile phones to COMAND
R visit www.mbusa-mobile.com
R call the Mercedes-Benz Customer
Assistance Center at
1-800-FOR-MERCedes
(1-800-367-6372) (in the USA)
R call Customer Service at
1-800-387-0100 (in Canada)
Calls disconnected while the vehicle is
in motion
A call may be disconnected if
R there is insufficient network coverage
R you move from one transmitter/receiver
area (cell) into another and no channels are
free or the cell is full
Operating options
i The components and operating principles
of COMAND can be found on ( Y page 76).
You can operate the mobile phone using the
following:
R the keys on the mobile phone
R the COMAND telephone keypad in the
center console
R the COMAND controller
R the multifunction steering wheel
R the Voice Control System ( Y page 237)
Unless otherwise specified, the descriptions
and illustrations in this section apply to
COMAND or the telephone keypad in the
center console. Thus, in order to use the
described functions you always have to call
up the Telephone menu. The fastest way to
get to the Telephone menu is pressing
shortcut button S.
You can control other functions of the mobile
phone via the COMAND, instrument cluster
control system (Y page 230) or Voice Control
System ( Y page 237).
Caller ID
COMAND can display the telephone number
and the name of the caller, e.g. for an
incoming call and also in other menus or
displays.
For the telephone number to be displayed,
the caller must transmit his telephone
number.
This is also the case for name displays. For
this, the telephone number and the name of
the caller must also be saved in the mobile
phone book.
Functional restrictions
You will not be able to use the telephone, or
you may have to wait a while, in the following
situations:
R If the Bluetooth function in COMAND or
on the mobile phone is switched off.
R If the telephone has not yet logged into the
network.
The telephone tries to log into a network
automatically. If no network is available,
you will also not be able to make a “911”
emergency call. If you attempt to make an
10 vCards are electronic business cards used by e-mail applications, mobile phones, PDAs, etc. to exchange
contact information.COMAND telephone149Control systems221_AKB; 6; 20, en-USd2ugruen,Version: 2.11.8.12009-09-24T13:28:17+02:00 - Seite 149Z