2010 MERCEDES-BENZ S65AMG key
[x] Cancel search: keyPage 117 of 548
XSwitching manually to the street list
without predictive speller: Slide ZV.
or
XSelect ¬ in the second line from the
bottom and press W.
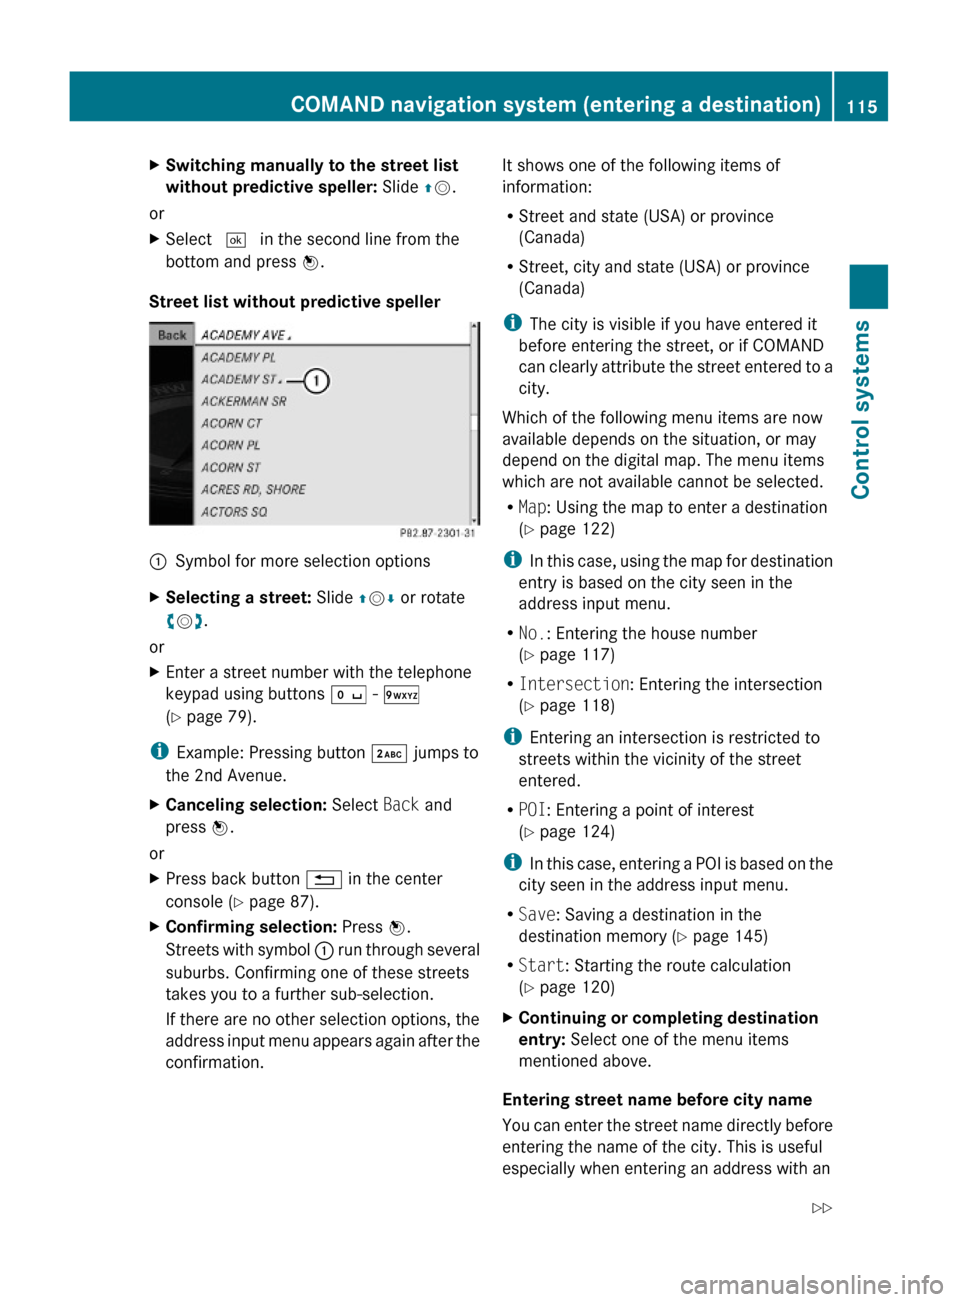
Street list without predictive speller
:Symbol for more selection optionsXSelecting a street: Slide ZVÆ or rotate
cVd.
or
XEnter a street number with the telephone
keypad using buttons Å - Ã
(Y page 79).
iExample: Pressing button · jumps to
the 2nd Avenue.
XCanceling selection: Select Back and
press W.
or
XPress back button % in the center
console (Y page 87).
XConfirming selection: Press W.
Streets with symbol : run through several
suburbs. Confirming one of these streets
takes you to a further sub-selection.
If there are no other selection options, the
address input menu appears again after the
confirmation.
It shows one of the following items of
information:
RStreet and state (USA) or province
(Canada)
RStreet, city and state (USA) or province
(Canada)
iThe city is visible if you have entered it
before entering the street, or if COMAND
can clearly attribute the street entered to a
city.
Which of the following menu items are now
available depends on the situation, or may
depend on the digital map. The menu items
which are not available cannot be selected.
RMap: Using the map to enter a destination
(Y page 122)
iIn this case, using the map for destination
entry is based on the city seen in the
address input menu.
RNo.: Entering the house number
(Y page 117)
RIntersection: Entering the intersection
(Y page 118)
iEntering an intersection is restricted to
streets within the vicinity of the street
entered.
RPOI: Entering a point of interest
(Y page 124)
iIn this case, entering a POI is based on the
city seen in the address input menu.
RSave: Saving a destination in the
destination memory (Y page 145)
RStart: Starting the route calculation
(Y page 120)
XContinuing or completing destination
entry: Select one of the menu items
mentioned above.
Entering street name before city name
You can enter the street name directly before
entering the name of the city. This is useful
especially when entering an address with an
COMAND navigation system (entering a destination)115Control systems221_AKB; 6; 20, en-USd2ugruen,Version: 2.11.8.12009-09-24T13:28:17+02:00 - Seite 115Z
Page 120 of 548

XSelecting numbers: Slide XVY or rotate
cVd.
XConfirming number selection: Press W.
or
XEntering a number with the telephone
keypad using buttons Å - Ã
(Y page 79).
XDeleting individual numbers: Select F
in the bottom line and press W.
XDeleting an entire entry: Select F in the
bottom line and press W and hold until the
entire entry is deleted.
XCanceling an entry: Select % in the
bottom line and press W.
or
XPress back button % in the center
console (Y page 87).
XConfirming entry: Select ¬ in the
second line from the bottom and press W.
If COMAND cannot clearly attribute the
house number to a city, the city input menu
appears.
Entering city: Proceed as described in the
“Entering a city” section (Y page 111).
After the city has been entered, the address
input menu appears again.
If COMAND can clearly attribute the house
number to a city, the address input menu
also appears.
In both cases, the address input menu
shows the house number, street, city and
state (USA) or province (Canada).
Which of the following menu items are now
available may depend on the data version of
the digital map. The menu items which are not
available cannot be selected.
RMap: Using the map to enter a destination
(Y page 122)
iIn this case, using the map for destination
entry is based on the city seen in the
address input menu.
RPOI: Entering a point of interest
(Y page 124)
iIn this case, entering a POI is based on the
city seen in the address input menu.
RSave: Saving a destination in the
destination memory (Y page 145)
RStart: Starting the route calculation
(Y page 120)
XContinuing or completing destination
entry: Select one of the menu items
mentioned above.
Entering an intersection
iThe intersection can only be entered after
the street has been entered.
You can only enter intersections which are
available on the digital map.
XIn the address input menu, select
Intersection.
The list of intersections appears either with
or without the predictive speller
(Y page 119). Whether or not the
predictive speller appears depends on how
many intersections are available for the
selected street.
List of intersections with predictive
speller
:Top list entry based on the input data up
to that point
;Characters entered by the user=Characters automatically added by the
system
?Predictive spellerACurrently non-selectable characters118COMAND navigation system (entering a destination)Control systems
221_AKB; 6; 20, en-USd2ugruen,Version: 2.11.8.12009-09-24T13:28:17+02:00 - Seite 118
Page 131 of 548
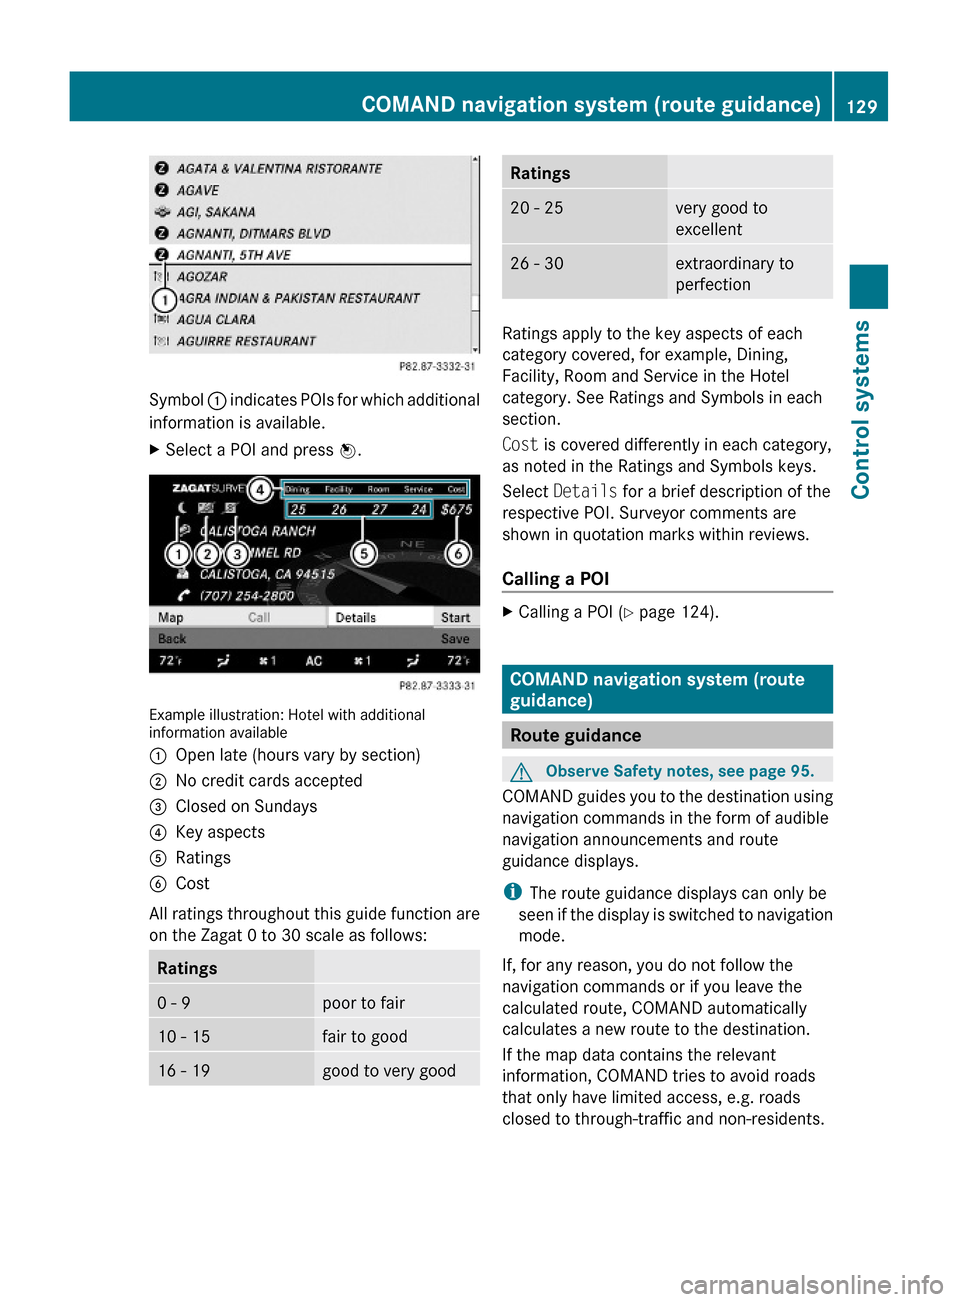
Symbol : indicates POIs for which additional
information is available.
XSelect a POI and press W.
Example illustration: Hotel with additionalinformation available
:Open late (hours vary by section);No credit cards accepted=Closed on Sundays?Key aspectsARatingsBCost
All ratings throughout this guide function are
on the Zagat 0 to 30 scale as follows:
Ratings0 - 9poor to fair10 - 15fair to good16 - 19good to very goodRatings20 - 25very good to
excellent
26 - 30extraordinary to
perfection
Ratings apply to the key aspects of each
category covered, for example, Dining,
Facility, Room and Service in the Hotel
category. See Ratings and Symbols in each
section.
Cost is covered differently in each category,
as noted in the Ratings and Symbols keys.
Select Details for a brief description of the
respective POI. Surveyor comments are
shown in quotation marks within reviews.
Calling a POI
XCalling a POI (Y page 124).
COMAND navigation system (route
guidance)
Route guidance
GObserve Safety notes, see page 95.
COMAND guides you to the destination using
navigation commands in the form of audible
navigation announcements and route
guidance displays.
iThe route guidance displays can only be
seen if the display is switched to navigation
mode.
If, for any reason, you do not follow the
navigation commands or if you leave the
calculated route, COMAND automatically
calculates a new route to the destination.
If the map data contains the relevant
information, COMAND tries to avoid roads
that only have limited access, e.g. roads
closed to through-traffic and non-residents.
COMAND navigation system (route guidance)129Control systems221_AKB; 6; 20, en-USd2ugruen,Version: 2.11.8.12009-09-24T13:28:17+02:00 - Seite 129Z
Page 137 of 548
The Off Road message and an arrow showing
the compass heading to the destination
appear on the display.
As soon as the system can allocate the
vehicle position to the map again, route
guidance continues in the usual way.
Navigation announcements
GWarning!
Navigation announcements are intended to
direct you while driving without diverting your
attention from the road and driving.
Please always use navigation announcements
instead of consulting the map display for
directions. Consulting the symbols or map
display for directions may cause you to divert
your attention from driving and increase your
risk of an accident.
i If Chinese is set as the system language,
the navigation announcements are in
English. For information on how to set the
system language see ( Y page 94).
Navigation announcements are muted
during telephone calls. You can, however,
call up a current announcement at any
time. You can also call up a current
announcement at any time if you have
missed an announcement.
Route guidance is active already.
XCalling up a current announcement:
Select Navi Q RPT .
or
XPress favorite button h if the button has
been programmed with this function
( Y page 94).XSwitching off navigation messages:
Press button 8 during an
announcement.
You will see the message The driving
instructions have been muted. for a
short while.
i The announcements remain switched off
even if you start a new route guidance or if
COMAND is switched off/on with button
u .
If you switch COMAND off by removing the
SmartKey from the starter switch and then
switch the ignition back on after more than
3 minutes, the announcements are
automatically switched back on.
XSwitching navigation announcements
back on manually: Select Navi Q RPT .XAdjusting volume of the messages:
Adjust the volume during an automatic
announcement ( Y page 87).
or
XCall up an announcement manually using
Navi Q RPT and adjust the volume
( Y page 87).
i
You can use the function Audio
Fadeout (Y page 106) to reduce the
volume of audio sources during navigation
announcements.
COMAND navigation system (during
route guidance)
Cancel route guidance
XSelect Destination Q Cancel Route
Guidance in map view with the menu
system displayed ( Y page 102).
Continuing canceled route guidance
XSelect Destination Q Continue
Route Guidance in map view with the
menu system displayed ( Y page 102).
COMAND calculates the route.COMAND navigation system (during route guidance)135Control systems221_AKB; 6; 20, en-USd2ugruen,Version: 2.11.8.12009-09-24T13:28:17+02:00 - Seite 135Z
Page 151 of 548
Using the Bluetooth®
interface
COMAND provides telephony via the
Bluetooth ®
interface by connecting a
Bluetooth ®
-compatible mobile phone. The
following functions can be used when a
suitable mobile phone is connected to the
Bluetooth ®
interface:
R Hands-free phone operation
R Phone book
R Reception of electronic business cards
(vCards 10
)
i For further information on suitable mobile
phones and connecting Bluetooth ®
-
enabled mobile phones to COMAND
R visit www.mbusa-mobile.com
R call the Mercedes-Benz Customer
Assistance Center at
1-800-FOR-MERCedes
(1-800-367-6372) (in the USA)
R call Customer Service at
1-800-387-0100 (in Canada)
Calls disconnected while the vehicle is
in motion
A call may be disconnected if
R there is insufficient network coverage
R you move from one transmitter/receiver
area (cell) into another and no channels are
free or the cell is full
Operating options
i The components and operating principles
of COMAND can be found on ( Y page 76).
You can operate the mobile phone using the
following:
R the keys on the mobile phone
R the COMAND telephone keypad in the
center console
R the COMAND controller
R the multifunction steering wheel
R the Voice Control System ( Y page 237)
Unless otherwise specified, the descriptions
and illustrations in this section apply to
COMAND or the telephone keypad in the
center console. Thus, in order to use the
described functions you always have to call
up the Telephone menu. The fastest way to
get to the Telephone menu is pressing
shortcut button S.
You can control other functions of the mobile
phone via the COMAND, instrument cluster
control system (Y page 230) or Voice Control
System ( Y page 237).
Caller ID
COMAND can display the telephone number
and the name of the caller, e.g. for an
incoming call and also in other menus or
displays.
For the telephone number to be displayed,
the caller must transmit his telephone
number.
This is also the case for name displays. For
this, the telephone number and the name of
the caller must also be saved in the mobile
phone book.
Functional restrictions
You will not be able to use the telephone, or
you may have to wait a while, in the following
situations:
R If the Bluetooth function in COMAND or
on the mobile phone is switched off.
R If the telephone has not yet logged into the
network.
The telephone tries to log into a network
automatically. If no network is available,
you will also not be able to make a “911”
emergency call. If you attempt to make an
10 vCards are electronic business cards used by e-mail applications, mobile phones, PDAs, etc. to exchange
contact information.COMAND telephone149Control systems221_AKB; 6; 20, en-USd2ugruen,Version: 2.11.8.12009-09-24T13:28:17+02:00 - Seite 149Z
Page 152 of 548
outgoing call, the No Service message will
appear for a short while.
RThe SIM card is not inserted in GSM type
phone.
RWhen you remove the SmartKey from the
starter switch during a call in hand-free
mode, the call will be maintained for up to
30 minutes. It will then be terminated.
Switch to “Private Mode” on the mobile
phone before switching off COMAND to
maintain the call beyond that time limit.
Refer to the operating instructions of your
mobile phone.
RWhen you want to switch off COMAND
during a call in hands-free mode, the
message You cannot shut off COMAND
until you have finished your
telephone call. appears.
Activating telephone mode
XSelect Telephone.
or
XPress button 6 on telephone keypad.
or
XPress shortcut button S once or twice.
iThe number of times you have to press
shortcut button S depends on the
operating mode currently selected.
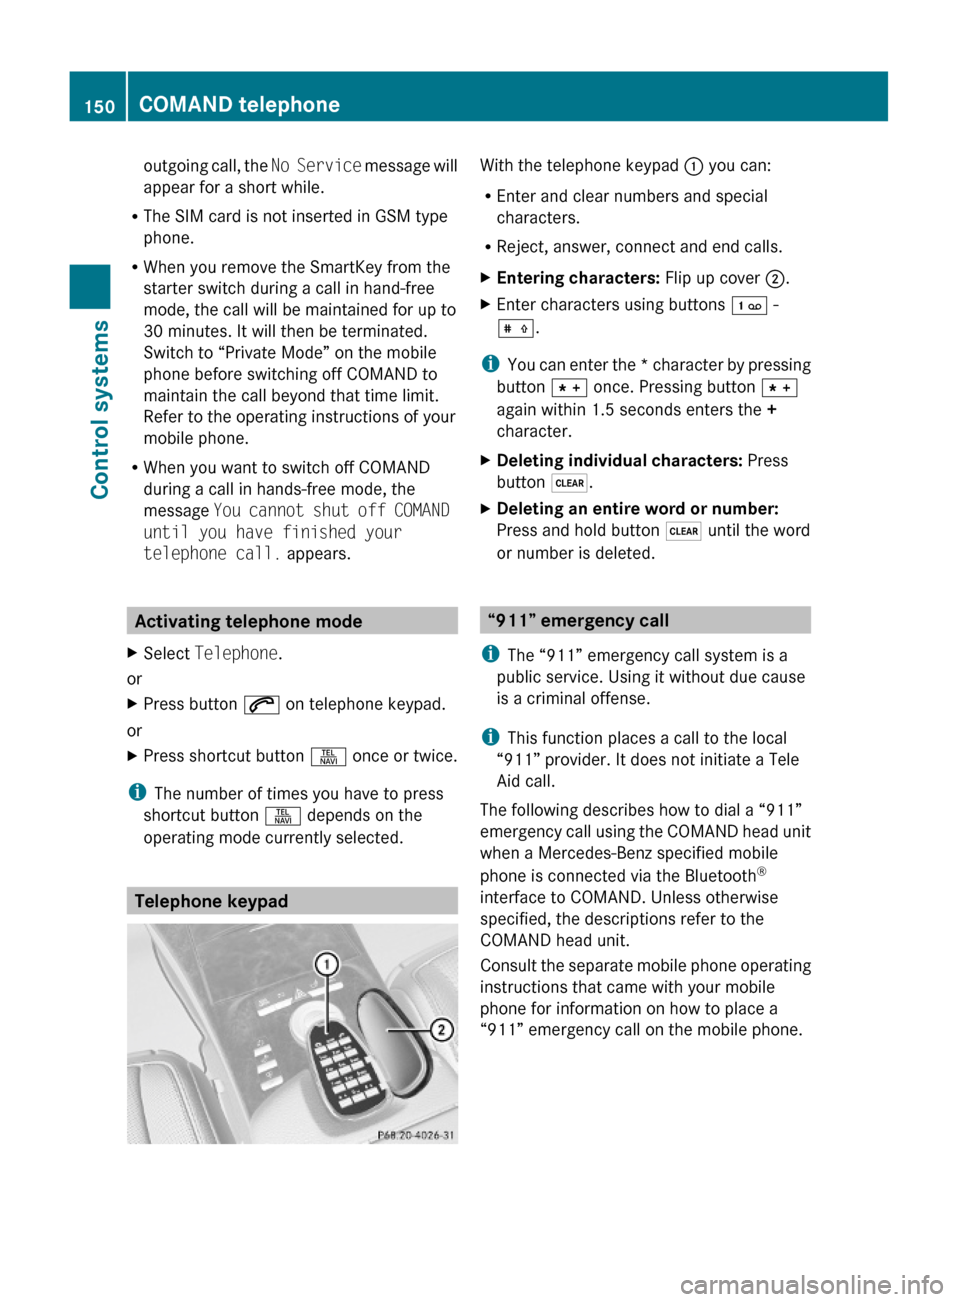
Telephone keypad
With the telephone keypad : you can:
REnter and clear numbers and special
characters.
RReject, answer, connect and end calls.
XEntering characters: Flip up cover ;.XEnter characters using buttons ´ -
Æ.
iYou can enter the * character by pressing
button à once. Pressing button Ã
again within 1.5 seconds enters the +
character.
XDeleting individual characters: Press
button $.
XDeleting an entire word or number:
Press and hold button $ until the word
or number is deleted.
“911” emergency call
iThe “911” emergency call system is a
public service. Using it without due cause
is a criminal offense.
iThis function places a call to the local
“911” provider. It does not initiate a Tele
Aid call.
The following describes how to dial a “911”
emergency call using the COMAND head unit
when a Mercedes-Benz specified mobile
phone is connected via the Bluetooth®
interface to COMAND. Unless otherwise
specified, the descriptions refer to the
COMAND head unit.
Consult the separate mobile phone operating
instructions that came with your mobile
phone for information on how to place a
“911” emergency call on the mobile phone.
150COMAND telephoneControl systems
221_AKB; 6; 20, en-USd2ugruen,Version: 2.11.8.12009-09-24T13:28:17+02:00 - Seite 150
Page 153 of 548

The following conditions must be met for a
“911” emergency call via COMAND:
RMobile phone must be switched on.
RThe corresponding mobile
communications network must be
available.
iEmergency calls may not be possible with
all telephone networks or if certain network
services and/or telephone functions are
active. Check with your local service
providers.
If you cannot make an emergency call, you
will have to initiate rescue measures yourself.
Placing a “911” emergency call using
COMAND with the mobile phone
unlocked
XPress button S to switch to telephone
mode.
XEnter 911 using the telephone keypad in
the center console.
XPress button 6 on the telephone
keypad in the center console.
or
XSelect 6 in the COMAND display and
press W for dialing to begin.
Connecting call… appears in the
COMAND display while the mobile phone
establishes the connection.
XWait until the emergency call center
answers, then describe the emergency.
iDepending on the phone type, if no SIM
card is inserted in a GSM mobile phone or
if there is no service on a CDMA mobile
phone, NO SERVICE may appear in the
COMAND display. In that case, you only can
make an emergency call on the mobile
phone itself, without the use of COMAND.
Placing a “911” emergency call with the
mobile phone locked
iIf the mobile phone is locked, you only can
make an emergency call on the mobile
phone itself, without the use of COMAND.
Bluetooth interface
Bluetooth® is a technology for wireless
exchange of data over short distances of up
to approximately 33 feet (10 m). You can
connect your mobile phone to COMAND or
exchange vCards using Bluetooth®.
Activating and deactivating Bluetooth®
XSelect Vehicle Q System Q
Bluetooth Q Bluetooth activated.
Bluetooth® is activated when the check box
is checked.
Mobile phone prerequisites
A Bluetooth®-compatible mobile phone is
required for telephony via the COMAND using
the Bluetooth® interface.
iFor further information on suitable mobile
phones and connecting Bluetooth®-
enabled mobile phones to COMAND
Rvisit www.mbusa-mobile.com
Rcall the Mercedes-Benz Customer
Assistance Center at
COMAND telephone151Control systems221_AKB; 6; 20, en-USd2ugruen,Version: 2.11.8.12009-09-24T13:28:17+02:00 - Seite 151Z
Page 155 of 548
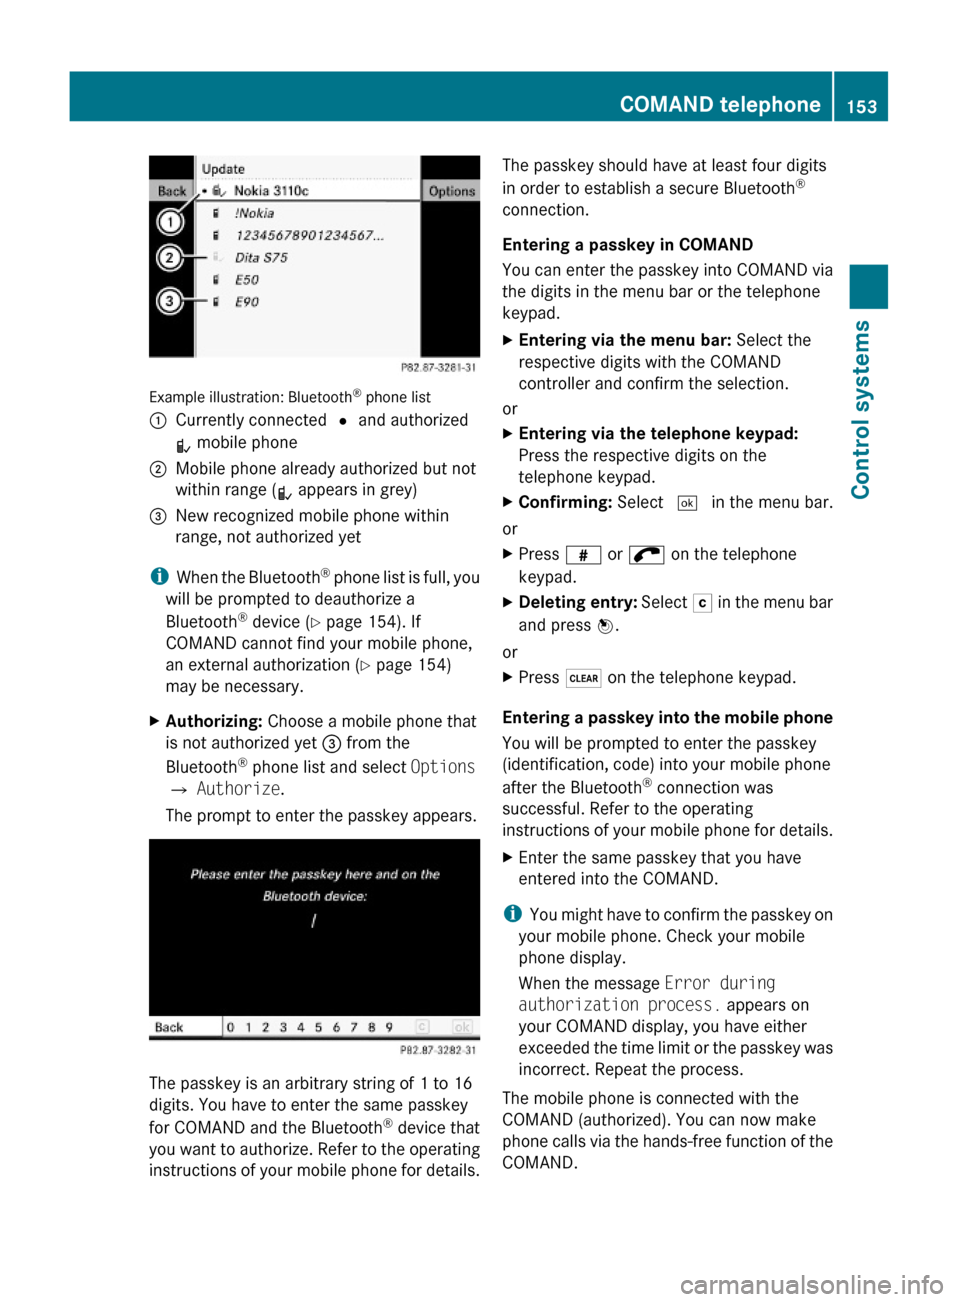
Example illustration: Bluetooth® phone list
:Currently connected # and authorized
L mobile phone
;Mobile phone already authorized but not
within range (L appears in grey)
=New recognized mobile phone within
range, not authorized yet
iWhen the Bluetooth® phone list is full, you
will be prompted to deauthorize a
Bluetooth® device (Y page 154). If
COMAND cannot find your mobile phone,
an external authorization (Y page 154)
may be necessary.
XAuthorizing: Choose a mobile phone that
is not authorized yet = from the
Bluetooth® phone list and select Options
Q Authorize.
The prompt to enter the passkey appears.
The passkey is an arbitrary string of 1 to 16
digits. You have to enter the same passkey
for COMAND and the Bluetooth® device that
you want to authorize. Refer to the operating
instructions of your mobile phone for details.
The passkey should have at least four digits
in order to establish a secure Bluetooth®
connection.
Entering a passkey in COMAND
You can enter the passkey into COMAND via
the digits in the menu bar or the telephone
keypad.
XEntering via the menu bar: Select the
respective digits with the COMAND
controller and confirm the selection.
or
XEntering via the telephone keypad:
Press the respective digits on the
telephone keypad.
XConfirming: Select ¬ in the menu bar.
or
XPress z or ; on the telephone
keypad.
XDeleting entry: Select F in the menu bar
and press W.
or
XPress $ on the telephone keypad.
Entering a passkey into the mobile phone
You will be prompted to enter the passkey
(identification, code) into your mobile phone
after the Bluetooth® connection was
successful. Refer to the operating
instructions of your mobile phone for details.
XEnter the same passkey that you have
entered into the COMAND.
iYou might have to confirm the passkey on
your mobile phone. Check your mobile
phone display.
When the message Error during
authorization process. appears on
your COMAND display, you have either
exceeded the time limit or the passkey was
incorrect. Repeat the process.
The mobile phone is connected with the
COMAND (authorized). You can now make
phone calls via the hands-free function of the
COMAND.
COMAND telephone153Control systems221_AKB; 6; 20, en-USd2ugruen,Version: 2.11.8.12009-09-24T13:28:17+02:00 - Seite 153Z