2010 MERCEDES-BENZ S65AMG sensor
[x] Cancel search: sensorPage 238 of 548
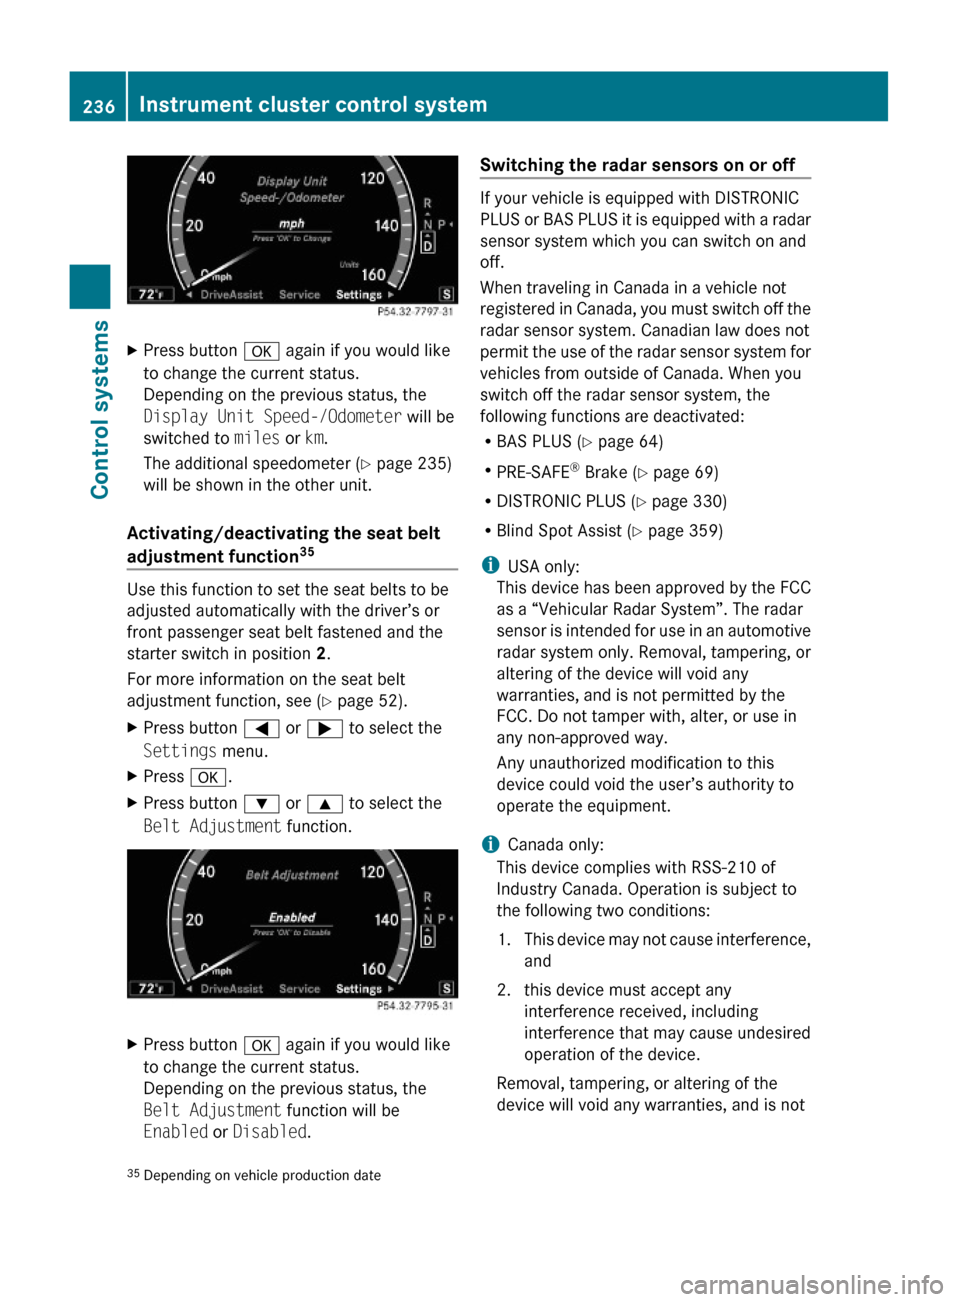
XPress button a again if you would like
to change the current status.
Depending on the previous status, the
Display Unit Speed-/Odometer will be
switched to miles or km.
The additional speedometer (Y page 235)
will be shown in the other unit.
Activating/deactivating the seat belt
adjustment function35
Use this function to set the seat belts to be
adjusted automatically with the driver’s or
front passenger seat belt fastened and the
starter switch in position 2.
For more information on the seat belt
adjustment function, see (Y page 52).
XPress button = or ; to select the
Settings menu.
XPress a.XPress button : or 9 to select the
Belt Adjustment function.
XPress button a again if you would like
to change the current status.
Depending on the previous status, the
Belt Adjustment function will be
Enabled or Disabled.
Switching the radar sensors on or off
If your vehicle is equipped with DISTRONIC
PLUS or BAS PLUS it is equipped with a radar
sensor system which you can switch on and
off.
When traveling in Canada in a vehicle not
registered in Canada, you must switch off the
radar sensor system. Canadian law does not
permit the use of the radar sensor system for
vehicles from outside of Canada. When you
switch off the radar sensor system, the
following functions are deactivated:
RBAS PLUS (Y page 64)
RPRE-SAFE® Brake (Y page 69)
RDISTRONIC PLUS (Y page 330)
RBlind Spot Assist (Y page 359)
iUSA only:
This device has been approved by the FCC
as a “Vehicular Radar System”. The radar
sensor is intended for use in an automotive
radar system only. Removal, tampering, or
altering of the device will void any
warranties, and is not permitted by the
FCC. Do not tamper with, alter, or use in
any non-approved way.
Any unauthorized modification to this
device could void the user’s authority to
operate the equipment.
iCanada only:
This device complies with RSS-210 of
Industry Canada. Operation is subject to
the following two conditions:
1.This device may not cause interference,
and
2. this device must accept any
interference received, including
interference that may cause undesired
operation of the device.
Removal, tampering, or altering of the
device will void any warranties, and is not
35Depending on vehicle production date236Instrument cluster control systemControl systems
221_AKB; 6; 20, en-USd2ugruen,Version: 2.11.8.12009-09-24T13:28:17+02:00 - Seite 236
Page 239 of 548
permitted. Do not tamper with, alter, or use
in any non-approved way.
Any unauthorized modification to this
device could void the user’s authority to
operate the equipment.
XPress button = or ; to select the
Settings menu.
XPress button : or 9 to select the
Radar Sensors function.
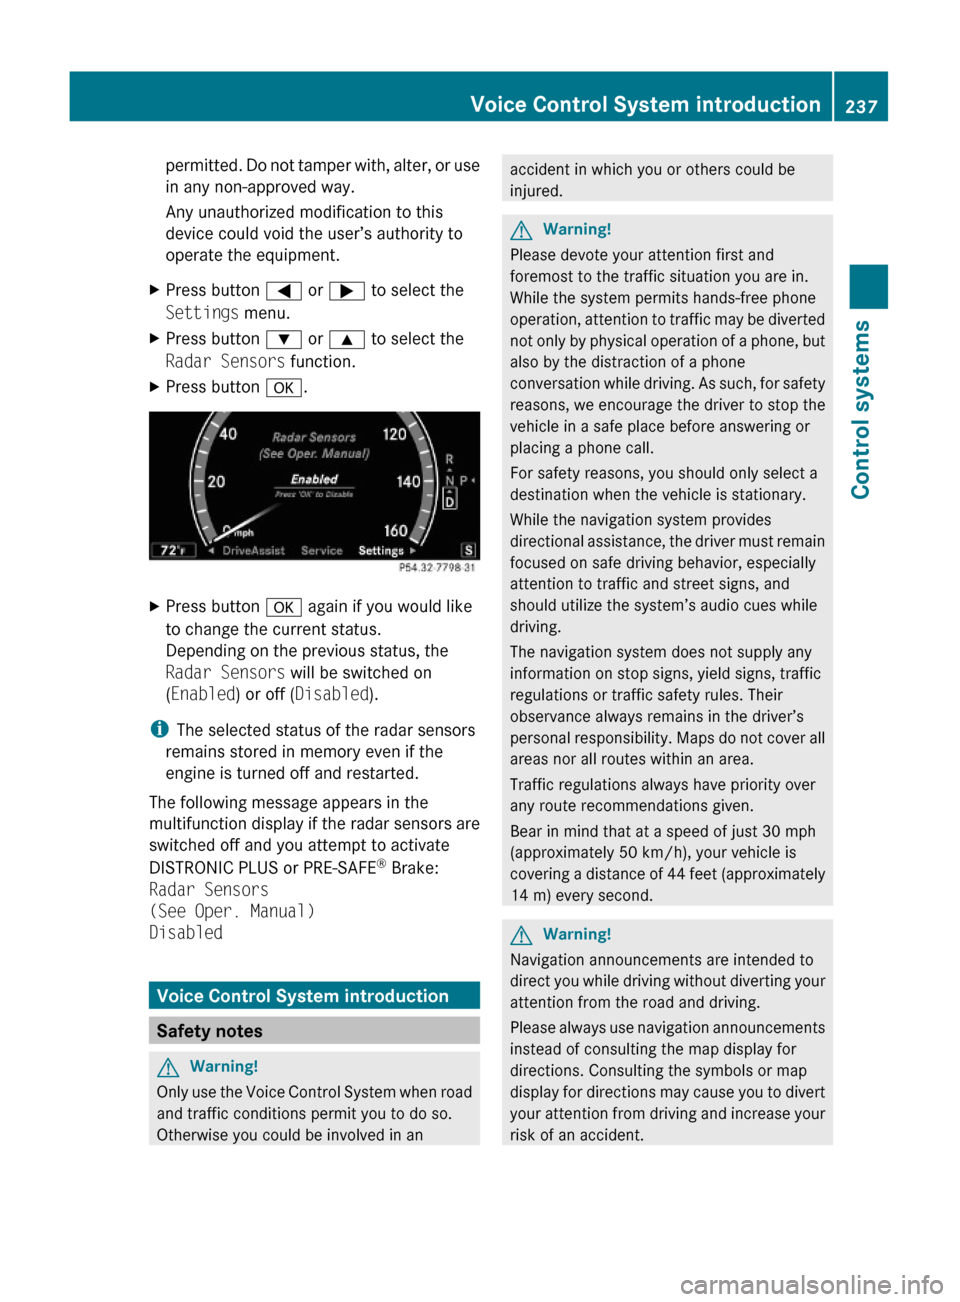
XPress button a.XPress button a again if you would like
to change the current status.
Depending on the previous status, the
Radar Sensors will be switched on
(Enabled) or off (Disabled).
iThe selected status of the radar sensors
remains stored in memory even if the
engine is turned off and restarted.
The following message appears in the
multifunction display if the radar sensors are
switched off and you attempt to activate
DISTRONIC PLUS or PRE-SAFE® Brake:
Radar Sensors
(See Oper. Manual)
Disabled
Voice Control System introduction
Safety notes
GWarning!
Only use the Voice Control System when road
and traffic conditions permit you to do so.
Otherwise you could be involved in an
accident in which you or others could be
injured.
GWarning!
Please devote your attention first and
foremost to the traffic situation you are in.
While the system permits hands-free phone
operation, attention to traffic may be diverted
not only by physical operation of a phone, but
also by the distraction of a phone
conversation while driving. As such, for safety
reasons, we encourage the driver to stop the
vehicle in a safe place before answering or
placing a phone call.
For safety reasons, you should only select a
destination when the vehicle is stationary.
While the navigation system provides
directional assistance, the driver must remain
focused on safe driving behavior, especially
attention to traffic and street signs, and
should utilize the system’s audio cues while
driving.
The navigation system does not supply any
information on stop signs, yield signs, traffic
regulations or traffic safety rules. Their
observance always remains in the driver’s
personal responsibility. Maps do not cover all
areas nor all routes within an area.
Traffic regulations always have priority over
any route recommendations given.
Bear in mind that at a speed of just 30 mph
(approximately 50 km/h), your vehicle is
covering a distance of 44 feet (approximately
14 m) every second.
GWarning!
Navigation announcements are intended to
direct you while driving without diverting your
attention from the road and driving.
Please always use navigation announcements
instead of consulting the map display for
directions. Consulting the symbols or map
display for directions may cause you to divert
your attention from driving and increase your
risk of an accident.
Voice Control System introduction237Control systems221_AKB; 6; 20, en-USd2ugruen,Version: 2.11.8.12009-09-24T13:28:17+02:00 - Seite 237Z
Page 297 of 548
Exterior rear view mirrorsGWarning!
Exercise care when using the passenger-side
exterior rear view mirror. The mirror surface
is convex (outwardly curved surface for a
wider field of view). Objects in mirror are
closer than they appear. Check your interior
rear view mirror and glance over your
shoulder before changing lanes.
iYou can store the settings for the exterior
rear view mirror position with the memory
function (Y page 297).
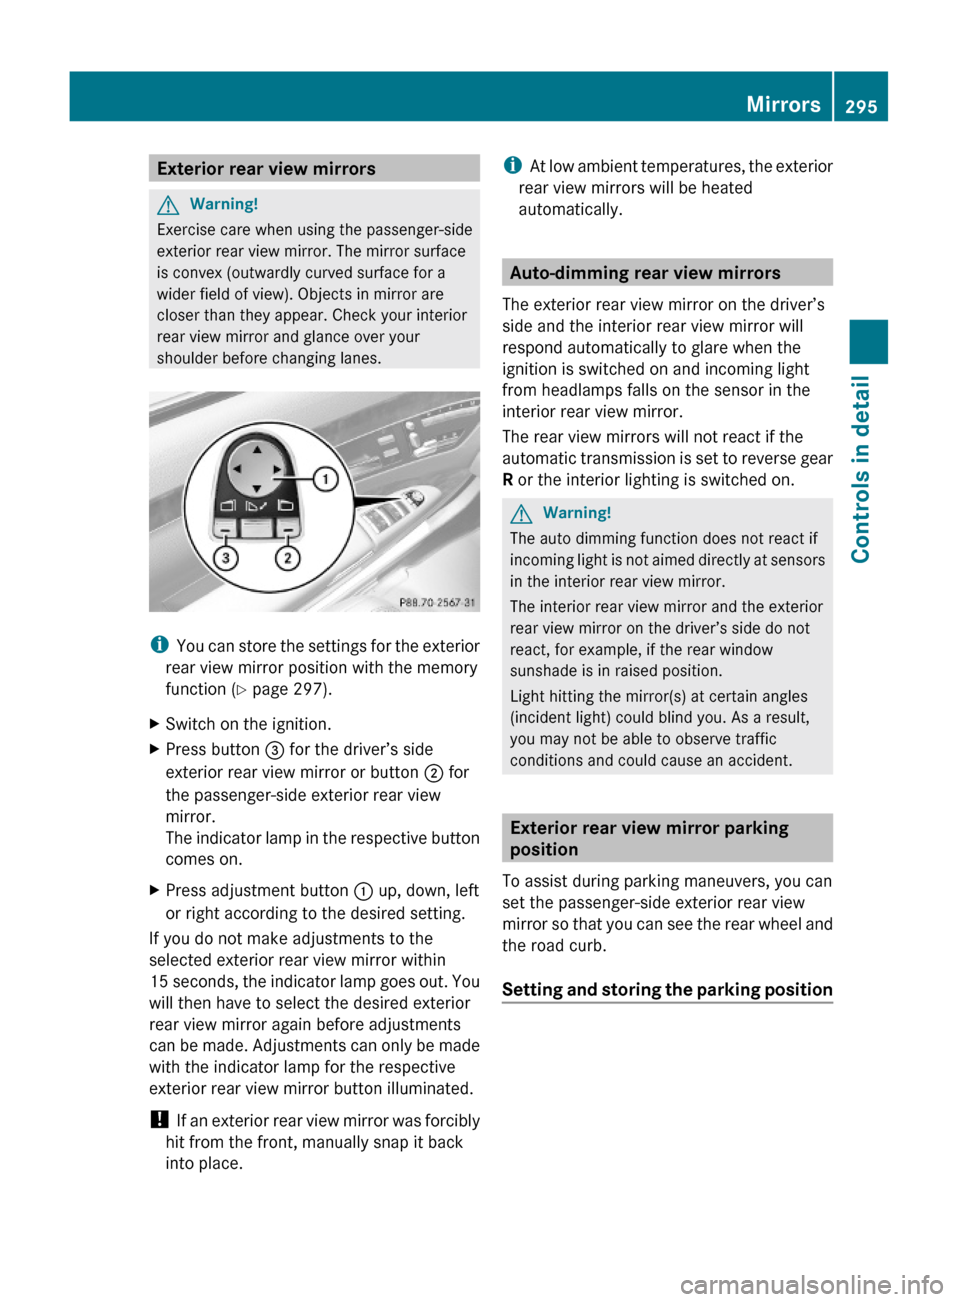
XSwitch on the ignition.XPress button = for the driver’s side
exterior rear view mirror or button ; for
the passenger-side exterior rear view
mirror.
The indicator lamp in the respective button
comes on.
XPress adjustment button : up, down, left
or right according to the desired setting.
If you do not make adjustments to the
selected exterior rear view mirror within
15 seconds, the indicator lamp goes out. You
will then have to select the desired exterior
rear view mirror again before adjustments
can be made. Adjustments can only be made
with the indicator lamp for the respective
exterior rear view mirror button illuminated.
! If an exterior rear view mirror was forcibly
hit from the front, manually snap it back
into place.
iAt low ambient temperatures, the exterior
rear view mirrors will be heated
automatically.
Auto-dimming rear view mirrors
The exterior rear view mirror on the driver’s
side and the interior rear view mirror will
respond automatically to glare when the
ignition is switched on and incoming light
from headlamps falls on the sensor in the
interior rear view mirror.
The rear view mirrors will not react if the
automatic transmission is set to reverse gear
R or the interior lighting is switched on.
GWarning!
The auto dimming function does not react if
incoming light is not aimed directly at sensors
in the interior rear view mirror.
The interior rear view mirror and the exterior
rear view mirror on the driver’s side do not
react, for example, if the rear window
sunshade is in raised position.
Light hitting the mirror(s) at certain angles
(incident light) could blind you. As a result,
you may not be able to observe traffic
conditions and could cause an accident.
Exterior rear view mirror parking
position
To assist during parking maneuvers, you can
set the passenger-side exterior rear view
mirror so that you can see the rear wheel and
the road curb.
Setting and storing the parking position
Mirrors295Controls in detail221_AKB; 6; 20, en-USd2ugruen,Version: 2.11.8.12009-09-24T13:28:17+02:00 - Seite 295Z
Page 303 of 548
Vehicles without front fog lampsXSwitching on rear fog lamp: Pull out the
exterior lamp switch to its stop
(Y page 298).
The rear fog lamp and the yellow indicator
lamp R in the exterior lamp switch
come on.
XSwitching off rear fog lamp: Push in the
exterior lamp switch to its stop.
Locator lighting and night security
illumination
The locator lighting and night security
illumination are described in the COMAND
vehicle menu section under (Y page 208).
Combination switch
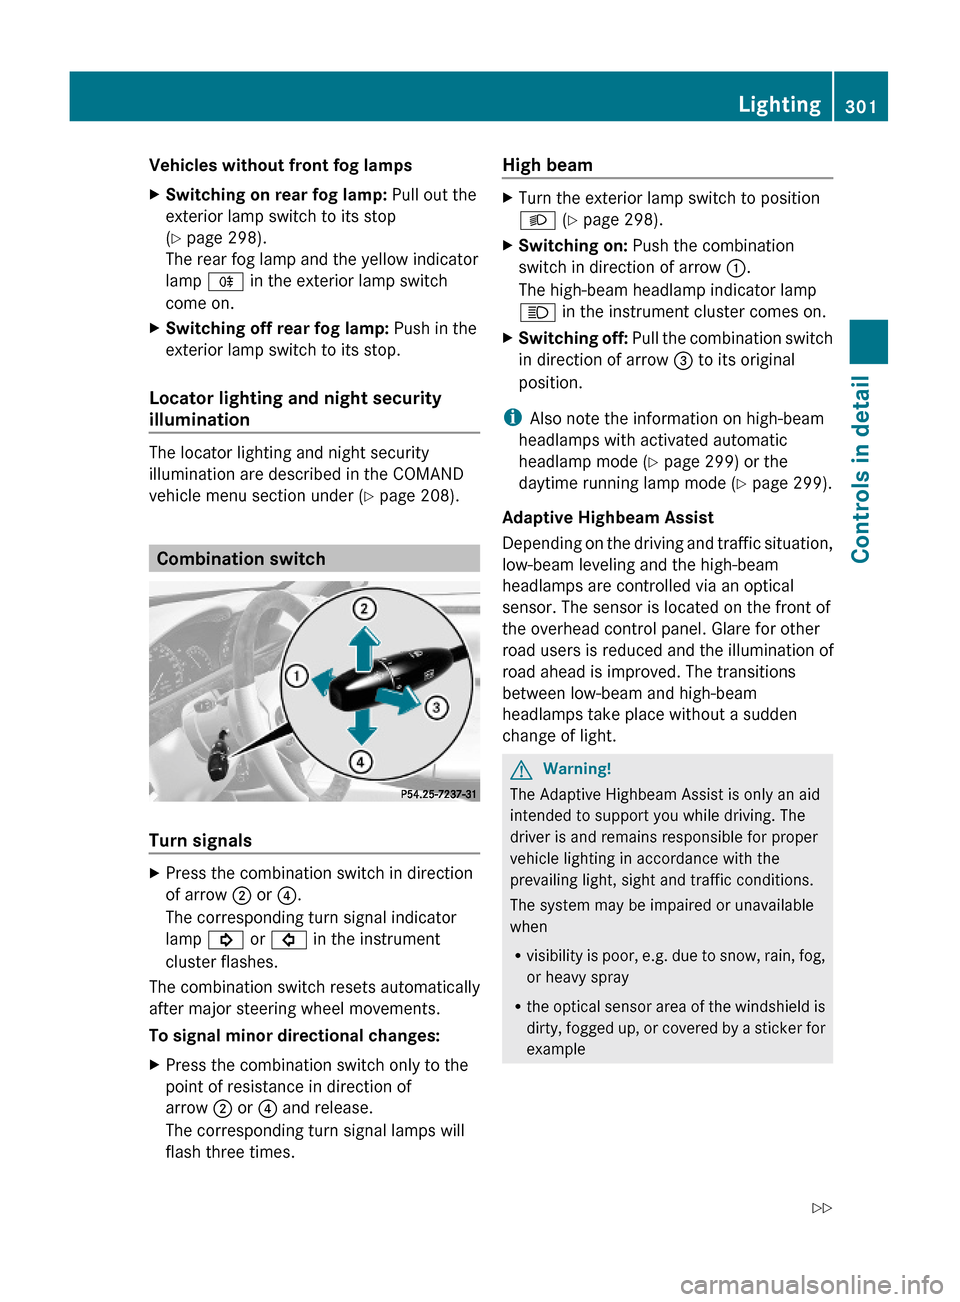
Turn signals
XPress the combination switch in direction
of arrow ; or ?.
The corresponding turn signal indicator
lamp ! or # in the instrument
cluster flashes.
The combination switch resets automatically
after major steering wheel movements.
To signal minor directional changes:
XPress the combination switch only to the
point of resistance in direction of
arrow ; or ? and release.
The corresponding turn signal lamps will
flash three times.
High beam XTurn the exterior lamp switch to position
L (Y page 298).
XSwitching on: Push the combination
switch in direction of arrow :.
The high-beam headlamp indicator lamp
K in the instrument cluster comes on.
XSwitching off: Pull the combination switch
in direction of arrow = to its original
position.
iAlso note the information on high-beam
headlamps with activated automatic
headlamp mode (Y page 299) or the
daytime running lamp mode (Y page 299).
Adaptive Highbeam Assist
Depending on the driving and traffic situation,
low-beam leveling and the high-beam
headlamps are controlled via an optical
sensor. The sensor is located on the front of
the overhead control panel. Glare for other
road users is reduced and the illumination of
road ahead is improved. The transitions
between low-beam and high-beam
headlamps take place without a sudden
change of light.
GWarning!
The Adaptive Highbeam Assist is only an aid
intended to support you while driving. The
driver is and remains responsible for proper
vehicle lighting in accordance with the
prevailing light, sight and traffic conditions.
The system may be impaired or unavailable
when
Rvisibility is poor, e.g. due to snow, rain, fog,
or heavy spray
Rthe optical sensor area of the windshield is
dirty, fogged up, or covered by a sticker for
example
Lighting301Controls in detail221_AKB; 6; 20, en-USd2ugruen,Version: 2.11.8.12009-09-24T13:28:17+02:00 - Seite 301Z
Page 307 of 548
Leaving an interior lamp switched on for an
extended period of time with the engine
turned off could result in a discharged
battery.
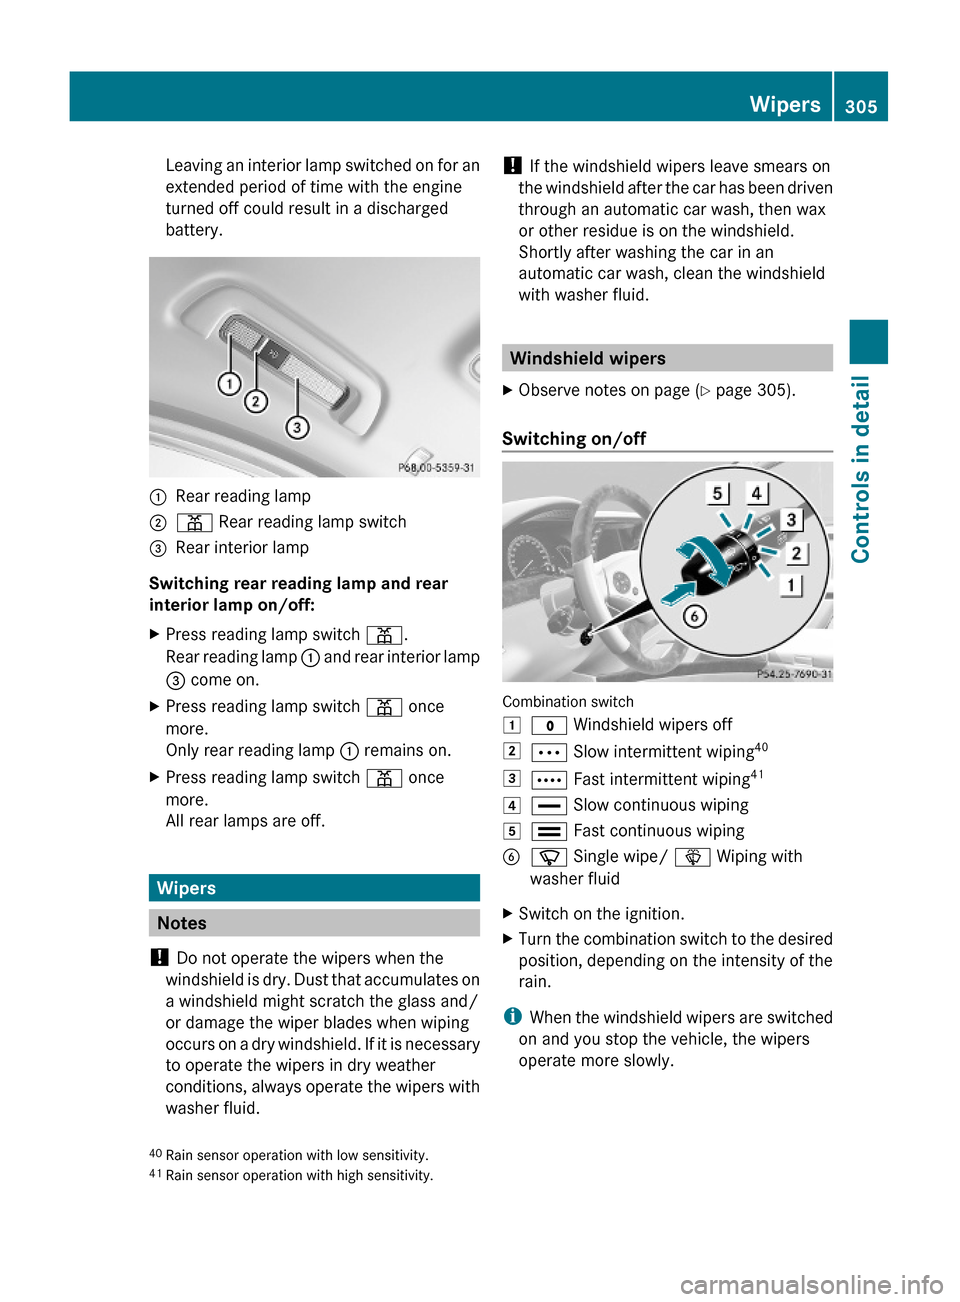
:Rear reading lamp;p Rear reading lamp switch=Rear interior lamp
Switching rear reading lamp and rear
interior lamp on/off:
XPress reading lamp switch p.
Rear reading lamp : and rear interior lamp
= come on.
XPress reading lamp switch p once
more.
Only rear reading lamp : remains on.
XPress reading lamp switch p once
more.
All rear lamps are off.
Wipers
Notes
! Do not operate the wipers when the
windshield is dry. Dust that accumulates on
a windshield might scratch the glass and/
or damage the wiper blades when wiping
occurs on a dry windshield. If it is necessary
to operate the wipers in dry weather
conditions, always operate the wipers with
washer fluid.
! If the windshield wipers leave smears on
the windshield after the car has been driven
through an automatic car wash, then wax
or other residue is on the windshield.
Shortly after washing the car in an
automatic car wash, clean the windshield
with washer fluid.
Windshield wipers
XObserve notes on page (Y page 305).
Switching on/off
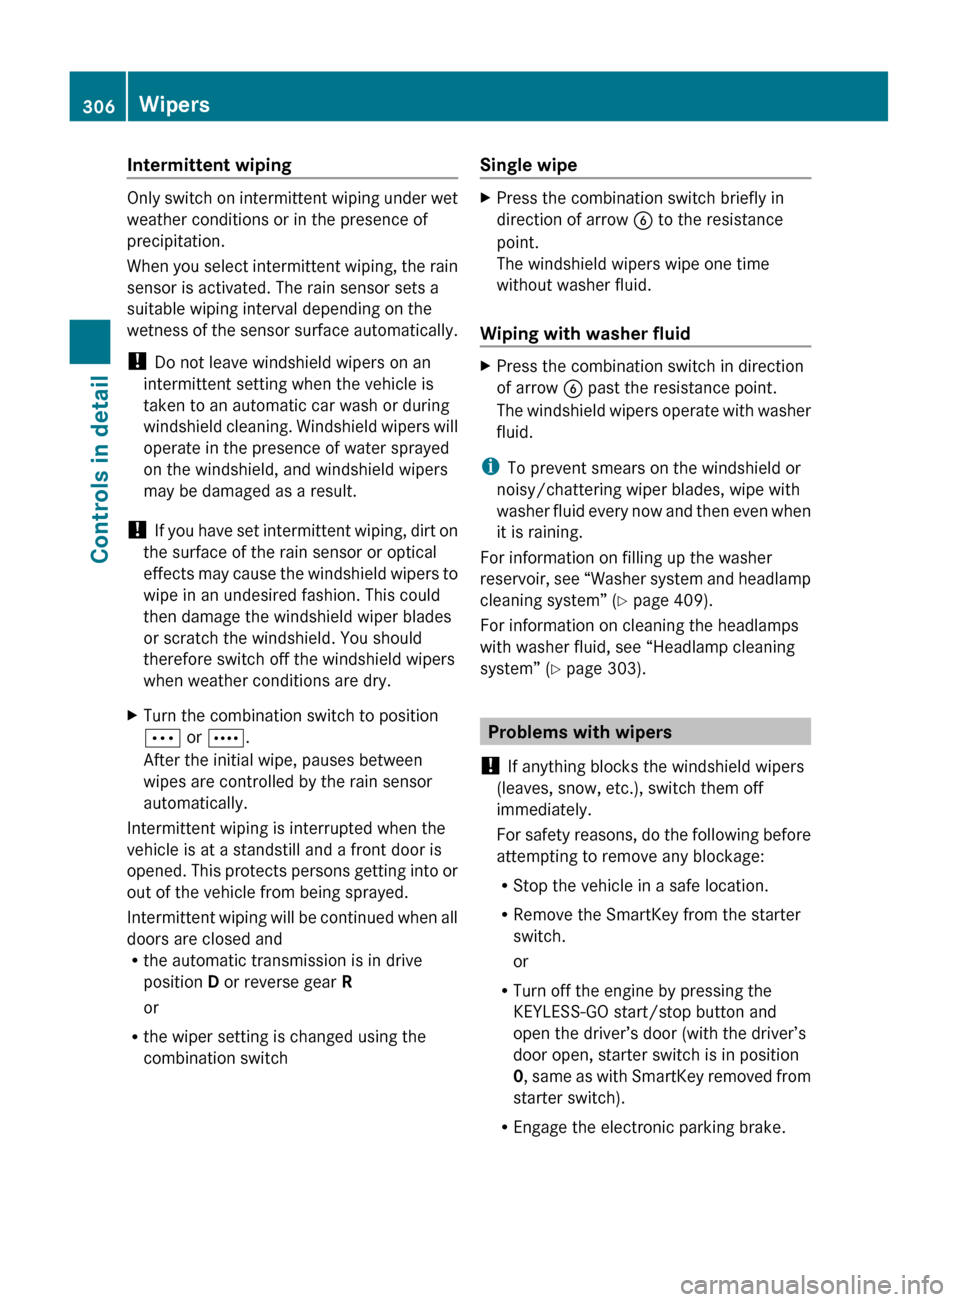
Combination switch
1$ Windshield wipers off2Ä Slow intermittent wiping403Å Fast intermittent wiping414° Slow continuous wiping5¯ Fast continuous wipingBí Single wipe/ î Wiping with
washer fluid
XSwitch on the ignition.XTurn the combination switch to the desired
position, depending on the intensity of the
rain.
iWhen the windshield wipers are switched
on and you stop the vehicle, the wipers
operate more slowly.
40Rain sensor operation with low sensitivity.41Rain sensor operation with high sensitivity.
Wipers305Controls in detail221_AKB; 6; 20, en-USd2ugruen,Version: 2.11.8.12009-09-24T13:28:17+02:00 - Seite 305Z
Page 308 of 548
Intermittent wiping
Only switch on intermittent wiping under wet
weather conditions or in the presence of
precipitation.
When you select intermittent wiping, the rain
sensor is activated. The rain sensor sets a
suitable wiping interval depending on the
wetness of the sensor surface automatically.
! Do not leave windshield wipers on an
intermittent setting when the vehicle is
taken to an automatic car wash or during
windshield cleaning. Windshield wipers will
operate in the presence of water sprayed
on the windshield, and windshield wipers
may be damaged as a result.
! If you have set intermittent wiping, dirt on
the surface of the rain sensor or optical
effects may cause the windshield wipers to
wipe in an undesired fashion. This could
then damage the windshield wiper blades
or scratch the windshield. You should
therefore switch off the windshield wipers
when weather conditions are dry.
XTurn the combination switch to position
Ä or Å .
After the initial wipe, pauses between
wipes are controlled by the rain sensor
automatically.
Intermittent wiping is interrupted when the
vehicle is at a standstill and a front door is
opened. This protects persons getting into or
out of the vehicle from being sprayed.
Intermittent wiping will be continued when all
doors are closed and
R the automatic transmission is in drive
position D or reverse gear R
or
R the wiper setting is changed using the
combination switch
Single wipeXPress the combination switch briefly in
direction of arrow B to the resistance
point.
The windshield wipers wipe one time
without washer fluid.
Wiping with washer fluid
XPress the combination switch in direction
of arrow B past the resistance point.
The windshield wipers operate with washer
fluid.
i To prevent smears on the windshield or
noisy/chattering wiper blades, wipe with
washer fluid every now and then even when
it is raining.
For information on filling up the washer
reservoir, see “Washer system and headlamp
cleaning system” ( Y page 409).
For information on cleaning the headlamps
with washer fluid, see “Headlamp cleaning
system” ( Y page 303).
Problems with wipers
! If anything blocks the windshield wipers
(leaves, snow, etc.), switch them off
immediately.
For safety reasons, do the following before
attempting to remove any blockage:
R Stop the vehicle in a safe location.
R Remove the SmartKey from the starter
switch.
or
R Turn off the engine by pressing the
KEYLESS-GO start/stop button and
open the driver’s door (with the driver’s
door open, starter switch is in position
0 , same as with SmartKey removed from
starter switch).
R Engage the electronic parking brake.
306WipersControls in detail
221_AKB; 6; 20, en-USd2ugruen,Version: 2.11.8.12009-09-24T13:28:17+02:00 - Seite 306
Page 312 of 548
anyone being harmed by the closing
procedure, press and hold button &.
Vehicles with KEYLESS-GO:
RRelease the sensor surface on the outside
door handle to stop the closing procedure.
RImmediately pull on the same outside door
handle and hold firmly. The door windows
and the tilt/sliding sunroof or panorama
roof with power tilt/sliding panel will open
for as long as the door handle is held but
the door not opened.
With SmartKey
The SmartKey must be in close proximity to
the driver’s outside door handle.
XAim transmitter eye of the SmartKey at the
driver’s outside door handle.
XPress and hold button & on the
SmartKey until the door windows and the
tilt/sliding sunroof or panorama roof with
power tilt/sliding panel are closed
completely.
XRelease button & on the SmartKey to
interrupt the closing procedure.
XVehicles with panorama roof with
power tilt/sliding panel and/or rear
door window sunshades: Press button
& on the SmartKey once more.
The roller sunblinds and/or the rear door
window sunshades extend.
XPress button % on the SmartKey to
interrupt the extending procedure.
iVehicles with rear door window
sunshades: The rear window sunshade
extends simultaneously.
With KEYLESS-GO
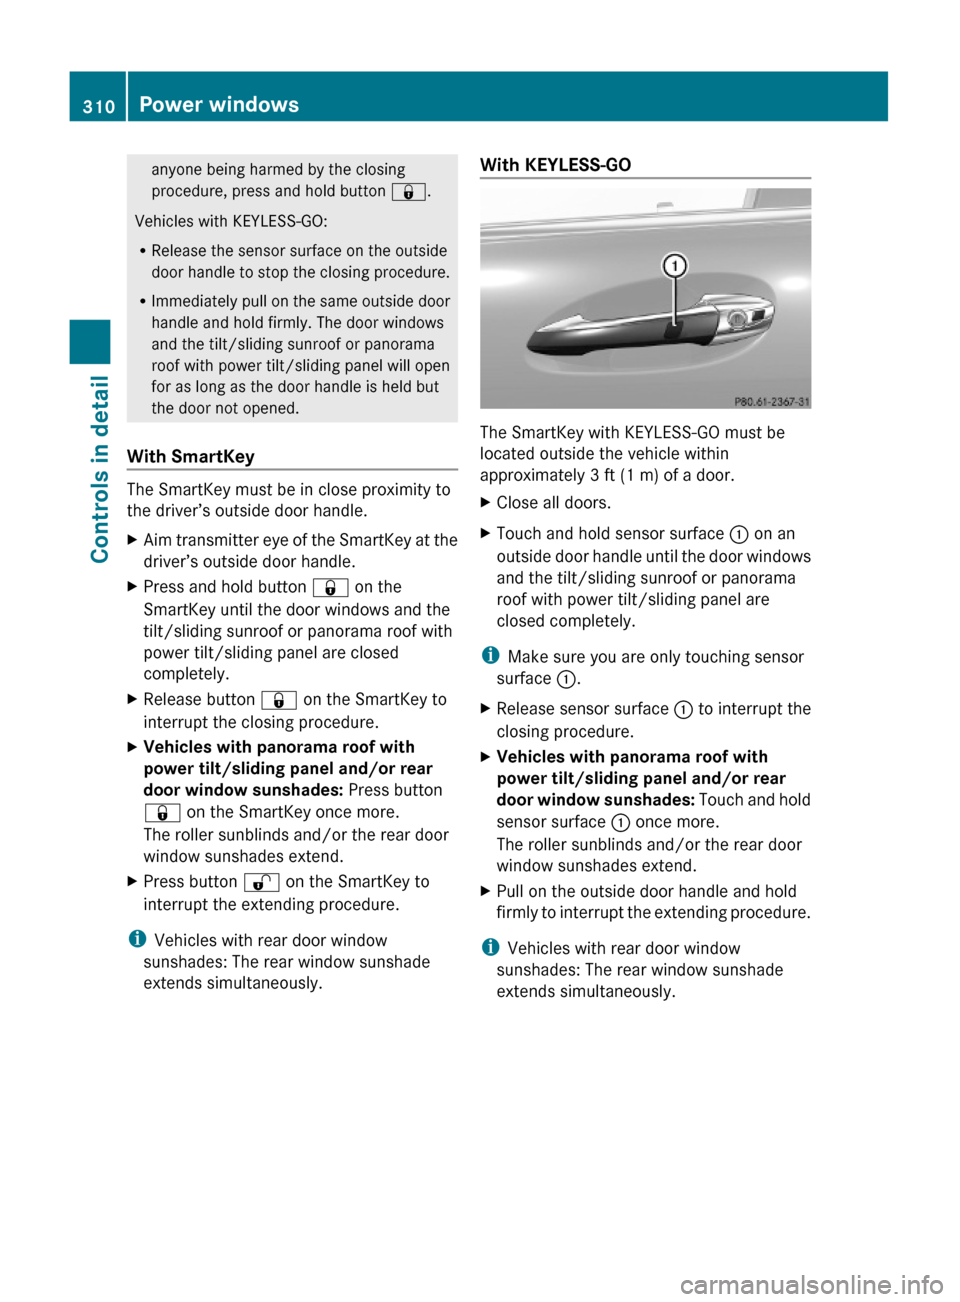
The SmartKey with KEYLESS-GO must be
located outside the vehicle within
approximately 3 ft (1 m) of a door.
XClose all doors.XTouch and hold sensor surface : on an
outside door handle until the door windows
and the tilt/sliding sunroof or panorama
roof with power tilt/sliding panel are
closed completely.
iMake sure you are only touching sensor
surface :.
XRelease sensor surface : to interrupt the
closing procedure.
XVehicles with panorama roof with
power tilt/sliding panel and/or rear
door window sunshades: Touch and hold
sensor surface : once more.
The roller sunblinds and/or the rear door
window sunshades extend.
XPull on the outside door handle and hold
firmly to interrupt the extending procedure.
iVehicles with rear door window
sunshades: The rear window sunshade
extends simultaneously.
310Power windowsControls in detail
221_AKB; 6; 20, en-USd2ugruen,Version: 2.11.8.12009-09-24T13:28:17+02:00 - Seite 310
Page 332 of 548
Adjustment in 1 mph (Canada:
1 km/h) increments
i The set speed value is increased or
decreased in 1 mph (Canada: 1 km/h)
increments each time you lift or press the
cruise control lever up or down to the
resistance point.XIncreasing: Briefly lift the cruise control
lever up to the resistance point in direction
of arrow :.XDecreasing: Briefly press the cruise
control lever down to the resistance point
in direction of arrow ;.XRelease the cruise control lever.
The new speed is set and the vehicle will
accelerate or decelerate.
Adjustment in 5 mph (Canada:
10 km/h) increments
i The set speed value is increased or
decreased in 5 mph (Canada: 10 km/h)
increments each time you lift or press the
cruise control lever up or down past the
resistance point.
XIncreasing: Briefly lift the cruise control
lever up past the resistance point in
direction of arrow :.XDecreasing: Briefly press the cruise
control lever down past the resistance
point in direction of arrow ;.XRelease the cruise control lever.
The new speed is set and the vehicle will
accelerate or decelerate. Keep in mind that
it may take a brief moment until the vehicle
has reached the set speed.
Setting stored speed (Resume
function)
GWarning!
The set speed stored in memory should only
be set again if prevailing road conditions and
legal speed limits permit. Possible
acceleration or deceleration differences
arising from returning to the preset speed
could cause an accident and/or serious injury
to you and others.XBriefly pull the cruise control lever in
direction of arrow ?.
If no speed is stored, the current speed is
set and stored.XRemove your foot from the accelerator
pedal.
The last stored speed is deleted from memory
when the engine is turned off.
DISTRONIC PLUS
Safety notes
When activated, the DISTRONIC PLUS
adaptive cruise control system increases the
driving convenience afforded by the cruise
control while traveling on expressways and
other major roadways.
R If the DISTRONIC PLUS distance sensor
detects a slower moving vehicle directly
ahead, your vehicle speed will be reduced
so that you follow that vehicle at your
preset following distance.
R If there is no vehicle directly ahead of you,
the DISTRONIC PLUS will function in the
same way as standard cruise control
( Y page 328).
GWarning!
The DISTRONIC PLUS requires familiarity with
its operational characteristics. We strongly
recommend that you review the following
information carefully before operating the
system.
GWarning!
HYBRID vehicles: It is imperative that you read
the HYBRID Supplemental Operating
Instructions included in your vehicle literature
portfolio. You may otherwise not receive all
necessary safety information and warning for
the operation of your vehicle.
330Driving systemsControls in detail
221_AKB; 6; 20, en-USd2ugruen,Version: 2.11.8.12009-09-24T13:28:17+02:00 - Seite 330