2010 MERCEDES-BENZ S65AMG glove box
[x] Cancel search: glove boxPage 188 of 548
iThe Group menu item cannot be selected
if only one audio format is saved on the
DVD.
The list of available audio formats appears. A
dot # indicates the format currently
selected.XChanging setting: Slide ZV Æ or rotate
c V d.XExiting menu: Slide XV Y.
Playback options
The following options are available:
R Normal Track Sequence : Tracks are
played back in the order in which they are
stored on the disc, e.g. track 1, 2, 3, etc.
R Medium Mix : Tracks are played back in
random order, e.g. track 3, 8, 5, etc.
R Track List Mix (MP3 mode only): Tracks
of the current folder and its subfolders are
played back in random order.
XSelecting an option: Select Audio.XSelect CD, DVD-A or MP3 .
The option list appears. A dot # indicates
which option is switched on.XSelect an option and press W.
The option is switched on. For all options
except Normal Track Sequence , you will
see a corresponding indicator in the main
area.
i The Normal Track Sequence option is
automatically activated when you select a
different medium. If an option is activated,
it remains activated after COMAND is
switched on/off.
Audio AUX and video AUX
You can play back external audio or video
sources via the systems installed in your
vehicle.
The sockets for external audio and video
sources (AUX) are located
R in the glove box (COMAND)
R on the CD/DVD drive in the rear passenger
compartment
R on the head restraints
i For operation of the external audio and
video sources, refer to the operating
instructions of the respective device. You
may have to adjust the proper video
standard on the external audio and video
source to ensure proper replay.
Do not leave external devices in the vehicle.
Proper function of the device could be
impaired due to excessive temperatures,
for example when exposing to direct
sunlight or when the outside temperature
is extremely low. Mercedes-Benz does not
assume liability for damage to external
devices.GWarning!
Operating an external audio source while the
vehicle is in motion will distract you. You may
not notice changing road and/or traffic
conditions which may cause an accident.
Bear in mind that at a speed of just 30 mph
(approximately 50 km/h), your vehicle is
covering a distance of 44 feet (approximately
14 m) every second.
For your safety and the safety of others, pull
over to a safe location and stop before
operating an external audio source.
GWarning!
Due to the different volumes of the external
audio sources, system messages of the
vehicle may be much louder. You may need to
disable these system messages or adjust the
volume of these messages manually.
i The volume of external audio sources is
extremely variable. It is possible that a
device connected as an external audio
source will sound quieter or louder in the
186Audio AUX and video AUXControl systems
221_AKB; 6; 20, en-USd2ugruen,Version: 2.11.8.12009-09-24T13:28:17+02:00 - Seite 186
Page 189 of 548
vehicle or that the usual maximum volume
cannot be achieved. On certain devices the
volume can be set separately. In this case,
start at a moderate volume and increase it
slowly. In this way, you can determine
whether the system is capable of playback
without distortion, even at high volume.
XConnect external audio and video sources
as described in the following sections.
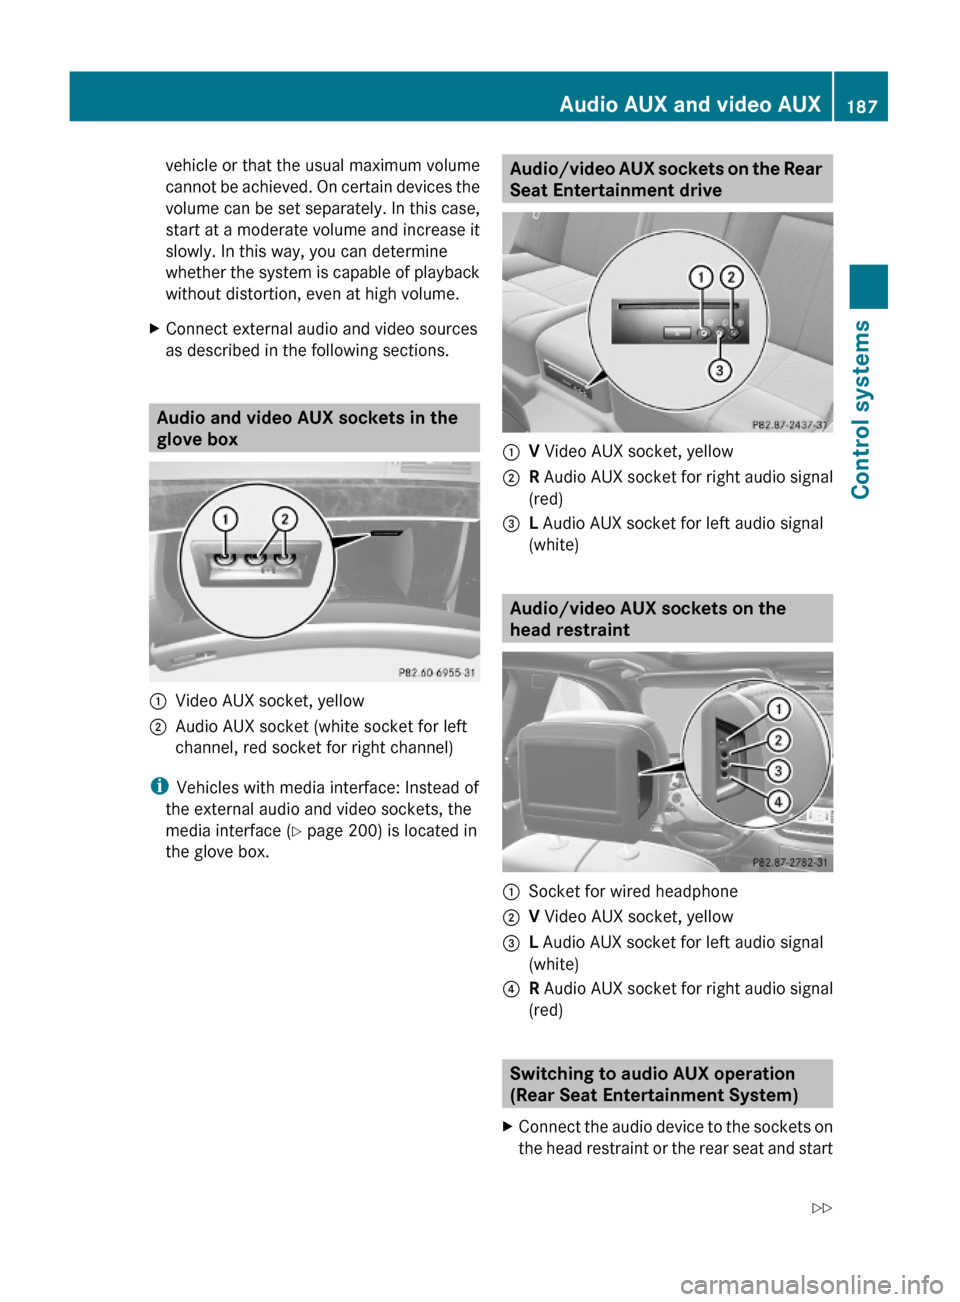
Audio and video AUX sockets in the
glove box
:Video AUX socket, yellow;Audio AUX socket (white socket for left
channel, red socket for right channel)
iVehicles with media interface: Instead of
the external audio and video sockets, the
media interface (Y page 200) is located in
the glove box.
Audio/video AUX sockets on the Rear
Seat Entertainment drive
:V Video AUX socket, yellow;R Audio AUX socket for right audio signal
(red)
=L Audio AUX socket for left audio signal
(white)
Audio/video AUX sockets on the
head restraint
:Socket for wired headphone;V Video AUX socket, yellow=L Audio AUX socket for left audio signal
(white)
?R Audio AUX socket for right audio signal
(red)
Switching to audio AUX operation
(Rear Seat Entertainment System)
XConnect the audio device to the sockets on
the head restraint or the rear seat and start
Audio AUX and video AUX187Control systems221_AKB; 6; 20, en-USd2ugruen,Version: 2.11.8.12009-09-24T13:28:17+02:00 - Seite 187Z
Page 203 of 548
For your safety and the safety of others, pull
over to a safe location and stop before
operating an external audio source.
Connections
iAlways store the devices in a safe place.
Only use genuine Mercedes-Benz
connector cables.
Suitable connector cables are located in
the vehicle or can be purchased at any
authorized Mercedes-Benz Center.
The media interface allows for connection of
the following media to the COMAND:
RiPod®
RUSB devices
RMP3 player
iFor further information on compatible
multimedia devices
Rvisit www.mbusa-mobile.com
Rcall the Mercedes-Benz Customer
Assistance Center at
1-800-FOR-MERCedes
(1-800-367-6372) (in the USA)
Rcall Customer Service at
1-800-387-0100 (in Canada)
Supported USB devices
The following USB devices are supported:
RUSB flash drives
RUSB hard drives (1", 1.8", and 2.5") with a
starting/steady current not to exceed
800 mA (separate power supply may be
necessary)
Rselected MP3 players
iThe media interface supports USB
storage devices of “USB Device
Subclass 6”. Information on “USB Device
Subclass 6” is available from the
manufacturer of the respective device.
Supported file formats on USB devices
The following file formats are supported:
RMP3: CBR, VBR (up to 320 kbit/s)
RWMA: CBR, VBR (up to 320 kbit/s)
Special characteristics of USB devices
RDo not store data other than audio data on
a USB device. Doing so will increase the
time required to initialize the USB device.
RA maximum of 8 directory levels with up to
1000 tracks each are supported.
RDo not use USB extensions or adapters.
They could impair functionality.
RPlaylists on the USB device will be searched
for in the background. Playlists that were
found will be available in separate
categories among the folders. The
initialization of large USB storage devices
that contain a large number of files may
take several minutes.
iFiles that are protected via DRM
(Digital Rights Management) are not
supported by the media interface.
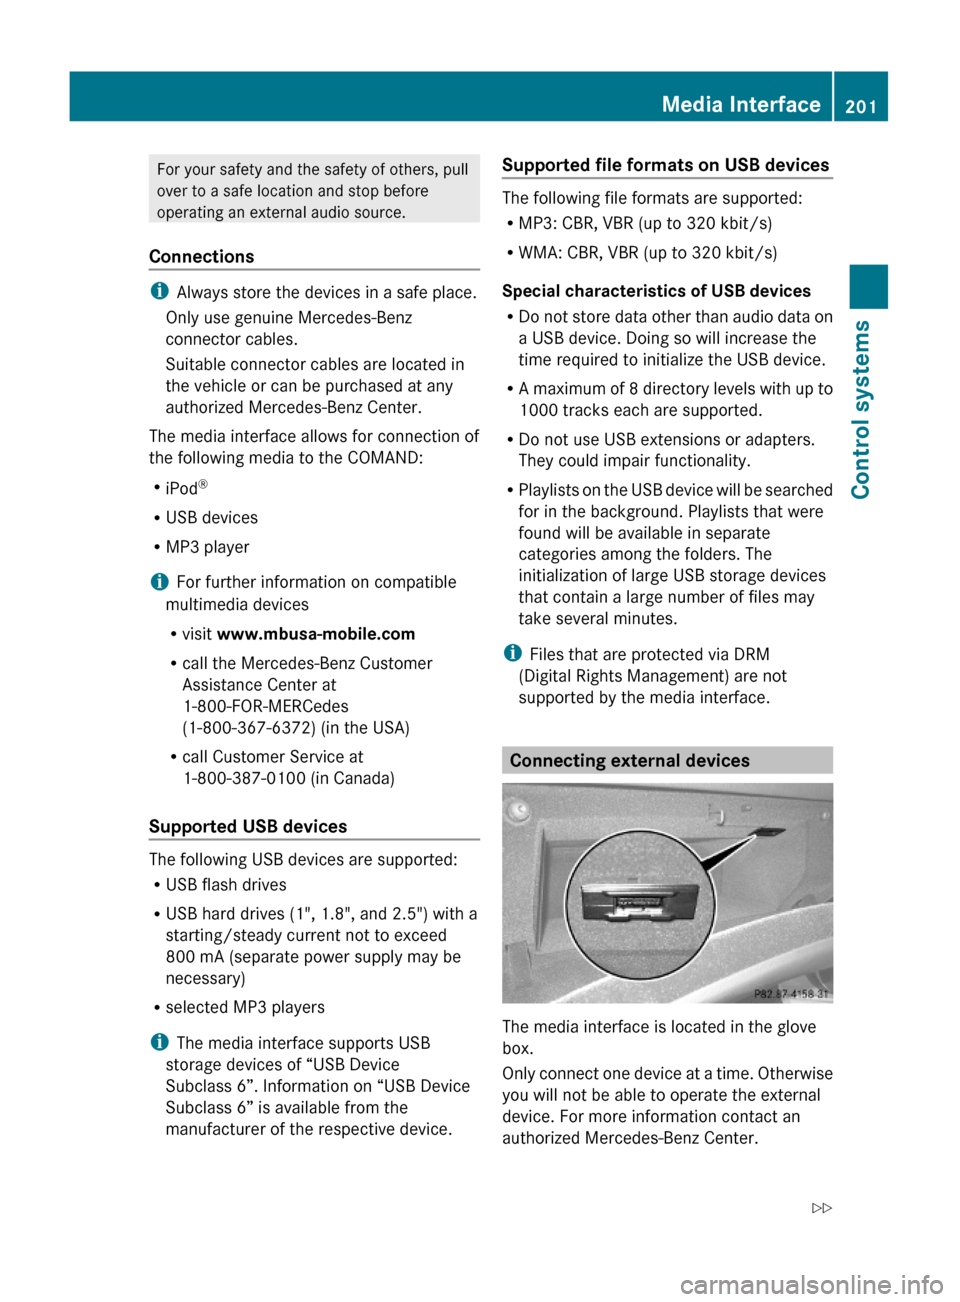
Connecting external devices
The media interface is located in the glove
box.
Only connect one device at a time. Otherwise
you will not be able to operate the external
device. For more information contact an
authorized Mercedes-Benz Center.
Media Interface201Control systems221_AKB; 6; 20, en-USd2ugruen,Version: 2.11.8.12009-09-24T13:28:17+02:00 - Seite 201Z
Page 204 of 548
iDo not leave external devices in the
vehicle. Proper function of the device could
be impaired due to excessive
temperatures, for example when exposing
to direct sunlight or when the outside
temperature is extremely low. Mercedes-
Benz does not assume liability for damage
to external devices.
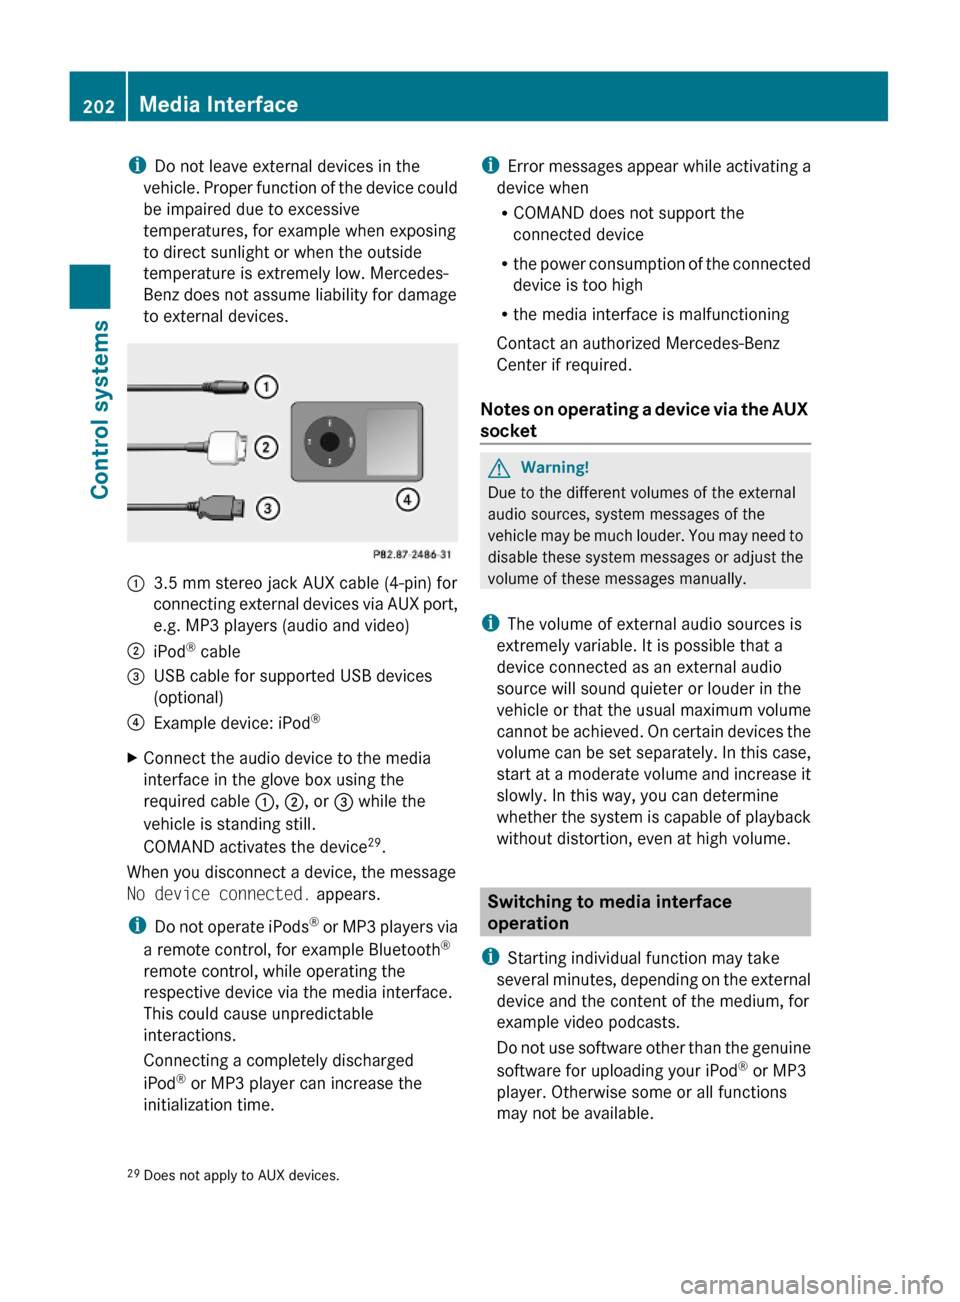
:3.5 mm stereo jack AUX cable (4-pin) for
connecting external devices via AUX port,
e.g. MP3 players (audio and video)
;iPod® cable=USB cable for supported USB devices
(optional)
?Example device: iPod®XConnect the audio device to the media
interface in the glove box using the
required cable :, ;, or = while the
vehicle is standing still.
COMAND activates the device29.
When you disconnect a device, the message
No device connected. appears.
iDo not operate iPods® or MP3 players via
a remote control, for example Bluetooth®
remote control, while operating the
respective device via the media interface.
This could cause unpredictable
interactions.
Connecting a completely discharged
iPod® or MP3 player can increase the
initialization time.
iError messages appear while activating a
device when
RCOMAND does not support the
connected device
Rthe power consumption of the connected
device is too high
Rthe media interface is malfunctioning
Contact an authorized Mercedes-Benz
Center if required.
Notes on operating a device via the AUX
socket
GWarning!
Due to the different volumes of the external
audio sources, system messages of the
vehicle may be much louder. You may need to
disable these system messages or adjust the
volume of these messages manually.
iThe volume of external audio sources is
extremely variable. It is possible that a
device connected as an external audio
source will sound quieter or louder in the
vehicle or that the usual maximum volume
cannot be achieved. On certain devices the
volume can be set separately. In this case,
start at a moderate volume and increase it
slowly. In this way, you can determine
whether the system is capable of playback
without distortion, even at high volume.
Switching to media interface
operation
iStarting individual function may take
several minutes, depending on the external
device and the content of the medium, for
example video podcasts.
Do not use software other than the genuine
software for uploading your iPod® or MP3
player. Otherwise some or all functions
may not be available.
29Does not apply to AUX devices.202Media InterfaceControl systems
221_AKB; 6; 20, en-USd2ugruen,Version: 2.11.8.12009-09-24T13:28:17+02:00 - Seite 202
Page 259 of 548
“Hard disk”, “Music Register”
Use the command “Hard disk” or “Music
Register” to switch to the internal hard disk
(Music Register) of the COMAND.
“Memory card”
The “Memory card” command is used to
switch from the DVD drive to the SD card.
Voice Control System external
devices
Operation
You can use the Voice Control System to
R switch to audio AUX mode
R switch to media interface mode
R switch to the USB interface
XSelecting application: Press
button ? on the multifunction steering
wheel.XSpeak one of the following commands.
Commands
For a list of commands, see ( Y page 257).
Help commands
Use the following commands to hear all
commands for external devices:
R “Help Media Interface”
R “Help USB-Interface”
“Audio AUX”
Use the command “Audio AUX” to switch to
audio AUX mode.
“Video AUX”
Use the command “Video AUX” to switch to
video AUX mode.
“Media Interface”
Use the command “Media Interface” to
switch to the media interface in the glove box.
“USB”
Use the command “USB” to switch to the USB
interface in the glove box.
Voice Control System command list
This section contains an overview of the most
important commands for Voice Control
System operation. Which commands are
available for use depends on the equipment
level in your vehicle.
i Some functions can be operated using
several different commands. In the
following list, these commands are
grouped in one cell. When multiple similar,
alternative commands are possible they
are separated by a slash “/”. Choose your
preferred command from those available.
Possible additions to the commands are in
brackets “( )”. Other commands are
possible. Refer to the respective help
function.
General commands
R yes
R right
R okRnoRcancel
R stop
R quit
R abort
R terminate
R exitVoice Control System command list257Control systems221_AKB; 6; 20, en-USd2ugruen,Version: 2.11.8.12009-09-24T13:28:17+02:00 - Seite 257Z
Page 281 of 548
The doors are designed to unlock
automatically after an accident if the force of
the impact exceeds a preset threshold.
The vehicle locks automatically when the
ignition is switched on and the wheels are
turning at a vehicle speed of above 9 mph
(15 km/h). You could therefore lock yourself
out when the vehicle is pushed or towed or is
on a test stand.
Locking and unlocking from the inside
GObserve Safety notes, see page 56.
You can lock or unlock the vehicle from the
inside using the central locking or unlocking
switch. This can be useful, for example, if you
want to lock the vehicle before starting to
drive.
The central locking or unlocking switch does
not lock or unlock the fuel filler flap or the
interior storage compartments, such as the
glove box.
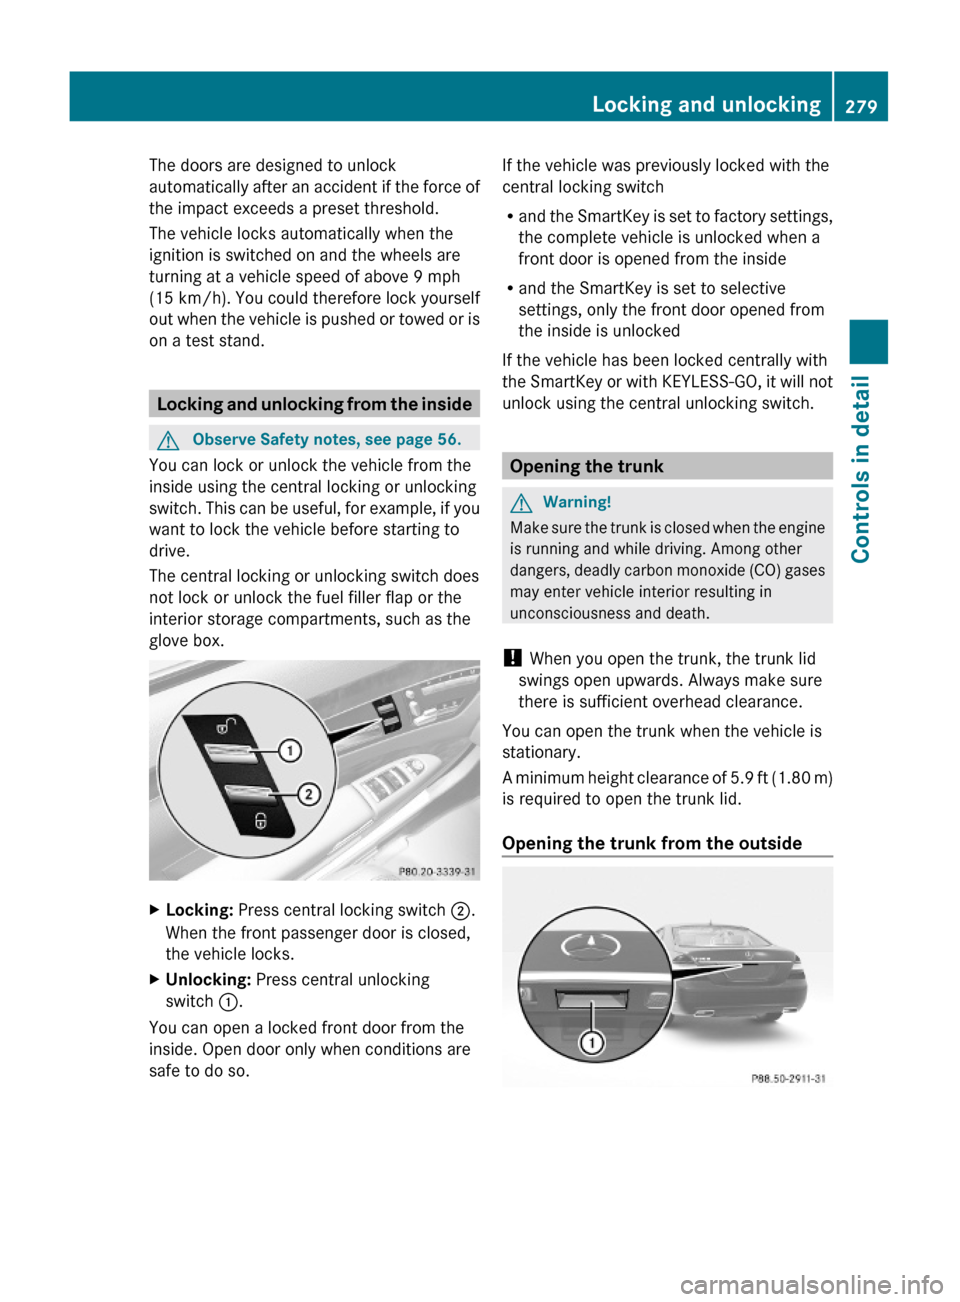
XLocking: Press central locking switch ;.
When the front passenger door is closed,
the vehicle locks.
XUnlocking: Press central unlocking
switch :.
You can open a locked front door from the
inside. Open door only when conditions are
safe to do so.
If the vehicle was previously locked with the
central locking switch
Rand the SmartKey is set to factory settings,
the complete vehicle is unlocked when a
front door is opened from the inside
Rand the SmartKey is set to selective
settings, only the front door opened from
the inside is unlocked
If the vehicle has been locked centrally with
the SmartKey or with KEYLESS-GO, it will not
unlock using the central unlocking switch.
Opening the trunk
GWarning!
Make sure the trunk is closed when the engine
is running and while driving. Among other
dangers, deadly carbon monoxide (CO) gases
may enter vehicle interior resulting in
unconsciousness and death.
! When you open the trunk, the trunk lid
swings open upwards. Always make sure
there is sufficient overhead clearance.
You can open the trunk when the vehicle is
stationary.
A minimum height clearance of 5.9 ft (1.80 m)
is required to open the trunk lid.
Opening the trunk from the outside
Locking and unlocking279Controls in detail221_AKB; 6; 20, en-USd2ugruen,Version: 2.11.8.12009-09-24T13:28:17+02:00 - Seite 279Z
Page 306 of 548
Switching offXSwitch off the left or right turn signal.
or
XSteer straight ahead.
The corner-illuminating lamp goes out.
iThere may be a brief delay before the
corner-illuminating lamps go out.
Interior lighting in the front
iEven with the SmartKey being removed
from the starter switch you can still use the
lighting for the storage compartment, glove
box and vanity mirrors, when you open a
door or press one of the interior lighting
buttons. If a lamp is switched on and you
do not lock the vehicle, it will be switched
off automatically after 30 minutes.
When you lock the vehicle from the outside,
the interior lighting is switched off.
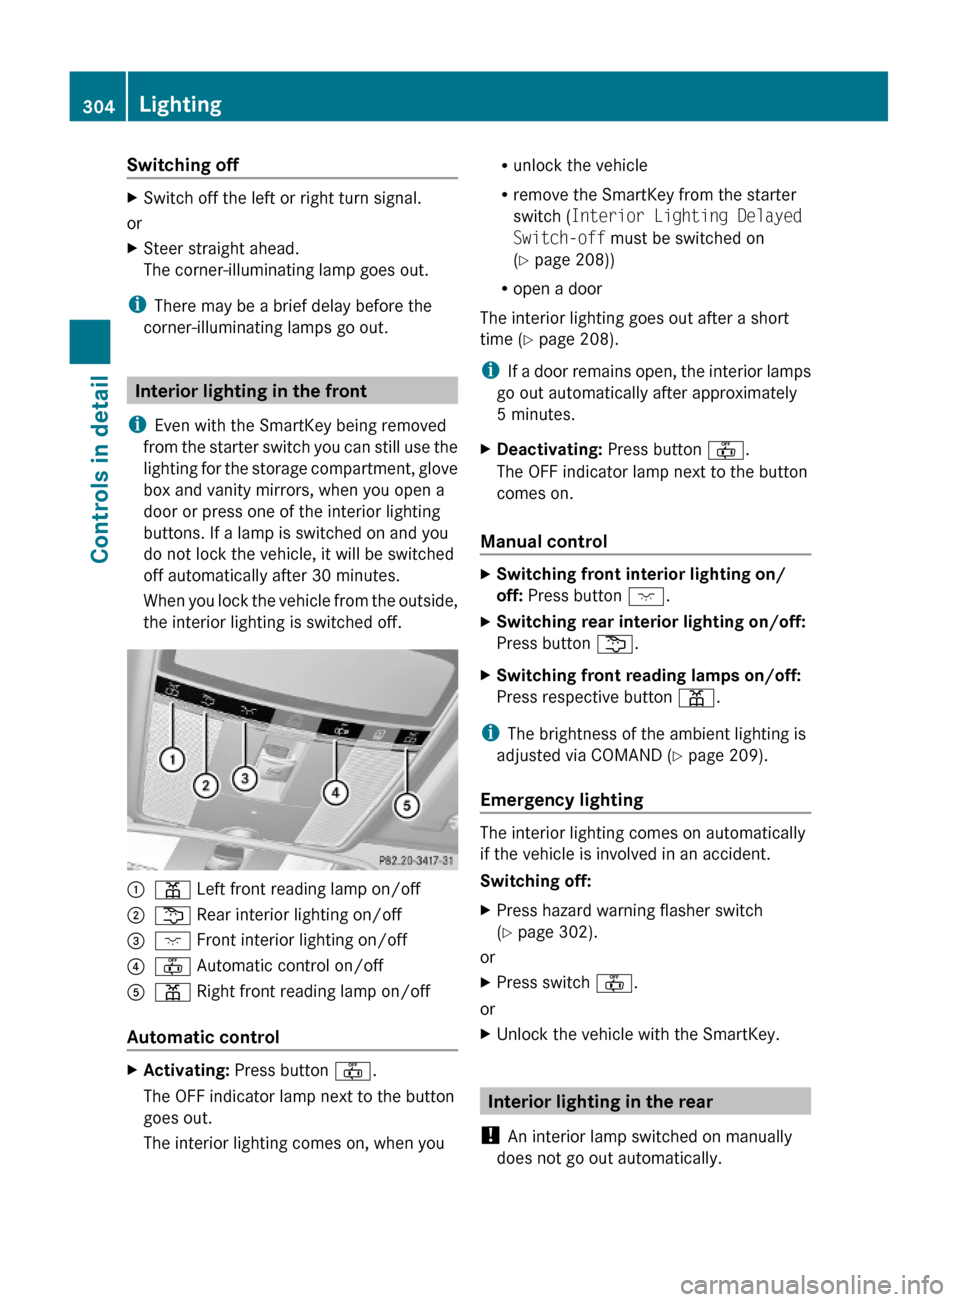
:p Left front reading lamp on/off ;s Rear interior lighting on/off=c Front interior lighting on/off ?~ Automatic control on/offAp Right front reading lamp on/off
Automatic control
XActivating: Press button ~.
The OFF indicator lamp next to the button
goes out.
The interior lighting comes on, when you
Runlock the vehicle
Rremove the SmartKey from the starter
switch (Interior Lighting Delayed
Switch-off must be switched on
(Y page 208))
Ropen a door
The interior lighting goes out after a short
time (Y page 208).
iIf a door remains open, the interior lamps
go out automatically after approximately
5 minutes.
XDeactivating: Press button ~.
The OFF indicator lamp next to the button
comes on.
Manual control
XSwitching front interior lighting on/
off: Press button c.
XSwitching rear interior lighting on/off:
Press button s.
XSwitching front reading lamps on/off:
Press respective button p.
iThe brightness of the ambient lighting is
adjusted via COMAND (Y page 209).
Emergency lighting
The interior lighting comes on automatically
if the vehicle is involved in an accident.
Switching off:
XPress hazard warning flasher switch
(Y page 302).
or
XPress switch ~.
or
XUnlock the vehicle with the SmartKey.
Interior lighting in the rear
! An interior lamp switched on manually
does not go out automatically.
304LightingControls in detail
221_AKB; 6; 20, en-USd2ugruen,Version: 2.11.8.12009-09-24T13:28:17+02:00 - Seite 304
Page 371 of 548
Side air vents
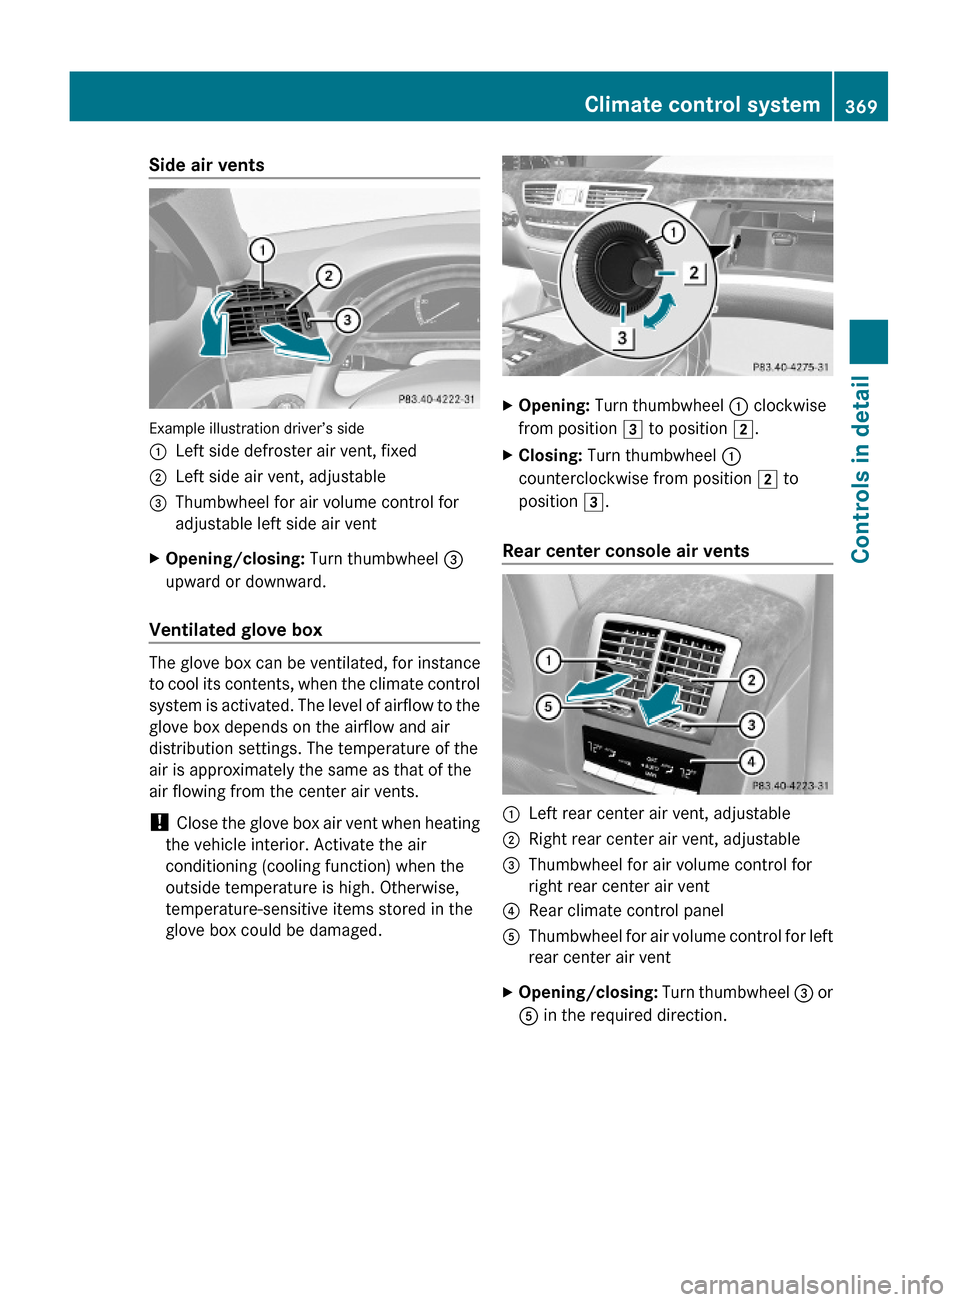
Example illustration driver’s side
:Left side defroster air vent, fixed;Left side air vent, adjustable=Thumbwheel for air volume control for
adjustable left side air vent
XOpening/closing: Turn thumbwheel =
upward or downward.
Ventilated glove box
The glove box can be ventilated, for instance
to cool its contents, when the climate control
system is activated. The level of airflow to the
glove box depends on the airflow and air
distribution settings. The temperature of the
air is approximately the same as that of the
air flowing from the center air vents.
! Close the glove box air vent when heating
the vehicle interior. Activate the air
conditioning (cooling function) when the
outside temperature is high. Otherwise,
temperature-sensitive items stored in the
glove box could be damaged.
XOpening: Turn thumbwheel : clockwise
from position 3 to position 2.
XClosing: Turn thumbwheel :
counterclockwise from position 2 to
position 3.
Rear center console air vents
:Left rear center air vent, adjustable;Right rear center air vent, adjustable=Thumbwheel for air volume control for
right rear center air vent
?Rear climate control panelAThumbwheel for air volume control for left
rear center air vent
XOpening/closing: Turn thumbwheel = or
A in the required direction.
Climate control system369Controls in detail221_AKB; 6; 20, en-USd2ugruen,Version: 2.11.8.12009-09-24T13:28:17+02:00 - Seite 369Z