2010 MERCEDES-BENZ S63AMG door lock
[x] Cancel search: door lockPage 284 of 548
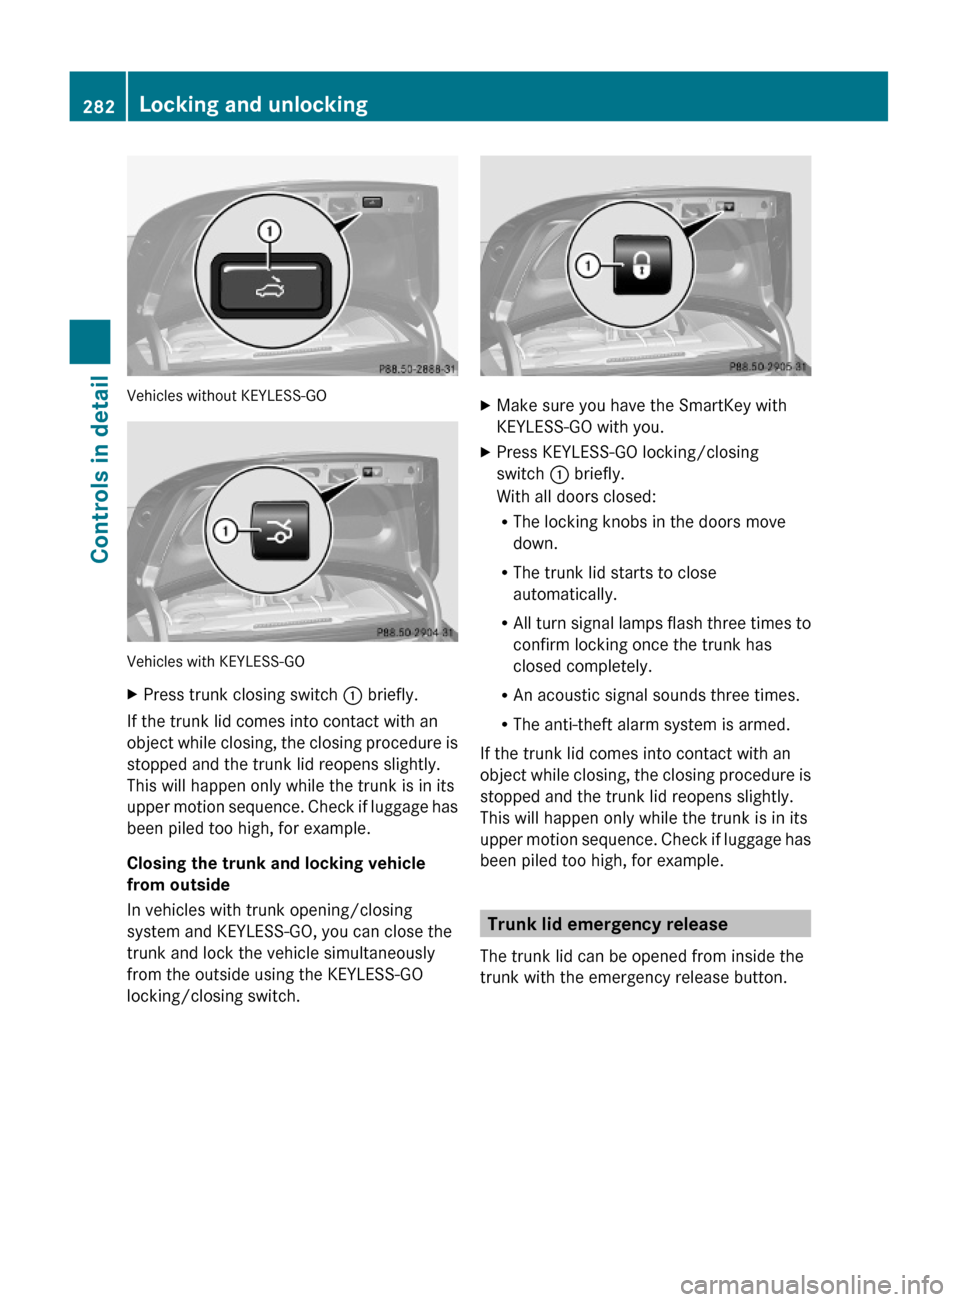
Vehicles without KEYLESS-GO
Vehicles with KEYLESS-GO
XPress trunk closing switch : briefly.
If the trunk lid comes into contact with an
object while closing, the closing procedure is
stopped and the trunk lid reopens slightly.
This will happen only while the trunk is in its
upper motion sequence. Check if luggage has
been piled too high, for example.
Closing the trunk and locking vehicle
from outside
In vehicles with trunk opening/closing
system and KEYLESS-GO, you can close the
trunk and lock the vehicle simultaneously
from the outside using the KEYLESS-GO
locking/closing switch.
XMake sure you have the SmartKey with
KEYLESS-GO with you.
XPress KEYLESS-GO locking/closing
switch : briefly.
With all doors closed:
RThe locking knobs in the doors move
down.
RThe trunk lid starts to close
automatically.
RAll turn signal lamps flash three times to
confirm locking once the trunk has
closed completely.
RAn acoustic signal sounds three times.
RThe anti-theft alarm system is armed.
If the trunk lid comes into contact with an
object while closing, the closing procedure is
stopped and the trunk lid reopens slightly.
This will happen only while the trunk is in its
upper motion sequence. Check if luggage has
been piled too high, for example.
Trunk lid emergency release
The trunk lid can be opened from inside the
trunk with the emergency release button.
282Locking and unlockingControls in detail
221_AKB; 6; 20, en-USd2ugruen,Version: 2.11.8.12009-09-24T13:28:17+02:00 - Seite 282
Page 285 of 548
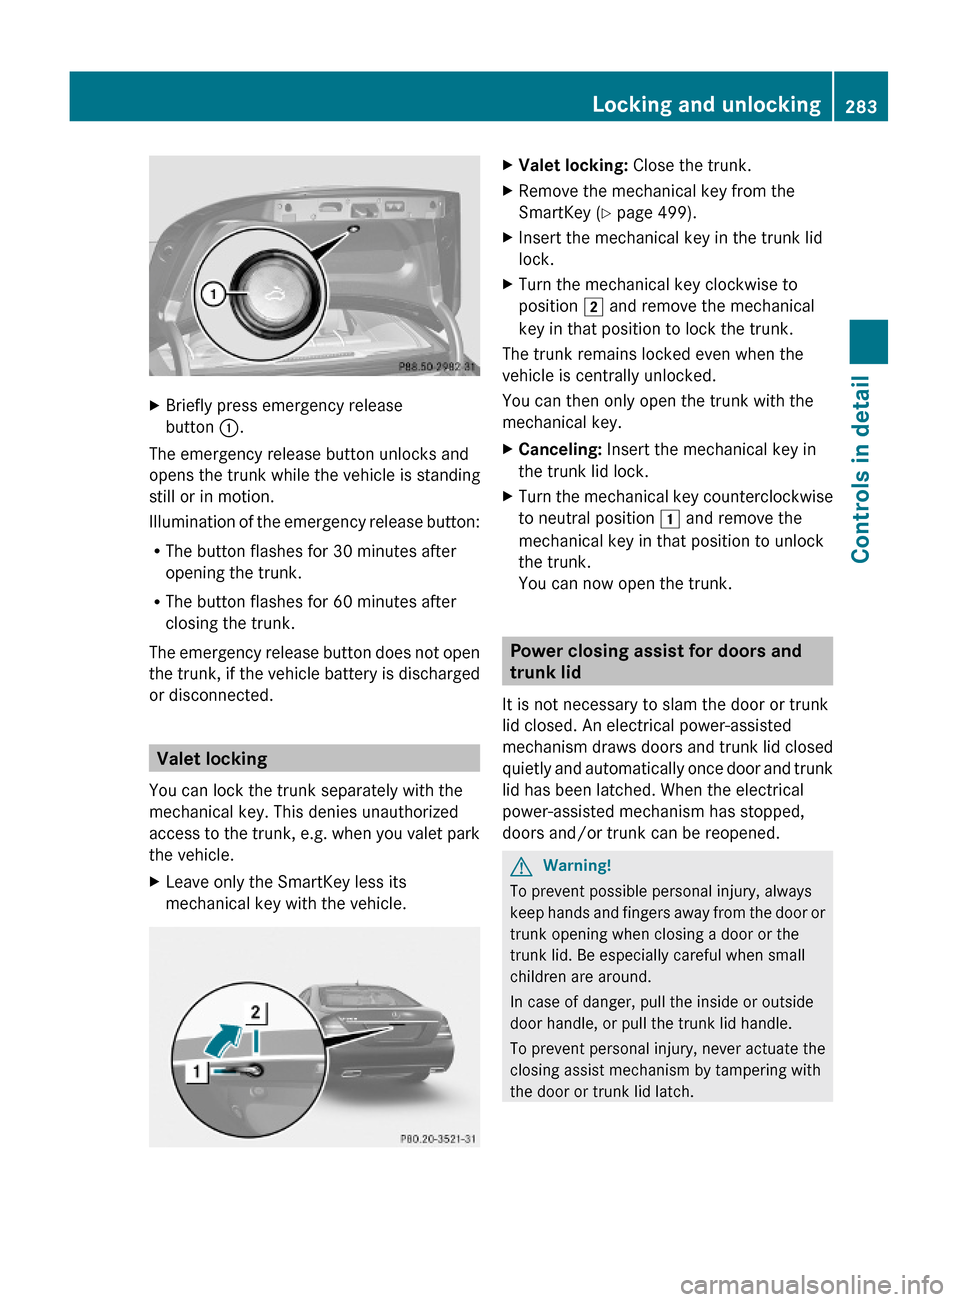
XBriefly press emergency release
button :.
The emergency release button unlocks and
opens the trunk while the vehicle is standing
still or in motion.
Illumination of the emergency release button:
RThe button flashes for 30 minutes after
opening the trunk.
RThe button flashes for 60 minutes after
closing the trunk.
The emergency release button does not open
the trunk, if the vehicle battery is discharged
or disconnected.
Valet locking
You can lock the trunk separately with the
mechanical key. This denies unauthorized
access to the trunk, e.g. when you valet park
the vehicle.
XLeave only the SmartKey less its
mechanical key with the vehicle.
XValet locking: Close the trunk.XRemove the mechanical key from the
SmartKey (Y page 499).
XInsert the mechanical key in the trunk lid
lock.
XTurn the mechanical key clockwise to
position 2 and remove the mechanical
key in that position to lock the trunk.
The trunk remains locked even when the
vehicle is centrally unlocked.
You can then only open the trunk with the
mechanical key.
XCanceling: Insert the mechanical key in
the trunk lid lock.
XTurn the mechanical key counterclockwise
to neutral position 1 and remove the
mechanical key in that position to unlock
the trunk.
You can now open the trunk.
Power closing assist for doors and
trunk lid
It is not necessary to slam the door or trunk
lid closed. An electrical power-assisted
mechanism draws doors and trunk lid closed
quietly and automatically once door and trunk
lid has been latched. When the electrical
power-assisted mechanism has stopped,
doors and/or trunk can be reopened.
GWarning!
To prevent possible personal injury, always
keep hands and fingers away from the door or
trunk opening when closing a door or the
trunk lid. Be especially careful when small
children are around.
In case of danger, pull the inside or outside
door handle, or pull the trunk lid handle.
To prevent personal injury, never actuate the
closing assist mechanism by tampering with
the door or trunk lid latch.
Locking and unlocking283Controls in detail221_AKB; 6; 20, en-USd2ugruen,Version: 2.11.8.12009-09-24T13:28:17+02:00 - Seite 283Z
Page 286 of 548

GWarning!
Only drive with the doors closed. Otherwise,
one or more of the doors could open while the
vehicle is in motion, putting you and/or
others at risk.
GWarning!
Make sure the trunk is closed when the engine
is running and while driving. Among other
dangers, deadly carbon monoxide (CO) gases
may enter vehicle interior resulting in
unconsciousness and death.
XPower closing assist for doors: Press the
doors gently past the initial engage position
into the lock.
XPower closing assist for trunk lid: Press
the trunk lid gently into its lock.
Starter switch positions
SmartKey
GObserve Safety notes, see page 56.
Starter switch
gFor removing SmartKey1Power supply for some electrical
consumers, e.g. wipers
2Ignition (power supply for all electrical
consumers) and driving position
3Starting position
When you switch on the ignition, all lamps in
the instrument cluster come on. The high-
beam headlamp indicator lamp and turn
signal indicator lamps will only come on if
activated. If a lamp in the instrument cluster
fails to come on when the ignition is switched
on, have it checked and replaced if necessary.
If a lamp in the instrument cluster remains on
after starting the engine or comes on while
driving, refer to “Lamps in instrument cluster”
(Y page 489).
XAlways remove the SmartKey from the
starter switch when the engine is not in
operation.
This will help to prevent accelerated vehicle
battery discharge or a completely
discharged vehicle battery.
If the SmartKey cannot be turned in the
starter switch, the vehicle battery may not be
sufficiently charged.
XCheck the vehicle battery and charge it if
necessary (Y page 514).
or
XGet a jump start (Y page 514).
iIf the SmartKey does not belong to the
vehicle, the SmartKey can be turned in the
starter switch. However, the ignition does
not switch on and the engine does not start.
KEYLESS-GO
GObserve Safety notes, see page 56.
Vehicles equipped with the KEYLESS-GO
feature are supplied with a SmartKey with
integrated KEYLESS-GO function and a
removable KEYLESS-GO start/stop button.
The KEYLESS-GO start/stop button must be
inserted in the starter switch and the
SmartKey present in the vehicle.
Pressing the KEYLESS-GO start/stop button
without depressing the brake pedal
corresponds to the various starter switch
positions (Y page 284).
Pressing the KEYLESS-GO start/stop button
with the brake pedal firmly depressed will
start the engine (Y page 311).
The KEYLESS-GO start/stop button can be
pulled out of the starter switch easily. You can
284Starter switch positionsControls in detail
221_AKB; 6; 20, en-USd2ugruen,Version: 2.11.8.12009-09-24T13:28:17+02:00 - Seite 284
Page 288 of 548
iWhen you now press the KEYLESS-GO
start/stop button once and the driver’s
door is open, the power supply is switched
off.
Seats
Safety notes
GWarning!
In order to avoid possible loss of vehicle
control the following must be done before the
vehicle is put into motion:
R seat adjustment
R head restraint adjustment
R steering wheel adjustment
R rear view mirror adjustment
R fastening of seat belts
GWarning!
Do not adjust the driver’s seat while driving.
Adjusting the seat while driving could cause
the driver to lose control of the vehicle.
Never ride in a moving vehicle with the seat
backrest in an excessively reclined position as
this can be dangerous. You could slide under
the seat belt in a collision. If you slide under
it, the seat belt would apply force at the
abdomen or neck. That could cause serious
or fatal injuries. The seat backrest and seat
belts provide the best restraint when the
wearer is in a position that is as upright as
possible and seat belts are properly
positioned on the body.
GWarning!
Your seat must be adjusted so that you can
correctly fasten your seat belt.
Observe the following points:
R Adjust the seat backrest until your arms are
slightly angled when holding the steering
wheel.
R Adjust the seat to a comfortable seating
position that still allows you to reach the
accelerator/brake pedal safely. The
position should be as far back as possible
with the driver still able to operate the
controls properly.
R Adjust the head restraint so that it is as
close to the head as possible. The center of
the head restraint must support the back of
the head at eye level.
R Never place hands under the seat or near
any moving parts while a seat is being
adjusted.
Failure to do so could result in an accident
and/or serious personal injury.GWarning!
The power seats can be operated at any time.
Therefore, do not leave children unattended
in the vehicle, or with access to an unlocked
vehicle. A child’s unsupervised access to a
vehicle could result in an accident and/or
serious personal injury.
GWarning!
According to accident statistics, children are
safer when properly restrained in the rear
seating positions than in the front seating
position. Thus, we strongly recommend that
children be placed in the rear seats whenever
possible. Regardless of seating position,
children 12 years old and under must be
seated and properly secured in an
appropriately sized infant restraint, toddler
restraint, or booster seat recommended for
the size and weight of the child. For additional
information, see “Children in the vehicle”.
A child’s risk of serious or fatal injuries is
significantly increased if the child restraints
are not properly secured in the vehicle and/
286SeatsControls in detail
221_AKB; 6; 20, en-USd2ugruen,Version: 2.11.8.12009-09-24T13:28:17+02:00 - Seite 286
Page 290 of 548
XAdjust the seat using seat
switches :, ; and A.
Adjusting front passenger seat from
driver’s seat/rear
GWarning!
When adjusting the front passenger seat,
make sure the seat, if occupied, is as far from
the front passenger front air bag as possible.
Otherwise, the passenger could be seriously
or even fatally injured in the event of an
accident or braking maneuver.
Make sure no one is caught or injured while
the seat is being adjusted.
Even with the SmartKey or SmartKey with
KEYLESS-GO removed from the starter switch
or the SmartKey with KEYLESS-GO removed
from the vehicle, the power seats can be
operated. Therefore, do not leave children
unattended in the vehicle, or with access to
an unlocked vehicle. A child’s unsupervised
access to a vehicle could result in an accident
and/or serious personal injury.
! Do not move the front passenger seat
completely forward if objects are stored in
the parcel net in the front passenger-side
footwell. Items in the net may be damaged.
Adjusting front passenger seat from
driver’s seat
You can adjust the front passenger seat using
the seat switches on the driver’s side.
XPress button :.When the indicator lamp in button : is on,
you can operate the following features of the
front passenger seat:
Rseat adjustment
Rseat heating/ventilation
Rmemory function
Setting front passenger seat position
from rear
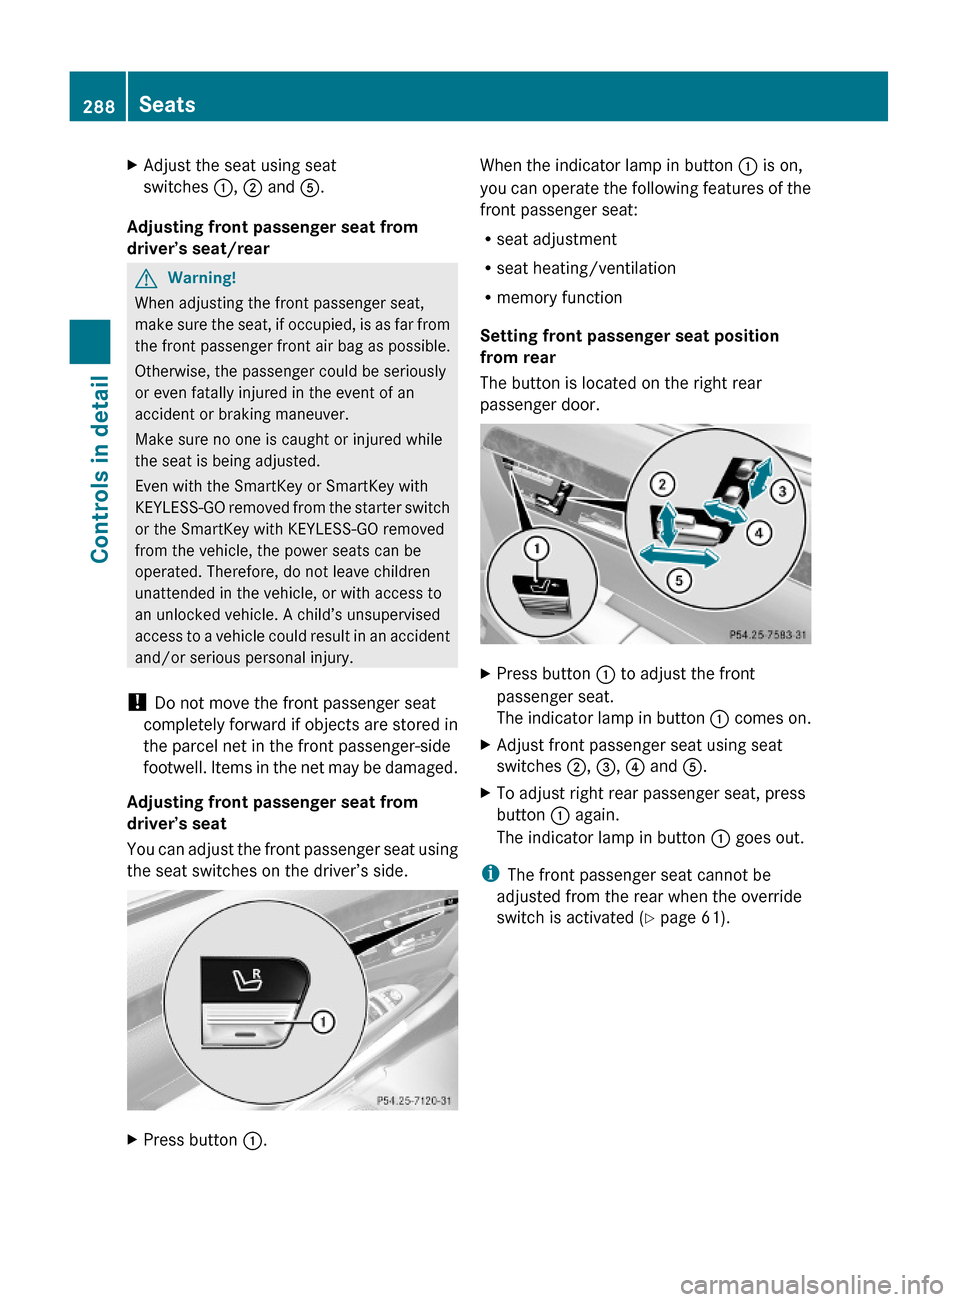
The button is located on the right rear
passenger door.
XPress button : to adjust the front
passenger seat.
The indicator lamp in button : comes on.
XAdjust front passenger seat using seat
switches ;, =, ? and A.
XTo adjust right rear passenger seat, press
button : again.
The indicator lamp in button : goes out.
iThe front passenger seat cannot be
adjusted from the rear when the override
switch is activated (Y page 61).
288SeatsControls in detail
221_AKB; 6; 20, en-USd2ugruen,Version: 2.11.8.12009-09-24T13:28:17+02:00 - Seite 288
Page 291 of 548
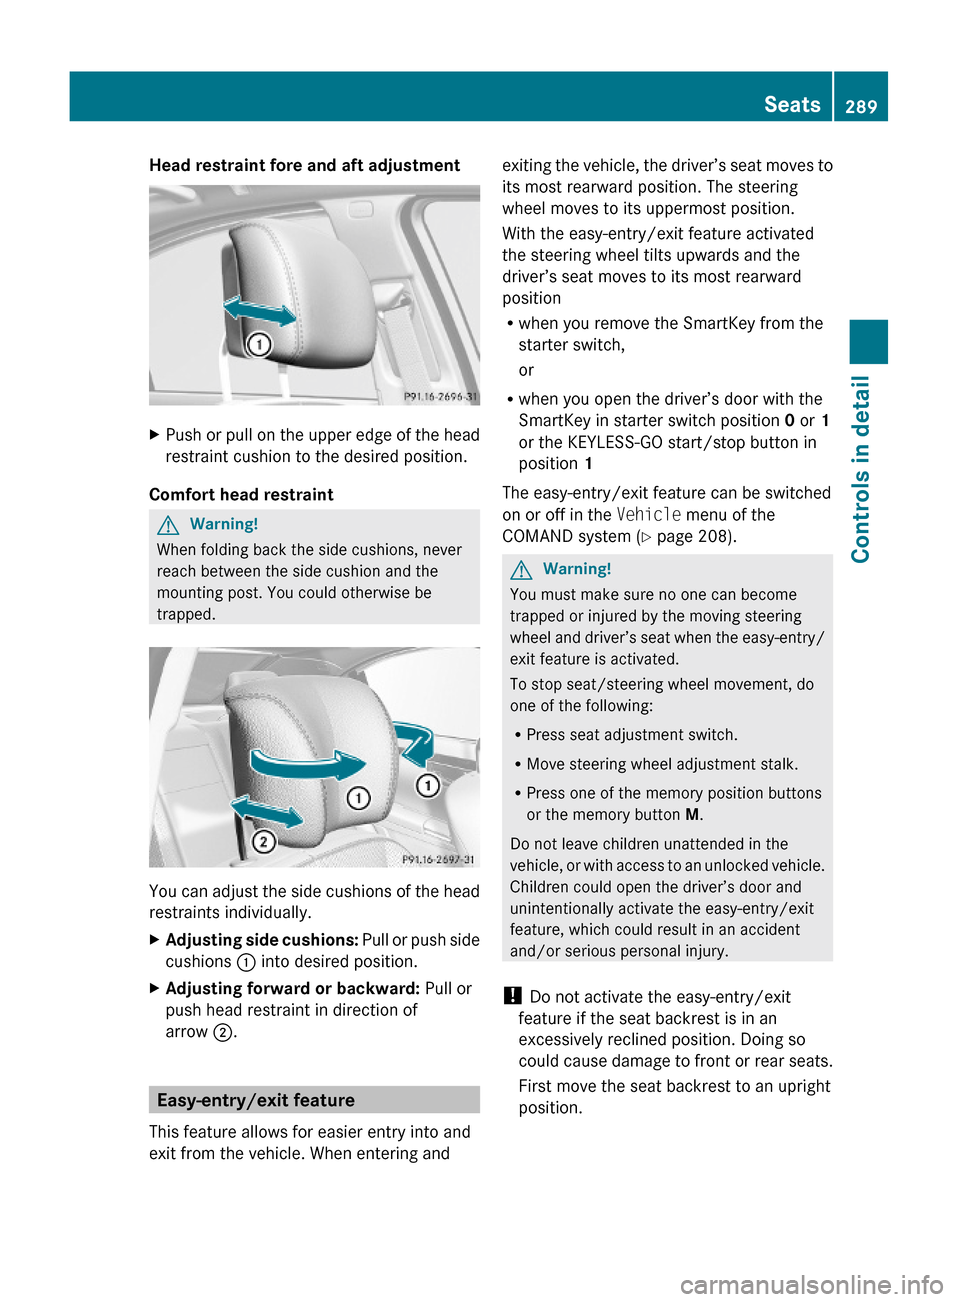
Head restraint fore and aft adjustment XPush or pull on the upper edge of the head
restraint cushion to the desired position.
Comfort head restraint
GWarning!
When folding back the side cushions, never
reach between the side cushion and the
mounting post. You could otherwise be
trapped.
You can adjust the side cushions of the head
restraints individually.
XAdjusting side cushions: Pull or push side
cushions : into desired position.
XAdjusting forward or backward: Pull or
push head restraint in direction of
arrow ;.
Easy-entry/exit feature
This feature allows for easier entry into and
exit from the vehicle. When entering and
exiting the vehicle, the driver’s seat moves to
its most rearward position. The steering
wheel moves to its uppermost position.
With the easy-entry/exit feature activated
the steering wheel tilts upwards and the
driver’s seat moves to its most rearward
position
Rwhen you remove the SmartKey from the
starter switch,
or
Rwhen you open the driver’s door with the
SmartKey in starter switch position 0 or 1
or the KEYLESS-GO start/stop button in
position 1
The easy-entry/exit feature can be switched
on or off in the Vehicle menu of the
COMAND system (Y page 208).
GWarning!
You must make sure no one can become
trapped or injured by the moving steering
wheel and driver’s seat when the easy-entry/
exit feature is activated.
To stop seat/steering wheel movement, do
one of the following:
RPress seat adjustment switch.
RMove steering wheel adjustment stalk.
RPress one of the memory position buttons
or the memory button M.
Do not leave children unattended in the
vehicle, or with access to an unlocked vehicle.
Children could open the driver’s door and
unintentionally activate the easy-entry/exit
feature, which could result in an accident
and/or serious personal injury.
! Do not activate the easy-entry/exit
feature if the seat backrest is in an
excessively reclined position. Doing so
could cause damage to front or rear seats.
First move the seat backrest to an upright
position.
Seats289Controls in detail221_AKB; 6; 20, en-USd2ugruen,Version: 2.11.8.12009-09-24T13:28:17+02:00 - Seite 289Z
Page 298 of 548
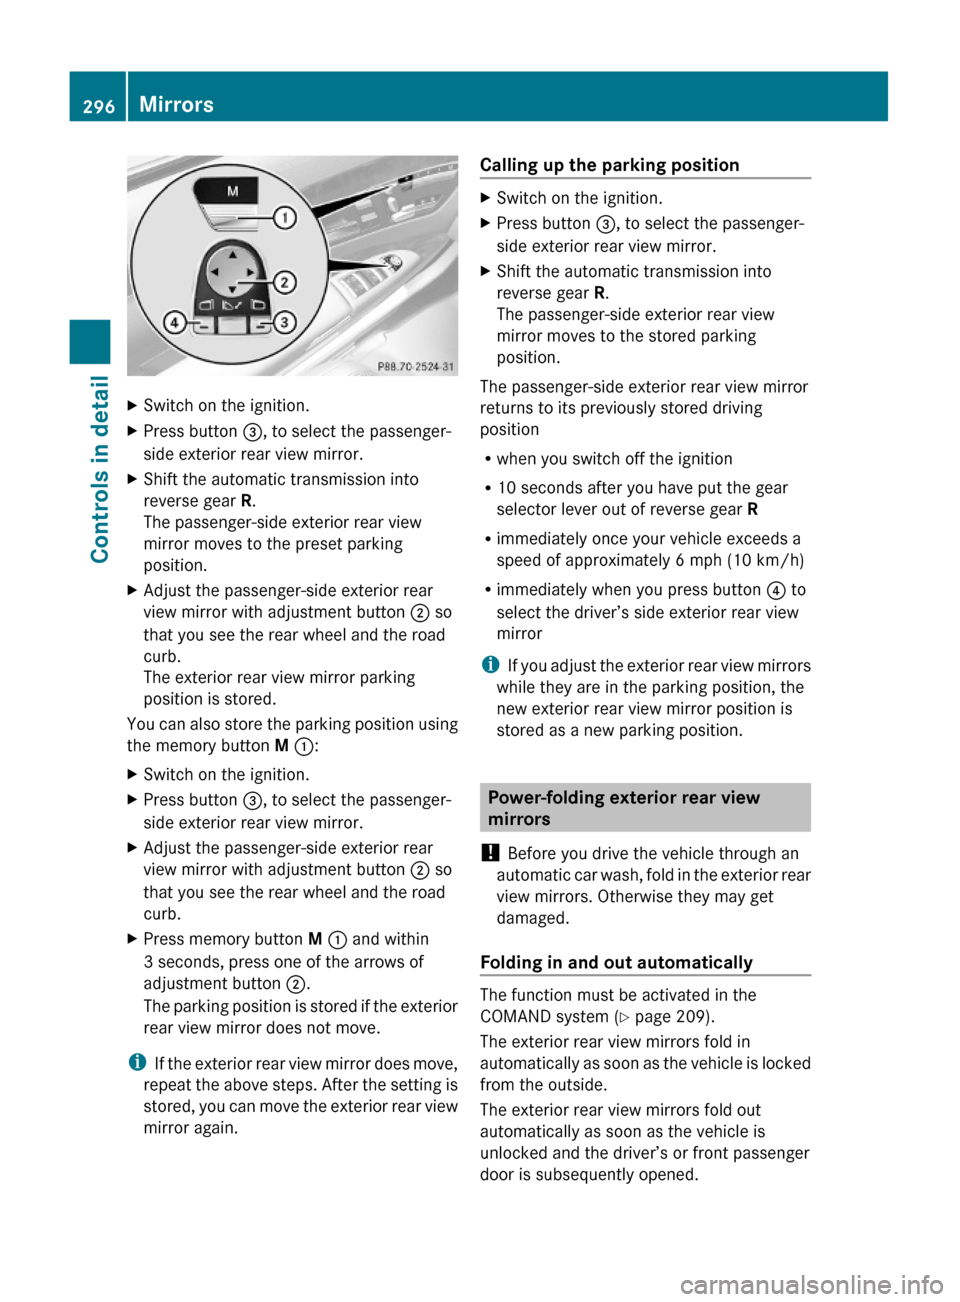
XSwitch on the ignition.XPress button =, to select the passenger-
side exterior rear view mirror.
XShift the automatic transmission into
reverse gear R.
The passenger-side exterior rear view
mirror moves to the preset parking
position.
XAdjust the passenger-side exterior rear
view mirror with adjustment button ; so
that you see the rear wheel and the road
curb.
The exterior rear view mirror parking
position is stored.
You can also store the parking position using
the memory button M ::
XSwitch on the ignition.XPress button =, to select the passenger-
side exterior rear view mirror.
XAdjust the passenger-side exterior rear
view mirror with adjustment button ; so
that you see the rear wheel and the road
curb.
XPress memory button M : and within
3 seconds, press one of the arrows of
adjustment button ;.
The parking position is stored if the exterior
rear view mirror does not move.
iIf the exterior rear view mirror does move,
repeat the above steps. After the setting is
stored, you can move the exterior rear view
mirror again.
Calling up the parking positionXSwitch on the ignition.XPress button =, to select the passenger-
side exterior rear view mirror.
XShift the automatic transmission into
reverse gear R.
The passenger-side exterior rear view
mirror moves to the stored parking
position.
The passenger-side exterior rear view mirror
returns to its previously stored driving
position
Rwhen you switch off the ignition
R10 seconds after you have put the gear
selector lever out of reverse gear R
Rimmediately once your vehicle exceeds a
speed of approximately 6 mph (10 km/h)
Rimmediately when you press button ? to
select the driver’s side exterior rear view
mirror
iIf you adjust the exterior rear view mirrors
while they are in the parking position, the
new exterior rear view mirror position is
stored as a new parking position.
Power-folding exterior rear view
mirrors
! Before you drive the vehicle through an
automatic car wash, fold in the exterior rear
view mirrors. Otherwise they may get
damaged.
Folding in and out automatically
The function must be activated in the
COMAND system (Y page 209).
The exterior rear view mirrors fold in
automatically as soon as the vehicle is locked
from the outside.
The exterior rear view mirrors fold out
automatically as soon as the vehicle is
unlocked and the driver’s or front passenger
door is subsequently opened.
296MirrorsControls in detail
221_AKB; 6; 20, en-USd2ugruen,Version: 2.11.8.12009-09-24T13:28:17+02:00 - Seite 296
Page 306 of 548
Switching offXSwitch off the left or right turn signal.
or
XSteer straight ahead.
The corner-illuminating lamp goes out.
iThere may be a brief delay before the
corner-illuminating lamps go out.
Interior lighting in the front
iEven with the SmartKey being removed
from the starter switch you can still use the
lighting for the storage compartment, glove
box and vanity mirrors, when you open a
door or press one of the interior lighting
buttons. If a lamp is switched on and you
do not lock the vehicle, it will be switched
off automatically after 30 minutes.
When you lock the vehicle from the outside,
the interior lighting is switched off.
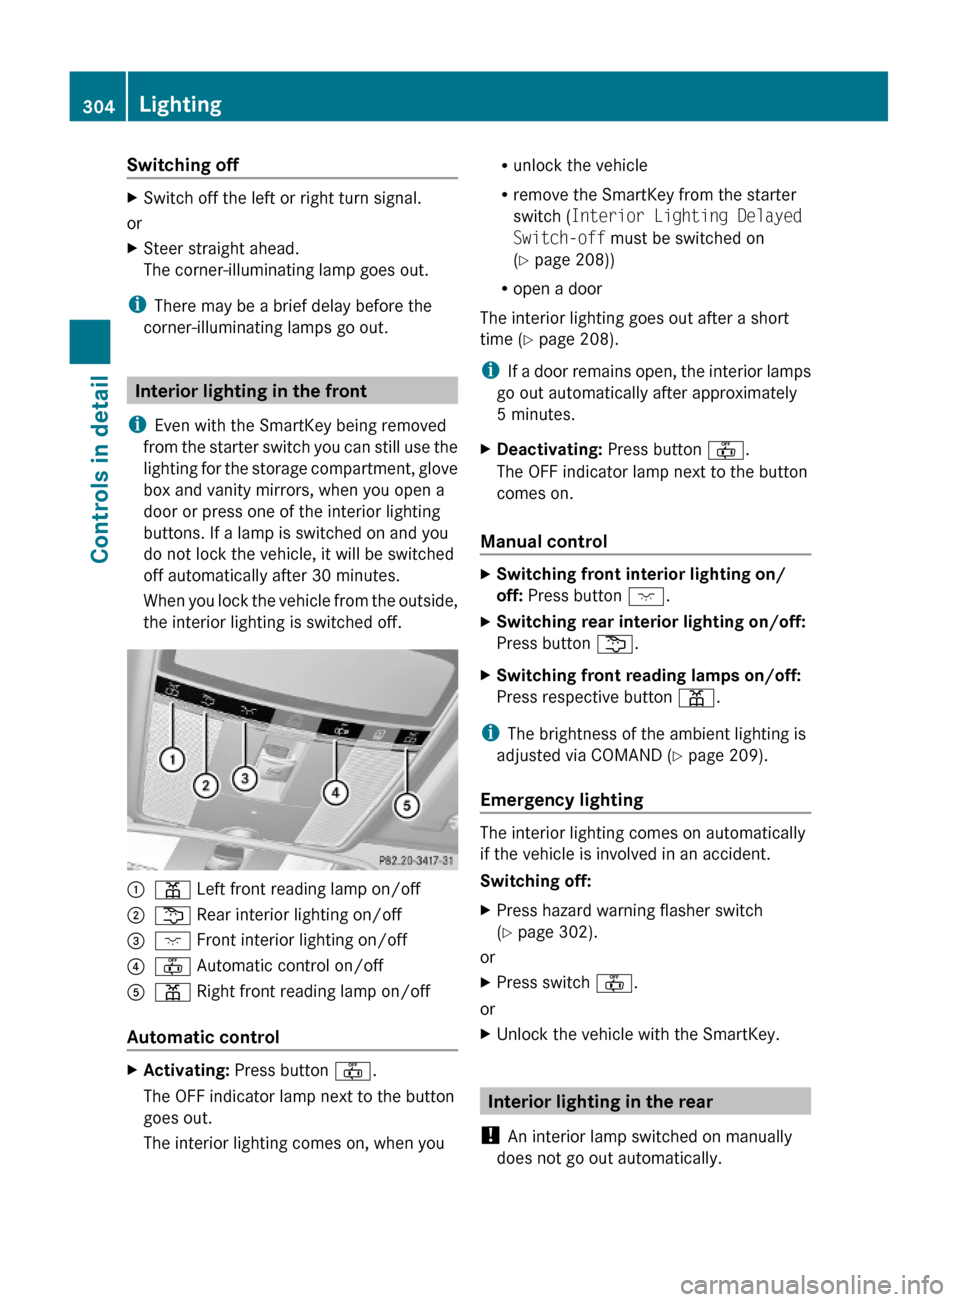
:p Left front reading lamp on/off ;s Rear interior lighting on/off=c Front interior lighting on/off ?~ Automatic control on/offAp Right front reading lamp on/off
Automatic control
XActivating: Press button ~.
The OFF indicator lamp next to the button
goes out.
The interior lighting comes on, when you
Runlock the vehicle
Rremove the SmartKey from the starter
switch (Interior Lighting Delayed
Switch-off must be switched on
(Y page 208))
Ropen a door
The interior lighting goes out after a short
time (Y page 208).
iIf a door remains open, the interior lamps
go out automatically after approximately
5 minutes.
XDeactivating: Press button ~.
The OFF indicator lamp next to the button
comes on.
Manual control
XSwitching front interior lighting on/
off: Press button c.
XSwitching rear interior lighting on/off:
Press button s.
XSwitching front reading lamps on/off:
Press respective button p.
iThe brightness of the ambient lighting is
adjusted via COMAND (Y page 209).
Emergency lighting
The interior lighting comes on automatically
if the vehicle is involved in an accident.
Switching off:
XPress hazard warning flasher switch
(Y page 302).
or
XPress switch ~.
or
XUnlock the vehicle with the SmartKey.
Interior lighting in the rear
! An interior lamp switched on manually
does not go out automatically.
304LightingControls in detail
221_AKB; 6; 20, en-USd2ugruen,Version: 2.11.8.12009-09-24T13:28:17+02:00 - Seite 304