2010 MERCEDES-BENZ S63AMG transmission
[x] Cancel search: transmissionPage 35 of 548
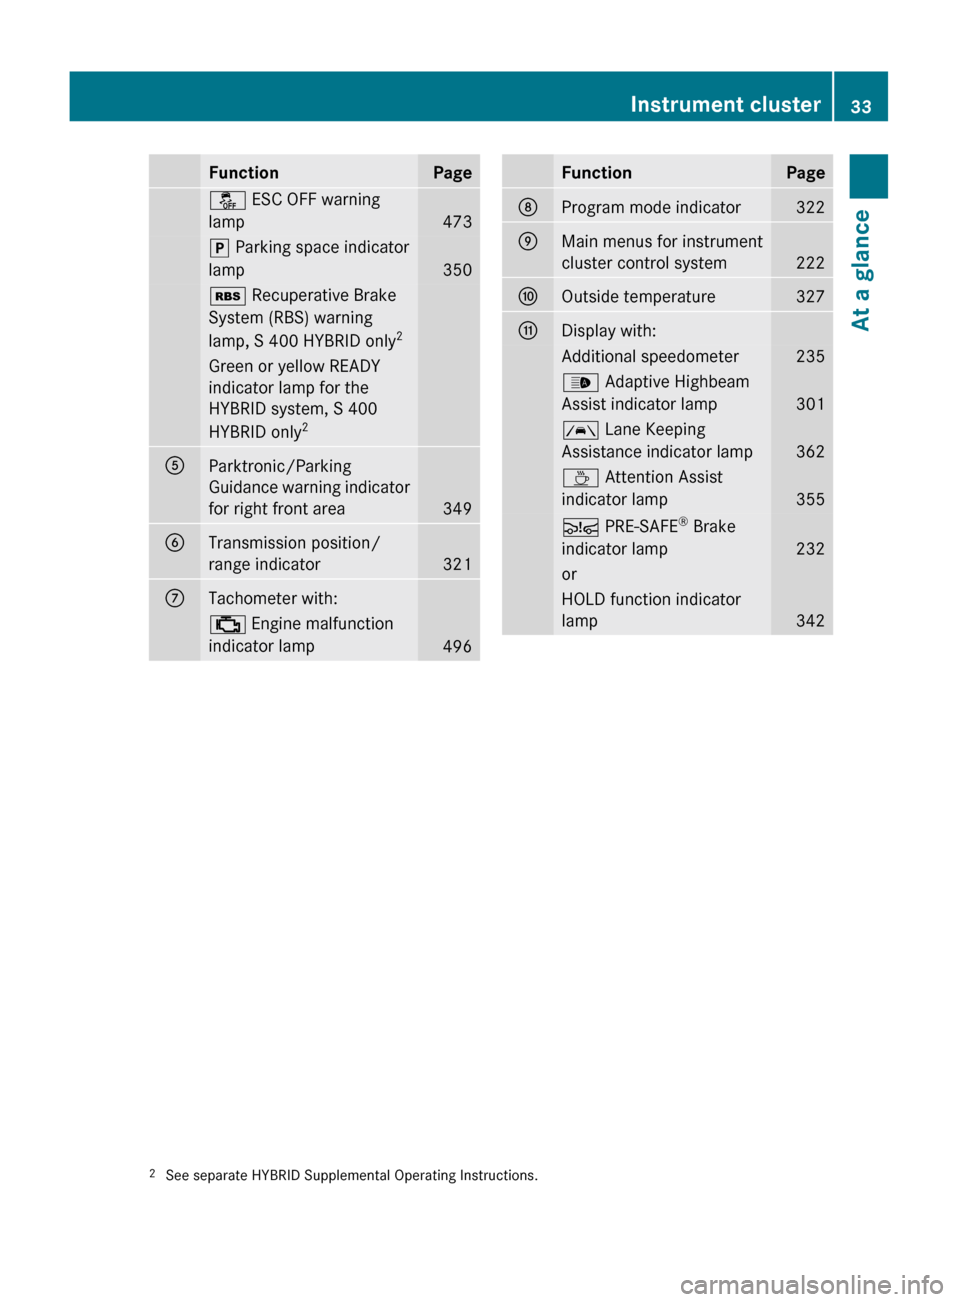
FunctionPageå ESC OFF warning
lamp
473
j Parking space indicator
lamp
350
é Recuperative Brake
System (RBS) warning
lamp, S 400 HYBRID only 2Green or yellow READY
indicator lamp for the
HYBRID system, S 400
HYBRID only 2AParktronic/Parking
Guidance warning indicator
for right front area
349
BTransmission position/
range indicator
321
CTachometer with: ; Engine malfunction
indicator lamp
496
FunctionPageDProgram mode indicator322EMain menus for instrument
cluster control system
222
FOutside temperature327GDisplay with:Additional speedometer235_ Adaptive Highbeam
Assist indicator lamp
301
à Lane Keeping
Assistance indicator lamp
362
À Attention Assist
indicator lamp
355
Ä PRE-SAFE ®
Brake
indicator lamp
232
orHOLD function indicator
lamp
3422 See separate HYBRID Supplemental Operating Instructions.Instrument cluster33At a glance221_AKB; 6; 20, en-USd2ugruen,Version: 2.11.8.12009-09-24T13:28:17+02:00 - Seite 33Z
Page 37 of 548

FunctionPagePress button W or X :to set the volumeto operate the RACETIMER 3APress button
?:to activate Voice Control
System
239
to accept a call156BInstrument cluster
illumination
326
CSwiveling COMAND display78DCOMAND display
illumination
78
ECOMAND display78FClock92GCD/DVD changer179HSD card slot180IRear window sunshade
switch
386
JHead restraint release
switch
291
KProgram mode selector
switch for automatic
transmission
322
LShortcut button for:CD/DVD/SD card181Radio166MBack button87NHazard warning flasher
switch
302
OSeat menu button216PShortcut button for:Telephone150Navigation101FunctionPageQCOMAND on/off button77RVolume control88SFavorite button94TTelephone keypad150UCOMAND controller793 AMG vehicles onlyControl systems35At a glance221_AKB; 6; 20, en-USd2ugruen,Version: 2.11.8.12009-09-24T13:28:17+02:00 - Seite 35Z
Page 85 of 548
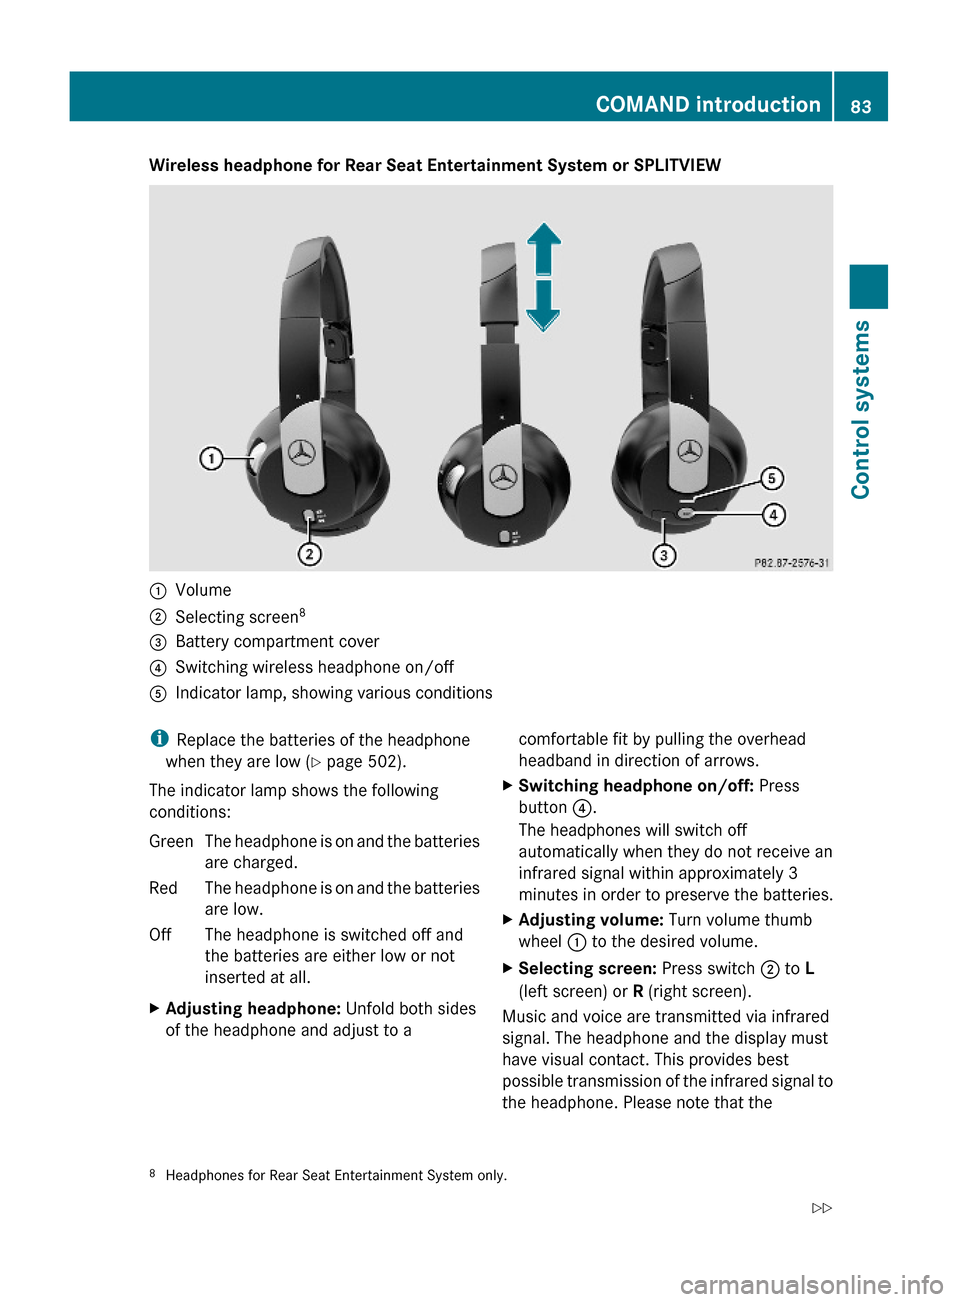
Wireless headphone for Rear Seat Entertainment System or SPLITVIEW:Volume;Selecting screen8=Battery compartment cover?Switching wireless headphone on/offAIndicator lamp, showing various conditionsiReplace the batteries of the headphone
when they are low (Y page 502).
The indicator lamp shows the following
conditions:
GreenThe headphone is on and the batteries
are charged.
RedThe headphone is on and the batteries
are low.
OffThe headphone is switched off and
the batteries are either low or not
inserted at all.
XAdjusting headphone: Unfold both sides
of the headphone and adjust to a
comfortable fit by pulling the overhead
headband in direction of arrows.
XSwitching headphone on/off: Press
button ?.
The headphones will switch off
automatically when they do not receive an
infrared signal within approximately 3
minutes in order to preserve the batteries.
XAdjusting volume: Turn volume thumb
wheel : to the desired volume.
XSelecting screen: Press switch ; to L
(left screen) or R (right screen).
Music and voice are transmitted via infrared
signal. The headphone and the display must
have visual contact. This provides best
possible transmission of the infrared signal to
the headphone. Please note that the
8Headphones for Rear Seat Entertainment System only.COMAND introduction83Control systems221_AKB; 6; 20, en-USd2ugruen,Version: 2.11.8.12009-09-24T13:28:17+02:00 - Seite 83Z
Page 93 of 548

control. Make sure the volume is not set
too high before putting on a headphone.
RThe DVD changer can playback only one
media source at a time. Example: if the
driver is playing an audio CD, the front
passenger can not play a different medium
(e.g. DVD video) from the DVD changer.
However, it is possible for the front
passenger to play media from radio,
memory card, MUSIC REGISTER, media
interface, USB, AUX or Rear Seat
Entertainment System.
RWhen driver and front passenger are using
the same medium, each can select
individual settings for that medium.
RCOMAND transmits music and voice to the
wireless headphone for the front passenger
side via infrared signal. The headphone and
the display must have visual contact. This
provides best possible transmission of the
infrared signal to the headphone. Please
note that the headphone has a left and right
side and must be used accordingly.
RWhen SPLITVIEW is on, the front passenger
can operate audio or video functions only.
RThe multifunction steering wheel lets you
operate functions for the driver’s side only.
Switching SPLITVIEW on/off
XSwitching on: Select Vehicle Q
SplitView ON.
or
XPress the SPLITVIEW remote control ON
button.
The SPLITVIEW symbol : appears and
status ; changes to SplitView OFF.
XSwitching off: Select Vehicle Q
SplitView OFF.
or
XPress the SPLITVIEW remote control ON
button.
Status ; changes to SplitView ON.
The SPLITVIEW screen remains on for
approximately 30 minutes after switching off
the ignition. After these 30 minutes or once
the SmartKey is removed from the starter
switch, the settings for the front passenger
side remain stored for approximately another
30 minutes.
COMAND system settings
System settings submenu overview
iThe components and operating principles
of COMAND can be found on (Y page 76).
System settings can be made in the following
submenus:
RDisplay Q Day Mode, Night Mode,
Automatic
RTime Q Time, Date, Format, Time Zone
RText Reader Q Speed Q Fast,
Medium or Slow:
Adjusts the reading speed of the Voice
Control System.
RVoice Control Q Help Window, Start
New Individualization, Delete
Individualization
RLanguage: Selecting system language
RFavorites Button *: Assigning the
favorite button
COMAND system settings 91Control systems221_AKB; 6; 20, en-USd2ugruen,Version: 2.11.8.12009-09-24T13:28:17+02:00 - Seite 91Z
Page 157 of 548
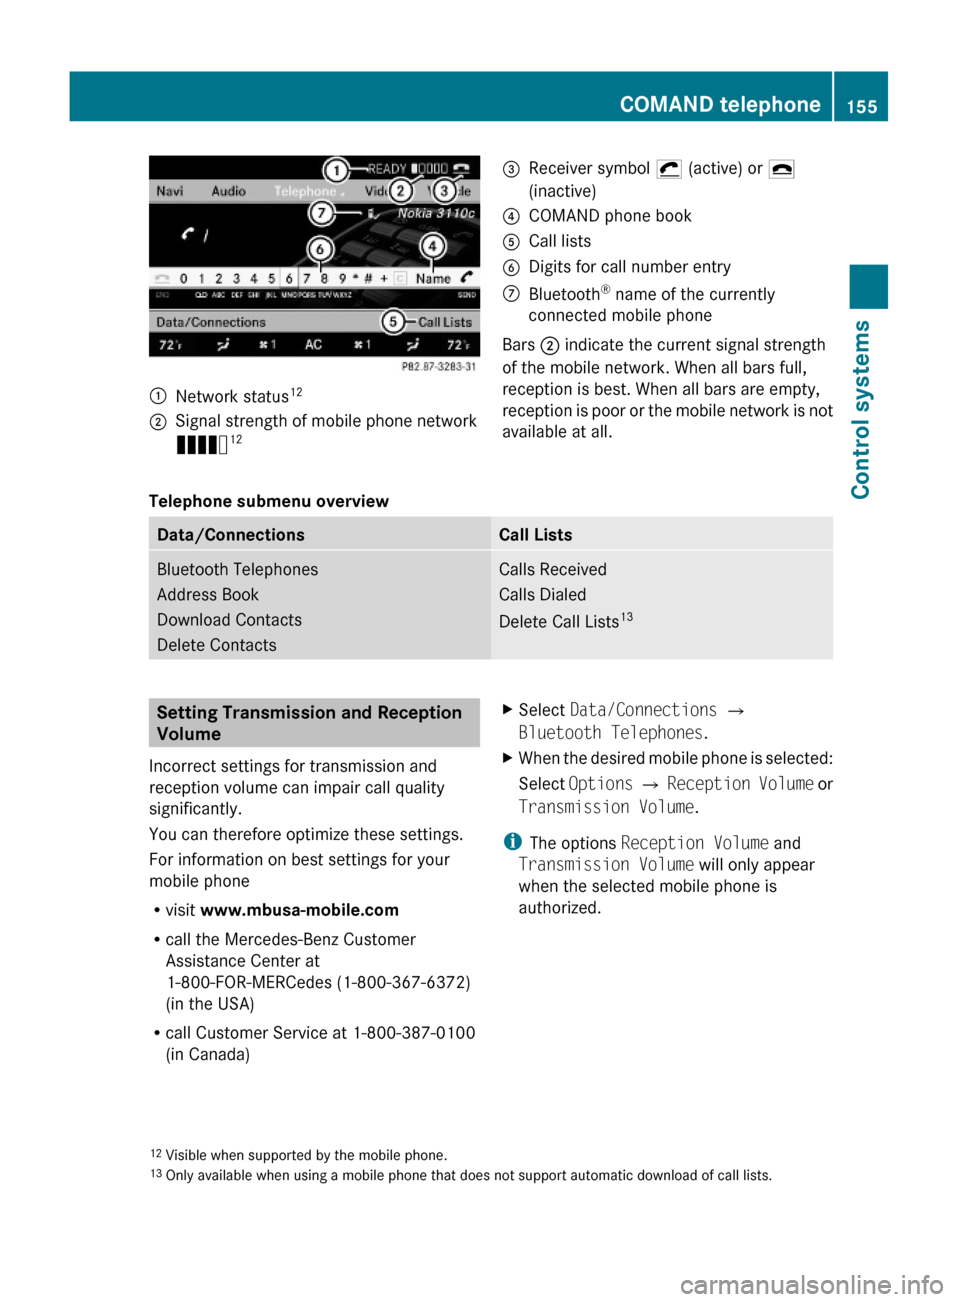
:Network status12;Signal strength of mobile phone network
Ä12=Receiver symbol ¡ (active) or ¢
(inactive)
?COMAND phone bookACall listsBDigits for call number entryCBluetooth® name of the currently
connected mobile phone
Bars ; indicate the current signal strength
of the mobile network. When all bars full,
reception is best. When all bars are empty,
reception is poor or the mobile network is not
available at all.
Telephone submenu overview
Data/ConnectionsCall ListsBluetooth Telephones
Address Book
Download Contacts
Delete Contacts
Calls Received
Calls Dialed
Delete Call Lists13
Setting Transmission and Reception
Volume
Incorrect settings for transmission and
reception volume can impair call quality
significantly.
You can therefore optimize these settings.
For information on best settings for your
mobile phone
Rvisit www.mbusa-mobile.com
Rcall the Mercedes-Benz Customer
Assistance Center at
1-800-FOR-MERCedes (1-800-367-6372)
(in the USA)
Rcall Customer Service at 1-800-387-0100
(in Canada)
XSelect Data/Connections Q
Bluetooth Telephones.
XWhen the desired mobile phone is selected:
Select Options Q Reception Volume or
Transmission Volume.
iThe options Reception Volume and
Transmission Volume will only appear
when the selected mobile phone is
authorized.
12Visible when supported by the mobile phone.13Only available when using a mobile phone that does not support automatic download of call lists.
COMAND telephone155Control systems221_AKB; 6; 20, en-USd2ugruen,Version: 2.11.8.12009-09-24T13:28:17+02:00 - Seite 155Z
Page 275 of 548
Vehicle equipment ............................274
Locking and unlocking .....................274
Starter switch positions ...................284
Seats ..................................................286
Multifunction steering wheel ..........293
Mirrors ...............................................294
Memory function ..............................297
Lighting ..............................................298
Wipers ................................................305
Power windows .................................307
Driving and parking ..........................311
Automatic transmission ...................317
Transfer case ....................................325
Instrument cluster ............................326
Driving systems ................................327
Climate control system ....................363
Rear window defroster .....................372
Power tilt/sliding sunroof ...............373
Panorama roof with power tilt/
sliding panel ......................................375
Loading and storing ..........................379
Useful features .................................384
273Controls in detail221_AKB; 6; 20, en-USd2ugruen,Version: 2.11.8.12009-09-24T13:28:17+02:00 - Seite 273
Page 278 of 548
iCanada only:
This device complies with RSS-210 of
Industry Canada. Operation is subject to
the following two conditions:
1. This device may not cause interference,
and
2. this device must accept any interference received, including
interference that may cause undesired
operation of the device.
Any unauthorized modification to this
device could void the user’s authority to
operate the equipment.
Important notes on using KEYLESS-GO
R You can also use the SmartKey with
KEYLESS-GO like a normal SmartKey
( Y page 274).
R You can combine KEYLESS-GO functions
with normal SmartKey functions (e.g.
unlocking with KEYLESS-GO and locking
with button &).
R Always carry the SmartKey with you.
R Never store the SmartKey together with
- electronic items such as a mobile phone
or another SmartKey
- metallic objects such as coins or metal
foil
Doing so could impair the function of the
KEYLESS-GO system.
R To lock or unlock the vehicle, the SmartKey
must be located outside the vehicle within
approximately 3 ft (1 m) of a door or the
trunk.
R When the vehicle has been parked for more
than 72 hours, the KEYLESS-GO function is
deactivated. Pull an outside door handle
and switch on the ignition once to activate
the KEYLESS-GO function.
R If the SmartKey is positioned farther away
from the vehicle, the system may no longer
recognize the SmartKey. The vehicle
cannot be locked or the engine started via
the KEYLESS-GO system.
R If the SmartKey is removed from the vehicle
(e.g. if a passenger exits the vehicle with
the SmartKey)
- when pressing the KEYLESS-GO start/
stop button or trying to lock the vehicle
with the outside door handle the
message Key Not Detected appears in
the multifunction display
- with the engine running, the red message
Key Not Detected appears in the
multifunction display while driving off
Find the SmartKey or change its present
location immediately (e.g. place it on the
front passenger seat or insert it in shirt
pocket).
R If you have started the engine with the
KEYLESS-GO start/stop button, you can
turn it off again by
- pressing the KEYLESS-GO start/stop
button
- inserting the SmartKey into the starter
switch when the vehicle is at a standstill
and the automatic transmission is in park
position P
R The vehicle could be inadvertently
unlocked if the SmartKey is within 3 ft (1 m)
of the vehicle and
- an outside door handle is splashed with
water
or
- you attempt to clean an outside door
handle
R Remember that the engine can be started
by anyone with a SmartKey that is left
inside the vehicle.
Possibility 1 (One SmartKey in the vehicle,
one SmartKey outside the vehicle):
If you leave the SmartKey behind when
exiting and locking the vehicle, no message
appears in the multifunction display.276Locking and unlockingControls in detail
221_AKB; 6; 20, en-USd2ugruen,Version: 2.11.8.12009-09-24T13:28:17+02:00 - Seite 276
Page 287 of 548

then insert the SmartKey into the starter
switch.
iThe KEYLESS-GO start/stop button does
not need to be removed from the starter
switch when you leave the vehicle.
However, always take the SmartKey with
you when you leave the vehicle. As long as
the SmartKey is in the vehicle, the vehicle’s
electrical systems can be switched on or
the engine can be started using the
KEYLESS-GO start/stop button.
:KEYLESS-GO start/stop button;Starter switchXInsert the KEYLESS-GO start/stop button
into the starter switch (if not inserted
already).
iAllow for 2 seconds until the system has
detected the KEYLESS-GO start/stop
button.
XMake sure the automatic transmission is in
park position P.
XDo not depress the brake pedal.
KEYLESS-GO start/stop button
=USA only?Canada only
Position 0
Before you press the KEYLESS-GO start/stop
button, the vehicle’s on-board electronics
have status 0 (as with SmartKey removed).
Position 1
XPress the KEYLESS-GO start/stop button
once.
This supplies power for some electrical
consumers, e.g. wipers.
iWhen you now open the driver’s door, the
power supply is switched off.
Ignition (or position 2)
XPress the KEYLESS-GO start/stop button
twice.
This supplies power for all electrical
consumers.
When you switch on the ignition, all lamps
in the instrument cluster come on. The
high-beam headlamp indicator lamp and
turn signal indicator lamps will only come
on if activated. If a lamp in the instrument
cluster fails to come on when the ignition
is switched on, have it checked and
replaced if necessary. If a lamp in the
instrument cluster remains on after
starting the engine or comes on while
driving, refer to “Lamps in instrument
cluster” (Y page 489).
Starter switch positions285Controls in detail221_AKB; 6; 20, en-USd2ugruen,Version: 2.11.8.12009-09-24T13:28:17+02:00 - Seite 285Z