2010 MERCEDES-BENZ S63AMG change time
[x] Cancel search: change timePage 98 of 548
COMAND may give incorrect navigation
commands if the data in the digital map does
not correspond with the actual road or traffic
situation. Maps do not cover all areas nor all
routes within an area. For example, if the
traffic routing has been changed or the
direction of a one-way road has been
reversed.
For this reason, you must always observe
applicable road and traffic rules and
regulations during your journey. Road and
traffic rules and regulations always have
priority over the navigation commands
generated by the system.GWarning!
Navigation announcements are intended to
direct you while driving without diverting your
attention from the road and driving.
Please always use navigation announcements
instead of consulting the map display for
directions. Consulting the symbols or map
display for directions may cause you to divert
your attention from driving and increase your
risk of an accident.
Map software
The digital maps generated by the map
software become outdated in the same way
as conventional road maps. Optimum route
guidance can only be provided by the
navigation system in conjunction with the
latest map software. Information about new
map software versions can be obtained from
an authorized Mercedes-Benz Center.
Displaying installed map version
XNavi Q Map Version
The installed map version is displayed.
For information on installing new map
software see ( Y page 96).
Installing the map software
Your vehicle is factory-equipped with map
software for the USA (including Alaska and
Hawaii), Canada, the U.S. Virgin Islands, and
Puerto Rico.
You can install new map software from one or
more DVDs, depending on the size of the map
software.
Copy protection of map software
COMAND map software is subject to charges.
The map software requires an activation
code. The map software can be used for one
individual vehicle only and is
non-transferrable. The six-digit activation
code is available at any authorized Mercedes-
Benz Center. Contact an authorized
Mercedes-Benz Center in case you have lost
your activation code or when the COMAND
system does not accept the activation code
you have received.
When reinstalling a map software that has
been installed in that vehicle already, an
activation code is not required.
Installation process
i The installation process can take
between 10 and 120 minutes, depending
on the size of the map software. If the radio
is switched on when you start the
installation process, you can still adjust the
volume. During the installation process,
some COMAND functions are suspended.
Still available are the COMAND functions
for automatic air conditioning operation
and canceling the installation process.
If possible, carry out the installation when
the vehicle is stationary. When the vehicle
is stationary, the reading rate of the DVD
drive is higher than in a moving vehicle and
the installation process requires less time.
GObserve Safety notes, see page 76.
i COMAND may switch off during the
installation process automatically in order
96COMAND navigation (introduction)Control systems
221_AKB; 6; 20, en-USd2ugruen,Version: 2.11.8.12009-09-24T13:28:17+02:00 - Seite 96
Page 100 of 548

XEnter the activation code and confirm by
pressing !.
Installation of the map software starts.
When you enter an invalid activation code,
you are prompted to reenter the activation
code. After entering an invalid activation code
for the third time, the prompt for reentering
the activation code will be delayed. The delay
increases by 5 minutes each time an invalid
activation code is entered to a maximum
delay of 5 hours.
Map software installation
Immediately before installation, the
COMAND system reboots.
A corresponding message and a progress bar
appear during the installation process.
XCanceling installation on the DVD
changer: Press the respective magazine
tray button.
XRemove the DVD from the slot.
iWhen you cancel the installation, the
navigation system will be inoperative. You
can resume a canceled installation at a
later time.
XInstallation of multiple DVD map
software: After installation of the first
DVD, a message appears that prompts you
to insert the next DVD. Follow the
instructions on the COMAND display.
XContinue installation without
canceling: Let the installation continue
without pressing any buttons.
When the installation has been completed,
a corresponding message appears.
XConfirming message: Press W.
The DVD is ejected.
XRemove the DVD from the slot.
The installation is finished.
When the installation has been completed
successfully, a corresponding message
appears.
XConfirming message: Press W.
The DVD is ejected.
XRemove the DVD from the slot.
If the installation was unsuccessful:
RThe DVD is dirty or scratched.
XClean the DVD (Y page 179).XStart the installation of the map
software once more.
RThe system may be overheated due to
excessive temperature in the vehicle
interior.
XWait until the vehicle interior has
cooled.
XStart the installation of the map
software once more.
RIf these measures do not solve the problem:
XContact an authorized Mercedes-Benz
Center.
General notes
Operational readiness of the navigation
system following a system software
update by an authorized Mercedes-
Benz Center
After a system software update by an
authorized Mercedes-Benz Center, the
installed map software may no longer be
98COMAND navigation (introduction)Control systems
221_AKB; 6; 20, en-USd2ugruen,Version: 2.11.8.12009-09-24T13:28:17+02:00 - Seite 98
Page 108 of 548
XSelect Navi.XCheck the check box for menu item City
(3D) .
Setting route type
You can set the following route types:
R Fast Route : COMAND calculates a route
with minimized driving time.
R Dynamic Route : COMAND calculates a
route with minimized driving time and takes
into account traffic messages received
along the route. Thus, the navigation
system can dynamically recalculate the
route. Roads that are blocked will be
avoided whenever possible. For
information on traffic messages see
( Y page 138).
R Short Route : COMAND calculates a route
with minimized route length.
XSelect Navi Q Mode .
The list of available rote types appears. The
dot # indicates the currently selected
setting.XSelect route type: Fast Route , Dynamic
Route or Short Route .XExit menu: Slide XV Y.
i
If you change the route type setting during
active route guidance, COMAND calculates
a new route. If you change the setting when
route guidance is inactive, COMAND uses
the new setting for the next route guidance.
Setting route mode
With this function you can select the following
options for route calculation:
R Minimize Highways
R Minimize Toll Roads
R Minimize Tunnels
R Minimize Ferries
R Minimize Motorail Trains
XSelect Navi Q Mode .
The mode list appears.XSwitching mode on or off: Select desired
modes.
Depending on the previous status, the
mode is switched on or off. A checkmark
indicates that the mode is switched on. It
is possible to switch on more than one
mode.XExiting menu: Slide XV Y or press back
button % in the center console
( Y page 87).
COMAND will verify whether it can
incorporate the modes if you select them
with route guidance active.
If possible, COMAND calculates a new
route considering the selected options.
If the route cannot be recalculated with the
selected options, a message appears and
an announcement is made. COMAND
calculates a new route. Only options that
are possible will be considered.
Displaying highway information
When this function is enabled, highway
information ahead will display automatically
( Y page 137).
Audio fadeout
XSelect Navi Q Audio Fadeout .
When the check box is checked U the
volume of the current audio source fades
during a navigation announcement.
COMAND navigation system
(entering a destination)
Introduction
GWarning!
For safety reasons, only enter a new
destination when the vehicle is stationary.
106COMAND navigation system (entering a destination)Control systems
221_AKB; 6; 20, en-USd2ugruen,Version: 2.11.8.12009-09-24T13:28:17+02:00 - Seite 106
Page 123 of 548

iIn predictive speller :, you can only
select currently selectable characters.
Which characters are included depends on
the sequence in which you have entered
your destination and the content of the
destination memory.
While the characters are being selected as
described below, the top list entry always
shows the destination which best matches to
the input data as it has been entered up to
that point.
At the same time, COMAND automatically
adds matching characters to characters
already entered by the user.
XChanging language for the predictive
speller: Select B.
XSelect desired language.XChanging character set for the
predictive speller: Select C.
Depending on the previous setting, you will
change to letters with special characters or
to numbers with special characters.
XSelecting characters: Slide XVY or
rotate cVd.
XConfirming character selection:
Press W.
XDeleting individual characters: Select
F in the bottom line and press W.
XDeleting an entire entry: Select F in the
bottom line and press W and hold until the
entire entry is deleted.
XCanceling an entry: Select % in the
bottom line and press W.
or
XPress back button % in the center
console (Y page 87).
As soon as COMAND can clearly attribute the
characters entered to a destination,
predictive speller : disappears. You see the
destination memory list without predictive
speller. Here you can confirm the current
entry or make another selection.
You can also manually switch to the
destination memory list without predictive
speller at any time.
XSwitching manually to the destination
memory list without predictive speller:
Slide ZV.
or
XSelect ¬ in the second line from the
bottom and press W.
Destination memory list without
predictive speller
XSelecting a destination: Slide ZVÆ or
rotate cVd.
XCanceling selection: Press back button
% in the center console (Y page 87).
or
XSelect Back and press W.
iThe Back menu item is only present if this
list was called up from the list with
predictive speller.
XConfirming selection: Press W.XStarting route calculation: Select Start,
see also (Y page 120).
COMAND navigation system (entering a destination)121Control systems221_AKB; 6; 20, en-USd2ugruen,Version: 2.11.8.12009-09-24T13:28:17+02:00 - Seite 121Z
Page 129 of 548
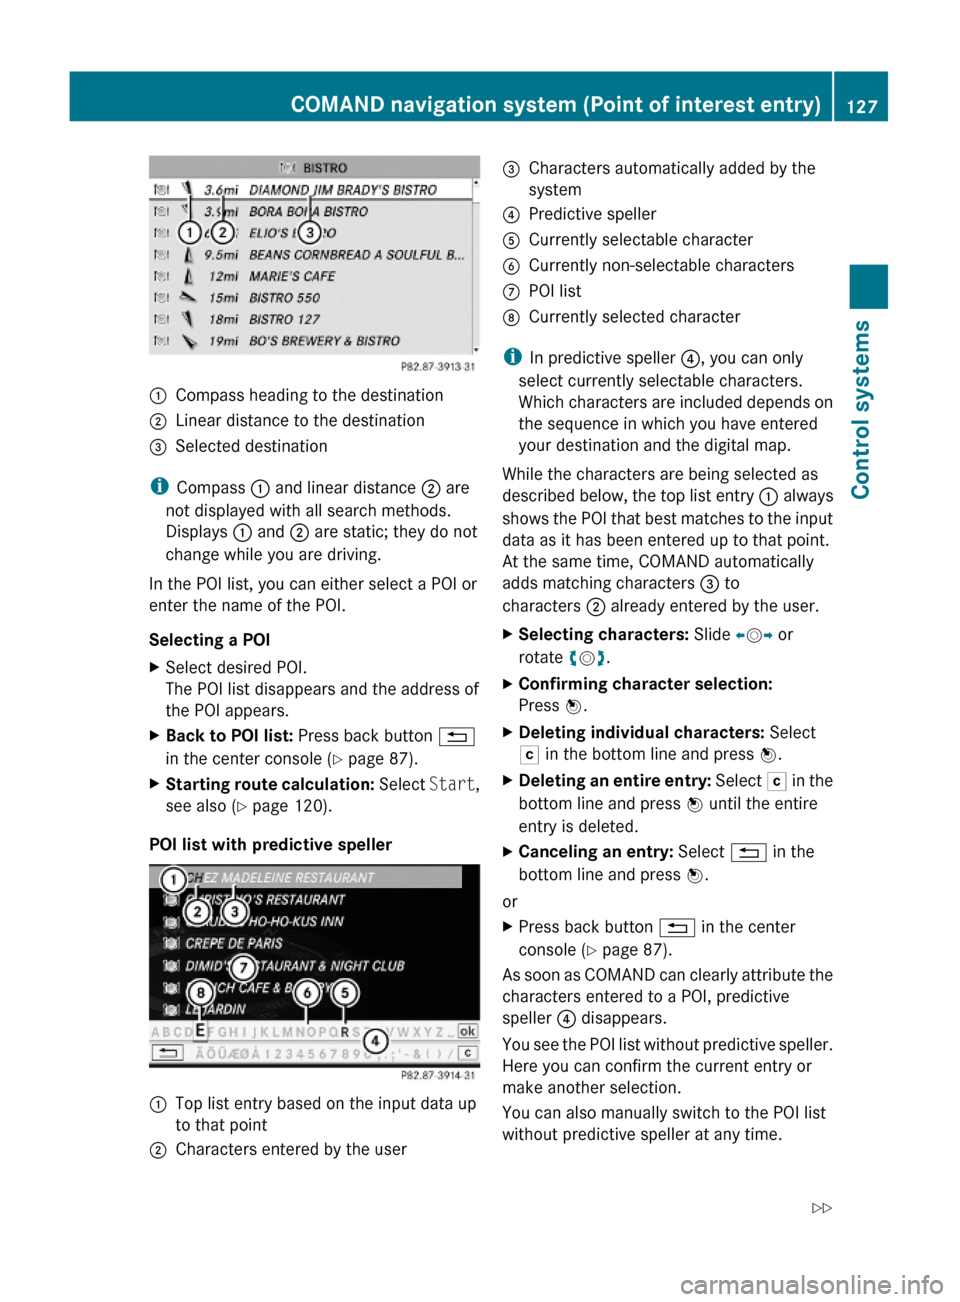
:Compass heading to the destination;Linear distance to the destination=Selected destination
iCompass : and linear distance ; are
not displayed with all search methods.
Displays : and ; are static; they do not
change while you are driving.
In the POI list, you can either select a POI or
enter the name of the POI.
Selecting a POI
XSelect desired POI.
The POI list disappears and the address of
the POI appears.
XBack to POI list: Press back button %
in the center console (Y page 87).
XStarting route calculation: Select Start,
see also (Y page 120).
POI list with predictive speller
:Top list entry based on the input data up
to that point
;Characters entered by the user=Characters automatically added by the
system
?Predictive spellerACurrently selectable characterBCurrently non-selectable charactersCPOI listDCurrently selected character
iIn predictive speller ?, you can only
select currently selectable characters.
Which characters are included depends on
the sequence in which you have entered
your destination and the digital map.
While the characters are being selected as
described below, the top list entry : always
shows the POI that best matches to the input
data as it has been entered up to that point.
At the same time, COMAND automatically
adds matching characters = to
characters ; already entered by the user.
XSelecting characters: Slide XVY or
rotate cVd.
XConfirming character selection:
Press W.
XDeleting individual characters: Select
F in the bottom line and press W.
XDeleting an entire entry: Select F in the
bottom line and press W until the entire
entry is deleted.
XCanceling an entry: Select % in the
bottom line and press W.
or
XPress back button % in the center
console (Y page 87).
As soon as COMAND can clearly attribute the
characters entered to a POI, predictive
speller ? disappears.
You see the POI list without predictive speller.
Here you can confirm the current entry or
make another selection.
You can also manually switch to the POI list
without predictive speller at any time.
COMAND navigation system (Point of interest entry)127Control systems221_AKB; 6; 20, en-USd2ugruen,Version: 2.11.8.12009-09-24T13:28:17+02:00 - Seite 127Z
Page 145 of 548
XBack to list: Select Back.XDisplaying previous or next traffic
message: Select Previous or Next.
XDisplaying details for selected traffic
message: Select Details.
XSwitching to map view: Select Map.
COMAND navigation system
(destination memory)
My address
iThe destination memory always contains
an entry called My Address. You can save
your home address, for example, under this
entry.
Assigning your address for the first
time or changing your own address
Assigning and/or changing your own
address
XSelect Navi Q Destination Q From
Memory.
Depending on the number of entries in the
destination memory, you will see the
destination memory list with or without
predictive speller.
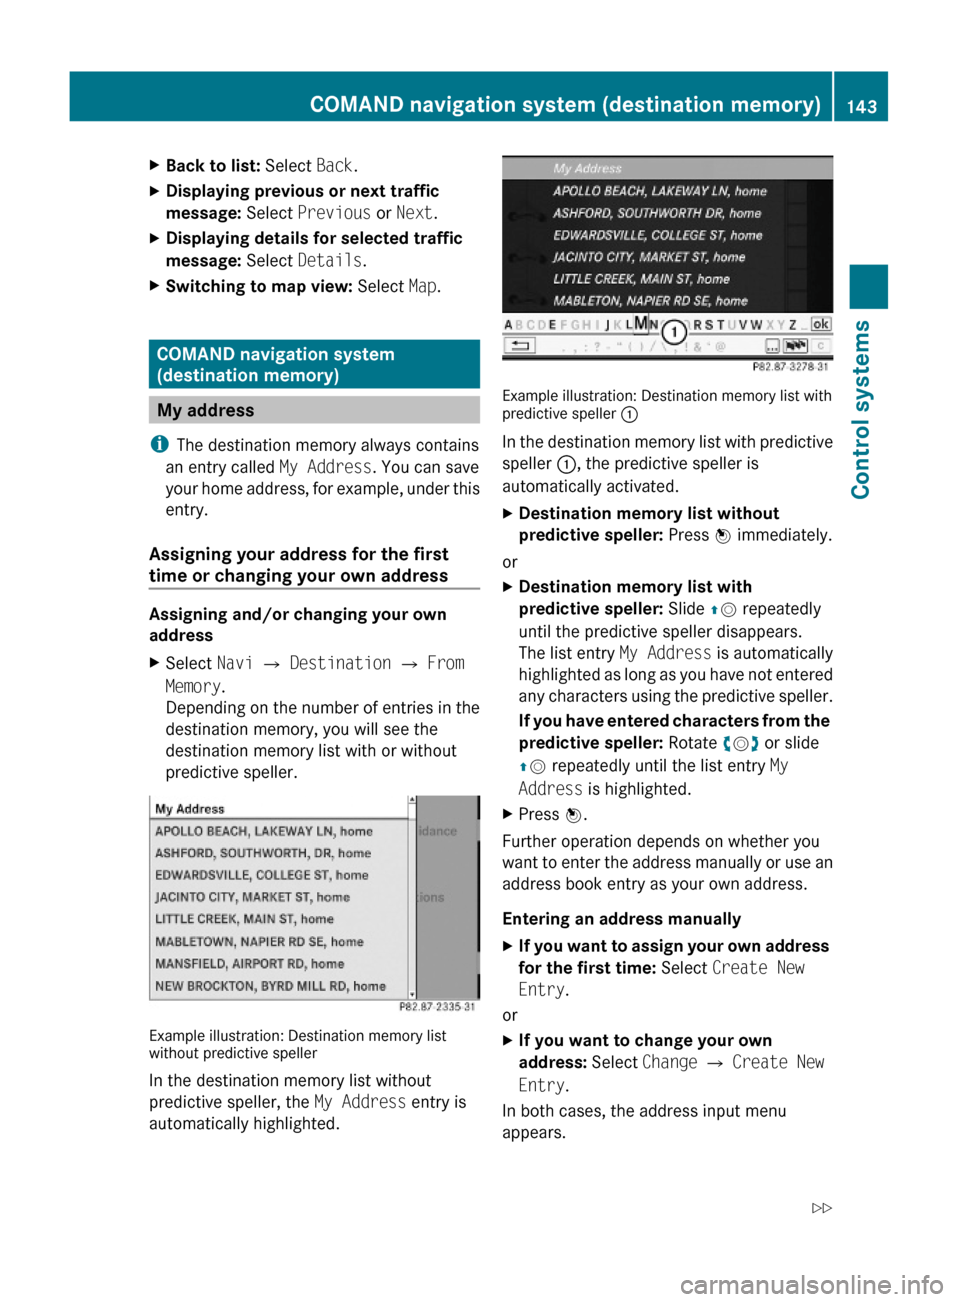
Example illustration: Destination memory listwithout predictive speller
In the destination memory list without
predictive speller, the My Address entry is
automatically highlighted.
Example illustration: Destination memory list withpredictive speller :
In the destination memory list with predictive
speller :, the predictive speller is
automatically activated.
XDestination memory list without
predictive speller: Press W immediately.
or
XDestination memory list with
predictive speller: Slide ZV repeatedly
until the predictive speller disappears.
The list entry My Address is automatically
highlighted as long as you have not entered
any characters using the predictive speller.
If you have entered characters from the
predictive speller: Rotate cVd or slide
ZV repeatedly until the list entry My
Address is highlighted.
XPress W.
Further operation depends on whether you
want to enter the address manually or use an
address book entry as your own address.
Entering an address manually
XIf you want to assign your own address
for the first time: Select Create New
Entry.
or
XIf you want to change your own
address: Select Change Q Create New
Entry.
In both cases, the address input menu
appears.
COMAND navigation system (destination memory)143Control systems221_AKB; 6; 20, en-USd2ugruen,Version: 2.11.8.12009-09-24T13:28:17+02:00 - Seite 143Z
Page 146 of 548
XEnter the address. Proceed as described
for destination entry in the “Entering a
destination by address” section
( Y page 107).XSelect Save after entering the address.
Your address is saved.
Using the address book entry as your own
address
XIf you want to assign your own address
for the first time: Select Assign
Address Book Entry .
or
XIf you want to change your own
address: Select Change Q Assign
Address Book Entry Q Home or Work .
In both cases, the menu appears for
searching for an address book entry.
XSelect desired address book entry.
Proceed as described in the “Searching for
an address book entry” section
( Y page 160).
Once the address data is complete and if it
matches the digital map data, COMAND
saves the entry as your own address in the
destination memory.
If address data is still missing or if it cannot
be found on the digital map, a message
appears indicating that the address is
incomplete.XClosing message: Select OK.
i
In the address book entry, the city and
street must be spelled in the same way as
the destination entry so that the data
matches the digital map data.
In order for the state (USA) or province
(Canada) to match the map data, you may
either enter the entire name or the
abbreviation in the address book.
Examples:
R Florida or FL
R Colorado or CO
RAlberta or AB
R Ontario or ON
Depending on which data is missing or cannot
be found on the digital map, you must now
either:
R select a state (USA) or province (Canada)
R or enter a city
R or enter a street
R or enter a house numberXSelecting a state (USA) or province
(Canada): Select desired state (USA) or
province (Canada) from the list.XEntering a city: Proceed as described for
destination entry in the “Entering a city”
section ( Y page 111).XEntering a street: Proceed as described
for destination entry in the “Entering a
street” section ( Y page 114).XEntering a house number: Proceed as
described for destination entry in the
“Entering a house number” section
( Y page 117).
If all data is available and matches the
digital map data, you can save the address.XSaving: Select Save.
Selecting your own address for route
guidance
XSelect Navi Q Destination Q From
Memory .
The destination memory list appears either
with or without the predictive speller.
Whether the predictive speller appears
depends on the number of entries in the
destination memory.144COMAND navigation system (destination memory)Control systems
221_AKB; 6; 20, en-USd2ugruen,Version: 2.11.8.12009-09-24T13:28:17+02:00 - Seite 144
Page 181 of 548
Such damages are not covered by the
Mercedes-Benz Limited Warranty.
Only use round discs with a diameter of
12 cm.
Notes about handling CDs/DVDs
ROnly hold discs by the edge.
RHandle discs carefully to prevent playback
problems.
RAvoid getting scratches, fingerprints and
dust on discs.
RClean discs from time to time with a
commercially-available cleaning cloth. Do
not wipe them with a circular motion, but
only in straight lines from the center
outwards.
ROnly use a pen designed for such a purpose
to label discs.
RPlace discs back in their boxes after use.
RProtect discs from heat and direct sunlight.
Inserting/ejecting CDs and DVDs
GObserve Safety notes, see page 176.
iIf the CD/DVD has a printed side, this
must face upwards when the CD/DVD is
inserted. If neither side is printed, the side
to be played should face downwards.
DVD changer
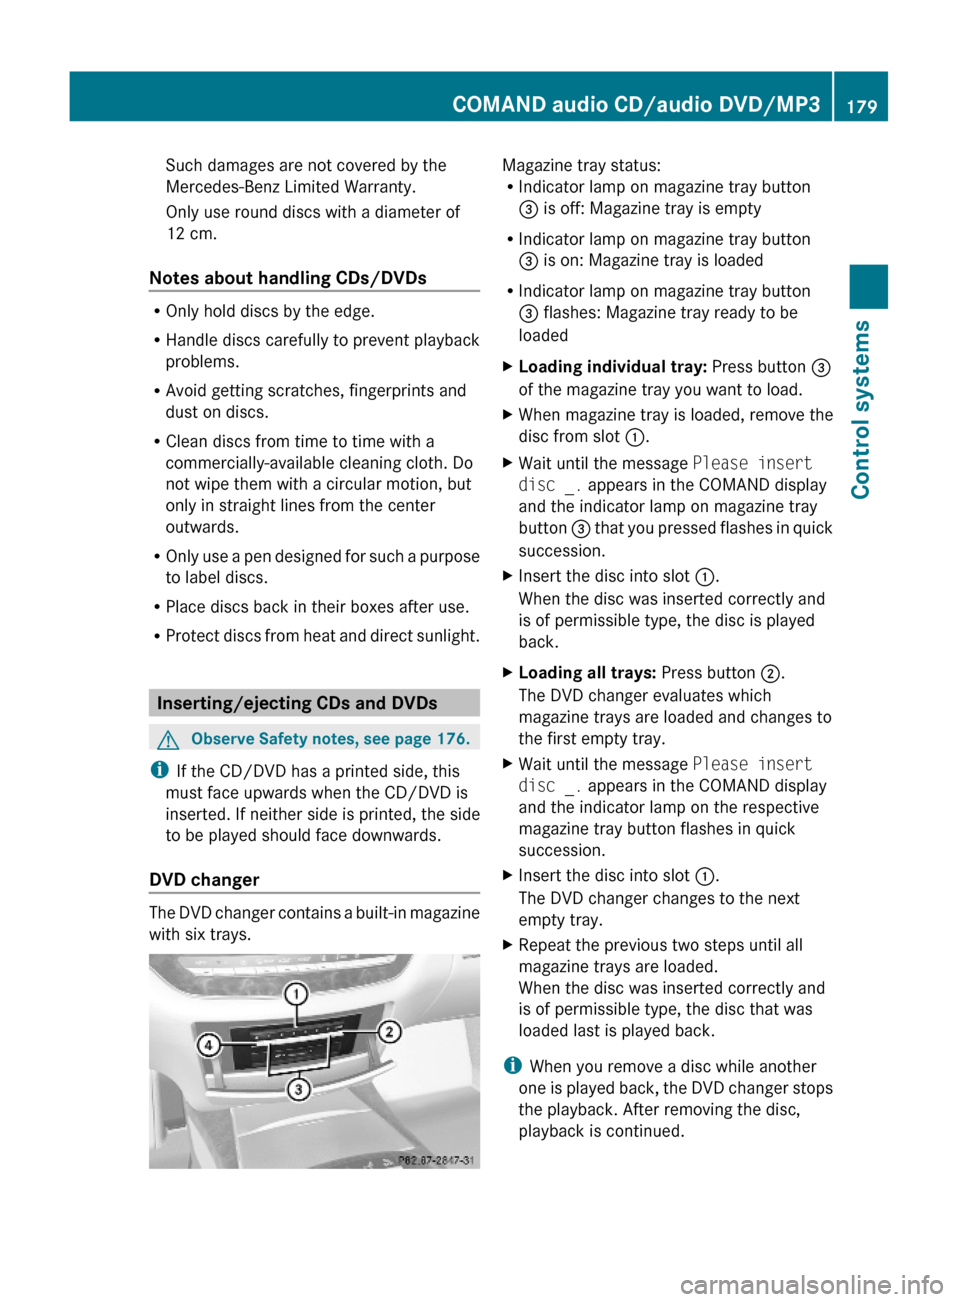
The DVD changer contains a built-in magazine
with six trays.
Magazine tray status:RIndicator lamp on magazine tray button
= is off: Magazine tray is empty
RIndicator lamp on magazine tray button
= is on: Magazine tray is loaded
RIndicator lamp on magazine tray button
= flashes: Magazine tray ready to be
loaded
XLoading individual tray: Press button =
of the magazine tray you want to load.
XWhen magazine tray is loaded, remove the
disc from slot :.
XWait until the message Please insert
disc _. appears in the COMAND display
and the indicator lamp on magazine tray
button = that you pressed flashes in quick
succession.
XInsert the disc into slot :.
When the disc was inserted correctly and
is of permissible type, the disc is played
back.
XLoading all trays: Press button ;.
The DVD changer evaluates which
magazine trays are loaded and changes to
the first empty tray.
XWait until the message Please insert
disc _. appears in the COMAND display
and the indicator lamp on the respective
magazine tray button flashes in quick
succession.
XInsert the disc into slot :.
The DVD changer changes to the next
empty tray.
XRepeat the previous two steps until all
magazine trays are loaded.
When the disc was inserted correctly and
is of permissible type, the disc that was
loaded last is played back.
iWhen you remove a disc while another
one is played back, the DVD changer stops
the playback. After removing the disc,
playback is continued.
COMAND audio CD/audio DVD/MP3179Control systems221_AKB; 6; 20, en-USd2ugruen,Version: 2.11.8.12009-09-24T13:28:17+02:00 - Seite 179Z