2010 MERCEDES-BENZ S63AMG Head lamps
[x] Cancel search: Head lampsPage 30 of 548
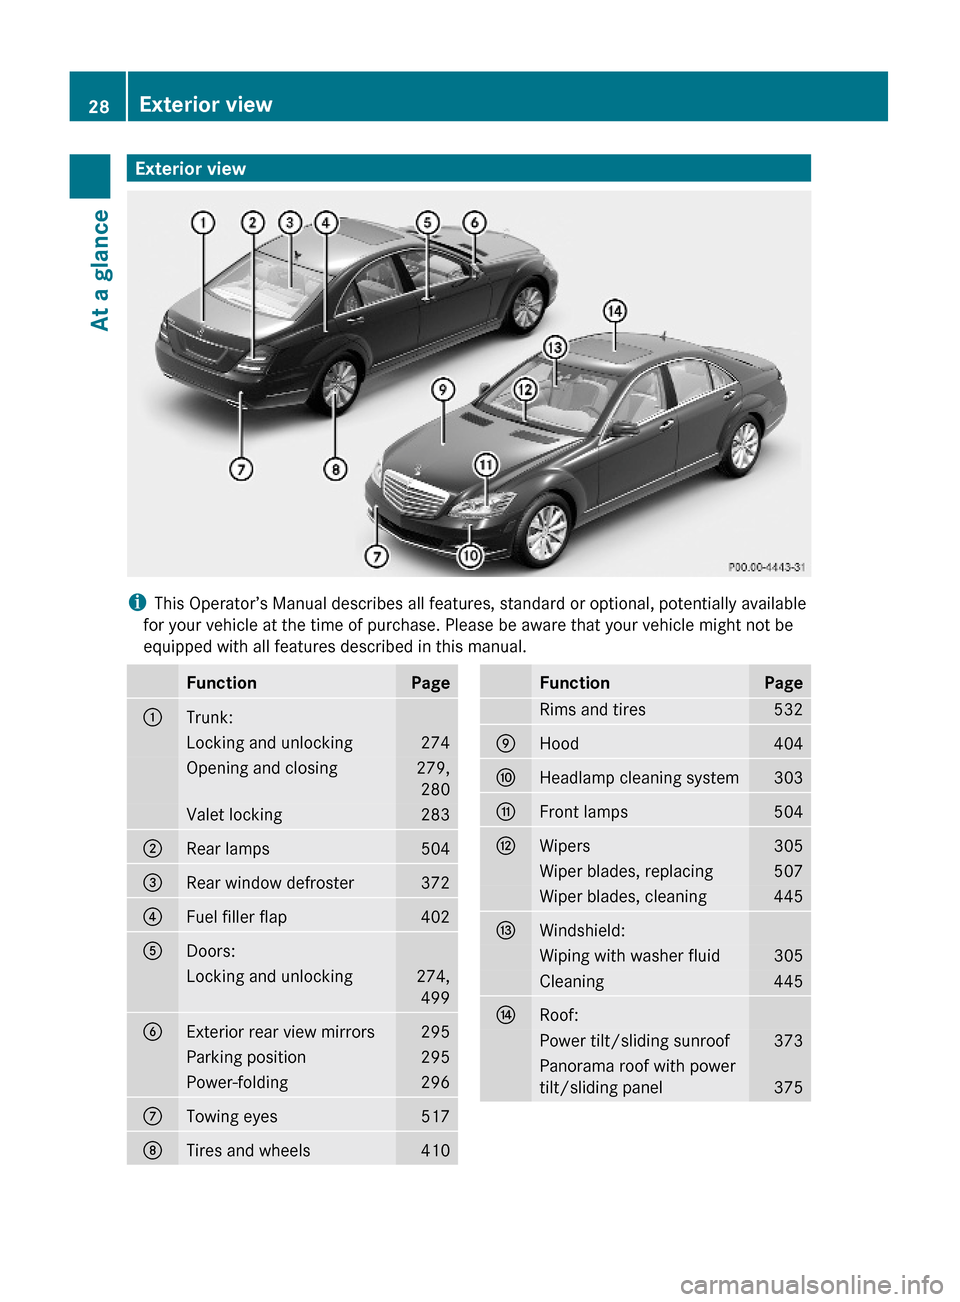
Exterior view
iThis Operator’s Manual describes all features, standard or optional, potentially available
for your vehicle at the time of purchase. Please be aware that your vehicle might not be
equipped with all features described in this manual.
FunctionPage:Trunk:Locking and unlocking274Opening and closing279,
280
Valet locking283;Rear lamps504=Rear window defroster372?Fuel filler flap402ADoors:Locking and unlocking274,
499
BExterior rear view mirrors295Parking position295Power-folding296CTowing eyes517DTires and wheels410FunctionPageRims and tires532EHood404FHeadlamp cleaning system303GFront lamps504HWipers305Wiper blades, replacing507Wiper blades, cleaning445IWindshield:Wiping with washer fluid305Cleaning445JRoof:Power tilt/sliding sunroof373Panorama roof with power
tilt/sliding panel375
28Exterior viewAt a glance
221_AKB; 6; 20, en-USd2ugruen,Version: 2.11.8.12009-09-24T13:28:17+02:00 - Seite 28
Page 34 of 548
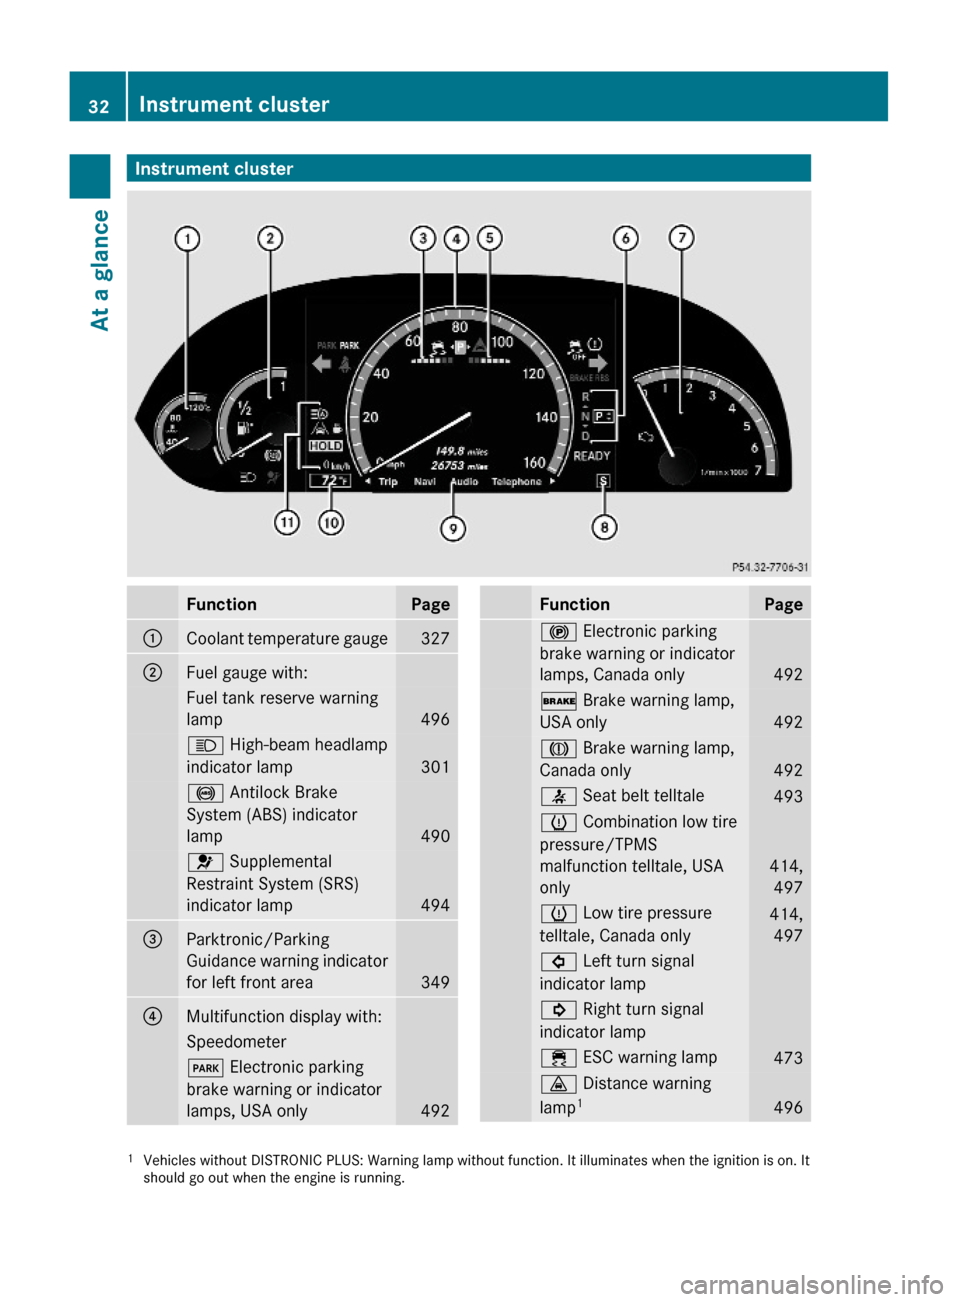
Instrument clusterFunctionPage:Coolant temperature gauge327;Fuel gauge with:Fuel tank reserve warning
lamp496
K High-beam headlamp
indicator lamp 301
! Antilock Brake
System (ABS) indicator
lamp 490
6 Supplemental
Restraint System (SRS)
indicator lamp 494
=Parktronic/Parking
Guidance warning indicator
for left front area349
?Multifunction display with:Speedometer F Electronic parking
brake warning or indicator
lamps, USA only492
FunctionPage! Electronic parking
brake warning or indicator
lamps, Canada only492
$ Brake warning lamp,
USA only492
J Brake warning lamp,
Canada only492
7 Seat belt telltale 493h Combination low tire
pressure/TPMS
malfunction telltale, USA
only
414,
497
h Low tire pressure
telltale, Canada only
414,
497
# Left turn signal
indicator lamp
! Right turn signal
indicator lamp
÷ ESC warning lamp 473· Distance warning
lamp14961Vehicles without DISTRONIC PLUS: Warning lamp without function. It illuminates when the ignition is on. Itshould go out when the engine is running.
32Instrument clusterAt a glance
221_AKB; 6; 20, en-USd2ugruen,Version: 2.11.8.12009-09-24T13:28:17+02:00 - Seite 32
Page 58 of 548
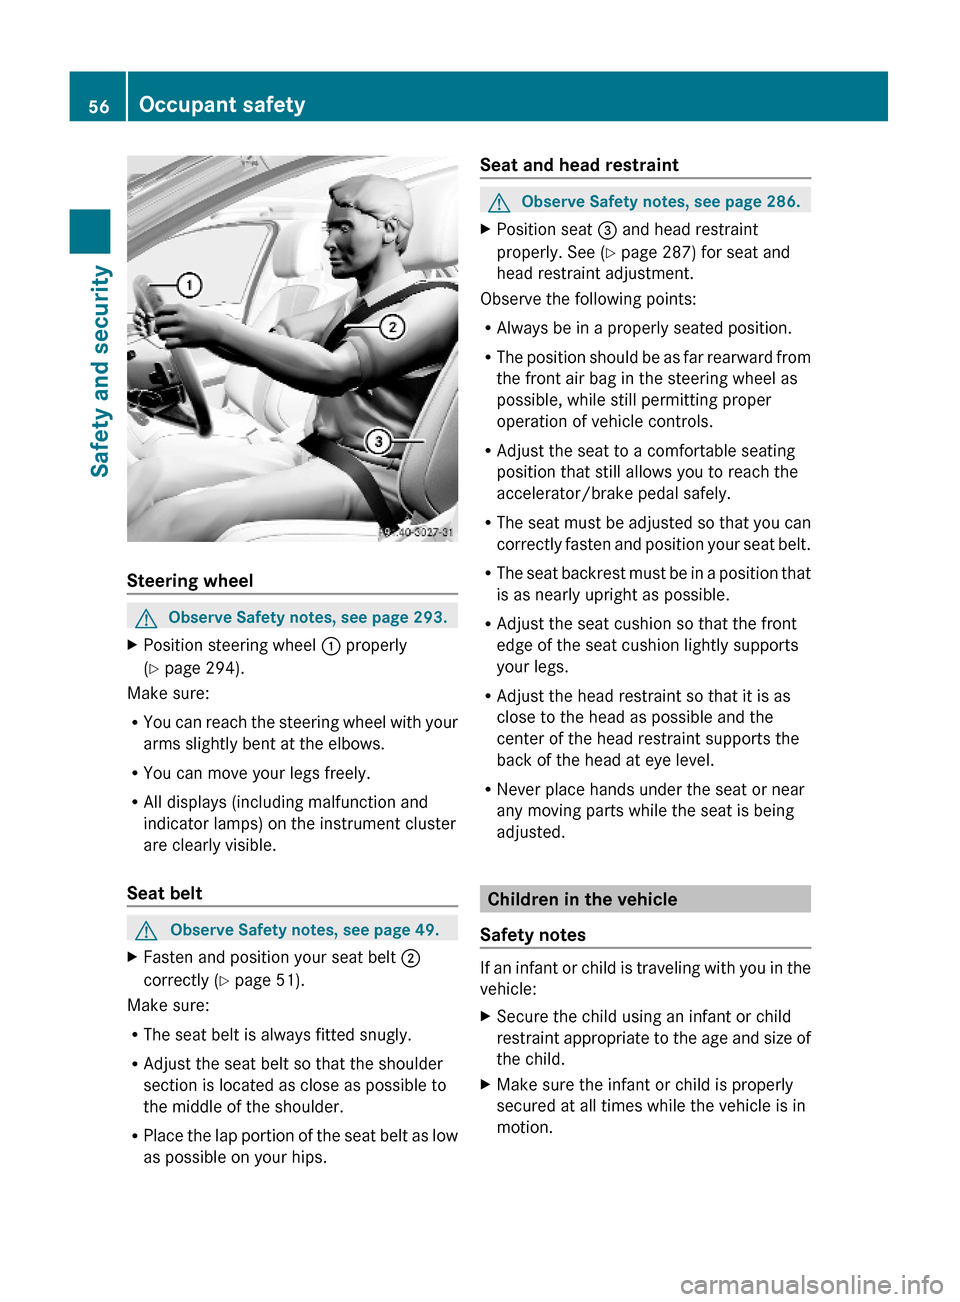
Steering wheel
GObserve Safety notes, see page 293.XPosition steering wheel : properly
(Y page 294).
Make sure:
RYou can reach the steering wheel with your
arms slightly bent at the elbows.
RYou can move your legs freely.
RAll displays (including malfunction and
indicator lamps) on the instrument cluster
are clearly visible.
Seat belt
GObserve Safety notes, see page 49.XFasten and position your seat belt ;
correctly (Y page 51).
Make sure:
RThe seat belt is always fitted snugly.
RAdjust the seat belt so that the shoulder
section is located as close as possible to
the middle of the shoulder.
RPlace the lap portion of the seat belt as low
as possible on your hips.
Seat and head restraintGObserve Safety notes, see page 286.XPosition seat = and head restraint
properly. See (Y page 287) for seat and
head restraint adjustment.
Observe the following points:
RAlways be in a properly seated position.
RThe position should be as far rearward from
the front air bag in the steering wheel as
possible, while still permitting proper
operation of vehicle controls.
RAdjust the seat to a comfortable seating
position that still allows you to reach the
accelerator/brake pedal safely.
RThe seat must be adjusted so that you can
correctly fasten and position your seat belt.
RThe seat backrest must be in a position that
is as nearly upright as possible.
RAdjust the seat cushion so that the front
edge of the seat cushion lightly supports
your legs.
RAdjust the head restraint so that it is as
close to the head as possible and the
center of the head restraint supports the
back of the head at eye level.
RNever place hands under the seat or near
any moving parts while the seat is being
adjusted.
Children in the vehicle
Safety notes
If an infant or child is traveling with you in the
vehicle:
XSecure the child using an infant or child
restraint appropriate to the age and size of
the child.
XMake sure the infant or child is properly
secured at all times while the vehicle is in
motion.
56Occupant safetySafety and security
221_AKB; 6; 20, en-USd2ugruen,Version: 2.11.8.12009-09-24T13:28:17+02:00 - Seite 56
Page 66 of 548

Braking
At the instant one of the wheels is about to
lock up, a slight pulsation can be felt in the
brake pedal. The pulsation indicates that the
ABS is in the regulating mode.
XKeep firm and steady pressure on the brake
pedal while you feel the pulsation.
Continuous, steady brake pedal pressure
yields the advantages provided by the ABS,
namely braking power and the ability to steer
the vehicle.
The pulsating brake pedal can be an
indication of hazardous road conditions and
functions as a reminder to take extra care
while driving.
Emergency brake maneuver
XKeep continuous full pressure on the brake
pedal.GWarning!
If the ABS malfunctions, other driving safety
systems such as the BAS or the ESC are also
switched off. Observe indicator and warning
lamps that may come on as well as messages
in the multifunction display that may appear.
If the ABS malfunctions, the wheels may lock
during hard braking, reducing steering
capability and extending the braking distance.
BAS
GObserve Safety notes, see page 63.
The Brake Assist System (BAS) operates in
emergency situations. If you apply the brakes
very quickly, the BAS provides full brake
boost automatically, thereby potentially
reducing the braking distance.
XApply continuous full braking pressure until
the emergency braking situation is over.
The ABS will prevent the wheels from
locking.When you release the brake pedal, the brakes
function again as normal. The BAS is then
deactivated.GWarning!
If the BAS malfunctions, the brake system still
functions, but without the additional brake
boost available that the BAS would normally
provide in an emergency braking maneuver.
Therefore, the braking distance may increase.
BAS PLUS
The Brake Assist System PLUS (BAS PLUS)
operates in emergency braking situations and
uses radar sensors to assess the traffic
situation. BAS PLUS assists you in braking at
speeds above approximately 20 mph
(30 km/h).
When traveling in Canada in a vehicle not
registered in Canada, you must switch off the
radar sensor system ( Y page 236). Canadian
law does not permit the use of the radar
sensor system for vehicles from outside of
Canada.
When you switch off the radar system, the
following functions are deactivated:
R BAS PLUS
R PRE-SAFE ®
Brake ( Y page 69)
R DISTRONIC PLUS ( Y page 330)
R Blind Spot Assist ( Y page 359)
GWarning!
BAS PLUS is a convenience system designed
to assist the driver during vehicle operation.
The responsibility for the vehicle speed and
the distance to the vehicle ahead, including
most importantly brake operation to assure
safe stopping distance, always remains with
the driver.
Always pay attention to traffic conditions
even while BAS PLUS is switched on.
Otherwise, you may not be able to recognize
dangerous situations until it is too late and
64Driving safety systemsSafety and security
221_AKB; 6; 20, en-USd2ugruen,Version: 2.11.8.12009-09-24T13:28:17+02:00 - Seite 64
Page 212 of 548
XSelect Vehicle.
The main area is active.
XSelecting Automatic Mirror Folding:
Slide XVY or rotate cVd.
XSwitching automatic fold-in function
on/off: Press W.
Locator lighting on/off
iThe components and operating principles
of COMAND can be found on (Y page 76).
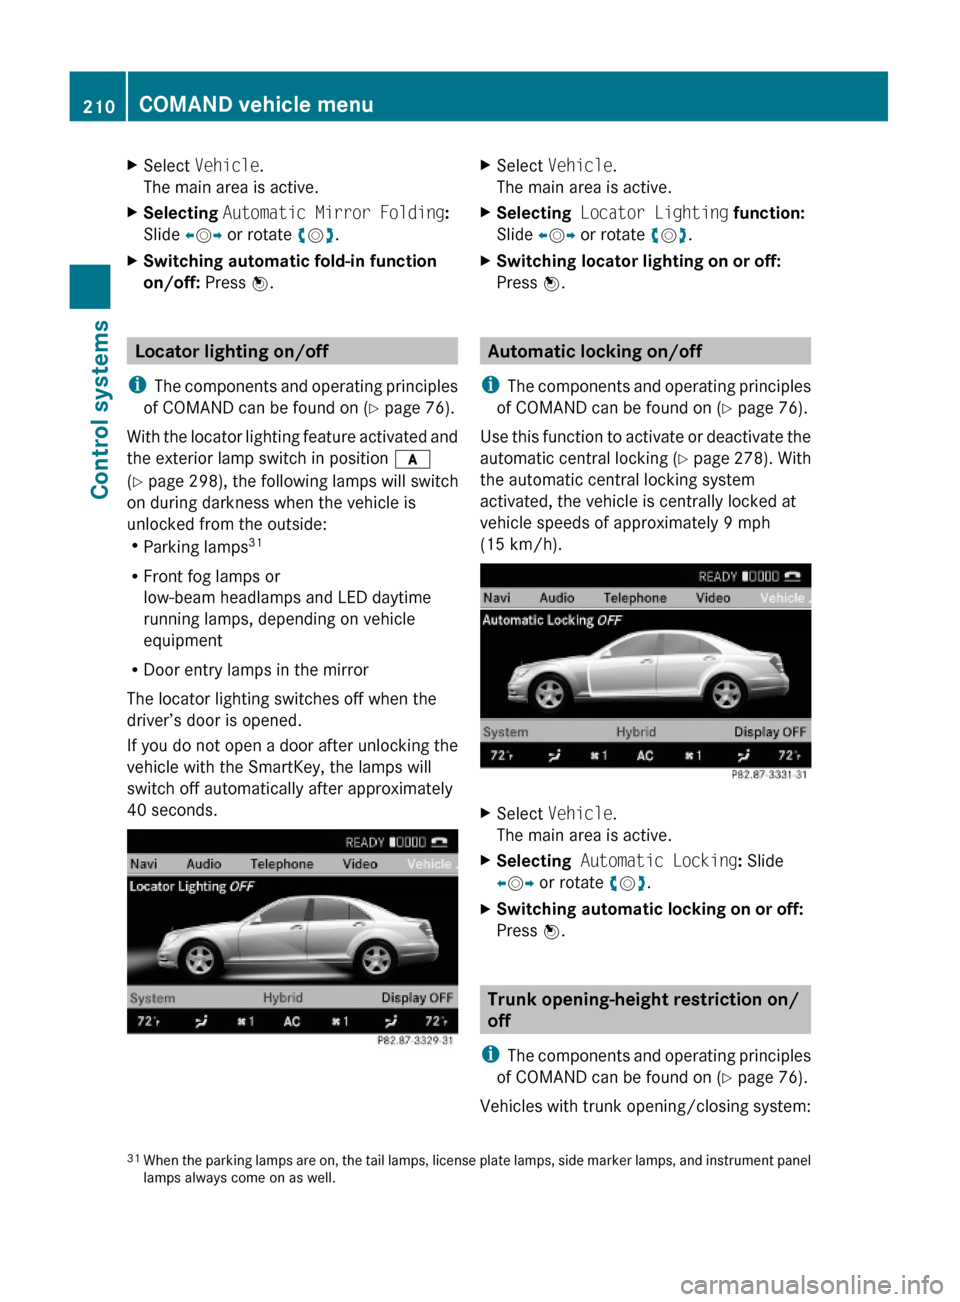
With the locator lighting feature activated and
the exterior lamp switch in position c
(Y page 298), the following lamps will switch
on during darkness when the vehicle is
unlocked from the outside:RParking lamps31
RFront fog lamps or
low-beam headlamps and LED daytime
running lamps, depending on vehicle
equipment
RDoor entry lamps in the mirror
The locator lighting switches off when the
driver’s door is opened.
If you do not open a door after unlocking the
vehicle with the SmartKey, the lamps will
switch off automatically after approximately
40 seconds.
XSelect Vehicle.
The main area is active.
XSelecting Locator Lighting function:
Slide XVY or rotate cVd.
XSwitching locator lighting on or off:
Press W.
Automatic locking on/off
iThe components and operating principles
of COMAND can be found on (Y page 76).
Use this function to activate or deactivate the
automatic central locking (Y page 278). With
the automatic central locking system
activated, the vehicle is centrally locked at
vehicle speeds of approximately 9 mph
(15 km/h).
XSelect Vehicle.
The main area is active.
XSelecting Automatic Locking: Slide
XVY or rotate cVd.
XSwitching automatic locking on or off:
Press W.
Trunk opening-height restriction on/
off
iThe components and operating principles
of COMAND can be found on (Y page 76).
Vehicles with trunk opening/closing system:
31When the parking lamps are on, the tail lamps, license plate lamps, side marker lamps, and instrument panellamps always come on as well.
210COMAND vehicle menuControl systems
221_AKB; 6; 20, en-USd2ugruen,Version: 2.11.8.12009-09-24T13:28:17+02:00 - Seite 210
Page 237 of 548
XPress button a again if you would like
to change the current status.
Depending on the previous status, the
Daytime Running Lamps will be switched
on (Enabled) or off (Disabled).
With Daytime Running Lamps mode
Enabled selected and the exterior lamp
switch at position $ or c, the low-
beam headlamps are switched on when the
engine is running.
In low ambient light conditions the following
lamps will come on additionally:
RParking lamps
RTail lamps
RLicense plate lamps
RSide marker lamps
For more information on the daytime running
lamp mode, see “Lighting” (Y page 299).
iMake sure the exterior lamp switch is set
to M or c when you switch off the
daytime running lamps while driving at
night.
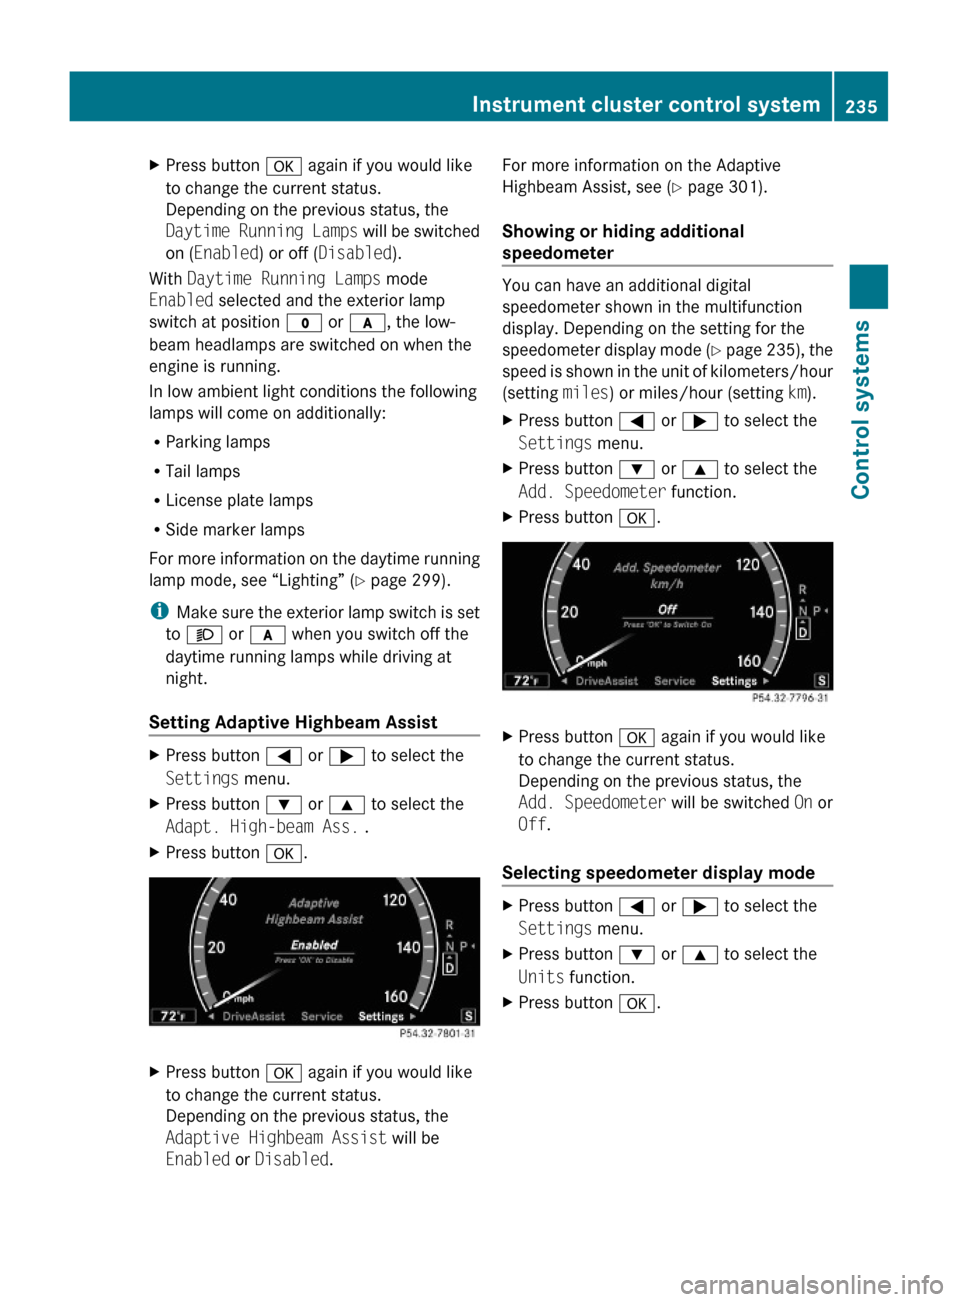
Setting Adaptive Highbeam Assist
XPress button = or ; to select the
Settings menu.
XPress button : or 9 to select the
Adapt. High-beam Ass. .
XPress button a.XPress button a again if you would like
to change the current status.
Depending on the previous status, the
Adaptive Highbeam Assist will be
Enabled or Disabled.
For more information on the Adaptive
Highbeam Assist, see (Y page 301).
Showing or hiding additional
speedometer
You can have an additional digital
speedometer shown in the multifunction
display. Depending on the setting for the
speedometer display mode (Y page 235), the
speed is shown in the unit of kilometers/hour
(setting miles) or miles/hour (setting km).
XPress button = or ; to select the
Settings menu.
XPress button : or 9 to select the
Add. Speedometer function.
XPress button a.XPress button a again if you would like
to change the current status.
Depending on the previous status, the
Add. Speedometer will be switched On or
Off.
Selecting speedometer display mode
XPress button = or ; to select the
Settings menu.
XPress button : or 9 to select the
Units function.
XPress button a.Instrument cluster control system235Control systems221_AKB; 6; 20, en-USd2ugruen,Version: 2.11.8.12009-09-24T13:28:17+02:00 - Seite 235Z
Page 286 of 548

GWarning!
Only drive with the doors closed. Otherwise,
one or more of the doors could open while the
vehicle is in motion, putting you and/or
others at risk.
GWarning!
Make sure the trunk is closed when the engine
is running and while driving. Among other
dangers, deadly carbon monoxide (CO) gases
may enter vehicle interior resulting in
unconsciousness and death.
XPower closing assist for doors: Press the
doors gently past the initial engage position
into the lock.
XPower closing assist for trunk lid: Press
the trunk lid gently into its lock.
Starter switch positions
SmartKey
GObserve Safety notes, see page 56.
Starter switch
gFor removing SmartKey1Power supply for some electrical
consumers, e.g. wipers
2Ignition (power supply for all electrical
consumers) and driving position
3Starting position
When you switch on the ignition, all lamps in
the instrument cluster come on. The high-
beam headlamp indicator lamp and turn
signal indicator lamps will only come on if
activated. If a lamp in the instrument cluster
fails to come on when the ignition is switched
on, have it checked and replaced if necessary.
If a lamp in the instrument cluster remains on
after starting the engine or comes on while
driving, refer to “Lamps in instrument cluster”
(Y page 489).
XAlways remove the SmartKey from the
starter switch when the engine is not in
operation.
This will help to prevent accelerated vehicle
battery discharge or a completely
discharged vehicle battery.
If the SmartKey cannot be turned in the
starter switch, the vehicle battery may not be
sufficiently charged.
XCheck the vehicle battery and charge it if
necessary (Y page 514).
or
XGet a jump start (Y page 514).
iIf the SmartKey does not belong to the
vehicle, the SmartKey can be turned in the
starter switch. However, the ignition does
not switch on and the engine does not start.
KEYLESS-GO
GObserve Safety notes, see page 56.
Vehicles equipped with the KEYLESS-GO
feature are supplied with a SmartKey with
integrated KEYLESS-GO function and a
removable KEYLESS-GO start/stop button.
The KEYLESS-GO start/stop button must be
inserted in the starter switch and the
SmartKey present in the vehicle.
Pressing the KEYLESS-GO start/stop button
without depressing the brake pedal
corresponds to the various starter switch
positions (Y page 284).
Pressing the KEYLESS-GO start/stop button
with the brake pedal firmly depressed will
start the engine (Y page 311).
The KEYLESS-GO start/stop button can be
pulled out of the starter switch easily. You can
284Starter switch positionsControls in detail
221_AKB; 6; 20, en-USd2ugruen,Version: 2.11.8.12009-09-24T13:28:17+02:00 - Seite 284
Page 287 of 548

then insert the SmartKey into the starter
switch.
iThe KEYLESS-GO start/stop button does
not need to be removed from the starter
switch when you leave the vehicle.
However, always take the SmartKey with
you when you leave the vehicle. As long as
the SmartKey is in the vehicle, the vehicle’s
electrical systems can be switched on or
the engine can be started using the
KEYLESS-GO start/stop button.
:KEYLESS-GO start/stop button;Starter switchXInsert the KEYLESS-GO start/stop button
into the starter switch (if not inserted
already).
iAllow for 2 seconds until the system has
detected the KEYLESS-GO start/stop
button.
XMake sure the automatic transmission is in
park position P.
XDo not depress the brake pedal.
KEYLESS-GO start/stop button
=USA only?Canada only
Position 0
Before you press the KEYLESS-GO start/stop
button, the vehicle’s on-board electronics
have status 0 (as with SmartKey removed).
Position 1
XPress the KEYLESS-GO start/stop button
once.
This supplies power for some electrical
consumers, e.g. wipers.
iWhen you now open the driver’s door, the
power supply is switched off.
Ignition (or position 2)
XPress the KEYLESS-GO start/stop button
twice.
This supplies power for all electrical
consumers.
When you switch on the ignition, all lamps
in the instrument cluster come on. The
high-beam headlamp indicator lamp and
turn signal indicator lamps will only come
on if activated. If a lamp in the instrument
cluster fails to come on when the ignition
is switched on, have it checked and
replaced if necessary. If a lamp in the
instrument cluster remains on after
starting the engine or comes on while
driving, refer to “Lamps in instrument
cluster” (Y page 489).
Starter switch positions285Controls in detail221_AKB; 6; 20, en-USd2ugruen,Version: 2.11.8.12009-09-24T13:28:17+02:00 - Seite 285Z