2010 MERCEDES-BENZ S600 window
[x] Cancel search: windowPage 64 of 548
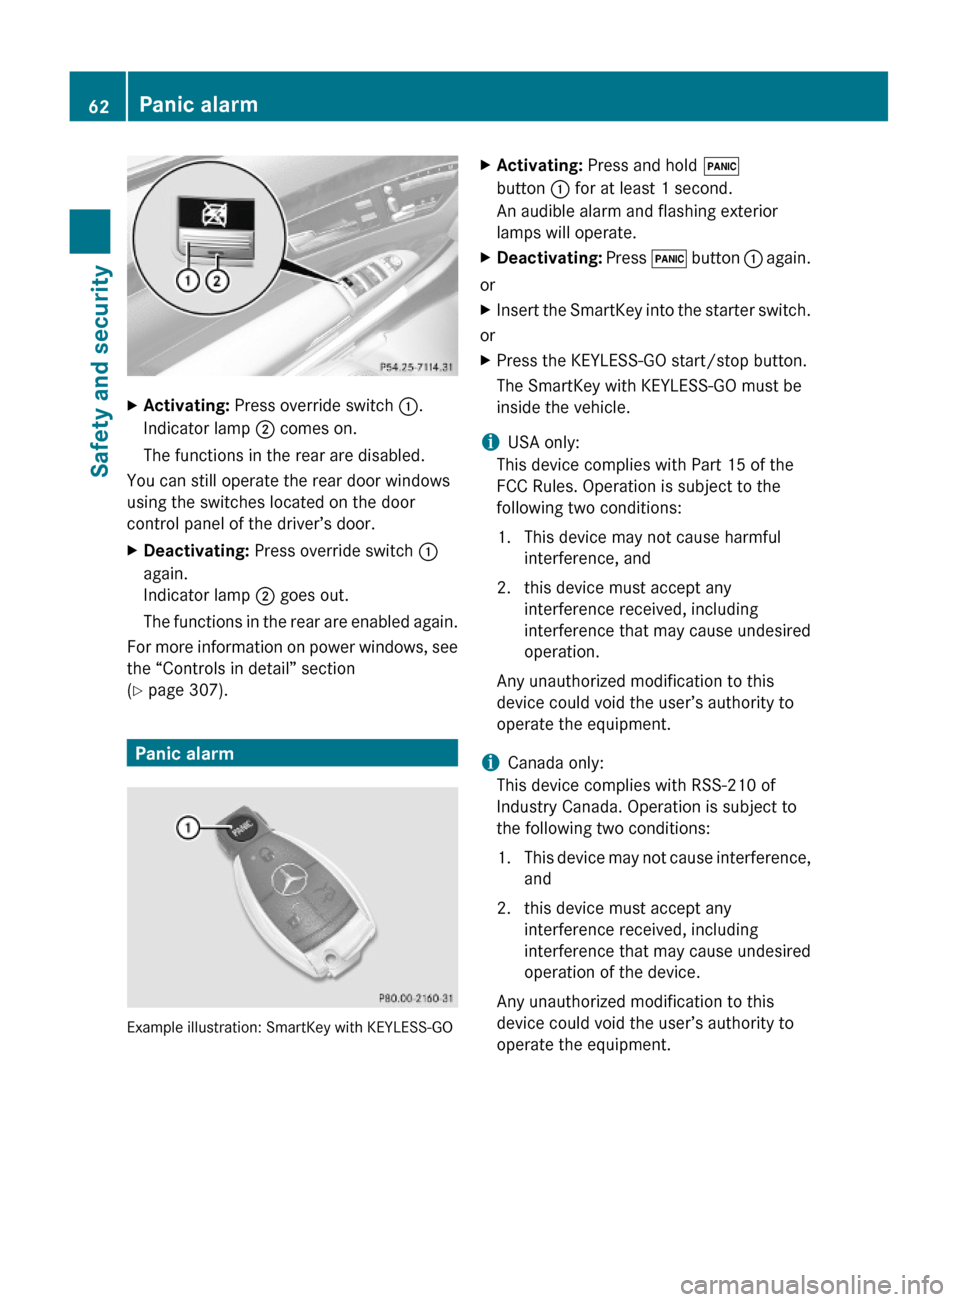
XActivating: Press override switch :.
Indicator lamp ; comes on.
The functions in the rear are disabled.
You can still operate the rear door windows
using the switches located on the door
control panel of the driver’s door.
XDeactivating: Press override switch :
again.
Indicator lamp ; goes out.
The functions in the rear are enabled again.
For more information on power windows, see
the “Controls in detail” section
(Y page 307).
Panic alarm
Example illustration: SmartKey with KEYLESS-GO
XActivating: Press and hold !
button : for at least 1 second.
An audible alarm and flashing exterior
lamps will operate.
XDeactivating: Press ! button : again.
or
XInsert the SmartKey into the starter switch.
or
XPress the KEYLESS-GO start/stop button.
The SmartKey with KEYLESS-GO must be
inside the vehicle.
iUSA only:
This device complies with Part 15 of the
FCC Rules. Operation is subject to the
following two conditions:
1. This device may not cause harmful
interference, and
2. this device must accept any
interference received, including
interference that may cause undesired
operation.
Any unauthorized modification to this
device could void the user’s authority to
operate the equipment.
iCanada only:
This device complies with RSS-210 of
Industry Canada. Operation is subject to
the following two conditions:
1.This device may not cause interference,
and
2. this device must accept any
interference received, including
interference that may cause undesired
operation of the device.
Any unauthorized modification to this
device could void the user’s authority to
operate the equipment.
62Panic alarmSafety and security
221_AKB; 6; 20, en-USd2ugruen,Version: 2.11.8.12009-09-24T13:28:17+02:00 - Seite 62
Page 79 of 548
Switching COMAND on or offXPress shortcut button u in the center
console (Y page 77).
COMAND calls up the last selected menu.
iWhen you switch off COMAND, you also
switch off the currently playing audio
source. During a telephone call, you cannot
switch off COMAND.
COMAND components
COMAND can be used to operate:
RAudio functions
RNavigation system
RTelephone
RExternal audio and video sources
RVideo DVD
RVarious vehicle settings
COMAND consists of the following:
RCOMAND shortcut buttons
RCOMAND display (with SPLITVIEW, if so
equipped)
RTelephone keypad
RCOMAND controller
RBuilt-in USB socket to connect USB storage
devices
ROptional media interface in the glove box
to connect external devices via iPod®
cable, jack plug, or USB cable
The Rear Seat Entertainment System consists
of the following:
Rtwo remote controls
Rtwo wireless headphones
Rtwo screens in rear passenger
compartment
Rone CD/DVD drive in rear passenger
compartment
RAudio and video sockets on each screen
RAudio and video sockets on CD/DVD drive
The Rear Seat Entertainment System
contains the following functions:
RDisc playback (CD audio, MP3, DVD audio
and DVD video)
RAUX playback
RSystem settings
SPLITVIEW contains the following:
Rone remote control for the front passenger
Rone wireless headphone for the front
passenger
Rone 3.5 mm socket in the front passenger
footwell for SPLITVIEW wired headphones
iFor information about cleaning and care
of displays, see (Y page 446).
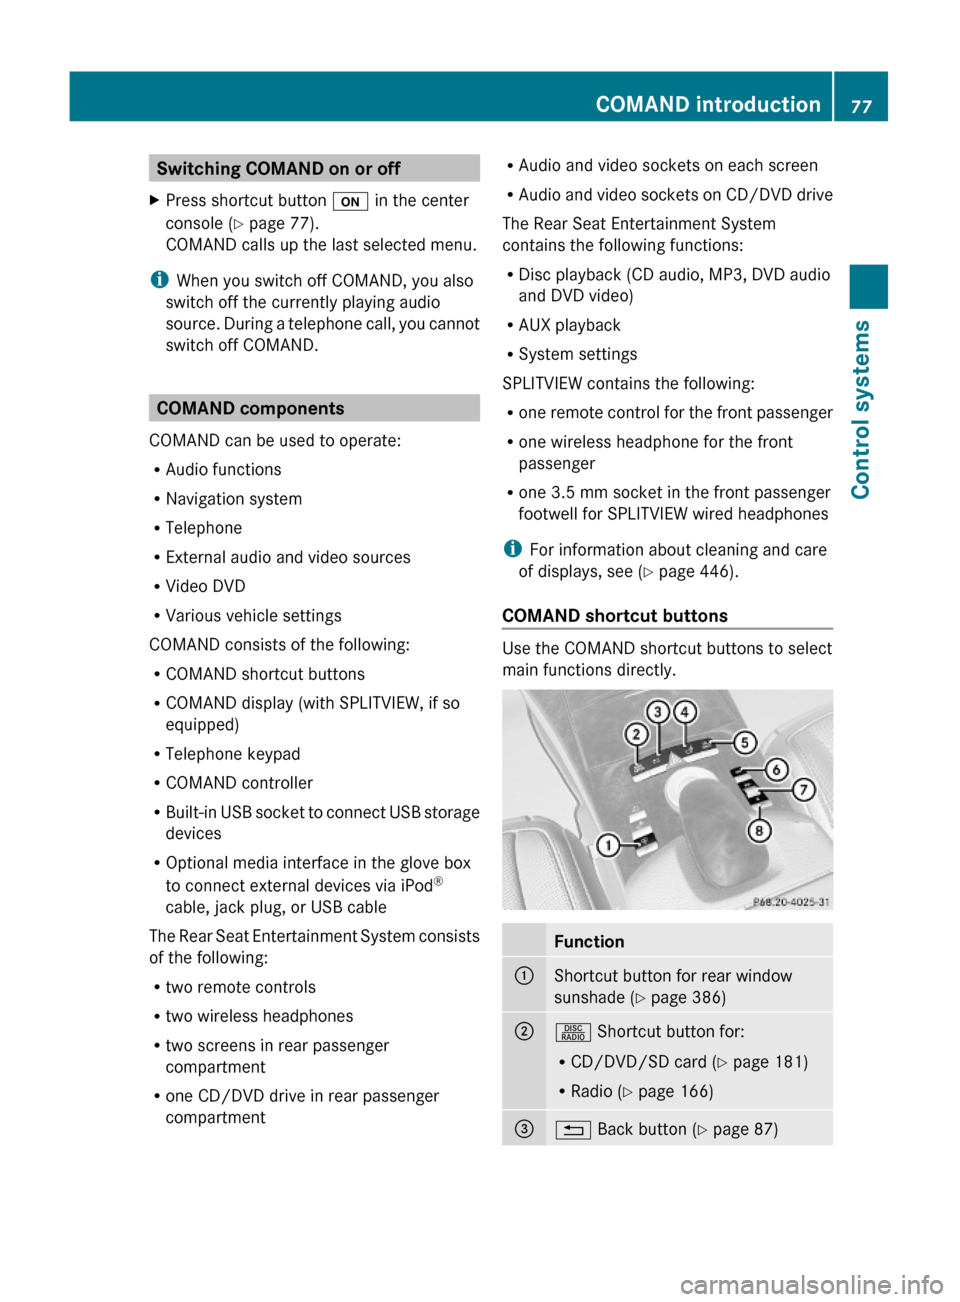
COMAND shortcut buttons
Use the COMAND shortcut buttons to select
main functions directly.
Function:Shortcut button for rear window
sunshade (Y page 386)
;R Shortcut button for:
RCD/DVD/SD card (Y page 181)
RRadio (Y page 166)
=% Back button (Y page 87)COMAND introduction77Control systems221_AKB; 6; 20, en-USd2ugruen,Version: 2.11.8.12009-09-24T13:28:17+02:00 - Seite 77Z
Page 87 of 548

NaviAudioTelephoneVideoVehicleModeFM/AM RadioVideo DVDMulti-function
Contour Seat
Settings/
Lumbar Settings
Map OrientationSat. RadioAUXRear Window
Sunshade
POI Symbols On MapDiscVideo OFFEasy Entry/ExitTraffic Symbols on
Map
Memory CardExterior Lighting
Delayed Shut-off
Text Information on
Map
Music RegisterInterior Lighting
Delayed Shut-off
ªTopographical
Map
Media InterfaceAmbient LightingªCity (3D)USBªAutomatic
Mirror Folding
ªHighway
Information
RearªLocator
Lighting
ªAudio FadeoutAUXªAutomatic
Locking
SIRIUS ServiceAudio OFFªTrunk
Opening-height
Restriction
Map VersionCalling up the main menu
Example illustration: Audio main menu
You can call up the main menu of a main
function in the following manner:
XMoving to the main function line: Slide
ZV.
XSelecting a main function: Slide XVY or
rotate cVd.
XConfirming selection: Press W.
iWhen a main function (e.g. Navi) is open
and you want to open the menu of the
Audio function for example, the main
function Audio must be selected twice.
Upon selecting the first time, the COMAND
system selects the main function Audio.
COMAND introduction85Control systems221_AKB; 6; 20, en-USd2ugruen,Version: 2.11.8.12009-09-24T13:28:17+02:00 - Seite 85Z
Page 89 of 548
Accepting first entryXPress W until you exit the character entry
window.
COMAND completes your entry as soon as
it can be clearly identified. In this case, you
do not need to switch to the list.
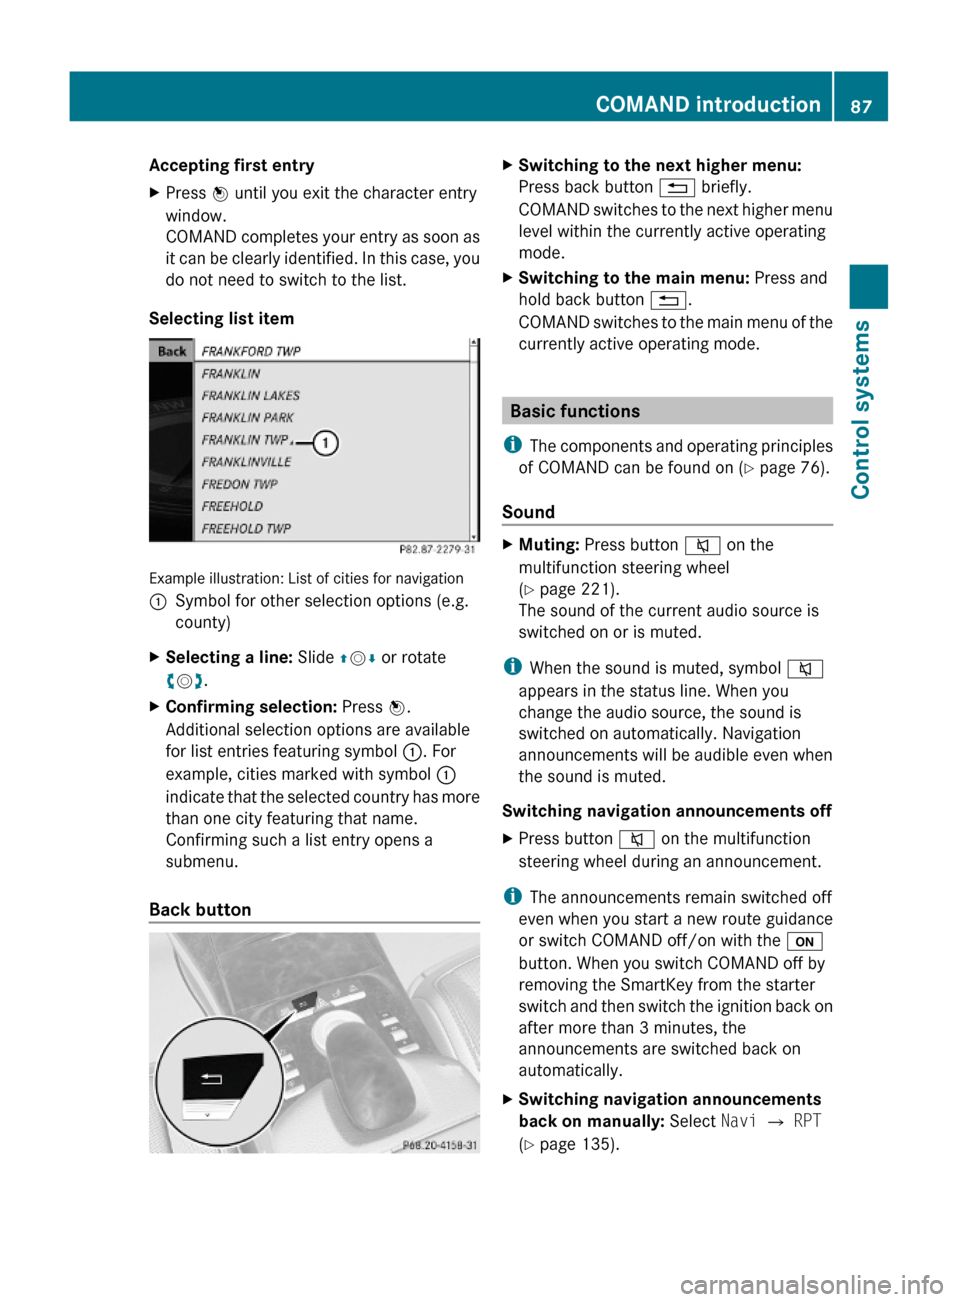
Selecting list item
Example illustration: List of cities for navigation
:Symbol for other selection options (e.g.
county)
XSelecting a line: Slide ZVÆ or rotate
cVd.
XConfirming selection: Press W.
Additional selection options are available
for list entries featuring symbol :. For
example, cities marked with symbol :
indicate that the selected country has more
than one city featuring that name.
Confirming such a list entry opens a
submenu.
Back button
XSwitching to the next higher menu:
Press back button % briefly.
COMAND switches to the next higher menu
level within the currently active operating
mode.
XSwitching to the main menu: Press and
hold back button %.
COMAND switches to the main menu of the
currently active operating mode.
Basic functions
iThe components and operating principles
of COMAND can be found on (Y page 76).
Sound
XMuting: Press button 8 on the
multifunction steering wheel
(Y page 221).
The sound of the current audio source is
switched on or is muted.
iWhen the sound is muted, symbol 8
appears in the status line. When you
change the audio source, the sound is
switched on automatically. Navigation
announcements will be audible even when
the sound is muted.
Switching navigation announcements off
XPress button 8 on the multifunction
steering wheel during an announcement.
iThe announcements remain switched off
even when you start a new route guidance
or switch COMAND off/on with the u
button. When you switch COMAND off by
removing the SmartKey from the starter
switch and then switch the ignition back on
after more than 3 minutes, the
announcements are switched back on
automatically.
XSwitching navigation announcements
back on manually: Select Navi Q RPT
(Y page 135).
COMAND introduction87Control systems221_AKB; 6; 20, en-USd2ugruen,Version: 2.11.8.12009-09-24T13:28:17+02:00 - Seite 87Z
Page 93 of 548

control. Make sure the volume is not set
too high before putting on a headphone.
RThe DVD changer can playback only one
media source at a time. Example: if the
driver is playing an audio CD, the front
passenger can not play a different medium
(e.g. DVD video) from the DVD changer.
However, it is possible for the front
passenger to play media from radio,
memory card, MUSIC REGISTER, media
interface, USB, AUX or Rear Seat
Entertainment System.
RWhen driver and front passenger are using
the same medium, each can select
individual settings for that medium.
RCOMAND transmits music and voice to the
wireless headphone for the front passenger
side via infrared signal. The headphone and
the display must have visual contact. This
provides best possible transmission of the
infrared signal to the headphone. Please
note that the headphone has a left and right
side and must be used accordingly.
RWhen SPLITVIEW is on, the front passenger
can operate audio or video functions only.
RThe multifunction steering wheel lets you
operate functions for the driver’s side only.
Switching SPLITVIEW on/off
XSwitching on: Select Vehicle Q
SplitView ON.
or
XPress the SPLITVIEW remote control ON
button.
The SPLITVIEW symbol : appears and
status ; changes to SplitView OFF.
XSwitching off: Select Vehicle Q
SplitView OFF.
or
XPress the SPLITVIEW remote control ON
button.
Status ; changes to SplitView ON.
The SPLITVIEW screen remains on for
approximately 30 minutes after switching off
the ignition. After these 30 minutes or once
the SmartKey is removed from the starter
switch, the settings for the front passenger
side remain stored for approximately another
30 minutes.
COMAND system settings
System settings submenu overview
iThe components and operating principles
of COMAND can be found on (Y page 76).
System settings can be made in the following
submenus:
RDisplay Q Day Mode, Night Mode,
Automatic
RTime Q Time, Date, Format, Time Zone
RText Reader Q Speed Q Fast,
Medium or Slow:
Adjusts the reading speed of the Voice
Control System.
RVoice Control Q Help Window, Start
New Individualization, Delete
Individualization
RLanguage: Selecting system language
RFavorites Button *: Assigning the
favorite button
COMAND system settings 91Control systems221_AKB; 6; 20, en-USd2ugruen,Version: 2.11.8.12009-09-24T13:28:17+02:00 - Seite 91Z
Page 95 of 548
XSelect Daylight Savings Time
(Summer) or Standard Time .
The dot # in front of a list entry indicates
the current setting.XSaving setting and exit the menu: Slide
X V Y.
Adjusting time lags
i
In some exceptional cases, e.g. where
time zones border, the displayed time and
the local time may show a time lag.
This time lag can be adjusted in steps of 30
minutes.
XSelect Vehicle Q System Q Time Q
Time .XSelecting hour or minutes: Slide XV Y.XSetting value: Rotate cV d or slide ZV Æ.XSaving setting: Press W.
Setting the date
XSelect Vehicle Q System Q Time Q
Date .XSelecting month, day, or year: Slide
X V Y.XSetting value: Rotate cV d or slide ZV Æ.XSaving setting: Press W.
i
Setting the date is only necessary or even
possible if the COMAND system does not
receive a GPS signal.
Setting the time/date format
XSelect Vehicle Q System Q Time Q
Format .
The format list appears. The dots # in
front of the list entries indicate the current
setting.XChanging format setting: Select desired
format.XSaving setting and exit the menu: Slide
X V Y.Voice Control System settings
Switching help window on or offXSelect Vehicle Q System Q Voice
Control .XSelect Help Window .
A checkmark appears when the help
window is switched on.
Individualization
Using individualization, you can fine-tune the
Voice Control System to your own voice and
thus improve voice recognition. The ability of
the system to recognize the commands of
other users does not deteriorate as a result.
Individualization consists of two parts. You
train the system to recognize digits in the first
part and specific commands in the second
part.
Starting new individualization
i The vehicle must be stationary to start
individualization. After starting the session,
acoustic instructions will guide you through
the individualization.
XSelect Vehicle Q System Q Voice
Control Q Start New
Individualization .
A prompt appears asking whether you
would like further information.XSelect Yes or No.
If you select No, the first part of
individualization begins.
If you select Yes, an information display will
be shown with audio instruction.XClosing display: Select OK.
The first part of individualization begins.
At the end of the first part, you will see a
prompt asking whether you want to begin
the second part.XSelect Yes or No.
If you select No, individualization will be
canceled. The data from the first part is
saved automatically.COMAND system settings 93Control systems221_AKB; 6; 20, en-USd2ugruen,Version: 2.11.8.12009-09-24T13:28:17+02:00 - Seite 93Z
Page 130 of 548
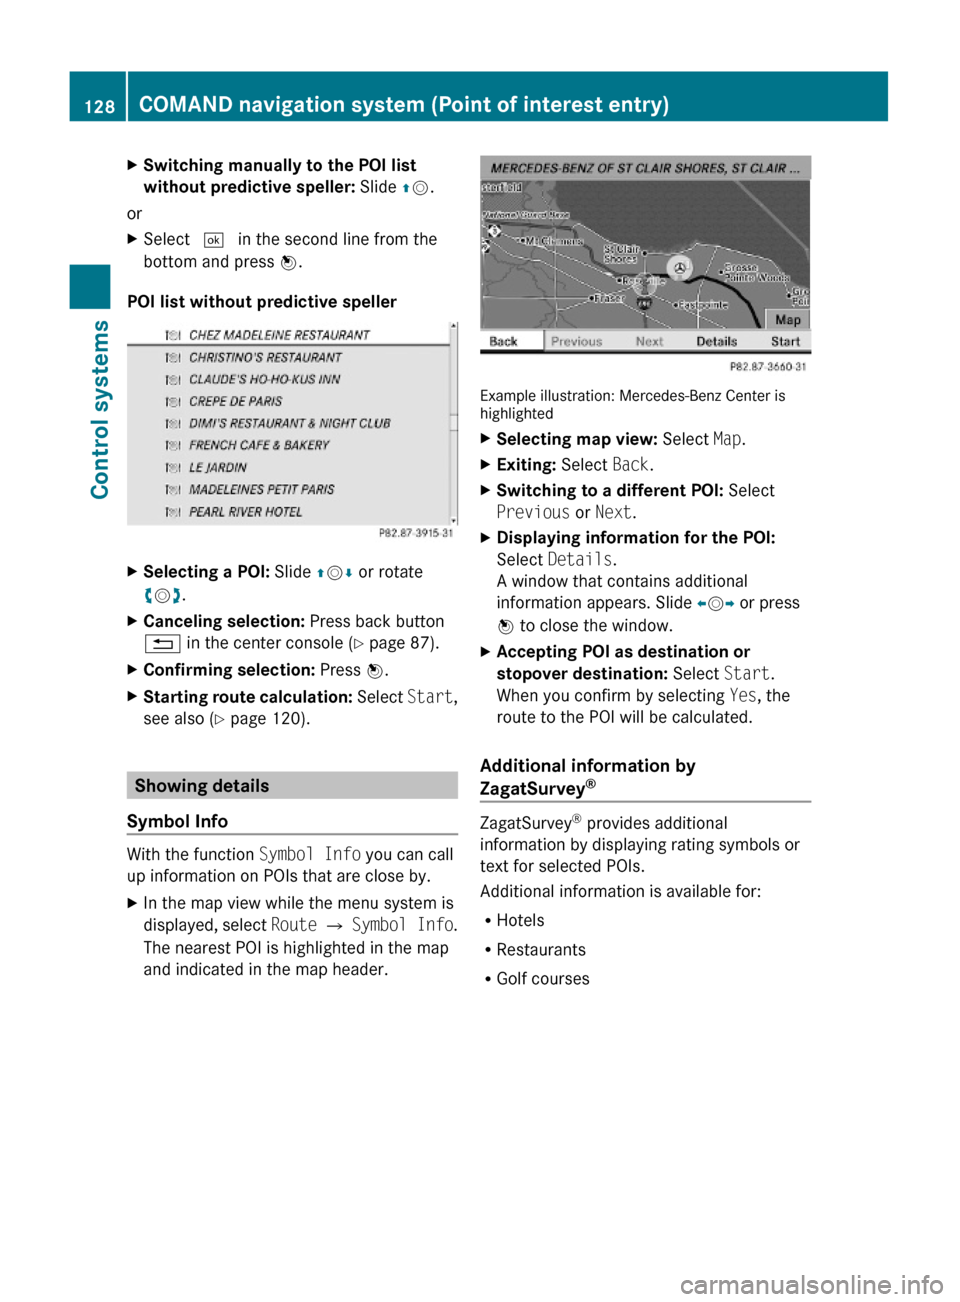
XSwitching manually to the POI list
without predictive speller: Slide ZV.
or
XSelect ¬ in the second line from the
bottom and press W.
POI list without predictive speller
XSelecting a POI: Slide ZVÆ or rotate
cVd.
XCanceling selection: Press back button
% in the center console (Y page 87).
XConfirming selection: Press W.XStarting route calculation: Select Start,
see also (Y page 120).
Showing details
Symbol Info
With the function Symbol Info you can call
up information on POIs that are close by.
XIn the map view while the menu system is
displayed, select Route Q Symbol Info.
The nearest POI is highlighted in the map
and indicated in the map header.
Example illustration: Mercedes-Benz Center ishighlighted
XSelecting map view: Select Map.XExiting: Select Back.XSwitching to a different POI: Select
Previous or Next.
XDisplaying information for the POI:
Select Details.
A window that contains additional
information appears. Slide omp or press
n to close the window.
XAccepting POI as destination or
stopover destination: Select Start.
When you confirm by selecting Yes, the
route to the POI will be calculated.
Additional information by
ZagatSurvey®
ZagatSurvey® provides additional
information by displaying rating symbols or
text for selected POIs.
Additional information is available for:
RHotels
RRestaurants
RGolf courses
128COMAND navigation system (Point of interest entry)Control systems
221_AKB; 6; 20, en-USd2ugruen,Version: 2.11.8.12009-09-24T13:28:17+02:00 - Seite 128
Page 179 of 548
File structure on a disc
When you create an audio disc, the tracks can
be organized in folders. A disc may contain a
maximum of 4000 tracks.
The directory depth may not exceed a
maximum of 8 levels. The system will ignore
files in lower levels.
Notes on USB storage media
Do not store data other than audio data on a
USB storage medium. Doing so will increase
the time required to initialize the USB storage
medium.
A maximum of 8 directory levels with up to
4000 tracks each are supported.
For information on connecting USB storage
media to the built-in USB socket in the glove
box see ( Y page 80).
Track and folder names
When you create an audio medium, you can
assign names to the tracks and folders.
COMAND uses these names for the
corresponding display. Empty folders or
folders which contain data other than MP3/
WMA tracks are not displayed by COMAND.
If MP3/WMA files are saved in the root
directory itself (uppermost directory on
storage medium), the root directory will also
be treated as a folder. COMAND will then
show the name of the root directory as the
folder name.
You must observe the following when
assigning track names:
R Track names must have at least one
character.
R Track names must have the extension
“mp3” or “wma”.
R There must be a period between the track
name and the extension.
Example of a correct track name:
Track1.mp3
Compatible file systems and
compression methods
COMAND supports the following formats:
R MPEG1 Audio Layer 3 (MP3) 25
R Microsoft Windows Media Audio (WMA) V2,
V7, V8 or V9 that are not copy-proof
Bit and sampling rates
MP3
COMAND supports MP3 files of the following
types:
R Fixed and variable bit rates from
32 kbit/s up to 320 kbit/s
R Sampling rates of 24 kHz to 48 kHz
WMA (Windows Media ®
Audio)
Windows Media ®
Audio (WMA) is an audio
data compression technology developed by
Microsoft ®
.
COMAND supports WMA files of the following
types:
R Fixed and variable bit rates from 5 kbit/s
up to 384 kbit/s
R Sampling rates of 8 kHz to 48 kHz
COMAND does not support WMA files of the
following types:
R DRM (Digital Rights Management) coded
files
R variable bit rates
R Losless Settings
R WMA Pro
R 5.1-Surround
i Only use tracks with a bit rate of above
128 kbit/s and a sampling rate of above
44.1 kHz. Lower rates will cause an audible
25 MPEG Layer 3 audio-coding technology under license of Fraunhofer-Institut for Integrated Circuits (IIS) and
ThomsonCOMAND audio CD/audio DVD/MP3177Control systems221_AKB; 6; 20, en-USd2ugruen,Version: 2.11.8.12009-09-24T13:28:17+02:00 - Seite 177Z