2010 MERCEDES-BENZ S600 high beam
[x] Cancel search: high beamPage 304 of 548
The system cannot recognize the following
road users:
RRoad users without a lighting system of
their own, e.g. pedestrians
RRoad users with dim lighting of their own,
e.g. cyclists
RRoad users whose lighting is obstructed,
e.g. road users behind a guardrail
RIn some seldom cases, even road users with
a lighting system of their own may be
recognized too late or not at all.
The automatic high-beam headlamps will then
not be deactivated or it will be activated in
spite of preceding or oncoming road users.
This could endanger you and/or others and
cause an accident. Always pay close attention
to the traffic situation and switch off the high
beam manually if necessary.
XActivating: Enable the Adaptive
Highbeam Assist via the control system
(Y page 235).
XTurn the exterior lamp switch to position
c.
XPress the combination switch in direction
of arrow :.
The Adaptive Highbeam Assist
indicator _ in the multifunction display
comes on when switching on the low-beam
headlamps.
When driving faster than approximately
34 mph (55 km/h) and no other road users
are recognized, the high-beam headlamps
are switched on automatically. The high-
beam headlamp indicator lamp K in the
instrument cluster comes on additionally.
When driving slower than approximately
28 mph (45 km/h), other road users are
recognized, or the road is illuminated
sufficiently, the high-beam headlamps are
switched off automatically. The indicator
lamp K in the instrument cluster goes
out. The Adaptive Highbeam Assist
indicator _ in the multifunction display
remains on.
Adaptive control of the headlamp leveling
takes place at a speed of approximately
25 mph (40 km/h).
XDeactivating: Pull the combination switch
back to its initial position.
The Adaptive Highbeam Assist
indicator _ in the multifunction display
goes out.
High-beam flasher
XSwitching on: Pull the combination switch
briefly in direction of arrow =.
Hazard warning flasher
The hazard warning flasher can be switched
on at all times, even with the SmartKey
removed from the starter switch.
The hazard warning flasher comes on
automatically when an air bag deploys.
S 600 and S 65 AMG (USA only):
The hazard warning flasher comes on
automatically when you brake the vehicle
strongly at a speed of more than 50 mph
(70 km/h) and bring it to a complete stop.
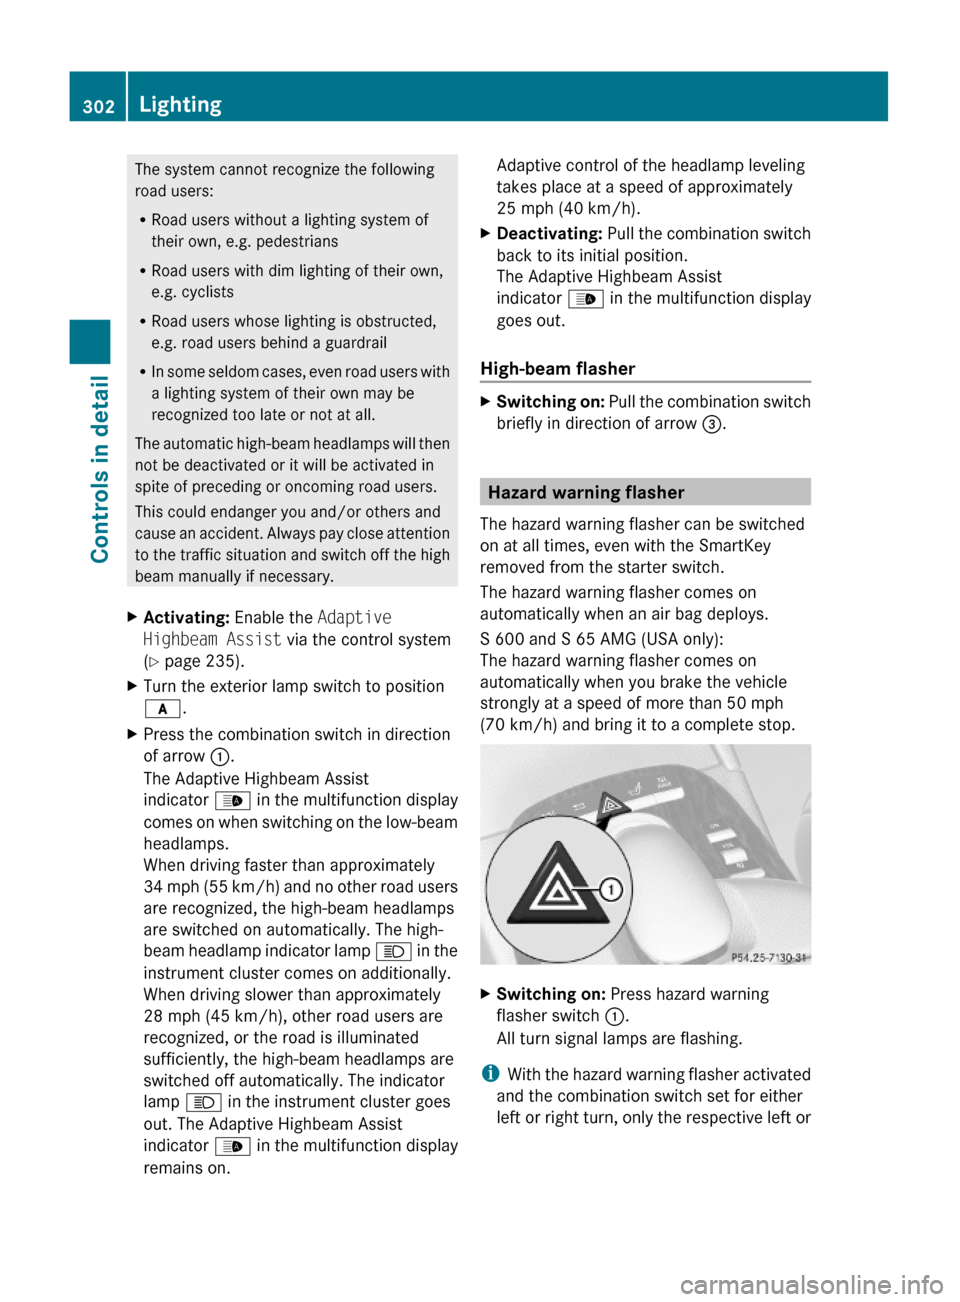
XSwitching on: Press hazard warning
flasher switch :.
All turn signal lamps are flashing.
iWith the hazard warning flasher activated
and the combination switch set for either
left or right turn, only the respective left or
302LightingControls in detail
221_AKB; 6; 20, en-USd2ugruen,Version: 2.11.8.12009-09-24T13:28:17+02:00 - Seite 302
Page 359 of 548
display. The image in the multifunction
display corresponds to a road lit up by high-
beam headlamps.
GWarning!
The Night View Assist Plus is only an aid to
support you while driving and cannot
substitute your careful attention. Do not rely
on the display of the Night View Assist Plus;
instead, continue to look through the
windshield. You are always responsible for
safety and must drive in accordance with
traffic conditions. Otherwise, you could
endanger yourself and others.
The system may be impaired or unavailable
when
Rvisibility is poor, e.g. due to snow, rain, fog,
or heavy spray
Rthe camera area of the windshield is dirty,
fogged up or covered by a sticker for
example
Rdriving through curves or on inclines or
declines
GWarning!
The Night View Assist Plus cannot record
objects immediately in front of or next to the
vehicle. When maneuvering, continue to look
through the windshield. Make sure no
persons or animals are in the area in which
you are maneuvering. You could otherwise
injure them.
The Night View Assist Plus image in the
multifunction display is not impaired by the
headlamps of approaching vehicles.
As a result, you can better follow the course
of the road and detect obstacles earlier on.
iInfrared light is invisible to the human eye
and thus does not blind. The Night View
Assist Plus can remain switched on
permanently even with oncoming traffic
present.
The Night View Assist Plus monitors the area
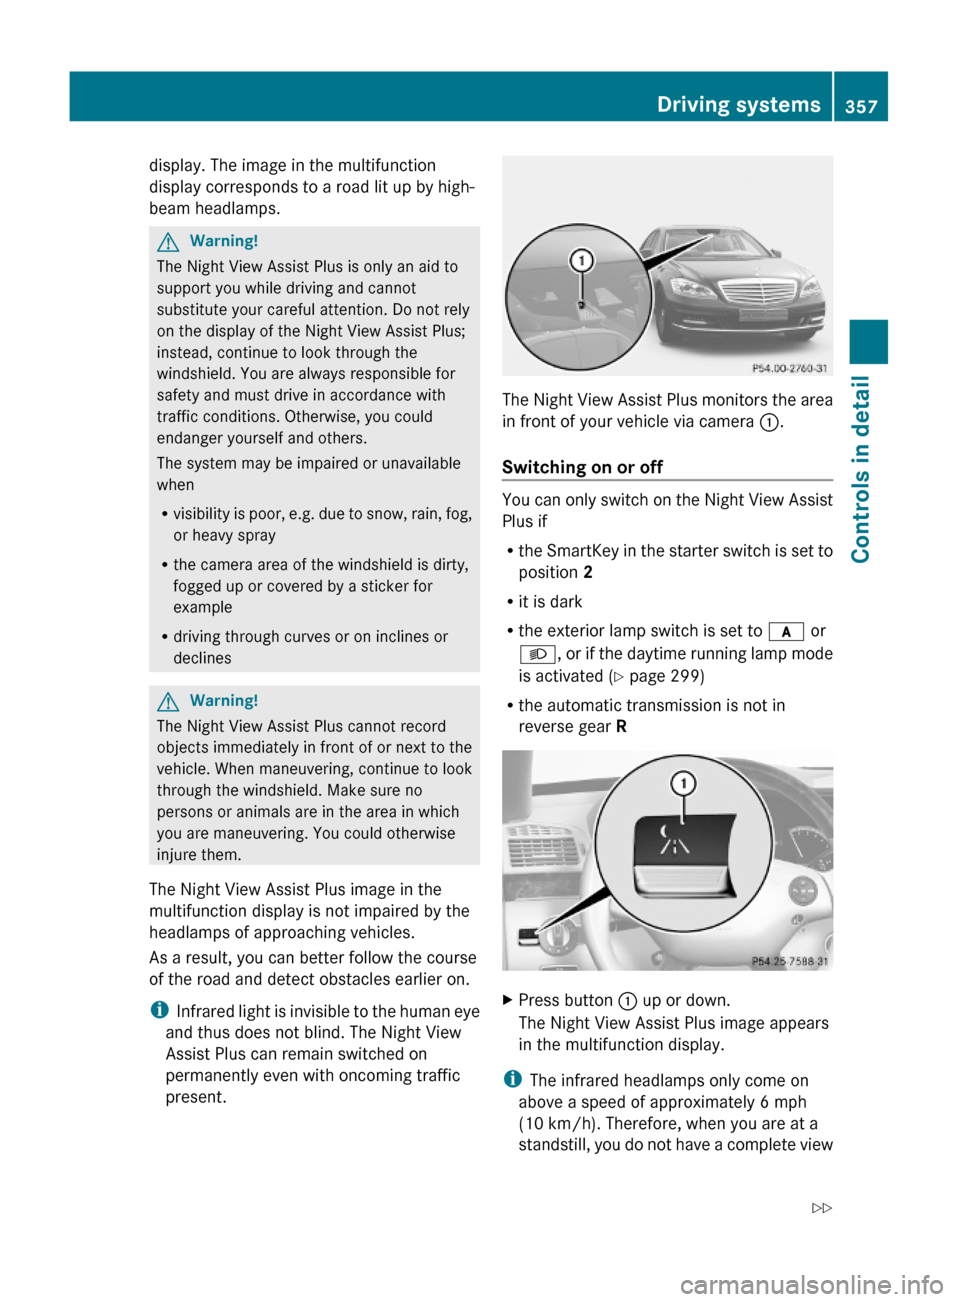
in front of your vehicle via camera :.
Switching on or off
You can only switch on the Night View Assist
Plus if
Rthe SmartKey in the starter switch is set to
position 2
Rit is dark
Rthe exterior lamp switch is set to c or
L, or if the daytime running lamp mode
is activated (Y page 299)
Rthe automatic transmission is not in
reverse gear R
XPress button : up or down.
The Night View Assist Plus image appears
in the multifunction display.
iThe infrared headlamps only come on
above a speed of approximately 6 mph
(10 km/h). Therefore, when you are at a
standstill, you do not have a complete view
Driving systems357Controls in detail221_AKB; 6; 20, en-USd2ugruen,Version: 2.11.8.12009-09-24T13:28:17+02:00 - Seite 357Z
Page 488 of 548
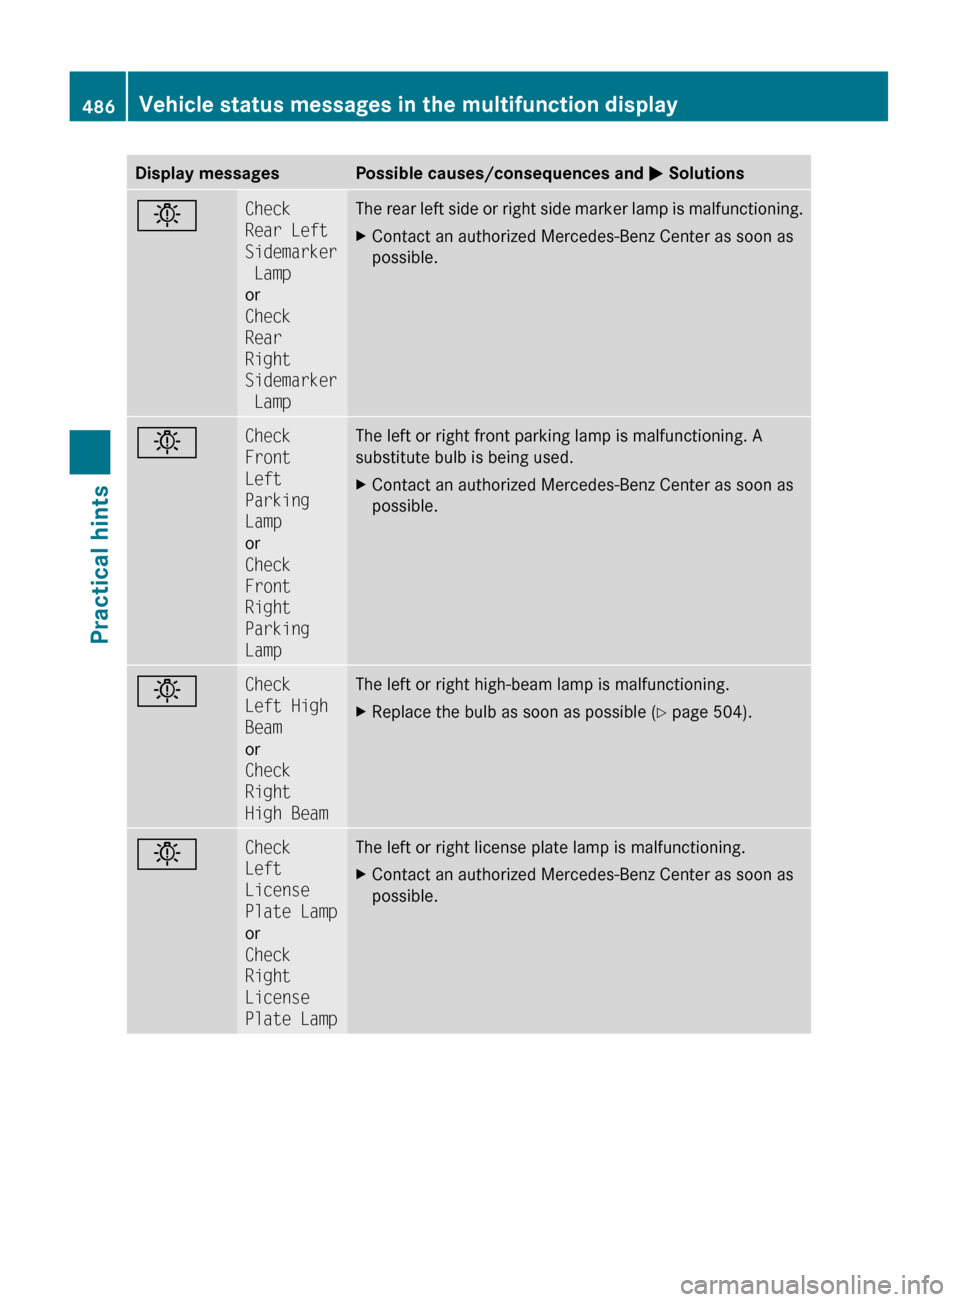
Display messagesPossible causes/consequences and M SolutionsbCheck
Rear Left
Sidemarker
Lamp
or
Check
Rear
Right
Sidemarker
LampThe rear left side or right side marker lamp is malfunctioning.XContact an authorized Mercedes-Benz Center as soon as
possible.bCheck
Front
Left
Parking
Lamp
or
Check
Front
Right
Parking
LampThe left or right front parking lamp is malfunctioning. A
substitute bulb is being used.XContact an authorized Mercedes-Benz Center as soon as
possible.bCheck
Left High
Beam
or
Check
Right
High BeamThe left or right high-beam lamp is malfunctioning.XReplace the bulb as soon as possible ( Y page 504).bCheck
Left
License
Plate Lamp
or
Check
Right
License
Plate LampThe left or right license plate lamp is malfunctioning.XContact an authorized Mercedes-Benz Center as soon as
possible.486Vehicle status messages in the multifunction displayPractical hints
221_AKB; 6; 20, en-USd2ugruen,Version: 2.11.8.12009-09-24T13:28:17+02:00 - Seite 486
Page 491 of 548
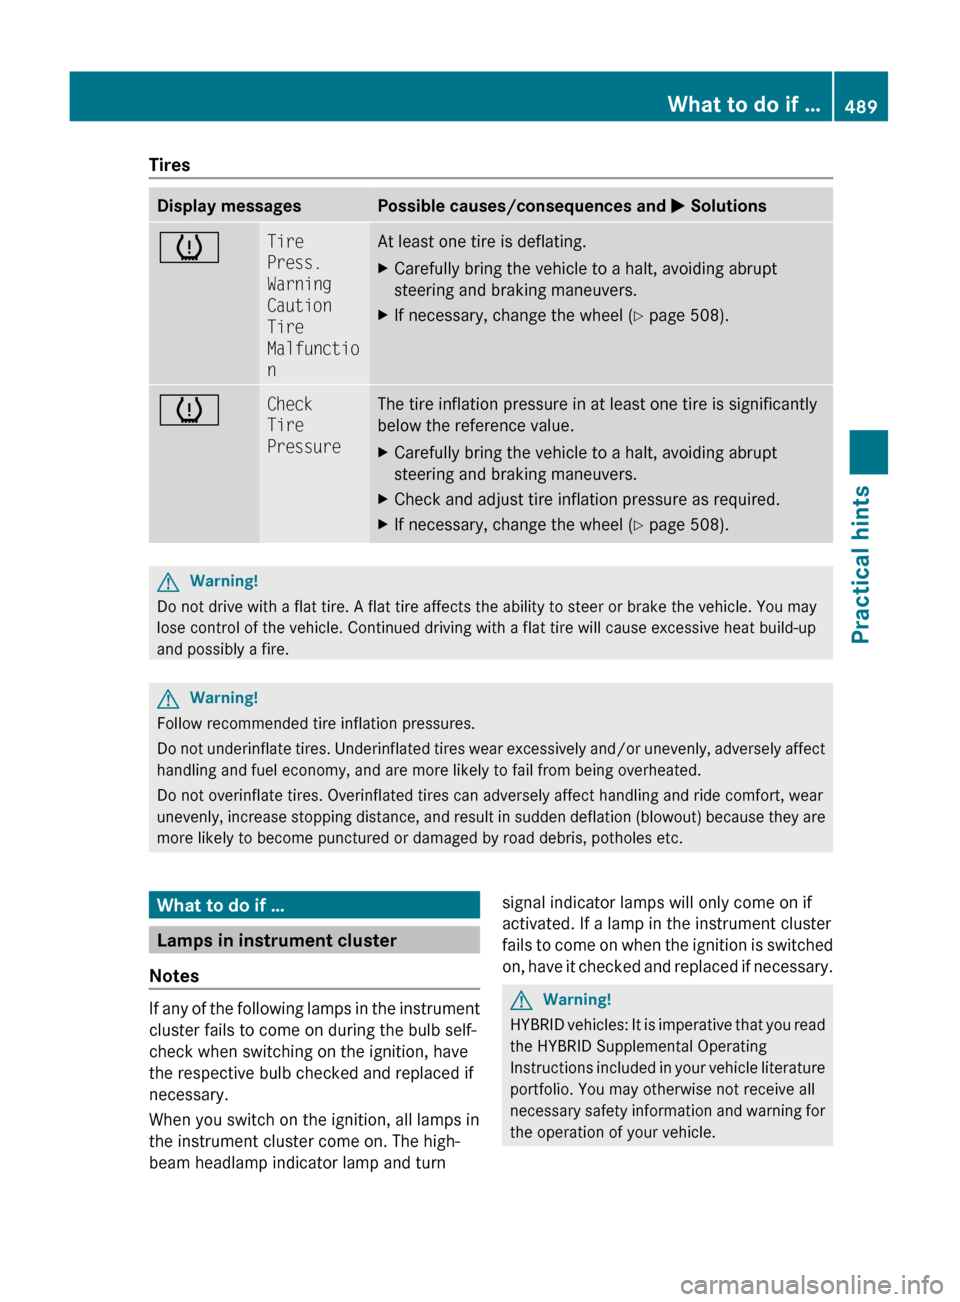
TiresDisplay messagesPossible causes/consequences and M SolutionshTire
Press.
Warning
Caution
Tire
Malfunctio
nAt least one tire is deflating.XCarefully bring the vehicle to a halt, avoiding abrupt
steering and braking maneuvers.XIf necessary, change the wheel ( Y page 508).hCheck
Tire
PressureThe tire inflation pressure in at least one tire is significantly
below the reference value.XCarefully bring the vehicle to a halt, avoiding abrupt
steering and braking maneuvers.XCheck and adjust tire inflation pressure as required.XIf necessary, change the wheel ( Y page 508).GWarning!
Do not drive with a flat tire. A flat tire affects the ability to steer or brake the vehicle. You may
lose control of the vehicle. Continued driving with a flat tire will cause excessive heat build-up
and possibly a fire.
GWarning!
Follow recommended tire inflation pressures.
Do not underinflate tires. Underinflated tires wear excessively and/or unevenly, adversely affect
handling and fuel economy, and are more likely to fail from being overheated.
Do not overinflate tires. Overinflated tires can adversely affect handling and ride comfort, wear
unevenly, increase stopping distance, and result in sudden deflation (blowout) because they are
more likely to become punctured or damaged by road debris, potholes etc.
What to do if …
Lamps in instrument cluster
Notes
If any of the following lamps in the instrument
cluster fails to come on during the bulb self-
check when switching on the ignition, have
the respective bulb checked and replaced if
necessary.
When you switch on the ignition, all lamps in
the instrument cluster come on. The high-
beam headlamp indicator lamp and turn
signal indicator lamps will only come on if
activated. If a lamp in the instrument cluster
fails to come on when the ignition is switched
on, have it checked and replaced if necessary.GWarning!
HYBRID vehicles: It is imperative that you read
the HYBRID Supplemental Operating
Instructions included in your vehicle literature
portfolio. You may otherwise not receive all
necessary safety information and warning for
the operation of your vehicle.
What to do if …489Practical hints221_AKB; 6; 20, en-USd2ugruen,Version: 2.11.8.12009-09-24T13:28:17+02:00 - Seite 489Z
Page 507 of 548
humidity, driving the vehicle a distance with
the lights on should clear up the fogging.
Bulbs
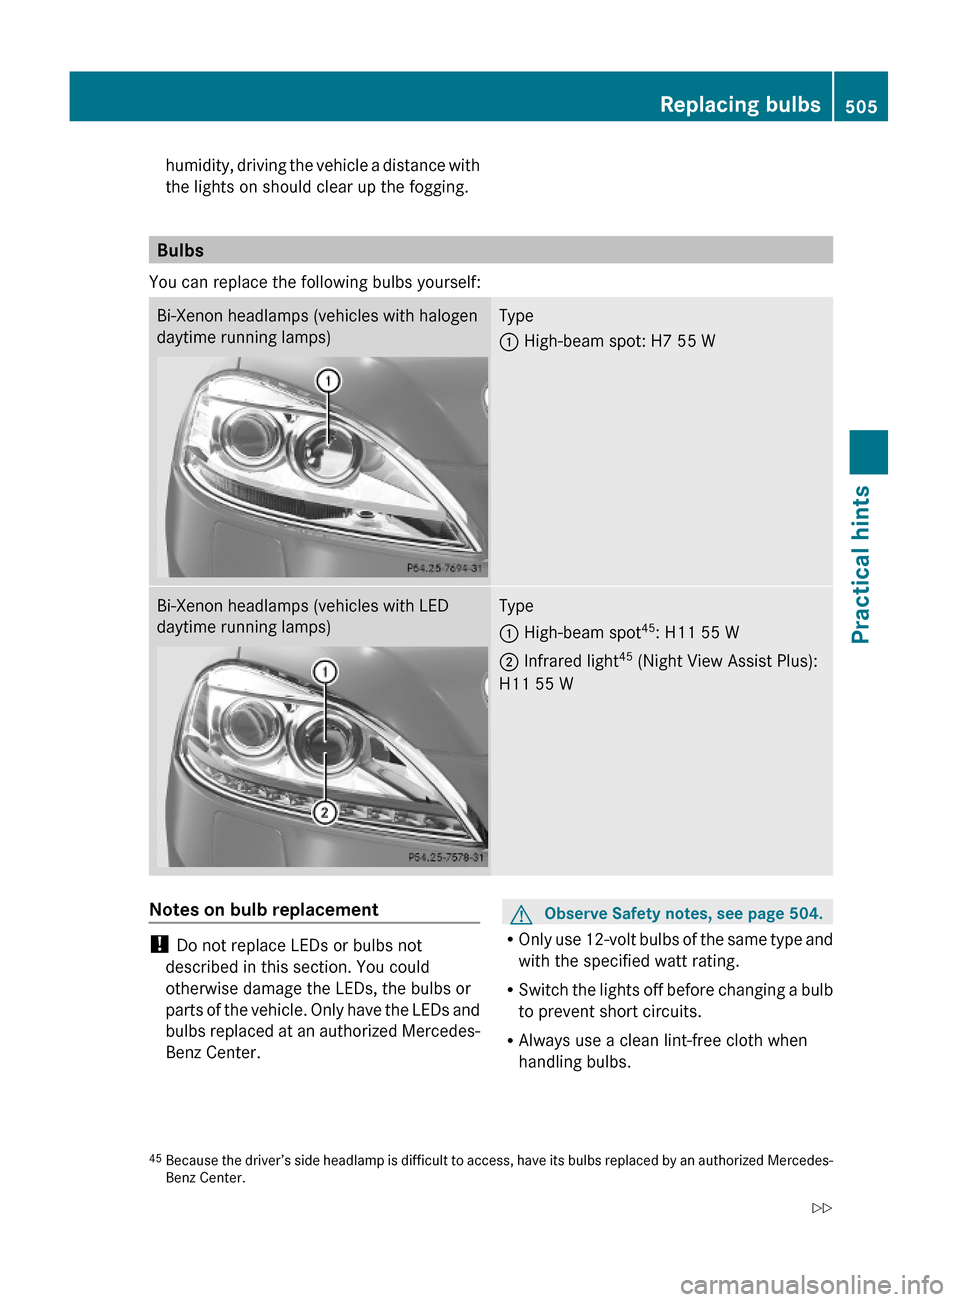
You can replace the following bulbs yourself:
Bi-Xenon headlamps (vehicles with halogen
daytime running lamps)
Type
: High-beam spot: H7 55 W
Bi-Xenon headlamps (vehicles with LED
daytime running lamps)
Type
: High-beam spot45: H11 55 W
; Infrared light45 (Night View Assist Plus):
H11 55 W
Notes on bulb replacement
! Do not replace LEDs or bulbs not
described in this section. You could
otherwise damage the LEDs, the bulbs or
parts of the vehicle. Only have the LEDs and
bulbs replaced at an authorized Mercedes-
Benz Center.
GObserve Safety notes, see page 504.
ROnly use 12-volt bulbs of the same type and
with the specified watt rating.
RSwitch the lights off before changing a bulb
to prevent short circuits.
RAlways use a clean lint-free cloth when
handling bulbs.
45Because the driver’s side headlamp is difficult to access, have its bulbs replaced by an authorized Mercedes-Benz Center.
Replacing bulbs505Practical hints221_AKB; 6; 20, en-USd2ugruen,Version: 2.11.8.12009-09-24T13:28:17+02:00 - Seite 505Z
Page 508 of 548
RYour hands should be dry and free of oil and
grease.
RIf the newly installed bulb does not come
on, contact an authorized Mercedes-Benz
Center.
iMercedes-Benz recommends using
Longlife (LL) bulbs.
Replacing bulbs for front lamps
GWarning!
Do not remove the cover for the Bi-Xenon
headlamp. Because of high voltage in Xenon
lamps, it is dangerous to replace the bulb or
repair the lamp and its components. It is
recommended to have such work done by a
qualified technician.
Before you start to replace a bulb for a front
lamp, do the following:
XSwitch off the ignition.XTurn the exterior lamp switch to position
$.
XOpen the hood (Y page 404).
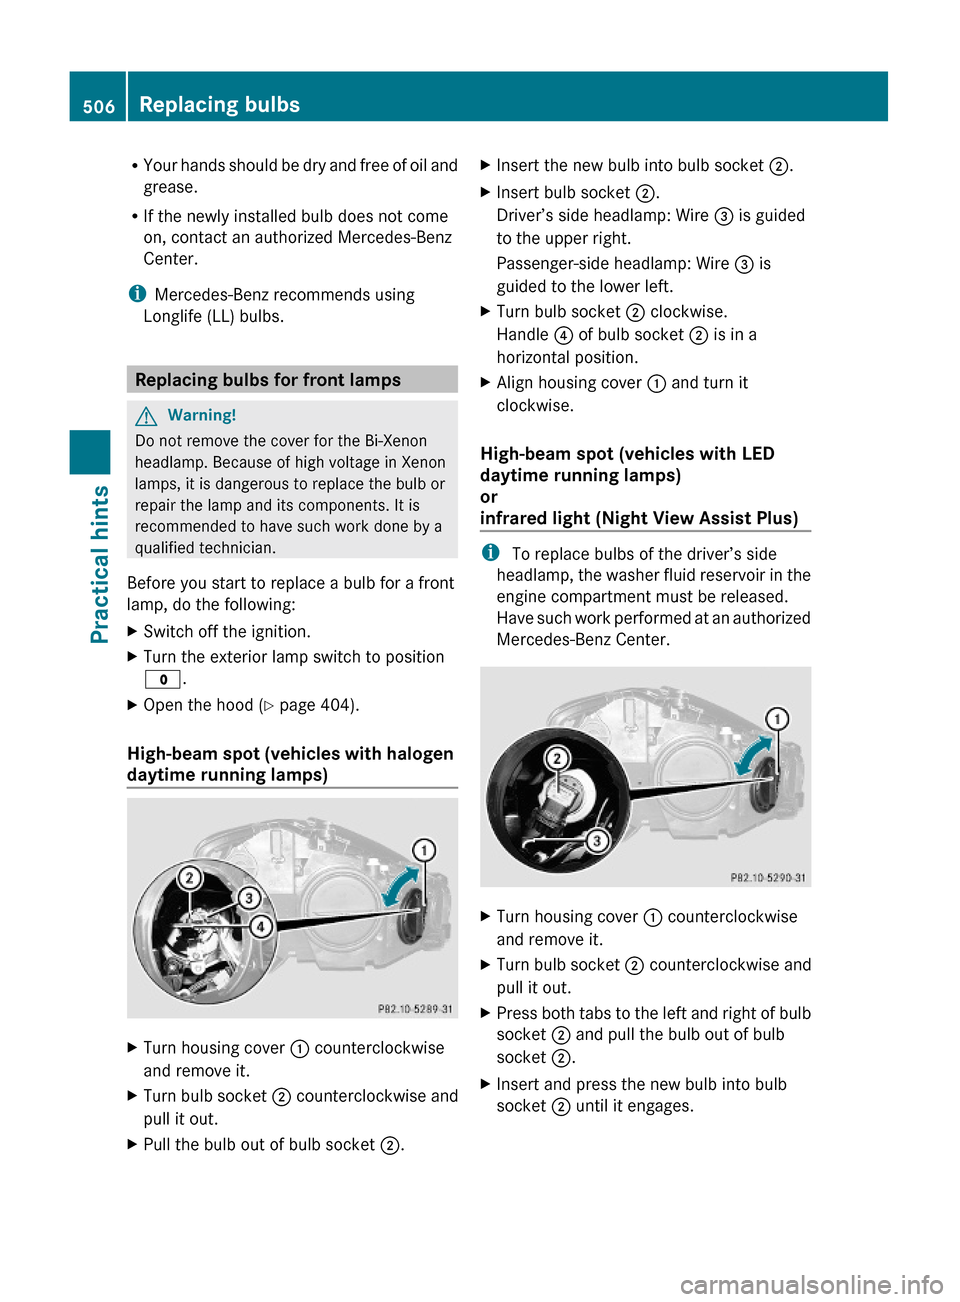
High-beam spot (vehicles with halogen
daytime running lamps)
XTurn housing cover : counterclockwise
and remove it.
XTurn bulb socket ; counterclockwise and
pull it out.
XPull the bulb out of bulb socket ;.XInsert the new bulb into bulb socket ;.XInsert bulb socket ;.
Driver’s side headlamp: Wire = is guided
to the upper right.
Passenger-side headlamp: Wire = is
guided to the lower left.
XTurn bulb socket ; clockwise.
Handle ? of bulb socket ; is in a
horizontal position.
XAlign housing cover : and turn it
clockwise.
High-beam spot (vehicles with LED
daytime running lamps)
or
infrared light (Night View Assist Plus)
i To replace bulbs of the driver’s side
headlamp, the washer fluid reservoir in the
engine compartment must be released.
Have such work performed at an authorized
Mercedes-Benz Center.
XTurn housing cover : counterclockwise
and remove it.
XTurn bulb socket ; counterclockwise and
pull it out.
XPress both tabs to the left and right of bulb
socket ; and pull the bulb out of bulb
socket ;.
XInsert and press the new bulb into bulb
socket ; until it engages.
506Replacing bulbsPractical hints
221_AKB; 6; 20, en-USd2ugruen,Version: 2.11.8.12009-09-24T13:28:17+02:00 - Seite 506