2010 MERCEDES-BENZ S600 brake sensor
[x] Cancel search: brake sensorPage 342 of 548
The DISTRONIC PLUS regulates only the
distance between your vehicle and those
directly ahead of it. It may not register
stationary objects in the road, e.g.:
Ra stopped vehicle in a traffic jam
Ra disabled vehicle
Ran oncoming vehicle
The driver must always be alert, observe all
traffic and intercede as required by means of
steering or braking the vehicle.
GWarning!
The DISTRONIC PLUS should not be used in
snowy or icy road conditions.
The most likely cause for a malfunctioning
system is a dirty sensor (located in the hood
grille and in the bumper), especially at times
of snow and ice or heavy rain.
In such a case, the DISTRONIC PLUS will
switch off, and the message DISTRONIC
PLUS Currently Unavailable See
Oper. Manual appears in the multifunction
display.
For cleaning and care of the sensors, see
(Y page 443).
iIf the message DISTRONIC PLUS
Currently Unavailable See Oper.
Manual disappears during driving and the
last speed stored flashes for approximately
5 seconds, the dirt (e.g. slush) has
dissolved; the DISTRONIC PLUS is available
again.
Another cause might be that the radar
sensors have been manually switched off in
the instrument cluster control system. Please
verify that the radar sensors are switched on
(Y page 236).
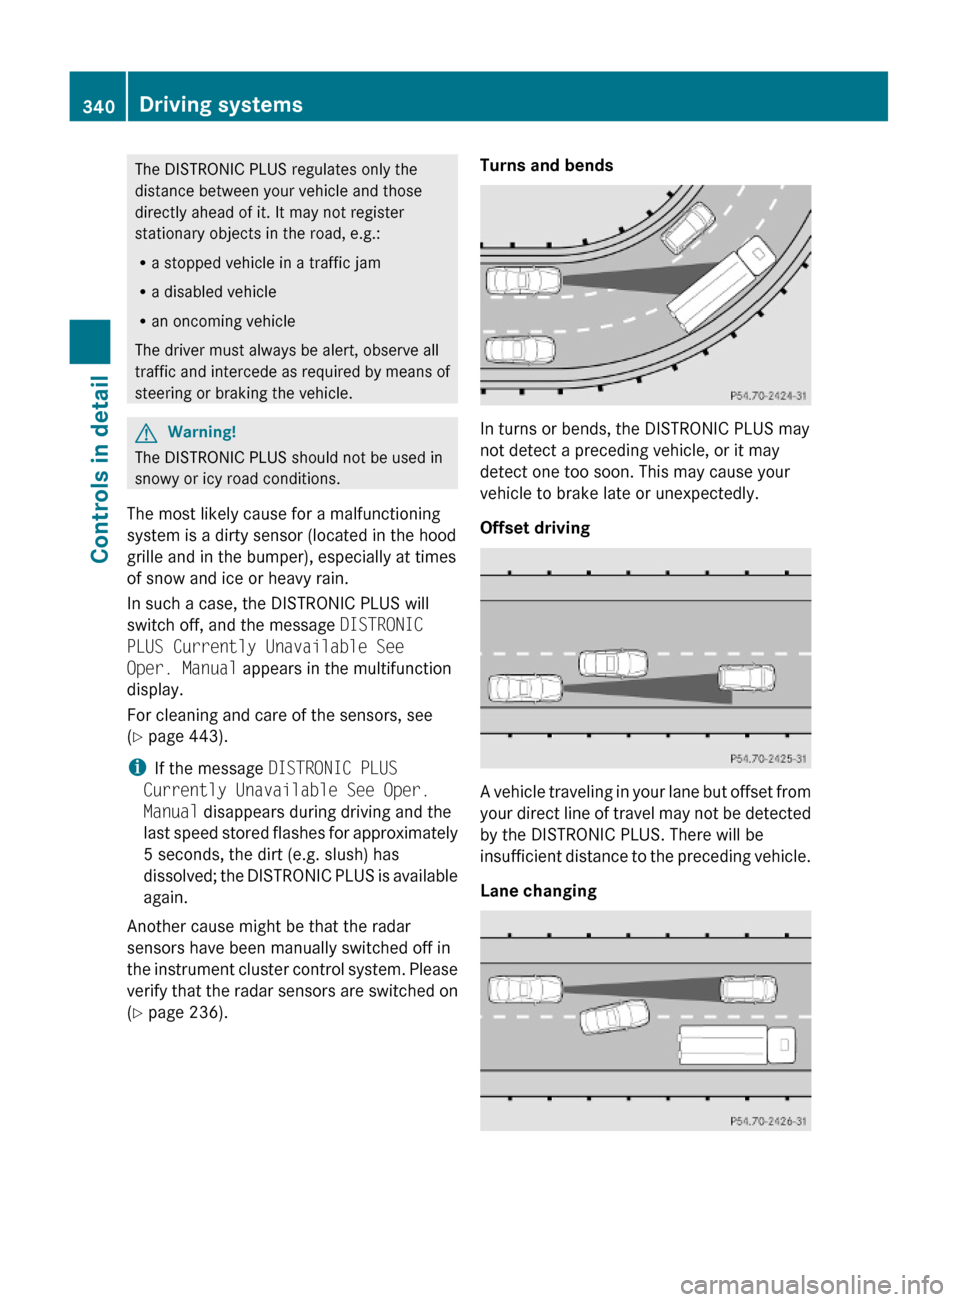
Turns and bends
In turns or bends, the DISTRONIC PLUS may
not detect a preceding vehicle, or it may
detect one too soon. This may cause your
vehicle to brake late or unexpectedly.
Offset driving
A vehicle traveling in your lane but offset from
your direct line of travel may not be detected
by the DISTRONIC PLUS. There will be
insufficient distance to the preceding vehicle.
Lane changing
340Driving systemsControls in detail
221_AKB; 6; 20, en-USd2ugruen,Version: 2.11.8.12009-09-24T13:28:17+02:00 - Seite 340
Page 349 of 548
Comfort suspension tuning
Vehicle handling in comfort driving mode is
softer. Select this mode when you prefer a
more comfortable driving style.XWhen indicator lamp ; is on: Press
button :.
Indicator lamp ; goes out. The
comfortable chassis and suspension setup
is selected.
The message ABC Active Body Control
COMFORT appears in the multifunction
display.
All-wheel drive (4MATIC)
In vehicles with all-wheel drive (4MATIC),
both axles are powered at all times when the
vehicle is being operated. The 4MATIC
improves traction in conjunction with the ESC
( Y page 66) and the Electronic Traction
System (ETS/4-ETS) ( Y page 67).
GWarning!
If a drive wheel is spinning due to insufficient
traction:
R While driving off, apply as little throttle as
possible.
R While driving, ease up on the accelerator
pedal.
R Adapt your speed and driving style to the
prevailing road conditions.
Failure to observe these guidelines could
cause the vehicle to skid.
The 4MATIC cannot prevent accidents
resulting from excessive speed.
! Do not tow with one axle raised. Doing so
could damage the transfer case, which is
not covered by the Mercedes-Benz Limited
Warranty. All wheels must be on or off the
ground. Observe instructions for towing the
vehicle with all wheels on the ground.
! Only conduct operational or performance
tests on a two-axle dynamometer. If such
tests are necessary, contact an authorized
Mercedes-Benz Center. You could
otherwise seriously damage the brake
system and/or the transfer case which is
not covered by the Mercedes-Benz Limited
Warranty.
i In winter operation, the maximum
effectiveness of the 4MATIC is only
achieved with winter tires ( Y page 432) or
snow chains as required.
Parktronic system
The Parktronic system with Parking Guidance
is an electronic parking aid with ultrasonic
sensors designed to assist the driver during
parking maneuvers. The Parktronic system
indicates the relative distance between the
vehicle and an obstacle visually and audibly.
The Parktronic system is activated
automatically when
R you switch on the ignition
and
R you release the electronic parking brake
or
R you start the engine
and
R shift the automatic transmission into drive
position D, reverse gear R, or neutral
position N
The Parktronic system deactivates at speeds
above approximately 11 mph (18 km/h). At
lower speeds, the Parktronic system
activates again.
The Parktronic system also deactivates when
you shift the automatic transmission into
park position P or engage the electronic
parking brake and turn off the engine.
The Parktronic system monitors the
surroundings of your vehicle with six sensors
Driving systems347Controls in detail221_AKB; 6; 20, en-USd2ugruen,Version: 2.11.8.12009-09-24T13:28:17+02:00 - Seite 347Z
Page 350 of 548
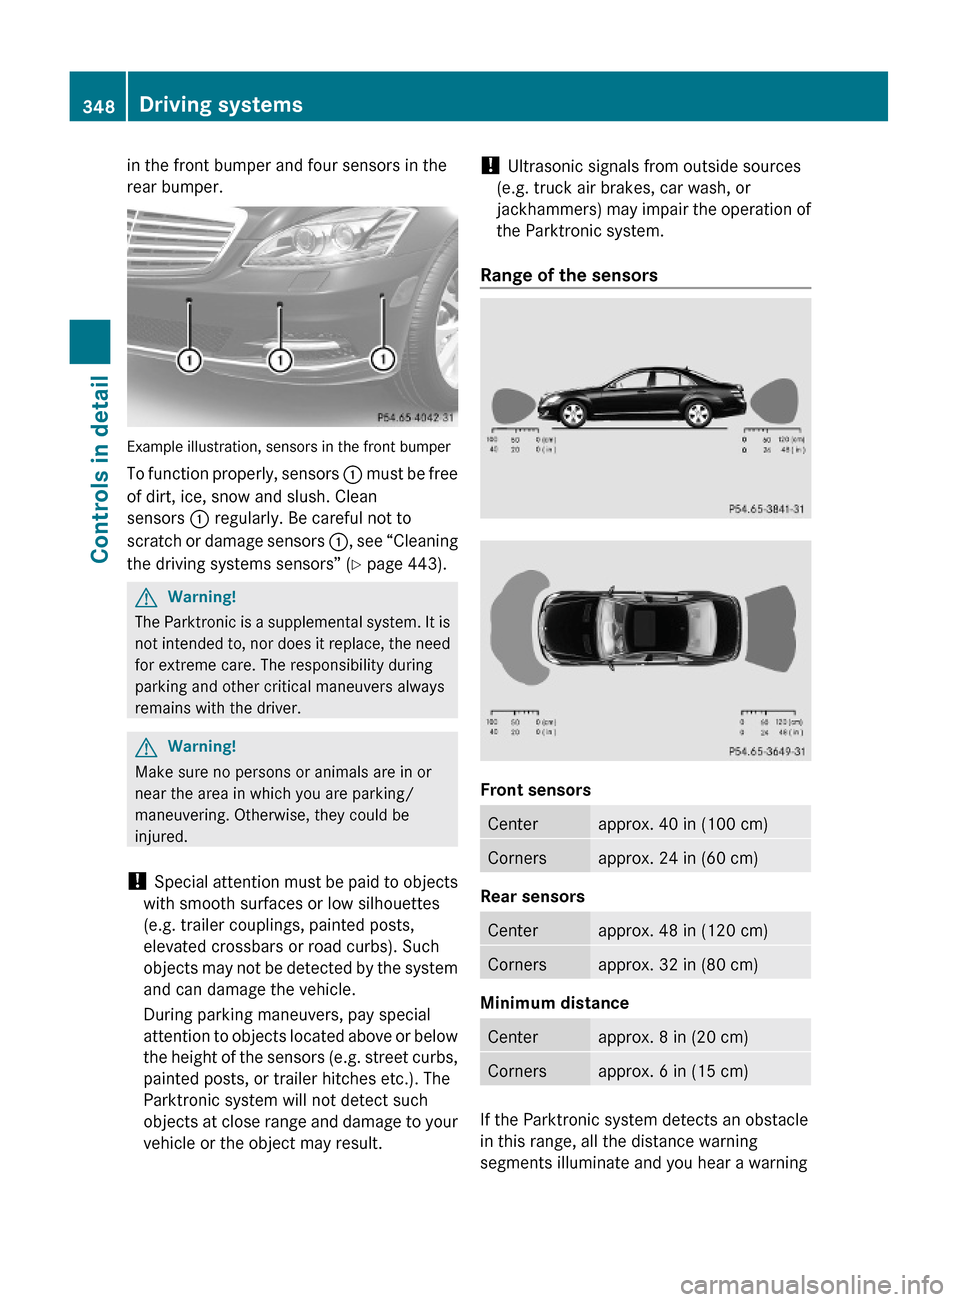
in the front bumper and four sensors in the
rear bumper.
Example illustration, sensors in the front bumper
To function properly, sensors : must be free
of dirt, ice, snow and slush. Clean
sensors : regularly. Be careful not to
scratch or damage sensors :, see “Cleaning
the driving systems sensors” (Y page 443).
GWarning!
The Parktronic is a supplemental system. It is
not intended to, nor does it replace, the need
for extreme care. The responsibility during
parking and other critical maneuvers always
remains with the driver.
GWarning!
Make sure no persons or animals are in or
near the area in which you are parking/
maneuvering. Otherwise, they could be
injured.
! Special attention must be paid to objects
with smooth surfaces or low silhouettes
(e.g. trailer couplings, painted posts,
elevated crossbars or road curbs). Such
objects may not be detected by the system
and can damage the vehicle.
During parking maneuvers, pay special
attention to objects located above or below
the height of the sensors (e.g. street curbs,
painted posts, or trailer hitches etc.). The
Parktronic system will not detect such
objects at close range and damage to your
vehicle or the object may result.
! Ultrasonic signals from outside sources
(e.g. truck air brakes, car wash, or
jackhammers) may impair the operation of
the Parktronic system.
Range of the sensors
Front sensors
Centerapprox. 40 in (100 cm)Cornersapprox. 24 in (60 cm)
Rear sensors
Centerapprox. 48 in (120 cm)Cornersapprox. 32 in (80 cm)
Minimum distance
Centerapprox. 8 in (20 cm)Cornersapprox. 6 in (15 cm)
If the Parktronic system detects an obstacle
in this range, all the distance warning
segments illuminate and you hear a warning
348Driving systemsControls in detail
221_AKB; 6; 20, en-USd2ugruen,Version: 2.11.8.12009-09-24T13:28:17+02:00 - Seite 348
Page 351 of 548
signal. If the obstacle is closer than the
minimum distance, the actual distance may
no longer be indicated by the Parktronic
system.
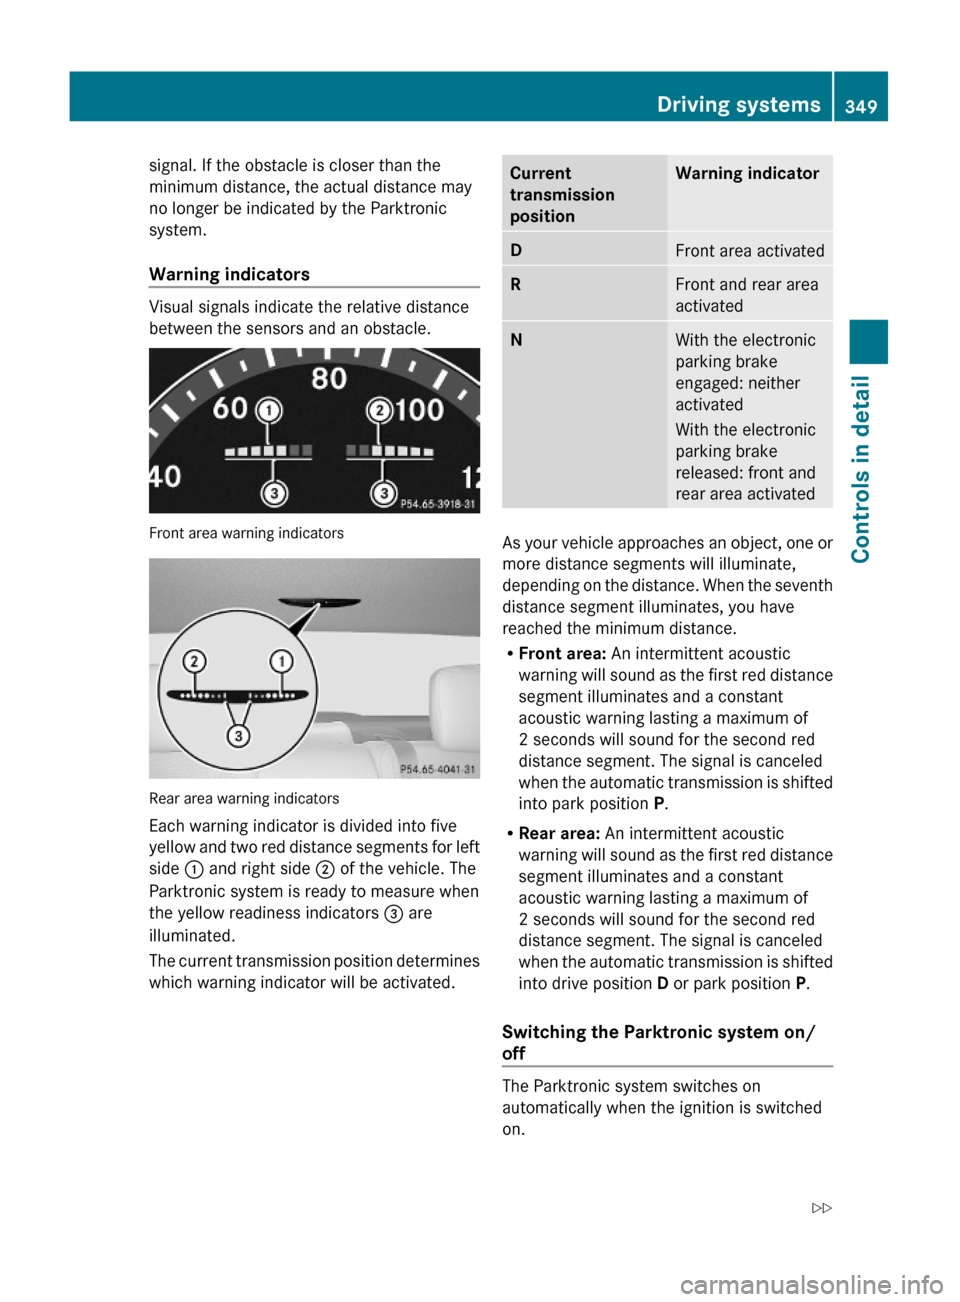
Warning indicators
Visual signals indicate the relative distance
between the sensors and an obstacle.
Front area warning indicators
Rear area warning indicators
Each warning indicator is divided into five
yellow and two red distance segments for left
side : and right side ; of the vehicle. The
Parktronic system is ready to measure when
the yellow readiness indicators = are
illuminated.
The current transmission position determines
which warning indicator will be activated.
Current
transmission
position
Warning indicatorDFront area activatedRFront and rear area
activated
NWith the electronic
parking brake
engaged: neither
activated
With the electronic
parking brake
released: front and
rear area activated
As your vehicle approaches an object, one or
more distance segments will illuminate,
depending on the distance. When the seventh
distance segment illuminates, you have
reached the minimum distance.
RFront area: An intermittent acoustic
warning will sound as the first red distance
segment illuminates and a constant
acoustic warning lasting a maximum of
2 seconds will sound for the second red
distance segment. The signal is canceled
when the automatic transmission is shifted
into park position P.
RRear area: An intermittent acoustic
warning will sound as the first red distance
segment illuminates and a constant
acoustic warning lasting a maximum of
2 seconds will sound for the second red
distance segment. The signal is canceled
when the automatic transmission is shifted
into drive position D or park position P.
Switching the Parktronic system on/
off
The Parktronic system switches on
automatically when the ignition is switched
on.
Driving systems349Controls in detail221_AKB; 6; 20, en-USd2ugruen,Version: 2.11.8.12009-09-24T13:28:17+02:00 - Seite 349Z
Page 352 of 548
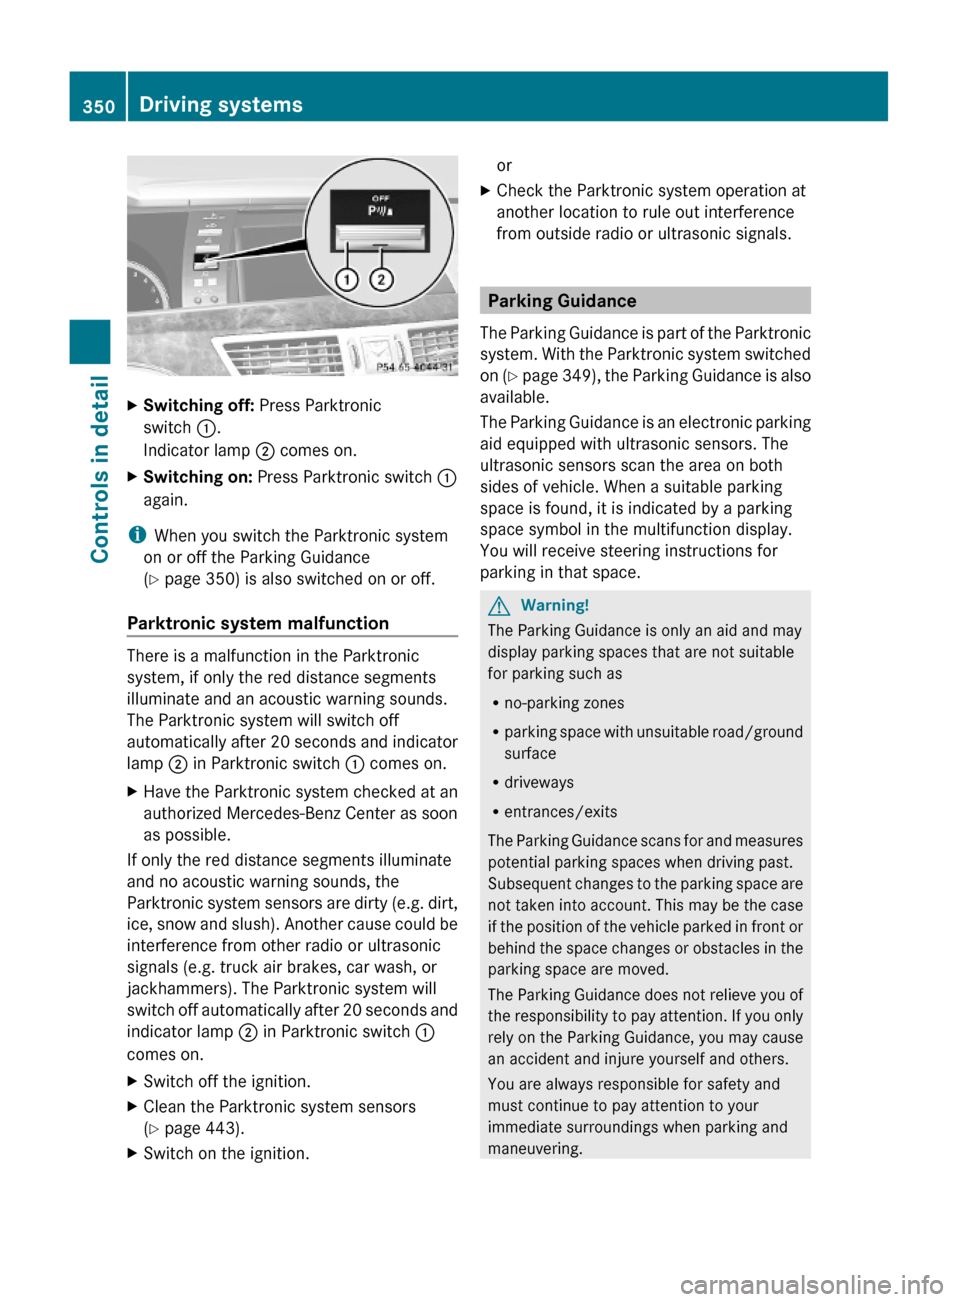
XSwitching off: Press Parktronic
switch :.
Indicator lamp ; comes on.
XSwitching on: Press Parktronic switch :
again.
iWhen you switch the Parktronic system
on or off the Parking Guidance
(Y page 350) is also switched on or off.
Parktronic system malfunction
There is a malfunction in the Parktronic
system, if only the red distance segments
illuminate and an acoustic warning sounds.
The Parktronic system will switch off
automatically after 20 seconds and indicator
lamp ; in Parktronic switch : comes on.
XHave the Parktronic system checked at an
authorized Mercedes-Benz Center as soon
as possible.
If only the red distance segments illuminate
and no acoustic warning sounds, the
Parktronic system sensors are dirty (e.g. dirt,
ice, snow and slush). Another cause could be
interference from other radio or ultrasonic
signals (e.g. truck air brakes, car wash, or
jackhammers). The Parktronic system will
switch off automatically after 20 seconds and
indicator lamp ; in Parktronic switch :
comes on.
XSwitch off the ignition.XClean the Parktronic system sensors
(Y page 443).
XSwitch on the ignition.orXCheck the Parktronic system operation at
another location to rule out interference
from outside radio or ultrasonic signals.
Parking Guidance
The Parking Guidance is part of the Parktronic
system. With the Parktronic system switched
on (Y page 349), the Parking Guidance is also
available.
The Parking Guidance is an electronic parking
aid equipped with ultrasonic sensors. The
ultrasonic sensors scan the area on both
sides of vehicle. When a suitable parking
space is found, it is indicated by a parking
space symbol in the multifunction display.
You will receive steering instructions for
parking in that space.
GWarning!
The Parking Guidance is only an aid and may
display parking spaces that are not suitable
for parking such as
Rno-parking zones
Rparking space with unsuitable road/ground
surface
Rdriveways
Rentrances/exits
The Parking Guidance scans for and measures
potential parking spaces when driving past.
Subsequent changes to the parking space are
not taken into account. This may be the case
if the position of the vehicle parked in front or
behind the space changes or obstacles in the
parking space are moved.
The Parking Guidance does not relieve you of
the responsibility to pay attention. If you only
rely on the Parking Guidance, you may cause
an accident and injure yourself and others.
You are always responsible for safety and
must continue to pay attention to your
immediate surroundings when parking and
maneuvering.
350Driving systemsControls in detail
221_AKB; 6; 20, en-USd2ugruen,Version: 2.11.8.12009-09-24T13:28:17+02:00 - Seite 350
Page 361 of 548
XDimming illumination: Turn knob :
counterclockwise.
Dirty or fogged-up windshield
The Night View Assist Plus image is
diminished when the windshield in front of the
camera is
R dirty
R fogged up on the outside
R fogged up on the inside
GWarning!
Please do not forget that your primary
responsibility is to drive the vehicle. A driver’s
attention to the road must always be his/her
primary focus when driving. For your safety
and the safety of others, stop before trying to
remove window fogging or cleaning the
windshield in front of the Night View Assist
Plus camera.
Bear in mind that at a speed of just 30 mph
(approximately 50 km/h), your vehicle is
covering a distance of 44 feet
(approximately 14 m) every second.
XRemoving condensation: Check settings
of the climate control and change them, if
necessary ( Y page 363).XSwing the camera cover downward
( Y page 444).XCleaning inside of windshield: Use a soft,
non-scratching cloth ( Y page 444).
Blind Spot Assist
The Blind Spot Assist uses radar sensors to
monitor the area on both sides of your
vehicle. It will assist you when you change
lanes driving at speeds of above 20 mph
(30 km/h). A red warning lamp will come on
in the exterior rear view mirror as soon as
another vehicle is detected. If you then
activate the corresponding turn signals to
change lanes, the red warning lamp flashes
and warning sounds (collision warning). The
Blind Spot Assist operates using sensors in
the rear bumper.GWarning!
The Blind Spot Assist is only a driving aid and
may not detect all vehicles.
The Blind Spot Assist may not be able to
detect narrow vehicles such as motorcycles
or bicycles, or it may not detect them until it
is too late.
The monitoring function may be impaired if
your sensors are dirty, subject to heavy spray,
or if visibility is poor due to e.g. snow, rain, or
fog. This can result in vehicles not being
detected or being detected too late.
The Blind Spot Assist cannot detect road,
traffic and weather conditions.
It is the driver’s responsibility at all times to
be attentive to road, weather and traffic
conditions and to provide the steering,
braking and other driving inputs necessary to
retain control of the vehicle. Failure to do so
could result in recognizing dangers too late,
possibly resulting in an accident and serious
injury to yourself and others.
In order for the Blind Spot Assist to function,
the radar sensors must be switched on and
operational.
When traveling in Canada in a vehicle not
registered in Canada, you must switch off the
radar sensor system ( Y page 236). Canadian
law does not permit the use of the radar
sensor system for vehicles from outside of
Canada. When you switch off the radar sensor
system, the following functions are
deactivated:
R Blind Spot Assist
R BAS PLUS ( Y page 64)
R PRE-SAFE ®
Brake ( Y page 69)
R DISTRONIC PLUS ( Y page 330)
i USA only:
This device has been approved by the FCC
as a “Vehicular Radar System”. The radar
Driving systems359Controls in detail221_AKB; 6; 20, en-USd2ugruen,Version: 2.11.8.12009-09-24T13:28:17+02:00 - Seite 359Z
Page 411 of 548
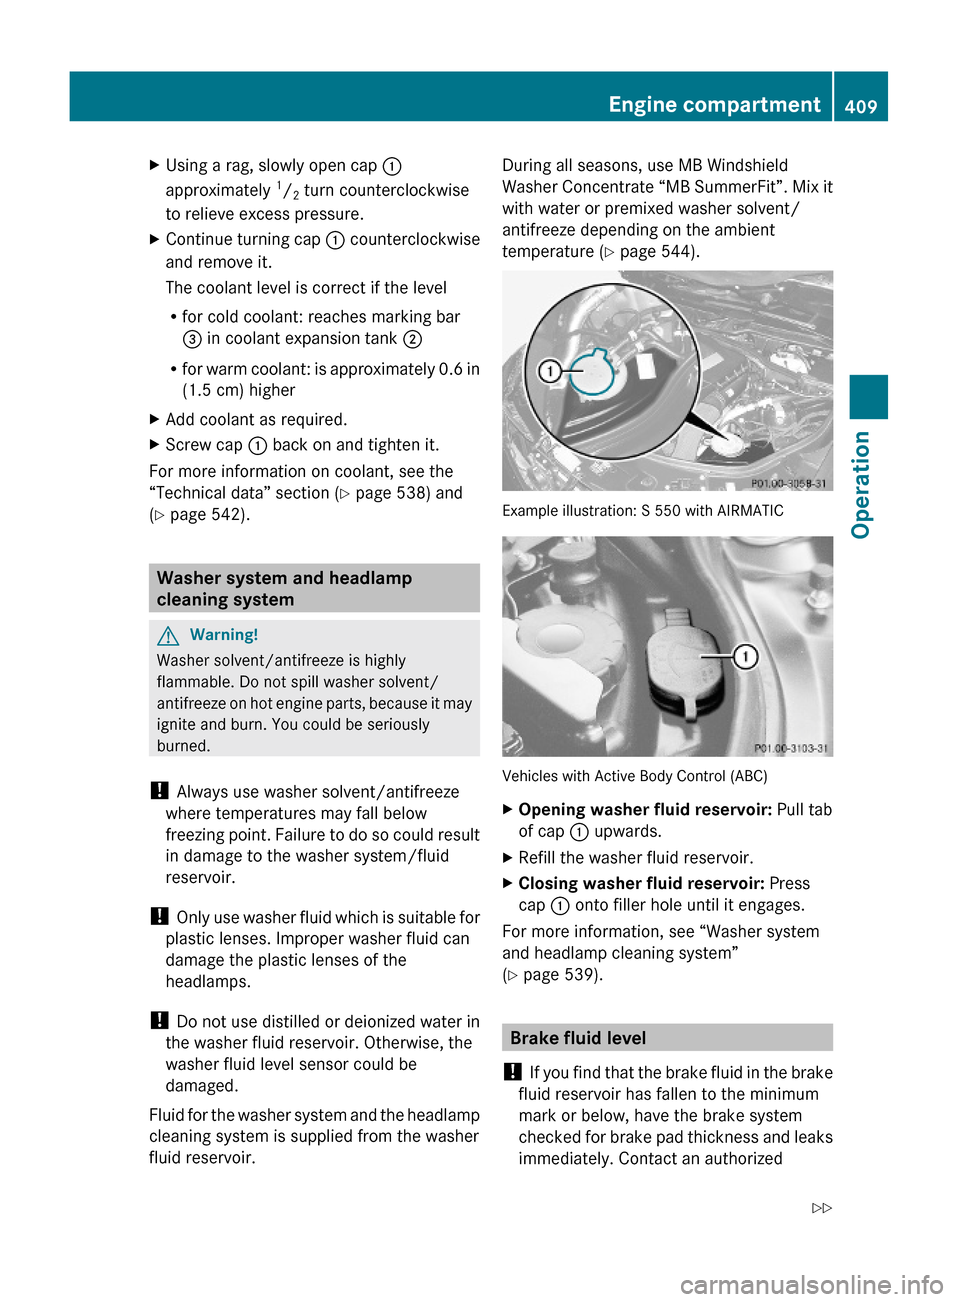
XUsing a rag, slowly open cap :
approximately 1/2 turn counterclockwise
to relieve excess pressure.
XContinue turning cap : counterclockwise
and remove it.
The coolant level is correct if the level
Rfor cold coolant: reaches marking bar
= in coolant expansion tank ;
Rfor warm coolant: is approximately 0.6 in
(1.5 cm) higher
XAdd coolant as required.XScrew cap : back on and tighten it.
For more information on coolant, see the
“Technical data” section (Y page 538) and
(Y page 542).
Washer system and headlamp
cleaning system
GWarning!
Washer solvent/antifreeze is highly
flammable. Do not spill washer solvent/
antifreeze on hot engine parts, because it may
ignite and burn. You could be seriously
burned.
! Always use washer solvent/antifreeze
where temperatures may fall below
freezing point. Failure to do so could result
in damage to the washer system/fluid
reservoir.
! Only use washer fluid which is suitable for
plastic lenses. Improper washer fluid can
damage the plastic lenses of the
headlamps.
! Do not use distilled or deionized water in
the washer fluid reservoir. Otherwise, the
washer fluid level sensor could be
damaged.
Fluid for the washer system and the headlamp
cleaning system is supplied from the washer
fluid reservoir.
During all seasons, use MB Windshield
Washer Concentrate “MB SummerFit”. Mix it
with water or premixed washer solvent/
antifreeze depending on the ambient
temperature (Y page 544).
Example illustration: S 550 with AIRMATIC
Vehicles with Active Body Control (ABC)
XOpening washer fluid reservoir: Pull tab
of cap : upwards.
XRefill the washer fluid reservoir.XClosing washer fluid reservoir: Press
cap : onto filler hole until it engages.
For more information, see “Washer system
and headlamp cleaning system”
(Y page 539).
Brake fluid level
! If you find that the brake fluid in the brake
fluid reservoir has fallen to the minimum
mark or below, have the brake system
checked for brake pad thickness and leaks
immediately. Contact an authorized
Engine compartment409Operation221_AKB; 6; 20, en-USd2ugruen,Version: 2.11.8.12009-09-24T13:28:17+02:00 - Seite 409Z
Page 416 of 548
can overheat them, possibly causing a
blowout. Overloading the tires can also result
in handling or steering problems, or brake
failure.
Check the tire inflation pressure at least once
a month.
Check and adjust the tire inflation pressure
when the tires are cold ( Y page 411).
Checking tire inflation pressure
manually
Follow the steps below to achieve correct tire
inflation pressure:
XRemove the cap from the valve on one tire.XFirmly press a tire gauge onto the valve.XRead the tire inflation pressure on the tire
gauge and check against the
recommended tire inflation pressure on the
Tire and Loading Information placard on the
driver’s door B-pillar ( Y page 418). If
necessary, add air to achieve the
recommended tire inflation pressure.XIf you have overfilled the tire, release tire
inflation pressure by pushing the metal
stem of the valve with e.g. a tip of a pen.
Then recheck the tire inflation pressure
with the tire gauge.XInstall the valve cap.XRepeat this procedure for each tire.
Advanced Tire Pressure Monitoring
System (Advanced TPMS)
Your vehicle is equipped with the Advanced
Tire Pressure Monitoring System (Advanced
TPMS). It measures the tire inflation pressure
in the vehicle’s tires and issues warnings in
case of pressure loss in one or more of the
tires.
The TPMS is equipped with a combination low
tire pressure/ TPMS malfunction telltale
(USA) or a low tire pressure telltale (Canada)
in the instrument cluster. Depending on how
the telltale illuminates, it indicates a low tire
pressure condition or a malfunction in the
TPMS system itself:
R If the telltale illuminates continuously, one
or more of your tires is significantly
underinflated. There is no malfunction in
the TPMS.
R USA only: If the telltale flashes for 60
seconds and then stays illuminated, the
TPMS system itself is not operating
properly.
The TPMS only functions on wheels that are
equipped with the proper electronic sensors.GWarning!
The TPMS does not indicate a warning for
wrongly selected inflation pressures. Always
adjust tire inflation pressure according to the
Tire and Loading Information placard or the
supplemental tire inflation pressure
information on the inside of the fuel filler flap.
The TPMS is not able to issue a warning due
to a sudden dramatic loss of pressure (e.g. tire
blowout caused by a foreign object). In this
case bring the vehicle to a halt by carefully
applying the brakes and avoiding abrupt
steering maneuvers.
GWarning!
Each tire, including the spare (if provided),
should be checked at least once a month
when cold and inflated to the inflation
pressure recommended by the vehicle
manufacturer on the Tire and Loading
Information placard on the driver’s door B-
pillar or the tire inflation pressure label on the
inside of the fuel filler flap. If your vehicle has
tires of a different size than the size indicated
on the Tire and Loading Information placard
or the tire inflation pressure label, you should
determine the proper tire inflation pressure
for those tires.
414Tires and wheelsOperation
221_AKB; 6; 20, en-USd2ugruen,Version: 2.11.8.12009-09-24T13:28:17+02:00 - Seite 414