2010 MERCEDES-BENZ S600 turn signal
[x] Cancel search: turn signalPage 276 of 548
Vehicle equipment
iThis Operator’s Manual describes all
features, standard or optional, potentially
available for your vehicle at the time of
purchase. Please be aware that your
vehicle might not be equipped with all
features described in this manual.
Locking and unlocking
Notes
GObserve Safety notes, see page 56.
When unlocking or locking the vehicle with
the SmartKey an acoustic signal sounds. The
acoustic signal is activated at the factory. If
you wish to deactivate the feature, or adjust
its signal volume, contact an authorized
Mercedes-Benz Center.
When unlocking the vehicle, all turn signal
lamps flash once. An acoustic signal sounds
once, and the locking knobs in the doors
move up. The anti-theft alarm system is
disarmed.
When locking the vehicle, all turn signal lamps
flash three times. An acoustic signal sounds
three times, and the locking knobs in the
doors move down. The anti-theft alarm
system is armed.
All doors and the trunk must be closed.
If you cannot lock or unlock the vehicle with
the SmartKey, the batteries in the SmartKey
are discharged, the SmartKey is
malfunctioning, or the vehicle battery is
drained.
XCheck the batteries in the SmartKey
(Y page 277) and replace them if
necessary.
XUse the mechanical key to unlock the
driver’s door and the trunk (Y page 499).
XUse the mechanical key to lock the vehicle
(Y page 500).
XHave the vehicle battery and the vehicle
battery connections checked at an
authorized Mercedes-Benz Center.
If the SmartKey is malfunctioning, contact
Roadside Assistance or an authorized
Mercedes-Benz Center.
SmartKey
Your vehicle comes supplied with two
SmartKeys, each with remote control and a
removable mechanical key.
The SmartKey centrally locks and unlocks
Rthe doors
Rthe trunk lid
Rthe fuel filler flap
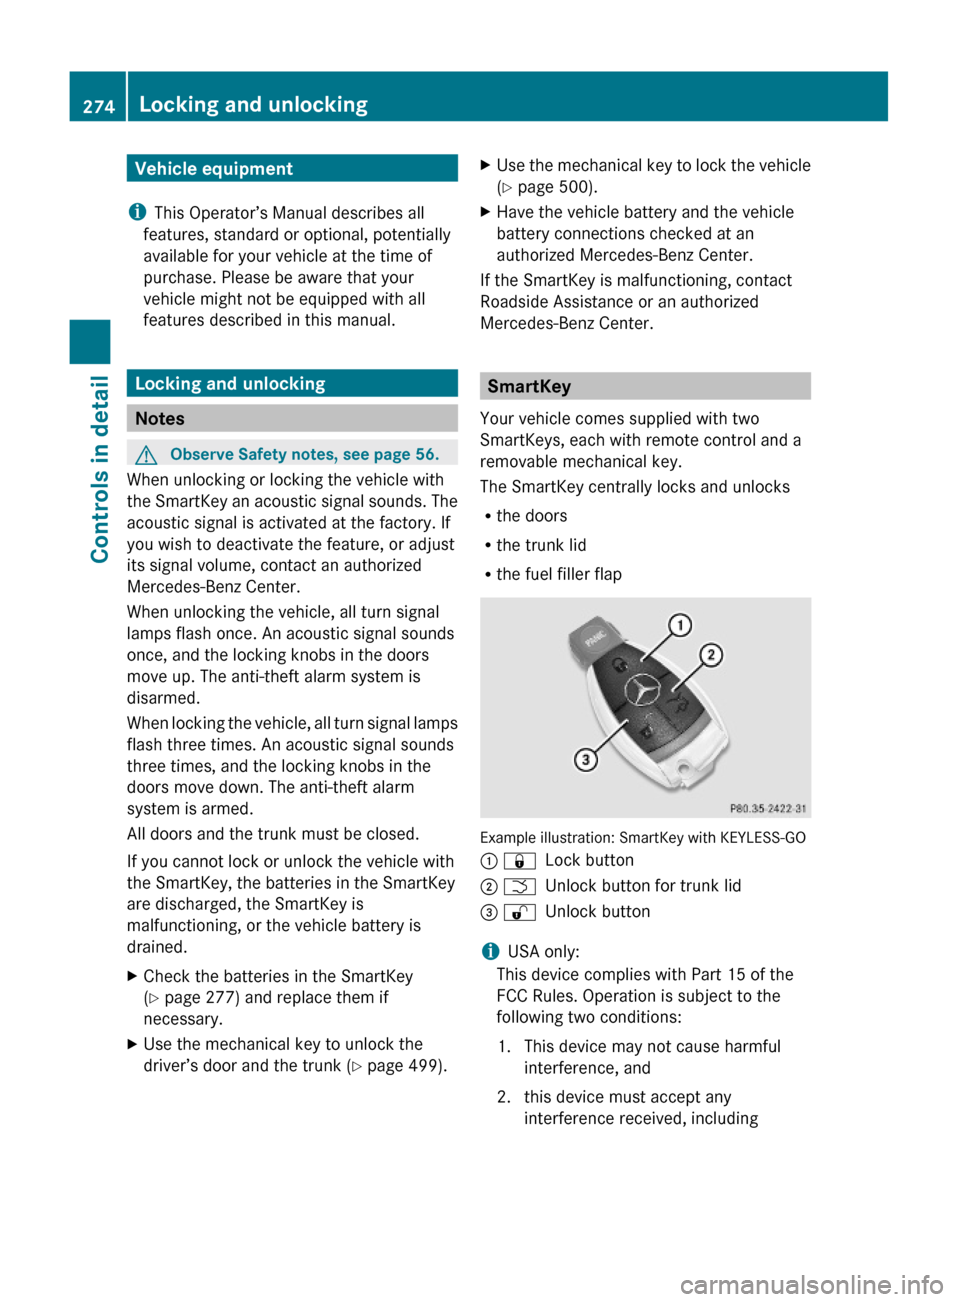
Example illustration: SmartKey with KEYLESS-GO
: &Lock button; FUnlock button for trunk lid= %Unlock button
iUSA only:
This device complies with Part 15 of the
FCC Rules. Operation is subject to the
following two conditions:
1. This device may not cause harmful
interference, and
2. this device must accept any
interference received, including
274Locking and unlockingControls in detail
221_AKB; 6; 20, en-USd2ugruen,Version: 2.11.8.12009-09-24T13:28:17+02:00 - Seite 274
Page 282 of 548
XPress and hold button F (Y page 274)
on the SmartKey until the trunk unlocks
and begins to open.
or
XPull on handle :.
In vehicles without KEYLESS-GO: The
vehicle must be unlocked.
If the trunk does not open, it is still locked
separately (Y page 283).
Vehicles with trunk opening/closing system:
XStopping the opening procedure: Press
button F on the SmartKey.
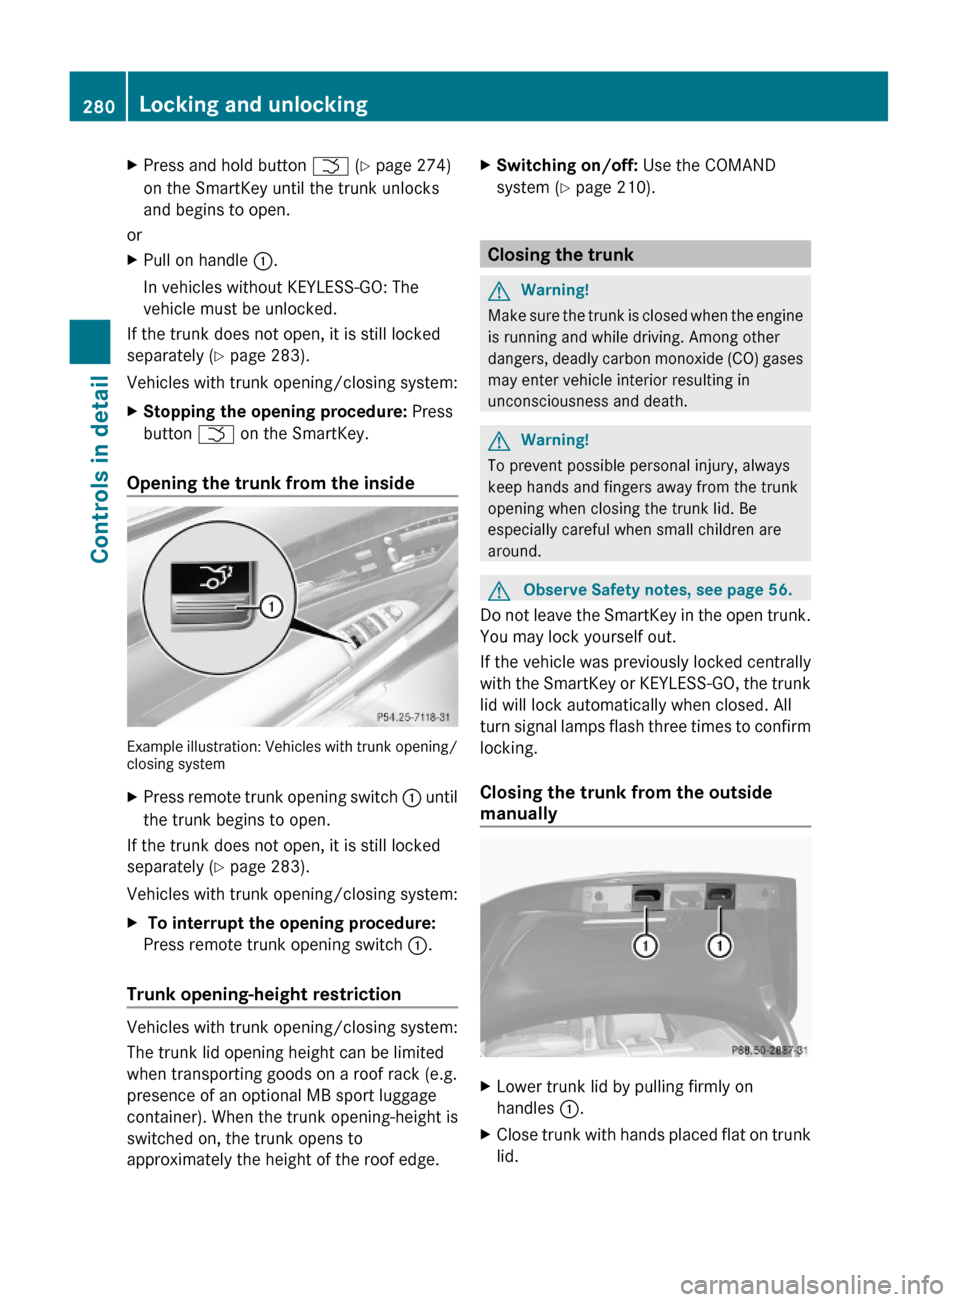
Opening the trunk from the inside
Example illustration: Vehicles with trunk opening/closing system
XPress remote trunk opening switch : until
the trunk begins to open.
If the trunk does not open, it is still locked
separately (Y page 283).
Vehicles with trunk opening/closing system:
X To interrupt the opening procedure:
Press remote trunk opening switch :.
Trunk opening-height restriction
Vehicles with trunk opening/closing system:
The trunk lid opening height can be limited
when transporting goods on a roof rack (e.g.
presence of an optional MB sport luggage
container). When the trunk opening-height is
switched on, the trunk opens to
approximately the height of the roof edge.
XSwitching on/off: Use the COMAND
system (Y page 210).
Closing the trunk
GWarning!
Make sure the trunk is closed when the engine
is running and while driving. Among other
dangers, deadly carbon monoxide (CO) gases
may enter vehicle interior resulting in
unconsciousness and death.
GWarning!
To prevent possible personal injury, always
keep hands and fingers away from the trunk
opening when closing the trunk lid. Be
especially careful when small children are
around.
GObserve Safety notes, see page 56.
Do not leave the SmartKey in the open trunk.
You may lock yourself out.
If the vehicle was previously locked centrally
with the SmartKey or KEYLESS-GO, the trunk
lid will lock automatically when closed. All
turn signal lamps flash three times to confirm
locking.
Closing the trunk from the outside
manually
XLower trunk lid by pulling firmly on
handles :.
XClose trunk with hands placed flat on trunk
lid.
280Locking and unlockingControls in detail
221_AKB; 6; 20, en-USd2ugruen,Version: 2.11.8.12009-09-24T13:28:17+02:00 - Seite 280
Page 284 of 548
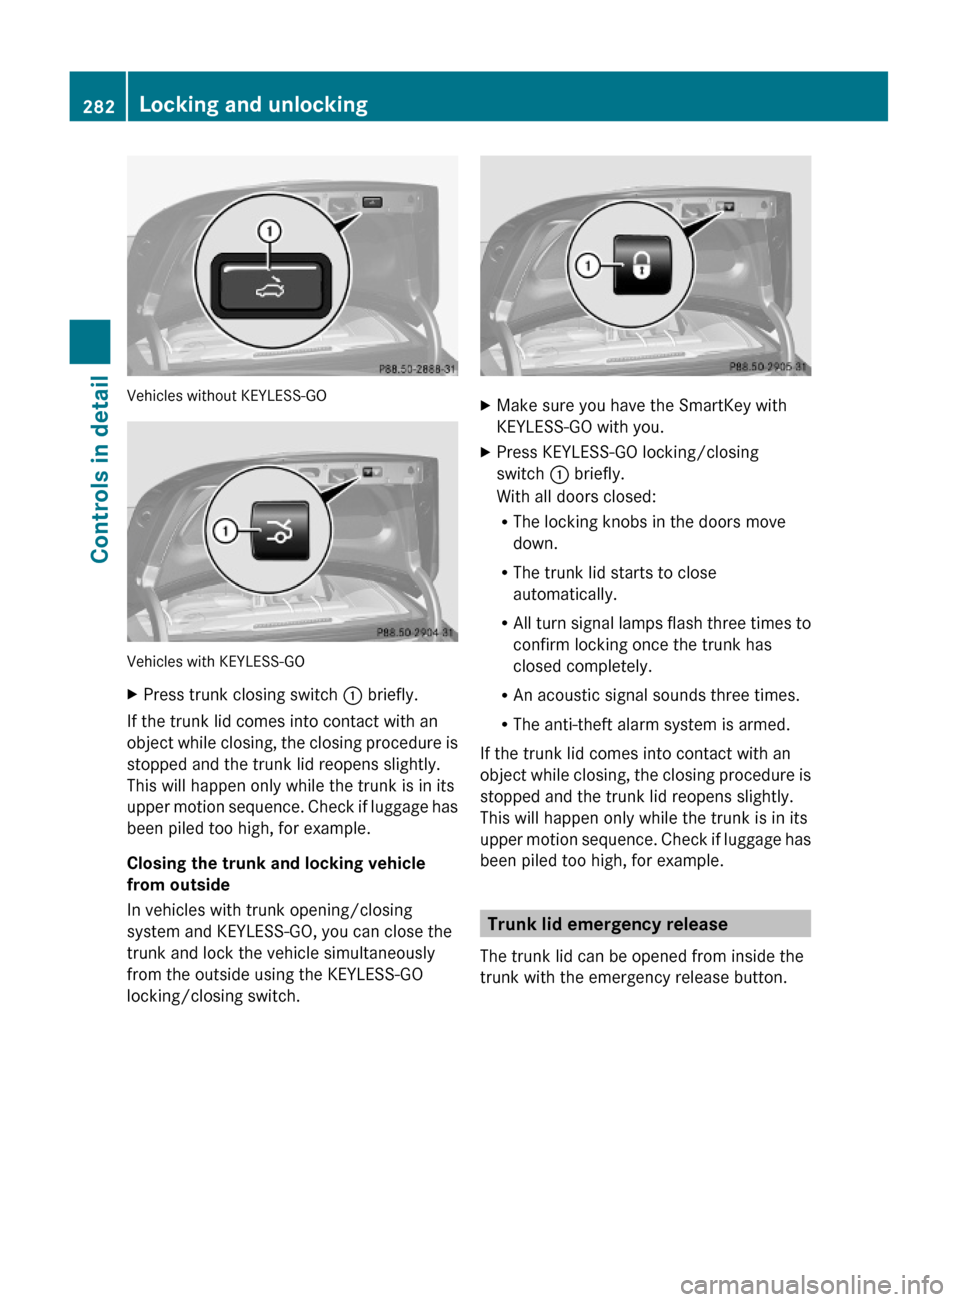
Vehicles without KEYLESS-GO
Vehicles with KEYLESS-GO
XPress trunk closing switch : briefly.
If the trunk lid comes into contact with an
object while closing, the closing procedure is
stopped and the trunk lid reopens slightly.
This will happen only while the trunk is in its
upper motion sequence. Check if luggage has
been piled too high, for example.
Closing the trunk and locking vehicle
from outside
In vehicles with trunk opening/closing
system and KEYLESS-GO, you can close the
trunk and lock the vehicle simultaneously
from the outside using the KEYLESS-GO
locking/closing switch.
XMake sure you have the SmartKey with
KEYLESS-GO with you.
XPress KEYLESS-GO locking/closing
switch : briefly.
With all doors closed:
RThe locking knobs in the doors move
down.
RThe trunk lid starts to close
automatically.
RAll turn signal lamps flash three times to
confirm locking once the trunk has
closed completely.
RAn acoustic signal sounds three times.
RThe anti-theft alarm system is armed.
If the trunk lid comes into contact with an
object while closing, the closing procedure is
stopped and the trunk lid reopens slightly.
This will happen only while the trunk is in its
upper motion sequence. Check if luggage has
been piled too high, for example.
Trunk lid emergency release
The trunk lid can be opened from inside the
trunk with the emergency release button.
282Locking and unlockingControls in detail
221_AKB; 6; 20, en-USd2ugruen,Version: 2.11.8.12009-09-24T13:28:17+02:00 - Seite 282
Page 286 of 548

GWarning!
Only drive with the doors closed. Otherwise,
one or more of the doors could open while the
vehicle is in motion, putting you and/or
others at risk.
GWarning!
Make sure the trunk is closed when the engine
is running and while driving. Among other
dangers, deadly carbon monoxide (CO) gases
may enter vehicle interior resulting in
unconsciousness and death.
XPower closing assist for doors: Press the
doors gently past the initial engage position
into the lock.
XPower closing assist for trunk lid: Press
the trunk lid gently into its lock.
Starter switch positions
SmartKey
GObserve Safety notes, see page 56.
Starter switch
gFor removing SmartKey1Power supply for some electrical
consumers, e.g. wipers
2Ignition (power supply for all electrical
consumers) and driving position
3Starting position
When you switch on the ignition, all lamps in
the instrument cluster come on. The high-
beam headlamp indicator lamp and turn
signal indicator lamps will only come on if
activated. If a lamp in the instrument cluster
fails to come on when the ignition is switched
on, have it checked and replaced if necessary.
If a lamp in the instrument cluster remains on
after starting the engine or comes on while
driving, refer to “Lamps in instrument cluster”
(Y page 489).
XAlways remove the SmartKey from the
starter switch when the engine is not in
operation.
This will help to prevent accelerated vehicle
battery discharge or a completely
discharged vehicle battery.
If the SmartKey cannot be turned in the
starter switch, the vehicle battery may not be
sufficiently charged.
XCheck the vehicle battery and charge it if
necessary (Y page 514).
or
XGet a jump start (Y page 514).
iIf the SmartKey does not belong to the
vehicle, the SmartKey can be turned in the
starter switch. However, the ignition does
not switch on and the engine does not start.
KEYLESS-GO
GObserve Safety notes, see page 56.
Vehicles equipped with the KEYLESS-GO
feature are supplied with a SmartKey with
integrated KEYLESS-GO function and a
removable KEYLESS-GO start/stop button.
The KEYLESS-GO start/stop button must be
inserted in the starter switch and the
SmartKey present in the vehicle.
Pressing the KEYLESS-GO start/stop button
without depressing the brake pedal
corresponds to the various starter switch
positions (Y page 284).
Pressing the KEYLESS-GO start/stop button
with the brake pedal firmly depressed will
start the engine (Y page 311).
The KEYLESS-GO start/stop button can be
pulled out of the starter switch easily. You can
284Starter switch positionsControls in detail
221_AKB; 6; 20, en-USd2ugruen,Version: 2.11.8.12009-09-24T13:28:17+02:00 - Seite 284
Page 287 of 548

then insert the SmartKey into the starter
switch.
iThe KEYLESS-GO start/stop button does
not need to be removed from the starter
switch when you leave the vehicle.
However, always take the SmartKey with
you when you leave the vehicle. As long as
the SmartKey is in the vehicle, the vehicle’s
electrical systems can be switched on or
the engine can be started using the
KEYLESS-GO start/stop button.
:KEYLESS-GO start/stop button;Starter switchXInsert the KEYLESS-GO start/stop button
into the starter switch (if not inserted
already).
iAllow for 2 seconds until the system has
detected the KEYLESS-GO start/stop
button.
XMake sure the automatic transmission is in
park position P.
XDo not depress the brake pedal.
KEYLESS-GO start/stop button
=USA only?Canada only
Position 0
Before you press the KEYLESS-GO start/stop
button, the vehicle’s on-board electronics
have status 0 (as with SmartKey removed).
Position 1
XPress the KEYLESS-GO start/stop button
once.
This supplies power for some electrical
consumers, e.g. wipers.
iWhen you now open the driver’s door, the
power supply is switched off.
Ignition (or position 2)
XPress the KEYLESS-GO start/stop button
twice.
This supplies power for all electrical
consumers.
When you switch on the ignition, all lamps
in the instrument cluster come on. The
high-beam headlamp indicator lamp and
turn signal indicator lamps will only come
on if activated. If a lamp in the instrument
cluster fails to come on when the ignition
is switched on, have it checked and
replaced if necessary. If a lamp in the
instrument cluster remains on after
starting the engine or comes on while
driving, refer to “Lamps in instrument
cluster” (Y page 489).
Starter switch positions285Controls in detail221_AKB; 6; 20, en-USd2ugruen,Version: 2.11.8.12009-09-24T13:28:17+02:00 - Seite 285Z
Page 303 of 548
Vehicles without front fog lampsXSwitching on rear fog lamp: Pull out the
exterior lamp switch to its stop
(Y page 298).
The rear fog lamp and the yellow indicator
lamp R in the exterior lamp switch
come on.
XSwitching off rear fog lamp: Push in the
exterior lamp switch to its stop.
Locator lighting and night security
illumination
The locator lighting and night security
illumination are described in the COMAND
vehicle menu section under (Y page 208).
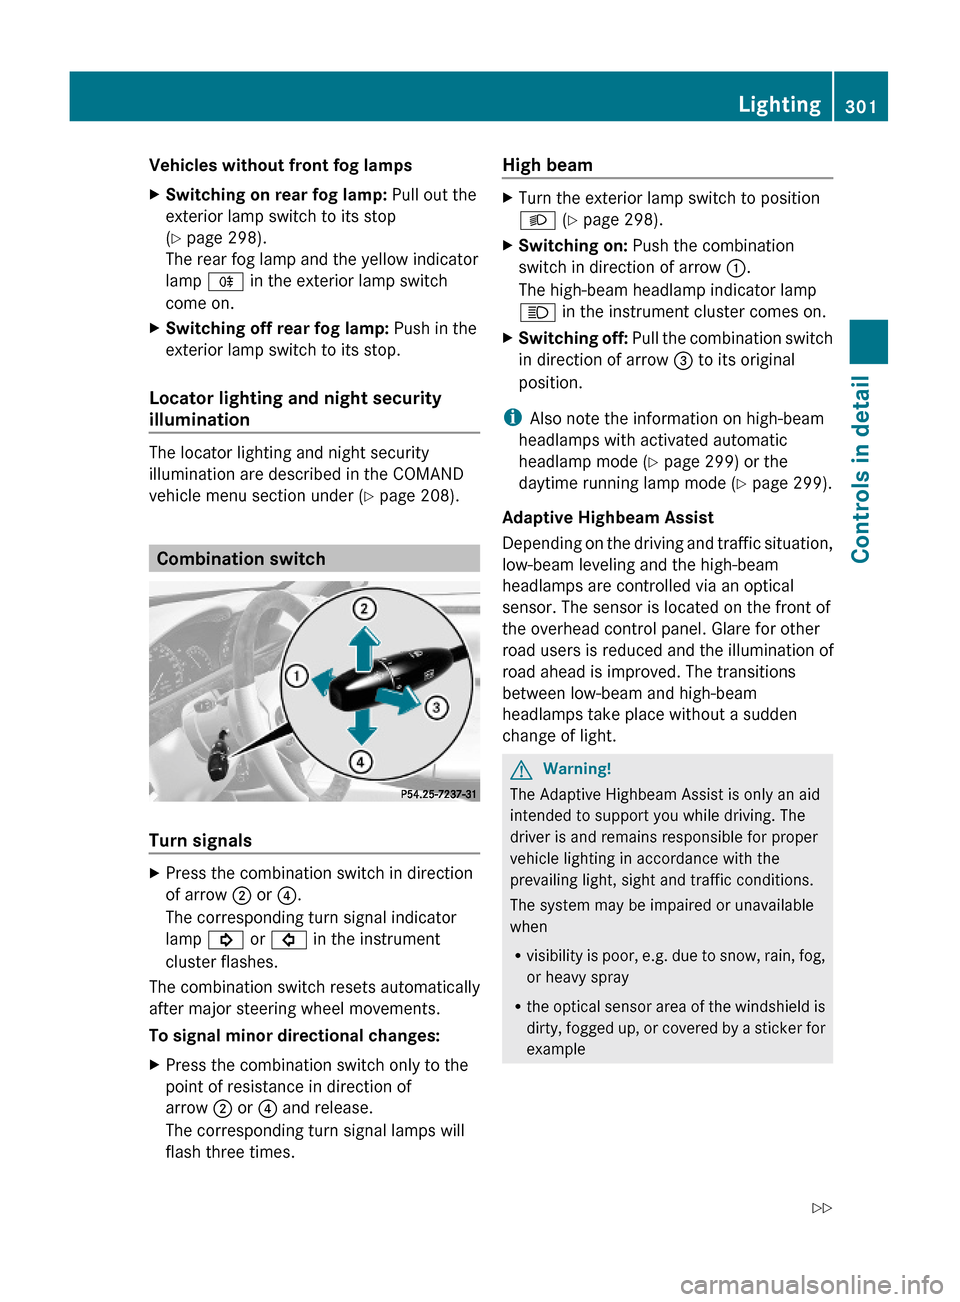
Combination switch
Turn signals
XPress the combination switch in direction
of arrow ; or ?.
The corresponding turn signal indicator
lamp ! or # in the instrument
cluster flashes.
The combination switch resets automatically
after major steering wheel movements.
To signal minor directional changes:
XPress the combination switch only to the
point of resistance in direction of
arrow ; or ? and release.
The corresponding turn signal lamps will
flash three times.
High beam XTurn the exterior lamp switch to position
L (Y page 298).
XSwitching on: Push the combination
switch in direction of arrow :.
The high-beam headlamp indicator lamp
K in the instrument cluster comes on.
XSwitching off: Pull the combination switch
in direction of arrow = to its original
position.
iAlso note the information on high-beam
headlamps with activated automatic
headlamp mode (Y page 299) or the
daytime running lamp mode (Y page 299).
Adaptive Highbeam Assist
Depending on the driving and traffic situation,
low-beam leveling and the high-beam
headlamps are controlled via an optical
sensor. The sensor is located on the front of
the overhead control panel. Glare for other
road users is reduced and the illumination of
road ahead is improved. The transitions
between low-beam and high-beam
headlamps take place without a sudden
change of light.
GWarning!
The Adaptive Highbeam Assist is only an aid
intended to support you while driving. The
driver is and remains responsible for proper
vehicle lighting in accordance with the
prevailing light, sight and traffic conditions.
The system may be impaired or unavailable
when
Rvisibility is poor, e.g. due to snow, rain, fog,
or heavy spray
Rthe optical sensor area of the windshield is
dirty, fogged up, or covered by a sticker for
example
Lighting301Controls in detail221_AKB; 6; 20, en-USd2ugruen,Version: 2.11.8.12009-09-24T13:28:17+02:00 - Seite 301Z
Page 304 of 548
The system cannot recognize the following
road users:
RRoad users without a lighting system of
their own, e.g. pedestrians
RRoad users with dim lighting of their own,
e.g. cyclists
RRoad users whose lighting is obstructed,
e.g. road users behind a guardrail
RIn some seldom cases, even road users with
a lighting system of their own may be
recognized too late or not at all.
The automatic high-beam headlamps will then
not be deactivated or it will be activated in
spite of preceding or oncoming road users.
This could endanger you and/or others and
cause an accident. Always pay close attention
to the traffic situation and switch off the high
beam manually if necessary.
XActivating: Enable the Adaptive
Highbeam Assist via the control system
(Y page 235).
XTurn the exterior lamp switch to position
c.
XPress the combination switch in direction
of arrow :.
The Adaptive Highbeam Assist
indicator _ in the multifunction display
comes on when switching on the low-beam
headlamps.
When driving faster than approximately
34 mph (55 km/h) and no other road users
are recognized, the high-beam headlamps
are switched on automatically. The high-
beam headlamp indicator lamp K in the
instrument cluster comes on additionally.
When driving slower than approximately
28 mph (45 km/h), other road users are
recognized, or the road is illuminated
sufficiently, the high-beam headlamps are
switched off automatically. The indicator
lamp K in the instrument cluster goes
out. The Adaptive Highbeam Assist
indicator _ in the multifunction display
remains on.
Adaptive control of the headlamp leveling
takes place at a speed of approximately
25 mph (40 km/h).
XDeactivating: Pull the combination switch
back to its initial position.
The Adaptive Highbeam Assist
indicator _ in the multifunction display
goes out.
High-beam flasher
XSwitching on: Pull the combination switch
briefly in direction of arrow =.
Hazard warning flasher
The hazard warning flasher can be switched
on at all times, even with the SmartKey
removed from the starter switch.
The hazard warning flasher comes on
automatically when an air bag deploys.
S 600 and S 65 AMG (USA only):
The hazard warning flasher comes on
automatically when you brake the vehicle
strongly at a speed of more than 50 mph
(70 km/h) and bring it to a complete stop.
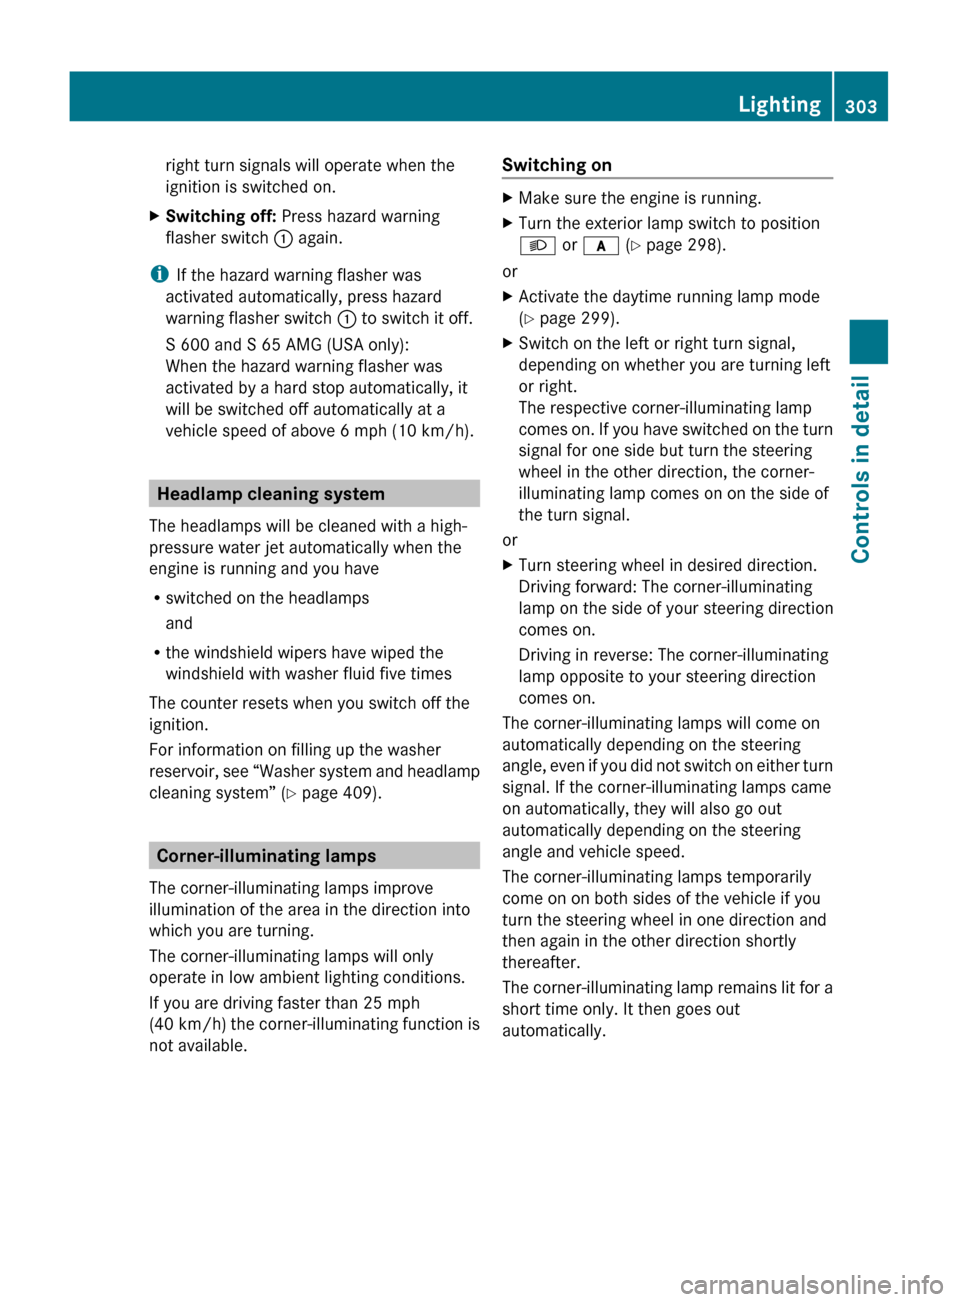
XSwitching on: Press hazard warning
flasher switch :.
All turn signal lamps are flashing.
iWith the hazard warning flasher activated
and the combination switch set for either
left or right turn, only the respective left or
302LightingControls in detail
221_AKB; 6; 20, en-USd2ugruen,Version: 2.11.8.12009-09-24T13:28:17+02:00 - Seite 302
Page 305 of 548
right turn signals will operate when the
ignition is switched on.XSwitching off: Press hazard warning
flasher switch : again.
i
If the hazard warning flasher was
activated automatically, press hazard
warning flasher switch : to switch it off.
S 600 and S 65 AMG (USA only):
When the hazard warning flasher was
activated by a hard stop automatically, it
will be switched off automatically at a
vehicle speed of above 6 mph (10 km/h).
Headlamp cleaning system
The headlamps will be cleaned with a high-
pressure water jet automatically when the
engine is running and you have
R switched on the headlamps
and
R the windshield wipers have wiped the
windshield with washer fluid five times
The counter resets when you switch off the
ignition.
For information on filling up the washer
reservoir, see “Washer system and headlamp
cleaning system” ( Y page 409).
Corner-illuminating lamps
The corner-illuminating lamps improve
illumination of the area in the direction into
which you are turning.
The corner-illuminating lamps will only
operate in low ambient lighting conditions.
If you are driving faster than 25 mph
(40 km/h) the corner-illuminating function is
not available.
Switching onXMake sure the engine is running.XTurn the exterior lamp switch to position
L or c (Y page 298).
or
XActivate the daytime running lamp mode
( Y page 299).XSwitch on the left or right turn signal,
depending on whether you are turning left
or right.
The respective corner-illuminating lamp
comes on. If you have switched on the turn
signal for one side but turn the steering
wheel in the other direction, the corner-
illuminating lamp comes on on the side of
the turn signal.
or
XTurn steering wheel in desired direction.
Driving forward: The corner-illuminating
lamp on the side of your steering direction
comes on.
Driving in reverse: The corner-illuminating
lamp opposite to your steering direction
comes on.
The corner-illuminating lamps will come on
automatically depending on the steering
angle, even if you did not switch on either turn
signal. If the corner-illuminating lamps came
on automatically, they will also go out
automatically depending on the steering
angle and vehicle speed.
The corner-illuminating lamps temporarily
come on on both sides of the vehicle if you
turn the steering wheel in one direction and
then again in the other direction shortly
thereafter.
The corner-illuminating lamp remains lit for a
short time only. It then goes out
automatically.
Lighting303Controls in detail221_AKB; 6; 20, en-USd2ugruen,Version: 2.11.8.12009-09-24T13:28:17+02:00 - Seite 303Z