2010 MERCEDES-BENZ S600 navigation system
[x] Cancel search: navigation systemPage 82 of 548
SymbolHow to use the COMAND
controller
ZVÆXSlide
Rto move through vertical
menus
Rto exit horizontal menus
XSlide and hold
Rto move through a navigation
map
XVYXSlide
Rto move through horizontal
menus
Rto exit vertical menus
XSlide and hold
Rfor fast forward or reverse for
audio CD or audio DVD
playback
Rto move through a navigation
map
aVbXSlide and hold
Rto move through a navigation
map
USB socket
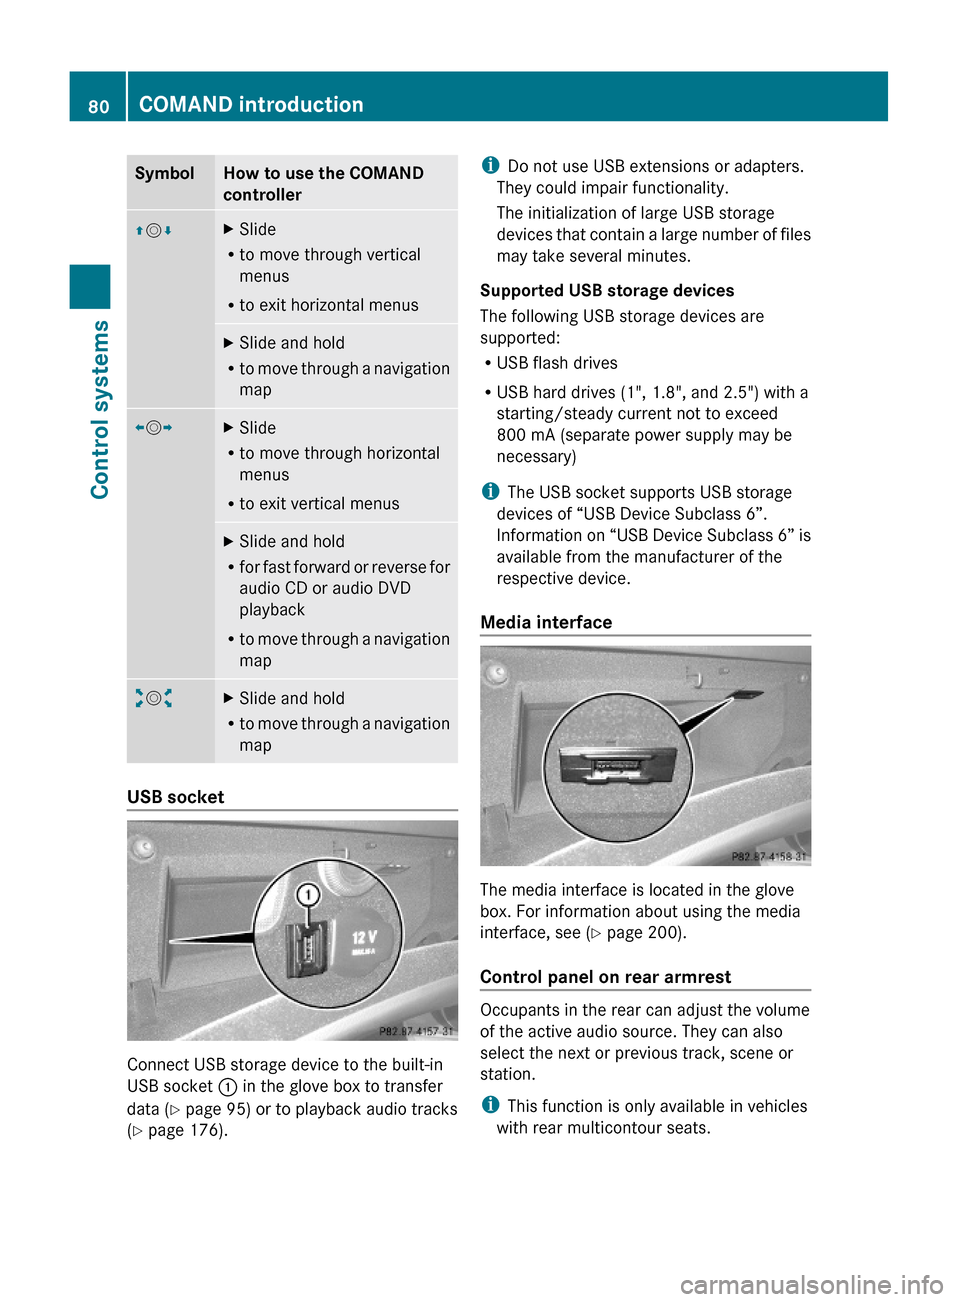
Connect USB storage device to the built-in
USB socket : in the glove box to transfer
data (Y page 95) or to playback audio tracks
(Y page 176).
iDo not use USB extensions or adapters.
They could impair functionality.
The initialization of large USB storage
devices that contain a large number of files
may take several minutes.
Supported USB storage devices
The following USB storage devices are
supported:
RUSB flash drives
RUSB hard drives (1", 1.8", and 2.5") with a
starting/steady current not to exceed
800 mA (separate power supply may be
necessary)
iThe USB socket supports USB storage
devices of “USB Device Subclass 6”.
Information on “USB Device Subclass 6” is
available from the manufacturer of the
respective device.
Media interface
The media interface is located in the glove
box. For information about using the media
interface, see (Y page 200).
Control panel on rear armrest
Occupants in the rear can adjust the volume
of the active audio source. They can also
select the next or previous track, scene or
station.
iThis function is only available in vehicles
with rear multicontour seats.
80COMAND introductionControl systems
221_AKB; 6; 20, en-USd2ugruen,Version: 2.11.8.12009-09-24T13:28:17+02:00 - Seite 80
Page 88 of 548
When selecting that main function once
more, the Audio main menu opens.
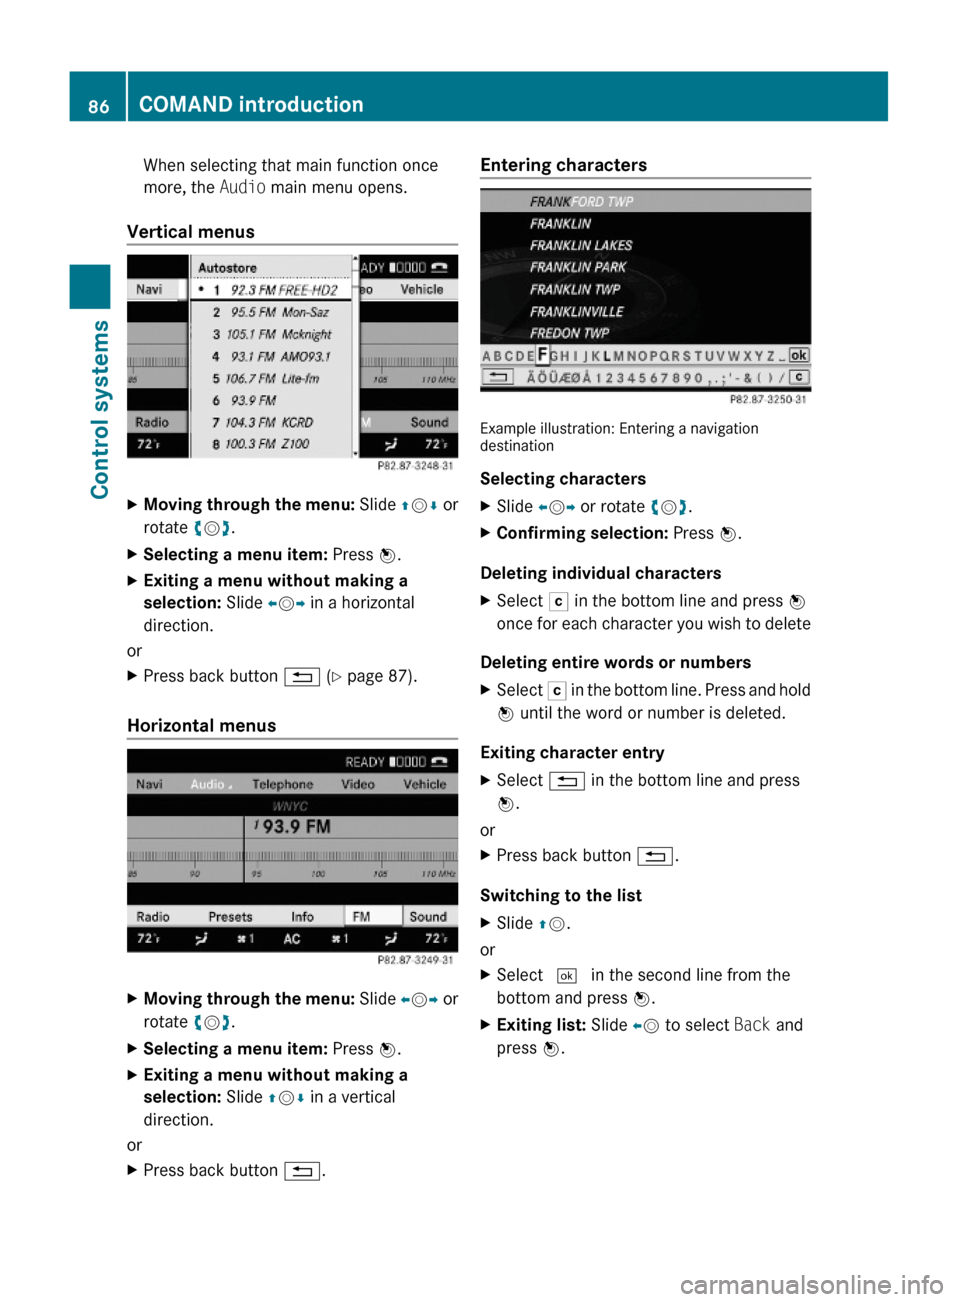
Vertical menus
XMoving through the menu: Slide ZVÆ or
rotate cVd.
XSelecting a menu item: Press W.XExiting a menu without making a
selection: Slide XVY in a horizontal
direction.
or
XPress back button % (Y page 87).
Horizontal menus
XMoving through the menu: Slide XVY or
rotate cVd.
XSelecting a menu item: Press W.XExiting a menu without making a
selection: Slide ZVÆ in a vertical
direction.
or
XPress back button %.Entering characters
Example illustration: Entering a navigationdestination
Selecting characters
XSlide XVY or rotate cVd.XConfirming selection: Press W.
Deleting individual characters
XSelect F in the bottom line and press W
once for each character you wish to delete
Deleting entire words or numbers
XSelect F in the bottom line. Press and hold
W until the word or number is deleted.
Exiting character entry
XSelect % in the bottom line and press
W.
or
XPress back button %.
Switching to the list
XSlide ZV.
or
XSelect ¬ in the second line from the
bottom and press W.
XExiting list: Slide XV to select Back and
press W.
86COMAND introductionControl systems
221_AKB; 6; 20, en-USd2ugruen,Version: 2.11.8.12009-09-24T13:28:17+02:00 - Seite 86
Page 89 of 548
Accepting first entryXPress W until you exit the character entry
window.
COMAND completes your entry as soon as
it can be clearly identified. In this case, you
do not need to switch to the list.
Selecting list item
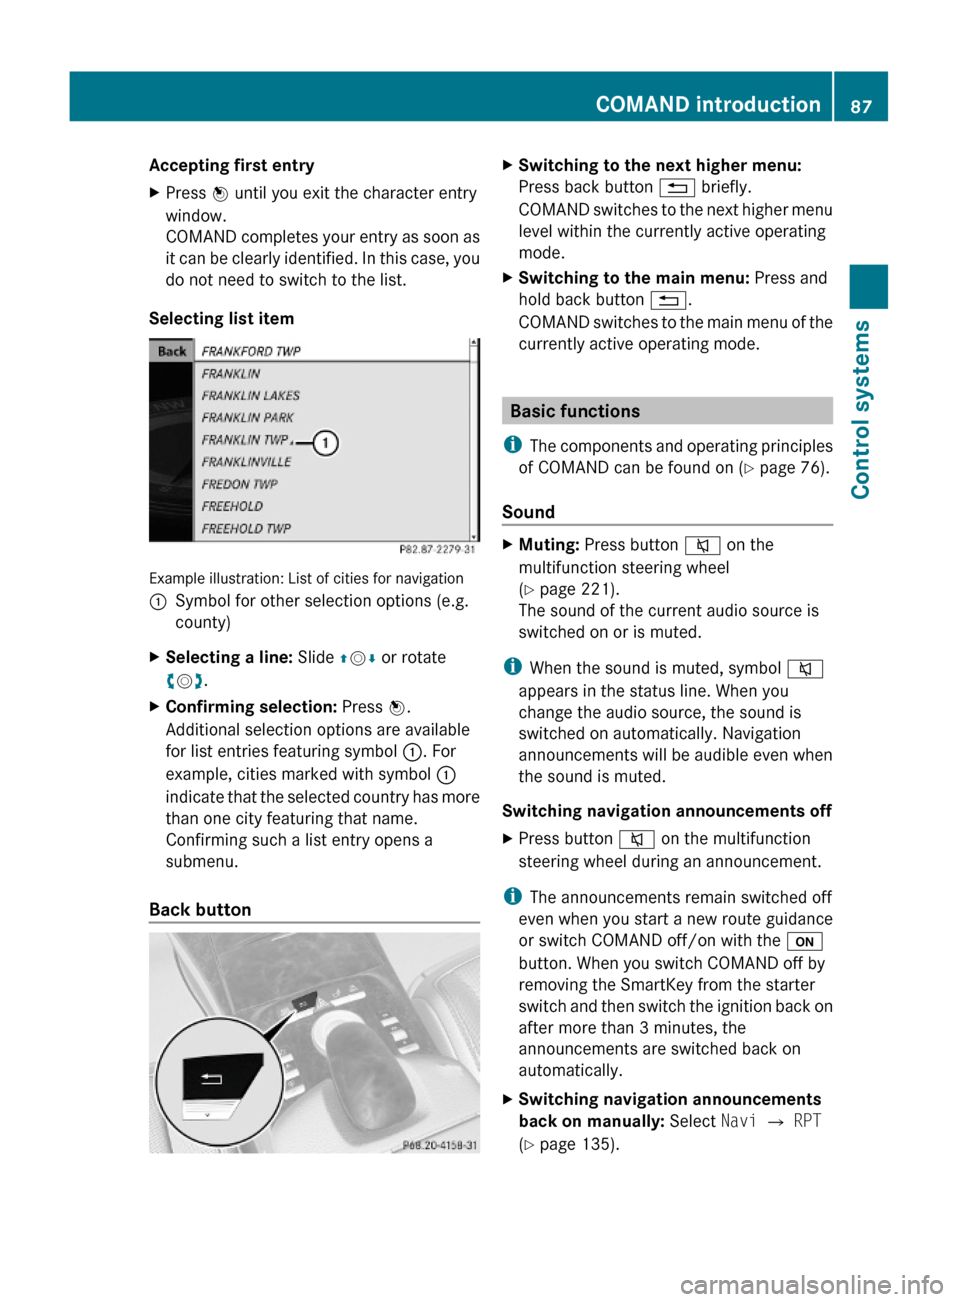
Example illustration: List of cities for navigation
:Symbol for other selection options (e.g.
county)
XSelecting a line: Slide ZVÆ or rotate
cVd.
XConfirming selection: Press W.
Additional selection options are available
for list entries featuring symbol :. For
example, cities marked with symbol :
indicate that the selected country has more
than one city featuring that name.
Confirming such a list entry opens a
submenu.
Back button
XSwitching to the next higher menu:
Press back button % briefly.
COMAND switches to the next higher menu
level within the currently active operating
mode.
XSwitching to the main menu: Press and
hold back button %.
COMAND switches to the main menu of the
currently active operating mode.
Basic functions
iThe components and operating principles
of COMAND can be found on (Y page 76).
Sound
XMuting: Press button 8 on the
multifunction steering wheel
(Y page 221).
The sound of the current audio source is
switched on or is muted.
iWhen the sound is muted, symbol 8
appears in the status line. When you
change the audio source, the sound is
switched on automatically. Navigation
announcements will be audible even when
the sound is muted.
Switching navigation announcements off
XPress button 8 on the multifunction
steering wheel during an announcement.
iThe announcements remain switched off
even when you start a new route guidance
or switch COMAND off/on with the u
button. When you switch COMAND off by
removing the SmartKey from the starter
switch and then switch the ignition back on
after more than 3 minutes, the
announcements are switched back on
automatically.
XSwitching navigation announcements
back on manually: Select Navi Q RPT
(Y page 135).
COMAND introduction87Control systems221_AKB; 6; 20, en-USd2ugruen,Version: 2.11.8.12009-09-24T13:28:17+02:00 - Seite 87Z
Page 90 of 548
Adjusting volumeXAdjusting: Turn thumbwheel H.
or
XPress button W or X on the
multifunction steering wheel.
iVehicles with rear multicontour seats:
Occupants in the rear can also adjust the
volume using the buttons on the rear
armrest (Y page 80).
Volume of navigation announcements
You can adjust the volume of navigation
announcements independently of the
respective audio source volume.
During a navigation announcement:
XTurn thumbwheel H.
or
XPress button W or X on the
multifunction steering wheel.
You can recall a navigation announcement
manually.
XSelect Navi Q RPT.
Adjusting volume for telephone calls
In hands-free mode, you can adjust the
volume of a telephone call while the call is
active.
During a telephone call:
XTurn thumbwheel H.
or
XPress button W or X on the
multifunction steering wheel.
Selecting sound settings
You can select different bass and treble
settings for the individual audio and video
sources. The respective sound menu can be
found via the submenu for which you wish to
make settings.
Example: Audio Q FM/AM Radio Q Sound
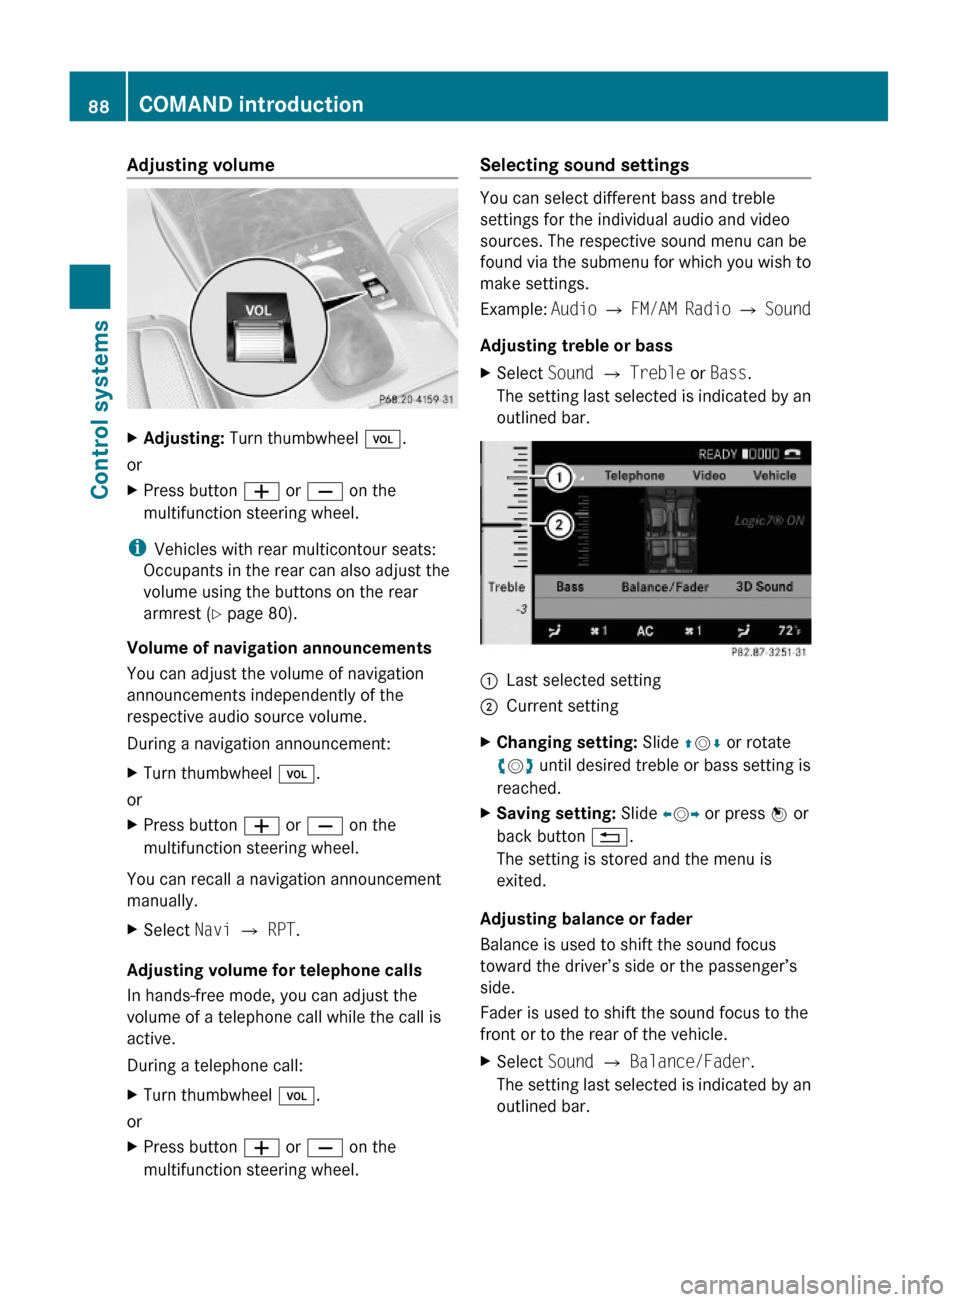
Adjusting treble or bass
XSelect Sound Q Treble or Bass.
The setting last selected is indicated by an
outlined bar.
:Last selected setting;Current settingXChanging setting: Slide ZVÆ or rotate
cVd until desired treble or bass setting is
reached.
XSaving setting: Slide XVY or press W or
back button %.
The setting is stored and the menu is
exited.
Adjusting balance or fader
Balance is used to shift the sound focus
toward the driver’s side or the passenger’s
side.
Fader is used to shift the sound focus to the
front or to the rear of the vehicle.
XSelect Sound Q Balance/Fader.
The setting last selected is indicated by an
outlined bar.
88COMAND introductionControl systems
221_AKB; 6; 20, en-USd2ugruen,Version: 2.11.8.12009-09-24T13:28:17+02:00 - Seite 88
Page 92 of 548
R3-D sound does not work for mono-signal
sources, such as on analog AM radio or
in Weather Band.
R In the event of poor radio reception
quality, e.g. inside a tunnel, you should
switch off Logic 7 ®
, as a dynamic switch
from Stereo to Mono could occur,
resulting in temporary sound distortion.
R With some stereo recordings, the
resulting sound may deviate from
conventional stereo playback.
Switching the audio/video source off/
on
i When you load a CD or DVD, the audio or
video source is activated automatically.
Active audio source
XSwitching off: Select Audio Q Audio
OFF .
Playback is paused and the audio source is
switched off; Audio OFF appears in the
COMAND display.XSwitching on: Select Audio, then the
desired audio source.
or
XLoad a CD/DVD ( Y page 179) or an SD
card ( Y page 180).
or
XConnect a USB storage device
( Y page 80) or media interface device
( Y page 200) to COMAND.
Active video source
XSwitching off: Select Video Q Video
OFF .
The audio source is switched off; Video
OFF appears in the COMAND display.XSwitching on: Select Video, then the
desired video source.
or
XLoad a DVD ( Y page 179).SPLITVIEW
SPLITVIEW enables the driver and front
passenger to use separate COMAND
functions at the same time. Two different
displays appear in the COMAND screen. For
example, a Navigation display is only viewable
form the driver’s seat while a DVD Video
display is only viewable from the front
passenger’s seat.
COMAND is operated via SPLITVIEW from the
front passenger seat using the SPLITVIEW
remote control and the special wireless,
infrared headphone. You may also use a wired
headphone via the 3.5 mm socket in the front
passenger footwell.
For information about using the remote
control, see ( Y page 81).
For information about using the headphone,
see ( Y page 82).
Depending on the production date of your
vehicle, it may be equipped with SPLITVIEW.
At the time of this printing, the use of
SPLITVIEW is NOT allowed in the following US
states (AL, AZ, CO, IL, LA, MA, MD, NH, PA,
VA, VT, WA, WI, and WV) or Canadian
provinces (Manitoba, Newfoundland, New
Brunswick, and Prince Edward Island).
SPLITVIEW must NOT be operated in these
states or provinces. The driver is responsible
for observing ALL local statutory provisions.
If your vehicle is registered in a non-approved
state or province, then the feature will need
to be deactivated. Contact your authorized
Mercedes-Benz dealer to verify if SPLITVIEW
is allowed in your state or province.
Notes
R The audio volume of the wireless
headphone for the front passenger side
must be adjusted on the headphone
directly. The audio volume of a wired
headphone can be adjusted via the remote
90COMAND introductionControl systems
221_AKB; 6; 20, en-USd2ugruen,Version: 2.11.8.12009-09-24T13:28:17+02:00 - Seite 90
Page 94 of 548

RBluetooth Q Search for Bluetooth
Devices, Bluetooth activated. For
information on the Bluetooth® interface
see (Y page 151).
RUpload/Download Data Q Copy Data
to Storage Medium, Import Data from
Storage Medium (Y page 95)
RReset: Resetting the COMAND system to
factory settings
Display settings
Switching the display on or off
XSwitching off: Select Vehicle Q
Display OFF.
XSwitching back on: Rotate cVd or slide
ZVÆ, XVY or press W.
or
XPress button u.
Setting the display design
XSelect Vehicle Q System Q Display.XSelect Day Mode, Night Mode or
Automatic.
iIn the Automatic setting, COMAND sets
the display design automatically. The
setting depends on the information
retrieved from the vehicle's light sensor.
Time settings
The time of day is set automatically according
to the GPS signal and the selected time zone.
All time information always applies to the
local time at the current vehicle position.
Time information changes when entering a
different time zone.
iThe correct time zone, daylight savings
time/standard time and the time itself
must be set for the following navigation
system functions to operate correctly:
RRoute guidance on routes with time-
dependent traffic guidance
RCalculation of estimated arrival time
The settings are adopted for the analog
clock in the dashboard.
Change the settings in the following order:
1. Time zone
2. Daylight savings time/standard time
3. Time lag (only necessary in exceptional
cases)
Setting the time zone and switching
between daylight savings time and
standard time
XSetting time zone: Select Vehicle Q
System Q Time Q Time Zone.
The country list appears. The dot # in front
of a list entry indicates the current setting.
XSelect the country in which you are.
A time zone list may also be displayed,
depending on the selected country.
XSelect the desired time zone.
Subsequent operation depends on
Rwhether your navigation system has GPS
reception
Rwhich country you have set previously
You may either switch between Daylight
Savings Time (Summer) and Standard
Time.
92COMAND system settings Control systems
221_AKB; 6; 20, en-USd2ugruen,Version: 2.11.8.12009-09-24T13:28:17+02:00 - Seite 92
Page 96 of 548
If you select Yes, the second part begins.
Individualization is completed at the end of
the second part. You will see a message to
this effect. The data from the second part is
saved automatically.
Canceling during the first or second part
of individualization
XSelect Cancel.
A prompt appears asking whether you
really do want to cancel.
XSelect Yes or No.
If you select Yes, individualization will be
canceled. The data from the part at which
you exited is not saved.
If you select No, the part at which you
stopped begins again.
Deleting existing individualization data
XSelect Vehicle Q System Q Voice
Control Q Delete
Individualization.
A prompt appears asking whether you
really do want to delete.
XSelect Yes or No.
The individualization data will either be
deleted or not, depending on your
selection.
Setting the system language
XSelect Vehicle Q System Q
Language.
The language list appears. A dot #
indicates the current setting.
XChanging setting: Select the desired
language.
The language is set.
iFor some system languages, the
navigation announcements are made in
English (Y page 135).
Assigning the favorite button
You can assign the following predefined
functions to favorite button g:
RDriver's Seat Massage (Y page 219)
You can switch the massage function for
the driver’s seat on or off.
RFront Passenger Seat Massage
(Y page 219)
You can switch the massage function for
the passenger seat on or off.
RDriver and Front Passenger Seat
Massage (Y page 219)
You can switch the massage function for
the driver’s and passenger seat on or off.
RDisplay OFF (Y page 92)
You can use the favorite button to switch
the COMAND display on or off.
RRepeat Navigation Command
(Y page 135)
When route guidance is activated, you can
use the favorite button to generate or call
up a current navigation announcement.
XSelect Vehicle Q System Q
Favorites Button *.
The list of predefined functions appears.
The dot # in front of the list entry indicates
the current setting.
XChanging setting: Rotate cVd and select
desired function.
XSaving setting and exiting the menu:
Press W.
94COMAND system settings Control systems
221_AKB; 6; 20, en-USd2ugruen,Version: 2.11.8.12009-09-24T13:28:17+02:00 - Seite 94
Page 97 of 548
Upload/Download of Data
This function lets you transfer COMAND data
to a memory card or a USB storage device and
vice versa.
The following COMAND data can be
transferred:
R Navigation destination memory and last
destination
R Address book entries
R Audio/Video presets memory
R System settings
i You can use this function, for example, to
save your COMAND data and transfer them
to another vehicle.XInsert an SD card into the SD card slot
( Y page 180) or connect a USB storage
device to the built-in USB socket in the
glove box (Y page 80). The USB jack of the
optional media interface is not intended for
this purpose.XSelect Vehicle Q System Q Upload/
Download Data .XDownload: Select Copy Data to
Storage Medium Q On the Memory
Card or On USB .XSelect Start Copying .XUpload: Select Import Data from
Storage Medium Q From Memory Card
or From USB .XSelect Start Data Import .XExiting menu without data transfer:
Select Back.
Reset
i You can reset COMAND back to its
factory settings.
Among other things, all personal data are
deleted, for example
R the address book entries
R the entries in the destination memory
R the list of last destinations of the
navigation systemXSelect Vehicle Q System Q Reset .
A prompt appears asking whether you
really want to reset.XSelect Yes or No.
If you select Yes another prompt will
appear asking whether you really want to
reset.XSelect Yes or No.
If you select Yes, COMAND will be reset
and restarted.
COMAND navigation (introduction)
Safety notes
GWarning!
For safety reasons, only enter a destination
when the vehicle is stationary. When the
vehicle is in motion, a passenger should enter
the destination. Study manual and select
route before driving.
Bear in mind that at a speed of just 30 mph
(approximately 50 km/h), your vehicle is
covering a distance of 44 feet (approximately
14 m) every second.
COMAND calculates the route to the
destination without taking account of the
following, for example:
R Traffic lights
R Stop and right-of-way signs
R Parking or stopping in prohibited areas
R Lane merging
R Other road and traffic rules and regulations
R Narrow bridges
COMAND navigation (introduction)95Control systems221_AKB; 6; 20, en-USd2ugruen,Version: 2.11.8.12009-09-24T13:28:17+02:00 - Seite 95Z