2010 MERCEDES-BENZ S600 clock
[x] Cancel search: clockPage 360 of 548

and cannot check the function of the Night
View Assist Plus.
Image on multifunction display
When you switch on the Night View Assist
Plus, the dial for the speedometer changes on
the multifunction display. The speedometer
dial is shown as a bar on the lower edge of
the multifunction display. The line for main
menus is no longer available. If you would like
to change a setting using the steering wheel
buttons, you must first switch off the Night
View Assist Plus.
Pedestrian detection
The Night View Assist Plus detects
pedestrians by means of specific
characteristics, e.g. a human silhouette.
Pedestrian detection is activated when
Rthe Night View Assist Plus is switched on
Rthe vehicle speed is above approximately
6 mph (10 km/h)
Rdriving in darkness, e.g. on highways
without road lighting
:Night View Assist Plus image;Detected pedestrian=Frame?Symbol for active pedestrian detectionASpeedometer dial
When pedestrian detection is active,
symbol ? appears in the Night View Assist
Plus image. Once a pedestrian is detected,
that pedestrian is highlighted by frame =.
When you have been made aware of a
pedestrian, assess the situation by looking
through the windshield. The actual distance
between your vehicle and objects or
pedestrians cannot be assessed properly via
a screen display.
Other objects apart from pedestrians may
also be highlighted.
GWarning!
The pedestrian detection may be impaired or
unavailable when
Rpedestrians are obstructed fully or in part
by other objects such as parking vehicles
Rthe silhouette in the Night View Assist Plus
image is displayed incomplete or
interrupted, e.g. by significant light
reflection
Ra pedestrian’s silhouette is not rich enough
in contrast compared to the background
Rpedestrians are not in erected position but,
for example, sit, crouch down, or lie
iAnimals cannot be detected.
Adjusting instrument cluster illumination
If you change the brightness of the
instrument cluster while the Night View
Assist Plus is switched on, only the brightness
of the multifunction display is changed.
XMake sure the Night View Assist Plus is
switched on.
XBrightening illumination: Turn knob :
clockwise.
358Driving systemsControls in detail
221_AKB; 6; 20, en-USd2ugruen,Version: 2.11.8.12009-09-24T13:28:17+02:00 - Seite 358
Page 361 of 548
XDimming illumination: Turn knob :
counterclockwise.
Dirty or fogged-up windshield
The Night View Assist Plus image is
diminished when the windshield in front of the
camera is
R dirty
R fogged up on the outside
R fogged up on the inside
GWarning!
Please do not forget that your primary
responsibility is to drive the vehicle. A driver’s
attention to the road must always be his/her
primary focus when driving. For your safety
and the safety of others, stop before trying to
remove window fogging or cleaning the
windshield in front of the Night View Assist
Plus camera.
Bear in mind that at a speed of just 30 mph
(approximately 50 km/h), your vehicle is
covering a distance of 44 feet
(approximately 14 m) every second.
XRemoving condensation: Check settings
of the climate control and change them, if
necessary ( Y page 363).XSwing the camera cover downward
( Y page 444).XCleaning inside of windshield: Use a soft,
non-scratching cloth ( Y page 444).
Blind Spot Assist
The Blind Spot Assist uses radar sensors to
monitor the area on both sides of your
vehicle. It will assist you when you change
lanes driving at speeds of above 20 mph
(30 km/h). A red warning lamp will come on
in the exterior rear view mirror as soon as
another vehicle is detected. If you then
activate the corresponding turn signals to
change lanes, the red warning lamp flashes
and warning sounds (collision warning). The
Blind Spot Assist operates using sensors in
the rear bumper.GWarning!
The Blind Spot Assist is only a driving aid and
may not detect all vehicles.
The Blind Spot Assist may not be able to
detect narrow vehicles such as motorcycles
or bicycles, or it may not detect them until it
is too late.
The monitoring function may be impaired if
your sensors are dirty, subject to heavy spray,
or if visibility is poor due to e.g. snow, rain, or
fog. This can result in vehicles not being
detected or being detected too late.
The Blind Spot Assist cannot detect road,
traffic and weather conditions.
It is the driver’s responsibility at all times to
be attentive to road, weather and traffic
conditions and to provide the steering,
braking and other driving inputs necessary to
retain control of the vehicle. Failure to do so
could result in recognizing dangers too late,
possibly resulting in an accident and serious
injury to yourself and others.
In order for the Blind Spot Assist to function,
the radar sensors must be switched on and
operational.
When traveling in Canada in a vehicle not
registered in Canada, you must switch off the
radar sensor system ( Y page 236). Canadian
law does not permit the use of the radar
sensor system for vehicles from outside of
Canada. When you switch off the radar sensor
system, the following functions are
deactivated:
R Blind Spot Assist
R BAS PLUS ( Y page 64)
R PRE-SAFE ®
Brake ( Y page 69)
R DISTRONIC PLUS ( Y page 330)
i USA only:
This device has been approved by the FCC
as a “Vehicular Radar System”. The radar
Driving systems359Controls in detail221_AKB; 6; 20, en-USd2ugruen,Version: 2.11.8.12009-09-24T13:28:17+02:00 - Seite 359Z
Page 371 of 548
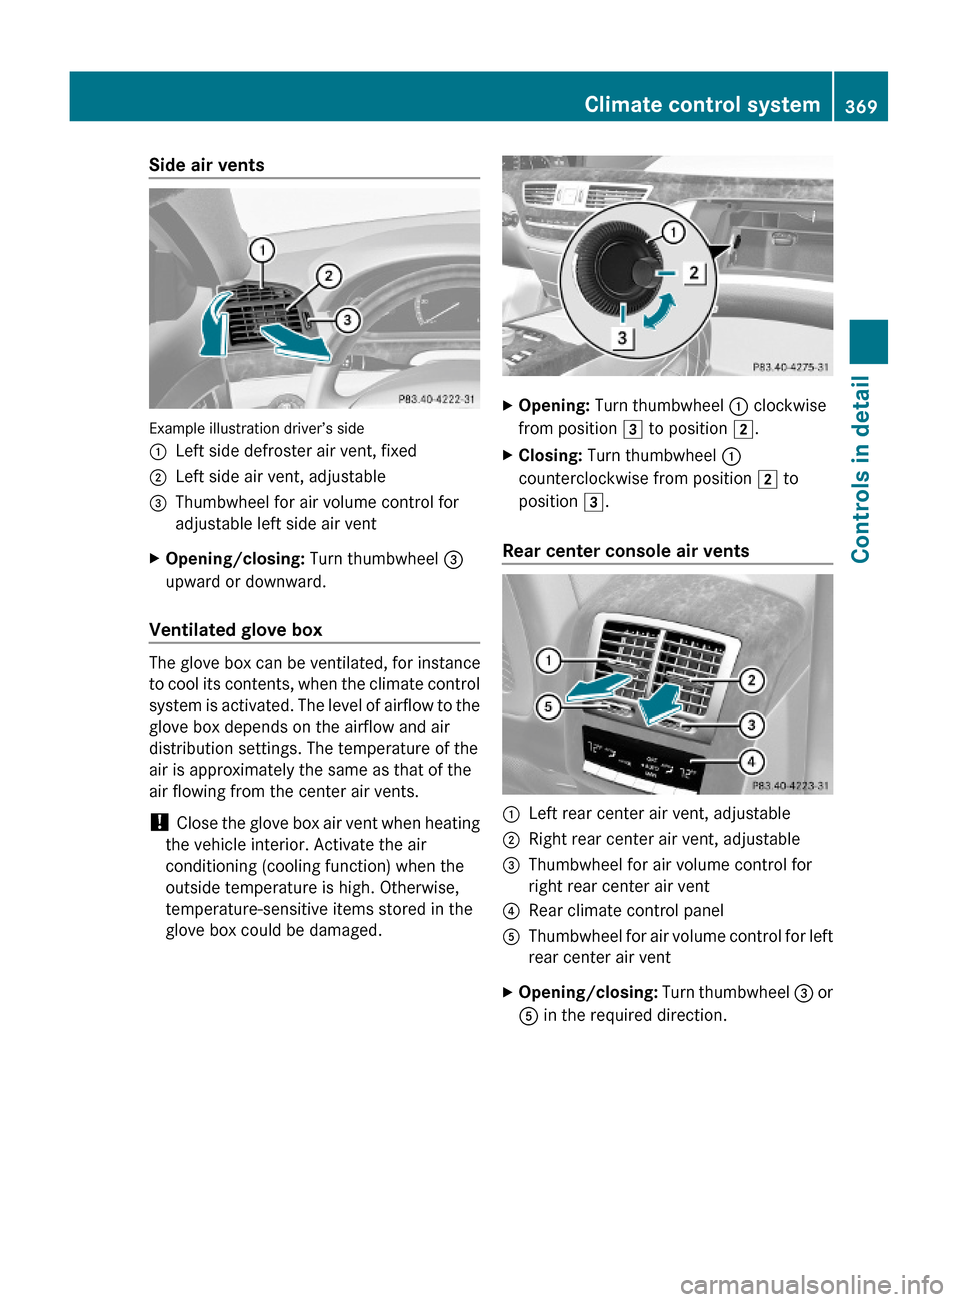
Side air vents
Example illustration driver’s side
:Left side defroster air vent, fixed;Left side air vent, adjustable=Thumbwheel for air volume control for
adjustable left side air vent
XOpening/closing: Turn thumbwheel =
upward or downward.
Ventilated glove box
The glove box can be ventilated, for instance
to cool its contents, when the climate control
system is activated. The level of airflow to the
glove box depends on the airflow and air
distribution settings. The temperature of the
air is approximately the same as that of the
air flowing from the center air vents.
! Close the glove box air vent when heating
the vehicle interior. Activate the air
conditioning (cooling function) when the
outside temperature is high. Otherwise,
temperature-sensitive items stored in the
glove box could be damaged.
XOpening: Turn thumbwheel : clockwise
from position 3 to position 2.
XClosing: Turn thumbwheel :
counterclockwise from position 2 to
position 3.
Rear center console air vents
:Left rear center air vent, adjustable;Right rear center air vent, adjustable=Thumbwheel for air volume control for
right rear center air vent
?Rear climate control panelAThumbwheel for air volume control for left
rear center air vent
XOpening/closing: Turn thumbwheel = or
A in the required direction.
Climate control system369Controls in detail221_AKB; 6; 20, en-USd2ugruen,Version: 2.11.8.12009-09-24T13:28:17+02:00 - Seite 369Z
Page 405 of 548

Mercedes-Benz Center to have the fuel
system drained completely.
! To prevent damage to the catalytic
converters, only use premium unleaded
gasoline in this vehicle.
Any noticeable irregularities in engine
operation should be repaired promptly.
Otherwise, excessive unburned fuel may
reach the catalytic converter, causing it to
overheat and potentially start a fire.
i Only use premium unleaded gasoline with
a minimum Posted Octane Rating of 91
(average of 96 RON/86 MON).
Information on gasoline quality can
normally be found on the fuel pump. Please
contact gas station personnel in case
labels on the pump cannot be found.
For more information on gasoline, see
“Premium unleaded gasoline”
(Y page 541), see “Fuel requirements”
(Y page 541), or contact an authorized
Mercedes-Benz Center, or visit
www.mbusa.com (USA only).
Locking/unlocking the vehicle with the
SmartKey or KEYLESS-GO automatically
locks/unlocks the fuel filler flap.
iIn case the central locking system does
not release the fuel filler flap, or the
opening mechanism is clamping, contact
Roadside Assistance or an authorized
Mercedes-Benz Center.
The fuel filler flap is located on the right-hand
side of the vehicle towards the rear.
XTurn off the engine.
iLeaving the engine running and the fuel
filler cap open can cause the yellow engine
malfunction indicator lamp ; to
illuminate.
For more information, see also “Practical
hints” (Y page 496).
XRemove the SmartKey from the starter
switch.
KEYLESS-GO: Open the driver’s door. This
puts the starter switch in position 0, same
as with the SmartKey removed from the
starter switch. The driver’s door then can
be closed again.
XOpening: Press fuel filler flap : at the
point indicated by the arrow.
XTurn fuel filler cap ; counterclockwise.XTake off fuel filler cap ;.XPlace fuel filler cap ; in direction of arrow
into holder =.
XFully insert filler nozzle unit and refuel.XOnly fill your tank until the filler nozzle unit
cuts out – do not top off or overfill.
XClosing: Turn fuel filler cap ; clockwise
until it audibly engages.
iClose the fuel filler flap before locking the
vehicle. Otherwise the flap locking pin will
prevent closing the fuel filler flap.
XClose fuel filler flap :.
Check regularly and before a long trip
For information on quantities and
requirements of operating agents, see “Fuels,
coolants, lubricants, etc.” (Y page 537).
Check the following:
REngine oil level (Y page 405)
RTire inflation pressure (Y page 413)
RCoolant level (Y page 408)
RVehicle lighting (Y page 504)
At the gas station403Operation221_AKB; 6; 20, en-USd2ugruen,Version: 2.11.8.12009-09-24T13:28:17+02:00 - Seite 403Z
Page 410 of 548
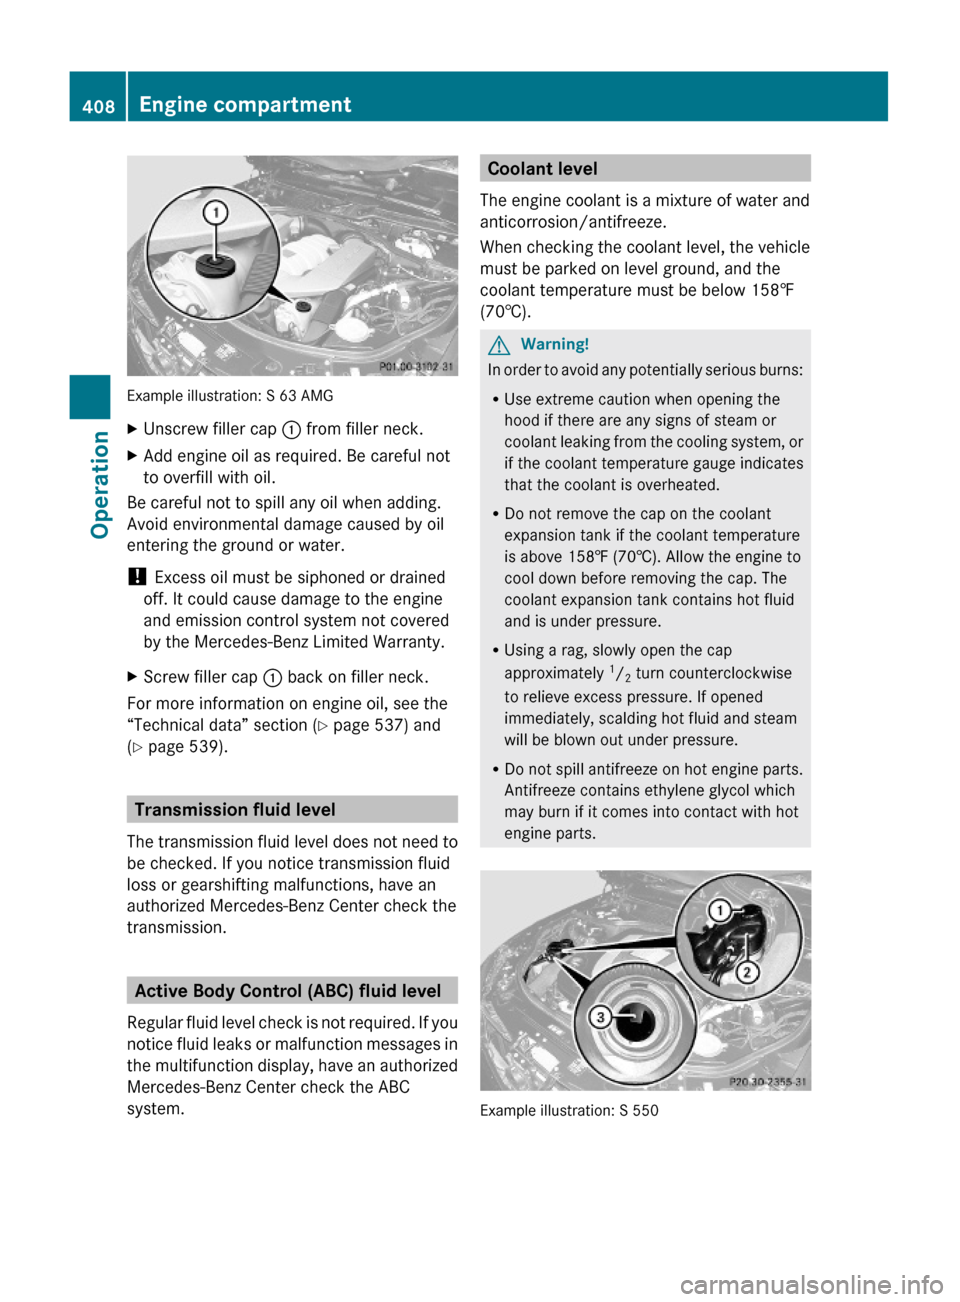
Example illustration: S 63 AMG
XUnscrew filler cap : from filler neck.XAdd engine oil as required. Be careful not
to overfill with oil.
Be careful not to spill any oil when adding.
Avoid environmental damage caused by oil
entering the ground or water.
! Excess oil must be siphoned or drained
off. It could cause damage to the engine
and emission control system not covered
by the Mercedes-Benz Limited Warranty.
XScrew filler cap : back on filler neck.
For more information on engine oil, see the
“Technical data” section (Y page 537) and
(Y page 539).
Transmission fluid level
The transmission fluid level does not need to
be checked. If you notice transmission fluid
loss or gearshifting malfunctions, have an
authorized Mercedes-Benz Center check the
transmission.
Active Body Control (ABC) fluid level
Regular fluid level check is not required. If you
notice fluid leaks or malfunction messages in
the multifunction display, have an authorized
Mercedes-Benz Center check the ABC
system.
Coolant level
The engine coolant is a mixture of water and
anticorrosion/antifreeze.
When checking the coolant level, the vehicle
must be parked on level ground, and the
coolant temperature must be below 158‡
(70†).
GWarning!
In order to avoid any potentially serious burns:
RUse extreme caution when opening the
hood if there are any signs of steam or
coolant leaking from the cooling system, or
if the coolant temperature gauge indicates
that the coolant is overheated.
RDo not remove the cap on the coolant
expansion tank if the coolant temperature
is above 158‡ (70†). Allow the engine to
cool down before removing the cap. The
coolant expansion tank contains hot fluid
and is under pressure.
RUsing a rag, slowly open the cap
approximately 1/2 turn counterclockwise
to relieve excess pressure. If opened
immediately, scalding hot fluid and steam
will be blown out under pressure.
RDo not spill antifreeze on hot engine parts.
Antifreeze contains ethylene glycol which
may burn if it comes into contact with hot
engine parts.
Example illustration: S 550
408Engine compartmentOperation
221_AKB; 6; 20, en-USd2ugruen,Version: 2.11.8.12009-09-24T13:28:17+02:00 - Seite 408
Page 411 of 548
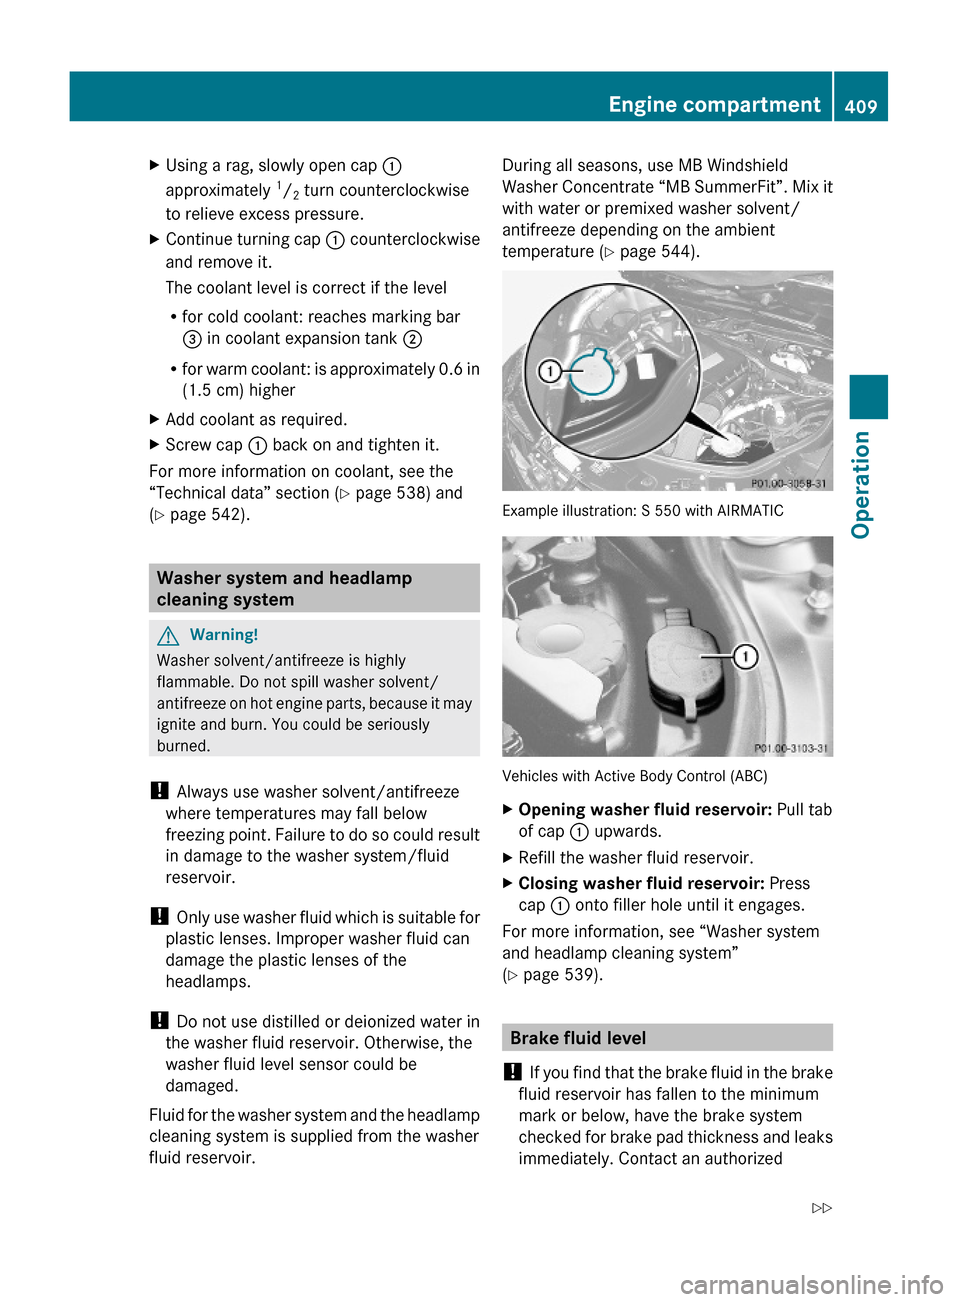
XUsing a rag, slowly open cap :
approximately 1/2 turn counterclockwise
to relieve excess pressure.
XContinue turning cap : counterclockwise
and remove it.
The coolant level is correct if the level
Rfor cold coolant: reaches marking bar
= in coolant expansion tank ;
Rfor warm coolant: is approximately 0.6 in
(1.5 cm) higher
XAdd coolant as required.XScrew cap : back on and tighten it.
For more information on coolant, see the
“Technical data” section (Y page 538) and
(Y page 542).
Washer system and headlamp
cleaning system
GWarning!
Washer solvent/antifreeze is highly
flammable. Do not spill washer solvent/
antifreeze on hot engine parts, because it may
ignite and burn. You could be seriously
burned.
! Always use washer solvent/antifreeze
where temperatures may fall below
freezing point. Failure to do so could result
in damage to the washer system/fluid
reservoir.
! Only use washer fluid which is suitable for
plastic lenses. Improper washer fluid can
damage the plastic lenses of the
headlamps.
! Do not use distilled or deionized water in
the washer fluid reservoir. Otherwise, the
washer fluid level sensor could be
damaged.
Fluid for the washer system and the headlamp
cleaning system is supplied from the washer
fluid reservoir.
During all seasons, use MB Windshield
Washer Concentrate “MB SummerFit”. Mix it
with water or premixed washer solvent/
antifreeze depending on the ambient
temperature (Y page 544).
Example illustration: S 550 with AIRMATIC
Vehicles with Active Body Control (ABC)
XOpening washer fluid reservoir: Pull tab
of cap : upwards.
XRefill the washer fluid reservoir.XClosing washer fluid reservoir: Press
cap : onto filler hole until it engages.
For more information, see “Washer system
and headlamp cleaning system”
(Y page 539).
Brake fluid level
! If you find that the brake fluid in the brake
fluid reservoir has fallen to the minimum
mark or below, have the brake system
checked for brake pad thickness and leaks
immediately. Contact an authorized
Engine compartment409Operation221_AKB; 6; 20, en-USd2ugruen,Version: 2.11.8.12009-09-24T13:28:17+02:00 - Seite 409Z
Page 453 of 548
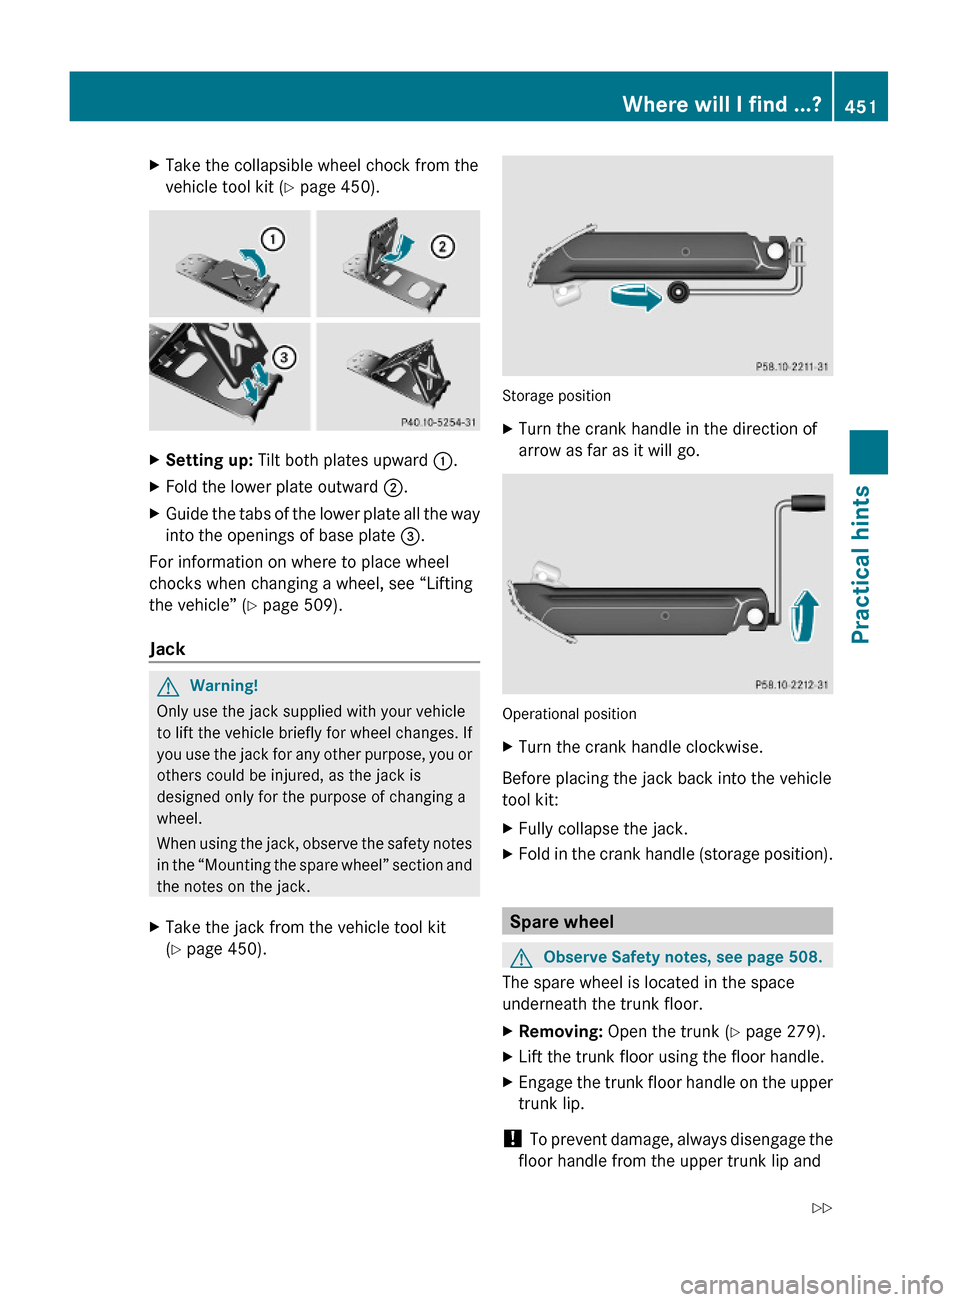
XTake the collapsible wheel chock from the
vehicle tool kit (Y page 450).
XSetting up: Tilt both plates upward :.XFold the lower plate outward ;.XGuide the tabs of the lower plate all the way
into the openings of base plate =.
For information on where to place wheel
chocks when changing a wheel, see “Lifting
the vehicle” (Y page 509).
Jack
GWarning!
Only use the jack supplied with your vehicle
to lift the vehicle briefly for wheel changes. If
you use the jack for any other purpose, you or
others could be injured, as the jack is
designed only for the purpose of changing a
wheel.
When using the jack, observe the safety notes
in the “Mounting the spare wheel” section and
the notes on the jack.
XTake the jack from the vehicle tool kit
(Y page 450).
Storage position
XTurn the crank handle in the direction of
arrow as far as it will go.
Operational position
XTurn the crank handle clockwise.
Before placing the jack back into the vehicle
tool kit:
XFully collapse the jack.XFold in the crank handle (storage position).
Spare wheel
GObserve Safety notes, see page 508.
The spare wheel is located in the space
underneath the trunk floor.
XRemoving: Open the trunk (Y page 279).XLift the trunk floor using the floor handle.XEngage the trunk floor handle on the upper
trunk lip.
! To prevent damage, always disengage the
floor handle from the upper trunk lip and
Where will I find ...?451Practical hints221_AKB; 6; 20, en-USd2ugruen,Version: 2.11.8.12009-09-24T13:28:17+02:00 - Seite 451Z
Page 454 of 548
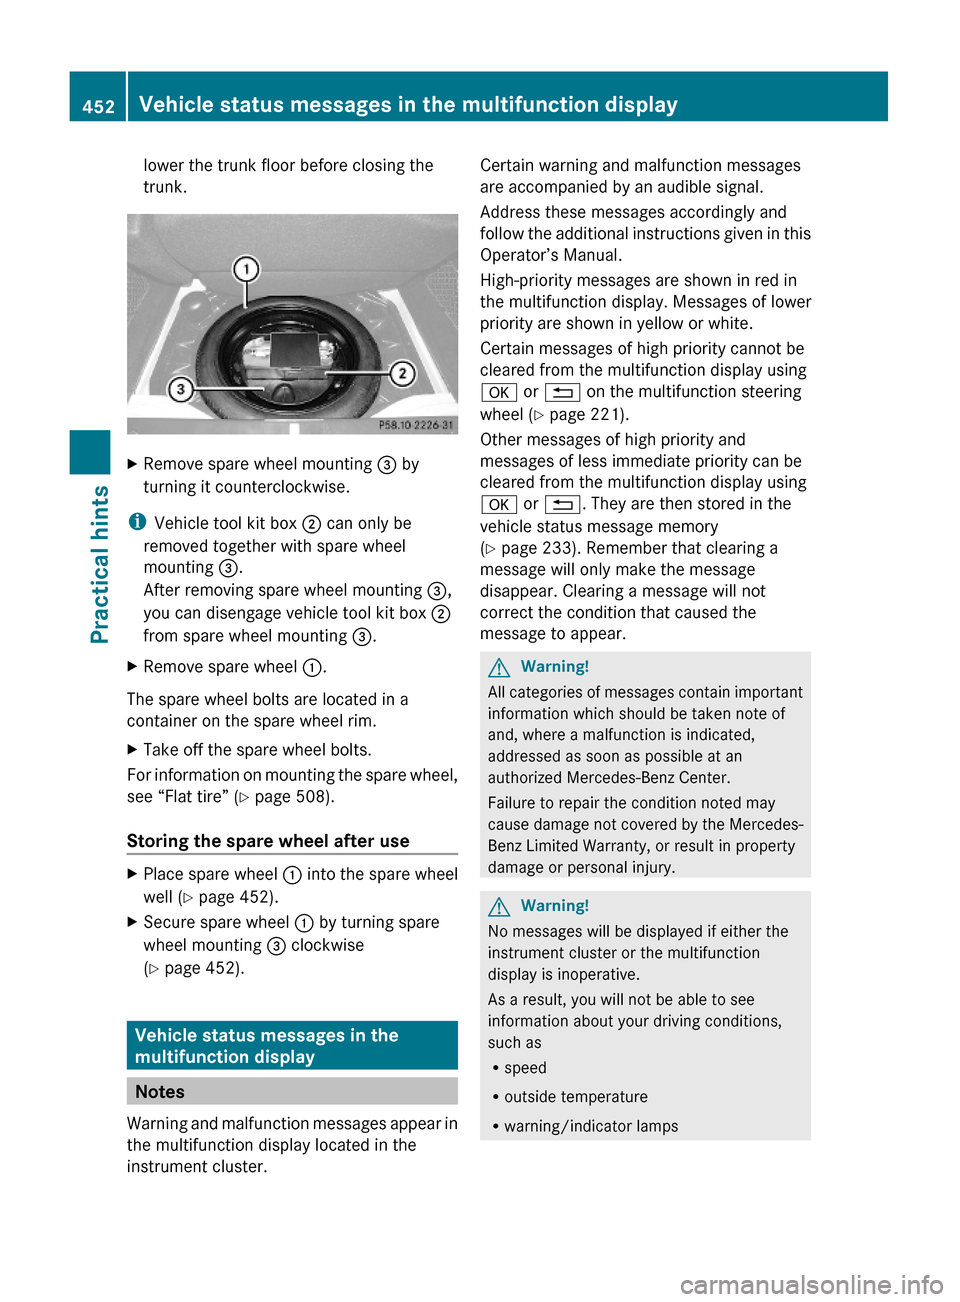
lower the trunk floor before closing the
trunk.
XRemove spare wheel mounting = by
turning it counterclockwise.
iVehicle tool kit box ; can only be
removed together with spare wheel
mounting =.
After removing spare wheel mounting =,
you can disengage vehicle tool kit box ;
from spare wheel mounting =.
XRemove spare wheel :.
The spare wheel bolts are located in a
container on the spare wheel rim.
XTake off the spare wheel bolts.
For information on mounting the spare wheel,
see “Flat tire” (Y page 508).
Storing the spare wheel after use
XPlace spare wheel : into the spare wheel
well (Y page 452).
XSecure spare wheel : by turning spare
wheel mounting = clockwise
(Y page 452).
Vehicle status messages in the
multifunction display
Notes
Warning and malfunction messages appear in
the multifunction display located in the
instrument cluster.
Certain warning and malfunction messages
are accompanied by an audible signal.
Address these messages accordingly and
follow the additional instructions given in this
Operator’s Manual.
High-priority messages are shown in red in
the multifunction display. Messages of lower
priority are shown in yellow or white.
Certain messages of high priority cannot be
cleared from the multifunction display using
a or % on the multifunction steering
wheel (Y page 221).
Other messages of high priority and
messages of less immediate priority can be
cleared from the multifunction display using
a or %. They are then stored in the
vehicle status message memory
(Y page 233). Remember that clearing a
message will only make the message
disappear. Clearing a message will not
correct the condition that caused the
message to appear.
GWarning!
All categories of messages contain important
information which should be taken note of
and, where a malfunction is indicated,
addressed as soon as possible at an
authorized Mercedes-Benz Center.
Failure to repair the condition noted may
cause damage not covered by the Mercedes-
Benz Limited Warranty, or result in property
damage or personal injury.
GWarning!
No messages will be displayed if either the
instrument cluster or the multifunction
display is inoperative.
As a result, you will not be able to see
information about your driving conditions,
such as
Rspeed
Routside temperature
Rwarning/indicator lamps
452Vehicle status messages in the multifunction displayPractical hints
221_AKB; 6; 20, en-USd2ugruen,Version: 2.11.8.12009-09-24T13:28:17+02:00 - Seite 452