2010 MERCEDES-BENZ S550 4MATIC dashboard
[x] Cancel search: dashboardPage 9 of 548

Upload/Download of Data ...............95
USB socket ...................................... 80
Vehicle settings ............................. 206
Video DVD ..................................... 191
Voice Control System ....................237
Combination switch .......................... 301
Controller (COMAND) .......................... 79
Control system .................................. 220
Multifunction display .....................222
Multifunction steering wheel .........221
Control system menus ...................... 222
AMG ............................................... 227
Assistance ..................................... 231
Audio ............................................. 226
Navi ............................................... 225
Service ........................................... 233
Settings ......................................... 234
Telephone ...................................... 230
Trip ................................................ 223
Coolant
Anticorrosion/antifreeze ...............543
Capacities .............................. 538, 539
Checking level ............................... 408
Messages in the multifunction
display ........................................... 480
Temperature gauge ........................ 327
Corner-illuminating lamps ................ 303
Cruise control .................................... 328
Activating ....................................... 328
Canceling ....................................... 329
Changing the set speed .................329
Last stored speed ..........................330
Lever .............................................. 328
Messages in the multifunction
display ........................................... 458
Resume function ............................ 330
Setting current speed ....................329
Cup holders ........................................ 384
Curb weight ....................................... 430
Customer Assistance Center (CAC) ... 24
Customer Relations Department ....... 24
D
Dashboard see Instrument cluster
Data recording ..................................... 25
Daytime running lamp mode ............ 299
Switching on or off ......................... 234
Deep water
see Standing water
Defogging (windshield) ..................... 371
Defroster
Front (Climate control system) ......370
Rear window .................................. 372
Department of Transportation
see DOT
Difficulties
While driving .................................. 314
With starting .................................. 312
Digital speedometer
Additional speedometer ................. 235
Dimensions (vehicle)
see Vehicle specification
Direction of rotation (tires) .............. 422
Displays
COMAND display ............................. 78
DISTRONIC PLUS ........................... 333
Maintenance service indicator .......439
Messages in the multifunction
display ........................................... 452
Multifunction display .....................222
Symbol messages ..........................466
Text messages ............................... 454
Trip computer ................................ 223
Vehicle status message memory ...233
Display settings (COMAND) ................ 92
DISTRONIC PLUS ............................... 330
Cleaning system sensors ...............443
Displaying the distance graphic .....334
Displays in the multifunction
display ........................................... 333
Distance warning lamp ..........333, 496
Driving ........................................... 336
Driving with .................................... 339
Lever .............................................. 335
Messages in the multifunction
display ........................................... 459
Resume function ............................ 338
Sensor cover .................................. 443
Speed settings ............................... 337
Stopping ........................................ 337
Doors
Child safety locks ............................ 61
Locking/unlocking (KEYLESS-GO) . 275Index7221_AKB; 6; 20, en-USd2ugruen,Version: 2.11.8.12009-09-24T13:28:17+02:00 - Seite 7
Page 44 of 548

you have any difficulties, please contact an
authorized Mercedes-Benz Center.
R Do not lean your head or chest close to the
steering wheel or dashboard.
R Keep hands on the outside of the steering
wheel rim. Placing hands and arms inside
the rim can increase the risk and potential
severity of hand/arm injury when the driver
front air bag inflates.
R Adjust the front passenger seat as far as
possible rearward from the dashboard
when the seat is occupied.
R Occupants, especially children, should
never place their bodies or lean their heads
in the area of the door where the side
impact air bag inflates. This could result in
serious injuries or death should the side
impact air bag be deployed. Always sit as
upright as possible, wear the seat belt
properly and use an appropriately sized
infant restraint, toddler restraint, or
booster seat recommended for the size and
weight of the child.
Failure to follow these instructions can result
in severe injuries to you or other occupants.
If you sell your vehicle, it is important that you
make the buyer aware of this safety
information. Be sure to give the buyer this
Operator’s Manual.GWarning!
Accident research shows that the safest place
for children in an automobile is in a rear seat.
There is a possibility for a side impact air bag-
related injury if occupants, especially
children, are not properly seated or restrained
when next to a side impact air bag which
needs to deploy rapidly in a side impact in
order to do its job.
To help avoid the possibility of injury, please
follow these guidelines:
(1)Occupants, especially children,
should never place their bodies or
lean their heads in the area of thedoor where the side impact air bag
inflates. This could result in
serious injuries or death should
the side impact air bag be
deployed.(2)Always sit as upright as possible,
wear the seat belt properly and use
an appropriately sized infant
restraint, toddler restraint, or
booster seat recommended for the
size and weight of the child. and
for children 12 years old and
under, use an appropriately sized
infant restraint, toddler restraint,
or booster seat recommended for
the size and weight of the child.(3)Always wear seat belts properly.
If you believe that, even with the use of these
guidelines, it would be safer for your rear seat
occupants to have the rear mounted side
impact air bags deactivated, then
deactivation can be carried out upon your
written request at an authorized Mercedes-
Benz Center at an additional cost.
Please contact an authorized Mercedes-Benz
Center or call the Customer Assistance
Center (in the USA) at 1-800-FOR-MERCedes
(1-800-367-6372), or Customer Service (in
Canada) at 1-800-387-0100 for details.
Air bags are designed to deploy only in certain
R frontal impacts (front air bags)
R side impacts (side impact and window
curtain air bags) if the system determines
the need for air bag deployment
R rollovers (window curtain air bags)
Only in the event of such a situation will they
provide their supplemental protection.
The driver and passengers should always
wear their seat belts. Otherwise it is not
possible for the air bags to provide their
supplemental protection.
In case of other types of impacts and impacts
below air bag deployment thresholds, air
bags will not deploy. The driver and
42Occupant safetySafety and security
221_AKB; 6; 20, en-USd2ugruen,Version: 2.11.8.12009-09-24T13:28:17+02:00 - Seite 42
Page 45 of 548

passengers will then be protected to the
extent possible by a properly fastened seat
belt. A properly fastened seat belt is also
needed to provide the best possible
protection in a rollover.
Air bags are not a substitute for seat belts.
Always wear your seat belt, regardless of
whether or not your vehicle is equipped with
air bags.
It is important to your safety and that of your
passengers to have deployed air bags
replaced and to have any malfunctioning air
bags repaired. This will help to make sure the
air bags will continue to provide supplemental
crash protection for occupants.
Safety guidelines for the seat belt,
Emergency Tensioning Device (ETD)
and air bag GWarning!
R Damaged seat belts or seat belts that have
been subjected to stress in an accident
must be replaced. Their anchoring points
must also be checked. Only use seat belts
installed or supplied by an authorized
Mercedes-Benz Center.
R Air bags and pyrotechnic Emergency
Tensioning Devices (ETDs) contain
perchlorate material, which may require
special handling and regard for the
environment. Check with your local
government’s disposal guidelines.
California residents, see
www.dtsc.ca.gov/HazardousWaste/
Perchlorate/index.cfm .
R Air bags and ETDs are designed to function
on a one-time-only basis. An air bag or ETD
that has deployed must be replaced. PRE-
SAFE ®
has electrically operated reversible
pre-tensioners in addition to the
pyrotechnic ETDs.
R Do not pass seat belts over sharp edges.
They could tear.
R Do not make any modification that could
change the effectiveness of the seat belts.
R Do not bleach or dye seat belts as this may
severely weaken them. In a crash they may
not be able to provide adequate protection.
R No modifications of any kind may be made
to any components or wiring of the SRS.
R Do no change or remove any component or
part of the SRS.
R Do not install additional trim material, seat
covers, badges, etc. over the steering
wheel hub, front passenger front air bag
cover, outboard sides of the seat
backrests, door trim panels, or door frame
trims.
R Do not install additional electrical/
electronic equipment on or near SRS
components and wiring.
R Keep area between air bags and occupants
free of objects (e.g. packages, purses,
umbrellas, etc.).
R Do not hang items such as coat hangers
from the coat hooks or handles over the
door. These items may be thrown around in
the vehicle and cause head and other
injuries when the window curtain air bag is
deployed.
R Air bag system components will be hot after
an air bag has inflated. Do not touch them.
R Never place your feet on the instrument
panel, dashboard, or on the seat. Always
keep both feet on the floor in front of the
seat.
R Improper repair work on the SRS creates a
risk of rendering the SRS inoperative or
causing unintended air bag deployment.
Work on the SRS must therefore only be
performed by qualified technicians.
Contact an authorized Mercedes-Benz
Center.
R For your protection and the protection of
others, when scrapping the air bag unit or
ETD, our safety instructions must beOccupant safety43Safety and security221_AKB; 6; 20, en-USd2ugruen,Version: 2.11.8.12009-09-24T13:28:17+02:00 - Seite 43Z
Page 53 of 548

around a person and another person or
other objects at the same time.
RSeat belts should not be worn twisted. In a
crash, you would not have the full width of
the seat belt to distribute impact forces.
The twisted seat belt against your body
could cause injuries.
RPregnant women should also always use a
lap/shoulder belt. The lap belt portion
should be positioned as low as possible on
the hips to avoid any possible pressure on
the abdomen.
RPlace the seat backrest in a position that is
as upright as possible.
RCheck your seat belt during travel to make
sure it is properly positioned.
RNever place your feet on the instrument
panel, dashboard, or on the seat. Always
keep both feet on the floor in front of the
seat.
RWhen using a seat belt to secure infant
restraints, toddler restraints, or children in
booster seats, always follow the child seat
manufacturer’s instructions.
GWarning!
Do not pass seat belts over sharp edges. They
could tear.
Do not allow the seat belt to get caught in the
door or in the seat adjustment mechanism.
This could damage the seat belt.
Never attempt to make modifications to seat
belts. This could impair the effectiveness of
the seat belts.
Fastening the seat belts
GWarning!
According to accident statistics, children are
safer when properly restrained in the rear
seating positions than in the front seating
position. Thus, we strongly recommend that
children be placed in the rear seats whenever
possible. Regardless of seating position,
children 12 years old and under must be
seated and properly secured in an
appropriately sized infant restraint, toddler
restraint, or booster seat recommended for
the size and weight of the child. For additional
information, see “Children in the vehicle”.
A child’s risk of serious or fatal injuries is
significantly increased if the child restraints
are not properly secured in the vehicle and/
or the child is not properly secured in the child
restraint.
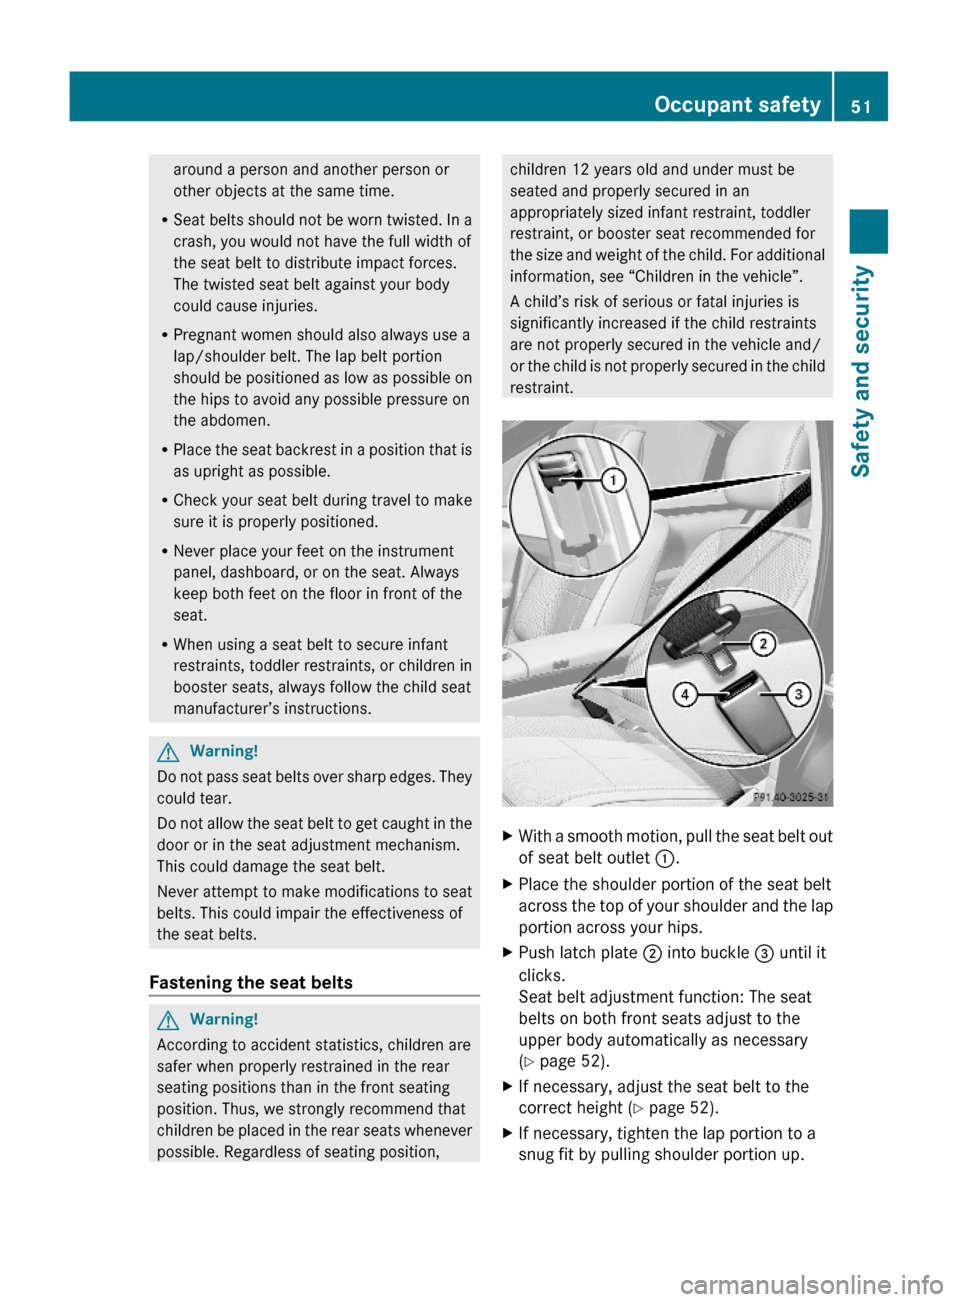
XWith a smooth motion, pull the seat belt out
of seat belt outlet :.
XPlace the shoulder portion of the seat belt
across the top of your shoulder and the lap
portion across your hips.
XPush latch plate ; into buckle = until it
clicks.
Seat belt adjustment function: The seat
belts on both front seats adjust to the
upper body automatically as necessary
(Y page 52).
XIf necessary, adjust the seat belt to the
correct height (Y page 52).
XIf necessary, tighten the lap portion to a
snug fit by pulling shoulder portion up.
Occupant safety51Safety and security221_AKB; 6; 20, en-USd2ugruen,Version: 2.11.8.12009-09-24T13:28:17+02:00 - Seite 51Z
Page 94 of 548

RBluetooth Q Search for Bluetooth
Devices, Bluetooth activated. For
information on the Bluetooth® interface
see (Y page 151).
RUpload/Download Data Q Copy Data
to Storage Medium, Import Data from
Storage Medium (Y page 95)
RReset: Resetting the COMAND system to
factory settings
Display settings
Switching the display on or off
XSwitching off: Select Vehicle Q
Display OFF.
XSwitching back on: Rotate cVd or slide
ZVÆ, XVY or press W.
or
XPress button u.
Setting the display design
XSelect Vehicle Q System Q Display.XSelect Day Mode, Night Mode or
Automatic.
iIn the Automatic setting, COMAND sets
the display design automatically. The
setting depends on the information
retrieved from the vehicle's light sensor.
Time settings
The time of day is set automatically according
to the GPS signal and the selected time zone.
All time information always applies to the
local time at the current vehicle position.
Time information changes when entering a
different time zone.
iThe correct time zone, daylight savings
time/standard time and the time itself
must be set for the following navigation
system functions to operate correctly:
RRoute guidance on routes with time-
dependent traffic guidance
RCalculation of estimated arrival time
The settings are adopted for the analog
clock in the dashboard.
Change the settings in the following order:
1. Time zone
2. Daylight savings time/standard time
3. Time lag (only necessary in exceptional
cases)
Setting the time zone and switching
between daylight savings time and
standard time
XSetting time zone: Select Vehicle Q
System Q Time Q Time Zone.
The country list appears. The dot # in front
of a list entry indicates the current setting.
XSelect the country in which you are.
A time zone list may also be displayed,
depending on the selected country.
XSelect the desired time zone.
Subsequent operation depends on
Rwhether your navigation system has GPS
reception
Rwhich country you have set previously
You may either switch between Daylight
Savings Time (Summer) and Standard
Time.
92COMAND system settings Control systems
221_AKB; 6; 20, en-USd2ugruen,Version: 2.11.8.12009-09-24T13:28:17+02:00 - Seite 92
Page 522 of 548

determined and remedied by an authorized
Mercedes-Benz Center.
! Switch off the vehicle’s internal electrical
functions when you are working on the
fuses.
A blown fuse must be replaced by an
appropriate spare fuse (recognizable by its
color or the fuse rating given on the fuse) of
the amperage recommended in the fuse
chart. Any Mercedes-Benz Center will be glad
to advise you on this subject.
iIn case of a blown fuse contact Roadside
Assistance or an authorized Mercedes-
Benz Center.
If a newly inserted fuse blows again, have the
cause determined and rectified by an
authorized Mercedes-Benz Center.
The fuse chart is located in the trunk with the
vehicle tool kit (Y page 450). The fuse chart
explains the fuse allocation and fuse
amperages.
Before replacing fuses
XEngage the electronic parking brake.XMake sure the automatic transmission is in
park position P.
The transmission position indicator in the
multifunction display should be on P.
XSwitch off all electrical consumers.XTurn off the engine.
Fuse box in passenger compartment
! Do not use sharp objects such as a
screwdriver to open the fuse box cover in
the dashboard. You could damage the fuse
box cover or the dashboard.
Fuse box on driver’s side
Fuse box on passenger side
XOpen the respective door.XUsing your hands, pull cover : in direction
of arrow and remove it.
XClosing: Hook fuse box cover : into the
opening at the front.
! The fuse box cover must be properly
positioned as described. Otherwise,
moisture or dirt could enter the fuse box
and possibly impair fuse operation.
520FusesPractical hints
221_AKB; 6; 20, en-USd2ugruen,Version: 2.11.8.12009-09-24T13:28:17+02:00 - Seite 520