2010 MERCEDES-BENZ S550 4MATIC ECO mode
[x] Cancel search: ECO modePage 366 of 548
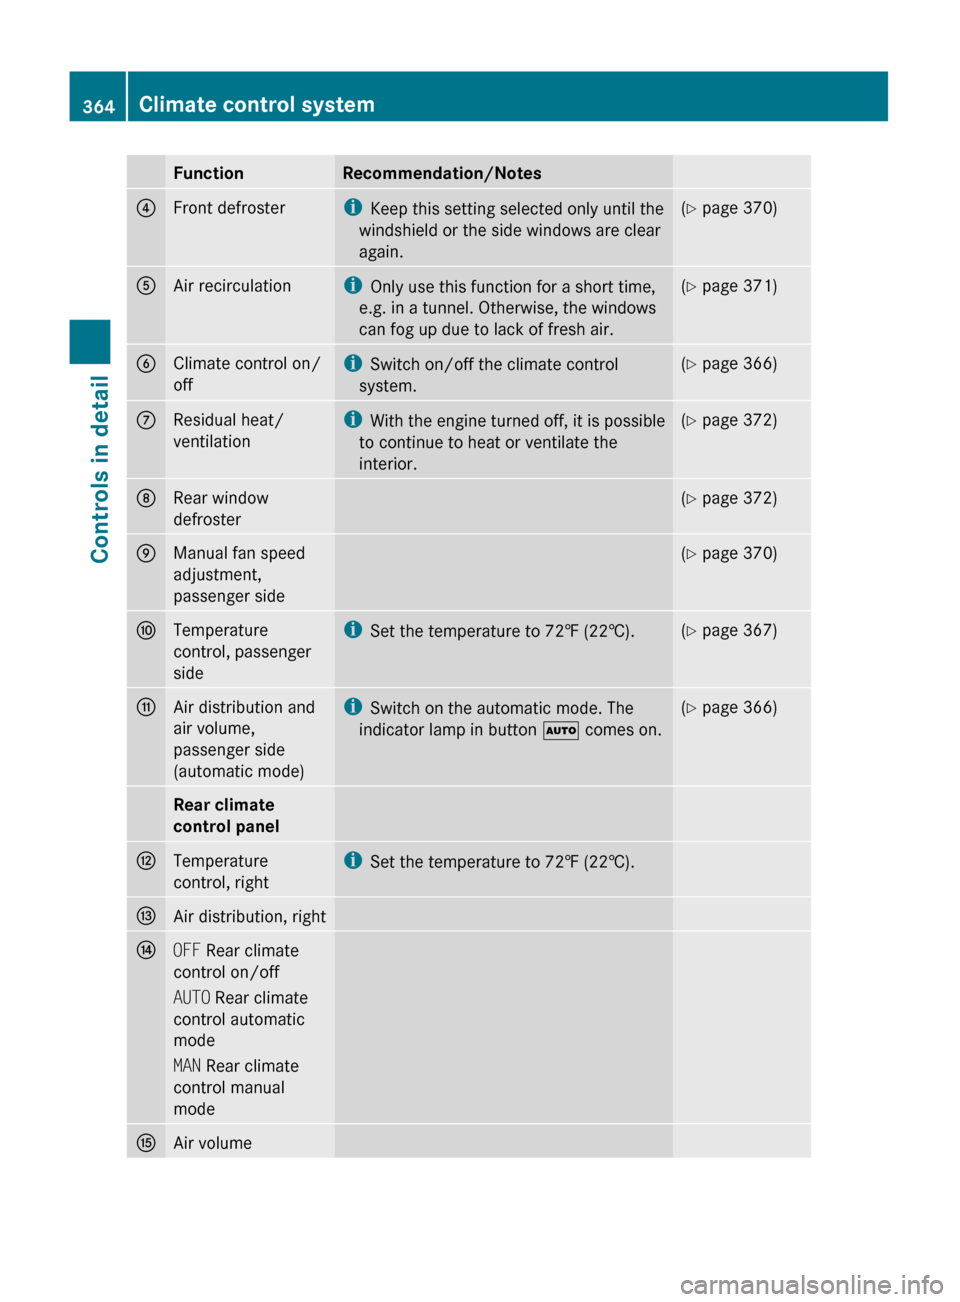
FunctionRecommendation/Notes4Front defrosteriKeep this setting selected only until the
windshield or the side windows are clear
again.( Y page 370)5Air recirculationi
Only use this function for a short time,
e.g. in a tunnel. Otherwise, the windows
can fog up due to lack of fresh air.( Y page 371)6Climate control on/
offi Switch on/off the climate control
system.( Y page 366)7Residual heat/
ventilationi With the engine turned off, it is possible
to continue to heat or ventilate the
interior.( Y page 372)8Rear window
defroster( Y page 372)9Manual fan speed
adjustment,
passenger side( Y page 370)aTemperature
control, passenger
sidei Set the temperature to 72‡ (22†).(Y page 367)bAir distribution and
air volume,
passenger side
(automatic mode)i Switch on the automatic mode. The
indicator lamp in button à comes on.(Y page 366)Rear climate
control panelHTemperature
control, righti Set the temperature to 72‡ (22†).IAir distribution, rightJOFF Rear climate
control on/off
AUTO Rear climate
control automatic
mode
MAN Rear climate
control manual
modeKAir volume364Climate control systemControls in detail
221_AKB; 6; 20, en-USd2ugruen,Version: 2.11.8.12009-09-24T13:28:17+02:00 - Seite 364
Page 367 of 548
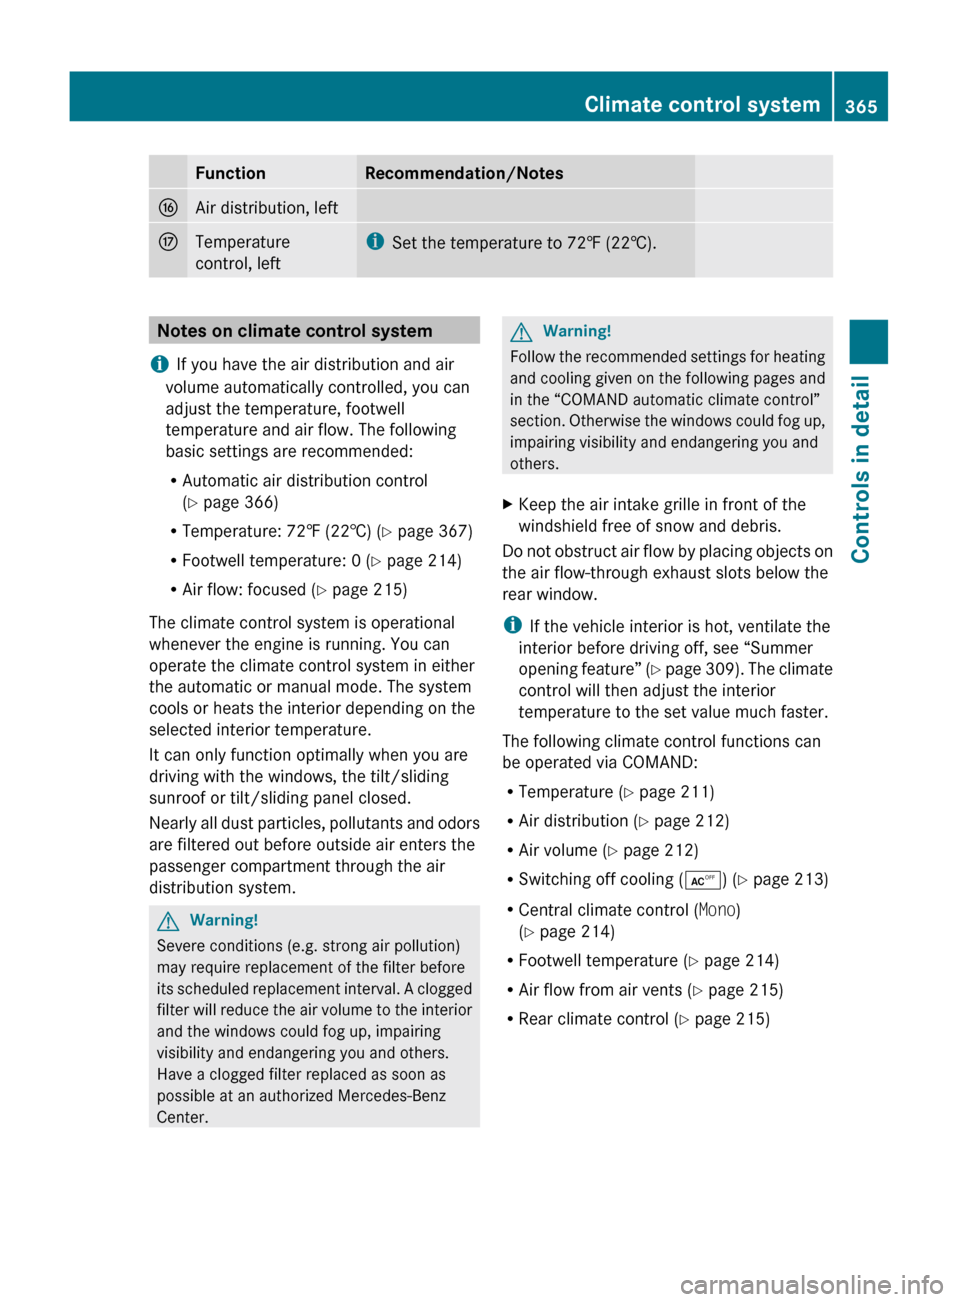
FunctionRecommendation/NotesLAir distribution, leftMTemperature
control, lefti Set the temperature to 72‡ (22†).Notes on climate control system
i If you have the air distribution and air
volume automatically controlled, you can
adjust the temperature, footwell
temperature and air flow. The following
basic settings are recommended:
R Automatic air distribution control
( Y page 366)
R Temperature: 72‡ (22†) ( Y page 367)
R Footwell temperature: 0 ( Y page 214)
R Air flow: focused ( Y page 215)
The climate control system is operational
whenever the engine is running. You can
operate the climate control system in either
the automatic or manual mode. The system
cools or heats the interior depending on the
selected interior temperature.
It can only function optimally when you are
driving with the windows, the tilt/sliding
sunroof or tilt/sliding panel closed.
Nearly all dust particles, pollutants and odors
are filtered out before outside air enters the
passenger compartment through the air
distribution system.GWarning!
Severe conditions (e.g. strong air pollution)
may require replacement of the filter before
its scheduled replacement interval. A clogged
filter will reduce the air volume to the interior
and the windows could fog up, impairing
visibility and endangering you and others.
Have a clogged filter replaced as soon as
possible at an authorized Mercedes-Benz
Center.
GWarning!
Follow the recommended settings for heating
and cooling given on the following pages and
in the “COMAND automatic climate control”
section. Otherwise the windows could fog up,
impairing visibility and endangering you and
others.
XKeep the air intake grille in front of the
windshield free of snow and debris.
Do not obstruct air flow by placing objects on
the air flow-through exhaust slots below the
rear window.
i If the vehicle interior is hot, ventilate the
interior before driving off, see “Summer
opening feature” (Y page 309). The climate
control will then adjust the interior
temperature to the set value much faster.
The following climate control functions can
be operated via COMAND:
R Temperature ( Y page 211)
R Air distribution ( Y page 212)
R Air volume ( Y page 212)
R Switching off cooling ( Æ) (Y page 213)
R Central climate control ( Mono)
( Y page 214)
R Footwell temperature ( Y page 214)
R Air flow from air vents ( Y page 215)
R Rear climate control ( Y page 215)
Climate control system365Controls in detail221_AKB; 6; 20, en-USd2ugruen,Version: 2.11.8.12009-09-24T13:28:17+02:00 - Seite 365Z
Page 382 of 548
distribution. It is therefore recommended to
load the vehicle accordingly with the heaviest
items being placed towards the front of the
vehicle.
Please pay attention to and comply with the
following instructions when loading the
vehicle and transporting cargo:
RAlways place items being carried against
front or rear seat backrests, and fasten
them as securely as possible.
RThe heaviest portion of the cargo should
always be kept as low as possible against
front or rear seat backrests.
Roof rack
For information about further roof rack
equipment, contact an authorized Mercedes-
Benz Center.
GWarning!
Only use roof racks approved by Mercedes-
Benz for your vehicle model to avoid damage
to the vehicle.
Follow the manufacturer’s installation
instructions. Otherwise, an improperly
attached roof rack system or its load could
become detached from the vehicle.
Do not exceed the maximum roof load of
220 lb (100 kg).
Take into consideration that when the roof
rack is loaded, the handling characteristics
are different from those when operating the
vehicle without the roof rack loaded.
Make sure
Ryou can raise the power tilt/sliding sunroof
or the panorama roof with tilt/sliding panel
completely
Ryou can open the trunk completely
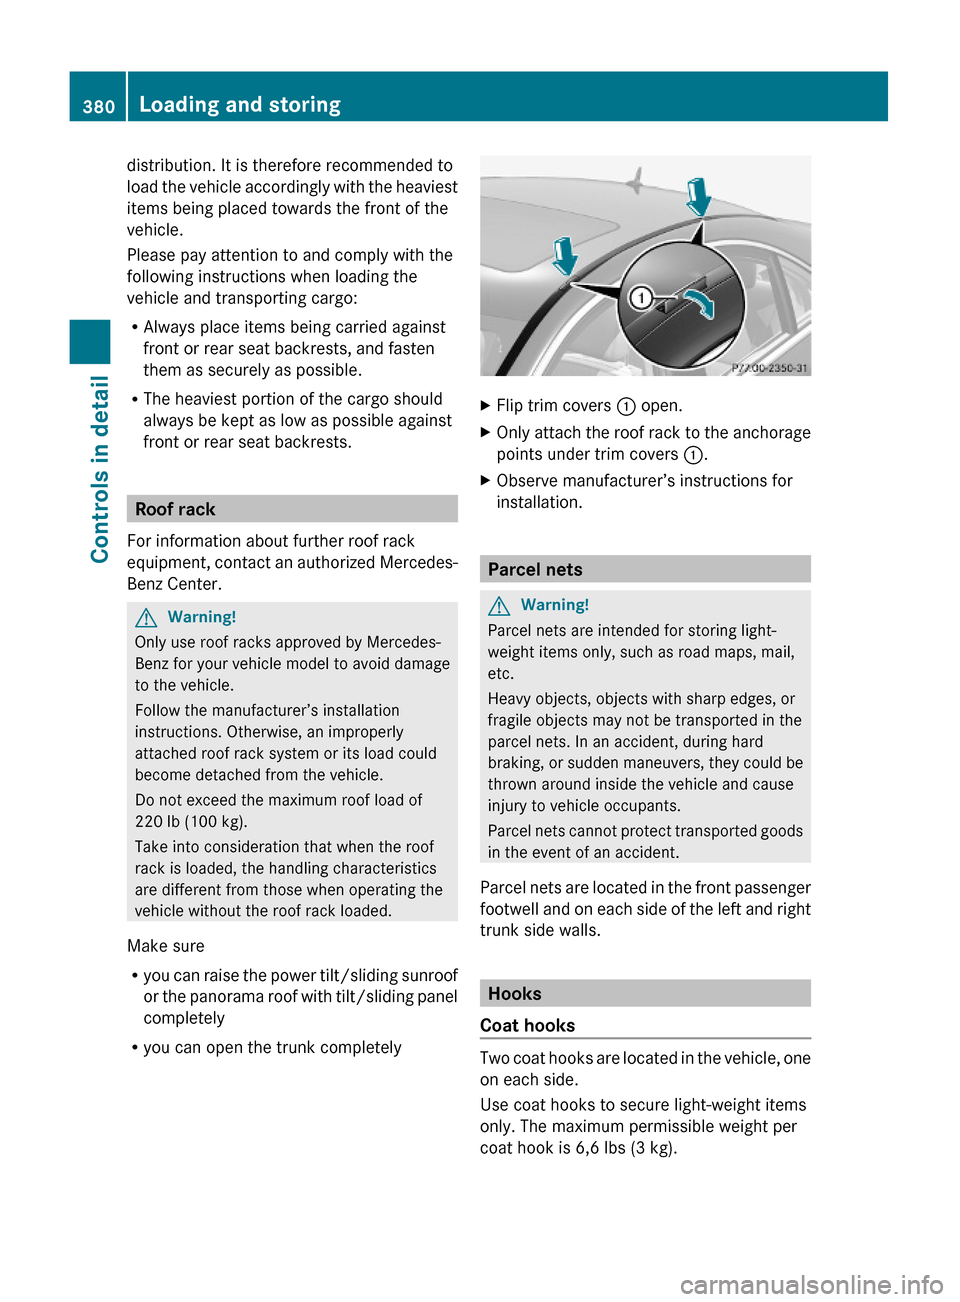
XFlip trim covers : open.XOnly attach the roof rack to the anchorage
points under trim covers :.
XObserve manufacturer’s instructions for
installation.
Parcel nets
GWarning!
Parcel nets are intended for storing light-
weight items only, such as road maps, mail,
etc.
Heavy objects, objects with sharp edges, or
fragile objects may not be transported in the
parcel nets. In an accident, during hard
braking, or sudden maneuvers, they could be
thrown around inside the vehicle and cause
injury to vehicle occupants.
Parcel nets cannot protect transported goods
in the event of an accident.
Parcel nets are located in the front passenger
footwell and on each side of the left and right
trunk side walls.
Hooks
Coat hooks
Two coat hooks are located in the vehicle, one
on each side.
Use coat hooks to secure light-weight items
only. The maximum permissible weight per
coat hook is 6,6 lbs (3 kg).
380Loading and storingControls in detail
221_AKB; 6; 20, en-USd2ugruen,Version: 2.11.8.12009-09-24T13:28:17+02:00 - Seite 380
Page 393 of 548
The message Call Failed appears in the
multifunction display for approximately
10 seconds.
Should this occur, assistance must be
summoned by other means.
iDuring the emergency call the telephone
is switched off automatically and must be
switched back on to make a call.
iThe “911” emergency call system is a
public service. Using it without due cause
is a criminal offense.
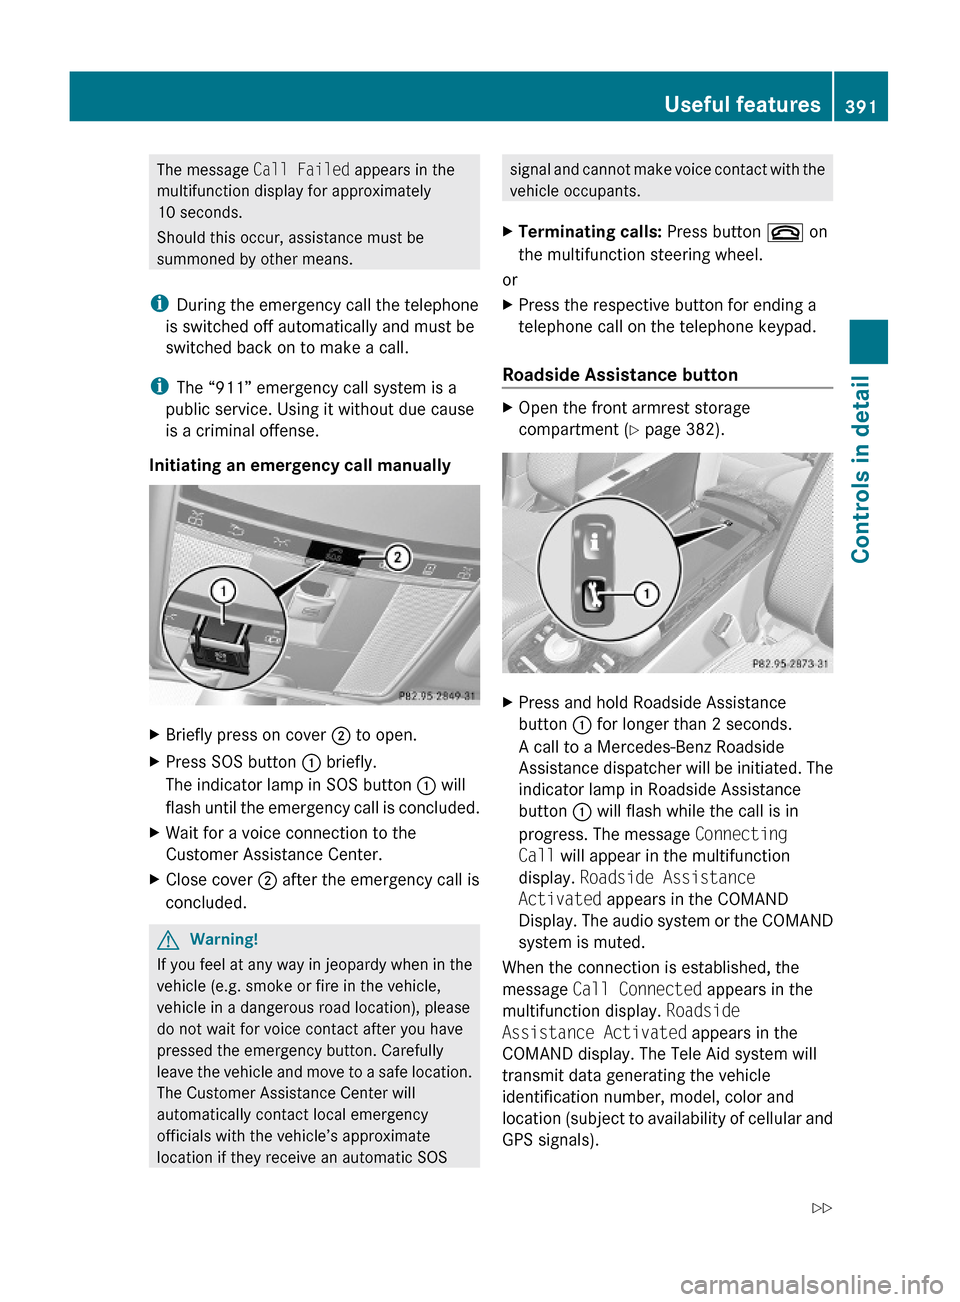
Initiating an emergency call manually
XBriefly press on cover ; to open.XPress SOS button : briefly.
The indicator lamp in SOS button : will
flash until the emergency call is concluded.
XWait for a voice connection to the
Customer Assistance Center.
XClose cover ; after the emergency call is
concluded.
GWarning!
If you feel at any way in jeopardy when in the
vehicle (e.g. smoke or fire in the vehicle,
vehicle in a dangerous road location), please
do not wait for voice contact after you have
pressed the emergency button. Carefully
leave the vehicle and move to a safe location.
The Customer Assistance Center will
automatically contact local emergency
officials with the vehicle’s approximate
location if they receive an automatic SOS
signal and cannot make voice contact with the
vehicle occupants.
XTerminating calls: Press button ~ on
the multifunction steering wheel.
or
XPress the respective button for ending a
telephone call on the telephone keypad.
Roadside Assistance button
XOpen the front armrest storage
compartment (Y page 382).
XPress and hold Roadside Assistance
button : for longer than 2 seconds.
A call to a Mercedes-Benz Roadside
Assistance dispatcher will be initiated. The
indicator lamp in Roadside Assistance
button : will flash while the call is in
progress. The message Connecting
Call will appear in the multifunction
display. Roadside Assistance
Activated appears in the COMAND
Display. The audio system or the COMAND
system is muted.
When the connection is established, the
message Call Connected appears in the
multifunction display. Roadside
Assistance Activated appears in the
COMAND display. The Tele Aid system will
transmit data generating the vehicle
identification number, model, color and
location (subject to availability of cellular and
GPS signals).
Useful features391Controls in detail221_AKB; 6; 20, en-USd2ugruen,Version: 2.11.8.12009-09-24T13:28:17+02:00 - Seite 391Z
Page 394 of 548
i The COMAND system display indicates
that a Tele Aid call is in progress. While the
call is connected you can change to the
navigation menu by pressing shortcut
button S. Spoken commands are not
available.
A voice connection between the Roadside
Assistance dispatcher and the occupants of
the vehicle will be established.
XDescribe the nature of the need for
assistance.
The Mercedes-Benz Roadside Assistance
dispatcher will either dispatch a qualified
Mercedes-Benz technician or arrange to tow
your vehicle to the nearest authorized
Mercedes-Benz Center. For services such as
labor and/or towing, charges may apply.
Refer to the Roadside Assistance manual for
more information.
Sign and Drive services (USA only):
Services such as a jump start, a few gallons
of fuel or the replacement of a flat tire with
the vehicle spare wheel are obtainable at no
charge.
iIf the indicator lamp in Roadside
Assistance button : is flashing
continuously and there was no voice
connection to the Customer Assistance
Center established, then the Tele Aid
system could not initiate a Roadside
Assistance call (e.g. the relevant cellular
phone network is not available). The
message Call Failed appears in the
multifunction display. Call could not
be connected! appears in the COMAND
display. Confirm the message pressing W
(Y page 79).
If the indicator lamp in Roadside Assistance
button : is flashing continuously and
there was no voice connection established,
then the Tele Aid system could not initiate
a Roadside Assistance call (e.g. the
relevant cellular phone network is not
available). The message Call Failed
appears in the multifunction display. Call
could not be connected! appears in the
COMAND display. Confirm the message
pressing W (Y page 79).
XTerminating calls: Press button ~ on
the multifunction steering wheel.
or
XPress the respective button for ending a
telephone call on the telephone keypad.
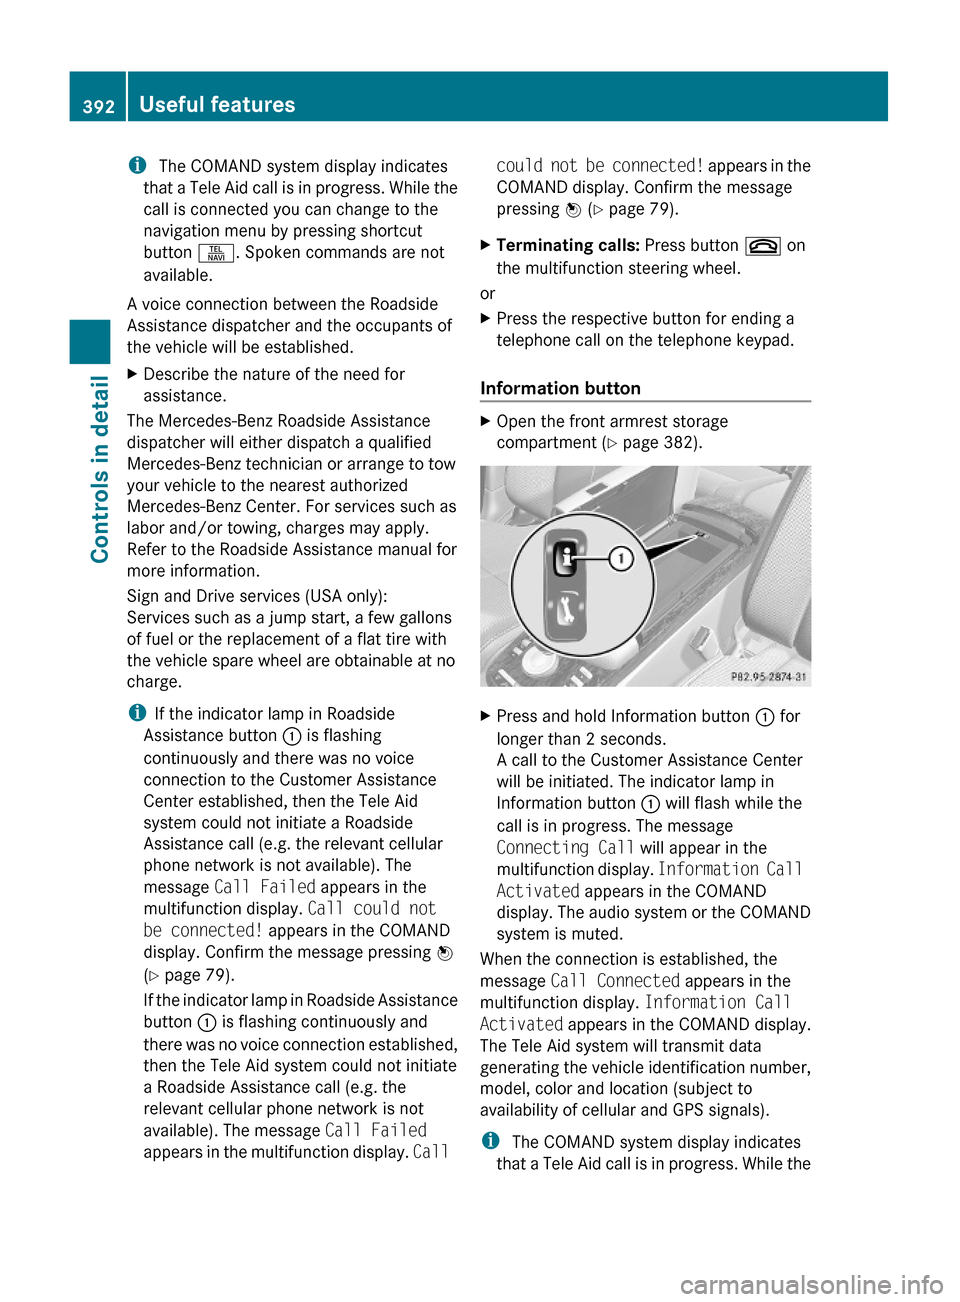
Information button
XOpen the front armrest storage
compartment (Y page 382).
XPress and hold Information button : for
longer than 2 seconds.
A call to the Customer Assistance Center
will be initiated. The indicator lamp in
Information button : will flash while the
call is in progress. The message
Connecting Call will appear in the
multifunction display. Information Call
Activated appears in the COMAND
display. The audio system or the COMAND
system is muted.
When the connection is established, the
message Call Connected appears in the
multifunction display. Information Call
Activated appears in the COMAND display.
The Tele Aid system will transmit data
generating the vehicle identification number,
model, color and location (subject to
availability of cellular and GPS signals).
i The COMAND system display indicates
that a Tele Aid call is in progress. While the
392Useful featuresControls in detail
221_AKB; 6; 20, en-USd2ugruen,Version: 2.11.8.12009-09-24T13:28:17+02:00 - Seite 392
Page 397 of 548
The vehicle can be remotely locked within
four days after the ignition has been switched
off.XContact the Customer Assistance Center
at 1-800-FOR-MERCedes
(1-800-367-6372) (USA only) or
1-888-923-8367 (Canada only).
You will be asked to provide your password.
When you are inside your vehicle the next
time and switch on the ignition, the message
Tele Aid Doors Locked Remotely will
appear on the multifunction display.
i The remote door lock feature is available
if the relevant cellular phone network is
available and data connection is possible.
Automatic Maintenance Call
Your vehicle is equipped with a feature that
considerably enhances vehicle care. Just
prior to reaching a vehicle maintenance
milestone, Tele Aid transmits important
vehicle maintenance information that alerts
your authorized Mercedes-Benz Center of
required service. This is automatic and does
not require driver intervention. This feature
allows your preferred Mercedes-Benz Center
to significantly improve the process of
arranging your service appointment and
ensures that your vehicle receives the best
possible care.
i The Automatic Maintenance Call feature
is available if the relevant telephone
network is available and data connection is
possible.
Stolen Vehicle Recovery Services
In the event your vehicle was stolen:
XReport the incident to the police.
The police will issue a numbered incident
report.XPass this number on to the Customer
Assistance Center along with your
password.
The Customer Assistance Center will then
attempt to covertly contact the vehicle’s
Tele Aid system. Once the vehicle is
located, the Customer Assistance Center
will contact the local law enforcement and
you. The vehicle’s location will only be
provided to law enforcement.
i If the anti-theft alarm stays on for more
than 30 seconds, the Tele Aid system will
notify the Customer Assistance Center
automatically.
Garage door opener
The integrated remote control can operate up
to three separately controlled devices
compatible with HomeLink ®
or some other
systems.
GWarning!
Before programming the integrated remote
control to a garage door opener or gate
operator, make sure people and objects are
out of the way of the device to prevent
potential harm or damage. When
programming a garage door opener, the door
moves up or down. When programming a gate
operator, the gate opens or closes.
Do not use the integrated remote control with
any garage door opener that lacks safety stop
and reverse features as required by U.S.
federal safety standards (this includes any
garage door opener model manufactured
before April 1, 1982). A garage door that
cannot detect an object - signaling the door
to stop and reverse - does not meet current
U.S. federal safety standards.
Useful features395Controls in detail221_AKB; 6; 20, en-USd2ugruen,Version: 2.11.8.12009-09-24T13:28:17+02:00 - Seite 395Z
Page 412 of 548
Mercedes-Benz Center immediately. Do
not add brake fluid as this will not solve the
problem. For more information, see
“Practical hints”.
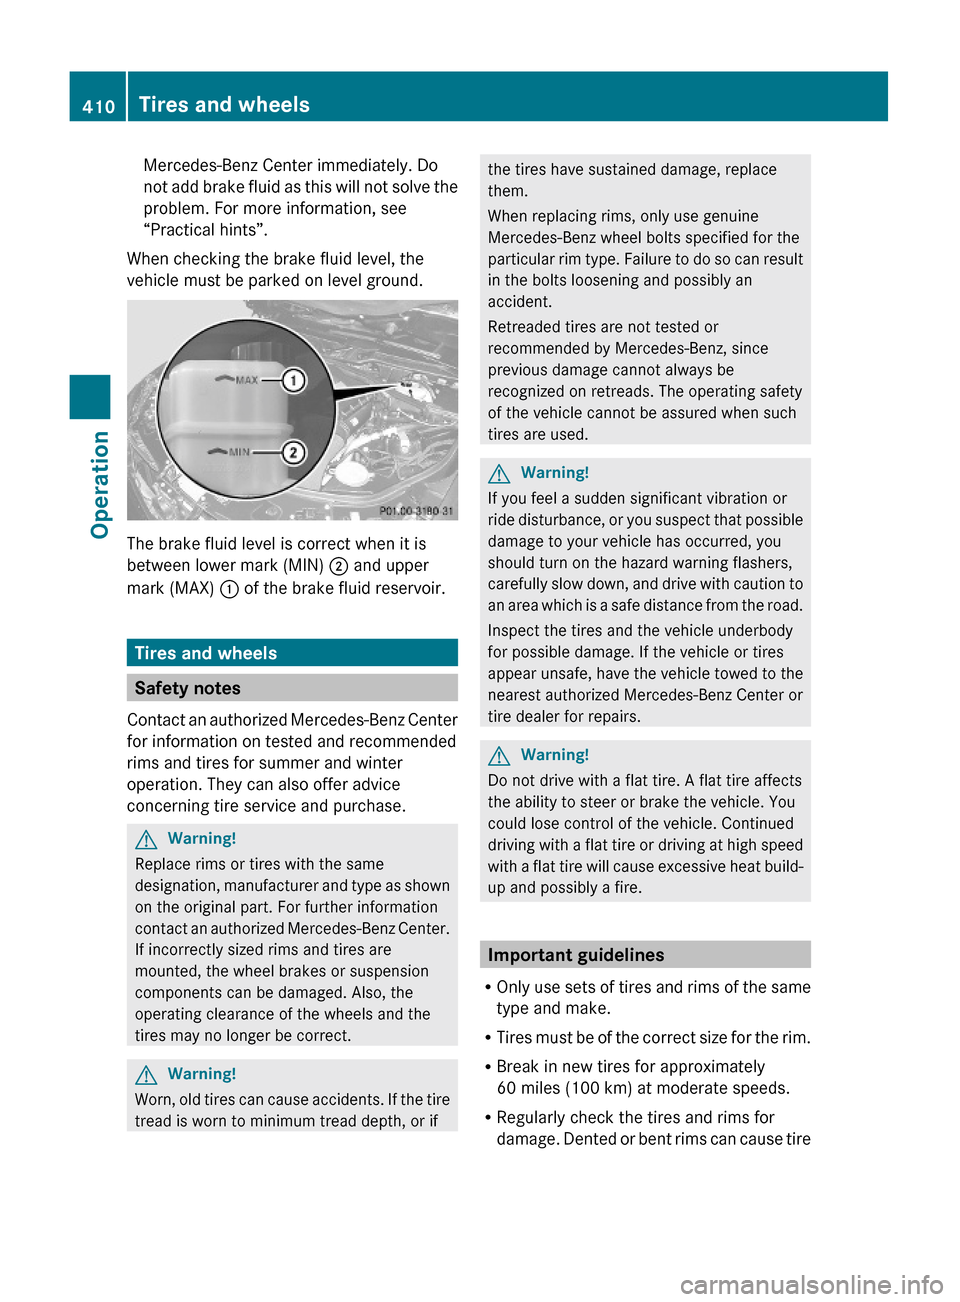
When checking the brake fluid level, the
vehicle must be parked on level ground.
The brake fluid level is correct when it is
between lower mark (MIN) ; and upper
mark (MAX) : of the brake fluid reservoir.
Tires and wheels
Safety notes
Contact an authorized Mercedes-Benz Center
for information on tested and recommended
rims and tires for summer and winter
operation. They can also offer advice
concerning tire service and purchase.
GWarning!
Replace rims or tires with the same
designation, manufacturer and type as shown
on the original part. For further information
contact an authorized Mercedes-Benz Center.
If incorrectly sized rims and tires are
mounted, the wheel brakes or suspension
components can be damaged. Also, the
operating clearance of the wheels and the
tires may no longer be correct.
GWarning!
Worn, old tires can cause accidents. If the tire
tread is worn to minimum tread depth, or if
the tires have sustained damage, replace
them.
When replacing rims, only use genuine
Mercedes-Benz wheel bolts specified for the
particular rim type. Failure to do so can result
in the bolts loosening and possibly an
accident.
Retreaded tires are not tested or
recommended by Mercedes-Benz, since
previous damage cannot always be
recognized on retreads. The operating safety
of the vehicle cannot be assured when such
tires are used.
GWarning!
If you feel a sudden significant vibration or
ride disturbance, or you suspect that possible
damage to your vehicle has occurred, you
should turn on the hazard warning flashers,
carefully slow down, and drive with caution to
an area which is a safe distance from the road.
Inspect the tires and the vehicle underbody
for possible damage. If the vehicle or tires
appear unsafe, have the vehicle towed to the
nearest authorized Mercedes-Benz Center or
tire dealer for repairs.
GWarning!
Do not drive with a flat tire. A flat tire affects
the ability to steer or brake the vehicle. You
could lose control of the vehicle. Continued
driving with a flat tire or driving at high speed
with a flat tire will cause excessive heat build-
up and possibly a fire.
Important guidelines
ROnly use sets of tires and rims of the same
type and make.
RTires must be of the correct size for the rim.
RBreak in new tires for approximately
60 miles (100 km) at moderate speeds.
RRegularly check the tires and rims for
damage. Dented or bent rims can cause tire
410Tires and wheelsOperation
221_AKB; 6; 20, en-USd2ugruen,Version: 2.11.8.12009-09-24T13:28:17+02:00 - Seite 410
Page 435 of 548

Always use winter tires at temperatures
below 45‡ (7†) and whenever wintry road
conditions prevail. Not all M+S rated tires
provide special winter performance. Make
sure the tires you use show the mountain/
snowflake imarking on the tire sidewall.
These tires meet specific snow traction
performance requirements of the Rubber
Manufacturers Association (RMA) and the
Rubber Association of Canada (RAC) and
have been designed specifically for use in
snow conditions. Use of winter tires is the
only way to achieve the maximum
effectiveness of your vehicle’s driving safety
systems such as the ABS and the ESC in
winter operation.
For safe handling, make sure all mounted
winter tires are of the same make and have
the same tread design.
For information on winter tires for your
vehicle model, see the “Technical data”
section ( Y page 532).
Always observe the speed rating of the winter
tires installed on your vehicle.
After installing winter tires:XCheck the tire inflation pressure and adjust
it if necessary ( Y page 413).XRestart the Advanced Tire Pressure
Monitoring System ( Y page 414).
Snow chains
! When driving with snow chains, always
select the raised level of the vehicle level
control. Other settings may result in
damage to your vehicle.
! Some tire sizes do not leave adequate
clearance for snow chains. To help avoid
serious damage to your vehicle or tires,
make sure the use of snow chains is
permissible as specified in the “Technical
data” section of this Operator’s Manual.
Snow chains should only be driven on snow-
covered roads at speeds not to exceed
30 mph (50 km/h). Remove chains as soon
as possible when driving on roads without
snow.
Observe the following guidelines when using
snow chains:
R Use of snow chains is not permissible with
all wheel/tire combinations ( Y page 532).
R Use snow chains in pairs and on rear
wheels only. Follow the manufacturer’s
mounting instructions.
! If snow chains are mounted to the front
wheels, they may scrape against the body
or axle components. The tires or the vehicle
could be damaged as a result.
R Only use snow chains that are approved by
Mercedes-Benz. Any authorized Mercedes-
Benz Center will be glad to advise you on
this subject.
R Use of snow chains may be prohibited
depending on location. Always check local
and state laws before installing snow
chains.
R Do not use snow chains on the spare wheel.
i When driving with snow chains, you may
wish to switch off the ESC ( Y page 232)
before setting the vehicle in motion. This
will improve the vehicle’s traction.
Winter driving instructions
GWarning!
If the vehicle becomes stuck in snow, make
sure snow is kept clear of the exhaust pipe
and from around the vehicle with the engine
running. Otherwise, deadly carbon monoxide
(CO) gases may enter vehicle interior
resulting in unconsciousness and death.
To assure sufficient fresh air ventilation, open
a window slightly on the side of the vehicle
not facing the wind.
Winter driving433Operation221_AKB; 6; 20, en-USd2ugruen,Version: 2.11.8.12009-09-24T13:28:17+02:00 - Seite 433Z