2010 MERCEDES-BENZ S550 4MATIC tire pressure
[x] Cancel search: tire pressurePage 20 of 548

Call waiting, call holding, and
conference ..................................... 158
Emergency call “911” ....................150
Functions during a single party
call ................................................. 157
Making calls ................................... 156
Menu ............................................. 230
Operation ....................................... 230
Phone book ........................... 159, 231
Redialing ........................................ 231
Telephone keypad ............................... 79
Temperature
Coolant .......................................... 327
Interior temperature ......................367
Outside .......................................... 327
Tether anchorage points
see Children in the vehicle
Tie-down hooks ................................. 381
Tightening torque
Wheels ........................................... 512
Time settings ....................................... 92
TIN (Tire Identification Number) ...... 432
Tire and Loading Information
placard ............................................... 418
Tire and loading terminology ........... 430
Tire Identification Number see TIN
Tire inflation pressure
Checking ........................................ 413
Important notes on ........................412
Label on the inside of fuel filler
flap ................................................ 412
Placard on driver’s door B-pillar .....418
Tire labeling ....................................... 426
Tire load rating .................................. 431
Tire ply composition and material
used .................................................... 432
Tires ........................................... 410, 532
Advanced Tire Pressure
Monitoring System (Advanced
TPMS) ............................................ 414
Air pressure ................................... 411
Care and maintenance ...................423
Cleaning ......................................... 424
Direction of rotation, spinning .......422
Important notes on tire inflation
pressure ........................................ 412Inflation pressure ........................... 413
Information placard .......................418
Inspection ...................................... 423
Labeling ......................................... 426
Load index ............................. 426, 431
Load rating .................................... 431
Messages in the multifunction
display ................................... 464, 489
Ply composition and material
used ............................................... 432
Problems under-/overinflation ......413
Retreads ........................................ 410
Rims and tires (technical data) ......532
Rotation ......................................... 425
Service life ..................................... 423
Sizes .............................................. 532
Snow chains .................................. 433
Speed rating .......................... 427, 432
Storing ........................................... 424
Temperature .......................... 412, 425
Terminology ................................... 430
Tire Identification Number .............432
TPMS low tire pressure/
malfunction telltale ........................497
Traction ................................. 424, 432
Tread ............................................. 432
Tread depth ........................... 423, 432
Treadwear ...................................... 424
Treadwear indicators .............423, 432
Vehicle maximum load on ..............432
Wear pattern .................................. 425
Winter tires ............................ 432, 532
Tire speed rating ....................... 427, 432
Top tether see Children in the vehicle
Total load limit ................................... 432
Towing
Towing eye bolt .............................. 517
Vehicle ........................................... 516
Towing eye bolt ................................. 517
Traction ...................................... 424, 432
Traffic messages ............................... 138
Transfer case ..................................... 325
Transmission see Automatic transmission
Transmission fluid level .................... 408
Transmission gear selector lever see Gear selector lever 18Index221_AKB; 6; 20, en-USd2ugruen,Version: 2.11.8.12009-09-24T13:28:17+02:00 - Seite 18
Page 34 of 548
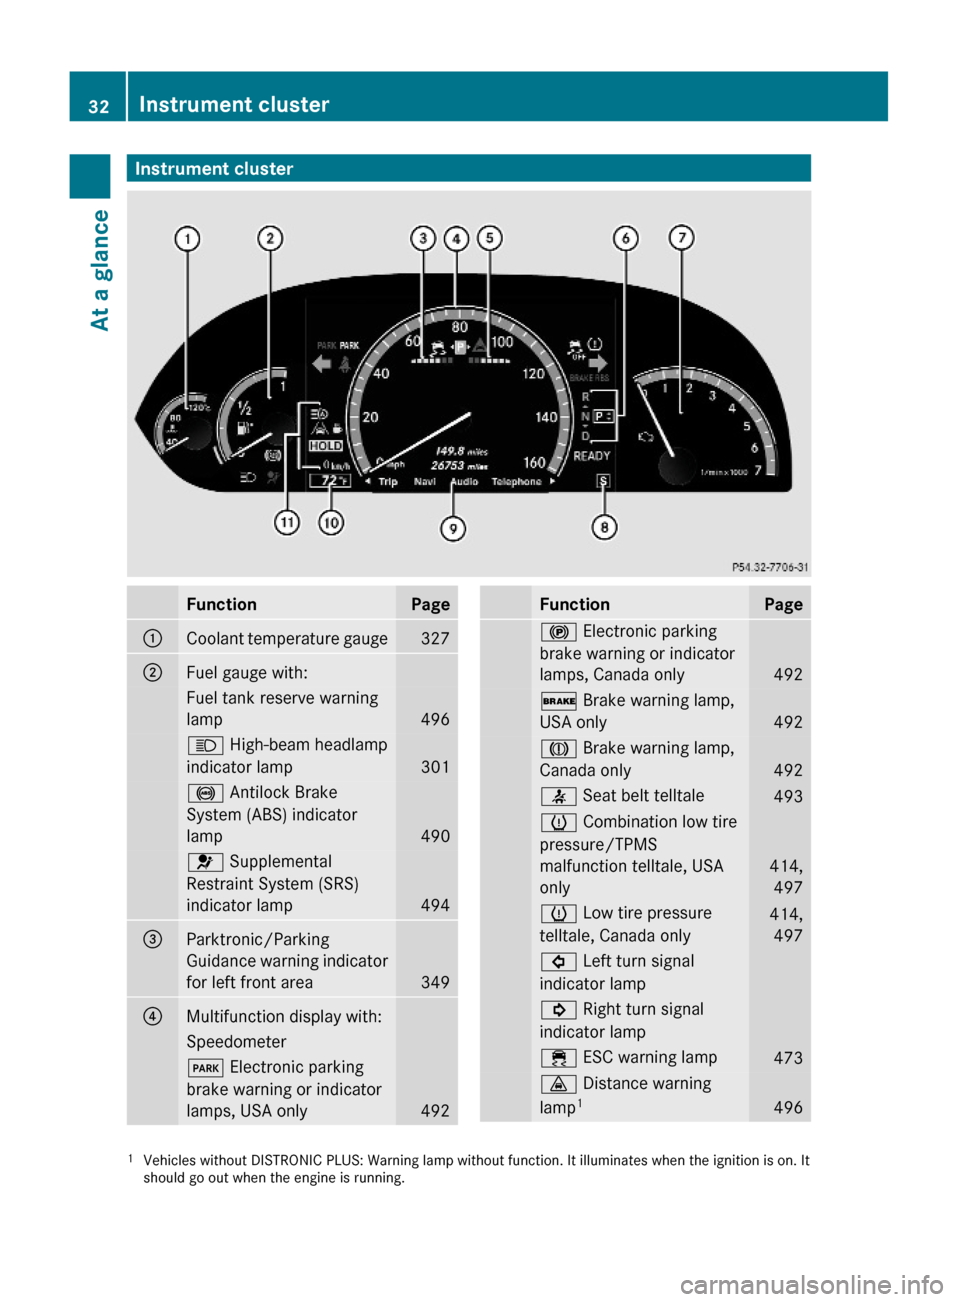
Instrument clusterFunctionPage:Coolant temperature gauge327;Fuel gauge with:Fuel tank reserve warning
lamp496
K High-beam headlamp
indicator lamp 301
! Antilock Brake
System (ABS) indicator
lamp 490
6 Supplemental
Restraint System (SRS)
indicator lamp 494
=Parktronic/Parking
Guidance warning indicator
for left front area349
?Multifunction display with:Speedometer F Electronic parking
brake warning or indicator
lamps, USA only492
FunctionPage! Electronic parking
brake warning or indicator
lamps, Canada only492
$ Brake warning lamp,
USA only492
J Brake warning lamp,
Canada only492
7 Seat belt telltale 493h Combination low tire
pressure/TPMS
malfunction telltale, USA
only
414,
497
h Low tire pressure
telltale, Canada only
414,
497
# Left turn signal
indicator lamp
! Right turn signal
indicator lamp
÷ ESC warning lamp 473· Distance warning
lamp14961Vehicles without DISTRONIC PLUS: Warning lamp without function. It illuminates when the ignition is on. Itshould go out when the engine is running.
32Instrument clusterAt a glance
221_AKB; 6; 20, en-USd2ugruen,Version: 2.11.8.12009-09-24T13:28:17+02:00 - Seite 32
Page 65 of 548
Driving safety systems
Introduction
This section contains information about the
following driving safety systems:
R ABS (
Antilock Brake System)
R Adaptive Brake
R Adaptive Brake Lights
R BAS (
Brake Assist System)
R BAS PLUS (
Brake Assist System PLUS)
R EBP (
Electronic Brake Proportioning)
R ESC (
Electronic Stability Control)
R PRE-SAFE ®
Brake (
Preventive Occupant
Safety System Brake)
i In winter operation, the maximum
effectiveness of most of the driving
systems described in this section is only
achieved with winter tires, or snow chains
as required.
Safety notes
GWarning!
The following factors increase the risk of
accidents:
R Excessive speed, especially in turns
R Wet and slippery road surfaces
R Following another vehicle too closely
The driving safety systems described in this
section cannot reduce these risks or prevent
the natural laws of physics from acting on the
vehicle. They cannot increase braking or
steering efficiency beyond that afforded by
the condition of the vehicle brakes and tires
or the traction afforded.
Only a safe, attentive, and skillful driver can
prevent accidents.
The capabilities of a vehicle equipped with the
driving safety systems described in this
section must never be exploited in a reckless
or dangerous manner which could jeopardize
the user’s safety or the safety of others.
Always adjust your driving style to the
prevailing road and weather conditions and
keep a safe distance to other road users and
objects on the street.
If a driving system malfunctions, other driving
safety systems may also switch off. Observe
indicator and warning lamps that may come
on as well as messages in the multifunction
display that may appear.GWarning!
HYBRID vehicles: It is imperative that you read
the HYBRID Supplemental Operating
Instructions included in your vehicle literature
portfolio. You may otherwise not receive all
necessary safety information and warning for
the operation of your vehicle.
ABS
GObserve Safety notes, see page 63.GWarning!
Do not pump the brake pedal. Use firm, steady
brake pedal pressure instead. Pumping the
brake pedal defeats the purpose of the ABS
and significantly reduces braking
effectiveness.
The Antilock Brake System (ABS) regulates
the brake pressure so that the wheels do not
lock during braking. This allows you to
maintain the ability to steer your vehicle.
The ABS is functional above a speed of
approximately 5 mph (8 km/h) independent
of road surface conditions.
On slippery road surfaces, the ABS will
respond even to light brake pressure.
The ABS indicator lamp ! in the
instrument cluster comes on when you switch
on the ignition. It goes out when the engine
is running.
Driving safety systems63Safety and security221_AKB; 6; 20, en-USd2ugruen,Version: 2.11.8.12009-09-24T13:28:17+02:00 - Seite 63Z
Page 235 of 548

XPress button a again if you would like
to change the current status.
After the function has been activated,
ATTENTION ASSIST indicator À appears
on the left-hand side of the multifunction
display.
For more information on ATTENTION ASSIST,
see (Y page 355).
Switching Blind Spot Assist on or off
XPress button = or ; to select the
DriveAssist menu.
XPress button : or 9 to select the
Blind Spot Assist function
XPress button a.XPress button a again if you would like
to change the current status.
Depending on the previous status, Blind
Spot Assist will be Enabled or Disabled
For more information on Blind Spot Assist,
see (Y page 359).
Switching Lane Keeping Assist on or off XPress button = or ; to select the
DriveAssist menu.
XPress button : or 9 to select the
Lane Keeping Assist function
XPress button a.XPress button a again if you would like
to change the current status.
After the function has been activated, the
Lane Keeping Assist indicator Ã
appears on the left-hand side of the
multifunction display.
For more information on Lane Keeping
Assistance, see (Y page 362).
Service menu
In the Service menu the following functions
are available:
RVehicle status message memory
(Y page 233)
RChecking tire inflation pressure
electronically with the Advanced TPMS
(Y page 414)
RCalling up the maintenance service
indicator display (Y page 439)
RChecking engine oil level (S 600 and
S 65 AMG) (Y page 406)
Vehicle status message memory
Use the vehicle status message memory
function to scan malfunction and warning
messages that may be stored in the system.
Such messages appear in the multifunction
Instrument cluster control system233Control systems221_AKB; 6; 20, en-USd2ugruen,Version: 2.11.8.12009-09-24T13:28:17+02:00 - Seite 233Z
Page 405 of 548

Mercedes-Benz Center to have the fuel
system drained completely.
! To prevent damage to the catalytic
converters, only use premium unleaded
gasoline in this vehicle.
Any noticeable irregularities in engine
operation should be repaired promptly.
Otherwise, excessive unburned fuel may
reach the catalytic converter, causing it to
overheat and potentially start a fire.
i Only use premium unleaded gasoline with
a minimum Posted Octane Rating of 91
(average of 96 RON/86 MON).
Information on gasoline quality can
normally be found on the fuel pump. Please
contact gas station personnel in case
labels on the pump cannot be found.
For more information on gasoline, see
“Premium unleaded gasoline”
(Y page 541), see “Fuel requirements”
(Y page 541), or contact an authorized
Mercedes-Benz Center, or visit
www.mbusa.com (USA only).
Locking/unlocking the vehicle with the
SmartKey or KEYLESS-GO automatically
locks/unlocks the fuel filler flap.
iIn case the central locking system does
not release the fuel filler flap, or the
opening mechanism is clamping, contact
Roadside Assistance or an authorized
Mercedes-Benz Center.
The fuel filler flap is located on the right-hand
side of the vehicle towards the rear.
XTurn off the engine.
iLeaving the engine running and the fuel
filler cap open can cause the yellow engine
malfunction indicator lamp ; to
illuminate.
For more information, see also “Practical
hints” (Y page 496).
XRemove the SmartKey from the starter
switch.
KEYLESS-GO: Open the driver’s door. This
puts the starter switch in position 0, same
as with the SmartKey removed from the
starter switch. The driver’s door then can
be closed again.
XOpening: Press fuel filler flap : at the
point indicated by the arrow.
XTurn fuel filler cap ; counterclockwise.XTake off fuel filler cap ;.XPlace fuel filler cap ; in direction of arrow
into holder =.
XFully insert filler nozzle unit and refuel.XOnly fill your tank until the filler nozzle unit
cuts out – do not top off or overfill.
XClosing: Turn fuel filler cap ; clockwise
until it audibly engages.
iClose the fuel filler flap before locking the
vehicle. Otherwise the flap locking pin will
prevent closing the fuel filler flap.
XClose fuel filler flap :.
Check regularly and before a long trip
For information on quantities and
requirements of operating agents, see “Fuels,
coolants, lubricants, etc.” (Y page 537).
Check the following:
REngine oil level (Y page 405)
RTire inflation pressure (Y page 413)
RCoolant level (Y page 408)
RVehicle lighting (Y page 504)
At the gas station403Operation221_AKB; 6; 20, en-USd2ugruen,Version: 2.11.8.12009-09-24T13:28:17+02:00 - Seite 403Z
Page 413 of 548
inflation pressure loss and damage to the
tire beads.
R If the vehicle is heavily loaded, check tire
inflation pressure and correct as required.
R Do not allow your tires to wear down too
far. Adhesion properties on wet roads are
sharply reduced at tread depths of less
than 1
/ 8 in (3 mm).
R When replacing individual tires, you should
mount new tires on the front wheels first
(on vehicles with same-sized wheels all
around).
Recommended tire inflation pressure
GWarning!
Follow recommended tire inflation pressures.
Do not underinflate tires. Underinflated tires
wear excessively and/or unevenly, adversely
affect handling and fuel economy, and are
more likely to fail from being overheated.
Do not overinflate tires. Overinflated tires can
adversely affect handling and ride comfort,
wear unevenly, increase stopping distance,
and result in sudden deflation (blowout)
because they are more likely to become
punctured or damaged by road debris,
potholes etc.
Do not overload the tires by exceeding the
specified load limit as indicated on the Tire
and Loading Information placard on the
driver’s door B-pillar. Overloading the tires
can overheat them, possibly causing a
blowout. Overloading the tires can also result
in handling or steering problems, or brake
failure.
Your vehicle is equipped with the Tire and
Loading Information placard located on the
driver’s door B-pillar ( Y page 418).
The tire inflation pressure should be checked
regularly. Only adjust the tire inflation
pressure on cold tires. The tires can be
considered cold if the vehicle has been
parked for at least 3 hours or driven less than
1 mile (1.6 km). Depending on the ambient
temperature, the driving speed and the tire
load, the tire temperature changes. When the
tire temperature changes by 18 ‡ (10†), the
tire inflation pressure will change by
approximately 1.5 psi (0.1 bar). Keep this in
mind when checking tire inflation pressure on
warm tires and adjust the tire pressure only
if the tire inflation pressure is too low for the
current operating conditions. If you check the
tire inflation pressure when the tires are
warm, the reading will be higher than the cold
reading. This is normal. Do not let air out to
match the specified cold tire inflation
pressure. Otherwise, the tire will be
underinflated.
Follow recommended cold tire inflation
pressures listed on Tire and Loading
Information placard on the driver’s door
B-pillar.
Keeping the tires properly inflated provides
the best handling, tread life and riding
comfort.
In addition to the Tire and Loading
Information placard on the driver’s door
B-pillar, also consult the tire inflation
pressure label on the inside of the filler flap
for any additional information pertaining to
special driving situations. For more
information, see “Important notes on tire
inflation pressure” ( Y page 412).
i Data shown on Tire and Loading
Information placard example are for
illustration purposes only. Tire data are
specific to each vehicle and may vary from
data shown in the following illustration.
Refer to Tire and Loading Information
placard on vehicle for actual data specific
to your vehicle.Tires and wheels411Operation221_AKB; 6; 20, en-USd2ugruen,Version: 2.11.8.12009-09-24T13:28:17+02:00 - Seite 411Z
Page 414 of 548
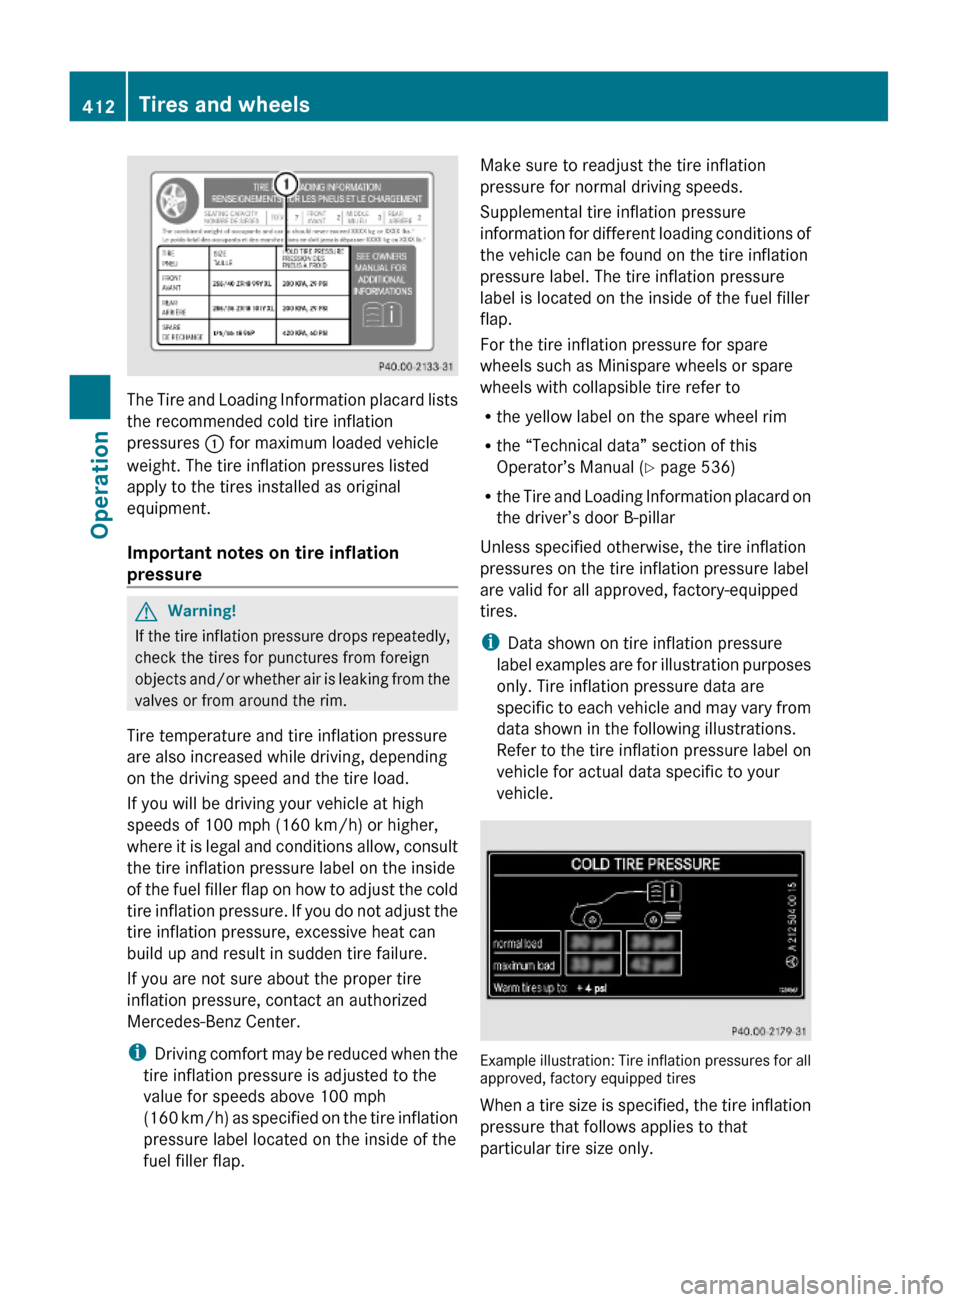
The Tire and Loading Information placard lists
the recommended cold tire inflation
pressures : for maximum loaded vehicle
weight. The tire inflation pressures listed
apply to the tires installed as original
equipment.
Important notes on tire inflation
pressure
GWarning!
If the tire inflation pressure drops repeatedly,
check the tires for punctures from foreign
objects and/or whether air is leaking from the
valves or from around the rim.
Tire temperature and tire inflation pressure
are also increased while driving, depending
on the driving speed and the tire load.
If you will be driving your vehicle at high
speeds of 100 mph (160 km/h) or higher,
where it is legal and conditions allow, consult
the tire inflation pressure label on the inside
of the fuel filler flap on how to adjust the cold
tire inflation pressure. If you do not adjust the
tire inflation pressure, excessive heat can
build up and result in sudden tire failure.
If you are not sure about the proper tire
inflation pressure, contact an authorized
Mercedes-Benz Center.
iDriving comfort may be reduced when the
tire inflation pressure is adjusted to the
value for speeds above 100 mph
(160 km/h) as specified on the tire inflation
pressure label located on the inside of the
fuel filler flap.
Make sure to readjust the tire inflation
pressure for normal driving speeds.
Supplemental tire inflation pressure
information for different loading conditions of
the vehicle can be found on the tire inflation
pressure label. The tire inflation pressure
label is located on the inside of the fuel filler
flap.
For the tire inflation pressure for spare
wheels such as Minispare wheels or spare
wheels with collapsible tire refer to
Rthe yellow label on the spare wheel rim
Rthe “Technical data” section of this
Operator’s Manual (Y page 536)
Rthe Tire and Loading Information placard on
the driver’s door B-pillar
Unless specified otherwise, the tire inflation
pressures on the tire inflation pressure label
are valid for all approved, factory-equipped
tires.
iData shown on tire inflation pressure
label examples are for illustration purposes
only. Tire inflation pressure data are
specific to each vehicle and may vary from
data shown in the following illustrations.
Refer to the tire inflation pressure label on
vehicle for actual data specific to your
vehicle.
Example illustration: Tire inflation pressures for allapproved, factory equipped tires
When a tire size is specified, the tire inflation
pressure that follows applies to that
particular tire size only.
412Tires and wheelsOperation
221_AKB; 6; 20, en-USd2ugruen,Version: 2.11.8.12009-09-24T13:28:17+02:00 - Seite 412
Page 415 of 548
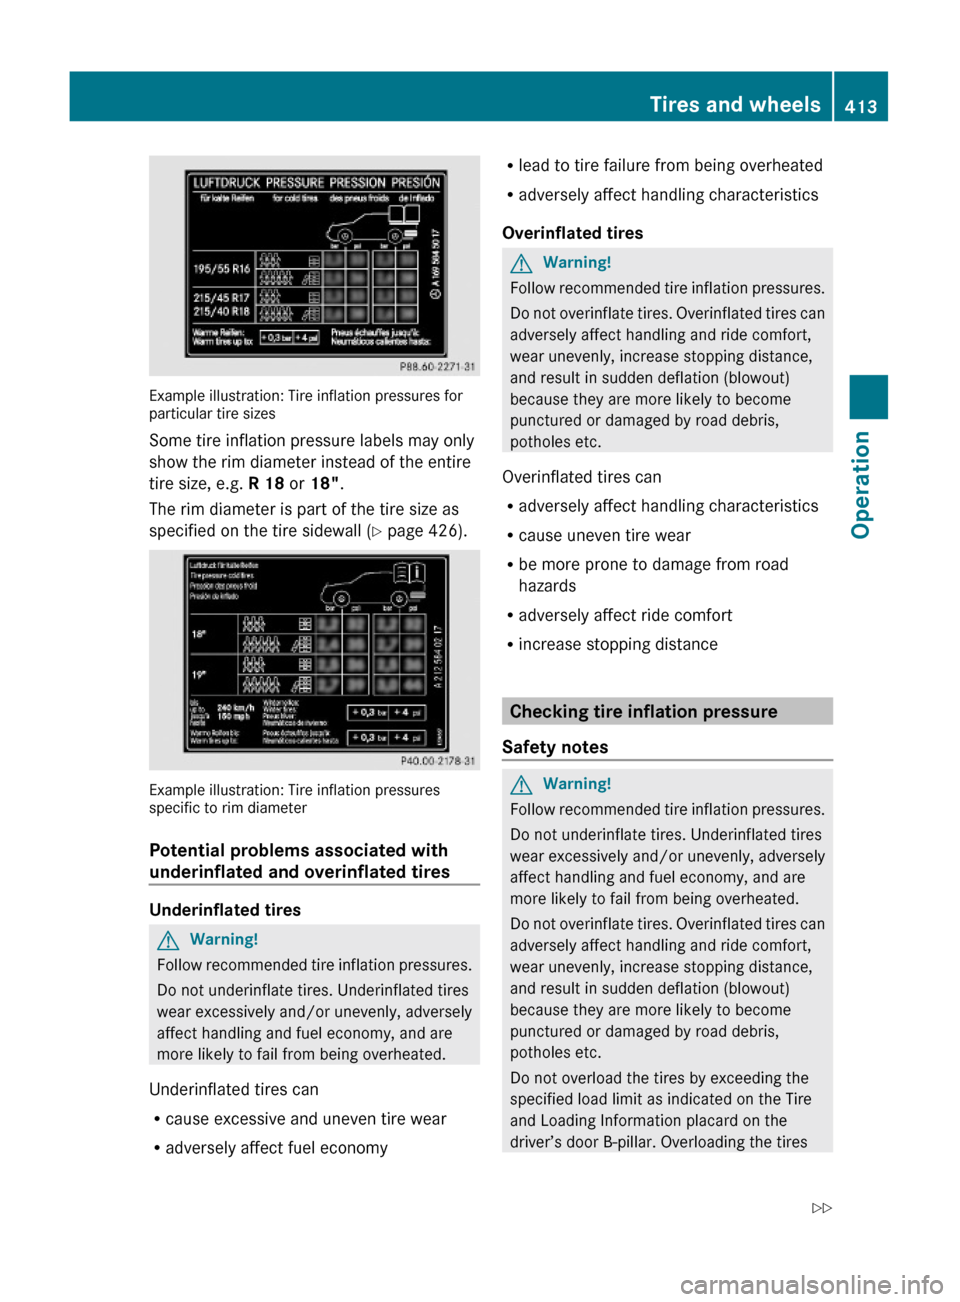
Example illustration: Tire inflation pressures forparticular tire sizes
Some tire inflation pressure labels may only
show the rim diameter instead of the entire
tire size, e.g. R 18 or 18".
The rim diameter is part of the tire size as
specified on the tire sidewall (Y page 426).
Example illustration: Tire inflation pressuresspecific to rim diameter
Potential problems associated with
underinflated and overinflated tires
Underinflated tires
GWarning!
Follow recommended tire inflation pressures.
Do not underinflate tires. Underinflated tires
wear excessively and/or unevenly, adversely
affect handling and fuel economy, and are
more likely to fail from being overheated.
Underinflated tires can
Rcause excessive and uneven tire wear
Radversely affect fuel economy
Rlead to tire failure from being overheated
Radversely affect handling characteristics
Overinflated tires
GWarning!
Follow recommended tire inflation pressures.
Do not overinflate tires. Overinflated tires can
adversely affect handling and ride comfort,
wear unevenly, increase stopping distance,
and result in sudden deflation (blowout)
because they are more likely to become
punctured or damaged by road debris,
potholes etc.
Overinflated tires can
Radversely affect handling characteristics
Rcause uneven tire wear
Rbe more prone to damage from road
hazards
Radversely affect ride comfort
Rincrease stopping distance
Checking tire inflation pressure
Safety notes
GWarning!
Follow recommended tire inflation pressures.
Do not underinflate tires. Underinflated tires
wear excessively and/or unevenly, adversely
affect handling and fuel economy, and are
more likely to fail from being overheated.
Do not overinflate tires. Overinflated tires can
adversely affect handling and ride comfort,
wear unevenly, increase stopping distance,
and result in sudden deflation (blowout)
because they are more likely to become
punctured or damaged by road debris,
potholes etc.
Do not overload the tires by exceeding the
specified load limit as indicated on the Tire
and Loading Information placard on the
driver’s door B-pillar. Overloading the tires
Tires and wheels413Operation221_AKB; 6; 20, en-USd2ugruen,Version: 2.11.8.12009-09-24T13:28:17+02:00 - Seite 413Z