2010 MERCEDES-BENZ S550 4MATIC headlamp
[x] Cancel search: headlampPage 30 of 548
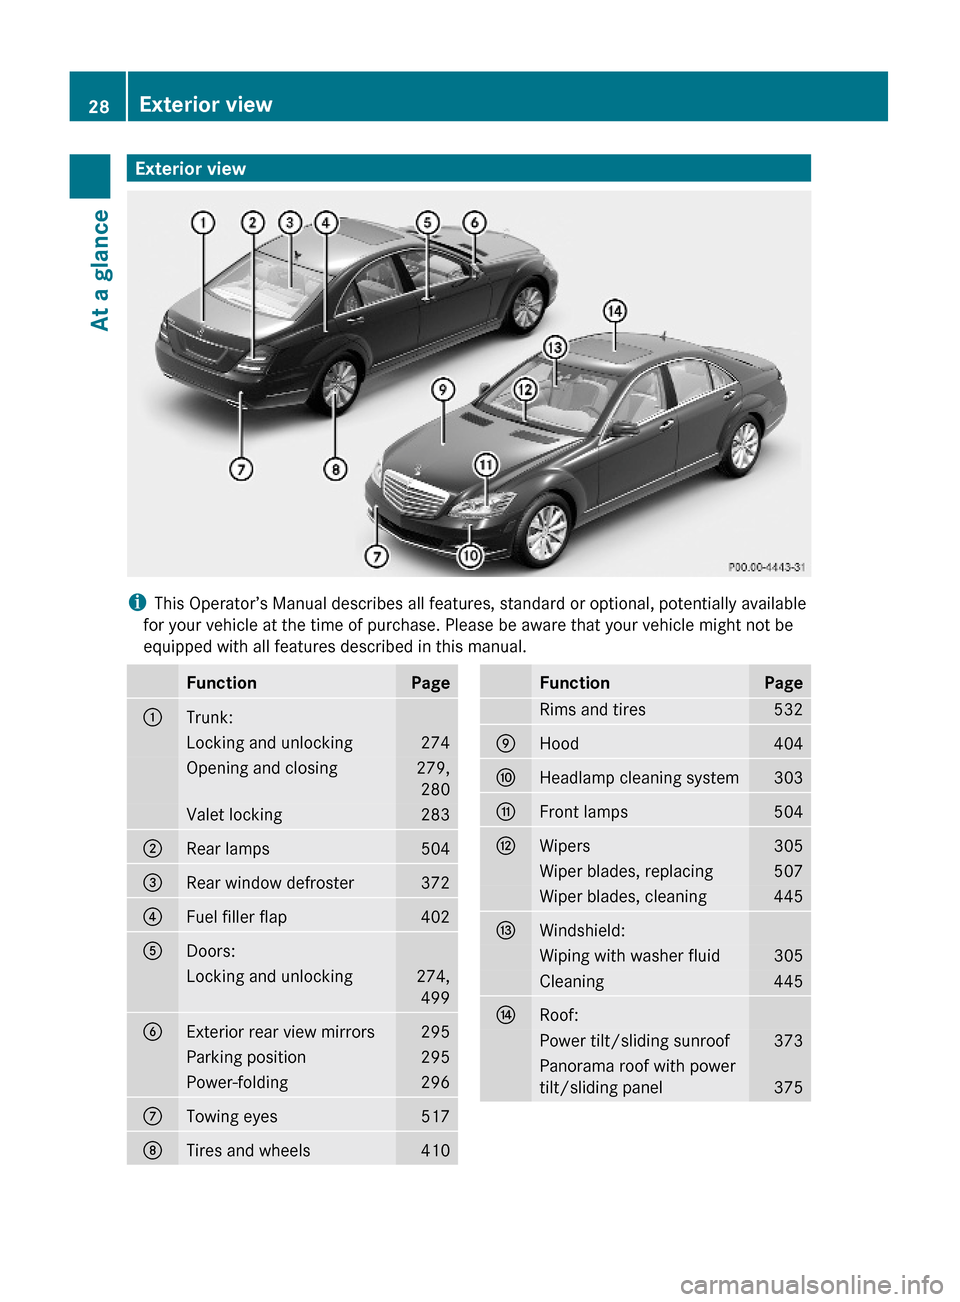
Exterior view
iThis Operator’s Manual describes all features, standard or optional, potentially available
for your vehicle at the time of purchase. Please be aware that your vehicle might not be
equipped with all features described in this manual.
FunctionPage:Trunk:Locking and unlocking274Opening and closing279,
280
Valet locking283;Rear lamps504=Rear window defroster372?Fuel filler flap402ADoors:Locking and unlocking274,
499
BExterior rear view mirrors295Parking position295Power-folding296CTowing eyes517DTires and wheels410FunctionPageRims and tires532EHood404FHeadlamp cleaning system303GFront lamps504HWipers305Wiper blades, replacing507Wiper blades, cleaning445IWindshield:Wiping with washer fluid305Cleaning445JRoof:Power tilt/sliding sunroof373Panorama roof with power
tilt/sliding panel375
28Exterior viewAt a glance
221_AKB; 6; 20, en-USd2ugruen,Version: 2.11.8.12009-09-24T13:28:17+02:00 - Seite 28
Page 34 of 548
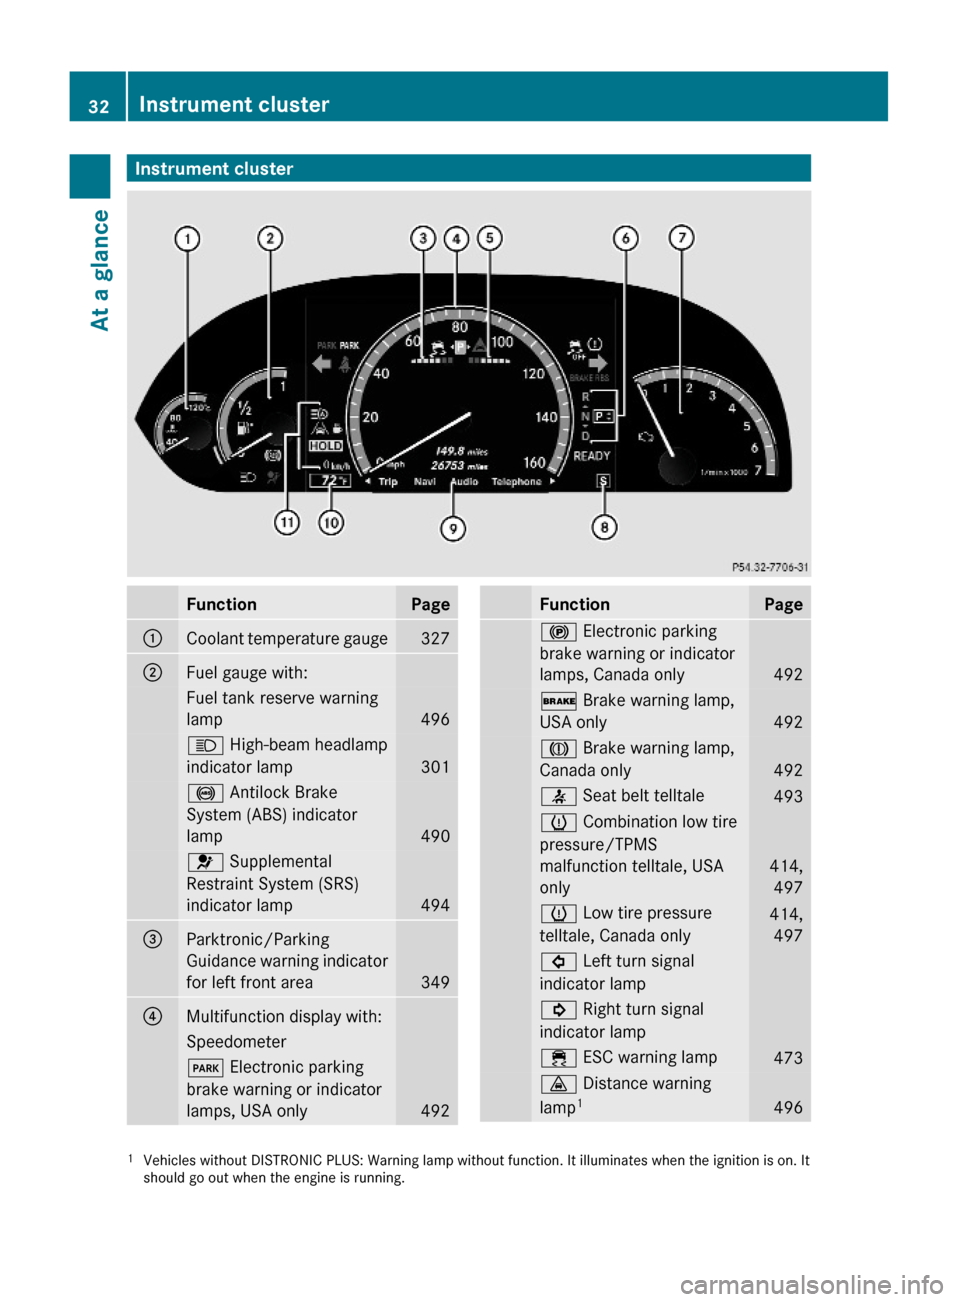
Instrument clusterFunctionPage:Coolant temperature gauge327;Fuel gauge with:Fuel tank reserve warning
lamp496
K High-beam headlamp
indicator lamp 301
! Antilock Brake
System (ABS) indicator
lamp 490
6 Supplemental
Restraint System (SRS)
indicator lamp 494
=Parktronic/Parking
Guidance warning indicator
for left front area349
?Multifunction display with:Speedometer F Electronic parking
brake warning or indicator
lamps, USA only492
FunctionPage! Electronic parking
brake warning or indicator
lamps, Canada only492
$ Brake warning lamp,
USA only492
J Brake warning lamp,
Canada only492
7 Seat belt telltale 493h Combination low tire
pressure/TPMS
malfunction telltale, USA
only
414,
497
h Low tire pressure
telltale, Canada only
414,
497
# Left turn signal
indicator lamp
! Right turn signal
indicator lamp
÷ ESC warning lamp 473· Distance warning
lamp14961Vehicles without DISTRONIC PLUS: Warning lamp without function. It illuminates when the ignition is on. Itshould go out when the engine is running.
32Instrument clusterAt a glance
221_AKB; 6; 20, en-USd2ugruen,Version: 2.11.8.12009-09-24T13:28:17+02:00 - Seite 32
Page 212 of 548
XSelect Vehicle.
The main area is active.
XSelecting Automatic Mirror Folding:
Slide XVY or rotate cVd.
XSwitching automatic fold-in function
on/off: Press W.
Locator lighting on/off
iThe components and operating principles
of COMAND can be found on (Y page 76).
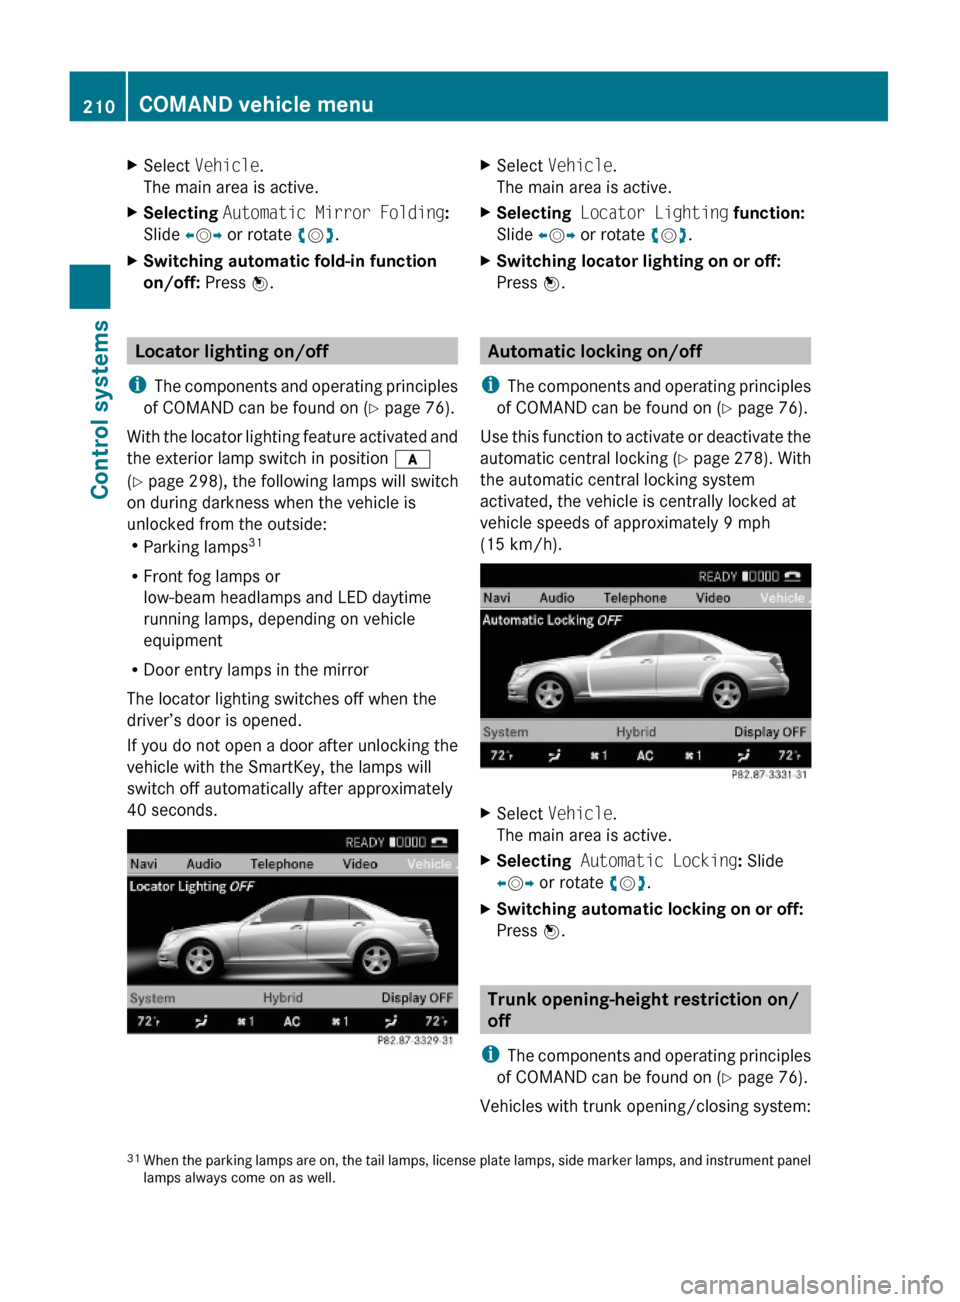
With the locator lighting feature activated and
the exterior lamp switch in position c
(Y page 298), the following lamps will switch
on during darkness when the vehicle is
unlocked from the outside:RParking lamps31
RFront fog lamps or
low-beam headlamps and LED daytime
running lamps, depending on vehicle
equipment
RDoor entry lamps in the mirror
The locator lighting switches off when the
driver’s door is opened.
If you do not open a door after unlocking the
vehicle with the SmartKey, the lamps will
switch off automatically after approximately
40 seconds.
XSelect Vehicle.
The main area is active.
XSelecting Locator Lighting function:
Slide XVY or rotate cVd.
XSwitching locator lighting on or off:
Press W.
Automatic locking on/off
iThe components and operating principles
of COMAND can be found on (Y page 76).
Use this function to activate or deactivate the
automatic central locking (Y page 278). With
the automatic central locking system
activated, the vehicle is centrally locked at
vehicle speeds of approximately 9 mph
(15 km/h).
XSelect Vehicle.
The main area is active.
XSelecting Automatic Locking: Slide
XVY or rotate cVd.
XSwitching automatic locking on or off:
Press W.
Trunk opening-height restriction on/
off
iThe components and operating principles
of COMAND can be found on (Y page 76).
Vehicles with trunk opening/closing system:
31When the parking lamps are on, the tail lamps, license plate lamps, side marker lamps, and instrument panellamps always come on as well.
210COMAND vehicle menuControl systems
221_AKB; 6; 20, en-USd2ugruen,Version: 2.11.8.12009-09-24T13:28:17+02:00 - Seite 210
Page 237 of 548
XPress button a again if you would like
to change the current status.
Depending on the previous status, the
Daytime Running Lamps will be switched
on (Enabled) or off (Disabled).
With Daytime Running Lamps mode
Enabled selected and the exterior lamp
switch at position $ or c, the low-
beam headlamps are switched on when the
engine is running.
In low ambient light conditions the following
lamps will come on additionally:
RParking lamps
RTail lamps
RLicense plate lamps
RSide marker lamps
For more information on the daytime running
lamp mode, see “Lighting” (Y page 299).
iMake sure the exterior lamp switch is set
to M or c when you switch off the
daytime running lamps while driving at
night.
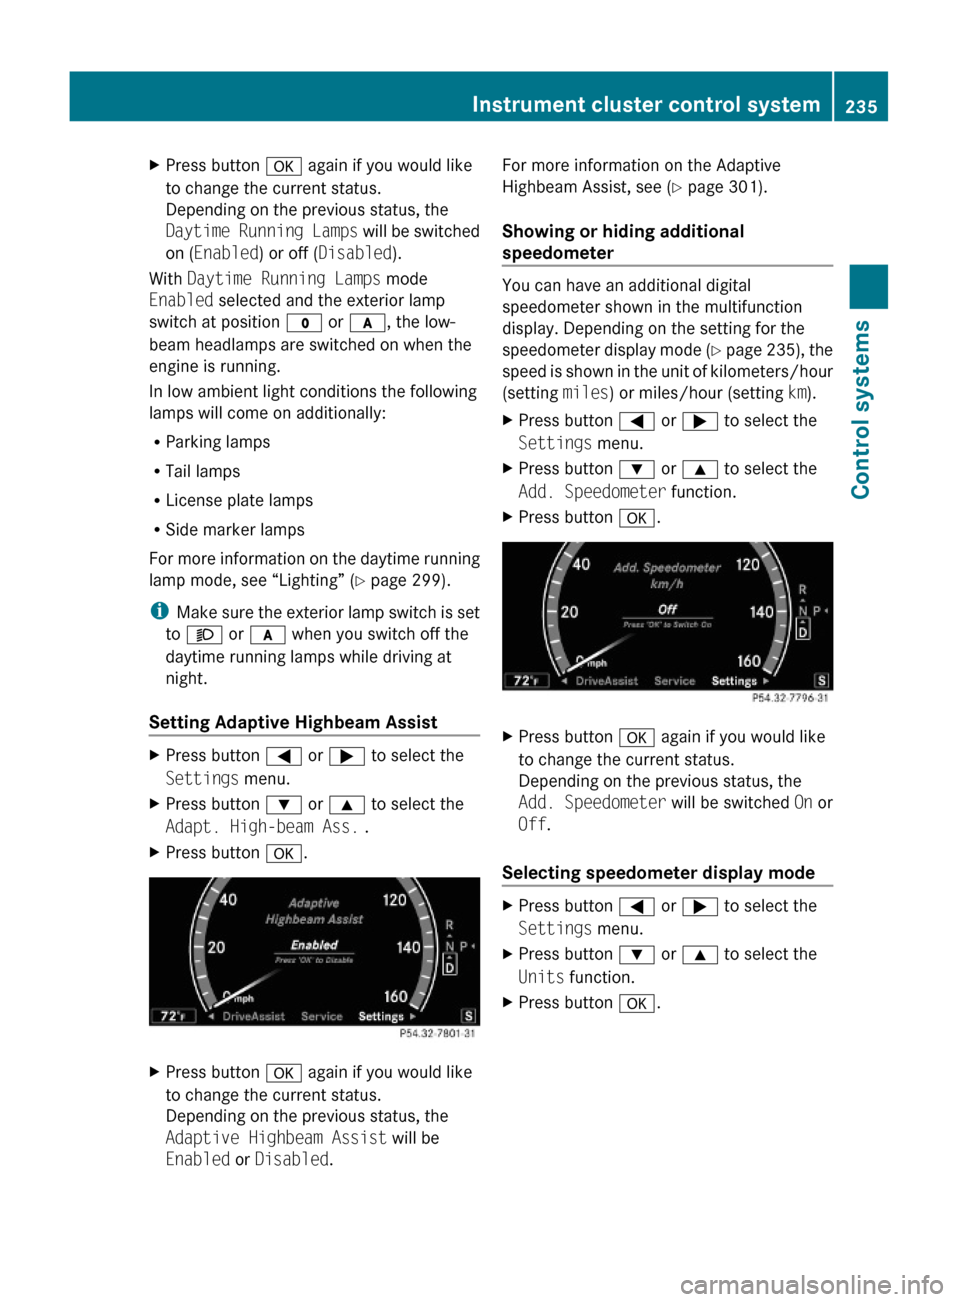
Setting Adaptive Highbeam Assist
XPress button = or ; to select the
Settings menu.
XPress button : or 9 to select the
Adapt. High-beam Ass. .
XPress button a.XPress button a again if you would like
to change the current status.
Depending on the previous status, the
Adaptive Highbeam Assist will be
Enabled or Disabled.
For more information on the Adaptive
Highbeam Assist, see (Y page 301).
Showing or hiding additional
speedometer
You can have an additional digital
speedometer shown in the multifunction
display. Depending on the setting for the
speedometer display mode (Y page 235), the
speed is shown in the unit of kilometers/hour
(setting miles) or miles/hour (setting km).
XPress button = or ; to select the
Settings menu.
XPress button : or 9 to select the
Add. Speedometer function.
XPress button a.XPress button a again if you would like
to change the current status.
Depending on the previous status, the
Add. Speedometer will be switched On or
Off.
Selecting speedometer display mode
XPress button = or ; to select the
Settings menu.
XPress button : or 9 to select the
Units function.
XPress button a.Instrument cluster control system235Control systems221_AKB; 6; 20, en-USd2ugruen,Version: 2.11.8.12009-09-24T13:28:17+02:00 - Seite 235Z
Page 286 of 548

GWarning!
Only drive with the doors closed. Otherwise,
one or more of the doors could open while the
vehicle is in motion, putting you and/or
others at risk.
GWarning!
Make sure the trunk is closed when the engine
is running and while driving. Among other
dangers, deadly carbon monoxide (CO) gases
may enter vehicle interior resulting in
unconsciousness and death.
XPower closing assist for doors: Press the
doors gently past the initial engage position
into the lock.
XPower closing assist for trunk lid: Press
the trunk lid gently into its lock.
Starter switch positions
SmartKey
GObserve Safety notes, see page 56.
Starter switch
gFor removing SmartKey1Power supply for some electrical
consumers, e.g. wipers
2Ignition (power supply for all electrical
consumers) and driving position
3Starting position
When you switch on the ignition, all lamps in
the instrument cluster come on. The high-
beam headlamp indicator lamp and turn
signal indicator lamps will only come on if
activated. If a lamp in the instrument cluster
fails to come on when the ignition is switched
on, have it checked and replaced if necessary.
If a lamp in the instrument cluster remains on
after starting the engine or comes on while
driving, refer to “Lamps in instrument cluster”
(Y page 489).
XAlways remove the SmartKey from the
starter switch when the engine is not in
operation.
This will help to prevent accelerated vehicle
battery discharge or a completely
discharged vehicle battery.
If the SmartKey cannot be turned in the
starter switch, the vehicle battery may not be
sufficiently charged.
XCheck the vehicle battery and charge it if
necessary (Y page 514).
or
XGet a jump start (Y page 514).
iIf the SmartKey does not belong to the
vehicle, the SmartKey can be turned in the
starter switch. However, the ignition does
not switch on and the engine does not start.
KEYLESS-GO
GObserve Safety notes, see page 56.
Vehicles equipped with the KEYLESS-GO
feature are supplied with a SmartKey with
integrated KEYLESS-GO function and a
removable KEYLESS-GO start/stop button.
The KEYLESS-GO start/stop button must be
inserted in the starter switch and the
SmartKey present in the vehicle.
Pressing the KEYLESS-GO start/stop button
without depressing the brake pedal
corresponds to the various starter switch
positions (Y page 284).
Pressing the KEYLESS-GO start/stop button
with the brake pedal firmly depressed will
start the engine (Y page 311).
The KEYLESS-GO start/stop button can be
pulled out of the starter switch easily. You can
284Starter switch positionsControls in detail
221_AKB; 6; 20, en-USd2ugruen,Version: 2.11.8.12009-09-24T13:28:17+02:00 - Seite 284
Page 287 of 548

then insert the SmartKey into the starter
switch.
iThe KEYLESS-GO start/stop button does
not need to be removed from the starter
switch when you leave the vehicle.
However, always take the SmartKey with
you when you leave the vehicle. As long as
the SmartKey is in the vehicle, the vehicle’s
electrical systems can be switched on or
the engine can be started using the
KEYLESS-GO start/stop button.
:KEYLESS-GO start/stop button;Starter switchXInsert the KEYLESS-GO start/stop button
into the starter switch (if not inserted
already).
iAllow for 2 seconds until the system has
detected the KEYLESS-GO start/stop
button.
XMake sure the automatic transmission is in
park position P.
XDo not depress the brake pedal.
KEYLESS-GO start/stop button
=USA only?Canada only
Position 0
Before you press the KEYLESS-GO start/stop
button, the vehicle’s on-board electronics
have status 0 (as with SmartKey removed).
Position 1
XPress the KEYLESS-GO start/stop button
once.
This supplies power for some electrical
consumers, e.g. wipers.
iWhen you now open the driver’s door, the
power supply is switched off.
Ignition (or position 2)
XPress the KEYLESS-GO start/stop button
twice.
This supplies power for all electrical
consumers.
When you switch on the ignition, all lamps
in the instrument cluster come on. The
high-beam headlamp indicator lamp and
turn signal indicator lamps will only come
on if activated. If a lamp in the instrument
cluster fails to come on when the ignition
is switched on, have it checked and
replaced if necessary. If a lamp in the
instrument cluster remains on after
starting the engine or comes on while
driving, refer to “Lamps in instrument
cluster” (Y page 489).
Starter switch positions285Controls in detail221_AKB; 6; 20, en-USd2ugruen,Version: 2.11.8.12009-09-24T13:28:17+02:00 - Seite 285Z
Page 297 of 548
Exterior rear view mirrorsGWarning!
Exercise care when using the passenger-side
exterior rear view mirror. The mirror surface
is convex (outwardly curved surface for a
wider field of view). Objects in mirror are
closer than they appear. Check your interior
rear view mirror and glance over your
shoulder before changing lanes.
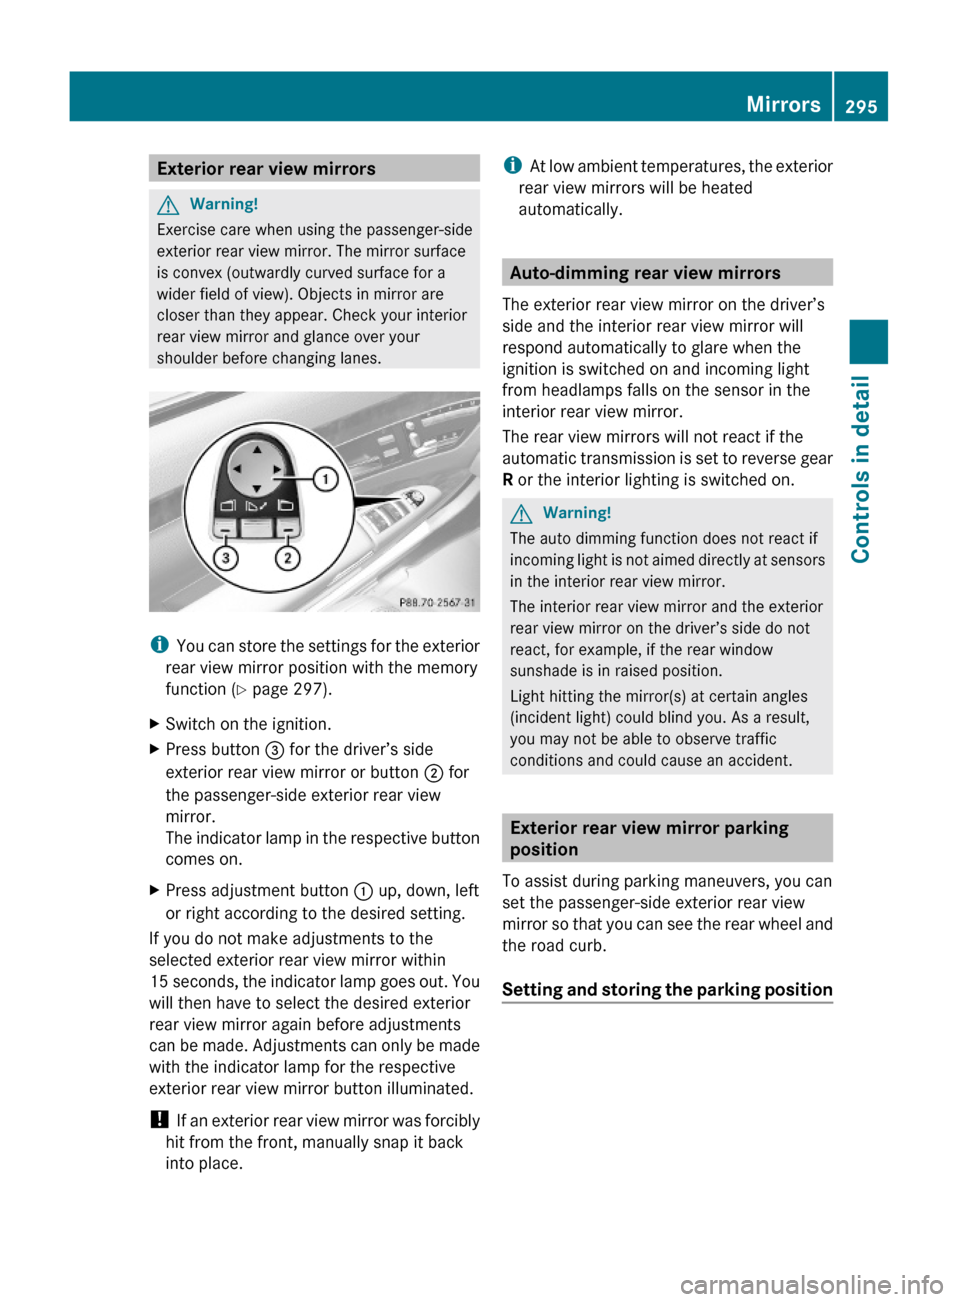
iYou can store the settings for the exterior
rear view mirror position with the memory
function (Y page 297).
XSwitch on the ignition.XPress button = for the driver’s side
exterior rear view mirror or button ; for
the passenger-side exterior rear view
mirror.
The indicator lamp in the respective button
comes on.
XPress adjustment button : up, down, left
or right according to the desired setting.
If you do not make adjustments to the
selected exterior rear view mirror within
15 seconds, the indicator lamp goes out. You
will then have to select the desired exterior
rear view mirror again before adjustments
can be made. Adjustments can only be made
with the indicator lamp for the respective
exterior rear view mirror button illuminated.
! If an exterior rear view mirror was forcibly
hit from the front, manually snap it back
into place.
iAt low ambient temperatures, the exterior
rear view mirrors will be heated
automatically.
Auto-dimming rear view mirrors
The exterior rear view mirror on the driver’s
side and the interior rear view mirror will
respond automatically to glare when the
ignition is switched on and incoming light
from headlamps falls on the sensor in the
interior rear view mirror.
The rear view mirrors will not react if the
automatic transmission is set to reverse gear
R or the interior lighting is switched on.
GWarning!
The auto dimming function does not react if
incoming light is not aimed directly at sensors
in the interior rear view mirror.
The interior rear view mirror and the exterior
rear view mirror on the driver’s side do not
react, for example, if the rear window
sunshade is in raised position.
Light hitting the mirror(s) at certain angles
(incident light) could blind you. As a result,
you may not be able to observe traffic
conditions and could cause an accident.
Exterior rear view mirror parking
position
To assist during parking maneuvers, you can
set the passenger-side exterior rear view
mirror so that you can see the rear wheel and
the road curb.
Setting and storing the parking position
Mirrors295Controls in detail221_AKB; 6; 20, en-USd2ugruen,Version: 2.11.8.12009-09-24T13:28:17+02:00 - Seite 295Z
Page 300 of 548
Storing positions into memoryXAdjust the seats.XOn the driver’s side, also adjust the
steering wheel and exterior rear view
mirrors to the desired positions.
XPress memory button M once and within
3 seconds press memory position button
1, 2 or 3.
When the settings are stored to the
selected position, an acknowledgement
signal sounds.
Recalling positions from memory
XPress and hold desired memory position
button 1, 2 or 3 until the seat has moved
to the stored position completely. On the
driver’s side, also wait for the steering
wheel and exterior rear view mirrors to
move to the stored position.
iReleasing the memory position button
stops movement to the stored positions
immediately.
Lighting
Notes
iIf you drive in countries with left-hand
driving, you must have the headlamps
modified for symmetrical low beams.
Relevant information can be obtained at
any authorized Mercedes-Benz Center.
iThe active Bi-Xenon headlamps increase
usable illumination over conventional
headlamps because they follow the
curvature of the road ahead. The beams of
the active Bi-Xenon headlamps shift to
either side according to the vehicle’s
steering angle and speed.
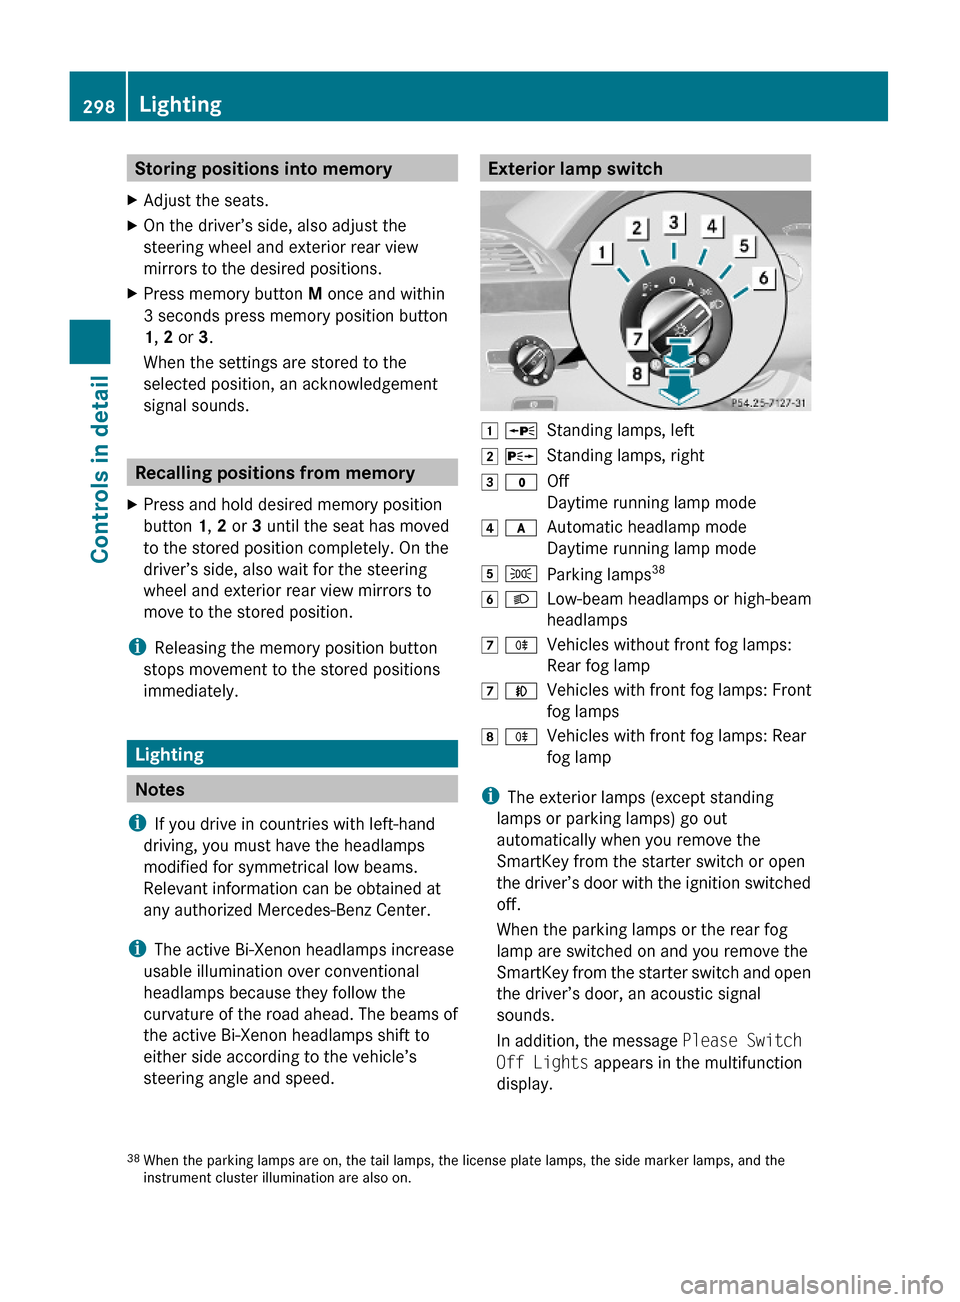
Exterior lamp switch1 WStanding lamps, left2 XStanding lamps, right3 $Off
Daytime running lamp mode
4 cAutomatic headlamp mode
Daytime running lamp mode
5 TParking lamps386 LLow-beam headlamps or high-beam
headlamps
7 RVehicles without front fog lamps:
Rear fog lamp
7 NVehicles with front fog lamps: Front
fog lamps
8 RVehicles with front fog lamps: Rear
fog lamp
iThe exterior lamps (except standing
lamps or parking lamps) go out
automatically when you remove the
SmartKey from the starter switch or open
the driver’s door with the ignition switched
off.
When the parking lamps or the rear fog
lamp are switched on and you remove the
SmartKey from the starter switch and open
the driver’s door, an acoustic signal
sounds.
In addition, the message Please Switch
Off Lights appears in the multifunction
display.
38When the parking lamps are on, the tail lamps, the license plate lamps, the side marker lamps, and theinstrument cluster illumination are also on.
298LightingControls in detail
221_AKB; 6; 20, en-USd2ugruen,Version: 2.11.8.12009-09-24T13:28:17+02:00 - Seite 298