2010 MERCEDES-BENZ S CLASS trunk
[x] Cancel search: trunkPage 391 of 548
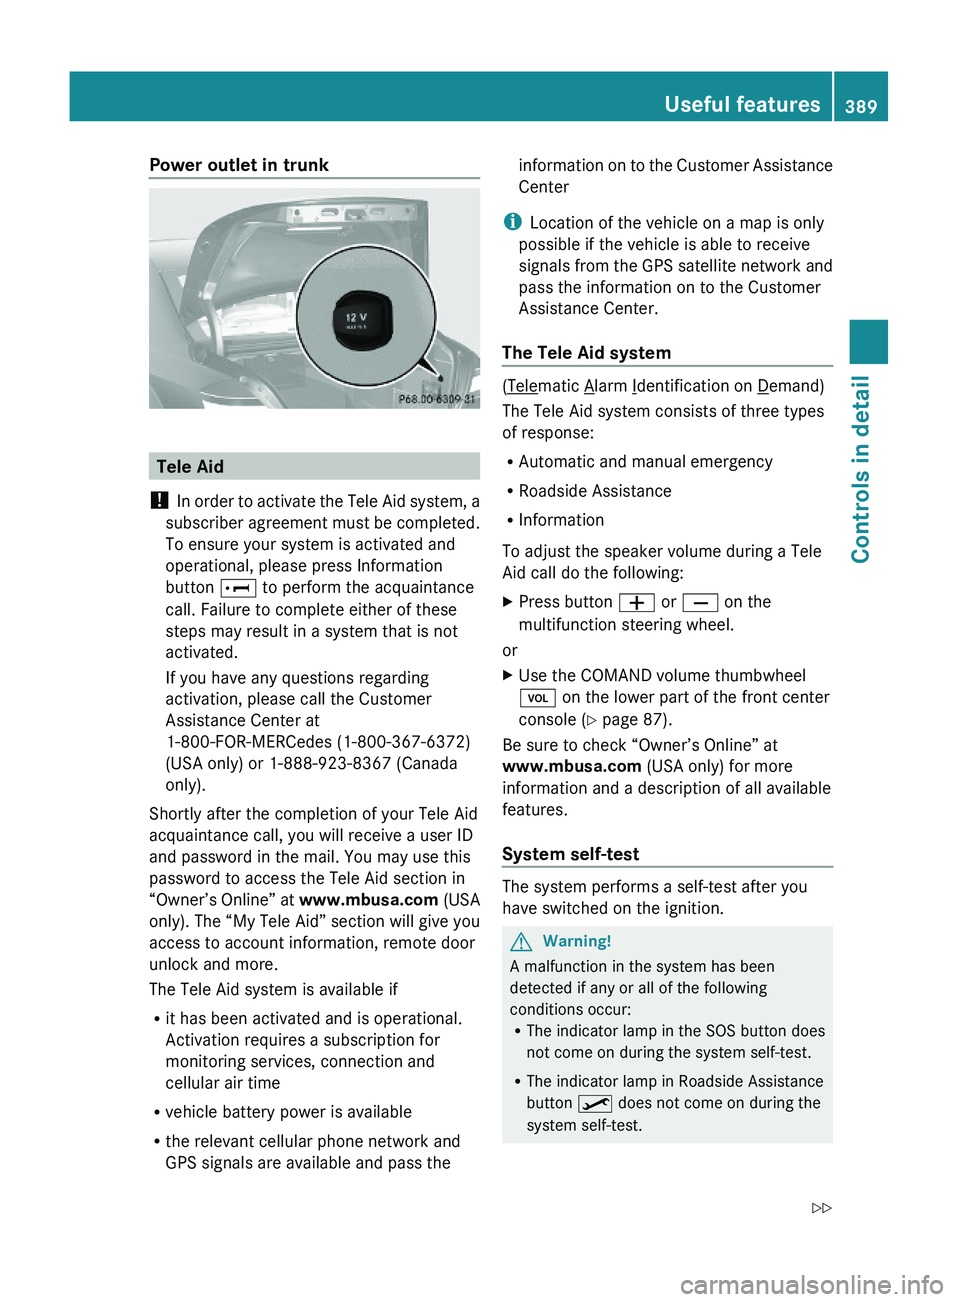
Power outlet in trunk
Tele Aid
! In order to activate the Tele Aid system, a
subscriber agreement must be completed.
To ensure your system is activated and
operational, please press Information
button \000] to perform the acquaintance
call. Failure to complete either of these
steps may result in a system that is not
activated.
If you have any questions regarding
activation, please call the Customer
Assistance Center at
1-800-FOR-MERCedes (1-800-367-6372)
(USA only) or 1-888-923-8367 (Canada
only).
Shortly after the completion of your Tele Aid
acquaintance call, you will receive a user ID
and password in the mail. You may use this
password to access the Tele Aid section in
“Owner’s Online” at www.mbusa.com (USA
only). The “My Tele Aid” section will give you
access to account information, remote door
unlock and more.
The Tele Aid system is available if
Rit has been activated and is operational.
Activation requires a subscription for
monitoring services, connection and
cellular air time
Rvehicle battery power is available
Rthe relevant cellular phone network and
GPS signals are available and pass the
information on to the Customer Assistance
Center
iLocation of the vehicle on a map is only
possible if the vehicle is able to receive
signals from the GPS satellite network and
pass the information on to the Customer
Assistance Center.
The Tele Aid system
(Telematic Alarm Identification on Demand)
The Tele Aid system consists of three types
of response:
RAutomatic and manual emergency
RRoadside Assistance
RInformation
To adjust the speaker volume during a Tele
Aid call do the following:
XPress button \000Z or \000[ on the
multifunction steering wheel.
or
XUse the COMAND volume thumbwheel
\000M on the lower part of the front center
console (Y page 87).
Be sure to check “Owner’s Online” at
www.mbusa.com (USA only) for more
information and a description of all available
features.
System self-test
The system performs a self-test after you
have switched on the ignition.
GWarning!
A malfunction in the system has been
detected if any or all of the following
conditions occur:RThe indicator lamp in the SOS button does
not come on during the system self-test.
RThe indicator lamp in Roadside Assistance
button \000
Page 396 of 548
directly to the Navigation system in your
vehicle.
Specify and Send a Destination Address
i Please refer to any specific instructions
provided by either website regarding
entering or sending an address. Each
website functions differently and is subject
to change.XGo to www.maps.google.com or
www.maps.yahoo.com and enter a
destination address in the address entry
field.XDepending on which website you are using,
click on the appropriate button to send the
destination address to your Tele Aid
account email address.XEnter the email address you specified when
you activated your Tele Aid account in the
appropriate field when the “Send” dialog
box appears.XClick “Send”.
Retrieve Destination Address
XPress the Tele Aid Information button to
begin the download of the destination
address to your vehicle's navigation
system.
i If you have sent more than one
destination address to your vehicle you
must make one Information call for each
destination address download.
XSelect Yes when the message appears
asking if you would like to start navigation.
This will open the start navigation screen.XSelect Start.
or
XSelect No if you wish to save the
downloaded destination address in the
From Memory destination list for future
use.
i Destination addresses will download in
the same order they were sent. If you have
multiple Mercedes-Benz vehicles equipped
with Tele Aid and active accounts, each
destination address sent will be retrievable
by all vehicles associated with the e-mail
address you specified for your Tele Aid
account.
Remote door unlock
In case you have locked your vehicle
unintentionally (e.g. SmartKey inside vehicle),
and the reserve SmartKey is not available:
XContact the Customer Assistance Center
at 1-800-FOR-MERCedes
(1-800-367-6372) (USA only) or
1-888-923-8367 (Canada only).
You will be asked to provide your password.XThen return to your vehicle at the time
arranged with the Customer Assistance
Center and pull the trunk lid handle for a
minimum of 20 seconds until the indicator
lamp in the SOS button is flashing.
The message Connecting Call appears in
the multifunction display.
As an alternative, you may unlock the vehicle
via Internet in the “My Tele Aid” section of
“Owner’s Online”, using your ID and password
(USA only).
i The remote door unlock feature is
available if the relevant cellular phone
network is available.
The SOS button will flash and the message
Connecting Call will appear in the
multifunction display to indicate receipt of
the door unlock command.
If the trunk lid handle was pulled for more
than 20 seconds before door unlock
authorization was received, you must wait
15 minutes before pulling the trunk lid
handle again.
Remote door lock
If you have forgotten to lock your vehicle and
are no longer near it, you can have it locked
remotely through the Customer Assistance
Center.
394Useful featuresControls in detail
221_AKB; 6; 20, en-USd2ugruen,Version: 2.11.8.12009-09-24T13:28:17+02:00 - Seite 394
Page 452 of 548

Vehicle equipment
iThis Operator’s Manual describes all
features, standard or optional, potentially
available for your vehicle at the time of
purchase. Please be aware that your
vehicle might not be equipped with all
features described in this manual.
Where will I find ...?
First aid kit
iCheck expiration dates and contents for
completeness at least once a year and
replace missing/expired items.
The first aid kit is located in the trunk on the
right side storage pocket, secured by a
tensioning strap.
XLoosen tensioning strap \000F.
First aid kit \000G can be removed.
Vehicle tool kit
The vehicle tool kit is located in the space
underneath the trunk floor.
iVehicles without spare wheel are not
factory-equipped with the tools required for
a wheel change such as a jack or a wheel
wrench. Some tools required for a wheel
change are specific to your vehicle.
Contact an authorized Mercedes-Benz
Center to obtain the tools approved for
your vehicle.
The vehicle tool kit includes:
RAlignment bolt 44
RCollapsible wheel chock44
RFuse chart
RJack44
RPair of gloves44
RTowing eye bolt
RWheel wrench44
XRemoving: Open the trunk (Y page 279).XLift the trunk floor using the floor handle.XEngage the floor handle on the upper trunk
lip.
! To prevent damage, always disengage the
floor handle from the upper trunk lip and
lower the trunk floor before closing the
trunk.
\000FCollapsible wheel chock\000GVehicle tool kit box cover\000
Page 454 of 548
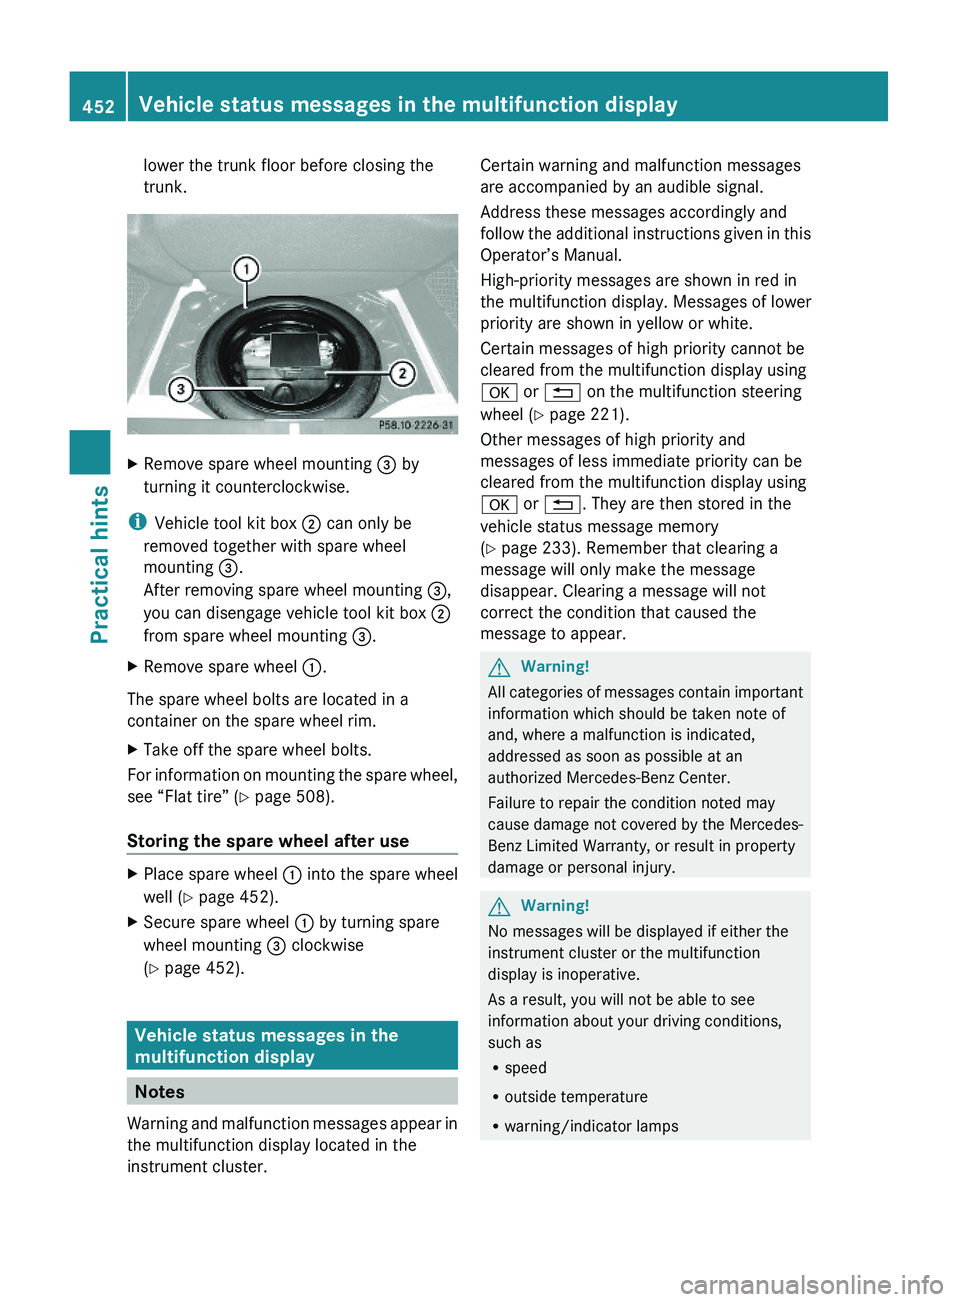
lower the trunk floor before closing the
trunk.
XRemove spare wheel mounting \000
Page 480 of 548
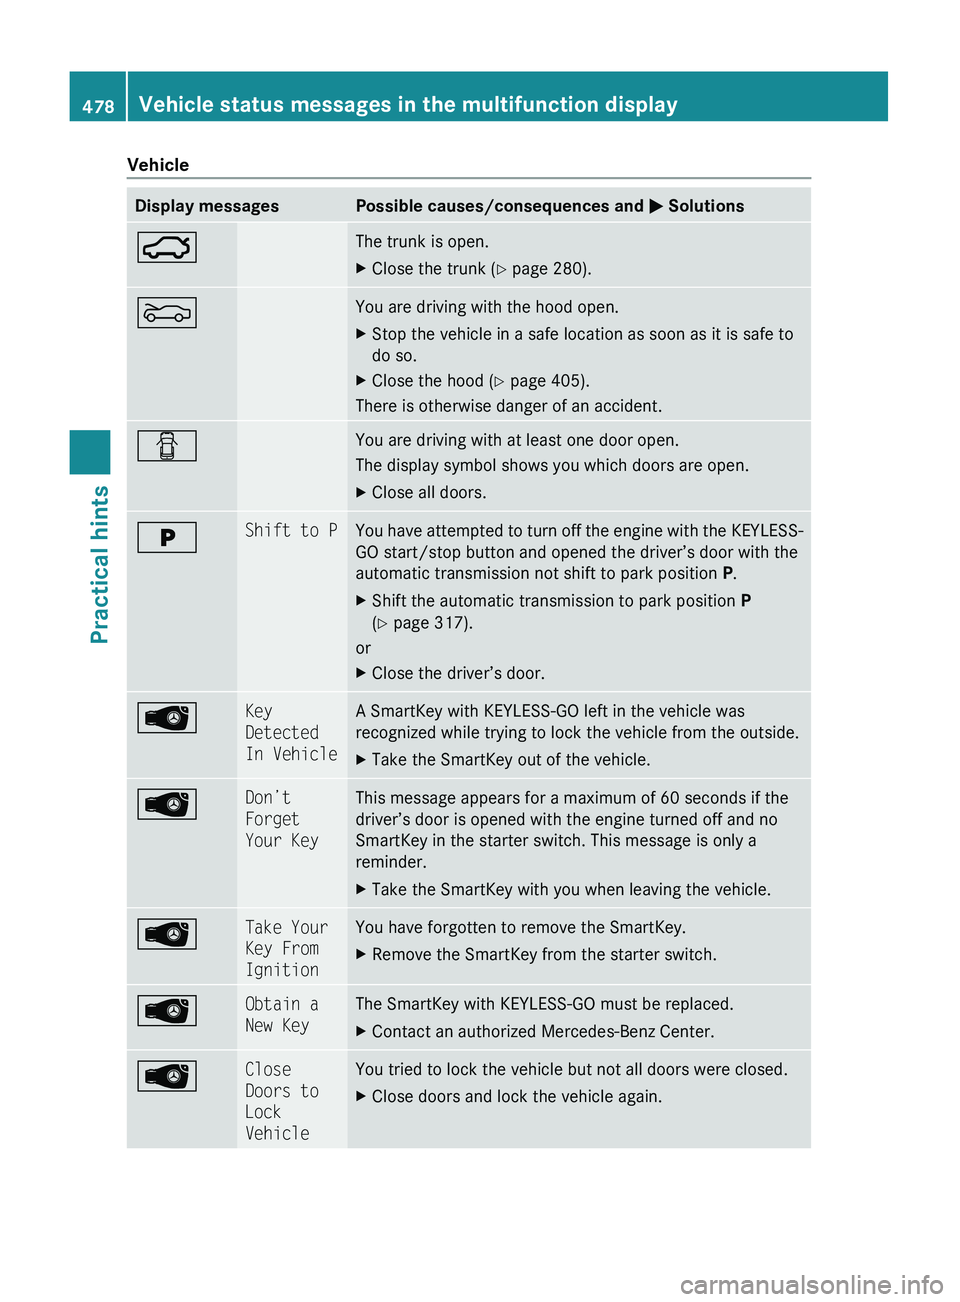
VehicleDisplay messagesPossible causes/consequences and 0050 Solutions0047The trunk is open.XClose the trunk ( Y page 280).0083You are driving with the hood open.XStop the vehicle in a safe location as soon as it is safe to
do so.XClose the hood ( Y page 405).
There is otherwise danger of an accident.
0051You are driving with at least one door open.
The display symbol shows you which doors are open.XClose all doors.0048Shift to PYou have attempted to turn off the engine with the KEYLESS-
GO start/stop button and opened the driver’s door with the
automatic transmission not shift to park position P.XShift the automatic transmission to park position P
( Y page 317).
or
XClose the driver’s door.00B1Key
Detected
In VehicleA SmartKey with KEYLESS-GO left in the vehicle was
recognized while trying to lock the vehicle from the outside.XTake the SmartKey out of the vehicle.00B1Don’t
Forget
Your KeyThis message appears for a maximum of 60 seconds if the
driver’s door is opened with the engine turned off and no
SmartKey in the starter switch. This message is only a
reminder.XTake the SmartKey with you when leaving the vehicle.00B1Take Your
Key From
IgnitionYou have forgotten to remove the SmartKey.XRemove the SmartKey from the starter switch.00B1Obtain a
New KeyThe SmartKey with KEYLESS-GO must be replaced.XContact an authorized Mercedes-Benz Center.00B1Close
Doors to
Lock
VehicleYou tried to lock the vehicle but not all doors were closed.XClose doors and lock the vehicle again.478Vehicle status messages in the multifunction displayPractical hints
221_AKB; 6; 20, en-USd2ugruen,Version: 2.11.8.12009-09-24T13:28:17+02:00 - Seite 478
Page 501 of 548
ProblemPossible causes/consequences and \000P Solutions\000\000}
The front passenger
front air bag off
indicator lamp does not
illuminate and/or does
not remain illuminated
with the weight of a
typical 12-month-old
child in a standard child
restraint or less on the
front passenger seat.
The system is malfunctioning.XMake sure there is nothing between seat cushion and child seat
and check installation of the child seat.
XMake sure no objects applying supplemental weight onto the
seat are present.
XIf the front passenger front air bag off indicator lamp remains
out, have the system checked as soon as possible at an
authorized Mercedes-Benz Center. Do not transport a child on
the front passenger seat until the system has been repaired.
XRead and observe messages in the multifunction display and
follow corrective steps (Y page 452).
GWarning!
If the \000\000} indicator lamp does not
illuminate or remains out with the weight of a
typical 12-month-old child in a standard child
restraint or less on the front passenger seat,
do not transport a child on the front
passenger seat until the system has been
repaired.
Unlocking/locking manually
Unlocking the vehicle
If you cannot unlock the vehicle with the
SmartKey or with KEYLESS-GO, unlock the
driver’s door and the trunk using the
mechanical key.
The anti-theft alarm system will trigger when
you
Runlock the driver’s door or the trunk with
the mechanical key
and
Ropen the driver’s door or the trunk
To cancel the alarm, insert the SmartKey into
the starter switch.
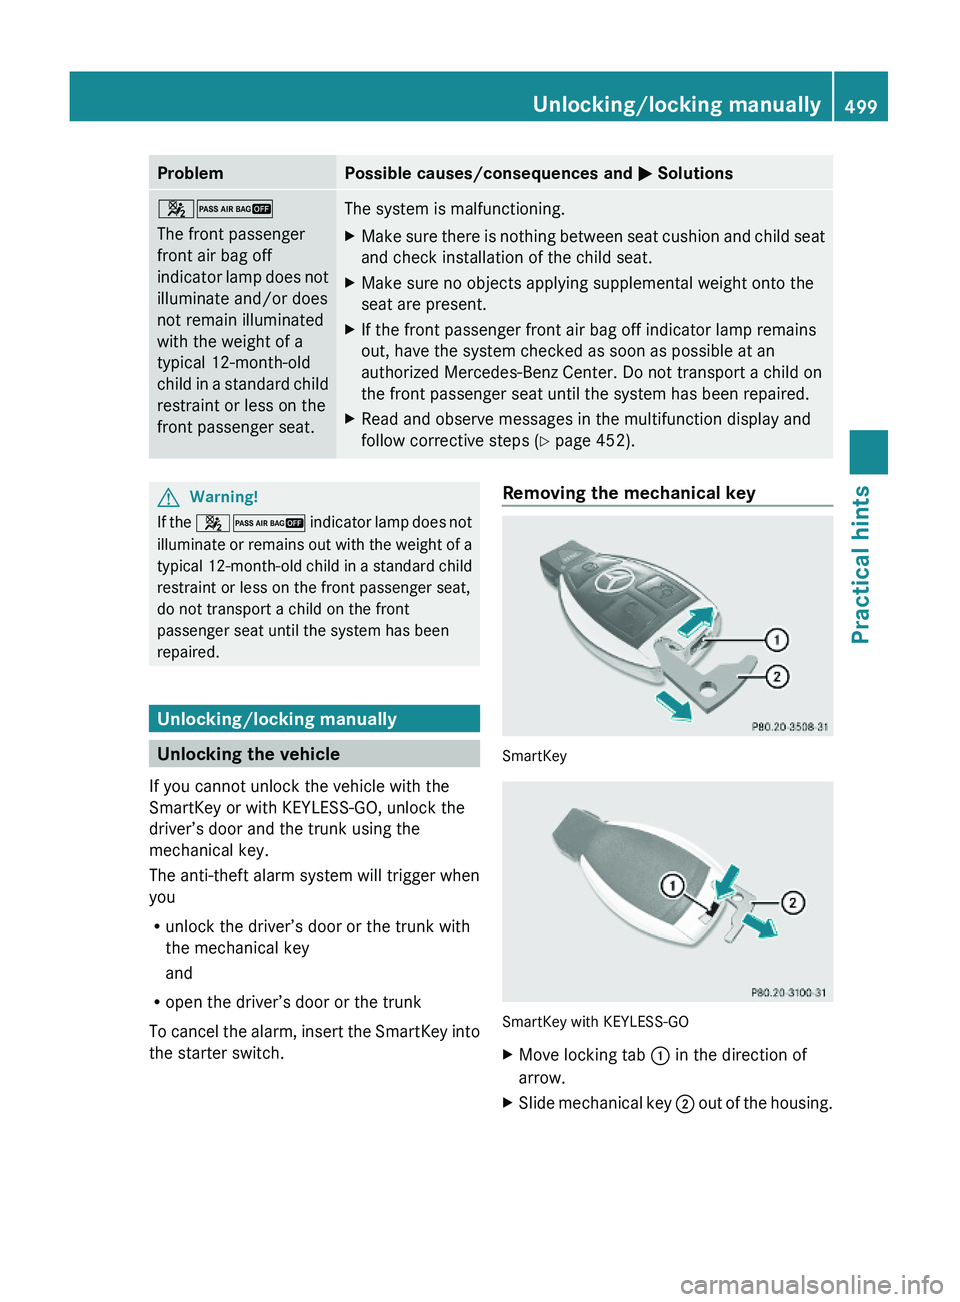
Removing the mechanical key
SmartKey
SmartKey with KEYLESS-GO
XMove locking tab \000F in the direction of
arrow.
XSlide mechanical key \000G out of the housing.Unlocking/locking manually499Practical hints221_AKB; 6; 20, en-USd2ugruen,Version: 2.11.8.12009-09-24T13:28:17+02:00 - Seite 499Z
Page 502 of 548
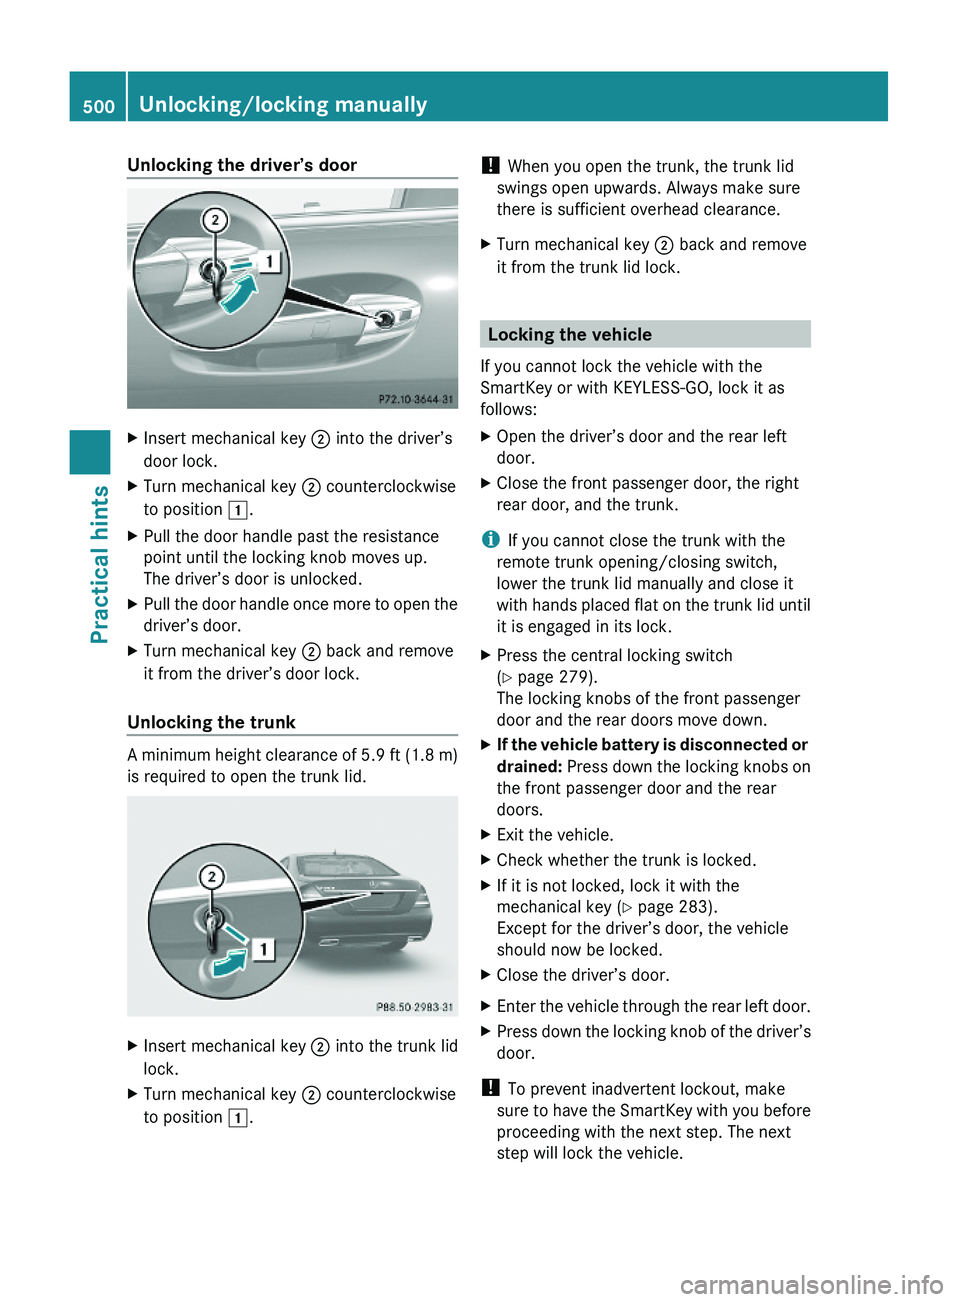
Unlocking the driver’s doorXInsert mechanical key \000G into the driver’s
door lock.
XTurn mechanical key \000G counterclockwise
to position \000J.
XPull the door handle past the resistance
point until the locking knob moves up.
The driver’s door is unlocked.
XPull the door handle once more to open the
driver’s door.
XTurn mechanical key \000G back and remove
it from the driver’s door lock.
Unlocking the trunk
A minimum height clearance of 5.9 ft (1.8 m)
is required to open the trunk lid.
XInsert mechanical key \000G into the trunk lid
lock.
XTurn mechanical key \000G counterclockwise
to position \000J.
! When you open the trunk, the trunk lid
swings open upwards. Always make sure
there is sufficient overhead clearance.
XTurn mechanical key \000G back and remove
it from the trunk lid lock.
Locking the vehicle
If you cannot lock the vehicle with the
SmartKey or with KEYLESS-GO, lock it as
follows:
XOpen the driver’s door and the rear left
door.
XClose the front passenger door, the right
rear door, and the trunk.
iIf you cannot close the trunk with the
remote trunk opening/closing switch,
lower the trunk lid manually and close it
with hands placed flat on the trunk lid until
it is engaged in its lock.
XPress the central locking switch
(Y page 279).
The locking knobs of the front passenger
door and the rear doors move down.
XIf the vehicle battery is disconnected or
drained: Press down the locking knobs on
the front passenger door and the rear
doors.
XExit the vehicle.XCheck whether the trunk is locked.XIf it is not locked, lock it with the
mechanical key (Y page 283).
Except for the driver’s door, the vehicle
should now be locked.
XClose the driver’s door.XEnter the vehicle through the rear left door.XPress down the locking knob of the driver’s
door.
! To prevent inadvertent lockout, make
sure to have the SmartKey with you before
proceeding with the next step. The next
step will lock the vehicle.
500Unlocking/locking manuallyPractical hints
221_AKB; 6; 20, en-USd2ugruen,Version: 2.11.8.12009-09-24T13:28:17+02:00 - Seite 500
Page 513 of 548
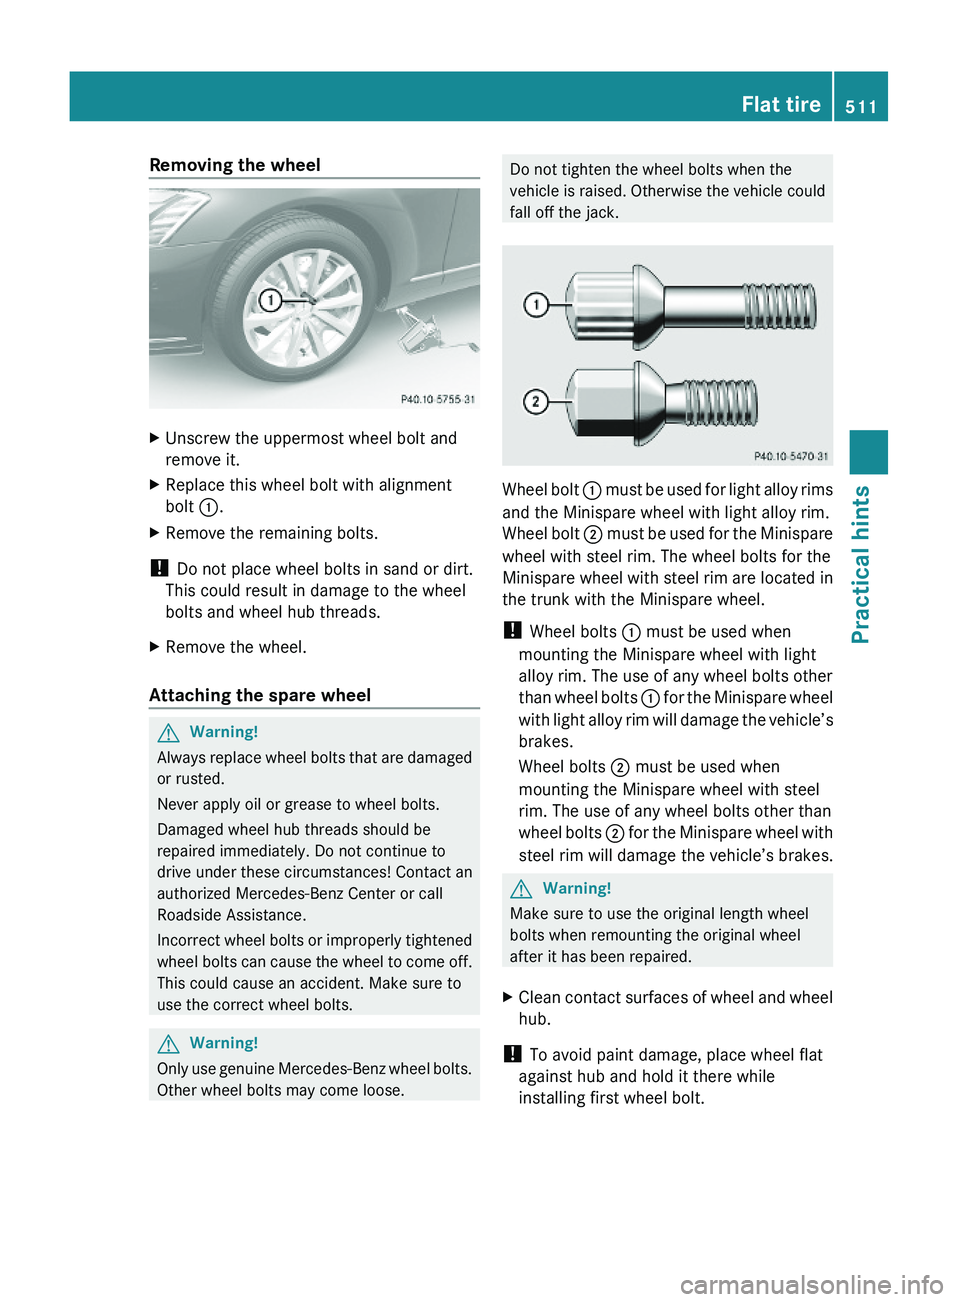
Removing the wheelXUnscrew the uppermost wheel bolt and
remove it.
XReplace this wheel bolt with alignment
bolt \000F.
XRemove the remaining bolts.
! Do not place wheel bolts in sand or dirt.
This could result in damage to the wheel
bolts and wheel hub threads.
XRemove the wheel.
Attaching the spare wheel
GWarning!
Always replace wheel bolts that are damaged
or rusted.
Never apply oil or grease to wheel bolts.
Damaged wheel hub threads should be
repaired immediately. Do not continue to
drive under these circumstances! Contact an
authorized Mercedes-Benz Center or call
Roadside Assistance.
Incorrect wheel bolts or improperly tightened
wheel bolts can cause the wheel to come off.
This could cause an accident. Make sure to
use the correct wheel bolts.
GWarning!
Only use genuine Mercedes-Benz wheel bolts.
Other wheel bolts may come loose.
Do not tighten the wheel bolts when the
vehicle is raised. Otherwise the vehicle could
fall off the jack.
Wheel bolt \000F must be used for light alloy rims
and the Minispare wheel with light alloy rim.
Wheel bolt \000G must be used for the Minispare
wheel with steel rim. The wheel bolts for the
Minispare wheel with steel rim are located in
the trunk with the Minispare wheel.
! Wheel bolts \000F must be used when
mounting the Minispare wheel with light
alloy rim. The use of any wheel bolts other
than wheel bolts \000F for the Minispare wheel
with light alloy rim will damage the vehicle’s
brakes.
Wheel bolts \000G must be used when
mounting the Minispare wheel with steel
rim. The use of any wheel bolts other than
wheel bolts \000G for the Minispare wheel with
steel rim will damage the vehicle’s brakes.
GWarning!
Make sure to use the original length wheel
bolts when remounting the original wheel
after it has been repaired.
XClean contact surfaces of wheel and wheel
hub.
! To avoid paint damage, place wheel flat
against hub and hold it there while
installing first wheel bolt.
Flat tire511Practical hints221_AKB; 6; 20, en-USd2ugruen,Version: 2.11.8.12009-09-24T13:28:17+02:00 - Seite 511Z