2010 MERCEDES-BENZ S CLASS window
[x] Cancel search: windowPage 47 of 548
Side impact air bags GObserve Safety notes, see page 41.
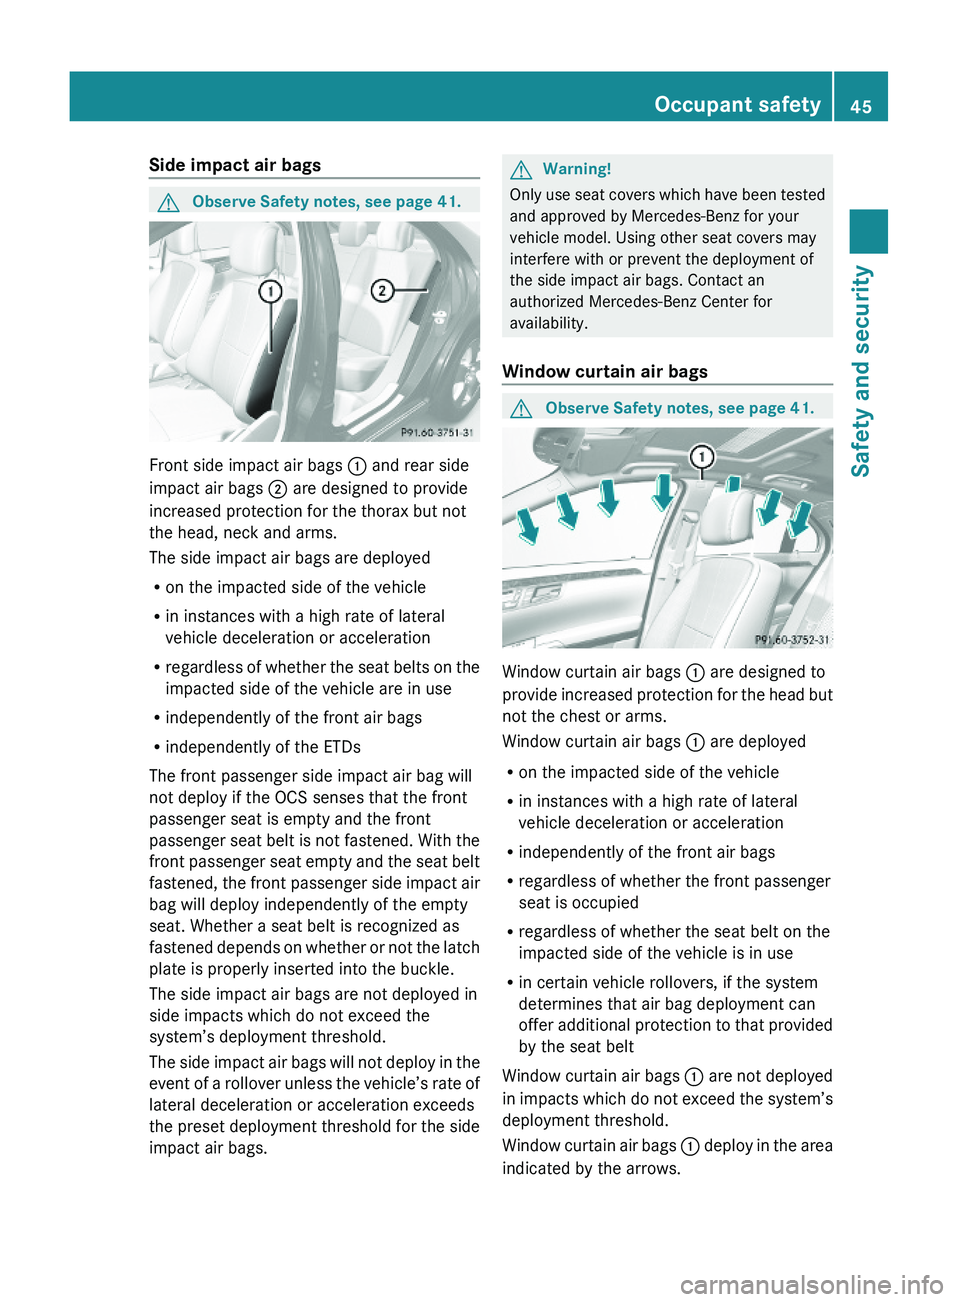
Front side impact air bags \000F and rear side
impact air bags \000G are designed to provide
increased protection for the thorax but not
the head, neck and arms.
The side impact air bags are deployed
Ron the impacted side of the vehicle
Rin instances with a high rate of lateral
vehicle deceleration or acceleration
Rregardless of whether the seat belts on the
impacted side of the vehicle are in use
Rindependently of the front air bags
Rindependently of the ETDs
The front passenger side impact air bag will
not deploy if the OCS senses that the front
passenger seat is empty and the front
passenger seat belt is not fastened. With the
front passenger seat empty and the seat belt
fastened, the front passenger side impact air
bag will deploy independently of the empty
seat. Whether a seat belt is recognized as
fastened depends on whether or not the latch
plate is properly inserted into the buckle.
The side impact air bags are not deployed in
side impacts which do not exceed the
system’s deployment threshold.
The side impact air bags will not deploy in the
event of a rollover unless the vehicle’s rate of
lateral deceleration or acceleration exceeds
the preset deployment threshold for the side
impact air bags.
GWarning!
Only use seat covers which have been tested
and approved by Mercedes-Benz for your
vehicle model. Using other seat covers may
interfere with or prevent the deployment of
the side impact air bags. Contact an
authorized Mercedes-Benz Center for
availability.
Window curtain air bags
GObserve Safety notes, see page 41.
Window curtain air bags \000F are designed to
provide increased protection for the head but
not the chest or arms.
Window curtain air bags \000F are deployed
Ron the impacted side of the vehicle
Rin instances with a high rate of lateral
vehicle deceleration or acceleration
Rindependently of the front air bags
Rregardless of whether the front passenger
seat is occupied
Rregardless of whether the seat belt on the
impacted side of the vehicle is in use
Rin certain vehicle rollovers, if the system
determines that air bag deployment can
offer additional protection to that provided
by the seat belt
Window curtain air bags \000F are not deployed
in impacts which do not exceed the system’s
deployment threshold.
Window curtain air bags \000F deploy in the area
indicated by the arrows.
Occupant safety45Safety and security221_AKB; 6; 20, en-USd2ugruen,Version: 2.11.8.12009-09-24T13:28:17+02:00 - Seite 45Z
Page 48 of 548

Occupant Classification System
The Occupant Classification System (OCS)
activates or deactivates the front passenger
front air bag automatically. The respective
status is based on the classified occupant
weight category determined by weight sensor
readings from the front passenger seat.
The system does not deactivate
R the front passenger side impact air bag
R the window curtain air bag
R the Emergency Tensioning Devices (ETDs)
To be classified correctly, the front passenger
must sit
R with the seat belt properly fastened
R in a position that is as upright as possible
with the back against the seat backrest
R with the feet on the floor
If the occupant’s weight is transferred to
another object in the vehicle (e.g. by leaning
on armrests), the OCS may not be able to
properly approximate the occupant’s weight
category.
If your seat, including the trim cover and
cushion, needs to be serviced in any way, take
the vehicle to an authorized Mercedes-Benz
Center.
Only seat accessories approved by
Mercedes-Benz may be used.
Both the driver and the front passenger
should always use the 007F007D
indicator lamp as an indication of whether or
not the front passenger is properly
positioned.GWarning!
If the 007F007D indicator lamp
illuminates when an adult or someone larger
than a small individual is in the front
passenger seat, have the front passenger
reposition himself or herself in the seat until
the 007F007D indicator lamp goes out.
In the event of a collision, the air bag control
unit will not allow front passenger front air bag
deployment when the OCS has classified the
front passenger seat occupant as weighting
as much as or less than a typical 12-month-
old child in a standard child restraint or if the
front passenger seat is classified as being
empty.
When the OCS senses that the front
passenger seat occupant is classified as
being up to or less than the weight of a typical
12-month-old child in a standard child
restraint, the 007F007D indicator lamp
will illuminate when the engine is started and
remain illuminated, indicating that the front
passenger front air bag is deactivated.
When the OCS senses that the front
passenger seat is classified as being empty,
the 007F007D indicator lamp will
illuminate when the engine is started and
remain illuminated, indicating that the front
passenger front air bag is deactivated.
When the OCS senses that the front
passenger seat occupant is classified as
being heavier than the weight of a typical
12-month-old child seated in a standard child
restraint or as being a small individual (such
as a young teenager or a small adult), the
007F007D indicator lamp will illuminate
for approximately 6 seconds when the engine
is started and then, depending on occupant
weight sensor readings from the seat, remain
illuminated or go out. With the
007F007D indicator lamp illuminated,
the front passenger front air bag is
deactivated. With the 007F007D
indicator lamp out, the front passenger front
air bag is activated.
When the OCS senses that the front
passenger seat occupant is classified as an
adult or someone larger than a small
individual, the 007F007D indicator lamp
will illuminate for approximately 6 seconds
when the engine is started and then goes out,
indicating that the front passenger front air
bag is activated.46Occupant safetySafety and security
221_AKB; 6; 20, en-USd2ugruen,Version: 2.11.8.12009-09-24T13:28:17+02:00 - Seite 46
Page 52 of 548
seat belt provide the best restraint when the
wearer is in a position that is as upright as
possible and the seat belt is properly
positioned on the body.GWarning!
Never let more people ride in the vehicle than
there are seat belts available. Make sure
everyone riding in the vehicle is correctly
restrained with a separate seat belt. Never
use a seat belt for more than one person at a
time.
GWarning!
Damaged seat belts or seat belts that have
been subjected to stress in an accident must
be replaced. Also, the seat belt anchoring
points must be checked.
Only use seat belts which have been approved
by Mercedes-Benz.
Do not make any modifications to the seat
belts. This can lead to unintended activation
of the ETDs or to their failure to activate when
necessary.
Do not bleach or dye seat belts as this may
severely weaken them. In a crash they may
not be able to provide adequate protection.
Have all work carried out only by qualified
technicians. Contact an authorized
Mercedes-Benz Center.
Proper use of seat belts
GWarning!
USE SEAT BELTS PROPERLY
R Seat belts can only protect when used
properly. Never wear seat belts in any other
way than as described in this section, as
that could result in serious injuries in case
of an accident.
R Each occupant should wear their seat belt
at all times, because seat belts help reduce
the likelihood of and potential severity of
injuries in accidents, including rollovers.
The integrated restraint system includes
SRS (driver front air bag, front passenger
front air bag, side impact air bags, window
curtain air bags for door windows),
Emergency Tensioning Devices (ETDs),
seat belt force limiters, and front seat knee
bolsters.
The system is designed to enhance the
protection offered to properly belted
occupants in certain frontal (front air bags
and ETDs) and side (side impact air bags,
window curtain air bags, and ETDs) impacts
which exceed preset deployment
thresholds and in certain rollovers (window
curtain air bags and ETDs).
R Never wear the shoulder belt under your
arm, against your neck or off your shoulder.
In a frontal crash, your body would move
too far forward. That would increase the
chance of head and neck injuries. The seat
belt would also apply too much force to the
ribs or abdomen, which could severely
injure internal organs such as your liver or
spleen.
Adjust the seat belt so that the shoulder
section is located as close as possible to
the middle of the shoulder. It should not
touch the neck. Never pass the shoulder
portion of the seat belt under your arm. For
this purpose, you can adjust the height of
the seat belt outlet.
R Position the lap belt as low as possible on
your hips and not across the abdomen. If
the lap belt is positioned across your
abdomen, it could cause serious injuries in
a crash.
R Never wear seat belts over rigid or
breakable objects in or on your clothing,
such as eyeglasses, pens, keys etc., as
these might cause injuries.
R Make sure the seat belt is always fitted
snugly. Take special care of this when
wearing loose clothing.
R Never use a seat belt for more than one
person at a time. Do not fasten a seat belt50Occupant safetySafety and security
221_AKB; 6; 20, en-USd2ugruen,Version: 2.11.8.12009-09-24T13:28:17+02:00 - Seite 50
Page 56 of 548
Automatic comfort-fit feature seat belt
The automatic comfort-fit feature reduces the
retracting force of the seat belts when they
are in normal use. It is available for the front
seats and for the rear outer seats (only for
vehicles with rear power seats).
Preventive occupant safety (PRE-
SAFE ®
)
GWarning!
The PRE-SAFE ®
system is intended to reduce
the effects of an accident on vehicle
occupants who are wearing their seat belt
properly. Despite your vehicle being equipped
with the PRE-SAFE ®
system, the possibility of
personal injuries occurring as a result of an
accident cannot be eliminated. Therefore,
always drive carefully and adjust your driving
to the prevailing road, weather, and traffic
conditions.
The PRE-SAFE ®
system takes preventive
measures to better protect the occupants
from the possibility of personal injuries in the
following hazardous situations:
R emergency braking situations, e.g. if the
Brake Assist System (BAS) ( Y page 64) is
activated
or when
vehicles with DISTRONIC PLUS:
the BAS PLUS ( Y page 64) or the PRE-
SAFE ®
Brake ( Y page 69) is strongly
engaging
R when the radar sensors recognize the
immediate risk of collision in certain
situations (vehicles with DISTRONIC PLUS)
R critical dynamic driving situations, e.g.
when the vehicle has been caused to
understeer or oversteer because it has
exceeded its physical limitations or in case
of evasive steering maneuvers at speeds
above approximately 85 mph (140 km/h)
The PRE-SAFE ®
system takes the following
measures when it is activated:
R The front seat belts are pre-tensioned
automatically.
R If the front passenger seat is in an
unfavorable position, the seat will be
adjusted to a position that seeks to better
protect the occupant.
R If a rear outer power seat (if so equipped)
is in an unfavorable position, the seat will
be adjusted to a position that seeks to
better protect the occupant.
R The system increases the air pressure in
the air pockets (on the sides of the seat
cushion and backrest) of the multicontour
and/or drive-dynamic multicontour front
seats.
R If the vehicle is equipped with multicontour
rear seats, the system increases the air
pressure in the air pockets (on the sides of
the seat backrest) of the multicontour rear
outer seats.
R If the vehicle is in a critical dynamic driving
situation, the door windows and the tilt/
sliding sunroof or panorama roof with tilt/
sliding panel also closes, except for a
minimal gap that remains open.
If the closing procedure of any of these
elements is blocked, it will stop and open
slightly.
Once the hazardous situation no longer exists
and an accident has been avoided, the PRE-
SAFE ®
system loosens the seat belt pre-
tension and decreases the air pressure in the
air pockets of the multicontour and/or drive-
dynamic multicontour seats. All of the PRE-
SAFE ®
system settings can be re-adjusted
following the critical driving event.
If the seat belts do not release:XAdjust the seat backrest to the rear until
the seat belt tension is reduced.
The locking mechanism releases.54Occupant safetySafety and security
221_AKB; 6; 20, en-USd2ugruen,Version: 2.11.8.12009-09-24T13:28:17+02:00 - Seite 54
Page 63 of 548
XVehicles with rear center seat: Make sure
that the seat belt for the rear center seat
can operate freely with a child seat
installed.
GWarning!
Vehicles with rear power seats:
Never change the rear seat position after
installing the child restraint. This could
Rdamage the child restraint
Rintroduce undesirable slack or tension into
the seat belt
Rloosen the child restraint
Rmisposition the child restraint
All of the above will lessen the
effectiveness of the child restraint and thus
increase the chance or severity of injury in
an accident.
Child safety
Child safety locks
GObserve Safety notes, see page 56.GWarning!
Children could open a rear door from the
inside. This may cause serious personal injury
or an accident. Therefore, secure the rear
doors with the child safety locks whenever
children are riding in the back seats of the
vehicle.
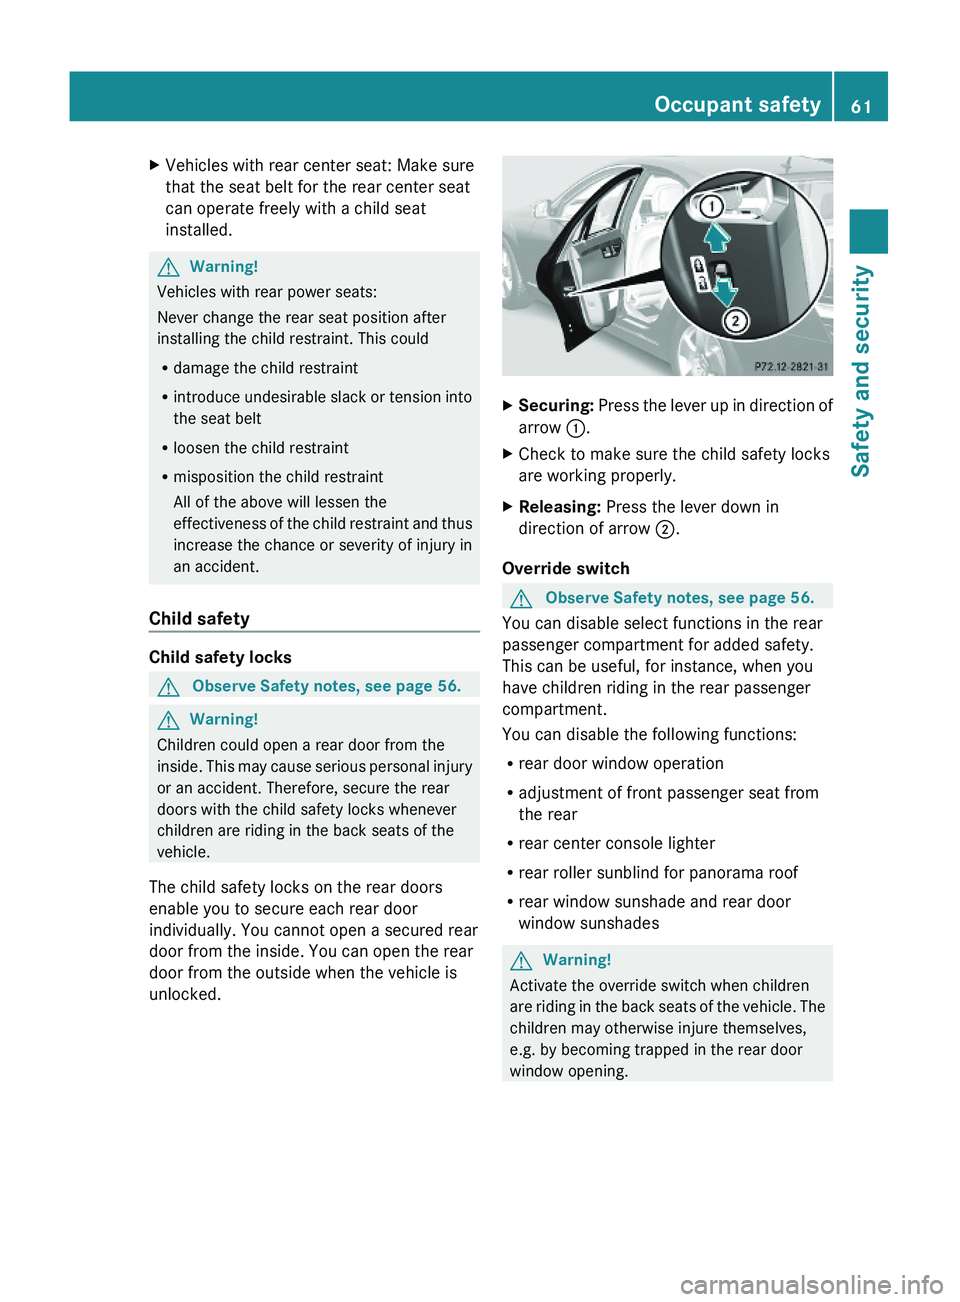
The child safety locks on the rear doors
enable you to secure each rear door
individually. You cannot open a secured rear
door from the inside. You can open the rear
door from the outside when the vehicle is
unlocked.
XSecuring: Press the lever up in direction of
arrow \000F.
XCheck to make sure the child safety locks
are working properly.
XReleasing: Press the lever down in
direction of arrow \000G.
Override switch
GObserve Safety notes, see page 56.
You can disable select functions in the rear
passenger compartment for added safety.
This can be useful, for instance, when you
have children riding in the rear passenger
compartment.
You can disable the following functions:
Rrear door window operation
Radjustment of front passenger seat from
the rear
Rrear center console lighter
Rrear roller sunblind for panorama roof
Rrear window sunshade and rear door
window sunshades
GWarning!
Activate the override switch when children
are riding in the back seats of the vehicle. The
children may otherwise injure themselves,
e.g. by becoming trapped in the rear door
window opening.
Occupant safety61Safety and security221_AKB; 6; 20, en-USd2ugruen,Version: 2.11.8.12009-09-24T13:28:17+02:00 - Seite 61Z
Page 64 of 548
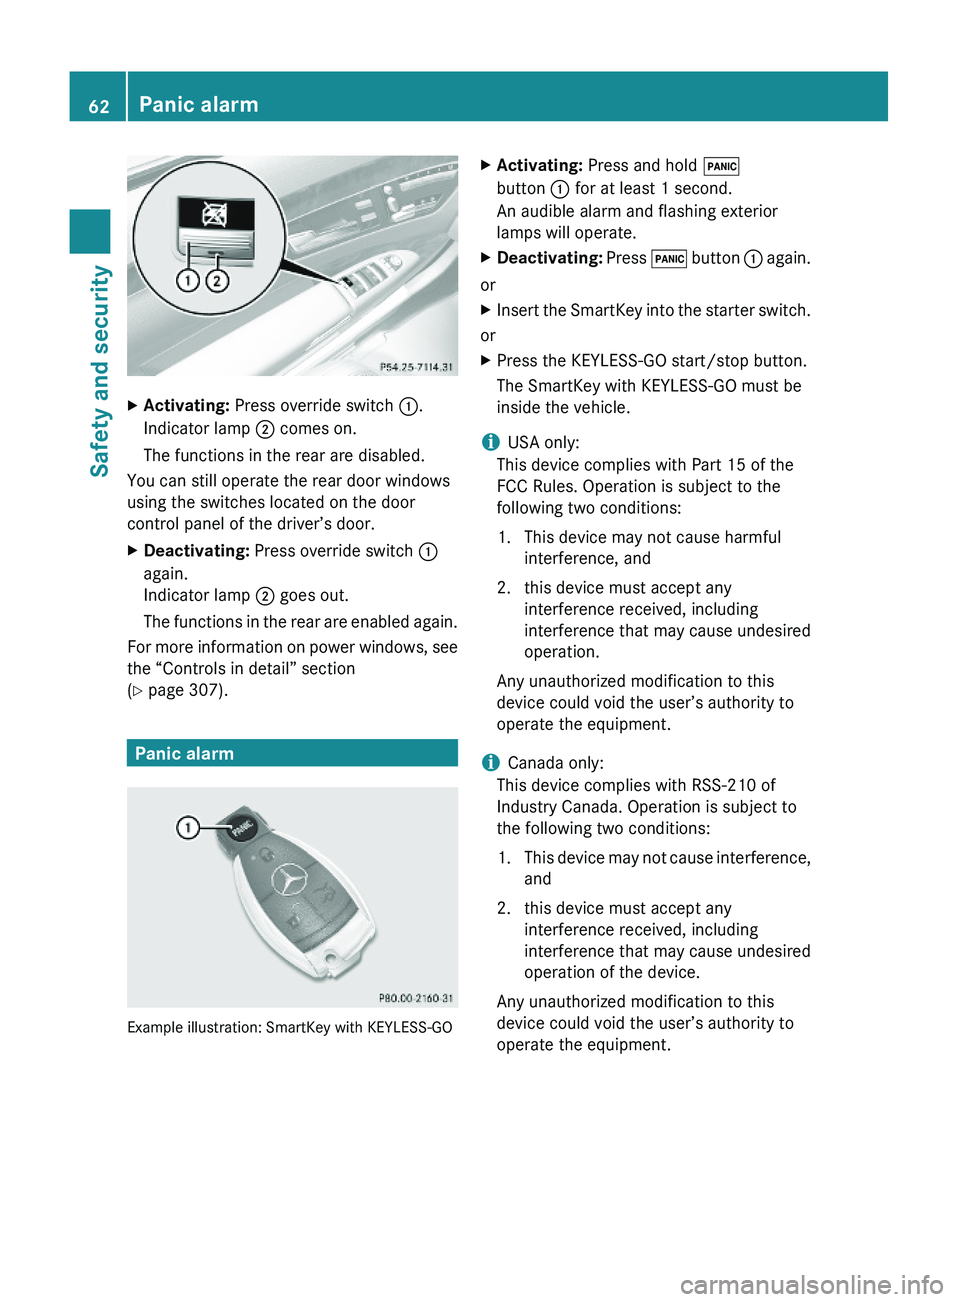
XActivating: Press override switch \000F.
Indicator lamp \000G comes on.
The functions in the rear are disabled.
You can still operate the rear door windows
using the switches located on the door
control panel of the driver’s door.
XDeactivating: Press override switch \000F
again.
Indicator lamp \000G goes out.
The functions in the rear are enabled again.
For more information on power windows, see
the “Controls in detail” section
(Y page 307).
Panic alarm
Example illustration: SmartKey with KEYLESS-GO
XActivating: Press and hold \0003
button \000F for at least 1 second.
An audible alarm and flashing exterior
lamps will operate.
XDeactivating: Press \0003 button \000F again.
or
XInsert the SmartKey into the starter switch.
or
XPress the KEYLESS-GO start/stop button.
The SmartKey with KEYLESS-GO must be
inside the vehicle.
iUSA only:
This device complies with Part 15 of the
FCC Rules. Operation is subject to the
following two conditions:
1. This device may not cause harmful
interference, and
2. this device must accept any
interference received, including
interference that may cause undesired
operation.
Any unauthorized modification to this
device could void the user’s authority to
operate the equipment.
iCanada only:
This device complies with RSS-210 of
Industry Canada. Operation is subject to
the following two conditions:
1.This device may not cause interference,
and
2. this device must accept any
interference received, including
interference that may cause undesired
operation of the device.
Any unauthorized modification to this
device could void the user’s authority to
operate the equipment.
62Panic alarmSafety and security
221_AKB; 6; 20, en-USd2ugruen,Version: 2.11.8.12009-09-24T13:28:17+02:00 - Seite 62
Page 87 of 548
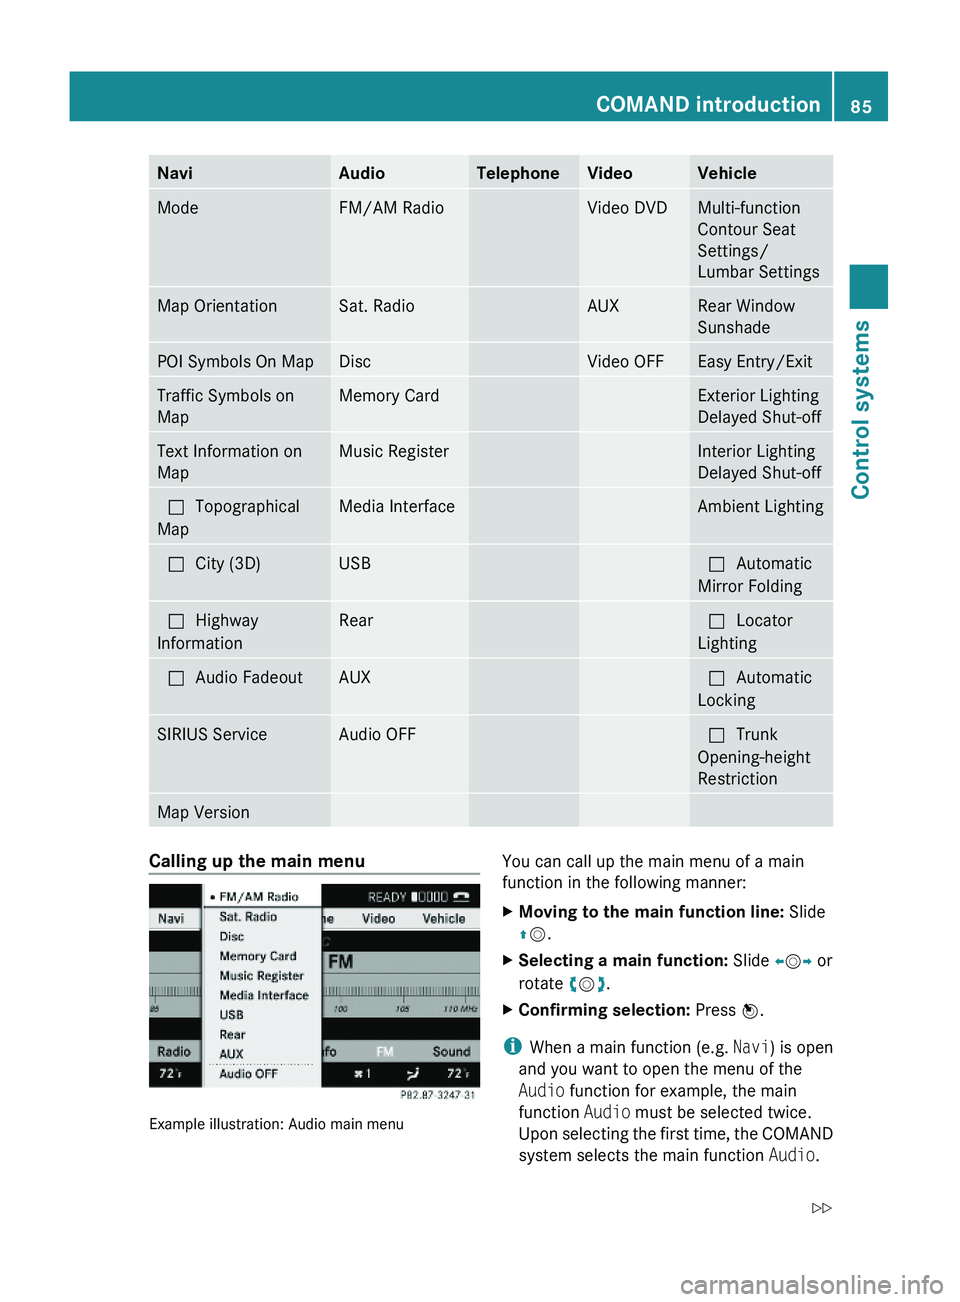
NaviAudioTelephoneVideoVehicleModeFM/AM RadioVideo DVDMulti-function
Contour Seat
Settings/
Lumbar Settings
Map OrientationSat. RadioAUXRear Window
Sunshade
POI Symbols On MapDiscVideo OFFEasy Entry/ExitTraffic Symbols on
Map
Memory CardExterior Lighting
Delayed Shut-off
Text Information on
Map
Music RegisterInterior Lighting
Delayed Shut-off
\000?Topographical
Map
Media InterfaceAmbient Lighting\000?City (3D)USB\000?Automatic
Mirror Folding
\000?Highway
Information
Rear\000?Locator
Lighting
\000?Audio FadeoutAUX\000?Automatic
Locking
SIRIUS ServiceAudio OFF\000?Trunk
Opening-height
Restriction
Map VersionCalling up the main menu
Example illustration: Audio main menu
You can call up the main menu of a main
function in the following manner:
XMoving to the main function line: Slide
\000
Page 93 of 548

control. Make sure the volume is not set
too high before putting on a headphone.
RThe DVD changer can playback only one
media source at a time. Example: if the
driver is playing an audio CD, the front
passenger can not play a different medium
(e.g. DVD video) from the DVD changer.
However, it is possible for the front
passenger to play media from radio,
memory card, MUSIC REGISTER, media
interface, USB, AUX or Rear Seat
Entertainment System.
RWhen driver and front passenger are using
the same medium, each can select
individual settings for that medium.
RCOMAND transmits music and voice to the
wireless headphone for the front passenger
side via infrared signal. The headphone and
the display must have visual contact. This
provides best possible transmission of the
infrared signal to the headphone. Please
note that the headphone has a left and right
side and must be used accordingly.
RWhen SPLITVIEW is on, the front passenger
can operate audio or video functions only.
RThe multifunction steering wheel lets you
operate functions for the driver’s side only.
Switching SPLITVIEW on/off
XSwitching on: Select Vehicle \000T
SplitView ON.
or
XPress the SPLITVIEW remote control ON
button.
The SPLITVIEW symbol \000F appears and
status \000G changes to SplitView OFF.
XSwitching off: Select Vehicle \000T
SplitView OFF.
or
XPress the SPLITVIEW remote control ON
button.
Status \000G changes to SplitView ON.
The SPLITVIEW screen remains on for
approximately 30 minutes after switching off
the ignition. After these 30 minutes or once
the SmartKey is removed from the starter
switch, the settings for the front passenger
side remain stored for approximately another
30 minutes.
COMAND system settings
System settings submenu overview
iThe components and operating principles
of COMAND can be found on (Y page 76).
System settings can be made in the following
submenus:
RDisplay \000T Day Mode, Night Mode,
Automatic
RTime \000T Time, Date, Format, Time Zone
RText Reader \000T Speed \000T Fast,
Medium or Slow:
Adjusts the reading speed of the Voice
Control System.
RVoice Control \000T Help Window, Start
New Individualization, Delete
Individualization
RLanguage: Selecting system language
RFavorites Button *: Assigning the
favorite button
COMAND system settings 91Control systems221_AKB; 6; 20, en-USd2ugruen,Version: 2.11.8.12009-09-24T13:28:17+02:00 - Seite 91Z