2010 MERCEDES-BENZ S CLASS remote control
[x] Cancel search: remote controlPage 92 of 548

R3-D sound does not work for mono-signal
sources, such as on analog AM radio or
in Weather Band.
R In the event of poor radio reception
quality, e.g. inside a tunnel, you should
switch off Logic 7 ®
, as a dynamic switch
from Stereo to Mono could occur,
resulting in temporary sound distortion.
R With some stereo recordings, the
resulting sound may deviate from
conventional stereo playback.
Switching the audio/video source off/
on
i When you load a CD or DVD, the audio or
video source is activated automatically.
Active audio source
XSwitching off: Select Audio 0054 Audio
OFF .
Playback is paused and the audio source is
switched off; Audio OFF appears in the
COMAND display.XSwitching on: Select Audio, then the
desired audio source.
or
XLoad a CD/DVD ( Y page 179) or an SD
card ( Y page 180).
or
XConnect a USB storage device
( Y page 80) or media interface device
( Y page 200) to COMAND.
Active video source
XSwitching off: Select Video 0054 Video
OFF .
The audio source is switched off; Video
OFF appears in the COMAND display.XSwitching on: Select Video, then the
desired video source.
or
XLoad a DVD ( Y page 179).SPLITVIEW
SPLITVIEW enables the driver and front
passenger to use separate COMAND
functions at the same time. Two different
displays appear in the COMAND screen. For
example, a Navigation display is only viewable
form the driver’s seat while a DVD Video
display is only viewable from the front
passenger’s seat.
COMAND is operated via SPLITVIEW from the
front passenger seat using the SPLITVIEW
remote control and the special wireless,
infrared headphone. You may also use a wired
headphone via the 3.5 mm socket in the front
passenger footwell.
For information about using the remote
control, see ( Y page 81).
For information about using the headphone,
see ( Y page 82).
Depending on the production date of your
vehicle, it may be equipped with SPLITVIEW.
At the time of this printing, the use of
SPLITVIEW is NOT allowed in the following US
states (AL, AZ, CO, IL, LA, MA, MD, NH, PA,
VA, VT, WA, WI, and WV) or Canadian
provinces (Manitoba, Newfoundland, New
Brunswick, and Prince Edward Island).
SPLITVIEW must NOT be operated in these
states or provinces. The driver is responsible
for observing ALL local statutory provisions.
If your vehicle is registered in a non-approved
state or province, then the feature will need
to be deactivated. Contact your authorized
Mercedes-Benz dealer to verify if SPLITVIEW
is allowed in your state or province.
Notes
R The audio volume of the wireless
headphone for the front passenger side
must be adjusted on the headphone
directly. The audio volume of a wired
headphone can be adjusted via the remote
90COMAND introductionControl systems
221_AKB; 6; 20, en-USd2ugruen,Version: 2.11.8.12009-09-24T13:28:17+02:00 - Seite 90
Page 93 of 548

control. Make sure the volume is not set
too high before putting on a headphone.
RThe DVD changer can playback only one
media source at a time. Example: if the
driver is playing an audio CD, the front
passenger can not play a different medium
(e.g. DVD video) from the DVD changer.
However, it is possible for the front
passenger to play media from radio,
memory card, MUSIC REGISTER, media
interface, USB, AUX or Rear Seat
Entertainment System.
RWhen driver and front passenger are using
the same medium, each can select
individual settings for that medium.
RCOMAND transmits music and voice to the
wireless headphone for the front passenger
side via infrared signal. The headphone and
the display must have visual contact. This
provides best possible transmission of the
infrared signal to the headphone. Please
note that the headphone has a left and right
side and must be used accordingly.
RWhen SPLITVIEW is on, the front passenger
can operate audio or video functions only.
RThe multifunction steering wheel lets you
operate functions for the driver’s side only.
Switching SPLITVIEW on/off
XSwitching on: Select Vehicle \000T
SplitView ON.
or
XPress the SPLITVIEW remote control ON
button.
The SPLITVIEW symbol \000F appears and
status \000G changes to SplitView OFF.
XSwitching off: Select Vehicle \000T
SplitView OFF.
or
XPress the SPLITVIEW remote control ON
button.
Status \000G changes to SplitView ON.
The SPLITVIEW screen remains on for
approximately 30 minutes after switching off
the ignition. After these 30 minutes or once
the SmartKey is removed from the starter
switch, the settings for the front passenger
side remain stored for approximately another
30 minutes.
COMAND system settings
System settings submenu overview
iThe components and operating principles
of COMAND can be found on (Y page 76).
System settings can be made in the following
submenus:
RDisplay \000T Day Mode, Night Mode,
Automatic
RTime \000T Time, Date, Format, Time Zone
RText Reader \000T Speed \000T Fast,
Medium or Slow:
Adjusts the reading speed of the Voice
Control System.
RVoice Control \000T Help Window, Start
New Individualization, Delete
Individualization
RLanguage: Selecting system language
RFavorites Button *: Assigning the
favorite button
COMAND system settings 91Control systems221_AKB; 6; 20, en-USd2ugruen,Version: 2.11.8.12009-09-24T13:28:17+02:00 - Seite 91Z
Page 190 of 548

playback. Refer to operating instructions of
the external device.XSelecting main function: Select Aux.XPress button 003E on the remote control.XSelect Source .XSelect Display Aux for playback via the
connections in the head restraint.
or
XSelect Disk Drive Aux for playback via
the connections in the rear seat.
Switching to audio AUX operation
(COMAND)
XSelect Audio 0054 AUX .
The Audio AUX menu appears. You will hear
the medium in the external audio source
provided it is connected and set to
playback.
You can adjust the following during audio AUX
operation:
R Volume ( Y page 88)
R Balance and fader ( Y page 88)
R Treble and Bass (Y page 88)
R 3D Sound (Y page 89)
Switching to video AUX operation
(Rear Seat Entertainment System)
XConnect the video device to the sockets on
the head restraint or the rear seat and start
playback. Refer to operating instructions of
the external device.XSelecting main function: Select Aux.XPress button 003E on the remote control.XSelect Source .XSelect Display Aux for playback via the
connections in the head restraint.
or
XSelect Disk Drive Aux for playback via
the connections in the rear seat.XSwitching from full screen to menu
system: Press button 003E on the remote
control.XScreen settings: Select Display Aux .
A list appears.XProceed as described in the section
“Screen settings” ( Y page 194).
Switching to video AUX operation
(COMAND)
XSelect Video 0054 AUX .
The video AUX menu appears. You will hear
and see the medium in the external audio
source provided it is connected and set to
playback.
i For operation of the external video
source, refer to the operating instructions
of the respective device.
You can adjust the following during video AUX
operation:
R Brightness , Contrast and Color
( Y page 194)
R Picture format ( Y page 194)
R Volume ( Y page 88)
R Balance and fader ( Y page 88)
R Treble and Bass (Y page 88)
R 3D Sound (Y page 89)
188Audio AUX and video AUXControl systems
221_AKB; 6; 20, en-USd2ugruen,Version: 2.11.8.12009-09-24T13:28:17+02:00 - Seite 188
Page 191 of 548
Rear Seat Entertainment SystemGObserve Safety notes, see page 76.GWarning!
The driver should not wear a Rear Seat
Entertainment headphone while operating the
vehicle under any circumstances. The use of
a headphone while driving the vehicle could
drastically impair the ability to react to audible
traffic conditions (e.g. emergency sirens from
police/fire/ambulance, another car’s horn,
etc.).
GWarning!
When not in use, headphones or external
video sources should be stored in a safe
location (e.g. one of the vehicle’s storage
compartments) so that they are not loose
within the passenger compartment during
braking, vehicle maneuvers or a traffic
accident. Objects moving within the
passenger compartment could cause serious
personal injury to vehicle occupants.
GWarning!
Due to a potential choking hazard, wired
headphone usage by children should only
occur with adult supervision.
You can operate the Rear Seat Entertainment
System via the remote controls ( Y page 81)
that come with the vehicle.
The playback of audio and video sources with
the Rear Seat Entertainment System is
identical to playback with the COMAND to a
large extent.
The COMAND and the Rear Seat
Entertainment System can be operated
simultaneously almost independent of each
other. However, some menus may cause
conflicts when the systems are used by
multiple users. Conflicts can occur between
the rear screens as well as COMAND and the
Rear Seat Entertainment System.
Remote controls for Rear Seat
Entertainment System
The Rear Seat Entertainment System
contains two remote controls for the rear
passenger compartment.
For information on using the remote controls,
see ( Y page 81).
Headphones for Rear Seat
Entertainment System
The Rear Seat Entertainment System
contains two headphones for the rear
passenger compartment.
For information on using the headphones, see
( Y page 82).
Related topics
R Inserting/ejecting CDs and DVDs
( Y page 180)
R Connecting and playing back external
devices ( Y page 186)
R Remote control ( Y page 81)
R Playing back audio CDs/audio DVDs
( Y page 176)
R Playing back video CDs/audio DVDs
( Y page 191)
CD/DVD drive
GObserve Safety notes, see page 176.
When both screens are used with the CD/
DVD drive, selecting certain menus or
changing certain settings on one screen will
also be applied to the other screen.
The following functions will be applied to both
screens:
R Changing Playback options
R Selecting track
R Using Play, Pause, and Stop
Rear Seat Entertainment System189Control systems221_AKB; 6; 20, en-USd2ugruen,Version: 2.11.8.12009-09-24T13:28:17+02:00 - Seite 189Z
Page 276 of 548
Vehicle equipment
iThis Operator’s Manual describes all
features, standard or optional, potentially
available for your vehicle at the time of
purchase. Please be aware that your
vehicle might not be equipped with all
features described in this manual.
Locking and unlocking
Notes
GObserve Safety notes, see page 56.
When unlocking or locking the vehicle with
the SmartKey an acoustic signal sounds. The
acoustic signal is activated at the factory. If
you wish to deactivate the feature, or adjust
its signal volume, contact an authorized
Mercedes-Benz Center.
When unlocking the vehicle, all turn signal
lamps flash once. An acoustic signal sounds
once, and the locking knobs in the doors
move up. The anti-theft alarm system is
disarmed.
When locking the vehicle, all turn signal lamps
flash three times. An acoustic signal sounds
three times, and the locking knobs in the
doors move down. The anti-theft alarm
system is armed.
All doors and the trunk must be closed.
If you cannot lock or unlock the vehicle with
the SmartKey, the batteries in the SmartKey
are discharged, the SmartKey is
malfunctioning, or the vehicle battery is
drained.
XCheck the batteries in the SmartKey
(Y page 277) and replace them if
necessary.
XUse the mechanical key to unlock the
driver’s door and the trunk (Y page 499).
XUse the mechanical key to lock the vehicle
(Y page 500).
XHave the vehicle battery and the vehicle
battery connections checked at an
authorized Mercedes-Benz Center.
If the SmartKey is malfunctioning, contact
Roadside Assistance or an authorized
Mercedes-Benz Center.
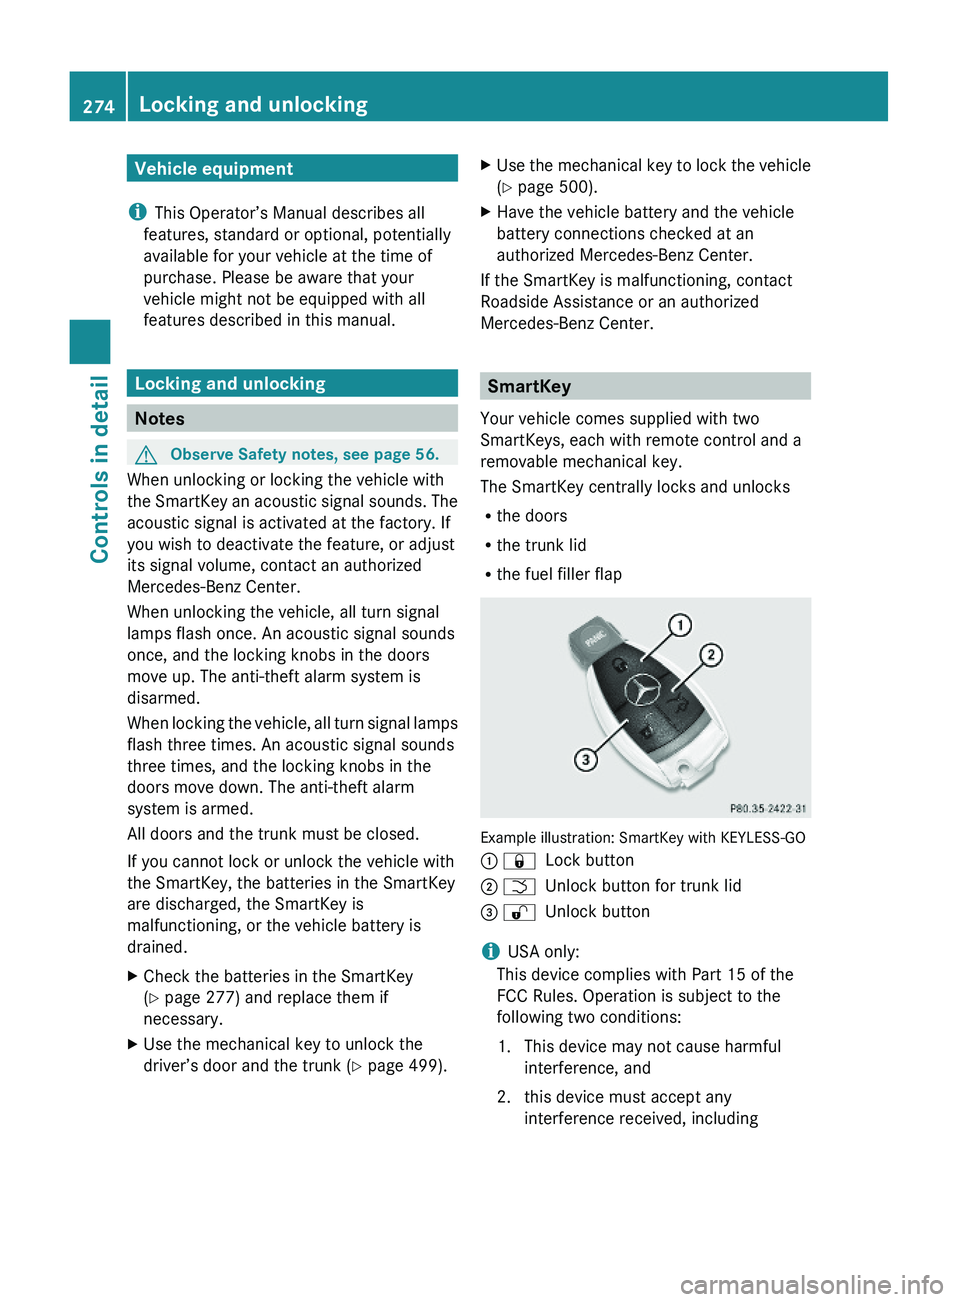
SmartKey
Your vehicle comes supplied with two
SmartKeys, each with remote control and a
removable mechanical key.
The SmartKey centrally locks and unlocks
Rthe doors
Rthe trunk lid
Rthe fuel filler flap
Example illustration: SmartKey with KEYLESS-GO
\000F \0007Lock button\000G \000TUnlock button for trunk lid\000
Page 277 of 548
interference that may cause undesired
operation.
Any unauthorized modification to this
device could void the user’s authority to
operate the equipment.
i Canada only:
This device complies with RSS-210 of
Industry Canada. Operation is subject to
the following two conditions:
1. This device may not cause interference,
and
2. this device must accept any interference received, including
interference that may cause undesired
operation of the device.
Any unauthorized modification to this
device could void the user’s authority to
operate the equipment.
Factory setting XGlobal unlocking: Press button 0036.
Unless you open a door or the trunk within
approximately 40 seconds after unlocking
the vehicle:
R The vehicle will be locked again.
R The anti-theft alarm system will be
rearmed.
XGlobal locking: Press button 0037.
Selective setting
If you frequently travel alone, you may wish
to reprogramm the SmartKey. Pressing
button 0036 will then only unlock the driver’s
door and the fuel filler flap.
XSwitching on/off: Press and hold buttons
0036 and 0037 simultaneously for
approximately 6 seconds until the battery
check lamp ( Y page 277) flashes twice.
The SmartKey will then function as follows:
XUnlocking driver’s door and fuel filler
flap: Press button 0036 once.XGlobal unlocking: Press button 0036
twice.XGlobal locking: Press button 0037.
KEYLESS-GO
Vehicles equipped with KEYLESS-GO come
with two SmartKeys with KEYLESS-GO, each
with remote control and a removable
mechanical key.
The KEYLESS-GO function is integrated into
the SmartKey. The validity of the SmartKey is
checked every time you grasp an outside door
handle.
When the SmartKey is valid, your vehicle
unlocks
R the doors
R the trunk lid
R the fuel filler flap
i USA only:
This device complies with Part 15 of the
FCC Rules. Operation is subject to the
following two conditions:
1. This device may not cause harmful interference, and
2. this device must accept any interference received, including
interference that may cause undesired
operation.
Any unauthorized modification to this
device could void the user’s authority to
operate the equipment.
Locking and unlocking275Controls in detail221_AKB; 6; 20, en-USd2ugruen,Version: 2.11.8.12009-09-24T13:28:17+02:00 - Seite 275Z
Page 282 of 548
XPress and hold button \000T (Y page 274)
on the SmartKey until the trunk unlocks
and begins to open.
or
XPull on handle \000F.
In vehicles without KEYLESS-GO: The
vehicle must be unlocked.
If the trunk does not open, it is still locked
separately (Y page 283).
Vehicles with trunk opening/closing system:
XStopping the opening procedure: Press
button \000T on the SmartKey.
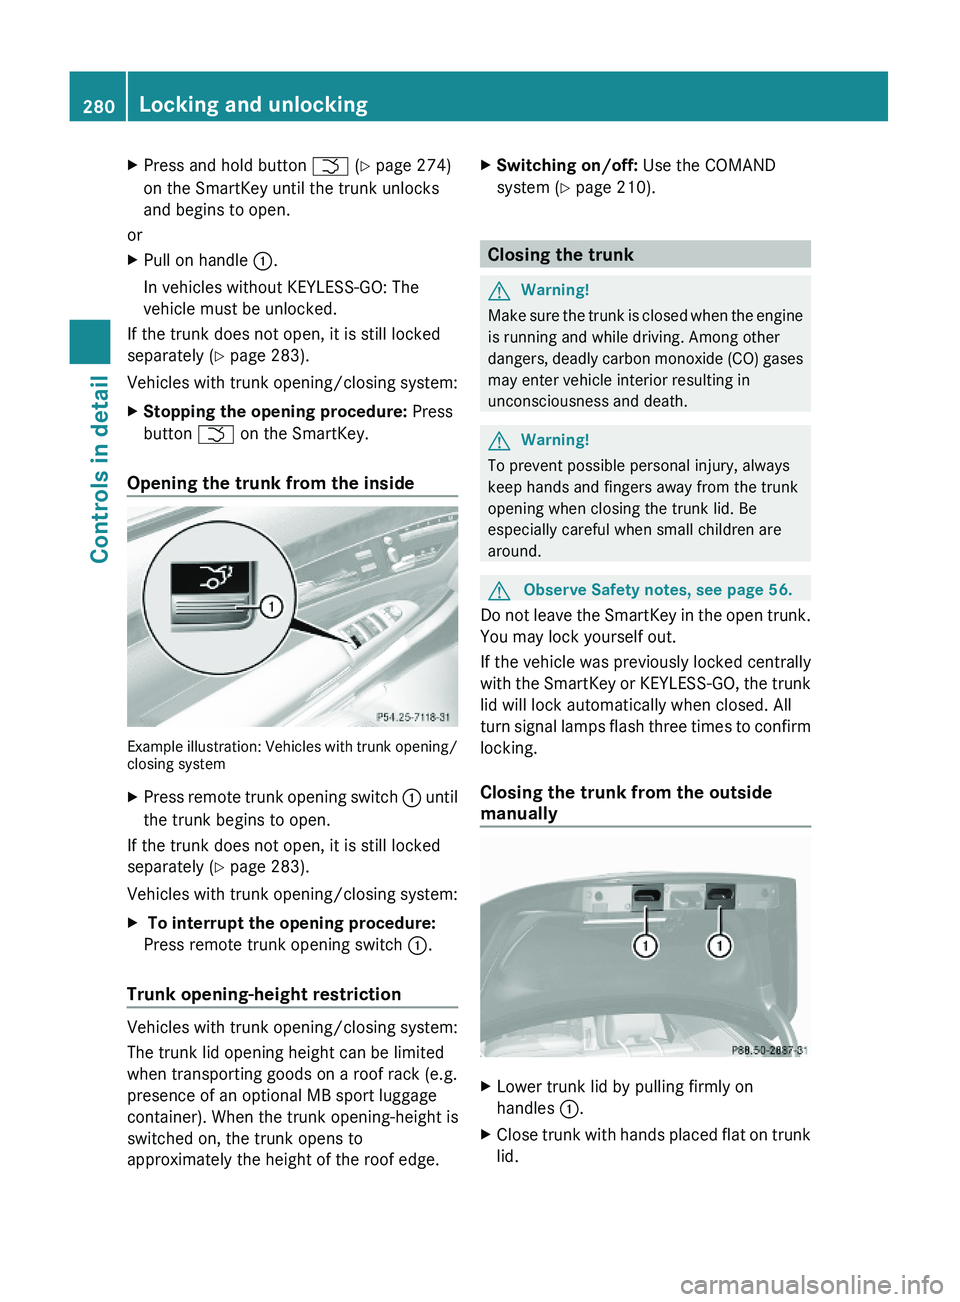
Opening the trunk from the inside
Example illustration: Vehicles with trunk opening/closing system
XPress remote trunk opening switch \000F until
the trunk begins to open.
If the trunk does not open, it is still locked
separately (Y page 283).
Vehicles with trunk opening/closing system:
X To interrupt the opening procedure:
Press remote trunk opening switch \000F.
Trunk opening-height restriction
Vehicles with trunk opening/closing system:
The trunk lid opening height can be limited
when transporting goods on a roof rack (e.g.
presence of an optional MB sport luggage
container). When the trunk opening-height is
switched on, the trunk opens to
approximately the height of the roof edge.
XSwitching on/off: Use the COMAND
system (Y page 210).
Closing the trunk
GWarning!
Make sure the trunk is closed when the engine
is running and while driving. Among other
dangers, deadly carbon monoxide (CO) gases
may enter vehicle interior resulting in
unconsciousness and death.
GWarning!
To prevent possible personal injury, always
keep hands and fingers away from the trunk
opening when closing the trunk lid. Be
especially careful when small children are
around.
GObserve Safety notes, see page 56.
Do not leave the SmartKey in the open trunk.
You may lock yourself out.
If the vehicle was previously locked centrally
with the SmartKey or KEYLESS-GO, the trunk
lid will lock automatically when closed. All
turn signal lamps flash three times to confirm
locking.
Closing the trunk from the outside
manually
XLower trunk lid by pulling firmly on
handles \000F.
XClose trunk with hands placed flat on trunk
lid.
280Locking and unlockingControls in detail
221_AKB; 6; 20, en-USd2ugruen,Version: 2.11.8.12009-09-24T13:28:17+02:00 - Seite 280
Page 283 of 548
The power closing assist automatically
ensures that the trunk lid is pulled completely
close (Y page 283).
Closing the trunk from the inside
automatically
GWarning!
Maintain sight of the area around the rear of
the vehicle while operating the trunk lid with
the door mounted switch. Monitor the closing
procedure carefully to make sure no one is in
danger of being injured.
To interrupt the closing procedure, release
the door mounted remote trunk opening/
closing switch again.
Even with the SmartKey removed from the
starter switch or the SmartKey with KEYLESS-
GO removed from the vehicle, the remote
trunk opening/closing switch can be
operated. Therefore, do not leave children
unattended in the vehicle, or with access to
an unlocked vehicle. A child’s unsupervised
access to a vehicle could result in an accident
and/or serious personal injury.
In vehicles with trunk opening/closing
system you can close the trunk from the
inside using the remote trunk opening/
closing switch.
If the trunk lid comes into contact with an
object while closing, the closing procedure is
stopped and the trunk lid reopens slightly.
This will happen only while the trunk is in its
upper motion sequence. Check if luggage has
been piled too high, for example.
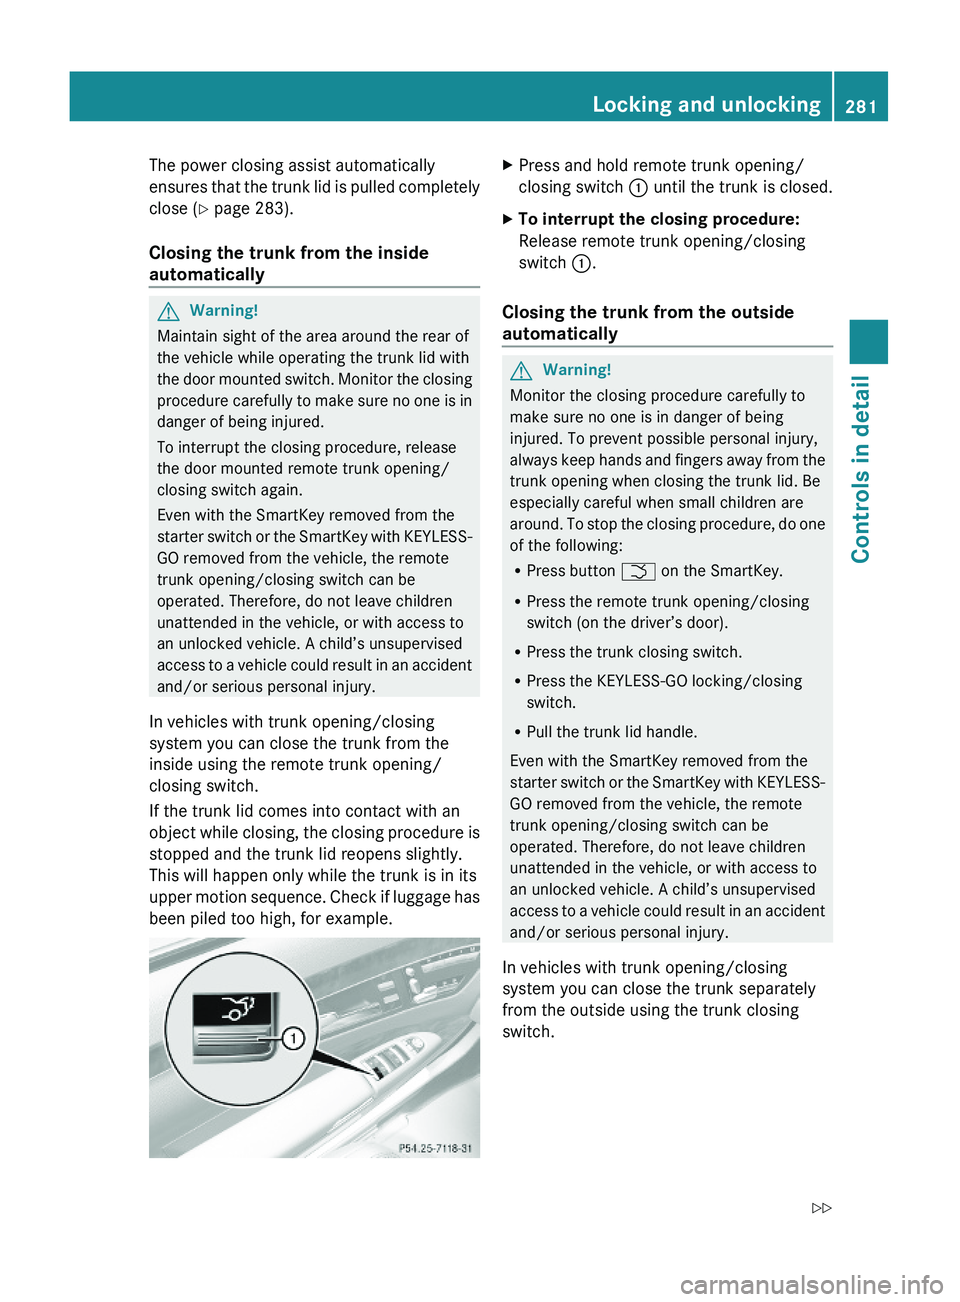
XPress and hold remote trunk opening/
closing switch \000F until the trunk is closed.
XTo interrupt the closing procedure:
Release remote trunk opening/closing
switch \000F.
Closing the trunk from the outside
automatically
GWarning!
Monitor the closing procedure carefully to
make sure no one is in danger of being
injured. To prevent possible personal injury,
always keep hands and fingers away from the
trunk opening when closing the trunk lid. Be
especially careful when small children are
around. To stop the closing procedure, do one
of the following:
RPress button \000T on the SmartKey.
RPress the remote trunk opening/closing
switch (on the driver’s door).
RPress the trunk closing switch.
RPress the KEYLESS-GO locking/closing
switch.
RPull the trunk lid handle.
Even with the SmartKey removed from the
starter switch or the SmartKey with KEYLESS-
GO removed from the vehicle, the remote
trunk opening/closing switch can be
operated. Therefore, do not leave children
unattended in the vehicle, or with access to
an unlocked vehicle. A child’s unsupervised
access to a vehicle could result in an accident
and/or serious personal injury.
In vehicles with trunk opening/closing
system you can close the trunk separately
from the outside using the trunk closing
switch.
Locking and unlocking281Controls in detail221_AKB; 6; 20, en-USd2ugruen,Version: 2.11.8.12009-09-24T13:28:17+02:00 - Seite 281Z