2010 MERCEDES-BENZ S CLASS high beam
[x] Cancel search: high beamPage 236 of 548
display and are based on conditions or
system status the vehicle’s system has
recorded.
The vehicle status message memory function
only appears if there are any messages
stored.
GWarning!
Malfunction and warning messages are only
indicated for certain systems and are
intentionally not very detailed. The
malfunction and warning messages are
simply a reminder with respect to the
operation of certain systems. They do not
replace the owner’s and/or driver’s
responsibility to maintain the vehicle’s
operating safety. Have all required
maintenance and safety checks performed on
the vehicle. Bring the vehicle to an authorized
Mercedes-Benz Center to address the
malfunction and warning messages.
XPress button \000@ or \000> to select the
Service menu.
If conditions have occurred causing status
messages to be recorded, the number of
messages appears in the multifunction
display: 2 Messages.
XPress button \000= or \000< to select the
Messages function.
XPress button \000d to confirm.
For malfunction and warning messages,
see “Vehicle status messages in the
multifunction display” (Y page 452).
XUse button \000= or \000< to scroll through
the messages.
If you turn the SmartKey in the starter switch
to position 0 and then back to position 2, all
messages will be deleted from the message
memory.
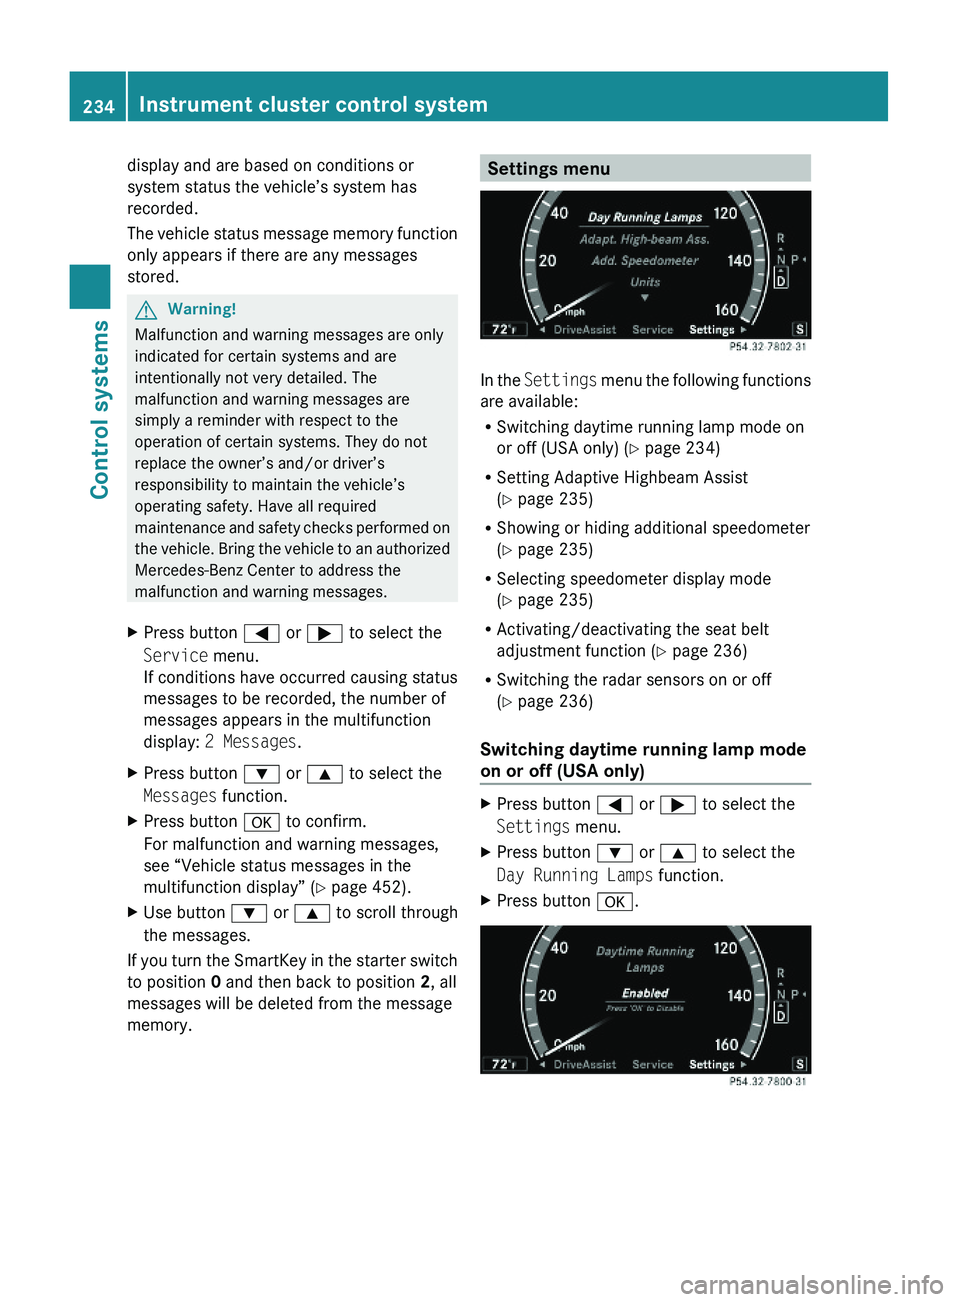
Settings menu
In the Settings menu the following functions
are available:
RSwitching daytime running lamp mode on
or off (USA only) (Y page 234)
RSetting Adaptive Highbeam Assist
(Y page 235)
RShowing or hiding additional speedometer
(Y page 235)
RSelecting speedometer display mode
(Y page 235)
RActivating/deactivating the seat belt
adjustment function (Y page 236)
RSwitching the radar sensors on or off
(Y page 236)
Switching daytime running lamp mode
on or off (USA only)
XPress button \000@ or \000> to select the
Settings menu.
XPress button \000= or \000< to select the
Day Running Lamps function.
XPress button \000d.234Instrument cluster control systemControl systems
221_AKB; 6; 20, en-USd2ugruen,Version: 2.11.8.12009-09-24T13:28:17+02:00 - Seite 234
Page 237 of 548
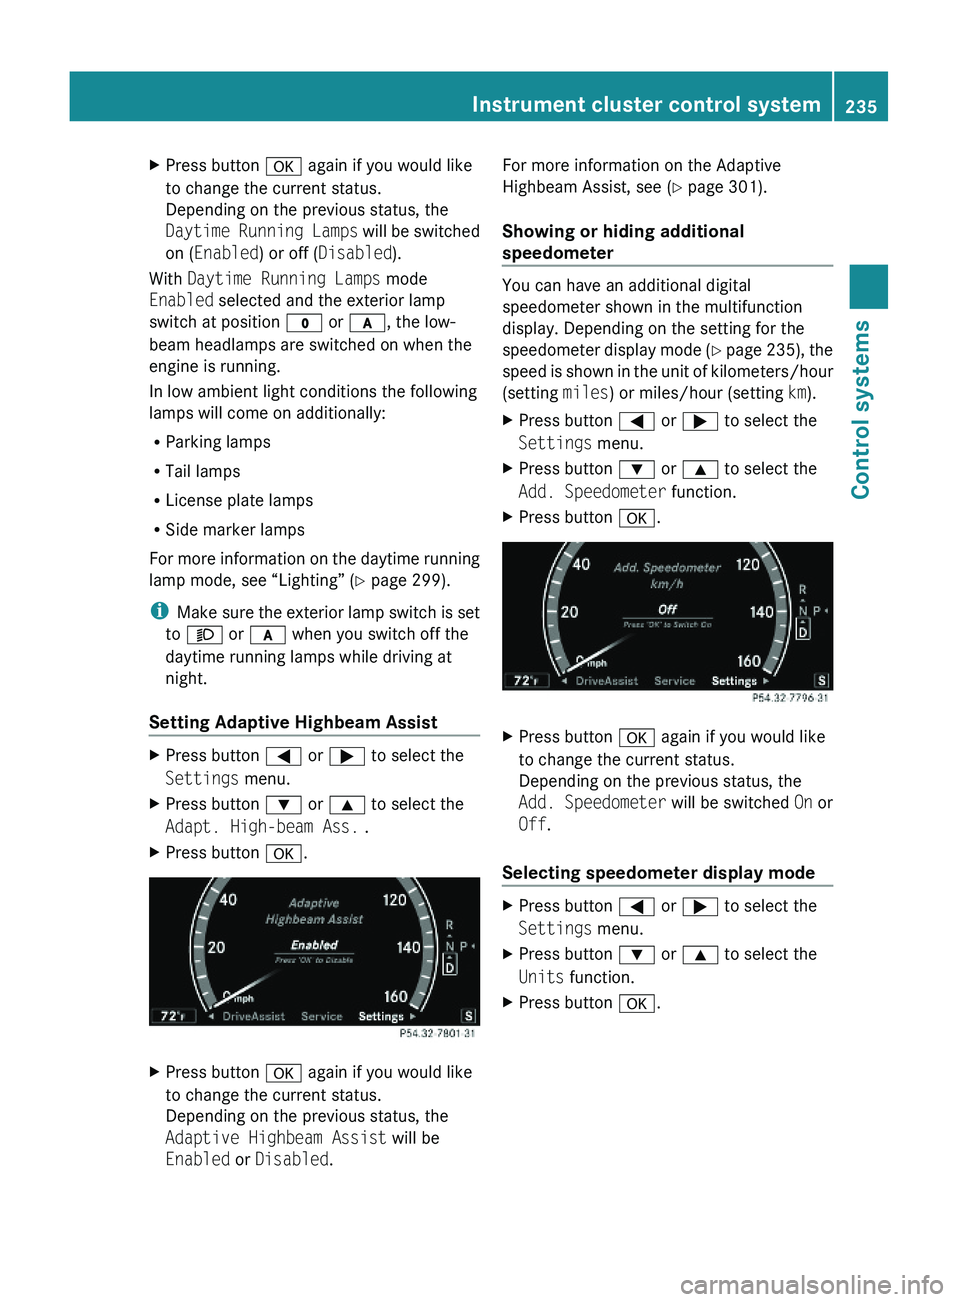
XPress button \000d again if you would like
to change the current status.
Depending on the previous status, the
Daytime Running Lamps will be switched
on (Enabled) or off (Disabled).
With Daytime Running Lamps mode
Enabled selected and the exterior lamp
switch at position \000' or \000f, the low-
beam headlamps are switched on when the
engine is running.
In low ambient light conditions the following
lamps will come on additionally:
RParking lamps
RTail lamps
RLicense plate lamps
RSide marker lamps
For more information on the daytime running
lamp mode, see “Lighting” (Y page 299).
iMake sure the exterior lamp switch is set
to \000e or \000f when you switch off the
daytime running lamps while driving at
night.
Setting Adaptive Highbeam Assist
XPress button \000@ or \000> to select the
Settings menu.
XPress button \000= or \000< to select the
Adapt. High-beam Ass. .
XPress button \000d.XPress button \000d again if you would like
to change the current status.
Depending on the previous status, the
Adaptive Highbeam Assist will be
Enabled or Disabled.
For more information on the Adaptive
Highbeam Assist, see (Y page 301).
Showing or hiding additional
speedometer
You can have an additional digital
speedometer shown in the multifunction
display. Depending on the setting for the
speedometer display mode (Y page 235), the
speed is shown in the unit of kilometers/hour
(setting miles) or miles/hour (setting km).
XPress button \000@ or \000> to select the
Settings menu.
XPress button \000= or \000< to select the
Add. Speedometer function.
XPress button \000d.XPress button \000d again if you would like
to change the current status.
Depending on the previous status, the
Add. Speedometer will be switched On or
Off.
Selecting speedometer display mode
XPress button \000@ or \000> to select the
Settings menu.
XPress button \000= or \000< to select the
Units function.
XPress button \000d.Instrument cluster control system235Control systems221_AKB; 6; 20, en-USd2ugruen,Version: 2.11.8.12009-09-24T13:28:17+02:00 - Seite 235Z
Page 286 of 548
GWarning!
Only drive with the doors closed. Otherwise,
one or more of the doors could open while the
vehicle is in motion, putting you and/or
others at risk.
GWarning!
Make sure the trunk is closed when the engine
is running and while driving. Among other
dangers, deadly carbon monoxide (CO) gases
may enter vehicle interior resulting in
unconsciousness and death.
XPower closing assist for doors: Press the
doors gently past the initial engage position
into the lock.
XPower closing assist for trunk lid: Press
the trunk lid gently into its lock.
Starter switch positions
SmartKey
GObserve Safety notes, see page 56.
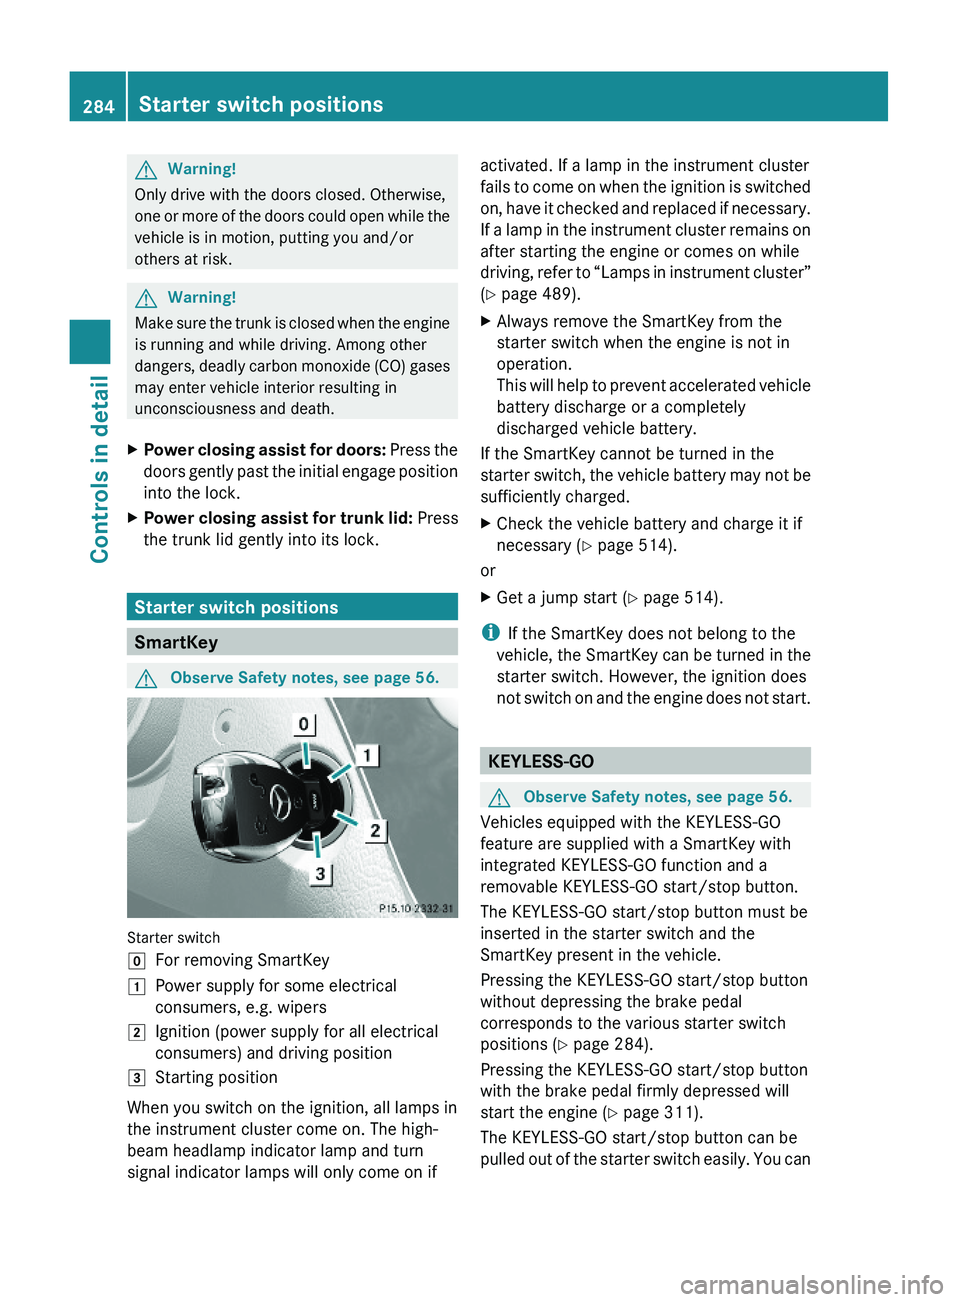
Starter switch
\000]For removing SmartKey\000JPower supply for some electrical
consumers, e.g. wipers
\000KIgnition (power supply for all electrical
consumers) and driving position
\000LStarting position
When you switch on the ignition, all lamps in
the instrument cluster come on. The high-
beam headlamp indicator lamp and turn
signal indicator lamps will only come on if
activated. If a lamp in the instrument cluster
fails to come on when the ignition is switched
on, have it checked and replaced if necessary.
If a lamp in the instrument cluster remains on
after starting the engine or comes on while
driving, refer to “Lamps in instrument cluster”
(Y page 489).
XAlways remove the SmartKey from the
starter switch when the engine is not in
operation.
This will help to prevent accelerated vehicle
battery discharge or a completely
discharged vehicle battery.
If the SmartKey cannot be turned in the
starter switch, the vehicle battery may not be
sufficiently charged.
XCheck the vehicle battery and charge it if
necessary (Y page 514).
or
XGet a jump start (Y page 514).
iIf the SmartKey does not belong to the
vehicle, the SmartKey can be turned in the
starter switch. However, the ignition does
not switch on and the engine does not start.
KEYLESS-GO
GObserve Safety notes, see page 56.
Vehicles equipped with the KEYLESS-GO
feature are supplied with a SmartKey with
integrated KEYLESS-GO function and a
removable KEYLESS-GO start/stop button.
The KEYLESS-GO start/stop button must be
inserted in the starter switch and the
SmartKey present in the vehicle.
Pressing the KEYLESS-GO start/stop button
without depressing the brake pedal
corresponds to the various starter switch
positions (Y page 284).
Pressing the KEYLESS-GO start/stop button
with the brake pedal firmly depressed will
start the engine (Y page 311).
The KEYLESS-GO start/stop button can be
pulled out of the starter switch easily. You can
284Starter switch positionsControls in detail
221_AKB; 6; 20, en-USd2ugruen,Version: 2.11.8.12009-09-24T13:28:17+02:00 - Seite 284
Page 300 of 548
Storing positions into memoryXAdjust the seats.XOn the driver’s side, also adjust the
steering wheel and exterior rear view
mirrors to the desired positions.
XPress memory button M once and within
3 seconds press memory position button
1, 2 or 3.
When the settings are stored to the
selected position, an acknowledgement
signal sounds.
Recalling positions from memory
XPress and hold desired memory position
button 1, 2 or 3 until the seat has moved
to the stored position completely. On the
driver’s side, also wait for the steering
wheel and exterior rear view mirrors to
move to the stored position.
iReleasing the memory position button
stops movement to the stored positions
immediately.
Lighting
Notes
iIf you drive in countries with left-hand
driving, you must have the headlamps
modified for symmetrical low beams.
Relevant information can be obtained at
any authorized Mercedes-Benz Center.
iThe active Bi-Xenon headlamps increase
usable illumination over conventional
headlamps because they follow the
curvature of the road ahead. The beams of
the active Bi-Xenon headlamps shift to
either side according to the vehicle’s
steering angle and speed.
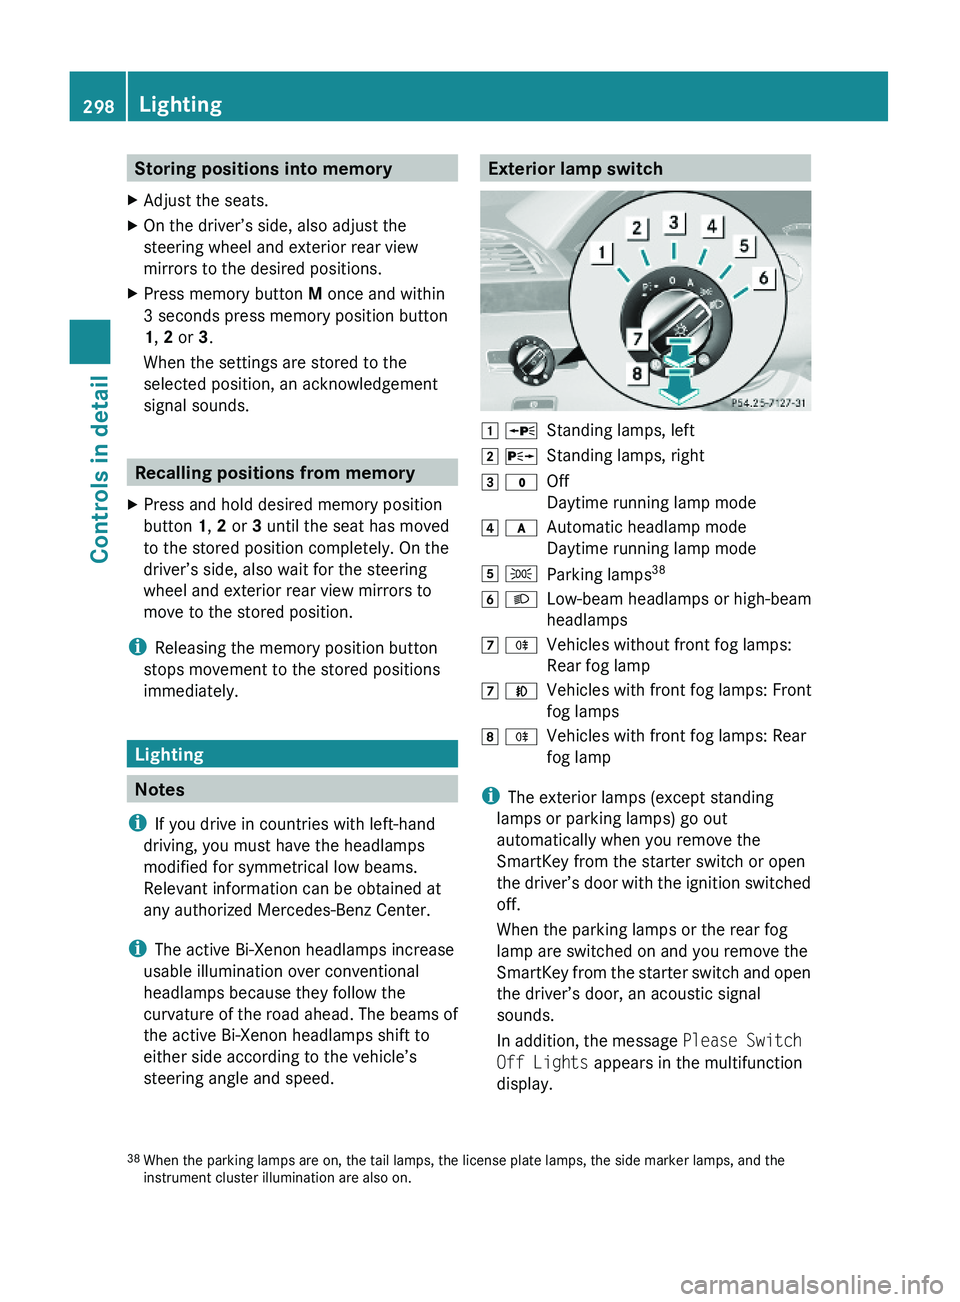
Exterior lamp switch\000J \000oStanding lamps, left\000K \000pStanding lamps, right\000L \000'Off
Daytime running lamp mode
\000M \000fAutomatic headlamp mode
Daytime running lamp mode
\000N \000lParking lamps38\000O \000dLow-beam headlamps or high-beam
headlamps
\000P \000jVehicles without front fog lamps:
Rear fog lamp
\000P \000fVehicles with front fog lamps: Front
fog lamps
\000Q \000jVehicles with front fog lamps: Rear
fog lamp
iThe exterior lamps (except standing
lamps or parking lamps) go out
automatically when you remove the
SmartKey from the starter switch or open
the driver’s door with the ignition switched
off.
When the parking lamps or the rear fog
lamp are switched on and you remove the
SmartKey from the starter switch and open
the driver’s door, an acoustic signal
sounds.
In addition, the message Please Switch
Off Lights appears in the multifunction
display.
38When the parking lamps are on, the tail lamps, the license plate lamps, the side marker lamps, and theinstrument cluster illumination are also on.
298LightingControls in detail
221_AKB; 6; 20, en-USd2ugruen,Version: 2.11.8.12009-09-24T13:28:17+02:00 - Seite 298
Page 301 of 548
Switch off the parking lamps or the rear fog
lamp manually.
! Failure to switch off the parking lamps
when leaving the vehicle may result in a
discharged battery.
i Vehicles without front fog lamps: For
better detection of the vehicle, the LED
daytime running lamps are dimmed to
parking lamp level when the low-beam
headlamps are switched on.
Low-beam headlamps
The low-beam headlamps can be switched on
and off with the exterior lamp switch.
XSwitch on the ignition.XSwitching on: Turn the exterior lamp
switch to position 0064.
The following lamps come on:
R Low-beam headlamps
R Parking lamps 38
R Green indicator lamp 006C in the exterior
lamp switchXSwitching off: Turn the exterior lamp
switch to position 0027.
Automatic headlamp mode
GWarning!
If the exterior lamp switch is set to 0066, the
headlamps will not automatically come on
under foggy conditions.
To minimize risk to you and to others, activate
headlamps by turning exterior lamp switch to
0064 when driving or when traffic and/or
ambient lighting conditions require you to do
so.
In low ambient lighting conditions, only switch
from position 0066 to 0064 with the vehicle
at a standstill in a safe location. Switching
from 0066 to 0064 will briefly switch off the
headlamps. Doing so while driving in low
ambient lighting conditions may result in an
accident.
The automatic headlamp feature is only an aid
to the driver. The driver is responsible for the
operation of the vehicle’s lights at all times.XSwitching on: Turn the exterior lamp
switch to position 0066.
When ambient light is low: When the
SmartKey is in starter switch position 1 or
when the KEYLESS-GO start/stop button has
been pressed once, the parking lamps 38
come on automatically.
When the engine is running, the low-beam
headlamps come on additionally.
When ambient light is bright: When the
SmartKey is in starter switch position 1 or
when the KEYLESS-GO start/stop button has
been pressed once, all lamps are off.
When the engine is running, the daytime
running lamps 39
come on automatically.
When the low-beam headlamps are switched
on, the green indicator lamp 006C in the
exterior lamp switch comes on.
Once the low-beam headlamps are on, the
high-beam headlamps are also available.
Daytime running lamp mode
In Canada, the daytime running lamp mode is
mandatory and therefore in a constant mode.
In the USA, the daytime running lamp mode
is deactivated by default.
XActivate the daytime running lamp mode
using the control system, see “Switching38 When the parking lamps are on, the tail lamps, the license plate lamps, the side marker lamps, and the
instrument cluster illumination are also on.
39 USA only: The daytime running lamp mode must be activated via the control system.Lighting299Controls in detail221_AKB; 6; 20, en-USd2ugruen,Version: 2.11.8.12009-09-24T13:28:17+02:00 - Seite 299Z
Page 302 of 548
daytime running lamp mode on or off (USA
only)” ( Y page 234).XTurn the exterior lamp switch to position
0027 or 0066 .
When the engine is running and the
ambient light is bright, the daytime running
lamps come on.
In low ambient lighting conditions, the
following lamps will come on additionally:
R Low-beam headlamps
R Parking lamps 38
R green indicator lamp 006C in the exterior
lamp switch
You can only switch on the high-beam
headlamps when the low-beam headlamps
are on.
The high-beam flasher is available at all times.
Canada only
When the engine is running, and you
R shift from a driving position to park
position P with the vehicle at a standstill or
the electronic parking brake is engaged,
the daytime running lamps or the low-beam
headlamps will go out with a delay of
3 minutes
R turn the exterior lamp switch to position
006C , the daytime running lamps and the
parking lamps 38
come on in bright ambient
lighting conditions.
R turn the exterior lamp switch to position
0064 , the manual headlamp mode has
priority over the daytime running lamp
mode
The corresponding exterior lamps come on
( Y page 298).
USA only
When the engine is running, and you turn the
exterior lamp switch to position 006C or
0064 , the manual headlamp mode has
priority over the daytime running lamp mode.
The corresponding exterior lamps come on
( Y page 298).
Fog lamps
Fog lamps cannot be switched on with the
exterior lamp switch in position 0066 or
0027 .
GWarning!
In low ambient lighting or foggy conditions,
only switch from position 0066 to 0064 with
the vehicle at a standstill in a safe location.
Switching from 0066 to 0064 will briefly
switch off the headlamps. Doing so while
driving in low ambient lighting conditions may
result in an accident.
Front fog lamps will operate with the parking
lamps and/or the low-beam headlamps on.
The rear fog lamp can only be switched on
with the exterior lamp switch in position
0064 . Fog lamps should only be used in
conjunction with low-beam headlamps.
Consult your State or Province Motor Vehicle
Regulations regarding permissible lamp
operation.
XSwitch on the ignition.XTurn the exterior lamp switch to position
006C or 0064 (Y page 298).
Vehicles with front fog lamps
XSwitching on front fog lamps: Pull out the
exterior lamp switch to first stop
( Y page 298).
The green indicator lamp 0066 in the
exterior lamp switch comes on.XSwitching on rear fog lamp: Pull out the
exterior lamp switch to second stop.
The rear fog lamp, the front fog lamps, the
green 0066 and the yellow indicator lamp
006A in the exterior lamp switch come on.XSwitching off front fog lamps/rear fog
lamp: Push in the exterior lamp switch to
its stop.38 When the parking lamps are on, the tail lamps, the license plate lamps, the side marker lamps, and the
instrument cluster illumination are also on.300LightingControls in detail
221_AKB; 6; 20, en-USd2ugruen,Version: 2.11.8.12009-09-24T13:28:17+02:00 - Seite 300
Page 304 of 548
The system cannot recognize the following
road users:
RRoad users without a lighting system of
their own, e.g. pedestrians
RRoad users with dim lighting of their own,
e.g. cyclists
RRoad users whose lighting is obstructed,
e.g. road users behind a guardrail
RIn some seldom cases, even road users with
a lighting system of their own may be
recognized too late or not at all.
The automatic high-beam headlamps will then
not be deactivated or it will be activated in
spite of preceding or oncoming road users.
This could endanger you and/or others and
cause an accident. Always pay close attention
to the traffic situation and switch off the high
beam manually if necessary.
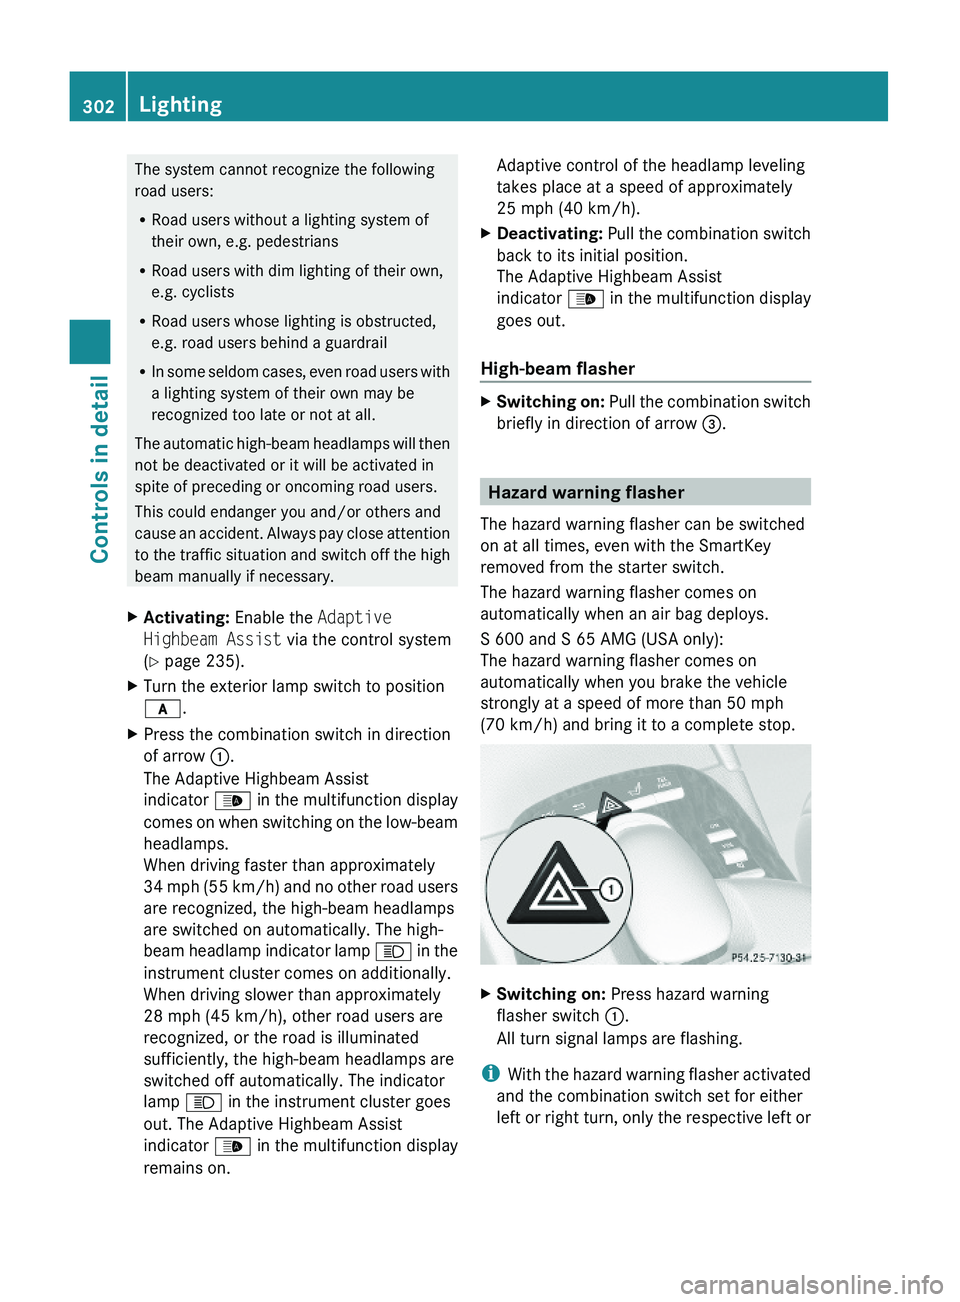
XActivating: Enable the Adaptive
Highbeam Assist via the control system
(Y page 235).
XTurn the exterior lamp switch to position
\000f.
XPress the combination switch in direction
of arrow \000F.
The Adaptive Highbeam Assist
indicator \000
Page 359 of 548
display. The image in the multifunction
display corresponds to a road lit up by high-
beam headlamps.
GWarning!
The Night View Assist Plus is only an aid to
support you while driving and cannot
substitute your careful attention. Do not rely
on the display of the Night View Assist Plus;
instead, continue to look through the
windshield. You are always responsible for
safety and must drive in accordance with
traffic conditions. Otherwise, you could
endanger yourself and others.
The system may be impaired or unavailable
when
Rvisibility is poor, e.g. due to snow, rain, fog,
or heavy spray
Rthe camera area of the windshield is dirty,
fogged up or covered by a sticker for
example
Rdriving through curves or on inclines or
declines
GWarning!
The Night View Assist Plus cannot record
objects immediately in front of or next to the
vehicle. When maneuvering, continue to look
through the windshield. Make sure no
persons or animals are in the area in which
you are maneuvering. You could otherwise
injure them.
The Night View Assist Plus image in the
multifunction display is not impaired by the
headlamps of approaching vehicles.
As a result, you can better follow the course
of the road and detect obstacles earlier on.
iInfrared light is invisible to the human eye
and thus does not blind. The Night View
Assist Plus can remain switched on
permanently even with oncoming traffic
present.
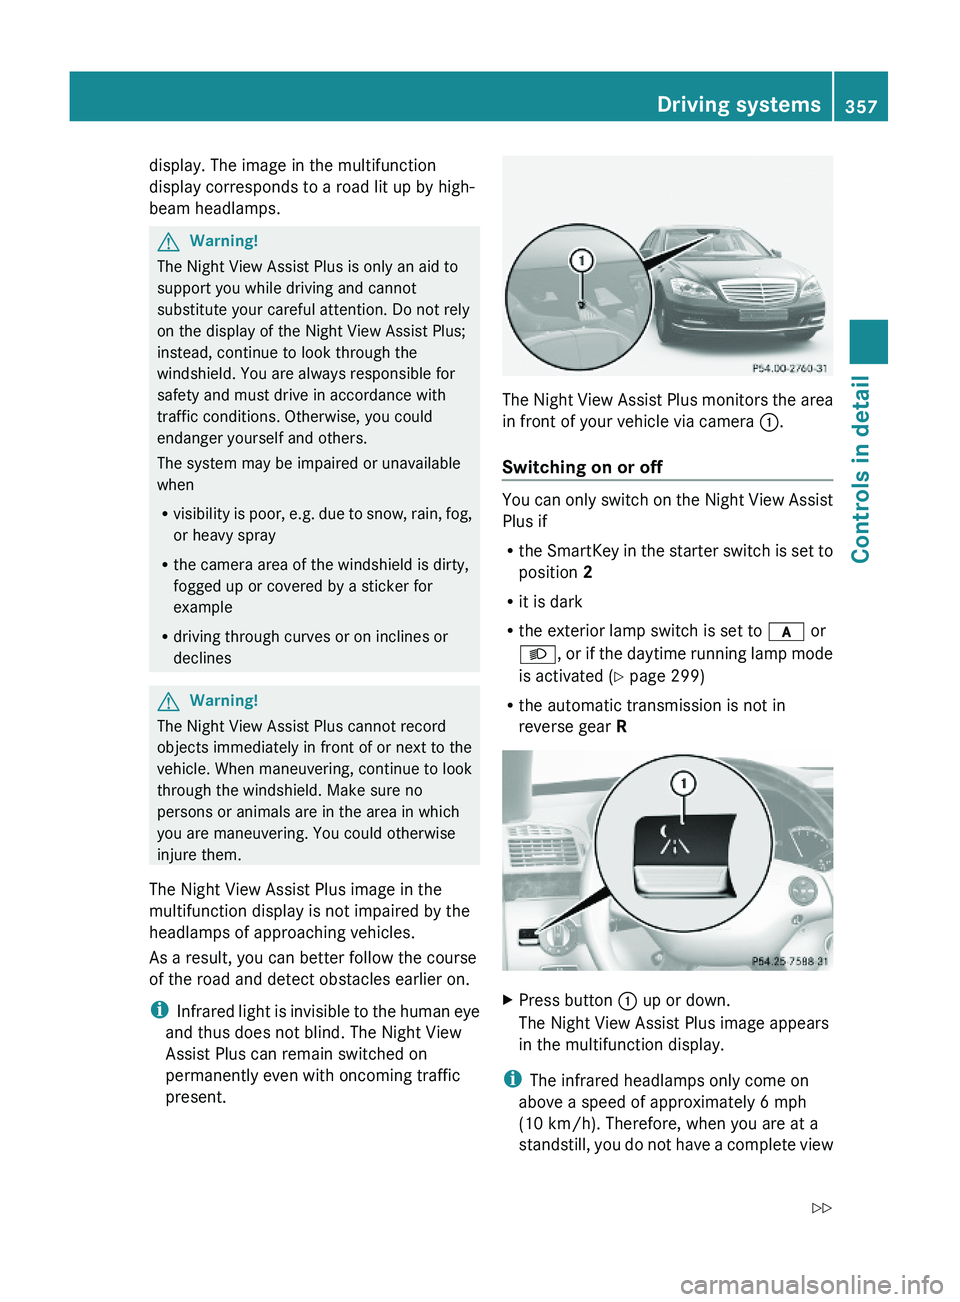
The Night View Assist Plus monitors the area
in front of your vehicle via camera \000F.
Switching on or off
You can only switch on the Night View Assist
Plus if
Rthe SmartKey in the starter switch is set to
position 2
Rit is dark
Rthe exterior lamp switch is set to \000f or
\000d, or if the daytime running lamp mode
is activated (Y page 299)
Rthe automatic transmission is not in
reverse gear R
XPress button \000F up or down.
The Night View Assist Plus image appears
in the multifunction display.
iThe infrared headlamps only come on
above a speed of approximately 6 mph
(10 km/h). Therefore, when you are at a
standstill, you do not have a complete view
Driving systems357Controls in detail221_AKB; 6; 20, en-USd2ugruen,Version: 2.11.8.12009-09-24T13:28:17+02:00 - Seite 357Z