2010 MERCEDES-BENZ R350 seats
[x] Cancel search: seatsPage 108 of 364
If the windshield wipers fail to function at
all with the combination switch in position
Ä or Å,
R
set the combination switch to the next
higher wiper speed
R have the windshield wipers checked at
the nearest authorized Mercedes-Benz
Center Power windows
Opening and closing
The door windows and the hinged quarter
windows are opened and closed electrically.
The switches for all door windows and the
hinged quarter windows are located on the
driver’s door control panel. The switches for
the respective door windows are located on
the front passenger door and the rear doors.
The
hinged quarter windows can be operated
from the driver’s seat only.
i Operating the rear door windows from
the rear is not possible when you activate
the override switch (Y page 62). G
Observe Safety notes, see page 55. G
Warning!
When opening or closing the windows, make
sure there is no danger of anyone being
harmed by the opening/closing procedure.
The door windows are equipped with the
express operation and automatic reversal
function.
If in express operation mode a door
window encounters an obstruction that
blocks its path, the automatic reversal
function will stop the door window and open
it slightly.
The door windows operate differently when
the switch is pulled and held. See the “Closing
when a door window is blocked” section in
this chapter for details.
The closing of a door window can be
immediately halted by releasing the switch or, if the switch was pulled past the resistance
point and released, by either pressing or
pulling the respective switch.
The
closing of the hinged quarter windows can
be immediately halted by pressing or pulling
the switch.
If a window encounters an obstruction that
blocks its path in a circumstance where you
are closing the windows by pressing and
holding button & on the SmartKey or by
pressing and holding the lock button (vehicles
with KEYLESS-GO) on an outside door handle,
the automatic reversal function will not
operate.
Activate the override switch when children
are riding in the back seats of the vehicle. The
children may otherwise injure themselves,
e.g. by becoming trapped in the window
opening. G
Warning!
Do not keep any part of your body up against
the
window pane when opening a window. The
downward motion of the pane may pull that
part of your body down between the window
pane and the door frame and trap it there. If
there is a risk of entrapment, release the
switch and pull it to close the window.
i You can also open or close the windows
using the SmartKey, see “Summer opening
feature” ( Y page 108) and “Convenience
closing feature” ( Y page 108).
i After switching off the ignition or
removing the SmartKey from the starter
switch, you can operate the windows until
you open the driver’s or front passenger
door. If no door was opened you can
operate the windows for up to 5 minutes. 106
Power windows
Controls in detail
251_AKB; 4; 52, en-US
d2ureepe,
Version: 2.11.8.1 2009-03-23T09:22:52+01:00 - Seite 106
Page 191 of 364
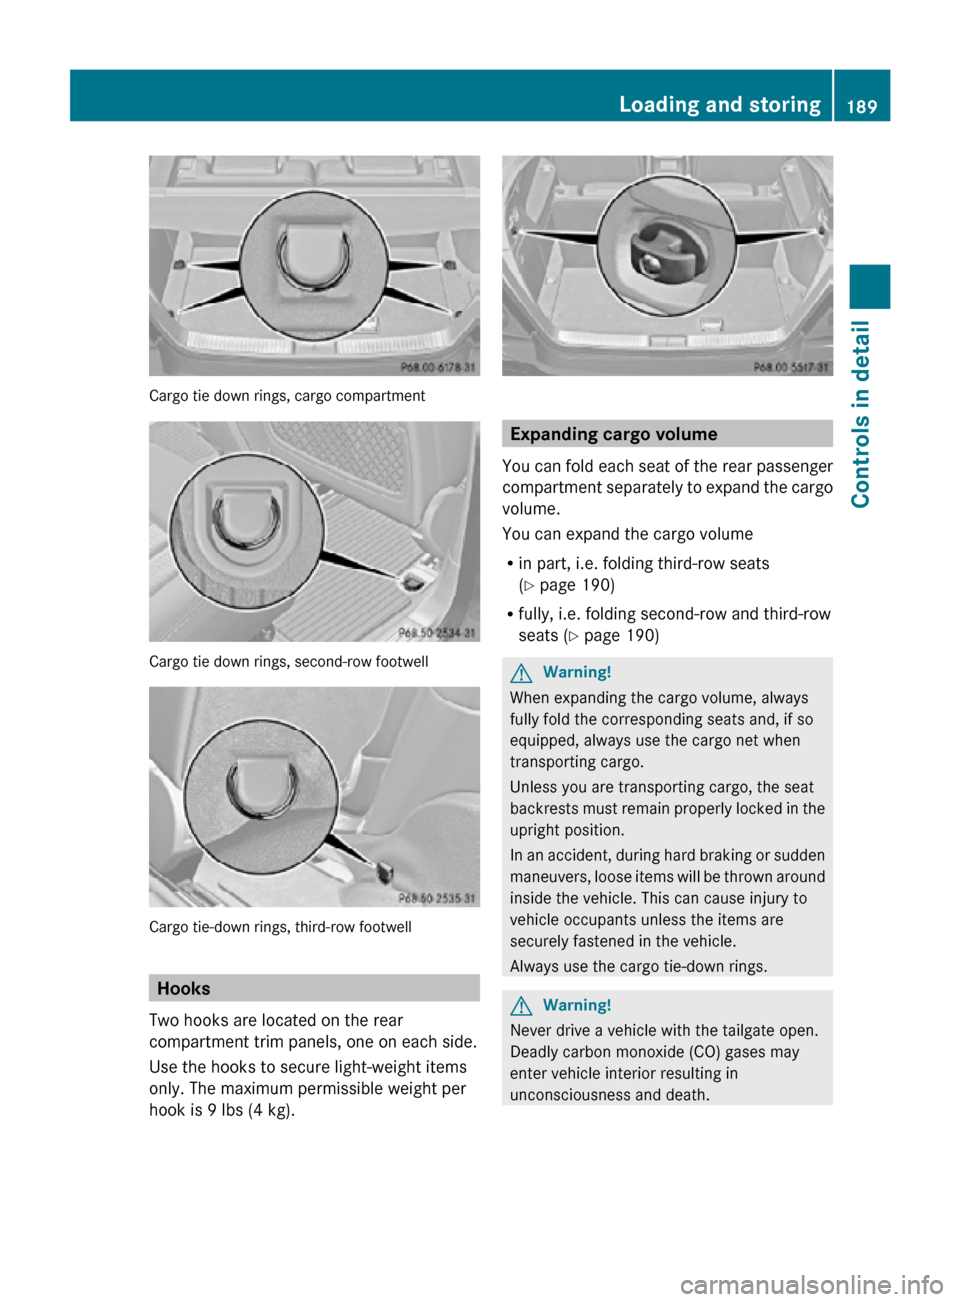
Cargo tie down rings, cargo compartment
Cargo tie down rings, second-row footwell
Cargo tie-down rings, third-row footwell
Hooks
Two hooks are located on the rear
compartment trim panels, one on each side.
Use the hooks to secure light-weight items
only. The maximum permissible weight per
hook is 9 lbs (4 kg). Expanding cargo volume
You can fold each seat of the rear passenger
compartment separately to expand the cargo
volume.
You can expand the cargo volume
R in part, i.e. folding third-row seats
(Y page 190)
R fully, i.e. folding second-row and third-row
seats (Y page 190) G
Warning!
When expanding the cargo volume, always
fully fold the corresponding seats and, if so
equipped, always use the cargo net when
transporting cargo.
Unless you are transporting cargo, the seat
backrests must remain properly locked in the
upright position.
In an accident, during hard braking or sudden
maneuvers, loose items will be thrown around
inside the vehicle. This can cause injury to
vehicle occupants unless the items are
securely fastened in the vehicle.
Always use the cargo tie-down rings. G
Warning!
Never drive a vehicle with the tailgate open.
Deadly carbon monoxide (CO) gases may
enter vehicle interior resulting in
unconsciousness and death. Loading and storing
189Controls in detail
251_AKB; 4; 52, en-US
d2ureepe, Version: 2.11.8.1 2009-03-23T09:22:52+01:00 - Seite 189 Z
Page 192 of 364
Expanding cargo volume in part
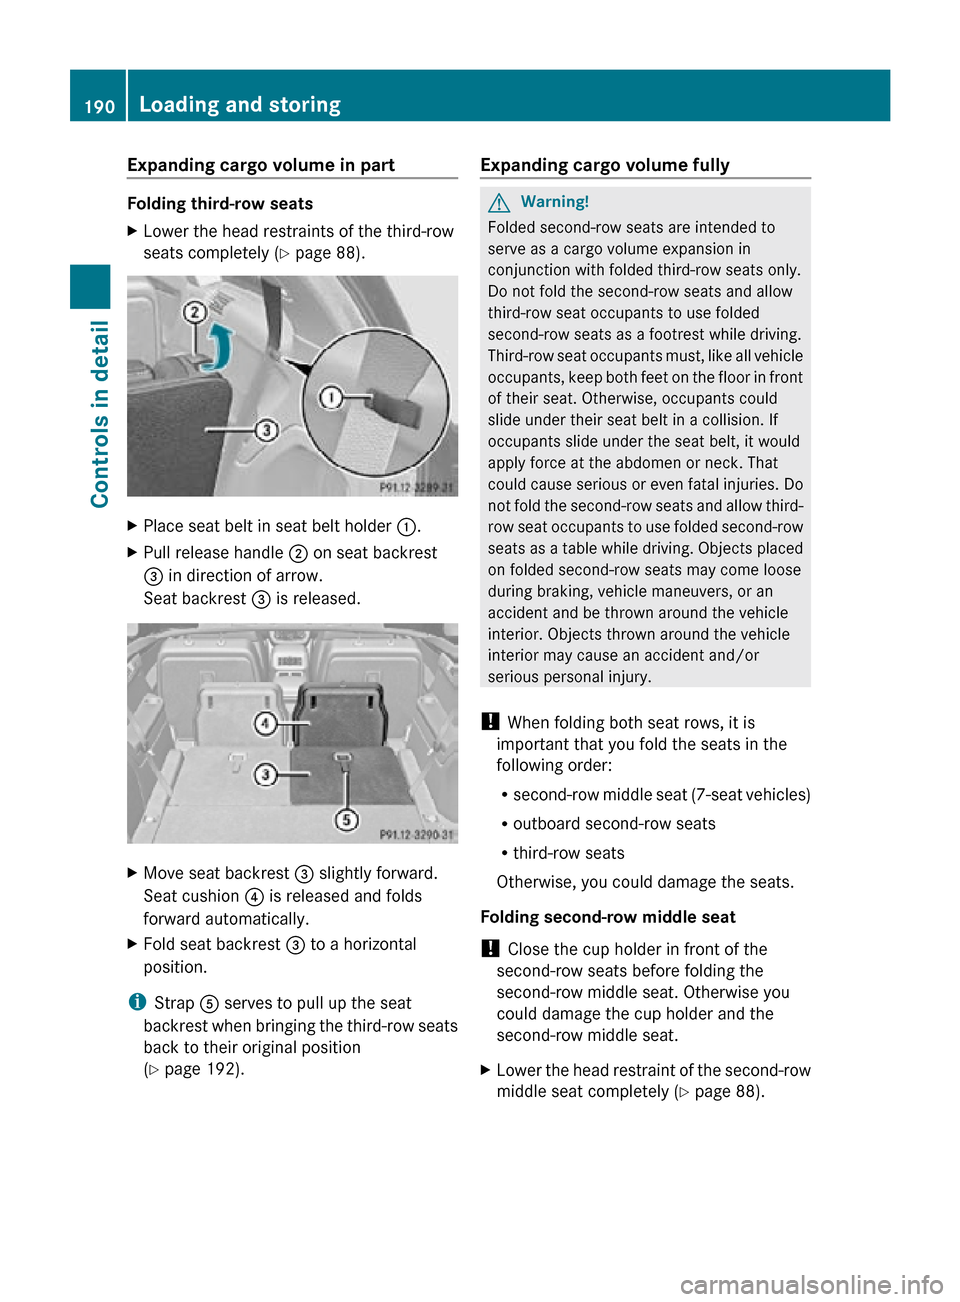
Folding third-row seats
X
Lower the head restraints of the third-row
seats completely ( Y page 88).X
Place seat belt in seat belt holder :.
X Pull release handle ; on seat backrest
= in direction of arrow.
Seat backrest = is released. X
Move seat backrest = slightly forward.
Seat cushion ? is released and folds
forward automatically.
X Fold seat backrest = to a horizontal
position.
i Strap A serves to pull up the seat
backrest when bringing the third-row seats
back to their original position
(Y page 192). Expanding cargo volume fully G
Warning!
Folded second-row seats are intended to
serve as a cargo volume expansion in
conjunction with folded third-row seats only.
Do not fold the second-row seats and allow
third-row seat occupants to use folded
second-row seats as a footrest while driving.
Third-row seat occupants must, like all vehicle
occupants, keep both feet on the floor in front
of their seat. Otherwise, occupants could
slide under their seat belt in a collision. If
occupants slide under the seat belt, it would
apply force at the abdomen or neck. That
could cause serious or even fatal injuries. Do
not fold the second-row seats and allow third-
row seat occupants to use folded second-row
seats as a table while driving. Objects placed
on folded second-row seats may come loose
during braking, vehicle maneuvers, or an
accident and be thrown around the vehicle
interior. Objects thrown around the vehicle
interior may cause an accident and/or
serious personal injury.
! When folding both seat rows, it is
important that you fold the seats in the
following order:
R second-row middle seat (7-seat vehicles)
R outboard second-row seats
R third-row seats
Otherwise, you could damage the seats.
Folding second-row middle seat
! Close the cup holder in front of the
second-row seats before folding the
second-row middle seat. Otherwise you
could damage the cup holder and the
second-row middle seat.
X Lower the head restraint of the second-row
middle seat completely ( Y page 88).190
Loading and storingControls in detail
251_AKB; 4; 52, en-US
d2ureepe,
Version: 2.11.8.1 2009-03-23T09:22:52+01:00 - Seite 190
Page 193 of 364
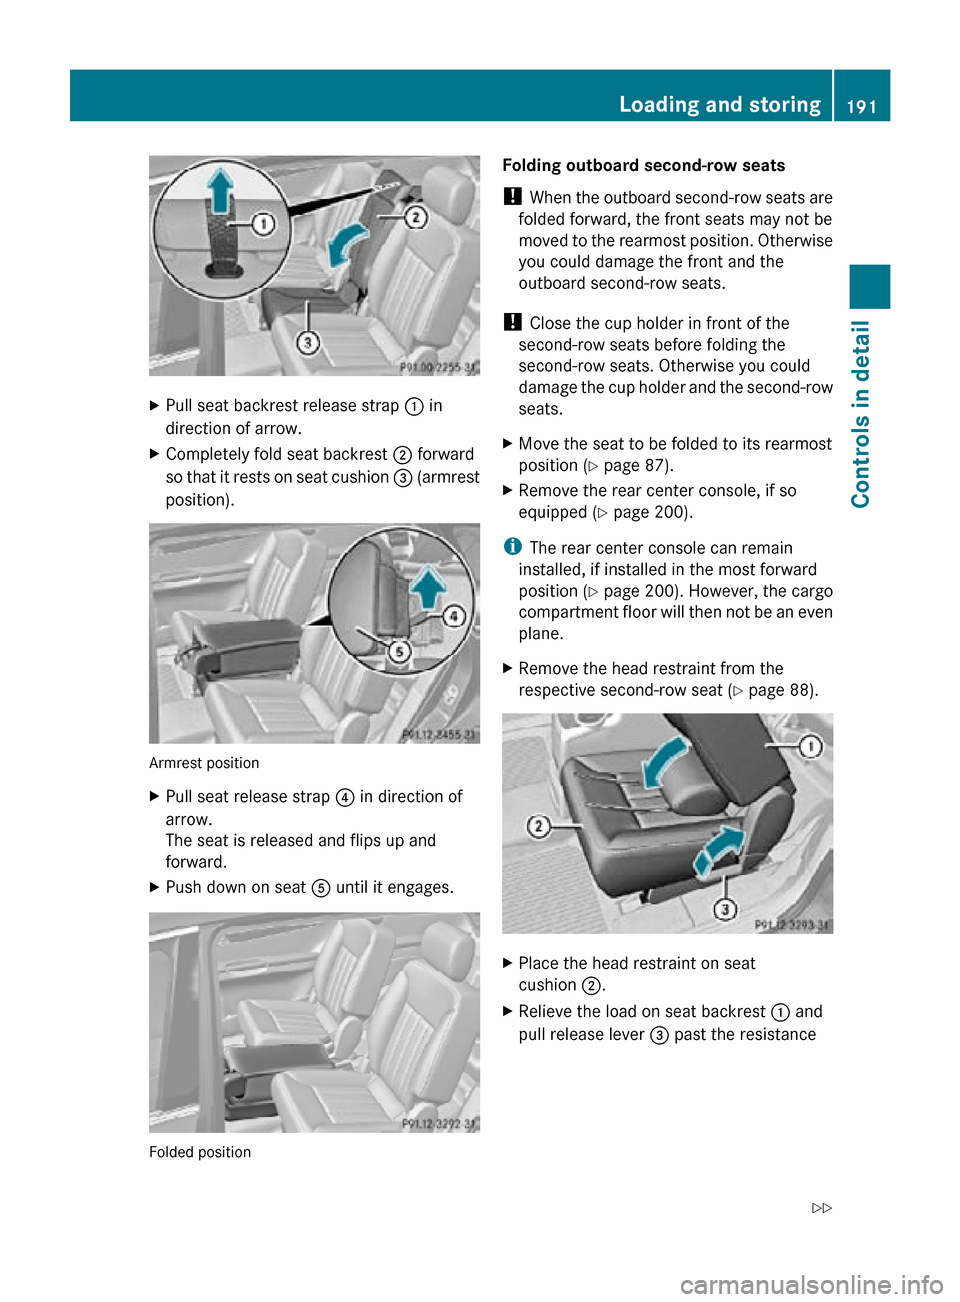
X
Pull seat backrest release strap : in
direction of arrow.
X Completely fold seat backrest ; forward
so that it rests on seat cushion = (armrest
position). Armrest position
X
Pull seat release strap ? in direction of
arrow.
The seat is released and flips up and
forward.
X Push down on seat A until it engages. Folded position Folding outboard second-row seats
!
When the outboard second-row seats are
folded forward, the front seats may not be
moved to the rearmost position. Otherwise
you could damage the front and the
outboard second-row seats.
! Close the cup holder in front of the
second-row seats before folding the
second-row seats. Otherwise you could
damage the cup holder and the second-row
seats.
X Move the seat to be folded to its rearmost
position (Y page 87).
X Remove the rear center console, if so
equipped ( Y page 200).
i The rear center console can remain
installed, if installed in the most forward
position ( Y page 200). However, the cargo
compartment floor will then not be an even
plane.
X Remove the head restraint from the
respective second-row seat (Y page 88). X
Place the head restraint on seat
cushion ;.
X Relieve the load on seat backrest : and
pull release lever = past the resistance Loading and storing
191Controls in detail
251_AKB; 4; 52, en-US
d2ureepe, Version: 2.11.8.1 2009-03-23T09:22:52+01:00 - Seite 191 Z
Page 194 of 364
point in direction of arrow as far as it will
go.
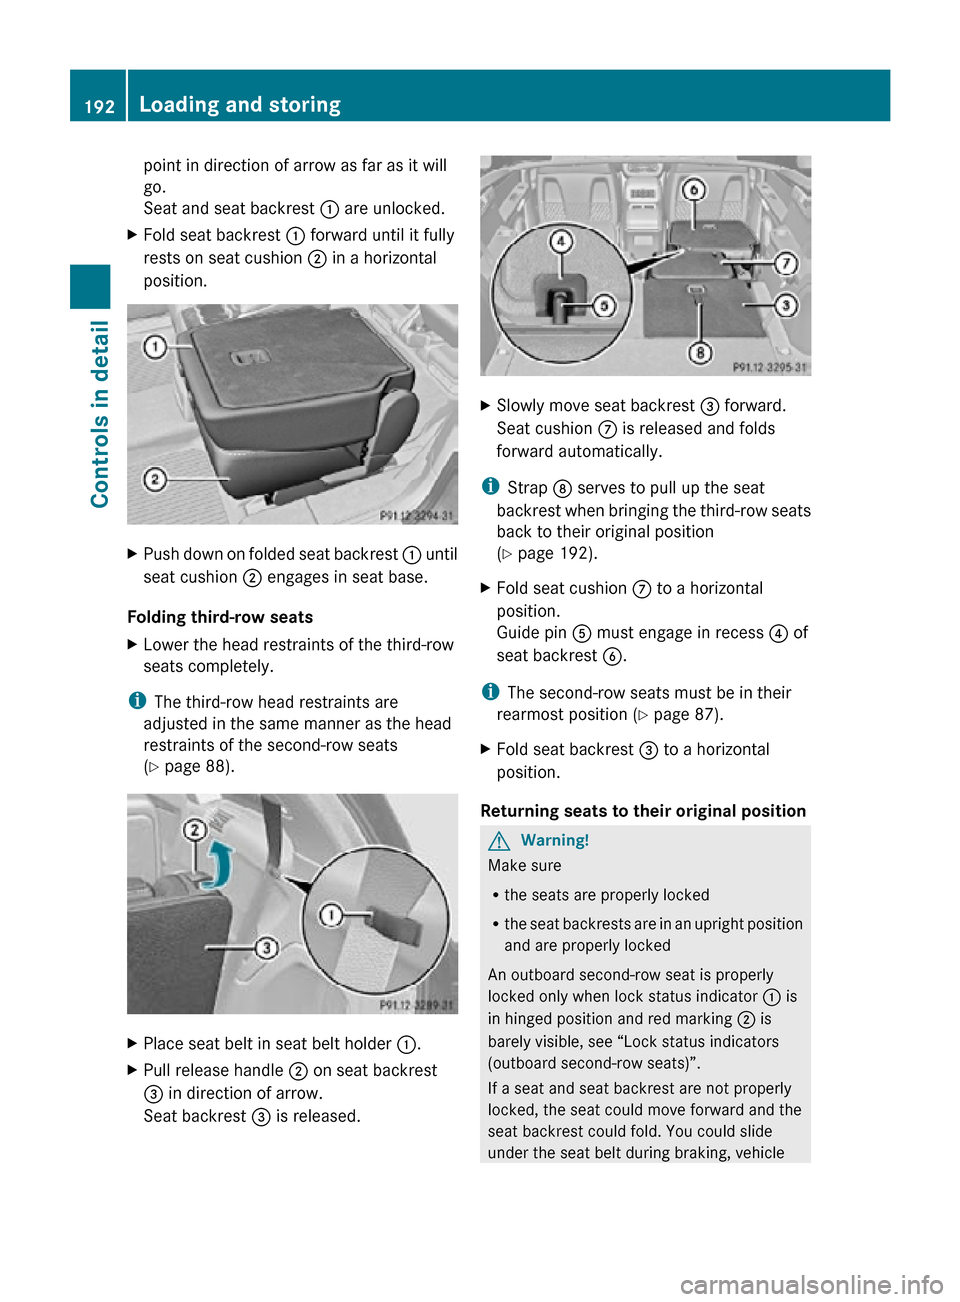
Seat and seat backrest
: are unlocked.
X Fold seat backrest : forward until it fully
rests on seat cushion ; in a horizontal
position. X
Push down on folded seat backrest : until
seat cushion ; engages in seat base.
Folding third-row seats
X Lower the head restraints of the third-row
seats completely.
i The third-row head restraints are
adjusted in the same manner as the head
restraints of the second-row seats
(Y page 88). X
Place seat belt in seat belt holder :.
X Pull release handle ; on seat backrest
= in direction of arrow.
Seat backrest = is released. X
Slowly move seat backrest = forward.
Seat cushion C is released and folds
forward automatically.
i Strap D serves to pull up the seat
backrest when bringing the third-row seats
back to their original position
(Y page 192).
X Fold seat cushion C to a horizontal
position.
Guide pin A must engage in recess ? of
seat backrest B.
i The second-row seats must be in their
rearmost position (Y page 87).
X Fold seat backrest = to a horizontal
position.
Returning seats to their original position G
Warning!
Make sure
R the seats are properly locked
R the seat backrests are in an upright position
and are properly locked
An outboard second-row seat is properly
locked only when lock status indicator : is
in hinged position and red marking ; is
barely visible, see “Lock status indicators
(outboard second-row seats)”.
If a seat and seat backrest are not properly
locked, the seat could move forward and the
seat backrest could fold. You could slide
under the seat belt during braking, vehicle 192
Loading and storingControls in detail
251_AKB; 4; 52, en-US
d2ureepe,
Version: 2.11.8.1 2009-03-23T09:22:52+01:00 - Seite 192
Page 195 of 364
maneuvers, or in an accident. If you slide
under it, the belt would apply force at the
abdomen or neck. That could cause serious
or even fatal injuries.
! When returning the seats to their original
position, it is important to proceed in the
following order:
R third-row seats
R outboard second-row seats
R second-row middle seat (7-seat vehicles)
Otherwise, you could damage the seats.
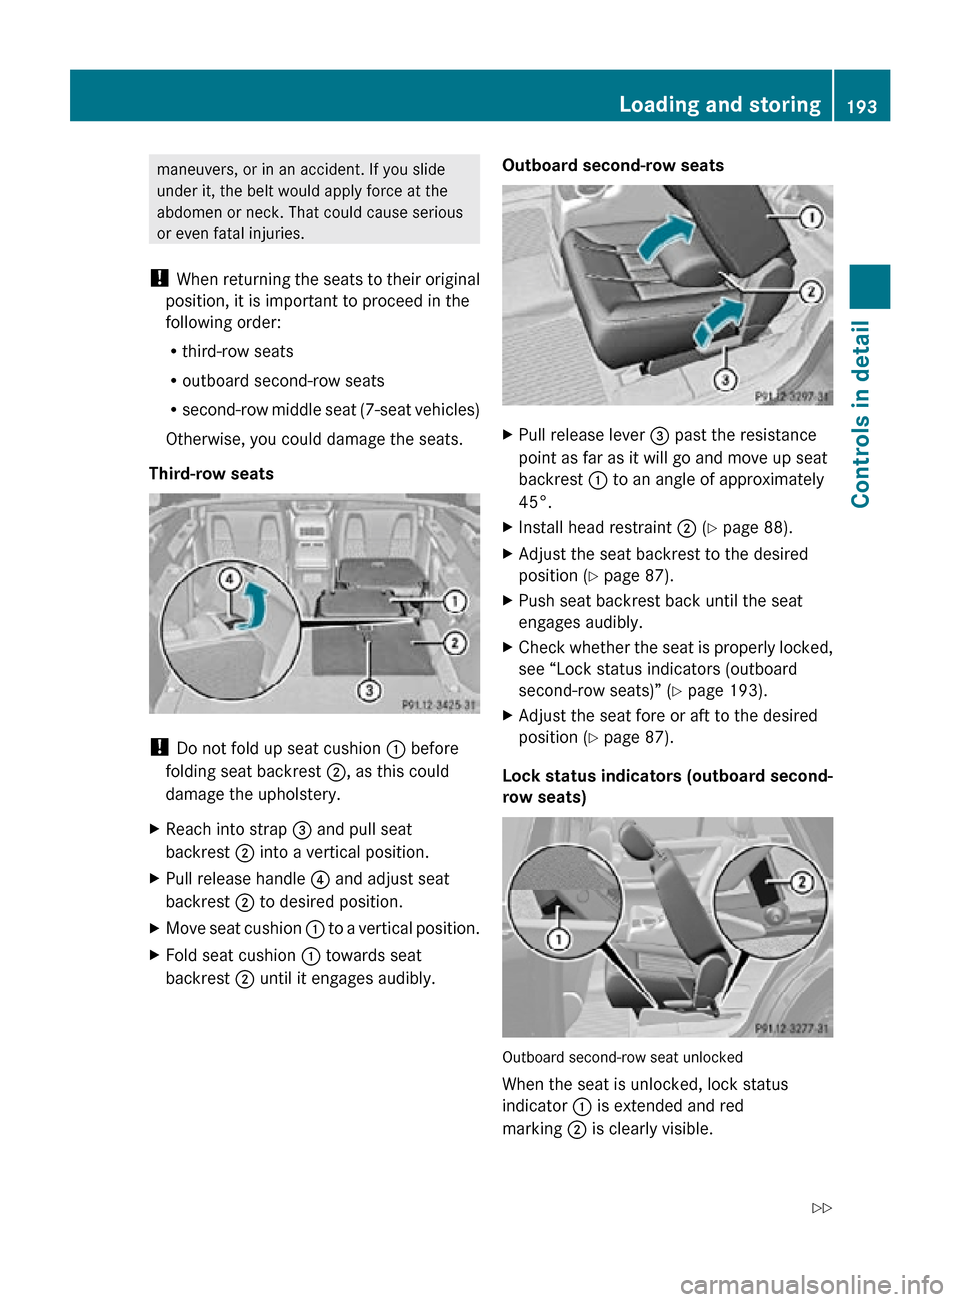
Third-row seats !
Do not fold up seat cushion : before
folding seat backrest ;, as this could
damage the upholstery.
X Reach into strap = and pull seat
backrest ; into a vertical position.
X Pull release handle ? and adjust seat
backrest ; to desired position.
X Move seat cushion : to a vertical position.
X Fold seat cushion : towards seat
backrest ; until it engages audibly. Outboard second-row seats X
Pull release lever = past the resistance
point as far as it will go and move up seat
backrest : to an angle of approximately
45°.
X Install head restraint ; (Y page 88).
X Adjust the seat backrest to the desired
position (Y page 87).
X Push seat backrest back until the seat
engages audibly.
X Check whether the seat is properly locked,
see “Lock status indicators (outboard
second-row seats)” ( Y page 193).
X Adjust the seat fore or aft to the desired
position (Y page 87).
Lock status indicators (outboard second-
row seats) Outboard second-row seat unlocked
When the seat is unlocked, lock status
indicator : is extended and red
marking ; is clearly visible. Loading and storing
193Controls in detail
251_AKB; 4; 52, en-US
d2ureepe, Version: 2.11.8.1 2009-03-23T09:22:52+01:00 - Seite 193 Z
Page 196 of 364
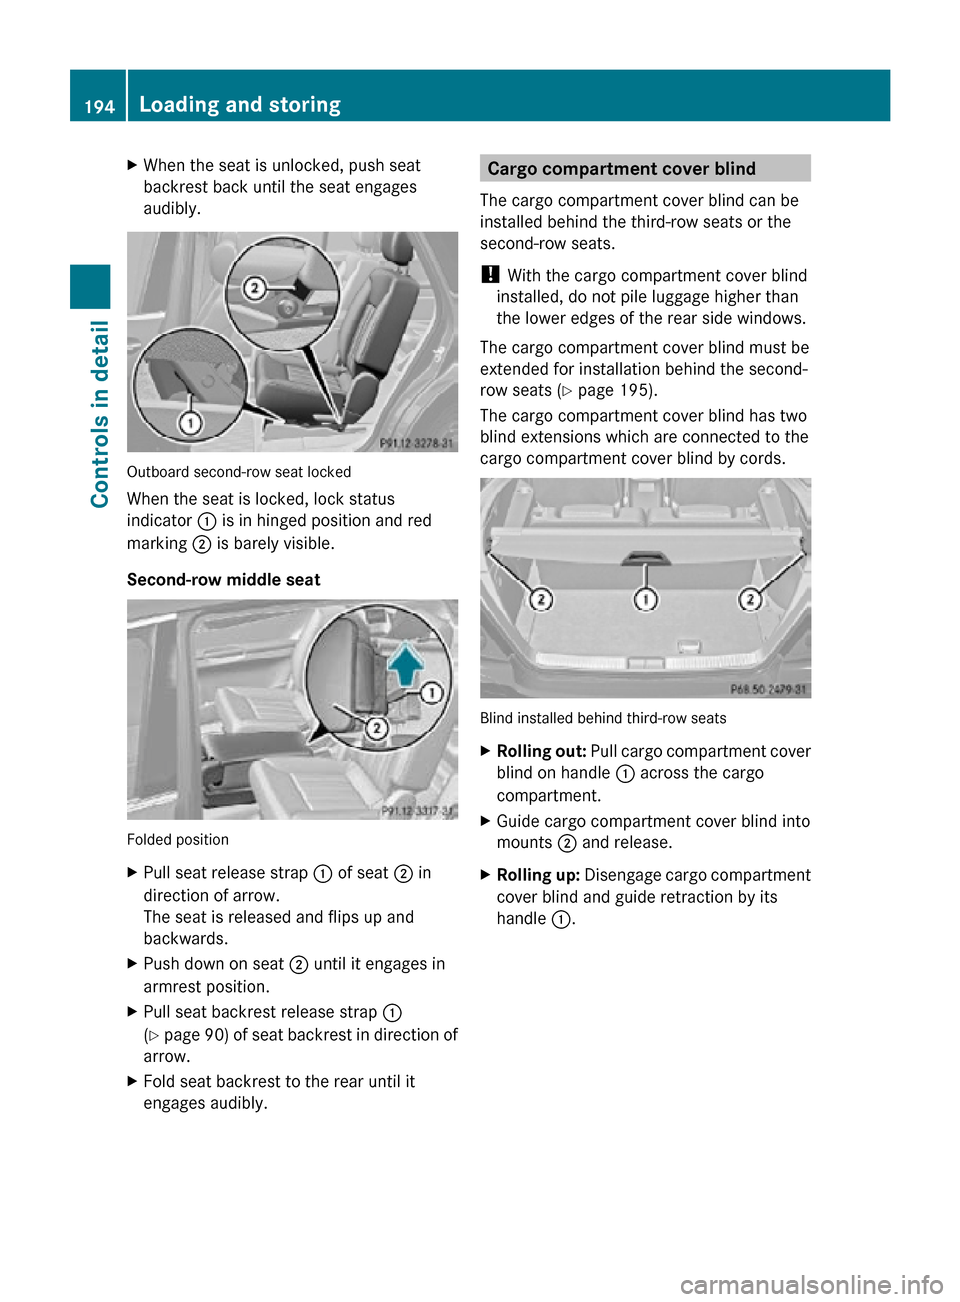
X
When the seat is unlocked, push seat
backrest back until the seat engages
audibly. Outboard second-row seat locked
When the seat is locked, lock status
indicator : is in hinged position and red
marking ; is barely visible.
Second-row middle seat
Folded position
X
Pull seat release strap : of seat ; in
direction of arrow.
The seat is released and flips up and
backwards.
X Push down on seat ; until it engages in
armrest position.
X Pull seat backrest release strap :
(Y page 90) of seat backrest in direction of
arrow.
X Fold seat backrest to the rear until it
engages audibly. Cargo compartment cover blind
The cargo compartment cover blind can be
installed behind the third-row seats or the
second-row seats.
! With the cargo compartment cover blind
installed, do not pile luggage higher than
the lower edges of the rear side windows.
The cargo compartment cover blind must be
extended for installation behind the second-
row seats ( Y page 195).
The cargo compartment cover blind has two
blind extensions which are connected to the
cargo compartment cover blind by cords. Blind installed behind third-row seats
X
Rolling out: Pull cargo compartment cover
blind on handle : across the cargo
compartment.
X Guide cargo compartment cover blind into
mounts ; and release.
X Rolling up: Disengage cargo compartment
cover blind and guide retraction by its
handle :. 194
Loading and storingControls in detail
251_AKB; 4; 52, en-US
d2ureepe,
Version: 2.11.8.1 2009-03-23T09:22:52+01:00 - Seite 194
Page 197 of 364
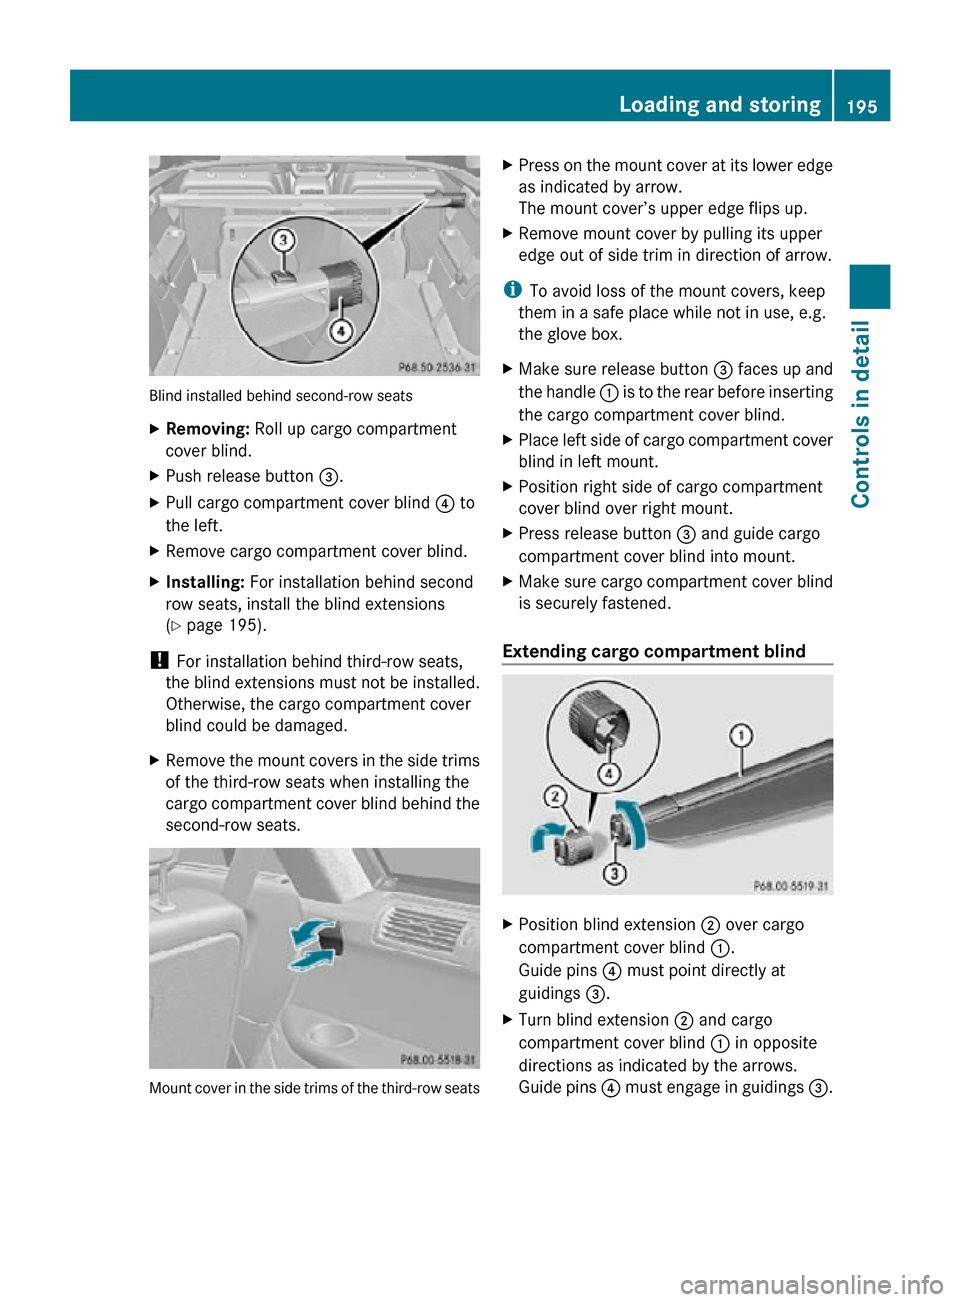
Blind installed behind second-row seats
X
Removing: Roll up cargo compartment
cover blind.
X Push release button =.
X Pull cargo compartment cover blind ? to
the left.
X Remove cargo compartment cover blind.
X Installing: For installation behind second
row seats, install the blind extensions
(Y page 195).
! For installation behind third-row seats,
the blind extensions must not be installed.
Otherwise, the cargo compartment cover
blind could be damaged.
X Remove the mount covers in the side trims
of the third-row seats when installing the
cargo compartment cover blind behind the
second-row seats. Mount cover in the side trims of the third-row seats X
Press on the mount cover at its lower edge
as indicated by arrow.
The mount cover’s upper edge flips up.
X Remove mount cover by pulling its upper
edge out of side trim in direction of arrow.
i To avoid loss of the mount covers, keep
them in a safe place while not in use, e.g.
the glove box.
X Make sure release button = faces up and
the handle : is to the rear before inserting
the cargo compartment cover blind.
X Place left side of cargo compartment cover
blind in left mount.
X Position right side of cargo compartment
cover blind over right mount.
X Press release button = and guide cargo
compartment cover blind into mount.
X Make sure cargo compartment cover blind
is securely fastened.
Extending cargo compartment blind X
Position blind extension ; over cargo
compartment cover blind :.
Guide pins ? must point directly at
guidings =.
X Turn blind extension ; and cargo
compartment cover blind : in opposite
directions as indicated by the arrows.
Guide pins ? must engage in guidings =. Loading and storing
195Controls in detail
251_AKB; 4; 52, en-US
d2ureepe, Version: 2.11.8.1 2009-03-23T09:22:52+01:00 - Seite 195 Z