2010 MERCEDES-BENZ R350 wipers
[x] Cancel search: wipersPage 108 of 364
If the windshield wipers fail to function at
all with the combination switch in position
Ä or Å,
R
set the combination switch to the next
higher wiper speed
R have the windshield wipers checked at
the nearest authorized Mercedes-Benz
Center Power windows
Opening and closing
The door windows and the hinged quarter
windows are opened and closed electrically.
The switches for all door windows and the
hinged quarter windows are located on the
driver’s door control panel. The switches for
the respective door windows are located on
the front passenger door and the rear doors.
The
hinged quarter windows can be operated
from the driver’s seat only.
i Operating the rear door windows from
the rear is not possible when you activate
the override switch (Y page 62). G
Observe Safety notes, see page 55. G
Warning!
When opening or closing the windows, make
sure there is no danger of anyone being
harmed by the opening/closing procedure.
The door windows are equipped with the
express operation and automatic reversal
function.
If in express operation mode a door
window encounters an obstruction that
blocks its path, the automatic reversal
function will stop the door window and open
it slightly.
The door windows operate differently when
the switch is pulled and held. See the “Closing
when a door window is blocked” section in
this chapter for details.
The closing of a door window can be
immediately halted by releasing the switch or, if the switch was pulled past the resistance
point and released, by either pressing or
pulling the respective switch.
The
closing of the hinged quarter windows can
be immediately halted by pressing or pulling
the switch.
If a window encounters an obstruction that
blocks its path in a circumstance where you
are closing the windows by pressing and
holding button & on the SmartKey or by
pressing and holding the lock button (vehicles
with KEYLESS-GO) on an outside door handle,
the automatic reversal function will not
operate.
Activate the override switch when children
are riding in the back seats of the vehicle. The
children may otherwise injure themselves,
e.g. by becoming trapped in the window
opening. G
Warning!
Do not keep any part of your body up against
the
window pane when opening a window. The
downward motion of the pane may pull that
part of your body down between the window
pane and the door frame and trap it there. If
there is a risk of entrapment, release the
switch and pull it to close the window.
i You can also open or close the windows
using the SmartKey, see “Summer opening
feature” ( Y page 108) and “Convenience
closing feature” ( Y page 108).
i After switching off the ignition or
removing the SmartKey from the starter
switch, you can operate the windows until
you open the driver’s or front passenger
door. If no door was opened you can
operate the windows for up to 5 minutes. 106
Power windows
Controls in detail
251_AKB; 4; 52, en-US
d2ureepe,
Version: 2.11.8.1 2009-03-23T09:22:52+01:00 - Seite 106
Page 171 of 364
X
Press button I to decrease or button
K to increase air volume to the desired
level.
The air volume decreases/increases to the
next lower/higher blower speed and
heating switches to the temperature that
was set before the front defroster was
switched on.
The indicator lamp in button ¦ goes out.
The indicator lamp in button Á comes
on.
or
X Turn temperature control : and/or C
(Y page 164) slightly in any direction.
Heating switches to the temperature that
was set before the front defroster was
switched on.
The
indicator lamp in button ¦ goes out.
The indicator lamp in button Á comes
on.
i The air conditioning compressor remains
on even if the indicator lamp in button
¦ goes out. This helps to prevent the
windshield from fogging.
Deactivating X
Press button ¦ again.
The indicator lamp in the button goes out.
Defrosting is turned off.
The previous settings are once again in
effect. The air conditioning compressor
remains switched on.
i To deactivate, you can also press button
^ or Ã.
Windshield fogged on the outside X
Switch the windshield wipers on
(Y page 104).
X Press air distribution button P
or O. Air recirculation mode
Switch to air recirculation mode to prevent
unpleasant odors from entering the vehicle
from the outside (e. g. before driving through
a tunnel). This setting cuts off the intake of
outside air and recirculates the air in the
passenger compartment. G
Warning!
Fogged windows impair visibility,
endangering you and others. If the windows
begin to fog on the inside, switching off the
air recirculation mode immediately should
clear interior window fogging. If interior
window fogging persists, make sure the air
conditioning is activated, or press button
¦.
X Activating: Press button d.
The
indicator lamp in the button comes on.
i The air recirculation mode is activated
automatically at high outside
temperatures.
The
indicator lamp in button d is not lit
when the air recirculation mode is switched
on automatically.
A quantity of outside air is added after
approximately 30 minutes.
If you have turned off the air conditioning
or the outside temperature is below 41‡
(5†), the air recirculation mode will not
switch on automatically.
X Deactivating: Press button d.
The indicator lamp in the button goes out. Climate control
169
Controls in detail
251_AKB; 4; 52, en-US
d2ureepe, Version: 2.11.8.1 2009-03-23T09:22:52+01:00 - Seite 169 Z
Page 181 of 364
was set before the front defroster was
switched on.
The
indicator lamp in button ¦ goes out.
The indicator lamp in button Á comes
on.
or
X Turn temperature control : and/or C
(USA only) ( Y page 170) or : and/or E
(Canada only)
(Y page 172) slightly in any
direction.
Heating switches to the temperature that
was set before the front defroster was
switched on.
The indicator lamp in button ¦ goes out.
The indicator lamp in button Á comes
on.
i The air conditioning compressor remains
on even if the indicator lamp in button
¦ goes out. This helps to prevent the
windshield from fogging.
Deactivating X
Press button ¦ once more.
The indicator lamp in the button goes out.
Defrosting is turned off.
The previous settings are once again in
effect. The air conditioning compressor
remains switched on.
i To deactivate, you can also press button
^ or Ã.
Windshield fogged on the outside X
Switch the windshield wipers on
(Y page 104).
X Press button Ã.
The indicator lamp in the button goes out.
Air volume and air distribution are
controlled separately for each zone.
If the automatic air volume and air
distribution are switched off: X
Press buttons O/c 13
and P/
\ 13
. Air recirculation mode
Switch to air recirculation mode to prevent
unpleasant odors from entering the vehicle
from the outside (e. g. before driving through
a tunnel). This setting cuts off the intake of
outside air and recirculates the air in the
passenger compartment. G
Warning!
Fogged windows impair visibility,
endangering you and others. If the windows
begin to fog on the inside, switching off the
air recirculation mode immediately should
clear interior window fogging. If interior
window fogging persists, make sure the air
conditioning is activated, or press button
¦.
X Activating: Press button d.
The
indicator lamp in the button comes on.
i The air recirculation mode is activated
automatically at high outside
temperatures.
The
indicator lamp in button d is not lit
when the air recirculation mode is switched
on automatically.
A quantity of outside air is added after
approximately 30 minutes.
If you have turned off the air conditioning
or the outside temperature is below 41‡
(5†), the air recirculation mode will not
switch on automatically.
X Deactivating: Press button d.
The indicator lamp in the button goes out.
13 Canada only 3-zone automatic climate control
179
Controls in detail
251_AKB; 4; 52, en-US
d2ureepe, Version: 2.11.8.1 2009-03-23T09:22:52+01:00 - Seite 179 Z
Page 225 of 364
vehicle. Comply with all relevant safety
precautions.
G
Warning!
To help prevent personal injury, stay clear of
moving parts when the hood is open and the
engine is running.
The radiator fan may continue to run for
approximately 30 seconds or may even
restart after the engine has been turned off.
Stay clear of fan blades. G
Warning!
Vehicles with gasoline engine:
The engine is equipped with a transistorized
ignition system. Because of the high voltage
it is dangerous to touch any components
(ignition coils, spark plug sockets, diagnostic
socket) of the ignition system
R with the engine running
R while starting the engine
R when the ignition is switched on and the
engine is turned manually G
Warning!
Vehicles with diesel engine:
The engine is equipped with a high-voltage
electronic control unit for the injection
system. Because of the high voltage it is
dangerous to touch any components of the
injection system (injectors, electrical wires)
R with the engine running
R while starting the engine
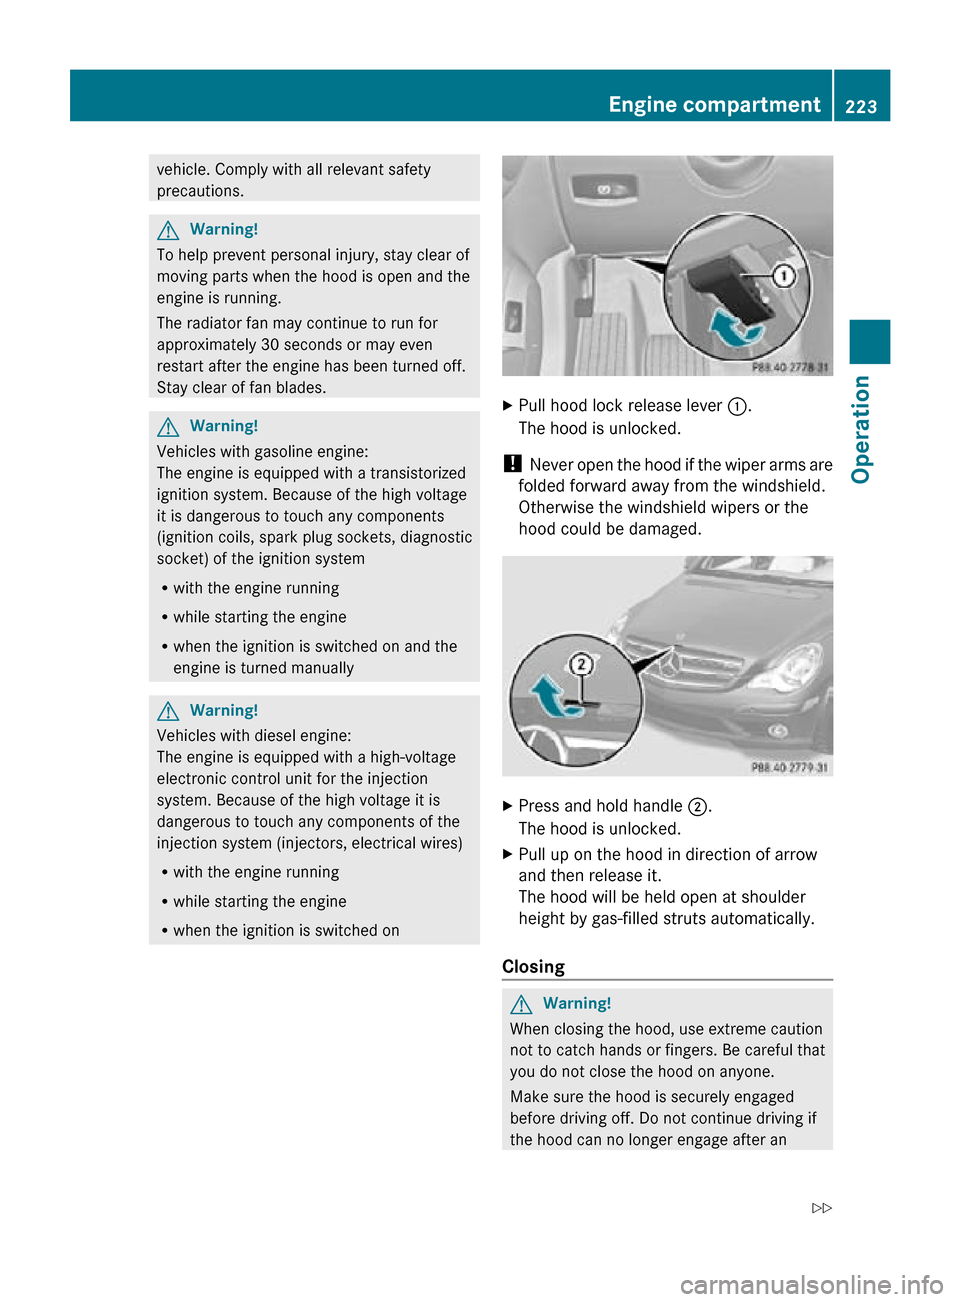
R when the ignition is switched on X
Pull hood lock release lever :.
The hood is unlocked.
! Never open the hood if the wiper arms are
folded forward away from the windshield.
Otherwise the windshield wipers or the
hood could be damaged. X
Press and hold handle ;.
The hood is unlocked.
X Pull up on the hood in direction of arrow
and then release it.
The hood will be held open at shoulder
height by gas-filled struts automatically.
Closing G
Warning!
When closing the hood, use extreme caution
not to catch hands or fingers. Be careful that
you do not close the hood on anyone.
Make sure the hood is securely engaged
before driving off. Do not continue driving if
the hood can no longer engage after an Engine compartment
223Operation
251_AKB; 4; 52, en-US
d2ureepe, Version: 2.11.8.1 2009-03-23T09:22:52+01:00 - Seite 223 Z
Page 266 of 364
Paintwork, painted body components
!
Affixing stickers, magnets, adhesive tape
or similar materials to painted body
components may damage the paintwork.
Mercedes-Benz approved Paint Care should
be applied when water drops on the paint
surface do not “bead up”. This should
normally be done every 3 to 5 months,
depending on the climate and washing
detergent used.
Mercedes-Benz approved Paint Cleaner
should be applied if the paint surface shows
signs of embedded dirt (i.e. loss of gloss).
Do not apply any of these products or wax if
your
vehicle is parked in the sun or if the hood
is still hot.
X Use the appropriate MB-Touch-Up Stick for
quick
and provisional repairs of minor paint
damage (i.e. chips from stones, vehicle
doors, etc.).
Engine cleaning Prior to cleaning the engine compartment,
make sure to protect electrical components
and connectors from contact with water and
cleaning agents.
Corrosion protection, such as MB
Anticorrosion Wax should be applied to the
engine compartment after every engine
cleaning. Before applying, all control linkage
bushings
and joints should be lubricated. The
poly-V-belt and all pulleys should be
protected from any wax.
Vehicle washing In the winter, thoroughly remove all traces of
road salt as soon as possible.
When
washing the vehicle underbody, do not
forget to clean the inner sides of the wheels.
i Vehicles with KEYLESS-GO:
If a door handle is hit by a strong jet of
water, and a SmartKey is within approximately 3 ft (1 m) of the vehicle, it
could
be inadvertently locked or unlocked.
Hand-wash
X Do not use hot water or wash your vehicle
in direct sunlight.
X Only use a soft, wet cloth or sponge to
clean the vehicle.
X Only use a mild vehicle wash detergent,
such as Mercedes-Benz approved Car
Shampoo.
X Thoroughly spray the vehicle with a
diffused jet of water.
X Do not spray directly towards the
ventilation intake.
X Use plenty of water and rinse the sponge
and chamois frequently.
X Rinse with clean water and dry with a
chamois thoroughly.
Do not allow cleaning agents to dry on the
finish.
Automatic car wash
You can have your vehicle washed in an
automatic
car wash from the start. Brushless
car washes are preferable.
X To protect the filter system, activate the air
recirculation mode using button d on
the climate control panel.
! Do
not clean your vehicle in an automatic
touchless car wash which uses caustic
spray. Caustic spray will damage the paint
or ornamental moldings.
If the vehicle is very dirty, prewash it before
running it through the automatic car wash.
! Make sure the combination switch is set
to wiper setting $. Otherwise, the rain
sensor could activate and cause the wipers
to move unintentionally. This may lead to
vehicle damage.
Due to the width of the vehicle, fold in
exterior rear view mirrors prior to running
the vehicle through an automatic car wash
to prevent damage to the mirrors. 264
Vehicle care
Operation
251_AKB; 4; 52, en-US
d2ureepe,
Version: 2.11.8.1 2009-03-23T09:22:52+01:00 - Seite 264
Page 268 of 364
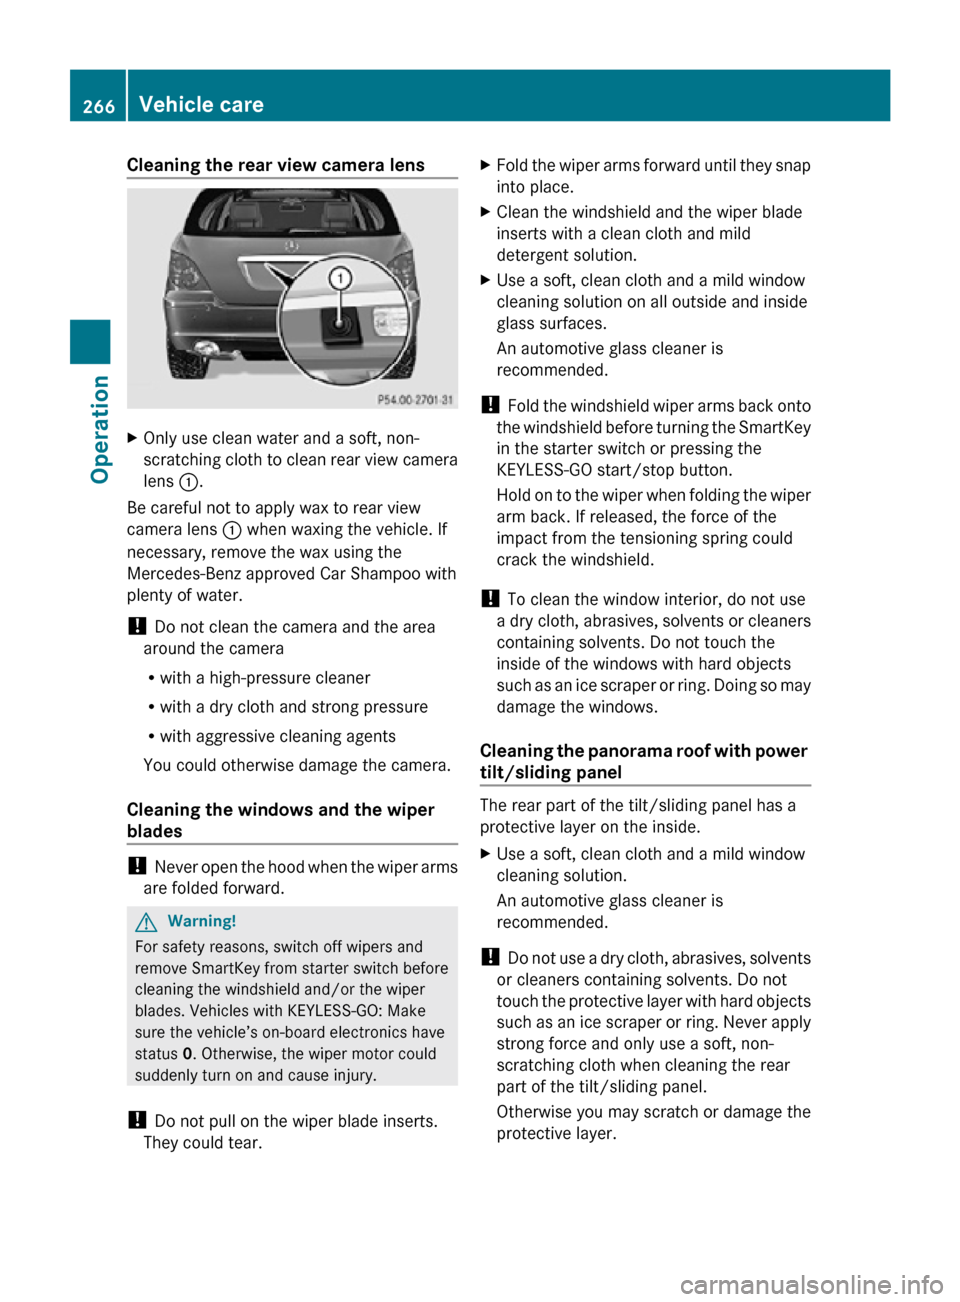
Cleaning the rear view camera lens
X
Only use clean water and a soft, non-
scratching cloth to clean rear view camera
lens :.
Be careful not to apply wax to rear view
camera lens : when waxing the vehicle. If
necessary, remove the wax using the
Mercedes-Benz approved Car Shampoo with
plenty of water.
! Do not clean the camera and the area
around the camera
R with a high-pressure cleaner
R with a dry cloth and strong pressure
R with aggressive cleaning agents
You could otherwise damage the camera.
Cleaning the windows and the wiper
blades !
Never open the hood when the wiper arms
are folded forward. G
Warning!
For safety reasons, switch off wipers and
remove SmartKey from starter switch before
cleaning the windshield and/or the wiper
blades. Vehicles with KEYLESS-GO: Make
sure the vehicle’s on-board electronics have
status 0. Otherwise, the wiper motor could
suddenly turn on and cause injury.
! Do not pull on the wiper blade inserts.
They could tear. X
Fold the wiper arms forward until they snap
into place.
X Clean the windshield and the wiper blade
inserts with a clean cloth and mild
detergent solution.
X Use a soft, clean cloth and a mild window
cleaning solution on all outside and inside
glass surfaces.
An automotive glass cleaner is
recommended.
! Fold the windshield wiper arms back onto
the windshield before turning the SmartKey
in the starter switch or pressing the
KEYLESS-GO start/stop button.
Hold on to the wiper when folding the wiper
arm back. If released, the force of the
impact from the tensioning spring could
crack the windshield.
! To clean the window interior, do not use
a dry cloth, abrasives, solvents or cleaners
containing solvents. Do not touch the
inside of the windows with hard objects
such as an ice scraper or ring. Doing so may
damage the windows.
Cleaning the panorama roof with power
tilt/sliding panel The rear part of the tilt/sliding panel has a
protective layer on the inside.
X
Use a soft, clean cloth and a mild window
cleaning solution.
An automotive glass cleaner is
recommended.
! Do not use a dry cloth, abrasives, solvents
or cleaners containing solvents. Do not
touch the protective layer with hard objects
such as an ice scraper or ring. Never apply
strong force and only use a soft, non-
scratching cloth when cleaning the rear
part of the tilt/sliding panel.
Otherwise you may scratch or damage the
protective layer. 266
Vehicle careOperation
251_AKB; 4; 52, en-US
d2ureepe,
Version: 2.11.8.1 2009-03-23T09:22:52+01:00 - Seite 266
Page 319 of 364
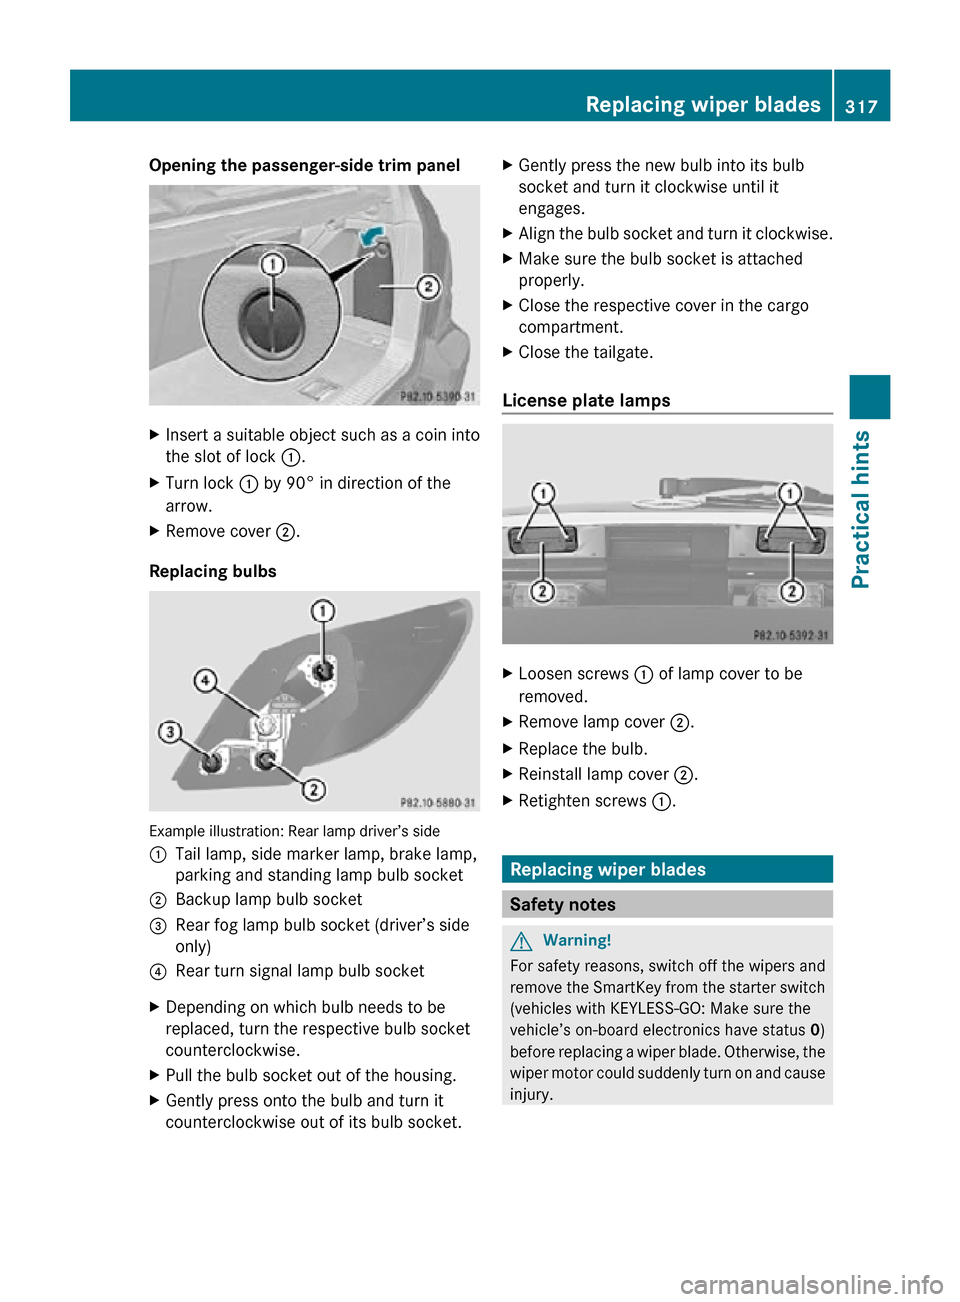
Opening the passenger-side trim panel
X
Insert a suitable object such as a coin into
the slot of lock :.
X Turn lock : by 90° in direction of the
arrow.
X Remove cover ;.
Replacing bulbs Example illustration: Rear lamp driver’s side
:
Tail lamp, side marker lamp, brake lamp,
parking and standing lamp bulb socket
; Backup lamp bulb socket
= Rear fog lamp bulb socket (driver’s side
only)
? Rear turn signal lamp bulb socket
X Depending on which bulb needs to be
replaced, turn the respective bulb socket
counterclockwise.
X Pull the bulb socket out of the housing.
X Gently press onto the bulb and turn it
counterclockwise out of its bulb socket. X
Gently press the new bulb into its bulb
socket and turn it clockwise until it
engages.
X Align the bulb socket and turn it clockwise.
X Make sure the bulb socket is attached
properly.
X Close the respective cover in the cargo
compartment.
X Close the tailgate.
License plate lamps X
Loosen screws : of lamp cover to be
removed.
X Remove lamp cover ;.
X Replace the bulb.
X Reinstall lamp cover ;.
X Retighten screws :. Replacing wiper blades
Safety notes
G
Warning!
For safety reasons, switch off the wipers and
remove the SmartKey from the starter switch
(vehicles with KEYLESS-GO: Make sure the
vehicle’s on-board electronics have status 0)
before replacing a wiper blade. Otherwise, the
wiper motor could suddenly turn on and cause
injury. Replacing wiper blades
317Practical hints
251_AKB; 4; 52, en-US
d2ureepe, Version: 2.11.8.1 2009-03-23T09:22:52+01:00 - Seite 317 Z