2010 MERCEDES-BENZ R350 warning light
[x] Cancel search: warning lightPage 53 of 364

Seat belt adjustment function
The seat belt adjustment function adjusts the
seat belts on both front seats to the upper
body
of the respective vehicle occupant. The
seat belt will be pulled slightly tighter for that
purpose when
R you engage the latch plate into the buckle
and then turn the SmartKey in the starter
switch to position 2
R the SmartKey in the starter switch is in
position 2 and you then engage the latch
plate in the buckle
The seat belt adjustment function takes place
with a certain amount of retracting force
when the system senses slack between the
vehicle occupant and the seat belt. Do not
retain the seat belt during this procedure. You
can activate or deactivate the seat belt
adjustment function via the control system
(Y page 138).
Releasing the seat belts X
Press seat belt release button ?
(Y page 50).
Allow the retractor to completely rewind
the seat belt by guiding latch plate ;
(Y page 50).
! Make sure the seat belt retracts
completely.
Otherwise the seat belt and/or
latch plate could get caught or pinched in
the door or in the seat mechanism. This can
damage the seat belt and impair its
effectiveness, and/or cause damage to the
door and/or door trim panel. Such damage
is not covered by the Mercedes-Benz
Limited Warranty.
Damaged seat belts must be replaced.
Contact an authorized Mercedes-Benz
Center.
Enhanced seat belt reminder system When the engine is started, the seat belt
telltale
7 will always illuminate for 6 seconds to remind you and your passengers
to fasten your seat belts.
If the driver’s seat belt is not fastened when
the engine is started, an additional warning
chime
will sound. The warning chime goes out
after approximately 6 seconds or once the
driver’s seat belt is fastened.
If after these 6 seconds the driver’s or the
front passenger’s seat belt (with the front
passenger seat occupied) is not fastened with
front doors closed,
R the seat belt telltale 7 remains
illuminated for as long as either the driver’s
or front passenger’s seat belt is not
fastened.
R and if the vehicle speed once exceeds
15 mph (25 km/h), the seat belt telltale
7 starts flashing and a warning chime
sounds with increasing intensity for a
maximum of 60 seconds or until the
driver’s and front passenger’s seat belt are
fastened.
If you and/or your passenger release the
seat belt during driving, the seat belt
telltale 7 starts flashing and the
warning chime sounds as described before.
If the driver’s or the front passenger’s seat
belt remains unfastened after 60 seconds,
the warning chime stops sounding, the seat
belt telltale 7 stops flashing but
continues to be illuminated.
After a vehicle standstill, the warning chime
is reactivated and the seat belt telltale
7 is flashing again if the vehicle speed
once exceeds 15 mph (25 km/h).
The seat belt telltale 7 will only go out if
both the driver’s and the front passenger’s
seat belt (with the front passenger seat
occupied) are fastened, or the vehicle is
standing still and a front door is opened.
For more information, see “Practical hints”
(Y page 302). Occupant safety
51
Safety and security
251_AKB; 4; 52, en-US
d2ureepe, Version: 2.11.8.1 2009-03-23T09:22:52+01:00 - Seite 51 Z
Page 55 of 364
R
If the vehicle is in a critical dynamic driving
situation, the door windows close, except
for a minimal gap that remains open.
R Vehicles with power tilt/sliding sunroof: If
the vehicle is in a critical dynamic driving
situation, the tilt/sliding sunroof also
closes, except for a minimal gap that
remains open.
If the closing procedure of any of these
elements is blocked, it will stop and open
slightly.
Once the hazardous situation no longer exists
and an accident has been avoided, the seat
belt pre-tensioning is deactivated. All of the
PRE-SAFE ®
settings can be re-adjusted
following the critical driving event.
If the seat belts do not release:
X Adjust the seat backrest or seat slightly to
the rear until the seat belt tension is
reduced.
The locking mechanism releases.
! When moving the seats, make sure there
are no items in the footwell or behind the
seats. Otherwise, you could damage the
seats and/or the items.
For information on the seat belt adjustment
function as an integrated comfort feature of
PRE-SAFE ®
, see ( Y page 51). NECK-PRO active front head
restraints
The NECK-PRO active front head restraints
are intended to offer the driver and front
passenger increased protection from
whiplash-type injuries. In the event of a rear-
end
collision, the NECK-PRO active front head
restraints on the front seats are designed to
move forward in the direction of travel. They
thus provide the head with increased support
earlier on in the collision sequence. The
NECK-PRO active front head restraints will
move forward whether the seats are occupied
or not. G
Warning!
Do not attach any objects (e.g. hangers) to the
head restraint posts. Otherwise, the NECK-
PRO active front head restraints may not be
able
to function properly or offer the intended
degree of protection they were designed for
in the event of a rear-end collision. G
Warning!
Only use seat or head restraint covers which
have
been tested and approved by Mercedes-
Benz for your vehicle model.
Using other seat or head restraint covers may
interfere with or prevent the activation of the
NECK-PRO active front head restraints and/
or the deployment of the front side impact air
bags.
Contact an authorized Mercedes-Benz Center
for availability.
When the NECK-PRO active front head
restraints have been triggered in an accident,
the NECK-PRO active front head restraints
must be reset. Otherwise, the NECK-PRO
active front head restraints cannot offer any
additional protection in the event of another
rear-end collision.
For information on resetting the activated
NECK-PRO active front head restraints, see
“Resetting activated head restraints”
(Y page 310).
You cannot remove the NECK-PRO active
front head restraints. G
Warning!
For your protection, drive only with properly
positioned head restraints.
Adjust
the head restraint so that it is as close
to the head as possible and the center of the
head restraint supports the back of the head
at eye level. This will reduce the potential for
injury to the head and neck in the event of an
accident or similar situation.
For information on head restraint adjustment,
see “Head restraint height” ( Y page 83), or Occupant safety
53
Safety and security
251_AKB; 4; 52, en-US
d2ureepe, Version: 2.11.8.1 2009-03-23T09:22:52+01:00 - Seite 53 Z
Page 56 of 364
see “Head restraint fore and aft adjustment”
(Y page 83).
Correct driver seat adjustment
G
Warning!
In order to avoid possible loss of vehicle
control the following must be done before the
vehicle is put into motion:
R seat adjustment
R head restraint adjustment
R steering wheel adjustment
R rear view mirror adjustment
R fastening of seat belts Steering wheel
G
Observe Safety notes, see page 91.
X Position steering wheel : properly. See
(Y page 92) for manual adjustment and
(Y page 92) for electrical adjustment. Make sure:
R
You can reach the steering wheel with your
arms slightly bent at the elbows.
R You can move your legs freely.
R All displays (including malfunction and
indicator lamps) on the instrument cluster
are clearly visible.
Seat belt G
Observe Safety notes, see page 47.
X Fasten and position your seat belt ;
correctly (Y page 49).
Make sure:
R The seat belt is always fitted snugly.
R Adjust the seat belt so that the shoulder
section is located as close as possible to
the middle of the shoulder.
R Place the lap portion of the seat belt as low
as possible on your hips.
Seat and head restraint G
Observe Safety notes, see page 81.
X Position seat = and head restraint
properly. See ( Y page 82) for seat and
head restraint adjustment.
Observe the following points:
R Always be in a properly seated position.
R The position should be as far rearward from
the front air bag in the steering wheel as
possible, while still permitting proper
operation of vehicle controls.
R Adjust the seat to a comfortable seating
position that still allows you to reach the
accelerator/brake pedal safely.
R The seat must be adjusted so that you can
correctly fasten and position your seat belt.
R The seat backrest must be in a position that
is as nearly upright as possible. 54
Occupant safetySafety and security
251_AKB; 4; 52, en-US
d2ureepe,
Version: 2.11.8.1 2009-03-23T09:22:52+01:00 - Seite 54
Page 57 of 364
R
Adjust the seat cushion so that the front
edge of the seat cushion lightly supports
your legs.
R Adjust the head restraint so that it is as
close to the head as possible and the
center of the head restraint supports the
back of the head at eye level.
R Never place hands under the seat or near
any moving parts while the seat is being
adjusted. Children in the vehicle
Safety notes If an infant or child is traveling with you in the
vehicle:
X
Secure the child using an infant or child
restraint
appropriate to the age and size of
the child.
X Make sure the infant or child is properly
secured at all times while the vehicle is in
motion. G
Warning!
When leaving the vehicle, always remove the
SmartKey from the starter switch. Always
take the SmartKey with you and lock the
vehicle. Do not leave children unattended in
the
vehicle, even if they are secured in a child
restraint system, or with access to an
unlocked vehicle. A child’s unsupervised
access to a vehicle could result in an accident
and/or serious personal injury. The children
could
R injure themselves on parts of the vehicle
R be seriously or fatally injured through
excessive exposure to extreme heat or cold
R injure themselves or cause an accident with
vehicle equipment that can be operated
even if the SmartKey is removed from the
starter switch or removed from the vehicle,
such as seat adjustment, steering wheel
adjustment, or the memory function If children open a door, they could injure other
persons or get out of the vehicle and injure
themselves or be injured by following traffic.
Do not expose the child restraint system to
direct sunlight. The child restraint system’s
metal parts, for example, could become very
hot, and the child could be burned by these
parts.
G
Warning!
Do not carry heavy or hard objects in the
passenger
or cargo compartment unless they
are firmly secured in place.
Unsecured or improperly positioned cargo
increases a child’s risk of injury in the event
of
R strong braking maneuvers
R sudden changes of direction
R an accident
Infant and child restraint systems G
Observe Safety notes, see page 55.
We recommend all infants and children be
properly restrained at all times while the
vehicle is in motion.
Canada only:
Only use a BabySmart™ compatible child
restraint for the front passenger seat in this
vehicle.
All
lap/shoulder belts except the driver’s seat
belt have special seat belt retractors for
secure fastening of child restraints.
To fasten a child restraint, follow the child
restraint manufacturer’s instructions for
mounting.
To activate the special seat belt retractor:
X Pull the shoulder belt out completely and
let it retract. Occupant safety
55
Safety and security
251_AKB; 4; 52, en-US
d2ureepe, Version: 2.11.8.1 2009-03-23T09:22:52+01:00 - Seite 55 Z
Page 66 of 364
and significantly reduces braking
effectiveness.
The Antilock Brake System (ABS) regulates
the
brake pressure so that the wheels do not
lock during braking. This allows you to
maintain the ability to steer your vehicle.
The ABS is functional above a speed of
approximately 5 mph (8 km/h) independent
of road surface conditions.
On slippery road surfaces, the ABS will
respond even to light brake pressure.
The ABS indicator lamp ! indicator lamp
in the instrument cluster comes on when you
switch on the ignition. It goes out when the
engine is running.
Braking At the instant one of the wheels is about to
lock up, a slight pulsation can be felt in the
brake pedal. The pulsation indicates that the
ABS is in the regulating mode.
X
Keep firm and steady pressure on the brake
pedal while you feel the pulsation.
Continuous, steady brake pedal pressure
yields the advantages provided by the ABS,
namely
braking power and the ability to steer
the vehicle.
The pulsating brake pedal can be an
indication of hazardous road conditions and
functions as a reminder to take extra care
while driving.
Emergency brake maneuver X
Keep continuous full pressure on the brake
pedal. G
Warning!
If the ABS malfunctions, other driving safety
systems
such as the BAS or the ESP ®
are also
switched off. Observe indicator and warning
lamps that may come on as well as messages
in the multifunction display that may appear. If the ABS malfunctions, the wheels may lock
during hard braking, reducing steering
capability
and extending the braking distance. BAS
G
Observe Safety notes, see page 63.
The Brake Assist System (BAS) operates in
emergency
situations. If you apply the brakes
very quickly, the BAS provides full brake
boost automatically, thereby potentially
reducing the braking distance.
X Apply continuous full braking pressure until
the emergency braking situation is over.
The ABS will prevent the wheels from
locking.
When you release the brake pedal, the brakes
function again as normal. The BAS is then
deactivated. G
Warning!
If the BAS malfunctions, the brake system still
functions, but without the additional brake
boost available that the BAS would normally
provide in an emergency braking maneuver.
Therefore,
the braking distance may increase. EBP
G
Observe Safety notes, see page 63.
The Electronic Brake Proportioning (EBP)
enhances braking effectiveness by allowing
the
rear brakes to supply a greater proportion
of the braking effort in straight-line braking
without a loss of vehicle stability. G
Warning!
If the EBP malfunctions, the brake system will
still function with full brake boost. However,
the rear wheels could lock up during
emergency braking situations, for example.
You could lose control of the vehicle and
cause an accident.
Adapt your driving style to the changed
driving characteristics. 64
Driving safety systems
Safety and security
251_AKB; 4; 52, en-US
d2ureepe,
Version: 2.11.8.1 2009-03-23T09:22:52+01:00 - Seite 64
Page 83 of 364
Position 1
X
Press the KEYLESS-GO start/stop button
once.
This supplies power for some electrical
consumers, such as radio functions.
i If you now press the KEYLESS-GO start/
stop button
R once more, the ignition (position 2) is
switched on
R twice more the power supply is again
switched off
Ignition (or position 2) X
Press the KEYLESS-GO start/stop button
twice.
This supplies power for all electrical
consumers.
All lamps (except low-beam headlamp
indicator lamp, high-beam headlamp
indicator lamp, and turn signal indicator
lamps unless activated) in the instrument
cluster
come on. If a lamp in the instrument
cluster fails to come on when the ignition
is switched on, have it checked and
replaced if necessary. If a lamp in the
instrument cluster remains on after
starting the engine or comes on while
driving, refer to “Lamps in instrument
cluster” ( Y page 299).
i If you now press the KEYLESS-GO start/
stop
button once, the power supply is again
switched off. Seats
Safety notes
G
Warning!
In order to avoid possible loss of vehicle
control
the following must be done before the
vehicle is put into motion:
R seat adjustment
R head restraint adjustment
R steering wheel adjustment
R rear view mirror adjustment
R fastening of seat belts G
Warning!
Do not adjust the driver’s seat while driving.
Adjusting the seat while driving could cause
the driver to lose control of the vehicle.
Never ride in a moving vehicle with the seat
backrest
in an excessively reclined position as
this can be dangerous. You could slide under
the seat belt in a collision. If you slide under
it, the seat belt would apply force at the
abdomen or neck. That could cause serious
or fatal injuries. The seat backrest and seat
belts provide the best restraint when the
wearer is in a position that is as upright as
possible and seat belts are properly
positioned on the body. G
Warning!
Your seat must be adjusted so that you can
correctly fasten your seat belt.
Observe the following points:
R Adjust
the seat backrest until your arms are
slightly angled when holding the steering
wheel.
R Adjust the seat to a comfortable seating
position that still allows you to reach the
accelerator/brake pedal safely. The
position should be as far back as possible
with the driver still able to operate the
controls properly. Seats
81
Controls in detail
251_AKB; 4; 52, en-US
d2ureepe, Version: 2.11.8.1 2009-03-23T09:22:52+01:00 - Seite 81 Z
Page 85 of 364
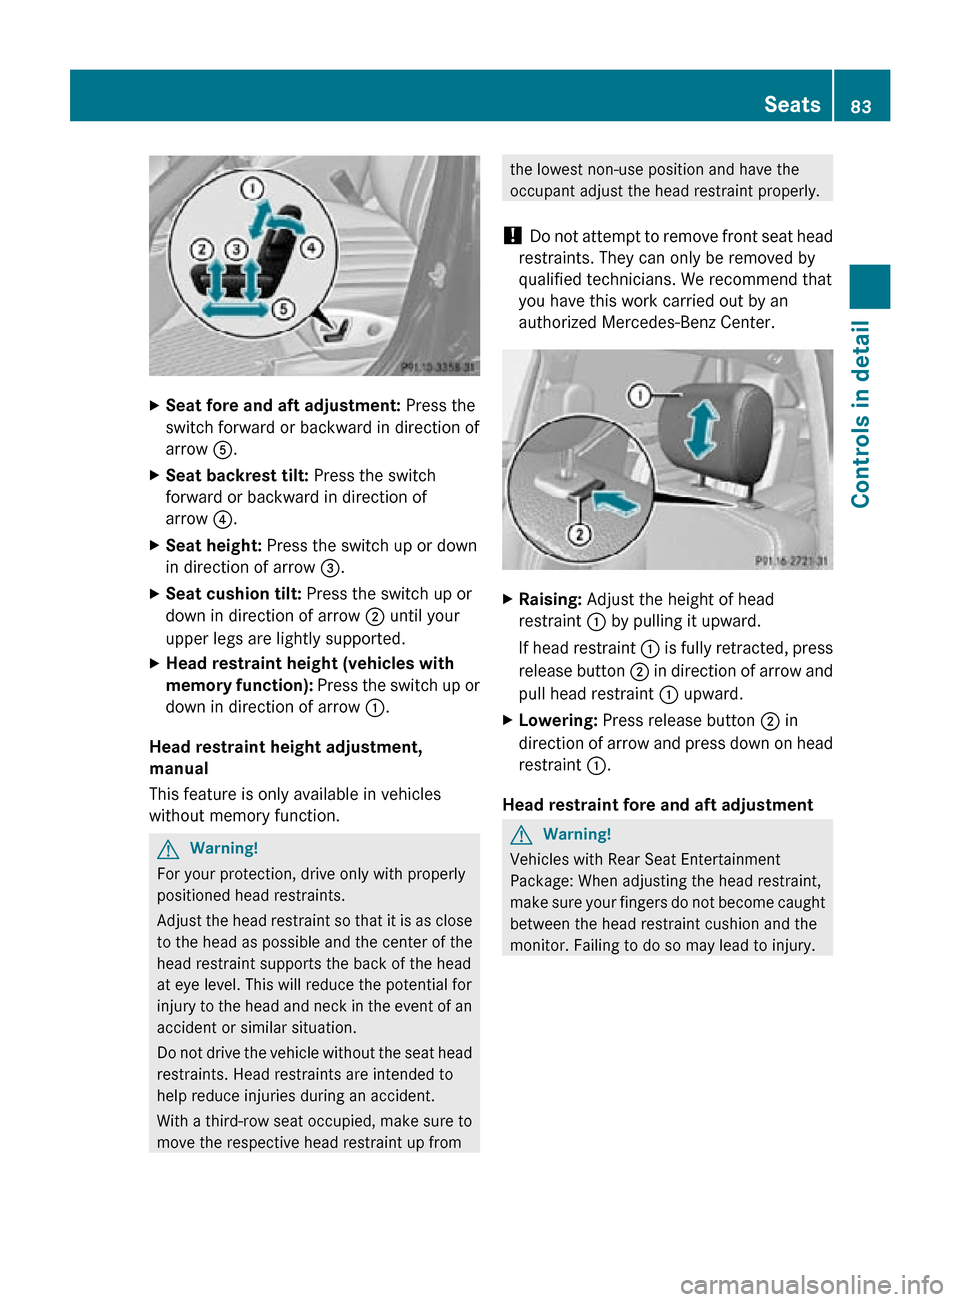
X
Seat fore and aft adjustment: Press the
switch forward or backward in direction of
arrow A.
X Seat backrest tilt: Press the switch
forward or backward in direction of
arrow ?.
X Seat height: Press the switch up or down
in direction of arrow =.
X Seat cushion tilt: Press the switch up or
down in direction of arrow ; until your
upper legs are lightly supported.
X Head restraint height (vehicles with
memory function): Press the switch up or
down in direction of arrow :.
Head restraint height adjustment,
manual
This feature is only available in vehicles
without memory function. G
Warning!
For your protection, drive only with properly
positioned head restraints.
Adjust the head restraint so that it is as close
to the head as possible and the center of the
head restraint supports the back of the head
at eye level. This will reduce the potential for
injury to the head and neck in the event of an
accident or similar situation.
Do not drive the vehicle without the seat head
restraints. Head restraints are intended to
help reduce injuries during an accident.
With a third-row seat occupied, make sure to
move the respective head restraint up from the lowest non-use position and have the
occupant adjust the head restraint properly.
! Do not attempt to remove front seat head
restraints. They can only be removed by
qualified technicians. We recommend that
you have this work carried out by an
authorized Mercedes-Benz Center. X
Raising: Adjust the height of head
restraint : by pulling it upward.
If head restraint : is fully retracted, press
release button ; in direction of arrow and
pull head restraint : upward.
X Lowering: Press release button ; in
direction of arrow and press down on head
restraint :.
Head restraint fore and aft adjustment G
Warning!
Vehicles with Rear Seat Entertainment
Package: When adjusting the head restraint,
make sure your fingers do not become caught
between the head restraint cushion and the
monitor. Failing to do so may lead to injury. Seats
83Controls in detail
251_AKB; 4; 52, en-US
d2ureepe, Version: 2.11.8.1 2009-03-23T09:22:52+01:00 - Seite 83 Z
Page 90 of 364
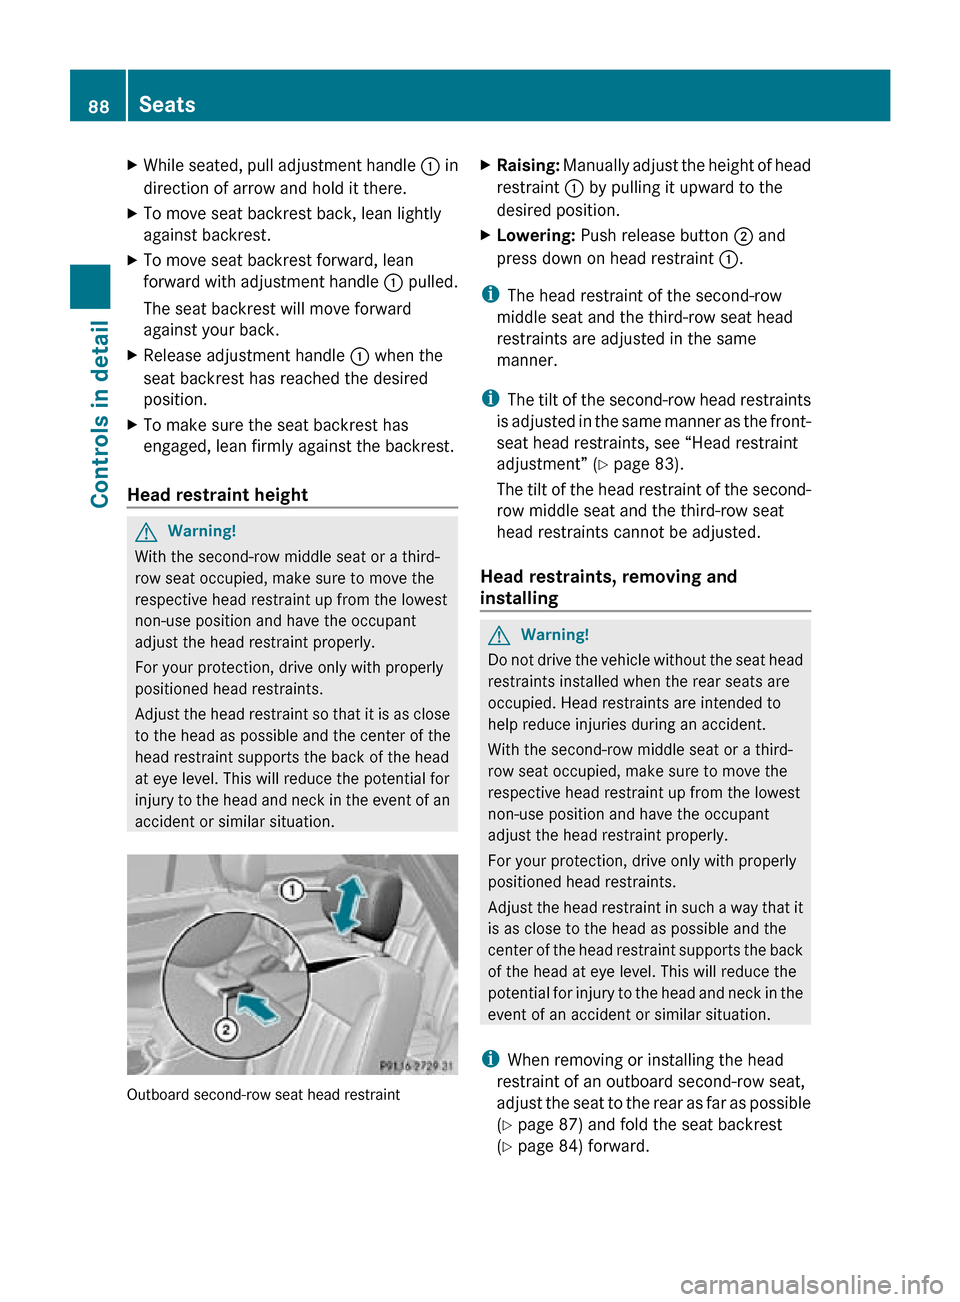
X
While seated, pull adjustment handle : in
direction of arrow and hold it there.
X To move seat backrest back, lean lightly
against backrest.
X To move seat backrest forward, lean
forward with adjustment handle : pulled.
The seat backrest will move forward
against your back.
X Release adjustment handle : when the
seat backrest has reached the desired
position.
X To make sure the seat backrest has
engaged, lean firmly against the backrest.
Head restraint height G
Warning!
With the second-row middle seat or a third-
row seat occupied, make sure to move the
respective head restraint up from the lowest
non-use position and have the occupant
adjust the head restraint properly.
For your protection, drive only with properly
positioned head restraints.
Adjust the head restraint so that it is as close
to the head as possible and the center of the
head restraint supports the back of the head
at eye level. This will reduce the potential for
injury to the head and neck in the event of an
accident or similar situation. Outboard second-row seat head restraint X
Raising: Manually adjust the height of head
restraint : by pulling it upward to the
desired position.
X Lowering: Push release button ; and
press down on head restraint :.
i The head restraint of the second-row
middle seat and the third-row seat head
restraints are adjusted in the same
manner.
i The tilt of the second-row head restraints
is adjusted in the same manner as the front-
seat head restraints, see “Head restraint
adjustment” (Y page 83).
The tilt of the head restraint of the second-
row middle seat and the third-row seat
head restraints cannot be adjusted.
Head restraints, removing and
installing G
Warning!
Do not drive the vehicle without the seat head
restraints installed when the rear seats are
occupied. Head restraints are intended to
help reduce injuries during an accident.
With the second-row middle seat or a third-
row seat occupied, make sure to move the
respective head restraint up from the lowest
non-use position and have the occupant
adjust the head restraint properly.
For your protection, drive only with properly
positioned head restraints.
Adjust the head restraint in such a way that it
is as close to the head as possible and the
center of the head restraint supports the back
of the head at eye level. This will reduce the
potential for injury to the head and neck in the
event of an accident or similar situation.
i When removing or installing the head
restraint of an outboard second-row seat,
adjust the seat to the rear as far as possible
(Y page 87) and fold the seat backrest
(Y page 84) forward. 88
SeatsControls in detail
251_AKB; 4; 52, en-US
d2ureepe,
Version: 2.11.8.1 2009-03-23T09:22:52+01:00 - Seite 88