2010 MERCEDES-BENZ R350 fuel
[x] Cancel search: fuelPage 19 of 364

Telephone
............................................. 30
Answering/ending a call ................ 141
Hands-free microphone ...................33
Menu ............................................. 140
Operation ....................................... 140
Phone book .................................... 141
Redialing ........................................ 142
Temperature
Interior temperature ..............168, 176
Outside .................................. 127, 133
Tether anchorage points
see Children in the vehicle
Tie-down rings ................................... 188
Tightening torque Wheels ........................................... 330
Time setting ....................................... 133
TIN (Tire Identification Number) ...... 250
Tire and Loading Information
placard ............................................... 236
Tire and loading terminology ...........248
TIREFIT ............................................... 320
Tire Identification Number see TIN
Tire inflation pressure
Checking ........................................ 230
Important notes on ........................ 229
Label on the inside of fuel filler
flap ................................................ 230
Placard on driver’s door B-pillar ..... 236
Tire labeling ....................................... 244
Tire load rating .................................. 249
Tire ply composition and material
used .................................................... 250
Tire pressure loss warning system . 231
Tire repair kit see TIREFIT
Tires ........................................... 227, 347
Advanced Tire Pressure
Monitoring System (Advanced
TPMS) ............................................ 232
Air pressure ................................... 228
Care and maintenance ................... 241
Cleaning ......................................... 242
Direction of rotation, spinning .......240
Important notes on tire inflation
pressure ........................................ 229
Inflation pressure ........................... 230Information placard .......................
236
Inspection ...................................... 241
Labeling ......................................... 244
Load index ............................. 245, 249
Load rating .................................... 249
Messages in the multifunction
display
................................... 283, 298
MOExtended .................................. 347
Ply composition and material
used ............................................... 250
Problems under-/overinflation ...... 230
Retreads ........................................ 227
Rims and tires (technical data) ...... 347
Rotation ......................................... 243
Service life ..................................... 241
Sizes .............................................. 347
Snow chains .................................. 252
Speed rating .......................... 246, 250
Storing ........................................... 242
Temperature .......................... 229, 243
Terminology ................................... 248
TIREFIT (tire repair kit) ................... 320
Tire Identification Number ............. 250
Tire pressure loss warning system . 231
TPMS low tire pressure/
malfunction telltale ........................ 306
Traction ................................. 242, 250
Tread ............................................. 251
Tread depth ........................... 241, 251
Treadwear ...................................... 242
Treadwear indicators ............. 241, 251
Vehicle maximum load on ..............251
Wear pattern .................................. 243
Winter tires ............................ 251, 347
Tire speed rating .......................246, 250
Tongue Weight Rating see TWR
Top tether
see Children in the vehicle
Total load limit ................................... 250
Towing
Towing eye bolt .............................. 338
Trailer .................................... 119, 256
Vehicle ........................................... 338
Towing eye bolt ................................. 338
Traction ...................................... 242, 250
Trailer towing ............................ 119, 256
Coupling a trailer ........................... 257 Index
17 251_AKB; 4; 52, en-US
d2ureepe,
Version: 2.11.8.1 2009-03-23T09:22:52+01:00 - Seite 17
Page 24 of 364
determined by our authorized technician and
tow service provider.
For additional information refer to the
Mercedes-Benz Roadside Assistance
Program brochure (in the USA) or the
Roadside Assistance section of the Service
and Warranty Information Booklet (in
Canada) in your vehicle literature portfolio.
Change of address or ownership
If you change your address, be sure to send
in the “Change of Address Notice” found in
the Service and Warranty Information
Booklet, or simply call the Mercedes-Benz
Customer Assistance Center (in the USA) at
1-800-FOR-MERCedes, or Customer Service
(in Canada) at
1-800-387-0100. This will
assist us in contacting you in a timely manner
should the need arise.
If you sell your Mercedes, please leave all
literature with the vehicle to make it available
to the next operator.
If you bought this vehicle used, be sure to
send in the “Notice of Purchase of Used
Truck” found in the Service and Warranty
Information Booklet, or call the Mercedes-
Benz Customer Assistance Center (in the
USA) at 1-800-FOR-MERCedes, or Customer
Service (in Canada) at 1-800-387-0100. Operating your vehicle outside the
USA or Canada
If you plan to operate your vehicle in foreign
countries, please be aware that:
R Service
facilities or replacement parts may
not be readily available.
R Unleaded gasoline for vehicles with
catalytic converters may not be available;
the use of leaded fuels will damage the
catalysts.
R Gasoline may have a considerably lower
octane rating, and improper fuel can cause
engine damage. Operating safety
G
Warning!
Work improperly carried out on electronic
components and associated software could
cause
them to cease functioning. Because the
vehicle’s electronic components are
interconnected, any modifications made may
produce an undesired effect on other
systems. Electronic malfunctions could
seriously impair the operating safety of your
vehicle.
Contact an authorized Mercedes-Benz Center
for repairs or modifications to electronic
components.
Other improper work or modifications on the
vehicle could also have a negative impact on
the operating safety of the vehicle.
Some safety systems only function while the
engine is running. You should therefore never
turn off the engine while driving. G
Warning!
Heavy blows against the vehicle underbody or
tires/wheels may cause serious damage and
impair the operating safety of your vehicle.
Such blows can be caused, for example, by
running over an obstacle, road debris or a
pothole. If you feel a sudden significant
vibration or ride disturbance, or you suspect
that damage to your vehicle as occurred:
R turn on your hazard warning flashers
R slow down carefully
R drive
with caution to an area which is a safe
distance from the road
Inspect the vehicle underbody and tires/
wheels for possible damage. If the vehicle
appears unsafe, have it towed to the nearest
authorized Mercedes-Benz Center or other
qualified maintenance or repair facility for
further inspection or repairs. 22
Introduction 251_AKB; 4; 52, en-US
d2ureepe,
Version: 2.11.8.1 2009-03-23T09:22:52+01:00 - Seite 22
Page 28 of 364
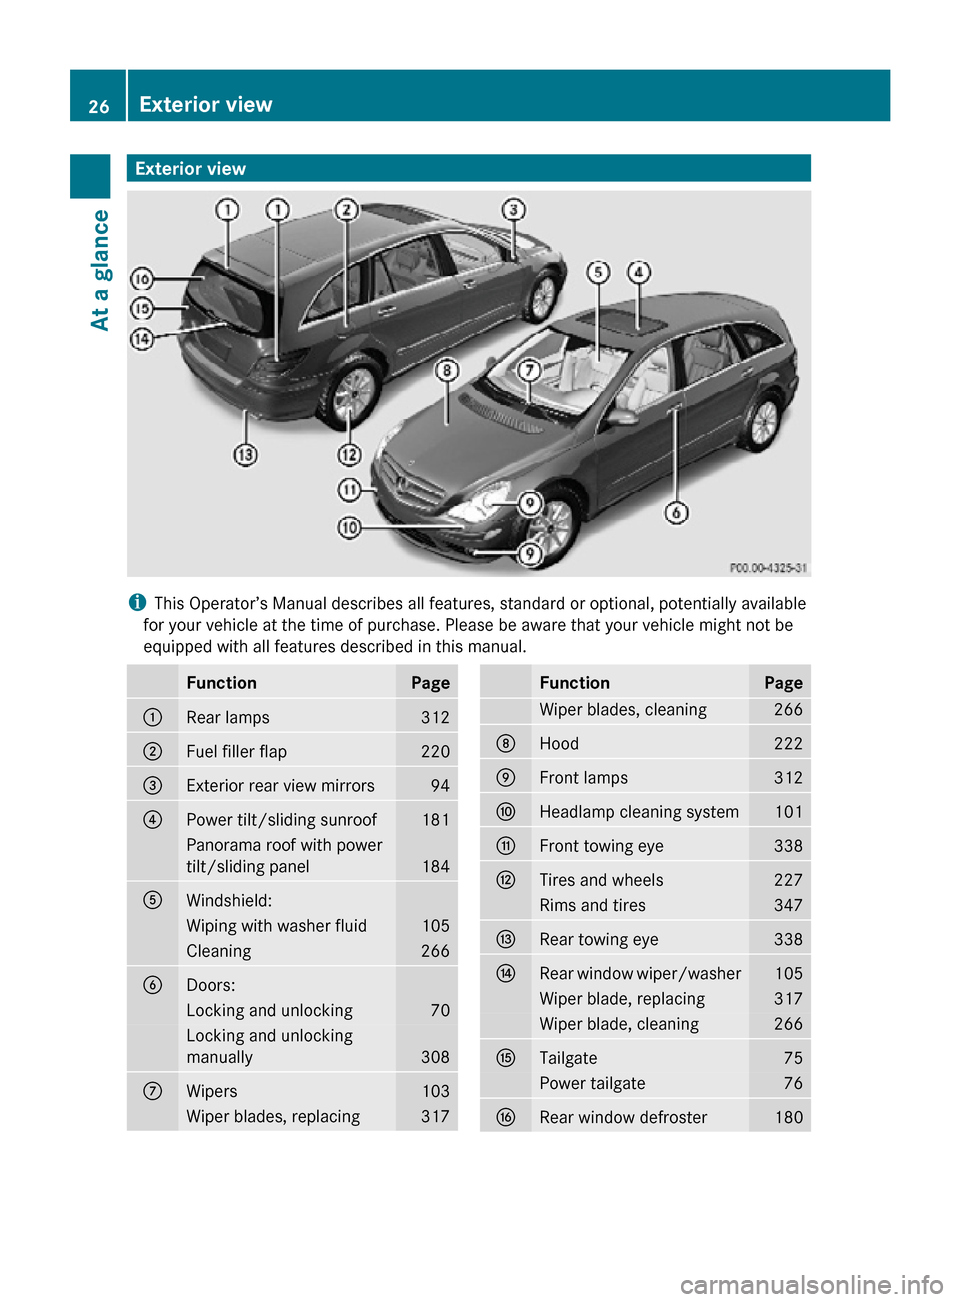
Exterior view
i
This Operator’s Manual describes all features, standard or optional, potentially available
for your vehicle at the time of purchase. Please be aware that your vehicle might not be
equipped with all features described in this manual. Function Page
:
Rear lamps 312
;
Fuel filler flap 220
=
Exterior rear view mirrors 94
?
Power tilt/sliding sunroof 181
Panorama roof with power
tilt/sliding panel
184
A
Windshield:
Wiping with washer fluid 105
Cleaning 266
B
Doors:
Locking and unlocking 70
Locking and unlocking
manually
308
C
Wipers 103
Wiper blades, replacing 317 Function Page
Wiper blades, cleaning 266
D
Hood 222
E
Front lamps 312
F
Headlamp cleaning system 101
G
Front towing eye 338
H
Tires and wheels 227
Rims and tires 347
I
Rear towing eye 338
J
Rear window wiper/washer 105
Wiper blade, replacing 317
Wiper blade, cleaning 266
K
Tailgate 75
Power tailgate 76
L
Rear window defroster 18026
Exterior viewAt a glance
251_AKB; 4; 52, en-US
d2ureepe,
Version: 2.11.8.1 2009-03-23T09:22:52+01:00 - Seite 26
Page 31 of 364
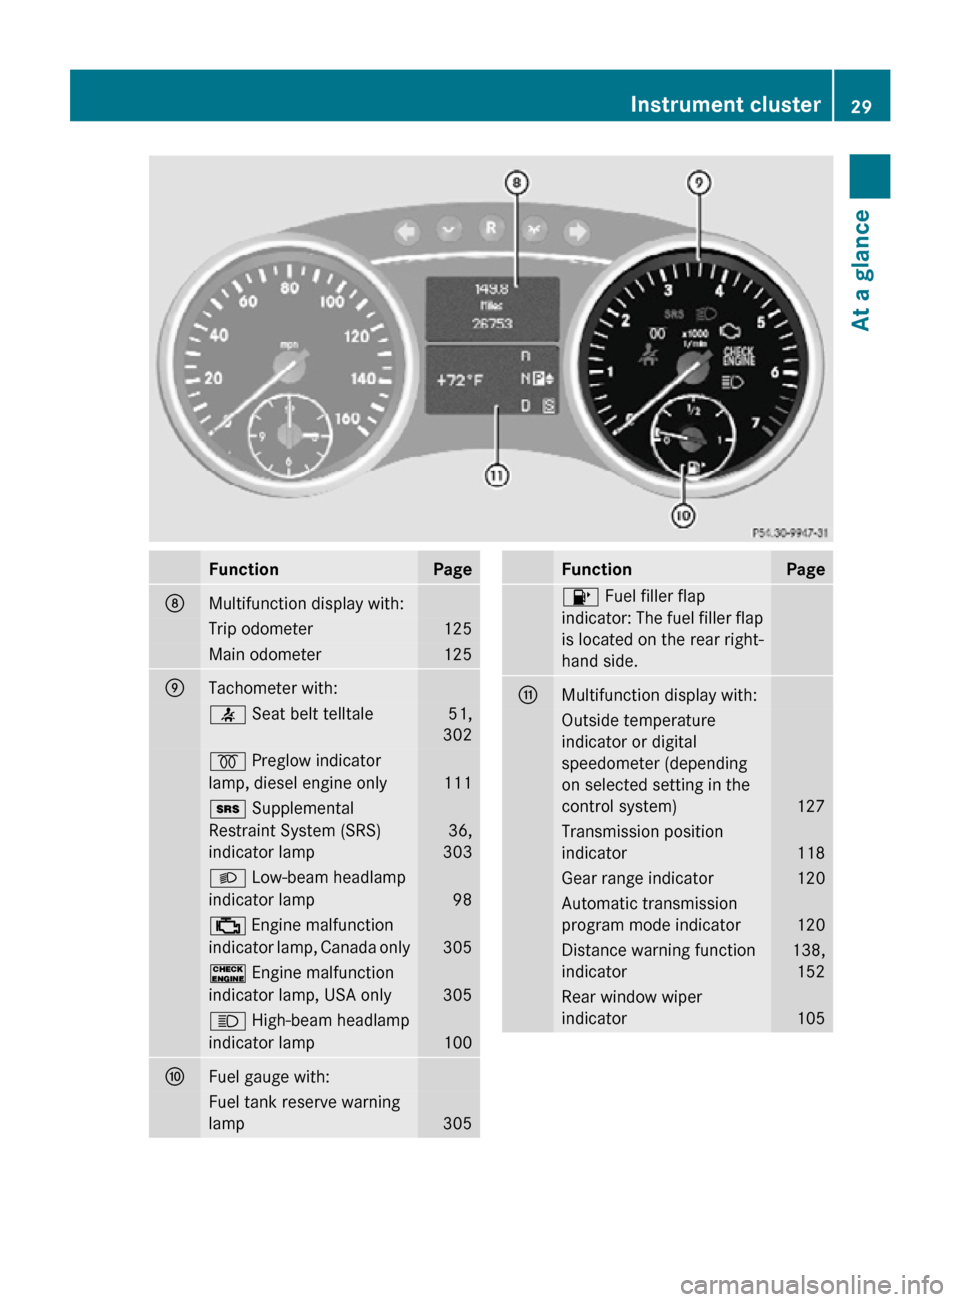
Function Page
D
Multifunction display with:
Trip odometer 125
Main odometer 125
E
Tachometer with:
7 Seat belt telltale 51,
302 % Preglow indicator
lamp, diesel engine only
111
+ Supplemental
Restraint System (SRS)
indicator lamp
36,
303 L Low-beam headlamp
indicator lamp
98
; Engine malfunction
indicator lamp, Canada only
305
! Engine malfunction
indicator lamp, USA only
305
K High-beam headlamp
indicator lamp
100
F
Fuel gauge with:
Fuel tank reserve warning
lamp
305 Function Page
8 Fuel filler flap
indicator: The fuel filler flap
is located on the rear right-
hand side.
G
Multifunction display with:
Outside temperature
indicator or digital
speedometer (depending
on selected setting in the
control system)
127
Transmission position
indicator
118
Gear range indicator 120
Automatic transmission
program mode indicator
120
Distance warning function
indicator 138,
152 Rear window wiper
indicator
105Instrument cluster
29At a glance
251_AKB; 4; 52, en-US
d2ureepe, Version: 2.11.8.1 2009-03-23T09:22:52+01:00 - Seite 29 Z
Page 72 of 364
Vehicle equipment
i This Operator’s Manual describes all
features, standard or optional, potentially
available for your vehicle at the time of
purchase. Please be aware that your
vehicle might not be equipped with all
features described in this manual. Locking and unlocking
Notes
G
Observe Safety notes, see page 55.
When unlocking the vehicle, all turn signal
lamps flash once. The locking knobs in the
doors move up. The anti-theft alarm system
is disarmed.
When locking the vehicle, all turn signal lamps
flash three times. The locking knobs in the
doors move down. The anti-theft alarm
system is armed.
All doors and the tailgate must be closed.
i If you cannot lock or unlock the vehicle
with the SmartKey, the batteries in the
SmartKey are discharged, the SmartKey is
malfunctioning, or the vehicle battery is
drained.
R Check the batteries in the SmartKey and
replace them if necessary.
R Use the mechanical key to unlock the
driver’s door.
R Use the mechanical key to lock the
vehicle.
R Have the vehicle battery and the vehicle
battery connections checked at an
authorized Mercedes-Benz Center.
If the SmartKey is malfunctioning, contact
Roadside Assistance or an authorized
Mercedes-Benz Center. SmartKey
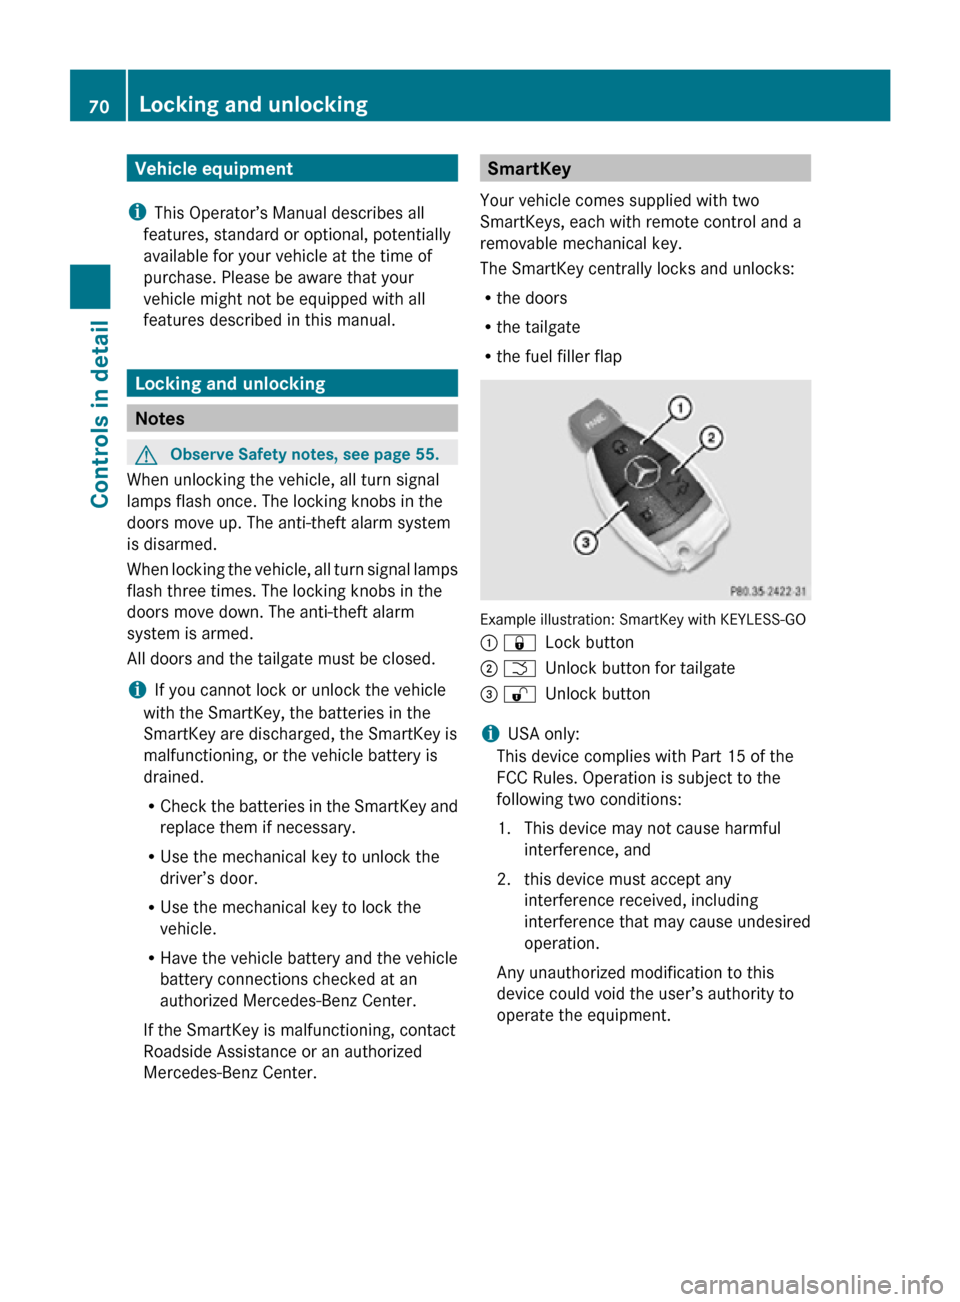
Your vehicle comes supplied with two
SmartKeys, each with remote control and a
removable mechanical key.
The SmartKey centrally locks and unlocks:
R the doors
R the tailgate
R the fuel filler flap Example illustration: SmartKey with KEYLESS-GO
: &
Lock button
; F Unlock button for tailgate
= % Unlock button
i USA only:
This device complies with Part 15 of the
FCC Rules. Operation is subject to the
following two conditions:
1. This device may not cause harmful interference, and
2. this device must accept any interference received, including
interference that may cause undesired
operation.
Any unauthorized modification to this
device could void the user’s authority to
operate the equipment. 70
Locking and unlockingControls in detail
251_AKB; 4; 52, en-US
d2ureepe,
Version: 2.11.8.1 2009-03-23T09:22:52+01:00 - Seite 70
Page 73 of 364
i
Canada only:
This device complies with RSS-210 of
Industry Canada. Operation is subject to
the following two conditions:
1. This
device may not cause interference,
and
2. this device must accept any interference received, including
interference that may cause undesired
operation of the device.
Any unauthorized modification to this
device could void the user’s authority to
operate the equipment.
Factory setting X
Global unlocking: Press button %.
Unless you open a door or the tailgate within
approximately 40 seconds after unlocking
the vehicle:
R The vehicle will be locked again.
R The
antitheft alarm system will be rearmed.
X Global locking: Press button &.
Selective setting If you frequently travel alone, you may wish
to reprogramm the SmartKey. Pressing
button
%
will then only unlock the driver’s
door and the fuel filler flap.
X Switching on/off:
Press and hold buttons
% and & simultaneously for
approximately 6 seconds until the battery
check lamp (Y page 73) flashes twice.
The SmartKey will then function as follows:
X Unlocking driver’s door and fuel filler
flap: Press button % once.
X Global unlocking: Press button %
twice.
X Global locking: Press button &. KEYLESS-GO
Vehicles equipped with KEYLESS-GO come
with two SmartKeys with KEYLESS-GO, each
with remote control and a removable
mechanical key.
The KEYLESS-GO function is integrated into
the
SmartKey. The validity of the SmartKey is
checked every time you grasp an outside door
handle.
When the SmartKey is valid, your vehicle
unlocks
R the doors
R the fuel filler flap
R the tailgate
i USA only:
This device complies with Part 15 of the
FCC Rules. Operation is subject to the
following two conditions:
1. This device may not cause harmful interference, and
2. this device must accept any interference received, including
interference that may cause undesired
operation.
Any unauthorized modification to this
device could void the user’s authority to
operate the equipment.
i Canada only:
This device complies with RSS-210 of
Industry Canada. Operation is subject to
the following two conditions:
1. This device may not cause interference, and
2. this device must accept any interference received, including
interference that may cause undesired
operation of the device.
Any unauthorized modification to this
device could void the user’s authority to
operate the equipment. Locking and unlocking
71
Controls in detail
251_AKB; 4; 52, en-US
d2ureepe, Version: 2.11.8.1 2009-03-23T09:22:52+01:00 - Seite 71 Z
Page 75 of 364
Unless you open a door or the tailgate within
approximately 40 seconds after unlocking
the vehicle:
R
The vehicle will be locked again.
R The antitheft alarm system will be rearmed. X
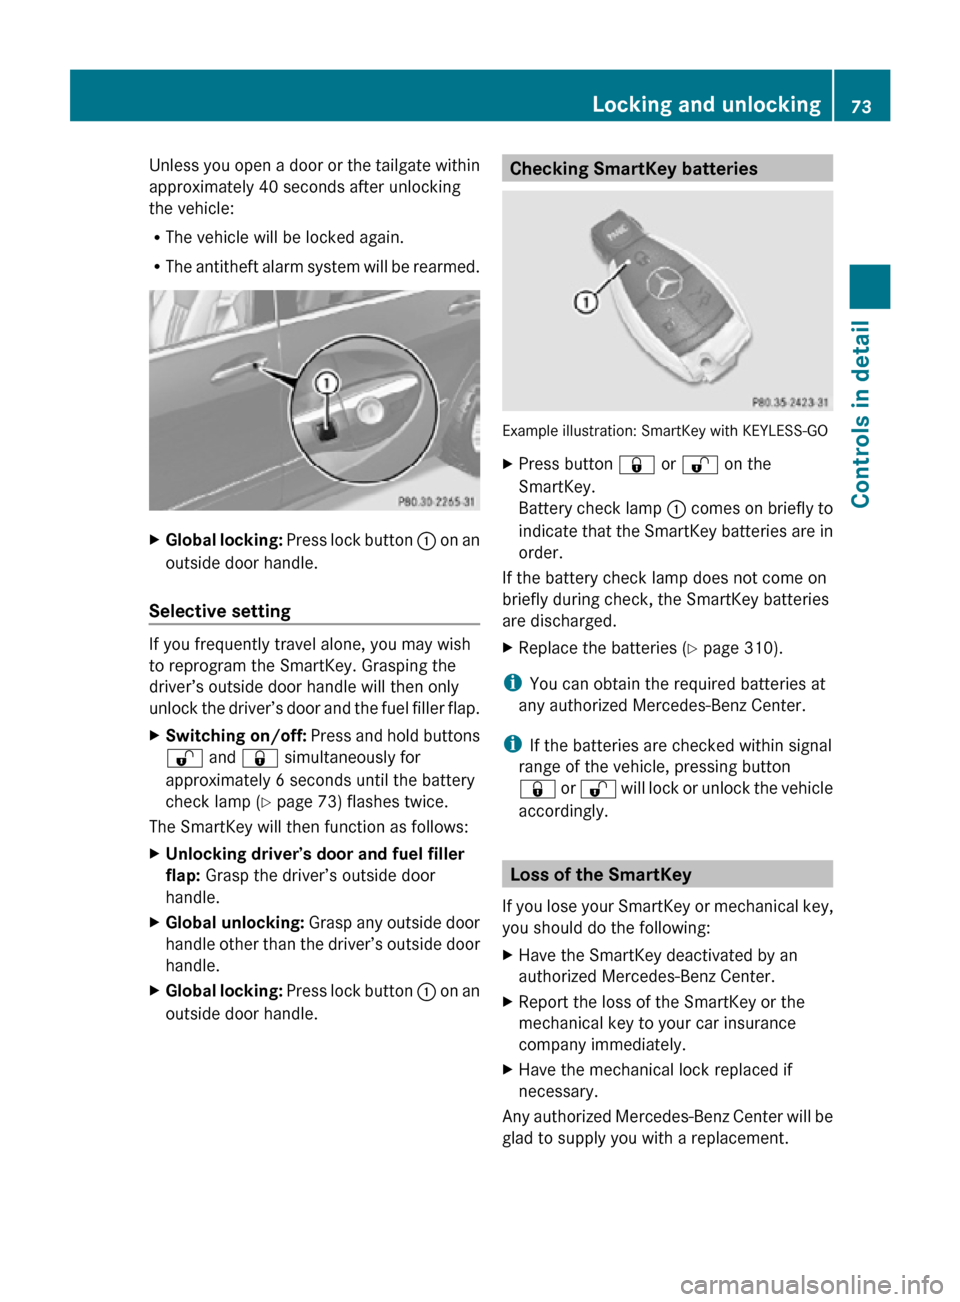
Global locking: Press lock button : on an
outside door handle.
Selective setting If you frequently travel alone, you may wish
to reprogram the SmartKey. Grasping the
driver’s outside door handle will then only
unlock the driver’s door and the fuel filler flap.
X
Switching on/off: Press and hold buttons
% and & simultaneously for
approximately 6 seconds until the battery
check lamp (Y page 73) flashes twice.
The SmartKey will then function as follows:
X Unlocking driver’s door and fuel filler
flap: Grasp the driver’s outside door
handle.
X Global unlocking: Grasp any outside door
handle other than the driver’s outside door
handle.
X Global locking: Press lock button : on an
outside door handle. Checking SmartKey batteries
Example illustration: SmartKey with KEYLESS-GO
X
Press button & or % on the
SmartKey.
Battery check lamp : comes on briefly to
indicate that the SmartKey batteries are in
order.
If the battery check lamp does not come on
briefly during check, the SmartKey batteries
are discharged.
X Replace the batteries ( Y page 310).
i You can obtain the required batteries at
any authorized Mercedes-Benz Center.
i If the batteries are checked within signal
range of the vehicle, pressing button
& or % will lock or unlock the vehicle
accordingly. Loss of the SmartKey
If you lose your SmartKey or mechanical key,
you should do the following:
X Have the SmartKey deactivated by an
authorized Mercedes-Benz Center.
X Report the loss of the SmartKey or the
mechanical key to your car insurance
company immediately.
X Have the mechanical lock replaced if
necessary.
Any authorized Mercedes-Benz Center will be
glad to supply you with a replacement. Locking and unlocking
73Controls in detail
251_AKB; 4; 52, en-US
d2ureepe, Version: 2.11.8.1 2009-03-23T09:22:52+01:00 - Seite 73 Z
Page 76 of 364
Opening the doors from the inside
You can open a door from the inside even
when it is locked unless it is secured with the
child safety lock ( Y page 61).
Open door only when conditions are safe to
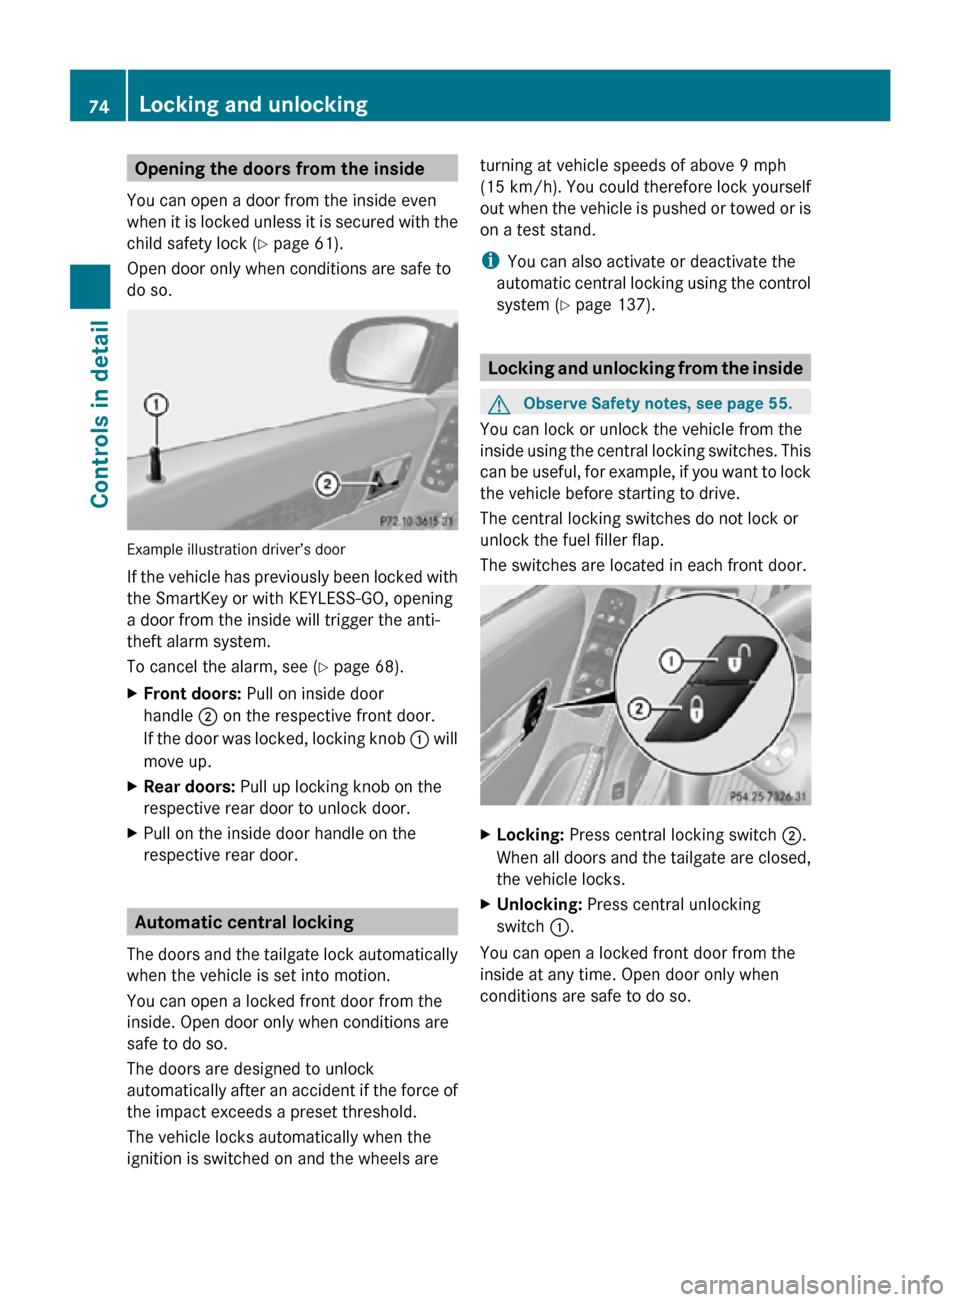
do so. Example illustration driver’s door
If the vehicle has previously been locked with
the SmartKey or with KEYLESS-GO, opening
a door from the inside will trigger the anti-
theft alarm system.
To cancel the alarm, see (
Y page 68).
X Front doors: Pull on inside door
handle ; on the respective front door.
If the door was locked, locking knob : will
move up.
X Rear doors: Pull up locking knob on the
respective rear door to unlock door.
X Pull on the inside door handle on the
respective rear door. Automatic central locking
The doors and the tailgate lock automatically
when the vehicle is set into motion.
You can open a locked front door from the
inside. Open door only when conditions are
safe to do so.
The doors are designed to unlock
automatically after an accident if the force of
the impact exceeds a preset threshold.
The vehicle locks automatically when the
ignition is switched on and the wheels are turning at vehicle speeds of above 9 mph
(15 km/h). You could therefore lock yourself
out when the vehicle is pushed or towed or is
on a test stand.
i
You can also activate or deactivate the
automatic central locking using the control
system (Y page 137). Locking and unlocking from the inside
G
Observe Safety notes, see page 55.
You can lock or unlock the vehicle from the
inside using the central locking switches. This
can be useful, for example, if you want to lock
the vehicle before starting to drive.
The central locking switches do not lock or
unlock the fuel filler flap.
The switches are located in each front door. X
Locking: Press central locking switch ;.
When all doors and the tailgate are closed,
the vehicle locks.
X Unlocking: Press central unlocking
switch :.
You can open a locked front door from the
inside at any time. Open door only when
conditions are safe to do so. 74
Locking and unlockingControls in detail
251_AKB; 4; 52, en-US
d2ureepe,
Version: 2.11.8.1 2009-03-23T09:22:52+01:00 - Seite 74