2010 MERCEDES-BENZ R320 tailgate
[x] Cancel search: tailgatePage 214 of 364
Route guidance
You will be prompted to confirm that route
guidance to the entered address is to be
started.
X
Select Yes using button = or ; on
the COMAND system.
X Press button 9 on the COMAND system
to confirm.
The system calculates the route and
subsequently starts the route guidance to the
defined address.
i If you select No, you can save the address
to your address book.
i The Destination Download feature is
available if the relevant mobile phone
network is available and data connection is
possible.
Search & Send “Search & Send” is a navigation destination
address entry service. For more information
on “Search & Send”, refer to separate
COMAND system operating instructions.
Remote door unlock
In case you have locked your vehicle
unintentionally
(e.g. SmartKey inside vehicle),
and the reserve SmartKey is not available:
X Contact the Response Center at
1-800-756-9018
(in the USA) or
1-888-923-8367 (in Canada).
You will be asked to provide your password.
X Then return to your vehicle at the time
arranged with the Response Center and
pull the tailgate recessed handle
(Y page 75) for a minimum of 20 seconds
until the indicator lamp in the SOS button
is flashing.
The
message Connecting Call appears in
the multifunction display.
As an alternative, you may unlock the vehicle
via Internet in the “My Tele Aid” section of “Owner’s Online”, using your ID and password
(USA only).
The Response Center will then unlock your
vehicle with the remote door unlocking
feature.
i
The remote door unlock feature is
available if the relevant cellular phone
network is available.
The
SOS button will flash and the message
Call Connected will appear in the
multifunction display to indicate receipt of
the door unlock command.
Once the vehicle is unlocked, a Response
Center specialist will attempt to establish
voice contact with the vehicle occupants.
If the tailgate recessed handle was pulled
for more than 20 seconds before door
unlock authorization was received by the
Response Center, you must wait
15 minutes before pulling the tailgate
recessed handle again.
Stolen Vehicle Recovery Services In the event your vehicle was stolen:
X
Report the incident to the police.
The police will issue a numbered incident
report.
X Pass this number on to the Response
Center along with your password.
The Response Center will then attempt to
covertly contact the vehicle’s Tele Aid
system. Once the vehicle is located, the
Response
Center will contact the local law
enforcement and you. The vehicle’s
location will only be provided to law
enforcement.
i If the anti-theft alarm stays on for more
than 30 seconds, the Tele Aid system
initiates a call to the Response Center
automatically The Tele Aid system will
initiate the call provided that 212
Useful features
Controls in detail
251_AKB; 4; 52, en-US
d2ureepe,
Version: 2.11.8.1 2009-03-23T09:22:52+01:00 - Seite 212
Page 259 of 364
Loading a trailer
R
When
loading a trailer, you should observe
that neither the permissible GTW, nor the
Gross Vehicle Weight Rating (GVWR) are
exceeded. The GVWR is indicated on the
certification label located on the driver’s
door B-pillar ( Y page 236).
Maximum permissible values are listed on
the safety compliance certification labels
for the vehicle and for the trailer to be
towed.
The lowest value listed must be selected
when determining how the vehicle and
trailer are loaded.
R The tongue weight at the hitch ball must be
added to the rear axle weight to prevent
exceeding the rear Gross Axle Weight
Rating (GAWR). The GAWR is indicated on
the certification label located on the
driver’s door B-pillar ( Y page 236).
i Mercedes-Benz recommends loading the
trailer in such a manner that it has a tongue
weight between 8 % and 10 % of the GTW.
i The weight of other accessories,
passengers and cargo will reduce the
maximum trailer weight and tongue weight
your vehicle can tow.
Checking weights of vehicle and trailer
R To assure that the towing vehicle and trailer
are in compliance with the maximum
permissible weight limits, have the loaded
rig (towing vehicle including driver,
passengers and cargo, trailer fully loaded)
weighed on a commercial scale.
R Check the vehicle’s front and rear gross
axle weight, the Gross Trailer Weight (GTW)
and tongue weight.
The values as measured must not exceed
the weight limits listed under “Vehicle and
trailer weights and ratings” ( Y page 256).Coupling a trailer G
Warning!
Vehicles with AIRMATIC: While you are
coupling or decoupling a trailer, make sure
nobody locks or unlocks the vehicle and/or
opens or closes doors or the tailgate.
The vehicle’s level could change and you
could endanger yourself and/or others as a
result.
Make sure that you do not operate the ADS
switch or the vehicle level control system
when coupling/decoupling the trailer.
Observe maximum permitted trailer
dimensions (width and length).
Most states and all Canadian provinces
require
R safety chains between the towing vehicle
and the trailer
The chains should be criss-crossed under
the trailer tongue. They must be attached
to the hitch receiver, and not to the
vehicle’s bumper or axle.
Make sure to leave enough slack in the
chains to permit turning corners.
R a separate brake system at various trailer
weights
R a break-away switch on trailers with a
separate brake system.
Check
with your local state laws for specific
requirements.
The switch activates the trailer brakes in
the possible event that the trailer might
separate from the tow vehicle.
! Do not connect a trailer brake system (if
trailer is so equipped) directly to the
vehicle’s hydraulic brake system, as your
vehicle is equipped with antilock brakes. If
you do, neither the vehicle’s brakes nor the
trailer’s brakes will function properly.
i The provided vehicle electrical wiring
harness for trailer towing has a brake signal
wire for hook-up to a brake controller. Driving instructions
257
Operation
251_AKB; 4; 52, en-US
d2ureepe, Version: 2.11.8.1 2009-03-23T09:22:52+01:00 - Seite 257 Z
Page 260 of 364
X
Make sure the automatic transmission is in
park position P (Y page 116).
X Engage the parking brake for the vehicle
(Y page 114).
X Start the engine (Y page 110).
X Vehicles with AIRMATIC:
Set the vehicle level to highway
(Y page 154) and set the ADS to AUTO or
COMF (Y page 153).
X Turn off the engine ( Y page 114).
X Close all doors and the tailgate.
X Attach the trailer.
X Plug in all electrical connectors.
i Vehicles with AIRMATIC:
When you are towing a trailer, the vehicle
level
always remains in the highway setting.
The following applies additionally when
towing a trailer:
R The vehicle is lowered to the highway
level when it reaches a speed of 5 mph
(8 km/h) if not set to highway level.
R The highspeed level is not available.
The restrictions that apply to towing also
apply when using accessories that are
connected to the trailer power socket, such
as a bicycle rack.
Towing a trailer There are many different laws, including
speed limit restrictions, having to do with
trailer
towing. Make sure your rig will be legal,
not only for where you reside, but also for
where you will be driving. A good source for
this information can be the police or local
authorities.
Note the following, when driving with a trailer:
R In order to gain skill and an understanding
of the vehicle’s behavior, you should practice turning, stopping and backing up
in an area which is free of traffic.
R Before you start driving check the
-trailer hitch
- break-away switch
- safety chains
- electrical connections
- lighting
- tires
R Adjust the mirrors
(Y page 94) to permit
unobstructed view beyond rear of trailer.
R If the trailer has electric brakes, start your
vehicle and trailer moving slowly, and then
apply only the trailer brake controller by
hand to make sure the brakes are working
properly.
R Always secure items in the trailer to
prevent load shifts while driving.
R When towing a trailer, check occasionally
to make sure the load is secure, and that
trailer lighting and brakes (if so equipped)
are functioning properly.
R Take into consideration that when towing a
trailer, the handling characteristics are
different and less stable from those when
operating the vehicle without a trailer.
It is important to avoid sudden maneuvers.
R The vehicle and trailer combination is
heavier, and therefore limited in
acceleration and climbing ability, and has a
larger braking distance.
It is more prone to reacting to cross wind
gusts, and requires more sensitive steering
input.
R If possible, do not brake abruptly, but
rather engage the brake slightly at first to
permit the trailer to activate its brake. Then
increase the braking force.
! If the trailer should begin to sway, reduce
the vehicle’s speed immediately. 258
Driving instructions
Operation
251_AKB; 4; 52, en-US
d2ureepe,
Version: 2.11.8.1 2009-03-23T09:22:52+01:00 - Seite 258
Page 261 of 364
Do not attempt to straighten out the tow
vehicle
and trailer by increasing the speed.
R If the transmission shifts between gears on
inclines repeatedly, shift to a lower gear
range manually ( Y page 119). Select 4, 3,
2 or 1.
A lower gear and reduction of speed
reduces the chance of engine overloading
and/or overheating.
R When going down an incline, shift into a
lower gear and use the engine’s braking
effect.
Avoid riding the brakes, thus overheating
the vehicle and trailer brakes (if so
equipped).
R If the engine coolant rises to an extremely
high temperature when the air conditioning
is on, turn off the air conditioning system.
Engine coolant heat can be additionally
vented by opening the windows, switching
the climate control fan speed to high and
setting the temperature control to the
maximum.
R During a passing maneuver extreme care
must be exercised since your vehicle with
a trailer will require additional passing
distance ahead than when driving without
a trailer.
Because your vehicle and trailer is longer
than your vehicle alone, you will also need
to go much farther ahead of the passed
vehicle before you can return to your lane.
Decoupling a trailer G
Warning!
Vehicles with AIRMATIC: While you are
coupling or decoupling a trailer, make sure
nobody locks or unlocks the vehicle and/or
opens or closes doors or the tailgate.
The vehicle’s level could change and you
could endanger yourself and/or others as a
result. Make sure that you do not operate the ADS
switch or the vehicle level control system
when coupling/decoupling the trailer.
X Make sure the automatic transmission is in
park position P (Y page 116).
X Engage the parking brake for the vehicle
(Y page 114).
X Start the engine (Y page 110).
X Close all doors and the tailgate.
X Engage the parking brake for the trailer. G
Warning!
Vehicles with AIRMATIC: As soon as you
disconnect
the electrical connection between
the trailer and the vehicle, the vehicle will
lower. To help avoid personal injury, make
sure no one is near the wheel housing or
underneath the vehicle before the electrical
connection is disconnected.
When you decouple the trailer, the vehicle is
temporarily raised because the springs are
relieved of load. Be especially careful during
this process, as you could otherwise injure
yourself and/or others. Make sure that any
persons remaining in the vehicle do not press
the switches for vehicle level control or the
ADS.
X Disconnect all electrical plug connectors.
X Decouple the trailer.
X Make sure that the trailer coupling is free
of load.
X Turn off the engine ( Y page 114). Driving abroad
If
you plan to drive the vehicle outside the U.S.
or Canada, you should request dealer
network information for your destination from
any authorized Mercedes-Benz Center. Driving instructions
259
Operation
251_AKB; 4; 52, en-US
d2ureepe, Version: 2.11.8.1 2009-03-23T09:22:52+01:00 - Seite 259 Z
Page 272 of 364
Vehicle equipment
i This Operator’s Manual describes all
features, standard or optional, potentially
available for your vehicle at the time of
purchase. Please be aware that your
vehicle might not be equipped with all
features described in this manual. Where will I find ...?
First aid kit
i Check expiration dates and contents for
completeness at least once a year and
replace missing/expired items.
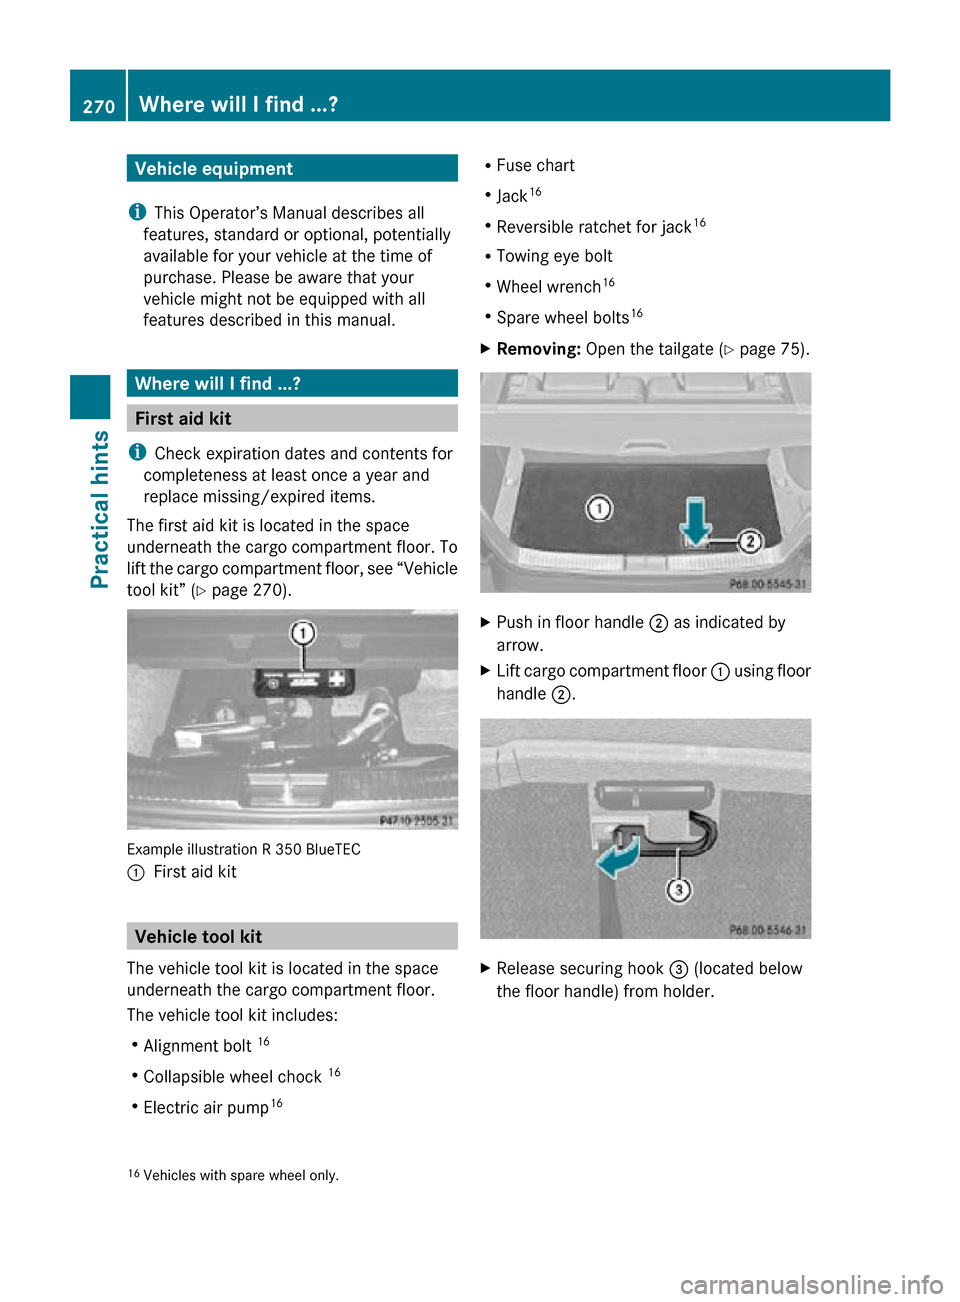
The first aid kit is located in the space
underneath the cargo compartment floor. To
lift the cargo compartment floor, see “Vehicle
tool kit” (Y page 270). Example illustration R 350 BlueTEC
:
First aid kit Vehicle tool kit
The vehicle tool kit is located in the space
underneath the cargo compartment floor.
The vehicle tool kit includes:
R Alignment bolt 16
R Collapsible wheel chock 16
R Electric air pump 16 R
Fuse chart
R Jack 16
R Reversible ratchet for jack 16
R Towing eye bolt
R Wheel wrench 16
R Spare wheel bolts 16
X Removing: Open the tailgate ( Y page 75). X
Push in floor handle ; as indicated by
arrow.
X Lift cargo compartment floor : using floor
handle ;. X
Release securing hook = (located below
the floor handle) from holder.
16 Vehicles with spare wheel only. 270
Where will I find ...?Practical hints
251_AKB; 4; 52, en-US
d2ureepe,
Version: 2.11.8.1 2009-03-23T09:22:52+01:00 - Seite 270
Page 273 of 364
X
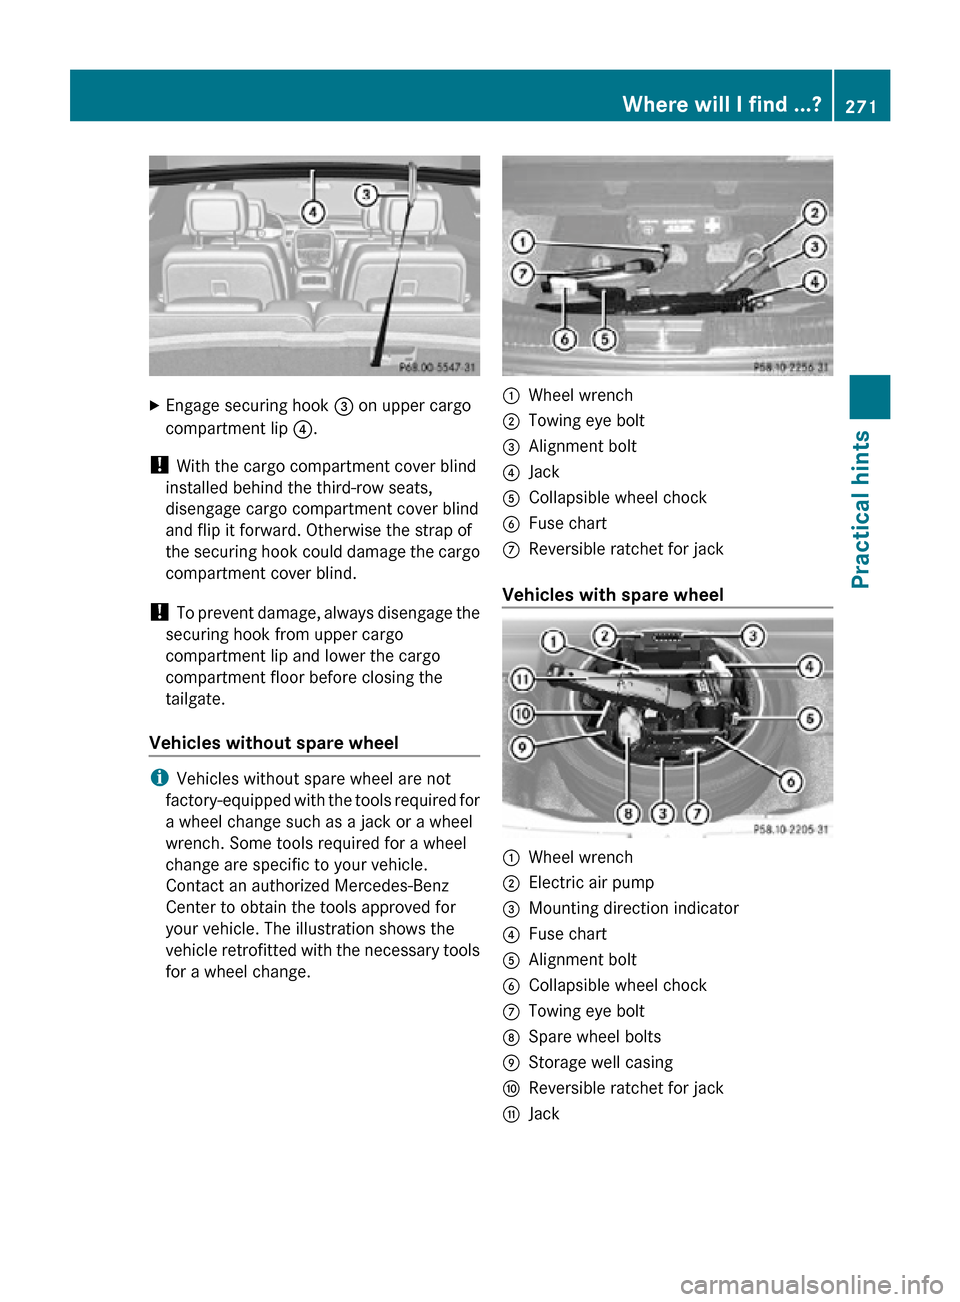
Engage securing hook = on upper cargo
compartment lip ?.
! With the cargo compartment cover blind
installed behind the third-row seats,
disengage cargo compartment cover blind
and flip it forward. Otherwise the strap of
the securing hook could damage the cargo
compartment cover blind.
! To prevent damage, always disengage the
securing hook from upper cargo
compartment lip and lower the cargo
compartment floor before closing the
tailgate.
Vehicles without spare wheel i
Vehicles without spare wheel are not
factory-equipped with the tools required for
a wheel change such as a jack or a wheel
wrench. Some tools required for a wheel
change are specific to your vehicle.
Contact an authorized Mercedes-Benz
Center to obtain the tools approved for
your vehicle. The illustration shows the
vehicle retrofitted with the necessary tools
for a wheel change. :
Wheel wrench
; Towing eye bolt
= Alignment bolt
? Jack
A Collapsible wheel chock
B Fuse chart
C Reversible ratchet for jack
Vehicles with spare wheel :
Wheel wrench
; Electric air pump
= Mounting direction indicator
? Fuse chart
A Alignment bolt
B Collapsible wheel chock
C Towing eye bolt
D Spare wheel bolts
E Storage well casing
F Reversible ratchet for jack
G Jack Where will I find ...?
271Practical hints
251_AKB; 4; 52, en-US
d2ureepe, Version: 2.11.8.1 2009-03-23T09:22:52+01:00 - Seite 271 Z
Page 275 of 364
X
Removing: Open the tailgate ( Y page 75).
X Lift the cargo compartment floor and
secure it on the upper cargo compartment
lip ( Y page 270).
! To prevent damage, always disengage the
securing hook from upper cargo
compartment lip and lower the cargo
compartment floor before closing the
tailgate.
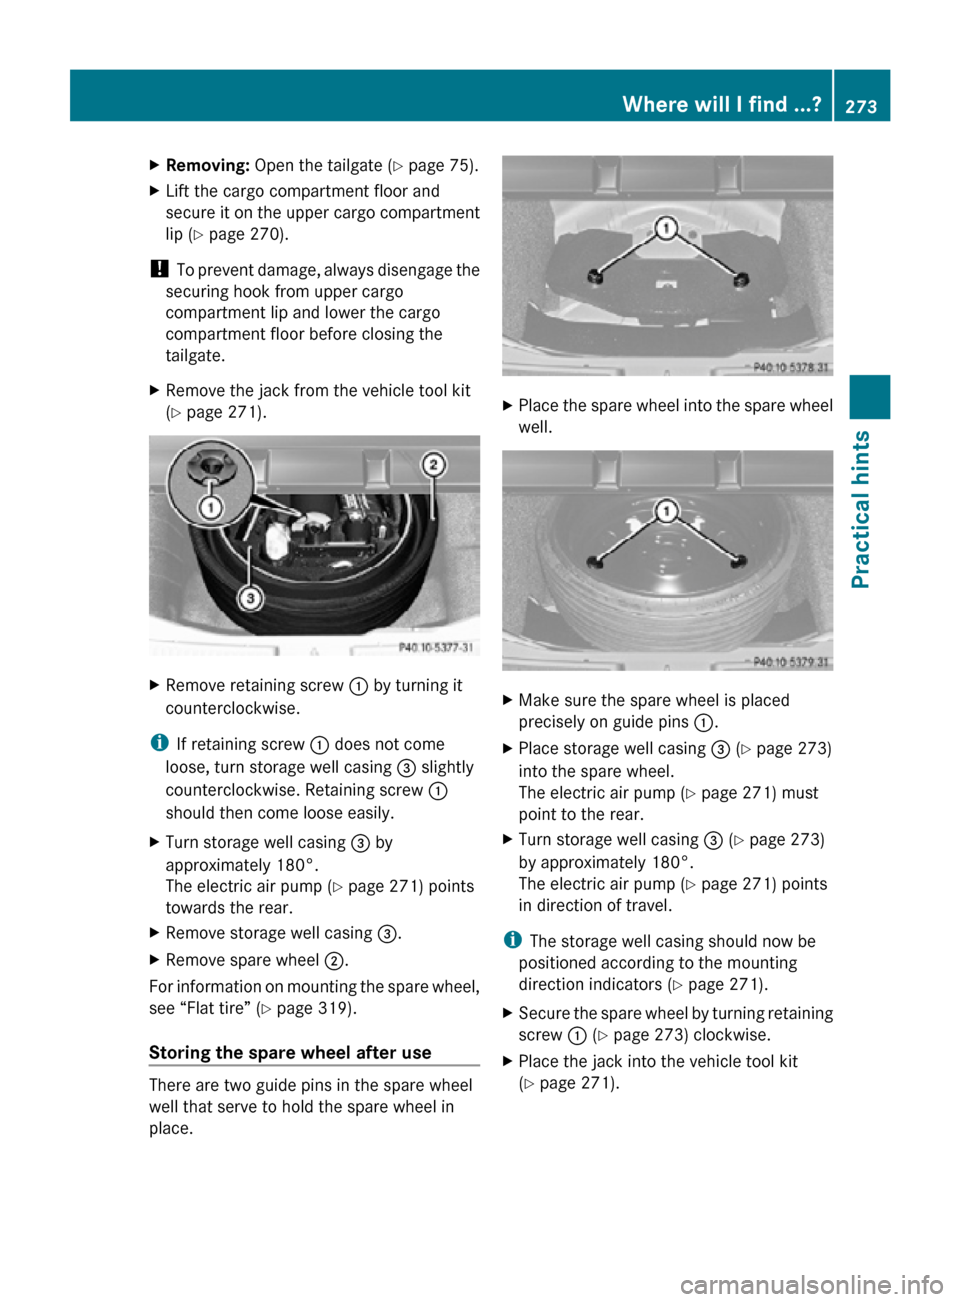
X Remove the jack from the vehicle tool kit
(Y page 271). X
Remove retaining screw : by turning it
counterclockwise.
i If retaining screw : does not come
loose, turn storage well casing = slightly
counterclockwise. Retaining screw :
should then come loose easily.
X Turn storage well casing = by
approximately 180°.
The electric air pump ( Y page 271) points
towards the rear.
X Remove storage well casing =.
X Remove spare wheel ;.
For information on mounting the spare wheel,
see “Flat tire” ( Y page 319).
Storing the spare wheel after use There are two guide pins in the spare wheel
well that serve to hold the spare wheel in
place. X
Place the spare wheel into the spare wheel
well. X
Make sure the spare wheel is placed
precisely on guide pins :.
X Place storage well casing = (Y page 273)
into the spare wheel.
The electric air pump ( Y page 271) must
point to the rear.
X Turn storage well casing = (Y page 273)
by approximately 180°.
The electric air pump ( Y page 271) points
in direction of travel.
i The storage well casing should now be
positioned according to the mounting
direction indicators (Y page 271).
X Secure the spare wheel by turning retaining
screw : (Y page 273) clockwise.
X Place the jack into the vehicle tool kit
(Y page 271). Where will I find ...?
273Practical hints
251_AKB; 4; 52, en-US
d2ureepe, Version: 2.11.8.1 2009-03-23T09:22:52+01:00 - Seite 273 Z
Page 290 of 364
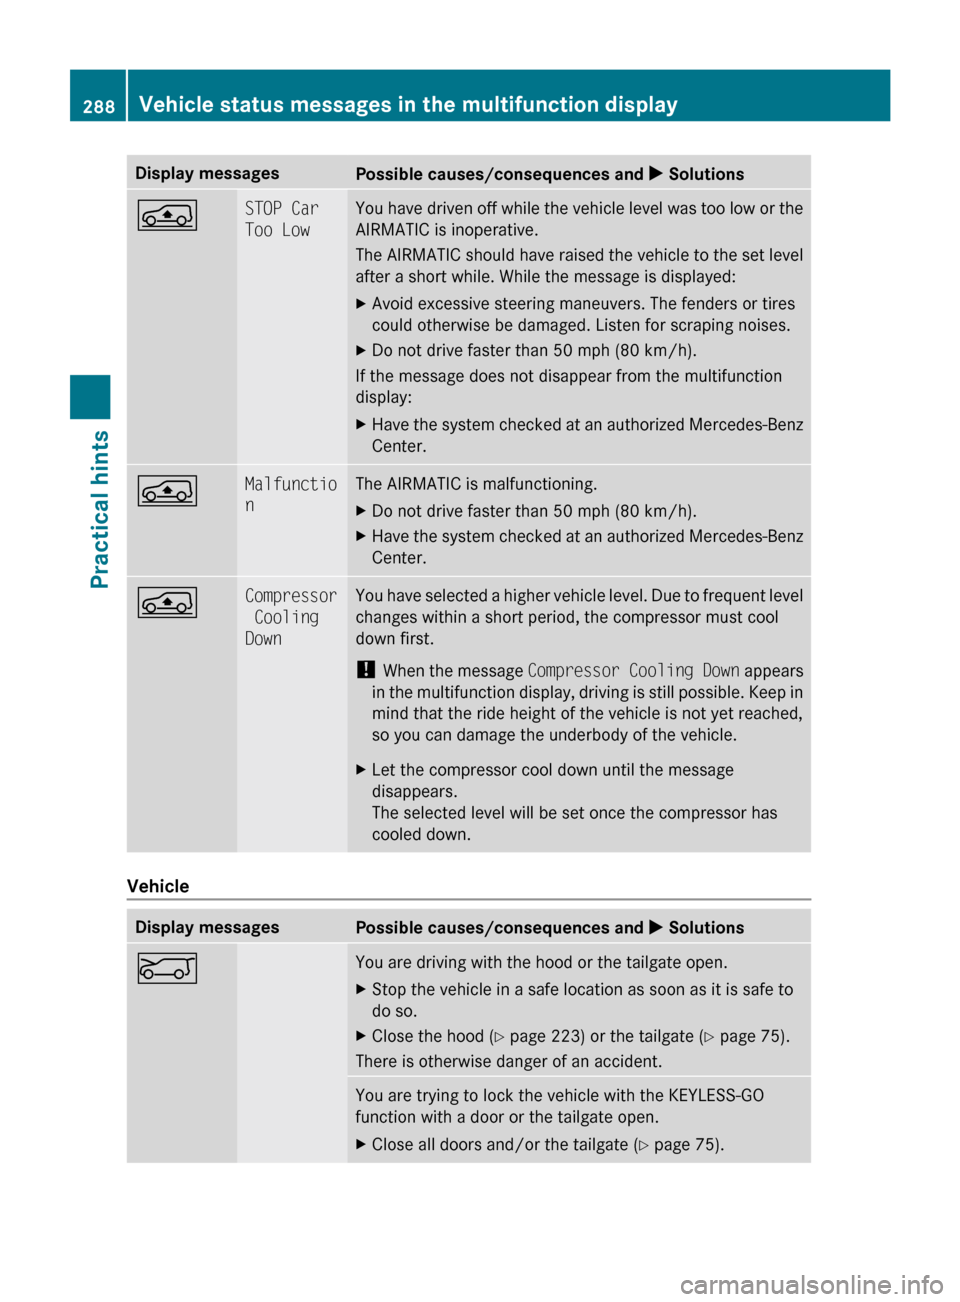
Display messages
Possible causes/consequences and
X SolutionsÁ STOP Car
Too Low You have driven off while the vehicle level was too low or the
AIRMATIC is inoperative.
The
AIRMATIC should have raised the vehicle to the set level
after a short while. While the message is displayed:
X Avoid excessive steering maneuvers. The fenders or tires
could otherwise be damaged. Listen for scraping noises.
X Do not drive faster than 50 mph (80 km/h).
If the message does not disappear from the multifunction
display:
X Have the system checked at an authorized Mercedes-Benz
Center. Á Malfunctio
n The AIRMATIC is malfunctioning.
X
Do not drive faster than 50 mph (80 km/h).
X Have the system checked at an authorized Mercedes-Benz
Center. Á Compressor
Cooling
Down You have selected a higher vehicle level. Due to frequent level
changes within a short period, the compressor must cool
down first.
!
When
the message Compressor Cooling Down appears
in the multifunction display, driving is still possible. Keep in
mind that the ride height of the vehicle is not yet reached,
so you can damage the underbody of the vehicle.
X Let the compressor cool down until the message
disappears.
The selected level will be set once the compressor has
cooled down. Vehicle
Display messages
Possible causes/consequences and
X SolutionsE You are driving with the hood or the tailgate open.
X
Stop the vehicle in a safe location as soon as it is safe to
do so.
X Close the hood ( Y page 223) or the tailgate ( Y page 75).
There is otherwise danger of an accident. You are trying to lock the vehicle with the KEYLESS-GO
function with a door or the tailgate open.
X
Close all doors and/or the tailgate ( Y page 75).288
Vehicle status messages in the multifunction displayPractical hints
251_AKB; 4; 52, en-US
d2ureepe,
Version: 2.11.8.1 2009-03-23T09:22:52+01:00 - Seite 288