2010 MERCEDES-BENZ R320 air conditioning
[x] Cancel search: air conditioningPage 181 of 364
was set before the front defroster was
switched on.
The
indicator lamp in button ¦ goes out.
The indicator lamp in button Á comes
on.
or
X Turn temperature control : and/or C
(USA only) ( Y page 170) or : and/or E
(Canada only)
(Y page 172) slightly in any
direction.
Heating switches to the temperature that
was set before the front defroster was
switched on.
The indicator lamp in button ¦ goes out.
The indicator lamp in button Á comes
on.
i The air conditioning compressor remains
on even if the indicator lamp in button
¦ goes out. This helps to prevent the
windshield from fogging.
Deactivating X
Press button ¦ once more.
The indicator lamp in the button goes out.
Defrosting is turned off.
The previous settings are once again in
effect. The air conditioning compressor
remains switched on.
i To deactivate, you can also press button
^ or Ã.
Windshield fogged on the outside X
Switch the windshield wipers on
(Y page 104).
X Press button Ã.
The indicator lamp in the button goes out.
Air volume and air distribution are
controlled separately for each zone.
If the automatic air volume and air
distribution are switched off: X
Press buttons O/c 13
and P/
\ 13
. Air recirculation mode
Switch to air recirculation mode to prevent
unpleasant odors from entering the vehicle
from the outside (e. g. before driving through
a tunnel). This setting cuts off the intake of
outside air and recirculates the air in the
passenger compartment. G
Warning!
Fogged windows impair visibility,
endangering you and others. If the windows
begin to fog on the inside, switching off the
air recirculation mode immediately should
clear interior window fogging. If interior
window fogging persists, make sure the air
conditioning is activated, or press button
¦.
X Activating: Press button d.
The
indicator lamp in the button comes on.
i The air recirculation mode is activated
automatically at high outside
temperatures.
The
indicator lamp in button d is not lit
when the air recirculation mode is switched
on automatically.
A quantity of outside air is added after
approximately 30 minutes.
If you have turned off the air conditioning
or the outside temperature is below 41‡
(5†), the air recirculation mode will not
switch on automatically.
X Deactivating: Press button d.
The indicator lamp in the button goes out.
13 Canada only 3-zone automatic climate control
179
Controls in detail
251_AKB; 4; 52, en-US
d2ureepe, Version: 2.11.8.1 2009-03-23T09:22:52+01:00 - Seite 179 Z
Page 182 of 364
i
The manually selected air recirculation
mode is deactivated automatically:
R after 5 minutes if the outside
temperature is below approximately
41‡ (5†)
R after
5 minutes if the air conditioning and
air-drying are turned off
R after 30 minutes if the outside
temperature is above approximately
41‡ (5†)
At outside temperatures above 79‡ (26†)
the system will not automatically switch back
to outside air. A quantity of outside air is
added after approximately 30 minutes. Residual heat and ventilation
With
the engine switched off, it is possible to
continue to heat or ventilate the interior for
up to 30 minutes. This feature makes use of
the residual heat produced by the engine.
i How long the system will provide heating
depends on the coolant temperature and
the battery voltage.
Regardless of the temperature and air
volume set on the climate control panel, an
interior temperature is aimed at by 72‡
(22†) and the blower runs on low speed to
protect the vehicle battery.
X Activating: Switch off the ignition.
X Press button Á.
The
indicator lamp in the button comes on.
X Deactivating: Press button Á again.
The indicator lamp in the button goes out.
The residual heat is deactivated
automatically:
R when the ignition is switched on
R after approximately 30 minutes
R if the battery voltage drops
R if the coolant temperature is too low Using driver-side settings for all
temperature zones
This feature is only available in Canada
vehicles.
You can use the settings of the driver’s side,
such as temperature, air volume and air
distribution,
for all temperature zones. These
settings only need to be made once and the
climate control system will automatically
regulate the settings for all temperature
zones quickly and comfortably.
X Activating:
Adjust the air temperature, air
volume and air distribution.
X Press button ¸.
The
indicator lamp in the button comes on.
The driver-side settings are used for all
temperature zones.
X Deactivating: Press button ¸ again.
The indicator lamp in the button goes out.
i If you manually set the temperature, air
volume
or air distribution for the passenger
side or the rear passenger compartment
when the MONO setting is active, the
MONO setting will be switched off. Rear window defroster
G
Warning!
Any accumulation of snow and ice should be
removed
from the rear window before driving.
Visibility could otherwise be impaired,
endangering you and others.
The rear window defroster uses a large
amount of power. To keep the battery drain
to a minimum, switch off the defroster as
soon as the rear window is clear. The
defroster is switched off automatically after
some time of operation depending on the
outside temperature. 180
Rear window defroster
Controls in detail
251_AKB; 4; 52, en-US
d2ureepe,
Version: 2.11.8.1 2009-03-23T09:22:52+01:00 - Seite 180
Page 251 of 364
radio, and heater, to the extent that these
items are available as factory-installed
equipment (whether installed or not).
Air pressure
The amount of air inside the tire pressing
outward on each square inch of the tire. Air
pressure is expressed in pounds per square
inch (psi), kilopascal (kPa), or bar.
Aspect ratio
Dimensional relationship between tire
section height and section width expressed
in percentage.
Bar
Metric unit for air pressure. There are
14.5038 pounds per square inch (psi) to
1
bar; there are 100 kilopascals (kPa) to 1 bar.
Bead The tire bead contains steel wires wrapped by
steel cords that hold the tire onto the rim.
Cold tire inflation pressure
Tire inflation pressure when your vehicle has
been sitting for at least 3 hours or driven no
more than 1 mile (1.6 km).
Curb weight
The weight of a motor vehicle with standard
equipment including the maximum capacity
of fuel, oil, and coolant, and, if so equipped,
air conditioning and additional optional
equipment, but without passengers and
cargo.
DOT (Department of Transportation)
A tire branding symbol which denotes the tire
meets requirements of the U.S. Department
of Transportation. GAWR (Gross Axle Weight Rating) The GAWR is the maximum permissible axle
weight.
The gross vehicle weight on each axle
must never exceed the GAWR for the front
and rear axle indicated on the certification
label located on the driver’s door B-pillar.
GTW (Gross Trailer Weight) The GTW is the weight of the trailer plus the
weight of all cargo, equipment, luggage etc.
loaded on the trailer.
GVW (Gross Vehicle Weight)
The GVW comprises the weight of the vehicle
including fuel, tools, spare wheel, installed
accessories, passengers and cargo and, if
applicable,
trailer tongue load. The GVW must
never exceed the GVWR indicated on the
certification label located on the driver’s door
B-pillar.
GVWR (Gross Vehicle Weight Rating) This is the maximum permissible vehicle
weight of the fully loaded vehicle (weight of
the
vehicle including all options, passengers,
fuel, and cargo and, if applicable, trailer
tongue load). It is indicated on the
certification label located on the driver’s door
B-pillar.
Kilopascal (kPa) Metric unit for air pressure. There are 6.9 kPa
to 1 psi; another metric unit for air pressure
is bar. There are 100 kilopascals (kPa) to
1 bar.
Load index
Numerical code associated with the
maximum load a tire can support.
Maximum load rating
The maximum load in kilograms and pounds
that can be carried by the tire. Tires and wheels
249
Operation
251_AKB; 4; 52, en-US
d2ureepe, Version: 2.11.8.1 2009-03-23T09:22:52+01:00 - Seite 249 Z
Page 261 of 364
Do not attempt to straighten out the tow
vehicle
and trailer by increasing the speed.
R If the transmission shifts between gears on
inclines repeatedly, shift to a lower gear
range manually ( Y page 119). Select 4, 3,
2 or 1.
A lower gear and reduction of speed
reduces the chance of engine overloading
and/or overheating.
R When going down an incline, shift into a
lower gear and use the engine’s braking
effect.
Avoid riding the brakes, thus overheating
the vehicle and trailer brakes (if so
equipped).
R If the engine coolant rises to an extremely
high temperature when the air conditioning
is on, turn off the air conditioning system.
Engine coolant heat can be additionally
vented by opening the windows, switching
the climate control fan speed to high and
setting the temperature control to the
maximum.
R During a passing maneuver extreme care
must be exercised since your vehicle with
a trailer will require additional passing
distance ahead than when driving without
a trailer.
Because your vehicle and trailer is longer
than your vehicle alone, you will also need
to go much farther ahead of the passed
vehicle before you can return to your lane.
Decoupling a trailer G
Warning!
Vehicles with AIRMATIC: While you are
coupling or decoupling a trailer, make sure
nobody locks or unlocks the vehicle and/or
opens or closes doors or the tailgate.
The vehicle’s level could change and you
could endanger yourself and/or others as a
result. Make sure that you do not operate the ADS
switch or the vehicle level control system
when coupling/decoupling the trailer.
X Make sure the automatic transmission is in
park position P (Y page 116).
X Engage the parking brake for the vehicle
(Y page 114).
X Start the engine (Y page 110).
X Close all doors and the tailgate.
X Engage the parking brake for the trailer. G
Warning!
Vehicles with AIRMATIC: As soon as you
disconnect
the electrical connection between
the trailer and the vehicle, the vehicle will
lower. To help avoid personal injury, make
sure no one is near the wheel housing or
underneath the vehicle before the electrical
connection is disconnected.
When you decouple the trailer, the vehicle is
temporarily raised because the springs are
relieved of load. Be especially careful during
this process, as you could otherwise injure
yourself and/or others. Make sure that any
persons remaining in the vehicle do not press
the switches for vehicle level control or the
ADS.
X Disconnect all electrical plug connectors.
X Decouple the trailer.
X Make sure that the trailer coupling is free
of load.
X Turn off the engine ( Y page 114). Driving abroad
If
you plan to drive the vehicle outside the U.S.
or Canada, you should request dealer
network information for your destination from
any authorized Mercedes-Benz Center. Driving instructions
259
Operation
251_AKB; 4; 52, en-US
d2ureepe, Version: 2.11.8.1 2009-03-23T09:22:52+01:00 - Seite 259 Z
Page 353 of 364
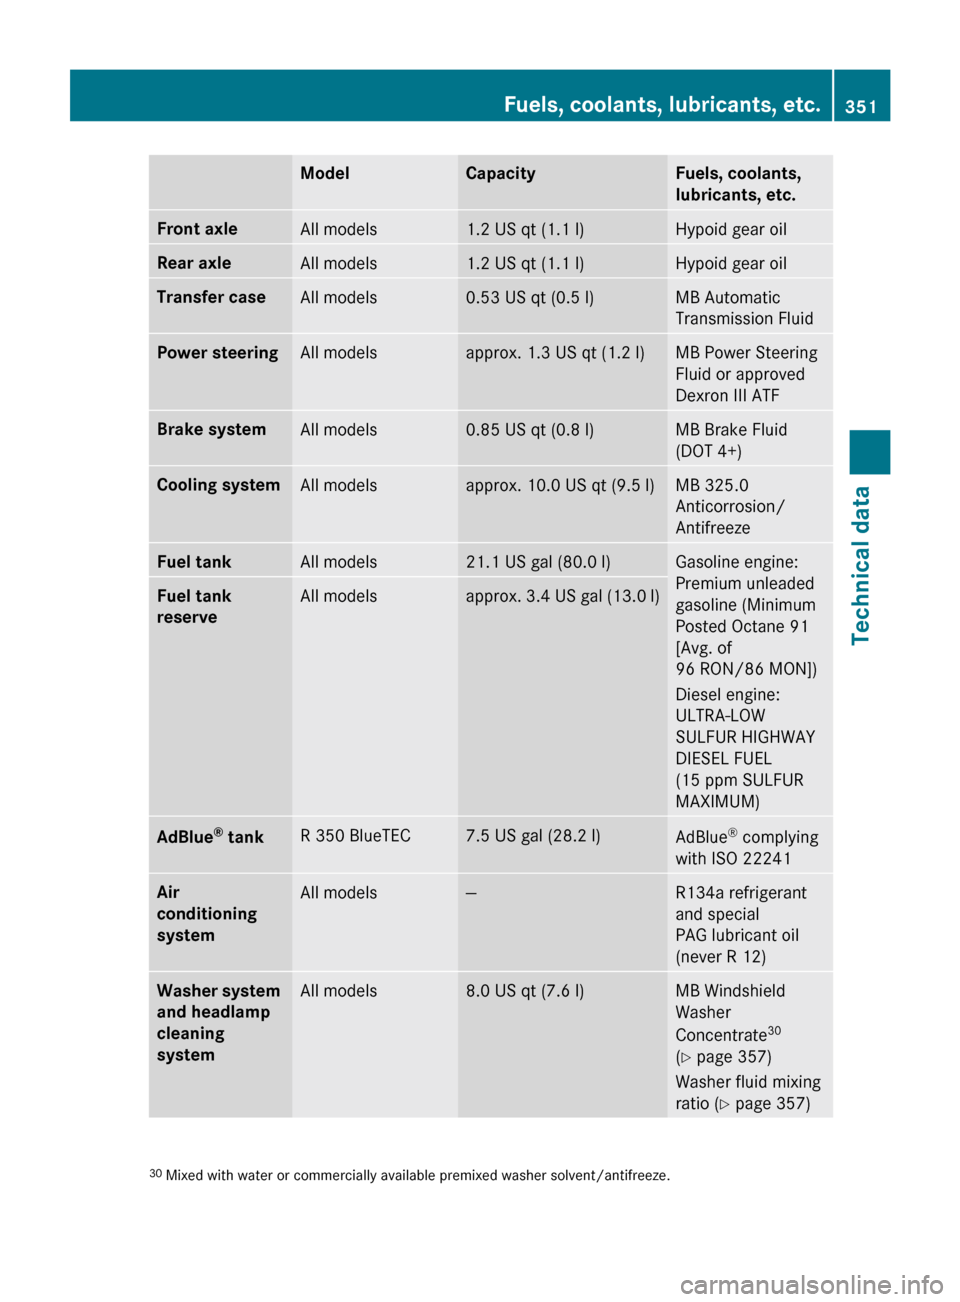
Model Capacity Fuels, coolants,
lubricants, etc.
Front axle
All models 1.2 US qt (1.1 l) Hypoid gear oil
Rear axle
All models 1.2 US qt (1.1 l) Hypoid gear oil
Transfer case
All models 0.53 US qt (0.5 l) MB Automatic
Transmission Fluid
Power steering
All models approx. 1.3 US qt (1.2 l) MB Power Steering
Fluid or approved
Dexron III ATF
Brake system
All models 0.85 US qt (0.8 l) MB Brake Fluid
(DOT 4+)
Cooling system
All models approx. 10.0 US qt (9.5 l) MB 325.0
Anticorrosion/
Antifreeze
Fuel tank
All models 21.1 US gal (80.0 l) Gasoline engine:
Premium unleaded
gasoline (Minimum
Posted Octane 91
[Avg. of
96 RON/86 MON])
Diesel engine:
ULTRA-LOW
SULFUR HIGHWAY
DIESEL FUEL
(15 ppm SULFUR
MAXIMUM)
Fuel tank
reserve
All models approx. 3.4 US gal (13.0 l)
AdBlue
®
tank R 350 BlueTEC 7.5 US gal (28.2 l)
AdBlue
®
complying
with ISO 22241 Air
conditioning
system
All models — R134a refrigerant
and special
PAG lubricant oil
(never R 12)
Washer system
and headlamp
cleaning
system
All models 8.0 US qt (7.6 l) MB Windshield
Washer
Concentrate
30
(Y page 357)
Washer fluid mixing
ratio ( Y page 357) 30
Mixed with water or commercially available premixed washer solvent/antifreeze. Fuels, coolants, lubricants, etc.
351Technical data
251_AKB; 4; 52, en-US
d2ureepe, Version: 2.11.8.1 2009-03-23T09:22:52+01:00 - Seite 351 Z
Page 354 of 364
Approved engine oils
Engine oils are specifically tested for their
suitability in our engines and durability for our
service intervals. Therefore, only use
approved engine oils and oil filters required
for vehicles with the Maintenance System.
For a listing of approved engine oils and oil
filters, contact an authorized Mercedes-Benz
Center or visit www.mbusa.com (USA only).
! Using engine oils and oil filters of a
specification other than those expressly
required for the Maintenance System, or
changing of oil and oil filter at change
intervals longer than those called for by the
Maintenance System will result in engine or
emission control system damage not
covered by the Mercedes-Benz Limited
Warranty.
Please follow Maintenance System
recommendations for scheduled oil
changes. Failure to do so will result in
engine or emission control system damage
not covered by the Mercedes-Benz Limited
Warranty.
Mercedes-Benz recommends MOBIL OIL.
Use the table below to determine the
MB sheet number. Model Engine,
type MB sheet
number
R 350 BlueTEC 642 229.51
R 350 272 229.5
i
MB sheet numbers are printed on the
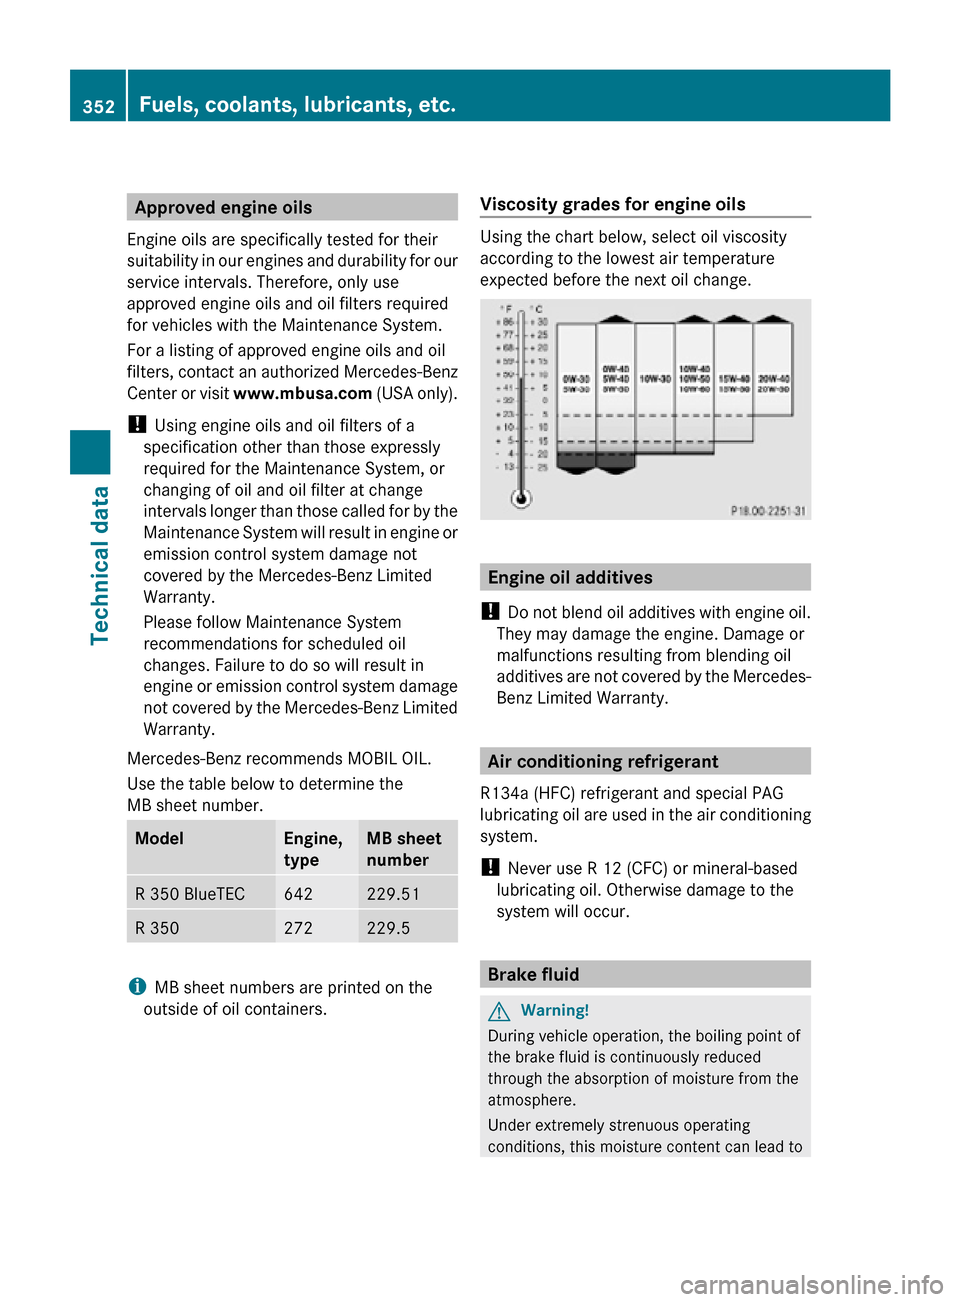
outside of oil containers. Viscosity grades for engine oils Using the chart below, select oil viscosity
according to the lowest air temperature
expected before the next oil change.
Engine oil additives
! Do not blend oil additives with engine oil.
They may damage the engine. Damage or
malfunctions resulting from blending oil
additives are not covered by the Mercedes-
Benz Limited Warranty. Air conditioning refrigerant
R134a (HFC) refrigerant and special PAG
lubricating oil are used in the air conditioning
system.
! Never use R 12 (CFC) or mineral-based
lubricating oil. Otherwise damage to the
system will occur. Brake fluid
G
Warning!
During vehicle operation, the boiling point of
the brake fluid is continuously reduced
through the absorption of moisture from the
atmosphere.
Under extremely strenuous operating
conditions, this moisture content can lead to 352
Fuels, coolants, lubricants, etc.Technical data
251_AKB; 4; 52, en-US
d2ureepe,
Version: 2.11.8.1 2009-03-23T09:22:52+01:00 - Seite 352