2010 MERCEDES-BENZ R320 instrument cluster
[x] Cancel search: instrument clusterPage 38 of 364
Vehicle equipment
i This Operator’s Manual describes all
features, standard or optional, potentially
available for your vehicle at the time of
purchase. Please be aware that your
vehicle might not be equipped with all
features described in this manual. Occupant safety
Introduction
In this section you will learn the most
important facts about the restraint system
components of the vehicle.
The restraint systems are:
R Seat belts
R Child restraints
R Lower Anchors and Tethers for CHildren
(LATCH)
Additional
protection potential is provided by:
R Supplemental Restraint System (SRS) with
- Air bags
- Air bag control unit (with crash sensors)
- Emergency Tensioning Device (ETD) for
seat belts
- Seat belt force limiter
R NECK-PRO active front head restraints
R Preventive occupant safety (PRE-SAFE ®
)
R Air bag system components with
-Front passenger front air bag off
indicator lamp
- USA only: Front passenger seat with Occupant Classification System (OCS)
- Canada only: Front passenger seat with
BabySmart™
air bag deactivation system
Although the systems are independent, their
protective functions work in conjunction with
each other. G
Warning!
Modifications to or work improperly
conducted on restraint system components
or their wiring, as well as tampering with
interconnected electronic systems, can lead
to
the restraint systems no longer functioning
as intended.
Air bags or Emergency Tensioning Devices
(ETDs), for example, could deploy
inadvertently or fail to deploy in accidents
although the deceleration threshold for air
bag deployment is exceeded. Therefore,
never modify the restraint systems. Do not
tamper with electronic components or their
software.
i See “Children in the vehicle”
(Y page 55) for information on
R infants and children traveling with you in
the vehicle
R restraint systems for infants and children SRS indicator lamp
The SRS system conducts a self-test when
the ignition is switched on and in regular
intervals while the engine is running. This
facilitates detection of system malfunctions.
The SRS indicator lamp + in the
instrument cluster comes on when the
ignition is switched on. It goes out no later
than
a few seconds after the engine has been
started.
The SRS components are in operational
readiness when the SRS indicator lamp
+ is not lit while the engine is running.
A malfunction in the system has been
detected if the SRS indicator lamp +
R fails to go out after approximately
4 seconds after the engine was started
R does not come on at all
R comes on after the engine was started or
while driving 36
Occupant safety
Safety and security
251_AKB; 4; 52, en-US
d2ureepe,
Version: 2.11.8.1 2009-03-23T09:22:52+01:00 - Seite 36
Page 46 of 364
completely eliminate this risk is to never
place a child in a rear-facing child restraint
in the front seat. We therefore strongly
recommend that you always place a child
in a rear-facing child restraint in a backseat.
R If you must install a rear-facing child
restraint on the front passenger seat
because circumstances require you to do
so, make sure the 42
indicator lamp is illuminated, indicating
that the front passenger front air bag is
deactivated. Should the 42
indicator lamp not illuminate or go out while
the restraint is installed, please check
installation. Periodically check the
42 indicator lamp while
driving to make sure the 42
indicator lamp is illuminated. If the
42 indicator lamp goes out or
remains out, do not transport a child on the
front passenger seat until the system has
been repaired.
A child in a rear-facing child restraint on the
front passenger seat will be seriously
injured or even killed if the front passenger
front air bag inflates.
R If you have to place a child in a forward-
facing child restraint on the front passenger
seat, move the seat as far back as possible,
use the proper child restraint
recommended for the age, size and weight
of the child, and secure child restraint with
the vehicle’s seat belt according to the child
seat manufacturer’s instructions. For
children larger than the typical 12-month-
old child, the front passenger front air bag
may or may not be activated.
Deployment of the driver front air bag does
not mean that the front passenger front air
bag also should have deployed.
The OCS may have determined
R that the seat was empty or occupied by the
weight up to or less than that of a typical
12-month-old child seated in a standard
child restraint – both of which are instances where the system suppresses deployment
of the front passenger front air bag even
though the impact met the criteria and was
of sufficient severity to deploy the driver
front air bag
R that the seat was occupied by a small
individual (such as a young teenager or a
small adult) or a child who weighs more
than the weight of a typical 12-month-old
child in a standard child restraint – both of
which are instances where the system may
suppress deployment of the front
passenger front air bag even though the
impact met the criteria and was of
sufficient severity to deploy the driver front
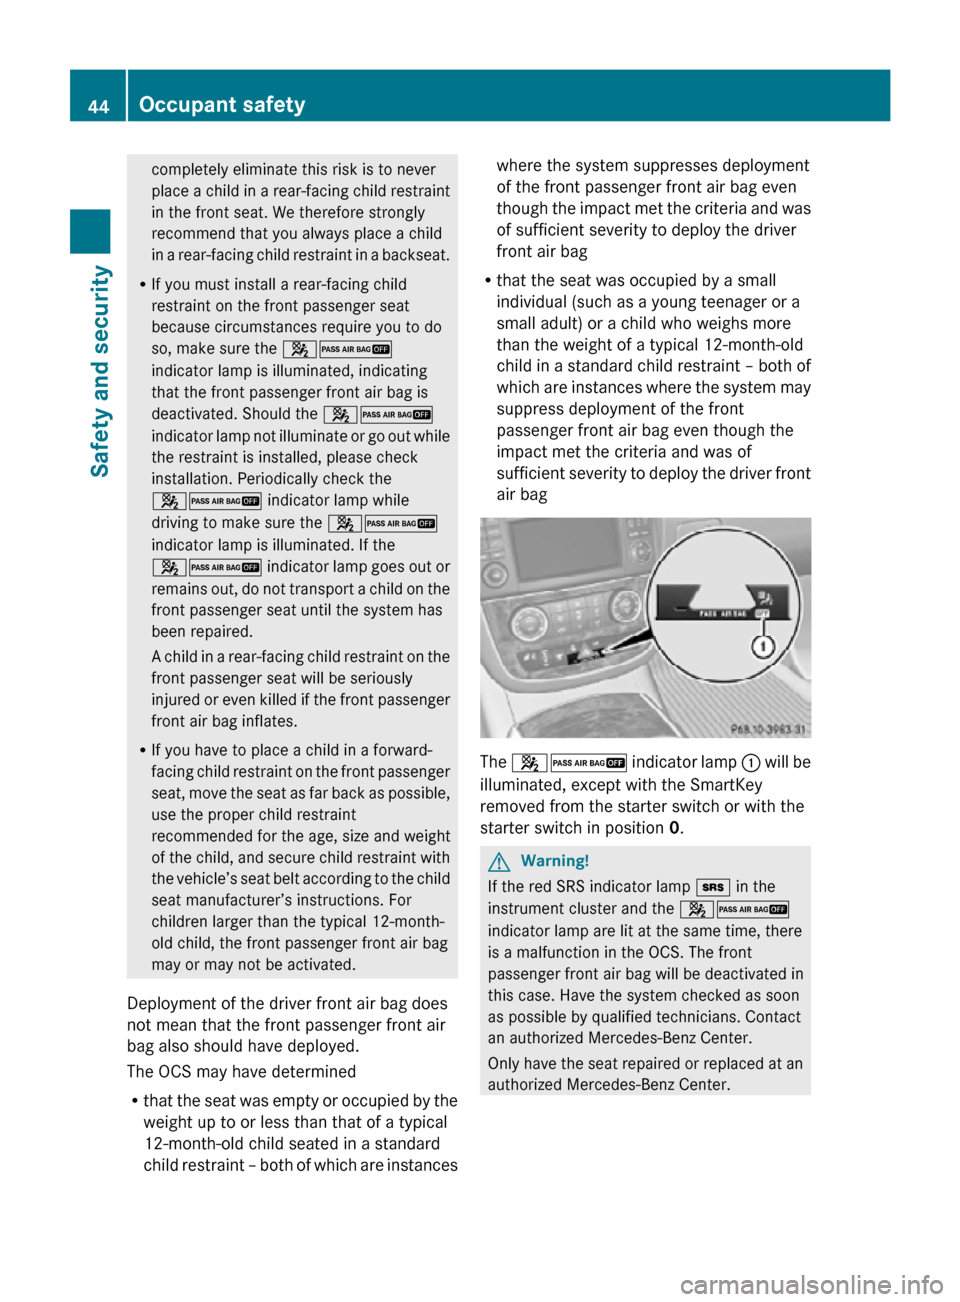
air bag The
42 indicator lamp : will be
illuminated, except with the SmartKey
removed from the starter switch or with the
starter switch in position 0. G
Warning!
If the red SRS indicator lamp + in the
instrument cluster and the 42
indicator lamp are lit at the same time, there
is a malfunction in the OCS. The front
passenger front air bag will be deactivated in
this case. Have the system checked as soon
as possible by qualified technicians. Contact
an authorized Mercedes-Benz Center.
Only have the seat repaired or replaced at an
authorized Mercedes-Benz Center. 44
Occupant safetySafety and security
251_AKB; 4; 52, en-US
d2ureepe,
Version: 2.11.8.1 2009-03-23T09:22:52+01:00 - Seite 44
Page 56 of 364
see “Head restraint fore and aft adjustment”
(Y page 83).
Correct driver seat adjustment
G
Warning!
In order to avoid possible loss of vehicle
control the following must be done before the
vehicle is put into motion:
R seat adjustment
R head restraint adjustment
R steering wheel adjustment
R rear view mirror adjustment
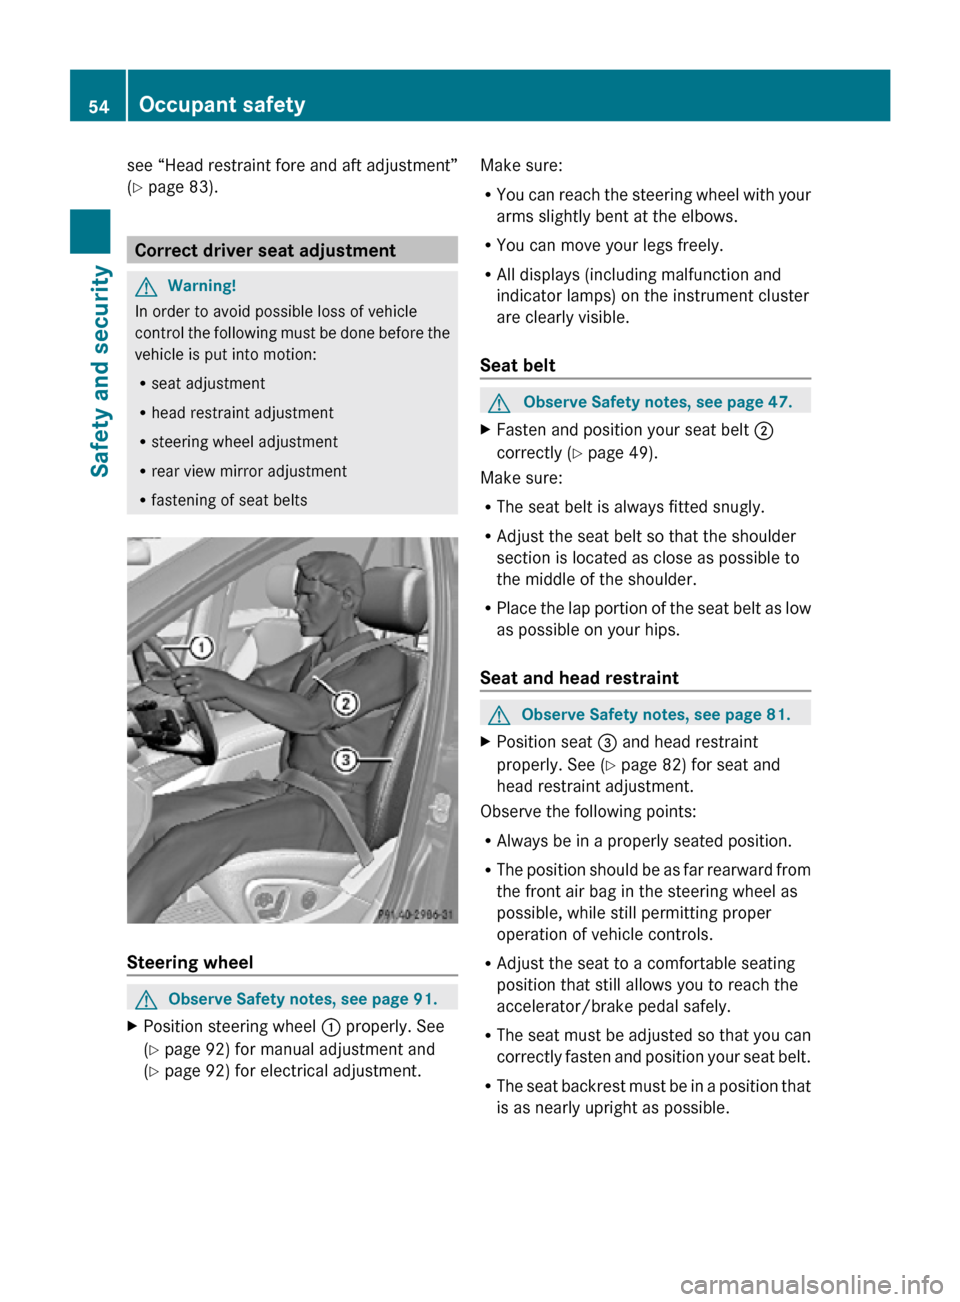
R fastening of seat belts Steering wheel
G
Observe Safety notes, see page 91.
X Position steering wheel : properly. See
(Y page 92) for manual adjustment and
(Y page 92) for electrical adjustment. Make sure:
R
You can reach the steering wheel with your
arms slightly bent at the elbows.
R You can move your legs freely.
R All displays (including malfunction and
indicator lamps) on the instrument cluster
are clearly visible.
Seat belt G
Observe Safety notes, see page 47.
X Fasten and position your seat belt ;
correctly (Y page 49).
Make sure:
R The seat belt is always fitted snugly.
R Adjust the seat belt so that the shoulder
section is located as close as possible to
the middle of the shoulder.
R Place the lap portion of the seat belt as low
as possible on your hips.
Seat and head restraint G
Observe Safety notes, see page 81.
X Position seat = and head restraint
properly. See ( Y page 82) for seat and
head restraint adjustment.
Observe the following points:
R Always be in a properly seated position.
R The position should be as far rearward from
the front air bag in the steering wheel as
possible, while still permitting proper
operation of vehicle controls.
R Adjust the seat to a comfortable seating
position that still allows you to reach the
accelerator/brake pedal safely.
R The seat must be adjusted so that you can
correctly fasten and position your seat belt.
R The seat backrest must be in a position that
is as nearly upright as possible. 54
Occupant safetySafety and security
251_AKB; 4; 52, en-US
d2ureepe,
Version: 2.11.8.1 2009-03-23T09:22:52+01:00 - Seite 54
Page 66 of 364
and significantly reduces braking
effectiveness.
The Antilock Brake System (ABS) regulates
the
brake pressure so that the wheels do not
lock during braking. This allows you to
maintain the ability to steer your vehicle.
The ABS is functional above a speed of
approximately 5 mph (8 km/h) independent
of road surface conditions.
On slippery road surfaces, the ABS will
respond even to light brake pressure.
The ABS indicator lamp ! indicator lamp
in the instrument cluster comes on when you
switch on the ignition. It goes out when the
engine is running.
Braking At the instant one of the wheels is about to
lock up, a slight pulsation can be felt in the
brake pedal. The pulsation indicates that the
ABS is in the regulating mode.
X
Keep firm and steady pressure on the brake
pedal while you feel the pulsation.
Continuous, steady brake pedal pressure
yields the advantages provided by the ABS,
namely
braking power and the ability to steer
the vehicle.
The pulsating brake pedal can be an
indication of hazardous road conditions and
functions as a reminder to take extra care
while driving.
Emergency brake maneuver X
Keep continuous full pressure on the brake
pedal. G
Warning!
If the ABS malfunctions, other driving safety
systems
such as the BAS or the ESP ®
are also
switched off. Observe indicator and warning
lamps that may come on as well as messages
in the multifunction display that may appear. If the ABS malfunctions, the wheels may lock
during hard braking, reducing steering
capability
and extending the braking distance. BAS
G
Observe Safety notes, see page 63.
The Brake Assist System (BAS) operates in
emergency
situations. If you apply the brakes
very quickly, the BAS provides full brake
boost automatically, thereby potentially
reducing the braking distance.
X Apply continuous full braking pressure until
the emergency braking situation is over.
The ABS will prevent the wheels from
locking.
When you release the brake pedal, the brakes
function again as normal. The BAS is then
deactivated. G
Warning!
If the BAS malfunctions, the brake system still
functions, but without the additional brake
boost available that the BAS would normally
provide in an emergency braking maneuver.
Therefore,
the braking distance may increase. EBP
G
Observe Safety notes, see page 63.
The Electronic Brake Proportioning (EBP)
enhances braking effectiveness by allowing
the
rear brakes to supply a greater proportion
of the braking effort in straight-line braking
without a loss of vehicle stability. G
Warning!
If the EBP malfunctions, the brake system will
still function with full brake boost. However,
the rear wheels could lock up during
emergency braking situations, for example.
You could lose control of the vehicle and
cause an accident.
Adapt your driving style to the changed
driving characteristics. 64
Driving safety systems
Safety and security
251_AKB; 4; 52, en-US
d2ureepe,
Version: 2.11.8.1 2009-03-23T09:22:52+01:00 - Seite 64
Page 67 of 364

ESP
® G
Observe Safety notes, see page 63.
The Electronic Stability Program (ESP ®
) is
operational as soon as the engine is running.
It monitors the vehicle’s traction (force of
adhesive friction between the tires and the
road surface) and handling.
The ESP ®
recognizes that the vehicle deviates
from the direction of travel as intended by the
driver. By applying brakes to individual
wheels and by limiting the engine output, the
ESP ®
works to stabilize the vehicle. The
ESP ®
is especially useful while driving off and
on wet or slippery road surfaces. The ESP ®
also stabilizes the vehicle during braking and
steering maneuvers.
The ESP ®
warning lamp d in the
instrument cluster comes on when you switch
on the ignition. It goes out when the engine
is running.
The ESP ®
warning lamp d in the
instrument cluster flashes when the ESP ®
is
engaged. G
Warning!
Never switch off the ESP ®
when you see the
ESP ®
warning lamp d flashing in the
instrument cluster. In this case proceed as
follows:
R When driving off, apply as little throttle as
possible.
R While driving, ease up on the accelerator
pedal.
R Adapt your speed and driving style to the
prevailing road conditions.
Failure to observe these guidelines could
cause the vehicle to skid. The ESP ®
cannot
prevent accidents resulting from excessive
speed.
! Only
conduct operational or performance
tests on a two-axle dynamometer. If such
tests are necessary, contact an authorized Mercedes-Benz Center. You could
otherwise seriously damage the brake
system or the transfer case which is not
covered by the Mercedes-Benz Limited
Warranty.
! Because the ESP ®
operates
automatically,
the engine and ignition must
be shut off (SmartKey in starter switch
position 0 or 1 or KEYLESS-GO start/stop
button in position 0 or 1) when the parking
brake is being tested on a brake test
dynamometer. Such testing should be no
longer than 10 seconds.
Active braking action through the ESP ®
may otherwise seriously damage the brake
system which is not covered by the
Mercedes-Benz Limited Warranty.
! The ESP ®
will only function properly if you
use wheels of the recommended tire size
as specified in the “Technical data” section
of this Operator’s Manual.
i The Distronic system and cruise control
switch off automatically when the ESP ®
engages.
Electronic Traction System (4-ETS) G
Observe Safety notes, see page 63.
The 4-ETS (four-wheel Electronic Traction
System) is a component of the ESP ®
. The
4-ETS
improves the vehicle’s ability to utilize
available traction, especially under slippery
road conditions by applying the brakes to a
spinning wheel. In addition, more power is
transferred to the wheel(s) with traction.
When you switch off the ESP ®
, the 4-ETS is
still enabled.
Switching off the ESP ® G
Warning!
The ESP ®
should not be switched off during
normal driving other than in the Driving safety systems
65
Safety and security
251_AKB; 4; 52, en-US
d2ureepe, Version: 2.11.8.1 2009-03-23T09:22:52+01:00 - Seite 65 Z
Page 68 of 364

circumstances described below. Disabling
the system will reduce vehicle stability in
driving maneuvers.
Do not switch off the ESP
®
when a spare
wheel is mounted.
To improve the vehicle’s traction, switch off
the ESP ®
. This allows the drive wheels to spin
and thus cut into surfaces for better grip, for
example
R when driving with snow chains
R in deep snow
R in sand or gravel G
Warning!
Switch on the ESP ®
immediately if the
aforementioned circumstances do not apply
anymore. Otherwise the ESP ®
will not
stabilize the vehicle when it is starting to skid
or a wheel is spinning.
When you switch off the ESP ®
,
R the ESP ®
does not stabilize the vehicle
R the engine output is not limited, which
allows the drive wheels to spin and thus cut
into surfaces for better grip
R the 4-ETS will still apply the brakes to a
spinning wheel
R the ESP ®
continues to operate when you
are braking
R the cruise control or the Distronic system
cannot be activated
R the cruise control or the Distronic system
switch off if activated
i When the ESP ®
is switched off and one or
more drive wheels are spinning, the ESP ®
warning lamp d in the instrument
cluster flashes. However, the ESP ®
will
then not stabilize the vehicle. X
With the engine running, press ESP ®
switch : until the ESP ®
warning lamp
d in the instrument cluster comes on.
The ESP ®
is switched off. G
Warning!
When the ESP ®
warning lamp d is
illuminated continuously, the ESP ®
is
switched off or is not operational due to a
malfunction. Vehicle stability in standard
driving maneuvers is reduced.
Adapt your speed and driving to the prevailing
road conditions and to the non-operating
status of the ESP ®
.
! Avoid spinning of a drive wheel for an
extended period with the ESP ®
switched
off. This may cause serious damage to the
drivetrain which is not covered by the
Mercedes-Benz Limited Warranty.
Switching on the ESP ® X
Press ESP ®
switch : until the ESP ®
warning lamp d in the instrument
cluster goes out.
You are now again in normal driving mode
with the ESP ®
switched on.
ESP ®
trailer stabilization If the trailer you are towing should begin to
sway, the rig can only be stabilized by
immediately applying the brakes hard.
Steering during this maneuver will not help to
stabilize the rig.66
Driving safety systemsSafety and security
251_AKB; 4; 52, en-US
d2ureepe,
Version: 2.11.8.1 2009-03-23T09:22:52+01:00 - Seite 66
Page 71 of 364
Vehicle equipment ..............................
70
Locking and unlocking .......................70
Starter switch positions ..................... 79
Seats .................................................... 81
Multifunction steering wheel .............91
Mirrors ................................................. 93
Memory function ................................. 96
Lighting ................................................ 97
Wipers ................................................ 103
Power windows ................................. 106
Driving and parking .......................... 110
Automatic transmission ................... 115
Transfer case .................................... 122
Instrument cluster ............................122
Control system .................................. 123
Driving systems ................................ 142
Overview of climate control sys-
tem functions and air vents ............. 162
Climate control ................................. 164
3-zone automatic climate control ... 170
Rear window defroster ..................... 180
Power tilt/sliding sunroof ...............181
Panorama roof with power tilt/
sliding panel ...................................... 184
Loading and storing ..........................186
Useful features ................................. 201 69Controls in detail
251_AKB; 4; 52, en-US
d2ureepe,
Version: 2.11.8.1 2009-03-23T09:22:52+01:00 - Seite 69
Page 81 of 364
the door-mounted remote tailgate switch.
Monitor the closing procedure carefully to
make sure no one is in danger of being
injured.
To interrupt the closing procedure, press or
pull the door-mounted remote tailgate switch.
If the tailgate comes into contact with an
object while closing, the closing procedure is
stopped and the tailgate reopens. This may
happen if luggage has been piled too high, for
example.
X Turn the SmartKey in the starter switch to
position 1 or 2.
X Press remote tailgate opening/closing
switch : until the tailgate begins to close.
While the tailgate is closing an acoustic
warning sounds.
X Interrupting the closing procedure:
Press or pull remote tailgate opening/
closing switch :.
Limiting opening height of tailgate You can limit the opening height of the
tailgate in the upper opening range. This can
be useful, for example, when the space above
the tailgate is not sufficient.
Activating
X
Open the tailgate: Pull on handle
(Y page 75) or press and hold button
F on the SmartKey until the tailgate
opens.
X Stop opening procedure: When the
tailgate is in the desired position, press
tailgate closing switch ( Y page 77) or pull
on handle once more.
X You can also press or pull the remote
tailgate opening/closing switch
(Y page 78) to stop the opening procedure. X
Press and hold the tailgate closing switch
in the tailgate ( Y page 77) until you hear a
short acoustic signal.
The opening height of the tailgate is limited.
The tailgate will now stop at the stored
position when opened.
Deactivating
X Press and hold the tailgate closing switch
in the tailgate ( Y page 77) until you hear
two short, consecutive acoustic signals. Starter switch positions
SmartKey
G
Observe Safety notes, see page 55. Starter switch
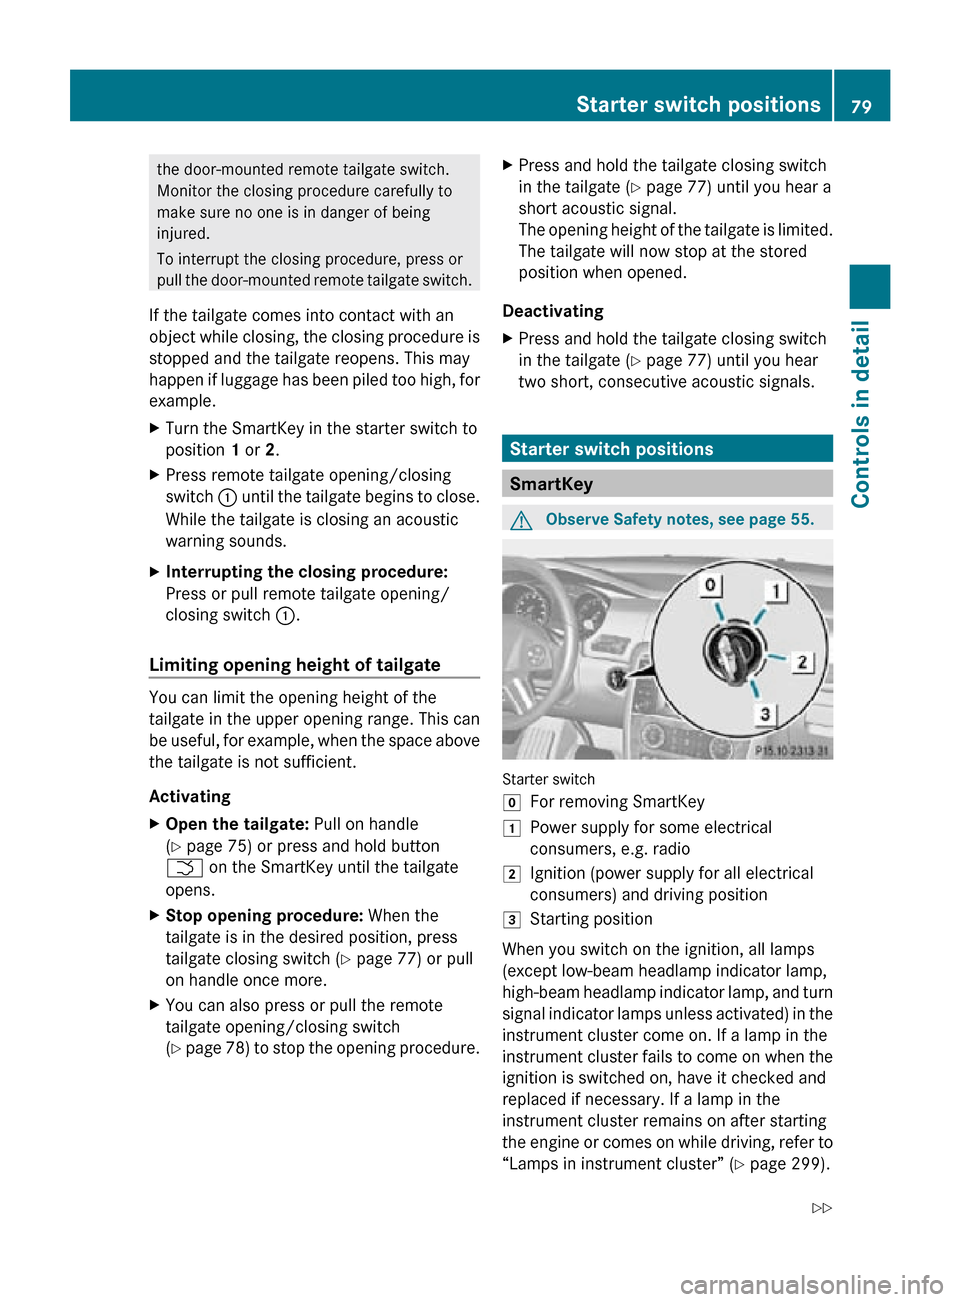
g
For removing SmartKey
1 Power supply for some electrical
consumers, e.g. radio
2 Ignition (power supply for all electrical
consumers) and driving position
3 Starting position
When you switch on the ignition, all lamps
(except low-beam headlamp indicator lamp,
high-beam headlamp indicator lamp, and turn
signal indicator lamps unless activated) in the
instrument cluster come on. If a lamp in the
instrument cluster fails to come on when the
ignition is switched on, have it checked and
replaced if necessary. If a lamp in the
instrument cluster remains on after starting
the engine or comes on while driving, refer to
“Lamps in instrument cluster” (Y page 299). Starter switch positions
79Controls in detail
251_AKB; 4; 52, en-US
d2ureepe, Version: 2.11.8.1 2009-03-23T09:22:52+01:00 - Seite 79 Z