2010 MERCEDES-BENZ R320 wiper blades
[x] Cancel search: wiper bladesPage 21 of 364
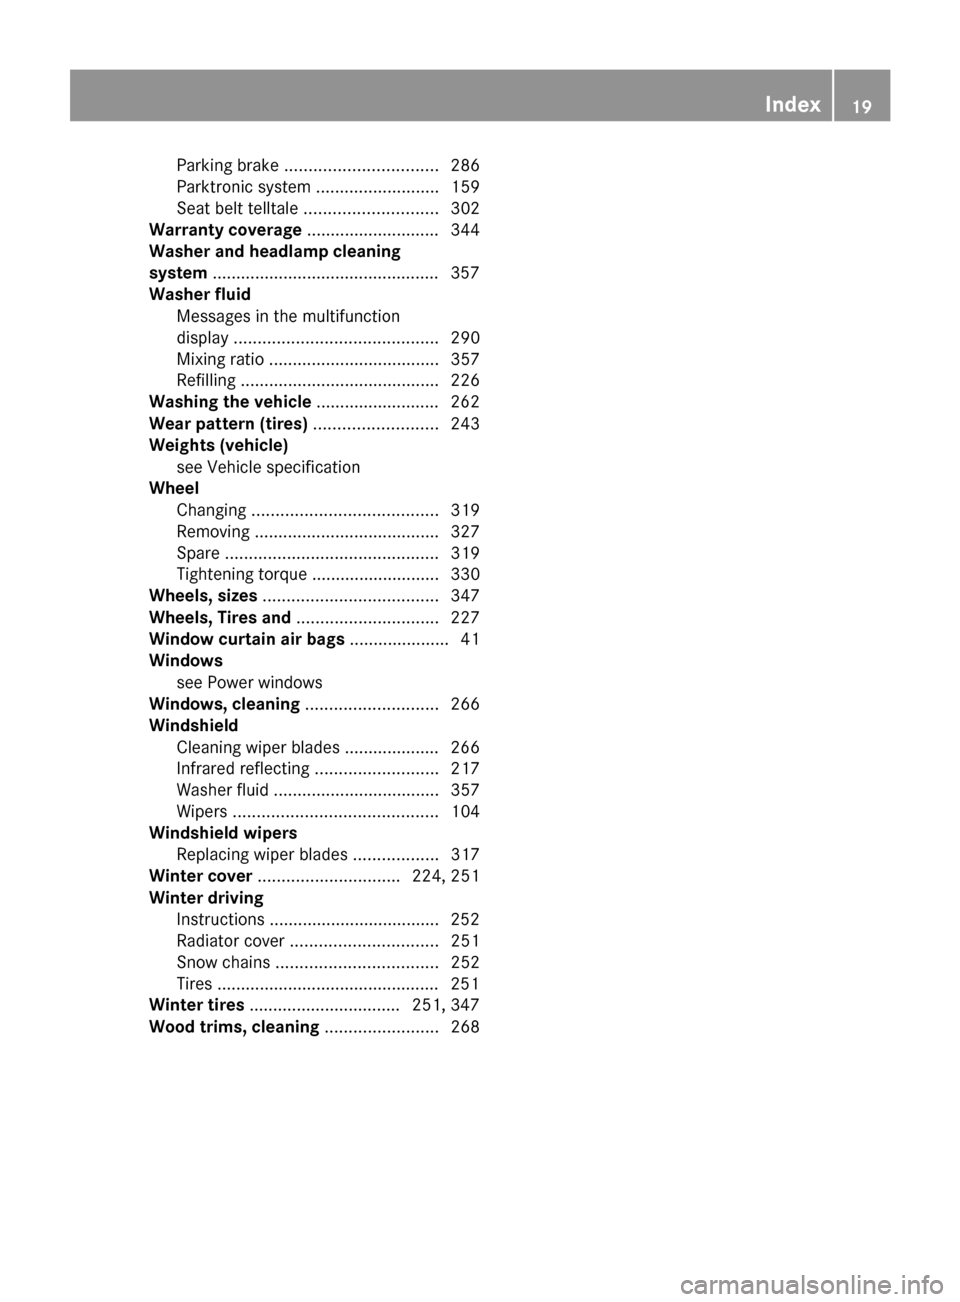
Parking brake ................................
286
Parktronic system ..........................159
Seat belt telltale ............................ 302
Warranty coverage ............................
344
Washer and headlamp cleaning
system ................................................ 357
Washer fluid
Messages in the multifunction
display ........................................... 290
Mixing ratio .................................... 357
Refilling .......................................... 226
Washing the vehicle .......................... 262
Wear pattern (tires) ..........................243
Weights (vehicle) see Vehicle specification
Wheel
Changing ....................................... 319
Removing ....................................... 327
Spare ............................................. 319
Tightening torque ........................... 330
Wheels, sizes ..................................... 347
Wheels, Tires and .............................. 227
Window curtain air bags ..................... 41
Windows see Power windows
Windows, cleaning ............................266
Windshield Cleaning wiper blades .................... 266
Infrared reflecting ..........................217
Washer fluid ................................... 357
Wipers ........................................... 104
Windshield wipers
Replacing wiper blades .................. 317
Winter cover .............................. 224, 251
Winter driving Instructions .................................... 252
Radiator cover ............................... 251
Snow chains .................................. 252
Tires ............................................... 251
Winter tires ................................ 251, 347
Wood trims, cleaning ........................ 268 Index
19 251_AKB; 4; 52, en-US
d2ureepe,
Version: 2.11.8.1 2009-03-23T09:22:52+01:00 - Seite 19
Page 28 of 364
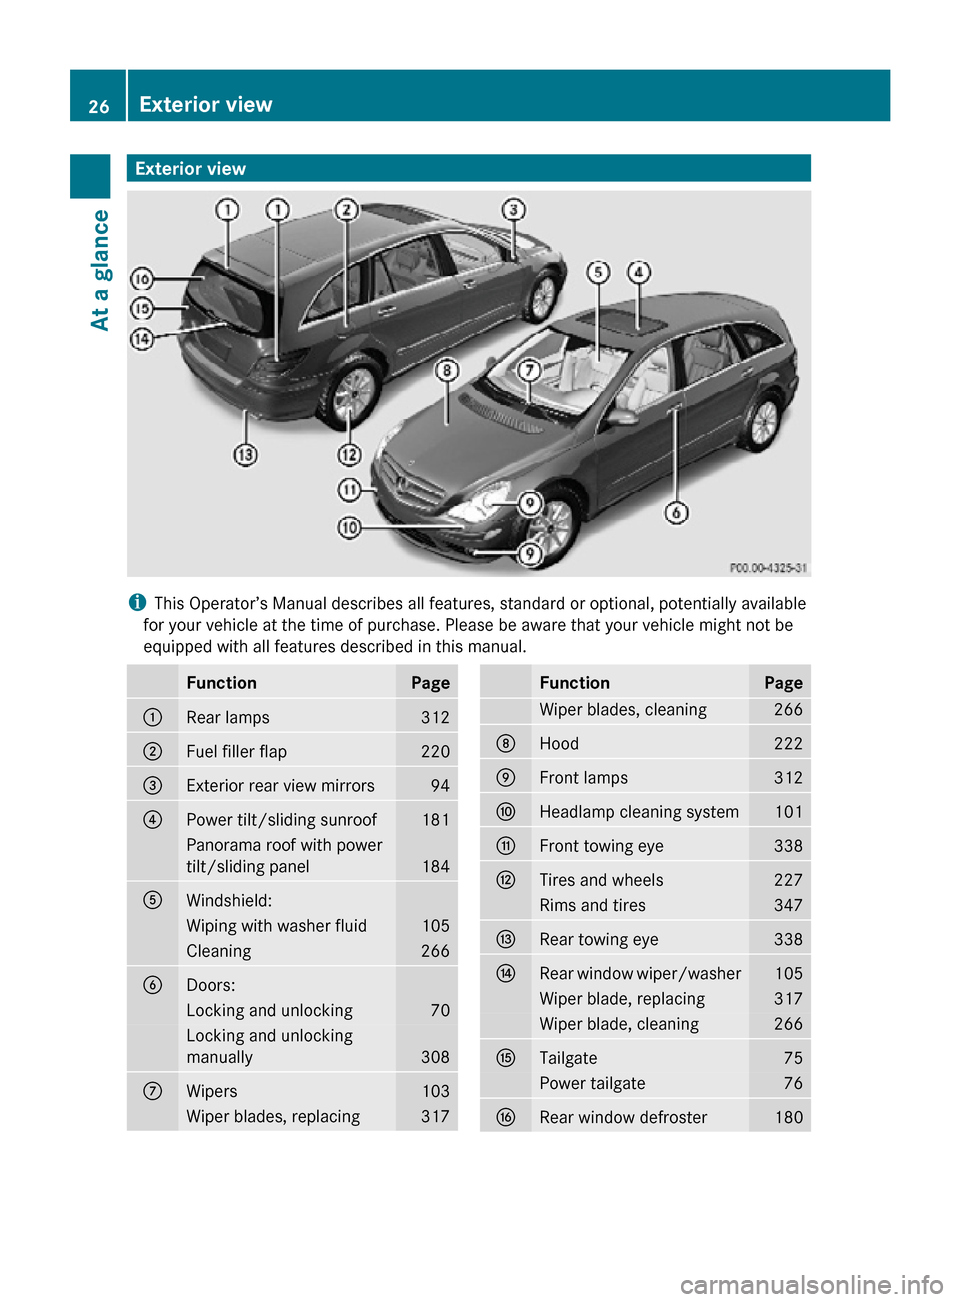
Exterior view
i
This Operator’s Manual describes all features, standard or optional, potentially available
for your vehicle at the time of purchase. Please be aware that your vehicle might not be
equipped with all features described in this manual. Function Page
:
Rear lamps 312
;
Fuel filler flap 220
=
Exterior rear view mirrors 94
?
Power tilt/sliding sunroof 181
Panorama roof with power
tilt/sliding panel
184
A
Windshield:
Wiping with washer fluid 105
Cleaning 266
B
Doors:
Locking and unlocking 70
Locking and unlocking
manually
308
C
Wipers 103
Wiper blades, replacing 317 Function Page
Wiper blades, cleaning 266
D
Hood 222
E
Front lamps 312
F
Headlamp cleaning system 101
G
Front towing eye 338
H
Tires and wheels 227
Rims and tires 347
I
Rear towing eye 338
J
Rear window wiper/washer 105
Wiper blade, replacing 317
Wiper blade, cleaning 266
K
Tailgate 75
Power tailgate 76
L
Rear window defroster 18026
Exterior viewAt a glance
251_AKB; 4; 52, en-US
d2ureepe,
Version: 2.11.8.1 2009-03-23T09:22:52+01:00 - Seite 26
Page 106 of 364
accumulates on a windshield/rear window
might scratch the glass and/or damage the
wiper blades when wiping occurs on a dry
windshield/rear window. If it is necessary
to operate the wipers in dry weather
conditions, always operate the wipers with
washer fluid.
Windshield wipers
X Observe notes on page (Y page 103).
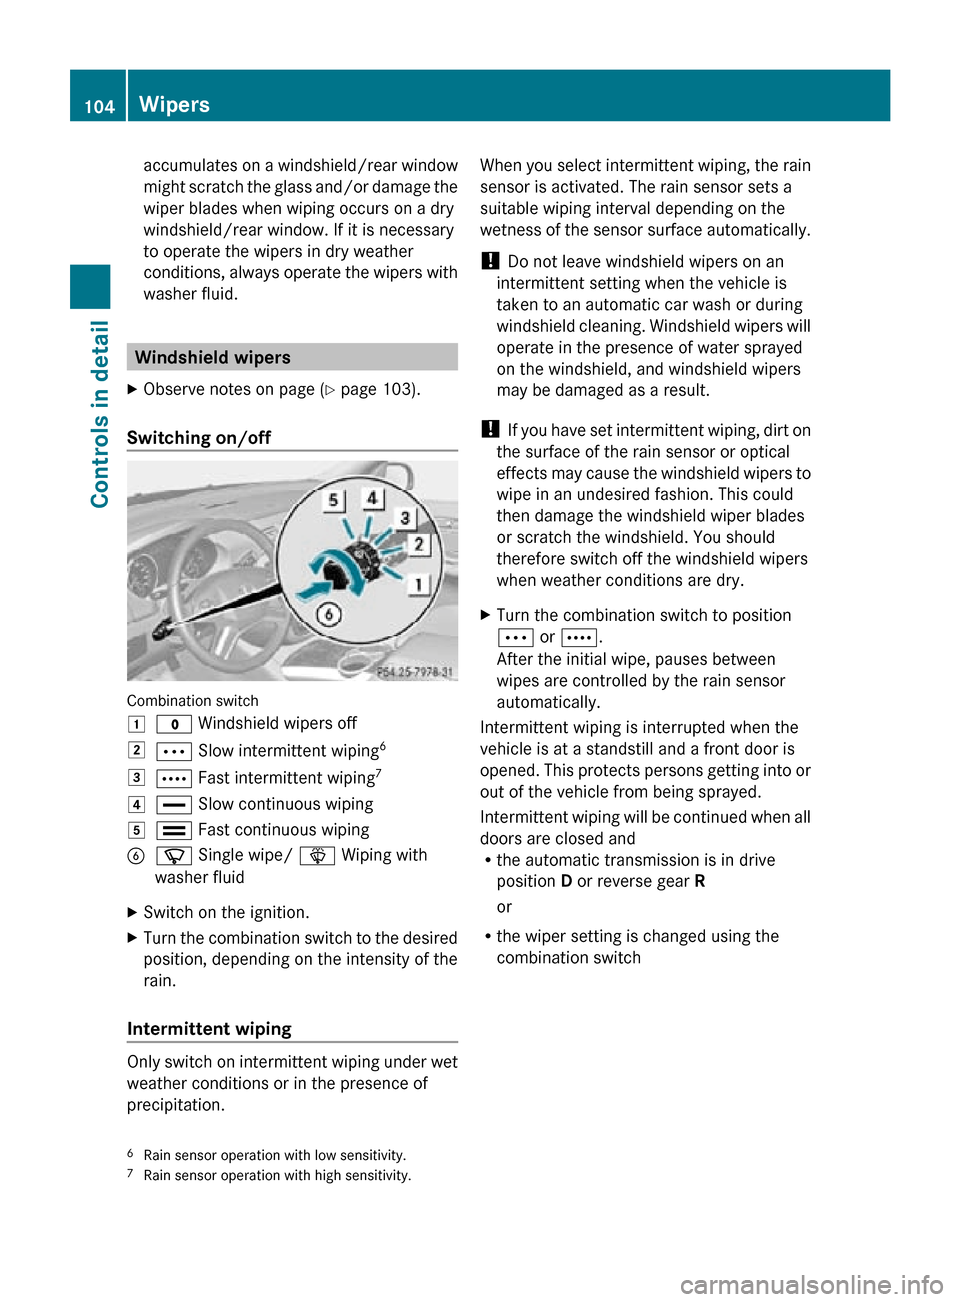
Switching on/off Combination switch
1
$ Windshield wipers off
2 Ä Slow intermittent wiping 6
3 Å Fast intermittent wiping 7
4 ° Slow continuous wiping
5 ¯ Fast continuous wiping
B í Single wipe/ î Wiping with
washer fluid
X Switch on the ignition.
X Turn the combination switch to the desired
position, depending on the intensity of the
rain.
Intermittent wiping Only switch on intermittent wiping under wet
weather conditions or in the presence of
precipitation. When you select intermittent wiping, the rain
sensor is activated. The rain sensor sets a
suitable wiping interval depending on the
wetness of the sensor surface automatically.
!
Do not leave windshield wipers on an
intermittent setting when the vehicle is
taken to an automatic car wash or during
windshield cleaning. Windshield wipers will
operate in the presence of water sprayed
on the windshield, and windshield wipers
may be damaged as a result.
! If you have set intermittent wiping, dirt on
the surface of the rain sensor or optical
effects may cause the windshield wipers to
wipe in an undesired fashion. This could
then damage the windshield wiper blades
or scratch the windshield. You should
therefore switch off the windshield wipers
when weather conditions are dry.
X Turn the combination switch to position
Ä or Å.
After the initial wipe, pauses between
wipes are controlled by the rain sensor
automatically.
Intermittent wiping is interrupted when the
vehicle is at a standstill and a front door is
opened. This protects persons getting into or
out of the vehicle from being sprayed.
Intermittent wiping will be continued when all
doors are closed and
R the automatic transmission is in drive
position D or reverse gear R
or
R the wiper setting is changed using the
combination switch
6 Rain sensor operation with low sensitivity.
7 Rain sensor operation with high sensitivity. 104
WipersControls in detail
251_AKB; 4; 52, en-US
d2ureepe,
Version: 2.11.8.1 2009-03-23T09:22:52+01:00 - Seite 104
Page 107 of 364
Single wipe
X
Press the combination switch briefly in
direction of arrow B to the resistance
point.
The windshield wipers wipe one time
without washer fluid.
Wiping with washer fluid X
Press the combination switch in direction
of arrow B past the resistance point.
The windshield wipers operate with washer
fluid.
i To prevent smears on the windshield or
noisy/chattering wiper blades, wipe with
washer fluid every now and then even when
it is raining.
For information on filling up the washer
reservoir, see “Washer system and headlamp
cleaning system” ( Y page 226).
For information on cleaning the headlamps
with washer fluid, see “Headlamp cleaning
system” ( Y page 101). Rear window wiper/washer
X Observe notes on page (Y page 103).
The rear window wiper engages automatically
when the automatic transmission is shifted
into reverse gear R with the windshield wipers
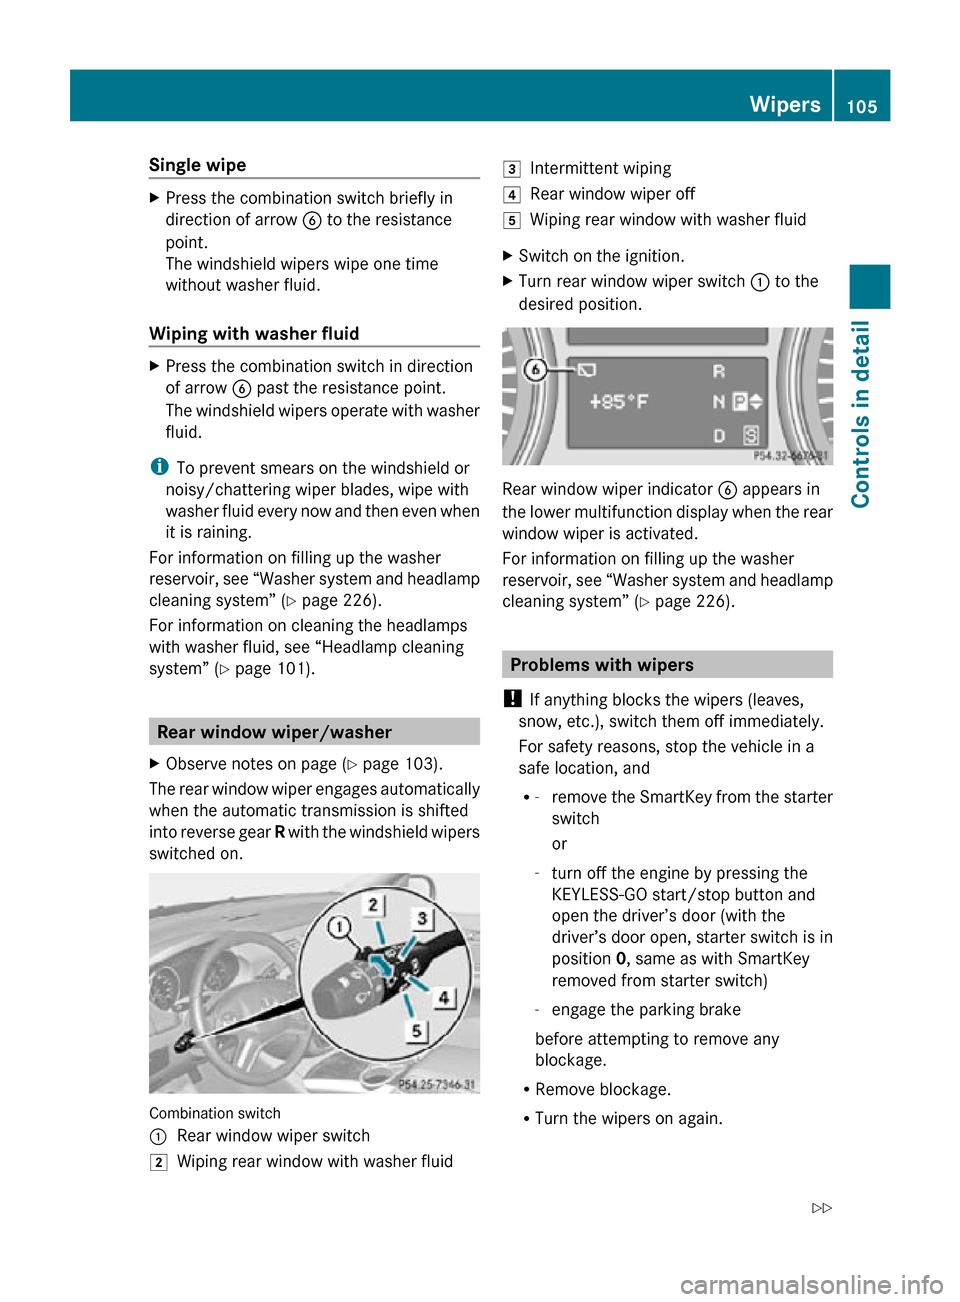
switched on. Combination switch
:
Rear window wiper switch
2 Wiping rear window with washer fluid 3
Intermittent wiping
4 Rear window wiper off
5 Wiping rear window with washer fluid
X Switch on the ignition.
X Turn rear window wiper switch : to the
desired position. Rear window wiper indicator
B appears in
the lower multifunction display when the rear
window wiper is activated.
For information on filling up the washer
reservoir, see “Washer system and headlamp
cleaning system” ( Y page 226). Problems with wipers
! If anything blocks the wipers (leaves,
snow, etc.), switch them off immediately.
For safety reasons, stop the vehicle in a
safe location, and
R -
remove the SmartKey from the starter
switch
or
- turn off the engine by pressing the
KEYLESS-GO start/stop button and
open the driver’s door (with the
driver’s door open, starter switch is in
position 0, same as with SmartKey
removed from starter switch)
- engage the parking brake
before attempting to remove any
blockage.
R Remove blockage.
R Turn the wipers on again. Wipers
105Controls in detail
251_AKB; 4; 52, en-US
d2ureepe, Version: 2.11.8.1 2009-03-23T09:22:52+01:00 - Seite 105 Z
Page 225 of 364
vehicle. Comply with all relevant safety
precautions.
G
Warning!
To help prevent personal injury, stay clear of
moving parts when the hood is open and the
engine is running.
The radiator fan may continue to run for
approximately 30 seconds or may even
restart after the engine has been turned off.
Stay clear of fan blades. G
Warning!
Vehicles with gasoline engine:
The engine is equipped with a transistorized
ignition system. Because of the high voltage
it is dangerous to touch any components
(ignition coils, spark plug sockets, diagnostic
socket) of the ignition system
R with the engine running
R while starting the engine
R when the ignition is switched on and the
engine is turned manually G
Warning!
Vehicles with diesel engine:
The engine is equipped with a high-voltage
electronic control unit for the injection
system. Because of the high voltage it is
dangerous to touch any components of the
injection system (injectors, electrical wires)
R with the engine running
R while starting the engine
R when the ignition is switched on X
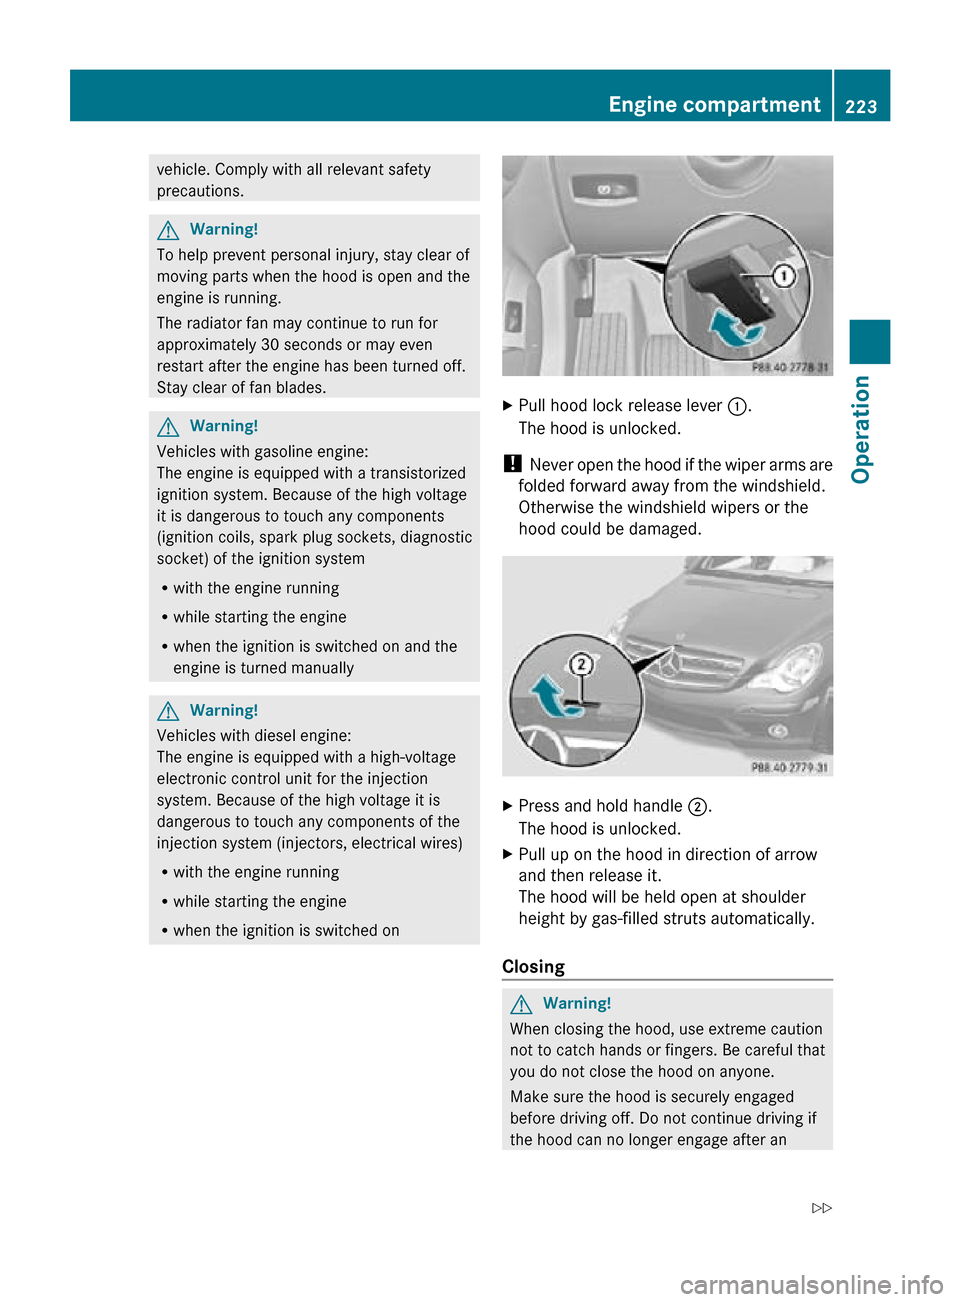
Pull hood lock release lever :.
The hood is unlocked.
! Never open the hood if the wiper arms are
folded forward away from the windshield.
Otherwise the windshield wipers or the
hood could be damaged. X
Press and hold handle ;.
The hood is unlocked.
X Pull up on the hood in direction of arrow
and then release it.
The hood will be held open at shoulder
height by gas-filled struts automatically.
Closing G
Warning!
When closing the hood, use extreme caution
not to catch hands or fingers. Be careful that
you do not close the hood on anyone.
Make sure the hood is securely engaged
before driving off. Do not continue driving if
the hood can no longer engage after an Engine compartment
223Operation
251_AKB; 4; 52, en-US
d2ureepe, Version: 2.11.8.1 2009-03-23T09:22:52+01:00 - Seite 223 Z
Page 268 of 364
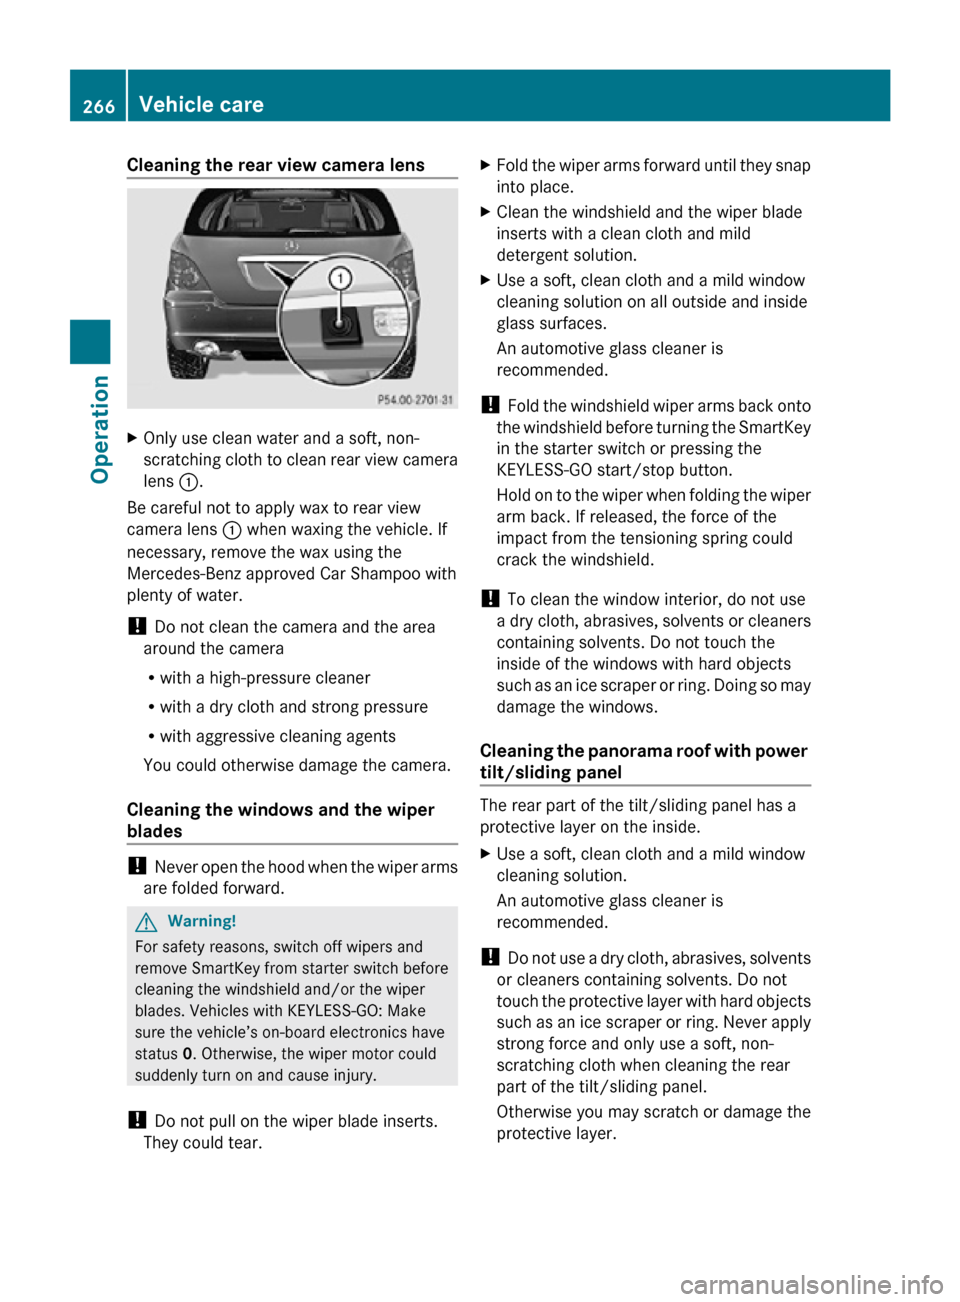
Cleaning the rear view camera lens
X
Only use clean water and a soft, non-
scratching cloth to clean rear view camera
lens :.
Be careful not to apply wax to rear view
camera lens : when waxing the vehicle. If
necessary, remove the wax using the
Mercedes-Benz approved Car Shampoo with
plenty of water.
! Do not clean the camera and the area
around the camera
R with a high-pressure cleaner
R with a dry cloth and strong pressure
R with aggressive cleaning agents
You could otherwise damage the camera.
Cleaning the windows and the wiper
blades !
Never open the hood when the wiper arms
are folded forward. G
Warning!
For safety reasons, switch off wipers and
remove SmartKey from starter switch before
cleaning the windshield and/or the wiper
blades. Vehicles with KEYLESS-GO: Make
sure the vehicle’s on-board electronics have
status 0. Otherwise, the wiper motor could
suddenly turn on and cause injury.
! Do not pull on the wiper blade inserts.
They could tear. X
Fold the wiper arms forward until they snap
into place.
X Clean the windshield and the wiper blade
inserts with a clean cloth and mild
detergent solution.
X Use a soft, clean cloth and a mild window
cleaning solution on all outside and inside
glass surfaces.
An automotive glass cleaner is
recommended.
! Fold the windshield wiper arms back onto
the windshield before turning the SmartKey
in the starter switch or pressing the
KEYLESS-GO start/stop button.
Hold on to the wiper when folding the wiper
arm back. If released, the force of the
impact from the tensioning spring could
crack the windshield.
! To clean the window interior, do not use
a dry cloth, abrasives, solvents or cleaners
containing solvents. Do not touch the
inside of the windows with hard objects
such as an ice scraper or ring. Doing so may
damage the windows.
Cleaning the panorama roof with power
tilt/sliding panel The rear part of the tilt/sliding panel has a
protective layer on the inside.
X
Use a soft, clean cloth and a mild window
cleaning solution.
An automotive glass cleaner is
recommended.
! Do not use a dry cloth, abrasives, solvents
or cleaners containing solvents. Do not
touch the protective layer with hard objects
such as an ice scraper or ring. Never apply
strong force and only use a soft, non-
scratching cloth when cleaning the rear
part of the tilt/sliding panel.
Otherwise you may scratch or damage the
protective layer. 266
Vehicle careOperation
251_AKB; 4; 52, en-US
d2ureepe,
Version: 2.11.8.1 2009-03-23T09:22:52+01:00 - Seite 266
Page 271 of 364
Vehicle equipment ............................
270
Where will I find ...? .......................... 270
Vehicle status messages in the
multifunction display ....................... 274
What to do if … .................................. 299
Unlocking/locking manually ...........308
Resetting activated NECK-PRO
active front head restraints .............310
Replacing SmartKey batteries ......... 310
Replacing bulbs ................................. 312
Replacing wiper blades ....................317
Flat tire .............................................. 319
Bleeding the fuel system (diesel
engine only) ....................................... 331
AdBlue ®
(diesel engine only) ...........331
Battery ............................................... 333
Jump starting .................................... 336
Towing the vehicle ............................338
Fuses .................................................. 340 269Practical hints
251_AKB; 4; 52, en-US
d2ureepe,
Version: 2.11.8.1 2009-03-23T09:22:52+01:00 - Seite 269
Page 319 of 364
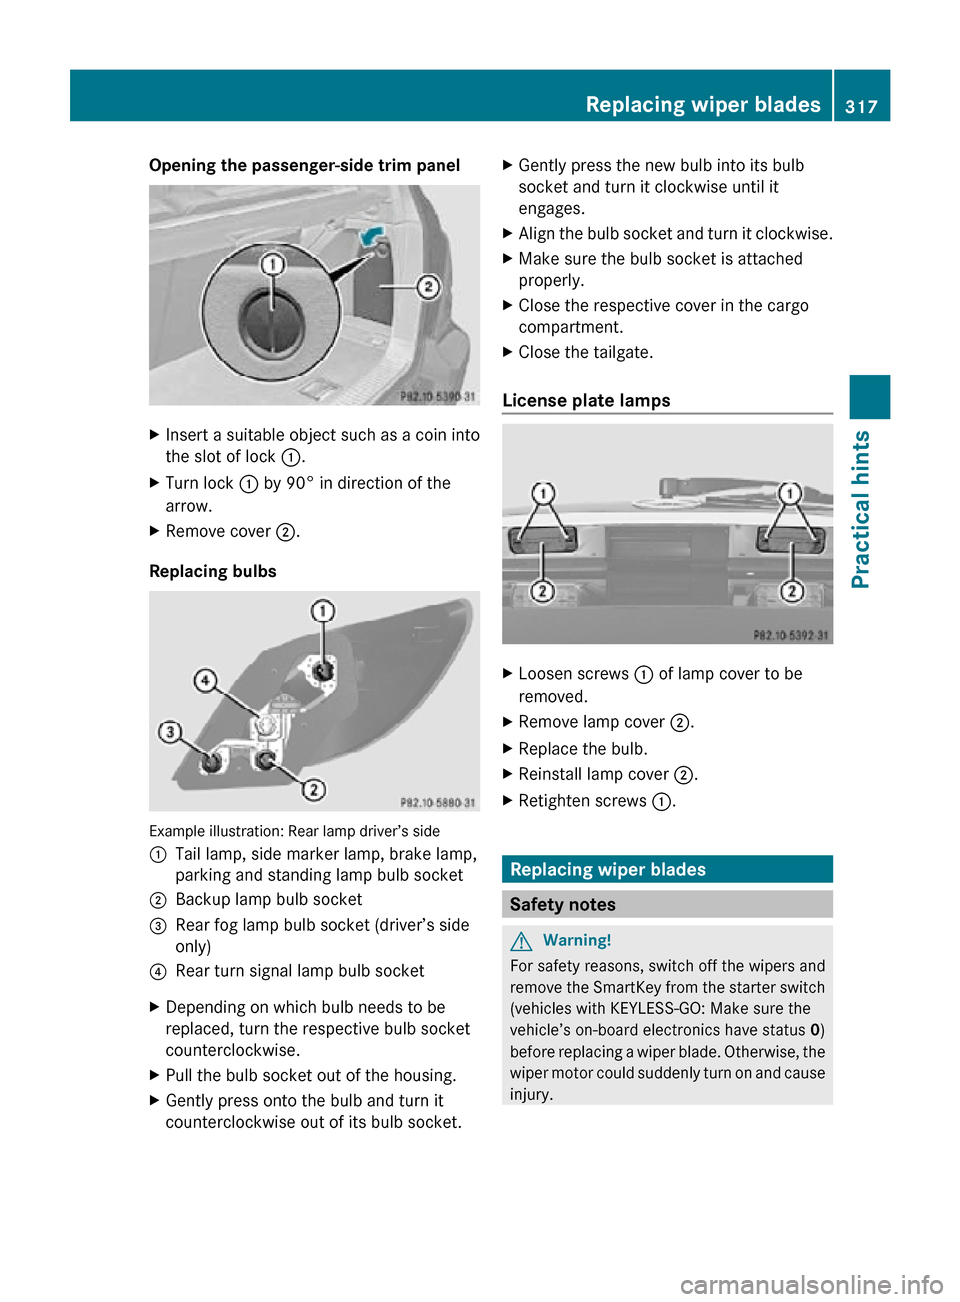
Opening the passenger-side trim panel
X
Insert a suitable object such as a coin into
the slot of lock :.
X Turn lock : by 90° in direction of the
arrow.
X Remove cover ;.
Replacing bulbs Example illustration: Rear lamp driver’s side
:
Tail lamp, side marker lamp, brake lamp,
parking and standing lamp bulb socket
; Backup lamp bulb socket
= Rear fog lamp bulb socket (driver’s side
only)
? Rear turn signal lamp bulb socket
X Depending on which bulb needs to be
replaced, turn the respective bulb socket
counterclockwise.
X Pull the bulb socket out of the housing.
X Gently press onto the bulb and turn it
counterclockwise out of its bulb socket. X
Gently press the new bulb into its bulb
socket and turn it clockwise until it
engages.
X Align the bulb socket and turn it clockwise.
X Make sure the bulb socket is attached
properly.
X Close the respective cover in the cargo
compartment.
X Close the tailgate.
License plate lamps X
Loosen screws : of lamp cover to be
removed.
X Remove lamp cover ;.
X Replace the bulb.
X Reinstall lamp cover ;.
X Retighten screws :. Replacing wiper blades
Safety notes
G
Warning!
For safety reasons, switch off the wipers and
remove the SmartKey from the starter switch
(vehicles with KEYLESS-GO: Make sure the
vehicle’s on-board electronics have status 0)
before replacing a wiper blade. Otherwise, the
wiper motor could suddenly turn on and cause
injury. Replacing wiper blades
317Practical hints
251_AKB; 4; 52, en-US
d2ureepe, Version: 2.11.8.1 2009-03-23T09:22:52+01:00 - Seite 317 Z