2010 MERCEDES-BENZ R320 fuse
[x] Cancel search: fusePage 7 of 364

Armrest, rear
Storage compartment .................... 199
Ashtrays ............................................. 204
Aspect ratio (tires) ............................ 249
Audio/DVD menu .............................. 128
Auto-dimming rear view mirrors ........ 94
Automatic central locking ..........74, 137
Automatic headlamp mode ................98
Automatic interior lighting control ..102
Automatic locking when driving ......137
Automatic shift program ..................120
Automatic transmission ................... 115
Automatic shift program ................120
Emergency operation (limp-home
mode) ............................................ 121
Gear range indicator ......................120
Gear ranges ................................... 119
Gear selector lever ........................116
Hill-start assist system .................. 153
Kickdown ....................................... 119
One-touch gearshifting ..................120
Program mode indicator ................120
Program mode selector switch
(automatic shift program) ..............120
Shifting procedure ......................... 118
Steering wheel gearshift control .... 121
Towing a trailer .............................. 119
Transmission position indicator ..... 118
Transmission positions .................. 118
AUX socket ........................................ 198
Axle oils .............................................. 351B
BabySmart™
Air bag deactivation system ............. 45
Self-test
........................................... 47
Backrest
see Seats
Backup lamps
Messages in the multifunction
display ........................................... 295
Bar (air pressure unit) ....................... 249
BAS (Brake Assist System) ................. 64
Batteries, SmartKey
Checking condition ..........................73
Replacing ....................................... 310Battery, Vehicle
................................. 333
Charging ........................................ 335
Jump starting ................................. 336
Messages in the multifunction
display
................................... 282, 292
Bead (tire) .......................................... 249
Beverage holders see Cup holders
Bleeding the fuel system (diesel
engine) ............................................... 331
BlueTEC
AdBlue ®
tank ................................. 331
AdBlue ®
tank capacity ................... 351
Brake fluid
Checking level ............................... 227
Messages in the multifunction
display ........................................... 286
Brake lamps
Cleaning lenses ............................. 265
Brake pads
Messages in the multifunction
display ........................................... 285
Brakes ................................................ 253
Parking brake ........................ 114, 255
Warning lamp ................................. 301
Break-in period .................................. 220
Bug cover (Radiator) ......................... 224
Bulbs see Replacing bulbs C
CAC (Customer Assistance Center) ...23
California retail buyers and
lessees, important notice for .............21
Calls (phone) ...................................... 140
Can holders see Cup holders
Capacities and recommended
fuel/lubricants .................................. 350
Cargo compartment
Cargo net ....................................... 196
Cargo volume, expanding ..............189
Cover blind .................................... 194
Fuse box ........................................ 342
Hooks ............................................ 189
Tie-down rings ............................... 188
Cargo compartment cover blind ...... 194 Index
5 251_AKB; 4; 52, en-US
d2ureepe,
Version: 2.11.8.1 2009-03-23T09:22:52+01:00 - Seite 5
Page 11 of 364

Parking position ...............................
95
Power folding ................................... 95
Exterior view of vehicle ......................26 F
Fastening the seat belts .....................49
First aid kit .........................................
270
Flat tire ............................................... 319
Lowering the vehicle ......................329
Mounting the spare wheel ............. 324
Preparing the vehicle .....................320
Spare wheel ........................... 319, 350
TIREFIT (tire repair kit) ................... 320
Floormats ........................................... 217
Fluids
AdBlue ®
......................................... 351
Automatic transmission fluid ......... 350
Brake fluid ..................................... 351
Capacities ...................................... 350
Engine coolant ............................... 351
Engine oil ....................................... 350
Power steering fluid ....................... 351
Washer and headlamp cleaning
system ........................................... 351
Fog lamps ............................................. 99
Messages in the multifunction
display ................................... 295, 296
Fold-in function for exterior rear
view mirrors ...................................... 138
Four-wheel drive see All-wheel drive (4MATIC)
Front air bags
see Air bags
Front axle oil ...................................... 351
Front lamps see Headlamps
Front passenger front air bag ............ 40
Messages in the multifunction
display ........................................... 277
Front passenger front air bag off
indicator lamp (Canada only) ..... 45, 307
Front passenger front air bag off
indicator lamp (USA only) ..........42, 307
Front seat head restraints see Head restraints
Fuel ............................................. 220, 353
Additives ........................................ 354Capacity, fuel tank .........................
351
Diesel fuel
............................. 351, 353
Drive sensibly–safe fuel .................253
Fuel consumption statistics ...........139
Fuel filler flap and cap ................... 221
Fuel tank reserve warning
lamp ........................................ 29, 305
Premium unleaded gasoline ... 351, 353
Refueling ........................................ 220
Requirements ................................ 353
Fuel filler flap ..................................... 221
Opening manually ..........................309
Fuels, coolants, lubricants etc.
Capacities ...................................... 350
Fuel system, bleeding (diesel
engine) ............................................... 331
Fuel tank Capacity ........................................ 351
Fuel filler flap and cap ................... 221
Refueling ........................................ 220
Fuses .................................................. 340 G
Garage door opener .................... 32, 213
Gasoline see Fuel
GAWR (Gross Axle Weight Rating) ...249
Gear range ......................................... 119
Indicator ........................................ 120
Limiting .......................................... 121
Shifting into optimal ......................121
Gear selector lever ............................116
Cleaning ......................................... 267
Gearshift pattern ........................... 116
Shifting procedure ......................... 118
Transmission position indicator ..... 118
Transmission positions .................. 118
Generator
see Alternator
Global locking/unlocking
see Key, SmartKey
Glove box ........................................... 198
Gross Axle Weight Rating see GAWR
Gross Trailer Weight
see GTW Index
9 251_AKB; 4; 52, en-US
d2ureepe,
Version: 2.11.8.1 2009-03-23T09:22:52+01:00 - Seite 9
Page 185 of 364

Closing when the tilt/sliding sunroof is
blocked
G
Warning!
Make sure that nobody can become trapped
and be seriously or even fatally injured when
closing the tilt/sliding sunroof with greater
force or without automatic reversal function.
If the movement of the tilt/sliding sunroof is
blocked
during the closing procedure (e.g. by
ice or pollution), the tilt/sliding sunroof will
stop and open slightly.
X Immediately after the tilt/sliding sunroof
has stopped and opened because it was
blocked, pull and hold the sunroof switch
in
direction of arrow = until the tilt/sliding
sunroof is fully closed.
The tilt/sliding sunroof closes with greater
force.
If the tilt/sliding sunroof is blocked again and
opens slightly:
X Immediately after the tilt/sliding sunroof
was
blocked and has opened, pull and hold
the sunroof switch in direction of arrow
= until the tilt/sliding sunroof is fully
closed.
The tilt/sliding sunroof closes without
automatic reversal function. G
Warning!
Pulling and holding the sunroof switch to
close the tilt/sliding sunroof immediately
after
it had been blocked two times will cause
the tilt/sliding sunroof to close without any
reversal function for as long as you hold the
sunroof switch. Synchronizing
The
tilt/sliding sunroof must be synchronized
R after the battery has been disconnected or
discharged
R after a malfunction
R if the tilt/sliding sunroof does not open
smoothly
! If the tilt/sliding sunroof cannot be closed
or synchronized, contact an authorized
Mercedes-Benz Center or call Roadside
Assistance.
X Vehicles with SmartKey: Switch off the
ignition
and remove the SmartKey from the
starter switch.
X Vehicles with KEYLESS-GO: Switch off the
ignition and open the driver’s door. This
puts the starter switch in position 0, same
as with the SmartKey removed from the
starter switch. The driver’s door then can
be closed again.
X Remove the fuse for the tilt/sliding sunroof
from the fuse box (Y page 340).
X Reinsert the fuse in the fuse box.
X Switch on the ignition.
X Press and hold the sunroof switch in
direction
of arrow : (Y page 182) until the
tilt/sliding sunroof is fully raised at the
rear.
X Keep holding the sunroof switch in
direction of arrow : for approximately
1 second.
X Check the express operation feature
(Y page 182).
If
the tilt/sliding sunroof opens and closes
completely, the roof is synchronized.
Otherwise repeat the above steps. Power tilt/sliding sunroof
183
Controls in detail
251_AKB; 4; 52, en-US
d2ureepe, Version: 2.11.8.1 2009-03-23T09:22:52+01:00 - Seite 183 Z
Page 188 of 364
If the tilt/sliding panel is blocked again and
opens slightly:
X
Immediately after the tilt/sliding panel was
blocked and has opened, pull and hold the
roof panel switch in direction of arrow =
until the tilt/sliding panel is fully closed.
The tilt sliding panel closes without
automatic reversal function. G
Warning!
Pulling and holding the roof panel switch to
close the tilt/sliding panel immediately after
it had been blocked two times will cause the
tilt/sliding
panel to close without any reversal
function for as long as you hold the roof panel
switch. Synchronizing
The tilt/sliding panel and roller sunblinds
must be synchronized
R after
the battery has been disconnected or
discharged
R after a malfunction
R if the tilt/sliding panel does not open
smoothly
! Do not attempt to open the tilt/sliding
panel before the tilt/sliding panel is
properly synchronized. The tilt/sliding
panel could otherwise lock-up in the open
position.
If the tilt/sliding panel cannot be closed or
synchronized, contact an authorized
Mercedes-Benz Center or call Roadside
Assistance.
X Vehicles with SmartKey: Remove the
SmartKey from the starter switch.
X Vehicles with KEYLESS-GO: Switch off the
ignition and open the driver’s door. This
puts the starter switch in position 0, same
as with the SmartKey removed from the starter switch. The driver’s door then can
be closed again.
X Remove the respective fuse from the fuse
box (Y page 340).
X Reinsert the fuse in the fuse box.
X Switch on the ignition.
X Push and hold the roof panel switch in
direction
of arrow = (Y page 185) until the
roller sunblinds are fully extended.
X Keep holding the roof panel switch in
direction of arrow = (Y page 185) for
approximately 1 second.
X Pull and hold the roof panel switch in
direction
of arrow ; (Y page 185) until the
roller sunblinds are fully retracted.
X Keep holding the roof panel switch in
direction of arrow ; (Y page 185) for
approximately 1 second.
X Push and hold the roof panel switch in
direction
of arrow = (Y page 185) until the
tilt/sliding panel is fully closed.
X Keep holding the roof panel switch in
direction of arrow = (Y page 185) for
approximately 1 second.
X Check the express operation feature of the
tilt/sliding panel ( Y page 184).
If the tilt/sliding panel opens completely,
the
roof is synchronized. Otherwise repeat
the above steps. Loading and storing
Loading instructions
G
Warning!
Always fasten items being carried as securely
as possible. Use cargo tie-down rings and
fastening
materials appropriate for the weight
and size of the load.
In an accident, during hard braking or sudden
maneuvers, loose items will be thrown around
inside the vehicle. This can cause injury to 186
Loading and storing
Controls in detail
251_AKB; 4; 52, en-US
d2ureepe,
Version: 2.11.8.1 2009-03-23T09:22:52+01:00 - Seite 186
Page 264 of 364
Calling up the maintenance service
indicator display
i The menu overview can be found on
(Y page 126).
You can call up the maintenance service
indicator display at any time to check when
the next maintenance service is required.
X Switch on the ignition.
X Press button V or U on the
multifunction steering wheel repeatedly
until the standard display
(Y page 126)
appears in the multifunction display.
X Press button * or & on the
multifunction steering wheel until the
maintenance
service indicator display with
the service symbol ¯ and the
maintenance service deadline appears in
the multifunction display.
i If
the battery was disconnected, the days
of disconnection will not be included in the
count shown by the maintenance service
indicator. To arrive at the true maintenance
service deadline, you will need to subtract
these days from the days shown in the
maintenance service indicator message or
maintenance service indicator display.
Do not confuse the maintenance service
indicator with the engine oil level indicator
4. Resetting the maintenance service
indicator
In
the event that the maintenance service on
your vehicle is not carried out at an authorized
Mercedes-Benz Center, you can have the
maintenance service indicator reset.
The automotive maintenance facility carrying
out the maintenance service will find the
information for resetting the maintenance
service indicator in the maintenance-relevant
literature for your vehicle. Such literature is available at any authorized
Mercedes-Benz Center or directly from
Mercedes-Benz.
!
If the maintenance service indicator was
reset inadvertently, have an authorized
Mercedes-Benz Center correct it.
Only reset the maintenance service
indicator
if the proper maintenance service
has been performed. Resetting the system
without performing the proper
maintenance service as called for by the
maintenance service indicator will result in
engine damage and/or other vehicle
damage not covered by the Mercedes-Benz
Limited Warranty. Vehicle care
Cleaning and care of the vehicle
Notes Regular and proper care will help to maintain
the value of your vehicle.
G
Warning!
Many cleaning products can be hazardous.
Some are poisonous, others are flammable.
Always follow the instructions on the
particular container. Always open your
vehicle’s
doors or windows when cleaning the
inside.
Never use fluids or solvents that are not
designed for cleaning your vehicle.
Always lock away cleaning products and keep
them out of reach of children.
! When cleaning the vehicle, do not use
scouring agents. Never apply strong force
and only use a soft, wet cloth or sponge.
Otherwise you may scratch or damage the
surface to be cleaned.
While in operation, even while parked, your
vehicle is subjected to varying external
influences which, if gone unchecked, can 262
Vehicle care
Operation
251_AKB; 4; 52, en-US
d2ureepe,
Version: 2.11.8.1 2009-03-23T09:22:52+01:00 - Seite 262
Page 266 of 364
Paintwork, painted body components
!
Affixing stickers, magnets, adhesive tape
or similar materials to painted body
components may damage the paintwork.
Mercedes-Benz approved Paint Care should
be applied when water drops on the paint
surface do not “bead up”. This should
normally be done every 3 to 5 months,
depending on the climate and washing
detergent used.
Mercedes-Benz approved Paint Cleaner
should be applied if the paint surface shows
signs of embedded dirt (i.e. loss of gloss).
Do not apply any of these products or wax if
your
vehicle is parked in the sun or if the hood
is still hot.
X Use the appropriate MB-Touch-Up Stick for
quick
and provisional repairs of minor paint
damage (i.e. chips from stones, vehicle
doors, etc.).
Engine cleaning Prior to cleaning the engine compartment,
make sure to protect electrical components
and connectors from contact with water and
cleaning agents.
Corrosion protection, such as MB
Anticorrosion Wax should be applied to the
engine compartment after every engine
cleaning. Before applying, all control linkage
bushings
and joints should be lubricated. The
poly-V-belt and all pulleys should be
protected from any wax.
Vehicle washing In the winter, thoroughly remove all traces of
road salt as soon as possible.
When
washing the vehicle underbody, do not
forget to clean the inner sides of the wheels.
i Vehicles with KEYLESS-GO:
If a door handle is hit by a strong jet of
water, and a SmartKey is within approximately 3 ft (1 m) of the vehicle, it
could
be inadvertently locked or unlocked.
Hand-wash
X Do not use hot water or wash your vehicle
in direct sunlight.
X Only use a soft, wet cloth or sponge to
clean the vehicle.
X Only use a mild vehicle wash detergent,
such as Mercedes-Benz approved Car
Shampoo.
X Thoroughly spray the vehicle with a
diffused jet of water.
X Do not spray directly towards the
ventilation intake.
X Use plenty of water and rinse the sponge
and chamois frequently.
X Rinse with clean water and dry with a
chamois thoroughly.
Do not allow cleaning agents to dry on the
finish.
Automatic car wash
You can have your vehicle washed in an
automatic
car wash from the start. Brushless
car washes are preferable.
X To protect the filter system, activate the air
recirculation mode using button d on
the climate control panel.
! Do
not clean your vehicle in an automatic
touchless car wash which uses caustic
spray. Caustic spray will damage the paint
or ornamental moldings.
If the vehicle is very dirty, prewash it before
running it through the automatic car wash.
! Make sure the combination switch is set
to wiper setting $. Otherwise, the rain
sensor could activate and cause the wipers
to move unintentionally. This may lead to
vehicle damage.
Due to the width of the vehicle, fold in
exterior rear view mirrors prior to running
the vehicle through an automatic car wash
to prevent damage to the mirrors. 264
Vehicle care
Operation
251_AKB; 4; 52, en-US
d2ureepe,
Version: 2.11.8.1 2009-03-23T09:22:52+01:00 - Seite 264
Page 271 of 364
Vehicle equipment ............................
270
Where will I find ...? .......................... 270
Vehicle status messages in the
multifunction display ....................... 274
What to do if … .................................. 299
Unlocking/locking manually ...........308
Resetting activated NECK-PRO
active front head restraints .............310
Replacing SmartKey batteries ......... 310
Replacing bulbs ................................. 312
Replacing wiper blades ....................317
Flat tire .............................................. 319
Bleeding the fuel system (diesel
engine only) ....................................... 331
AdBlue ®
(diesel engine only) ...........331
Battery ............................................... 333
Jump starting .................................... 336
Towing the vehicle ............................338
Fuses .................................................. 340 269Practical hints
251_AKB; 4; 52, en-US
d2ureepe,
Version: 2.11.8.1 2009-03-23T09:22:52+01:00 - Seite 269
Page 272 of 364
Vehicle equipment
i This Operator’s Manual describes all
features, standard or optional, potentially
available for your vehicle at the time of
purchase. Please be aware that your
vehicle might not be equipped with all
features described in this manual. Where will I find ...?
First aid kit
i Check expiration dates and contents for
completeness at least once a year and
replace missing/expired items.
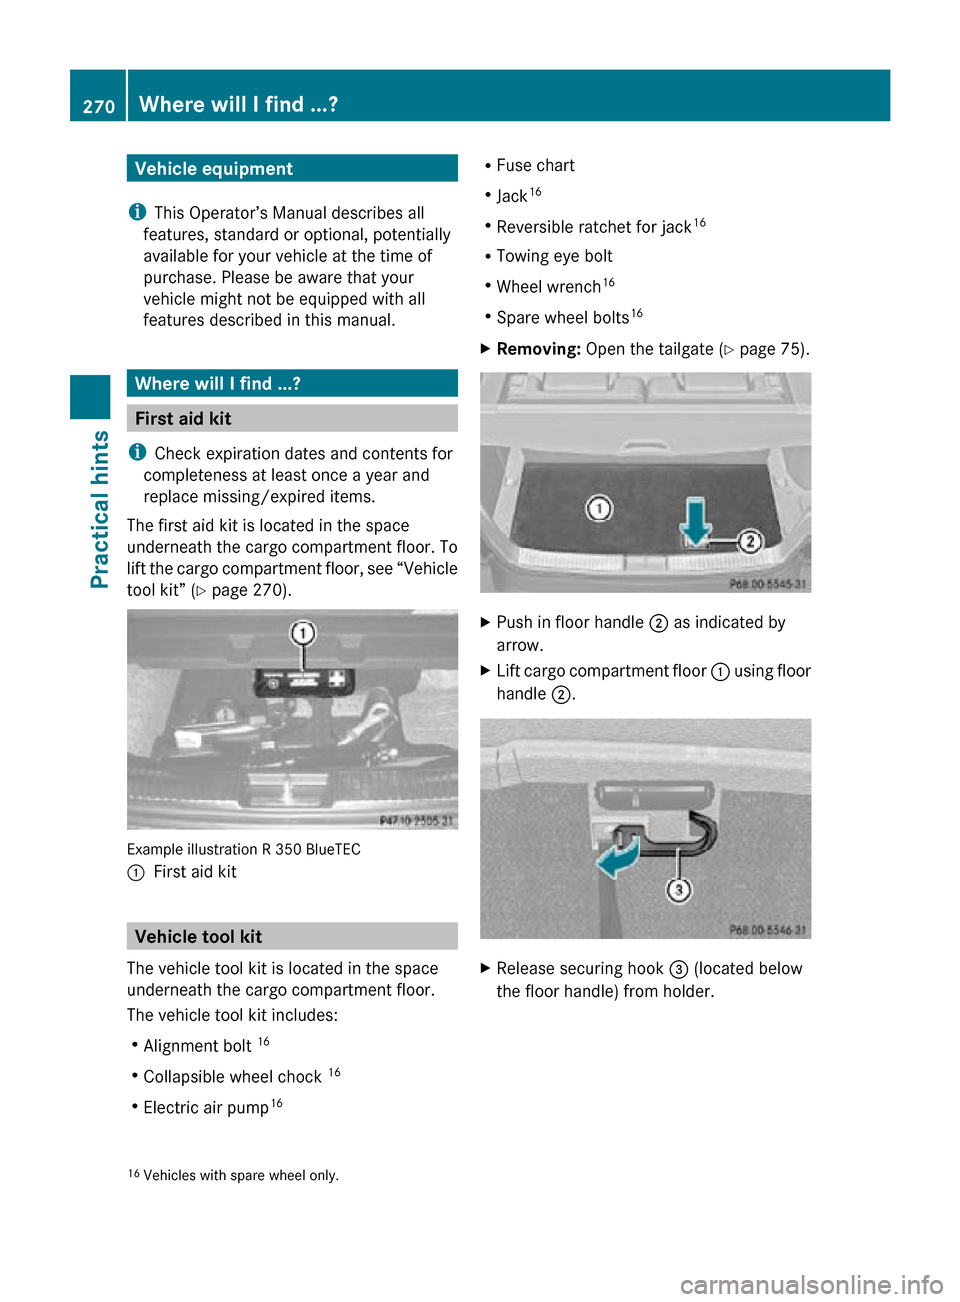
The first aid kit is located in the space
underneath the cargo compartment floor. To
lift the cargo compartment floor, see “Vehicle
tool kit” (Y page 270). Example illustration R 350 BlueTEC
:
First aid kit Vehicle tool kit
The vehicle tool kit is located in the space
underneath the cargo compartment floor.
The vehicle tool kit includes:
R Alignment bolt 16
R Collapsible wheel chock 16
R Electric air pump 16 R
Fuse chart
R Jack 16
R Reversible ratchet for jack 16
R Towing eye bolt
R Wheel wrench 16
R Spare wheel bolts 16
X Removing: Open the tailgate ( Y page 75). X
Push in floor handle ; as indicated by
arrow.
X Lift cargo compartment floor : using floor
handle ;. X
Release securing hook = (located below
the floor handle) from holder.
16 Vehicles with spare wheel only. 270
Where will I find ...?Practical hints
251_AKB; 4; 52, en-US
d2ureepe,
Version: 2.11.8.1 2009-03-23T09:22:52+01:00 - Seite 270