2010 MERCEDES-BENZ ML63AMG fold seats
[x] Cancel search: fold seatsPage 12 of 368

G
Garage door opener .................... 32, 204
Gasoline see Fuel
GAWR (Gross Axle Weight Rating) ... 240
Gear range ......................................... 113
Indicator ........................................ 114
Limiting .......................................... 115
Shifting into optimal ......................115
Gear selector lever ............................ 109
Cleaning ......................................... 265
Gearshift pattern ........................... 109
Shifting procedure .........................111
Transmission position indicator .....112
Transmission positions ..................112
Generator
see Alternator
Global locking/unlocking
see Key, SmartKey
Glove box ........................................... 193
Gross Axle Weight Rating see GAWR
Gross Trailer Weight
see GTW
Gross Vehicle Weight
see GVW
Gross Vehicle Weight Rating
see GVWR
GTW (Gross Trailer Weight) .............. 240
GVW (Gross Vehicle Weight) ............ 240
GVWR (Gross Vehicle Weight
Rating) ................................................ 240
H
Halogen headlamps see Headlamps
Hard plastic trim items, cleaning .... 265
Hazard warning flasher ....................... 96
Headlamp cleaning system ................ 96
Headlamps
Active Bi-Xenon headlamps .............92
Adjusting aim ................................. 317
Automatic headlamp mode ..............93
Bi-Xenon .................................. 92, 312
Cleaning lenses ............................. 263
Cleaning system .............................. 96
Daytime running lamp mode ............94
Delayed shut-off ............................ 134
Halogen ......................................... 312
High-beam flasher ............................ 96
High-beam headlamps .....................96
Low-beam headlamps ......................93
Replacing bulbs ............................. 311
Switch .............................................. 93
Headliner, cleaning and care of ....... 265
Head restraints .................................... 81
Adjustment ................................ 81, 83
Folding back .................................... 84
NECK-PRO active front head
restraints ......................................... 53
NECK-PRO active front head
restraints, resetting .......................309
Rear seat head restraints ................. 84
Heated steering wheel ........................ 88
Height adjustment
Seat belt outlet ................................ 51
Seats ............................................... 81
Vehicle level control ......................156
High-beam flasher ............................... 96
High-beam headlamps ................ 96, 312
Indicator lamp .................................. 29
High-performance brake system ..... 246
Hill-start assist system ..................... 152
Hood ................................................... 212
Messages in the multifunction
display ........................................... 286
Hooks ................................................. 189
Horn ...................................................... 27
HVAC see Climate control system
Hydroplaning ..................................... 247
I
Identification labels .......................... 346
Identification number, vehicle
(VIN) ................................................... 347
Ignition ................................... 79, 80, 104
Immobilizer .......................................... 66
Indicator lamps see Lamps, indicator and warning
Infant and child restraint systems
see Children in the vehicle
10Index164_AKB; 7; 31, en-USd2ureepe,Version: 2.11.8.12009-09-11T12:07:36+02:00 - Seite 10
Page 17 of 368

Program mode selector switch
Automatic shift program ................114
Manual shift program ..................... 116
Proximity key
see Key, SmartKey
PSI (air pressure unit) ....................... 241
R
RACETIMER ........................................ 124
Radiator ..................................... 214, 242
Radio
Selecting stations ..........................126
Radio transmitters ............................ 257
Rain sensor see Intermittent wiping
Rear axle oil ....................................... 357
Rear center console ashtray see Ashtrays
Rear doors
Child safety locks ............................ 60
Rear door window
Override switch ................................ 60
Rear fog lamp
see Fog lamps
Rear lamps
see Tail lamps
Rear seat head restraints
see Head restraints
Rear view camera .............................. 163
Cleaning the camera lens ..............263
Rear window defroster ..................... 183
Rear window wiper/washer ............. 100
Recommended tire inflation
pressure ..................................... 219, 241
Refilling
AdBlue ®
......................................... 332
Refrigerant, air conditioning ............ 359
Refueling ............................................ 210
Regular checks .................................. 212
Reminder, Seat belt see Seat belts, Telltale
Remote control
see Key, SmartKey
Remote door unlock (Tele Aid) ......... 203
Replacing
Key .................................................. 74
Replacing bulbs ................................. 311
Reporting safety defects .................... 24
Research Octane Number see RON
Reserve fuel
Messages in the multifunction
display ........................................... 291
Warning lamp ................................... 29
Reset button ................................ 28, 118
Reset tool (NECK-PRO active front
head restraints) ................................. 309
Restraint systems see Occupant safety
Rims ........................................... 241, 352
Roadside Assistance ................... 21, 201
RON (Research Octane Number) ..... 360
Rubber parts, cleaning ...................... 264
Run-flat tires see MOExtended tires
S
Safety
Driving safety systems .....................61
Occupant safety ............................... 36
Reporting defects ............................ 24
Safety belts
see Seat belts
Seat belt force limiter ......................... 52
Seat belts ............................................. 48
Adjustment function ........................51
Children in the vehicle .....................55
Cleaning ......................................... 265
Fastening ......................................... 50
Height adjustment ...........................51
Proper use of ................................... 48
Safety guidelines ............................. 39
Safety notes ..................................... 48
Telltale ..................................... 29, 300
Seat heating ......................................... 86
Seating capacity ................................ 228
Seats ..................................................... 81
Adjustment ...................................... 81
Easy-entry/exit feature ....................87
Folding (expanding cargo volume) . 189
Heating ............................................ 86
Memory function .............................. 92
Multicontour seat ............................ 85
Ventilation ....................................... 85
Index15164_AKB; 7; 31, en-USd2ureepe,Version: 2.11.8.12009-09-11T12:07:36+02:00 - Seite 15
Page 60 of 368

accident, they could be crushed between the
occupant and seat belt.
A child’s risk of serious or fatal injuries is
significantly increased if the child restraints
are not properly secured in the vehicle and/
or the child is not properly secured in the child
restraint.
Children too big for a toddler restraint must
ride in seats using regular seat belts. Position
shoulder belt across chest and shoulder, not
face or neck. A booster seat may be
necessary to achieve proper seat belt
positioning for children over 41 lb (18 kg) until
they reach a height where a lap/shoulder belt
fits properly without a booster.
When the child restraint is not in use, remove
it from the vehicle or secure it with the seat
belt to prevent the child restraint from
becoming a projectile in the event of an
accident.
Installation of infant and child restraint
systems
GObserve Safety notes, see page 55.GWarning!
Always lock the seat backrests in their upright
position when the rear seats are occupied by
passengers. Lock the seat backrests in their
upright position after installing top tether
straps or when the extended cargo
compartment is not in use. Make sure that
seat backrests are secured properly by
pushing and pulling on the seat backrests. If
a seat backrest is not locked properly, the
seat backrest could fold. The child seat would
no longer be supported properly or positioned
to provide its intended benefit. That could
cause serious or even fatal injuries.
This vehicle is equipped with tether
anchorages for a top tether strap at each of
the rear seating positions.
Top tether straps enable an additional
connection to be made between child
restraint systems secured with LATCH-type
anchors and rear seats. This can further
reduce the risk of injury.
XPress in lower part of anchorage ring
cover : on the seat backrest on which a
child seat is to be installed.
XPull on upper part of anchorage ring
cover : to remove cover.
XStore anchorage ring cover : in a
convenient place (e.g. glove box).
XMove the respective head restraint to its
uppermost position (Y page 84).
58Occupant safetySafety and security
164_AKB; 7; 31, en-USd2ureepe,Version: 2.11.8.12009-09-11T12:07:36+02:00 - Seite 58
Page 84 of 368

vehicle could result in an accident and/or
serious personal injury.
GWarning!
According to accident statistics, children are
safer when properly restrained in the rear
seating positions than in the front seating
position. Thus, we strongly recommend that
children be placed in the rear seats whenever
possible. Regardless of seating position,
children 12 years old and under must be
seated and properly secured in an
appropriately sized infant restraint, toddler
restraint, or booster seat recommended for
the size and weight of the child. For additional
information, see “Children in the vehicle”.
A child’s risk of serious or fatal injuries is
significantly increased if the child restraints
are not properly secured in the vehicle and/
or the child is not properly secured in the child
restraint.
GWarning!
For your protection, drive only with properly
positioned head restraints.
Adjust the head restraint so that it is as close
to the head as possible and the center of the
head restraint supports the back of the head
at eye level. This will reduce the potential for
injury to the head and neck in the event of an
accident or similar situation.
Do not drive the vehicle without the seat head
restraints. Head restraints are intended to
help reduce injuries during an accident.
Seat adjustment
! When moving the seats, make sure there
are no items in the footwell or behind the
seats. Otherwise, you could damage the
seats and/or the items.
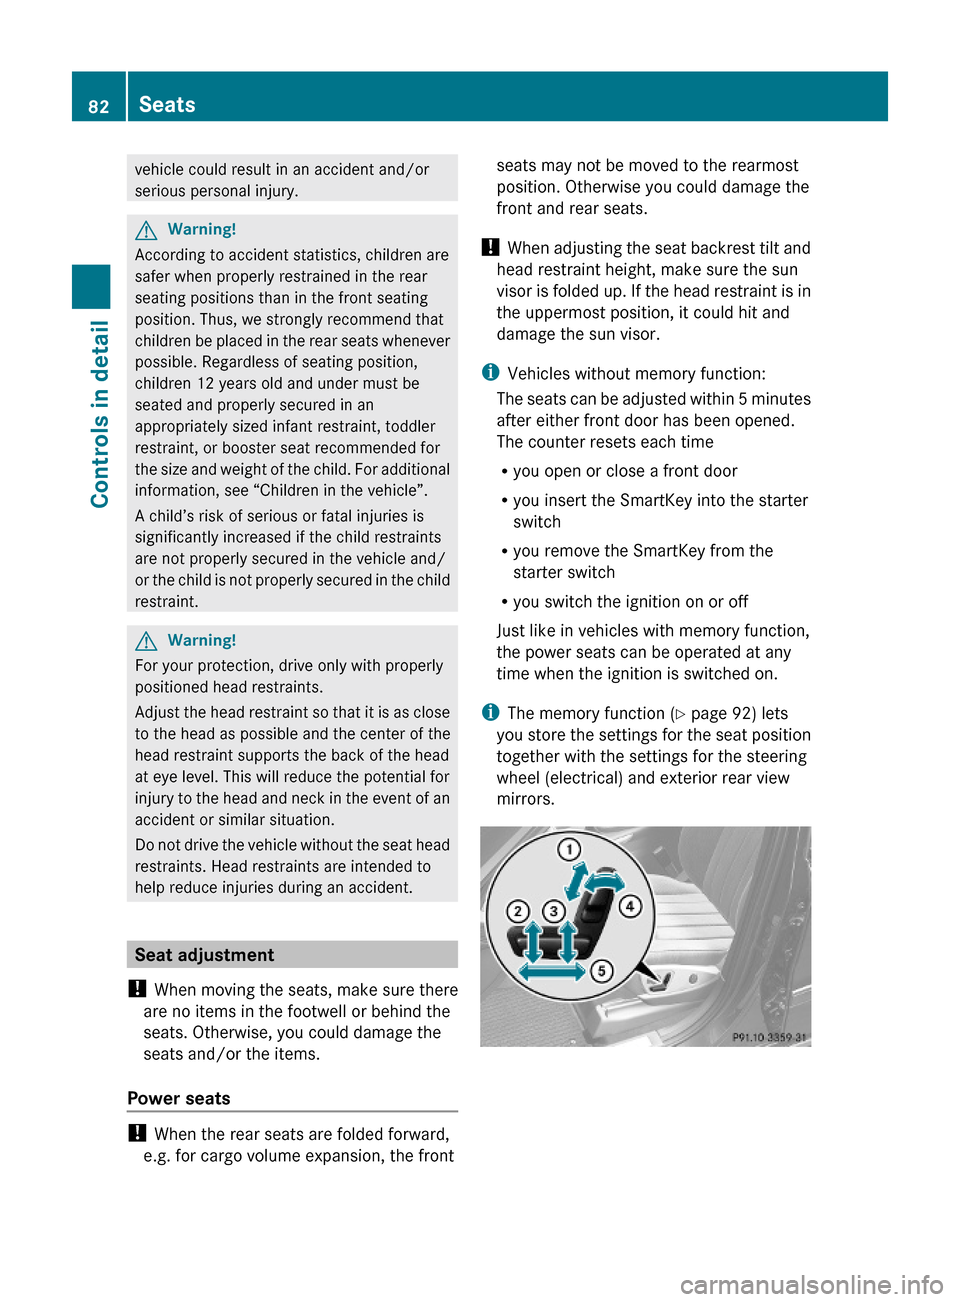
Power seats
! When the rear seats are folded forward,
e.g. for cargo volume expansion, the front
seats may not be moved to the rearmost
position. Otherwise you could damage the
front and rear seats.
! When adjusting the seat backrest tilt and
head restraint height, make sure the sun
visor is folded up. If the head restraint is in
the uppermost position, it could hit and
damage the sun visor.
iVehicles without memory function:
The seats can be adjusted within 5 minutes
after either front door has been opened.
The counter resets each time
Ryou open or close a front door
Ryou insert the SmartKey into the starter
switch
Ryou remove the SmartKey from the
starter switch
Ryou switch the ignition on or off
Just like in vehicles with memory function,
the power seats can be operated at any
time when the ignition is switched on.
iThe memory function (Y page 92) lets
you store the settings for the seat position
together with the settings for the steering
wheel (electrical) and exterior rear view
mirrors.
82SeatsControls in detail
164_AKB; 7; 31, en-USd2ureepe,Version: 2.11.8.12009-09-11T12:07:36+02:00 - Seite 82
Page 191 of 368

Cargo tie down rings, second-row footwell
Hooks
Four hooks are located on the rear
compartment trim panels, two on each side.
Use the hooks to secure light-weight items
only. The maximum permissible weight per
hook is 9 lbs (4 kg).
Expanding cargo volume
You can separately fold the left and right rear
seat backrests to expand the cargo volume.
GWarning!
When expanding the cargo volume, always
fully fold the corresponding seats and, if so
equipped, always use the cargo net when
transporting cargo.
Unless you are transporting cargo, the seat
backrests must remain properly locked in the
upright position.
In an accident, during hard braking or sudden
maneuvers, loose items will be thrown around
inside the vehicle. This can cause injury to
vehicle occupants unless the items are
securely fastened in the vehicle.
Always use the cargo tie-down rings.
GWarning!
Never drive a vehicle with the tailgate open.
Deadly carbon monoxide (CO) gases may
enter vehicle interior resulting in
unconsciousness and death.
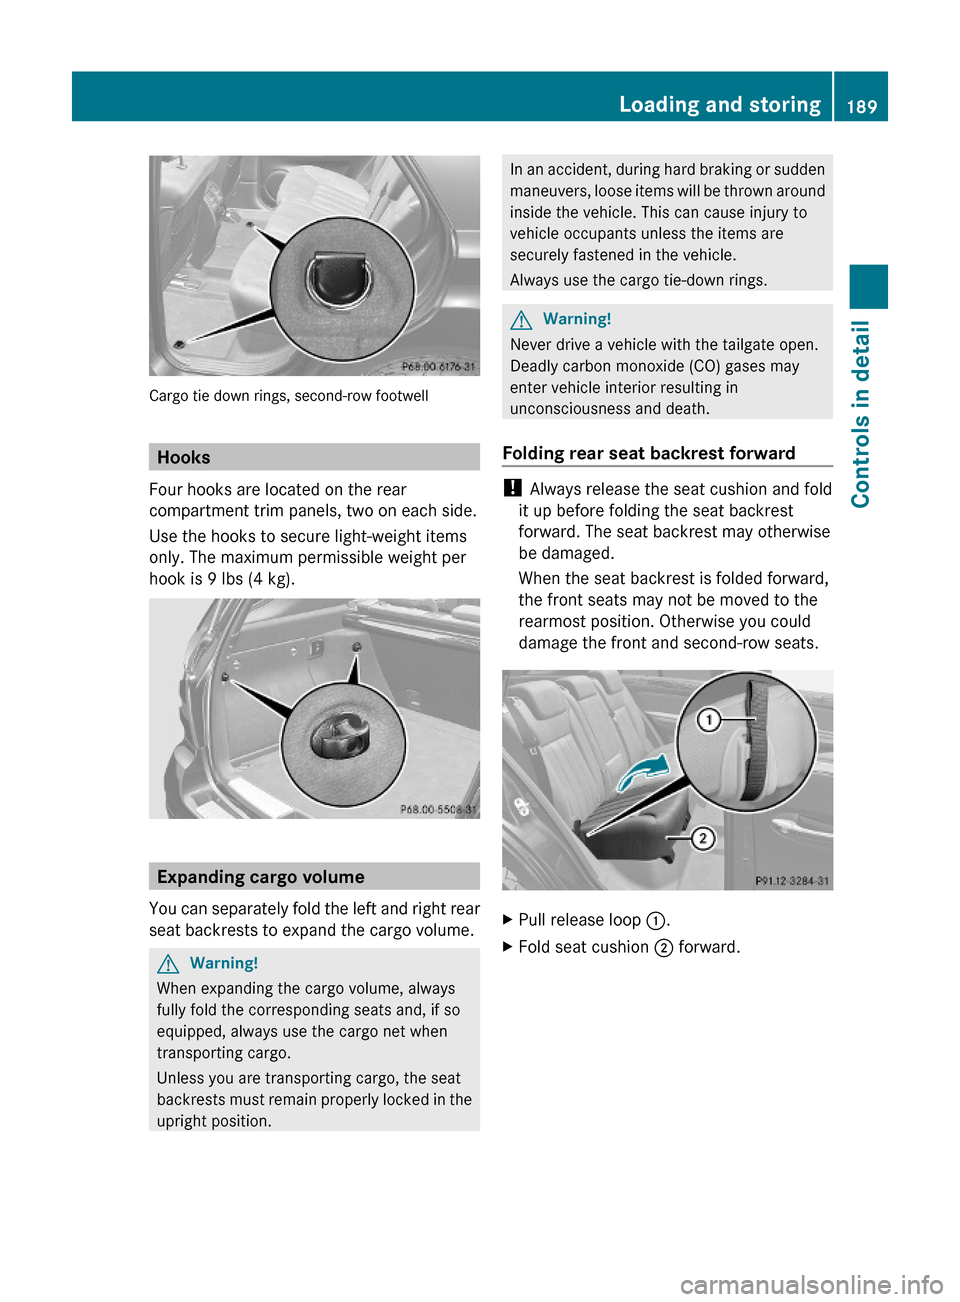
Folding rear seat backrest forward
! Always release the seat cushion and fold
it up before folding the seat backrest
forward. The seat backrest may otherwise
be damaged.
When the seat backrest is folded forward,
the front seats may not be moved to the
rearmost position. Otherwise you could
damage the front and second-row seats.
XPull release loop :.XFold seat cushion ; forward.Loading and storing189Controls in detail164_AKB; 7; 31, en-USd2ureepe,Version: 2.11.8.12009-09-11T12:07:36+02:00 - Seite 189Z
Page 192 of 368

XLower the rear seat head restraints
completely (Y page 84).
XPull release handle =.
A red indicator A will be visible and seat
backrest ? is released.
XFold seat backrest ? forward.
Returning rear seat backrest to original
position
! Make sure that the seat belt is not
pinched when folding rear seat backrest.
XFold seat backrest : rearward until it
engages.
Red indicator A should no longer be
visible.
XFold seat cushion ; rearward until it locks
into position.
XCheck for secure locking by pushing and
pulling on seat backrest :.
GWarning!
If a red indicator is visible with the seat
backrest up, then the seat backrest is not
properly locked into position.
Always lock seat backrest in its upright
position when the rear seats are occupied, or
the extended cargo compartment is not in
use. Check for secure locking by pushing and
pulling on the seat backrest.
XAdjust the rear seat head restraints, if
necessary (Y page 83).
Cargo compartment cover blind
The cargo compartment cover blind can be
installed behind the rear seats.
! With the cargo compartment cover blind
installed, do not pile luggage higher than
the lower edges of the rear side windows.
190Loading and storingControls in detail
164_AKB; 7; 31, en-USd2ureepe,Version: 2.11.8.12009-09-11T12:07:36+02:00 - Seite 190
Page 193 of 368

XRolling out: Pull cargo compartment cover
blind on handle : across the cargo
compartment.
XGuide cargo compartment cover blind into
mounts ; and release.
XRolling up: Disengage cargo compartment
cover blind and guide retraction by its
handle :.
Before removing or installing cargo
compartment cover blind behind the rear
seats, fold the left or right rear seat forward
(Y page 189). Afterwards, return the left or
right rear seat into its original position.
XRemoving: Roll up cargo compartment
cover blind.
XPush release button =.XPull cargo compartment cover blind ? to
the left.
XRemove cargo compartment cover blind.XInstalling: Make sure release button =
faces up and handle : is to the rear before
inserting the cargo compartment cover
blind.
XPlace left side of cargo compartment cover
blind in left mount.
XPosition right side of cargo compartment
cover blind over right mount.
XPress release button = and guide cargo
compartment cover blind into mount.
XMake sure cargo compartment cover blind
is securely fastened.Cargo netGWarning!
Make sure the cargo net is properly engaged
at top and bottom position and the tightening
belts are securely fastened.
Never use a damaged cargo net.
Always use cargo net when transporting
cargo. This helps to avoid personal injury from
smaller objects being thrown around in the
occupant compartment during a collision or
sudden maneuver.
The cargo net cannot prevent the movement
of large, heavier objects into the passenger
compartment in an accident. Such items must
be properly secured using the cargo tie-down
rings in the cargo compartment floor.
Passenger use of seats behind installed cargo
net is restricted because of the footwell being
taken up by the net.
Use of the cargo net is a particularly
important safety factor when the vehicle is
loaded higher than the top of the seat
backrests with smaller objects. For your
safety, always use the cargo net when
transporting cargo.
The cargo net can be installed behind the
B-pillar or the C-pillar.
RWith the cargo volume expanded
(Y page 189), use holders : behind
B-pillars and the cargo tie-down rings in the
second-row footwell (Y page 189).
RWithout the cargo volume expanded, use
holders ; behind C-pillars and the cargo
Loading and storing191Controls in detail164_AKB; 7; 31, en-USd2ureepe,Version: 2.11.8.12009-09-11T12:07:36+02:00 - Seite 191Z
Page 198 of 368

Vanity mirror
Vanity mirror lamp = only functions when
sun visor : is engaged in mounting C.
XFlip sun visor down.XLift up vanity mirror cover ?.
Vanity mirror lamp = comes on.
Ashtrays
Center console ashtray
iA storage compartment is located under
the ashtray insert.
! The storage compartment is not heat-
proof. Therefore, do not stub cigarettes in
the storage compartment.
XOpening: Press cover ; briefly.XRemoving ashtray insert: Grab ashtray
insert : on the sides and pull it out
upwards.
XReinstalling ashtray insert: Install
ashtray insert :.
XClosing: Push cover ;.
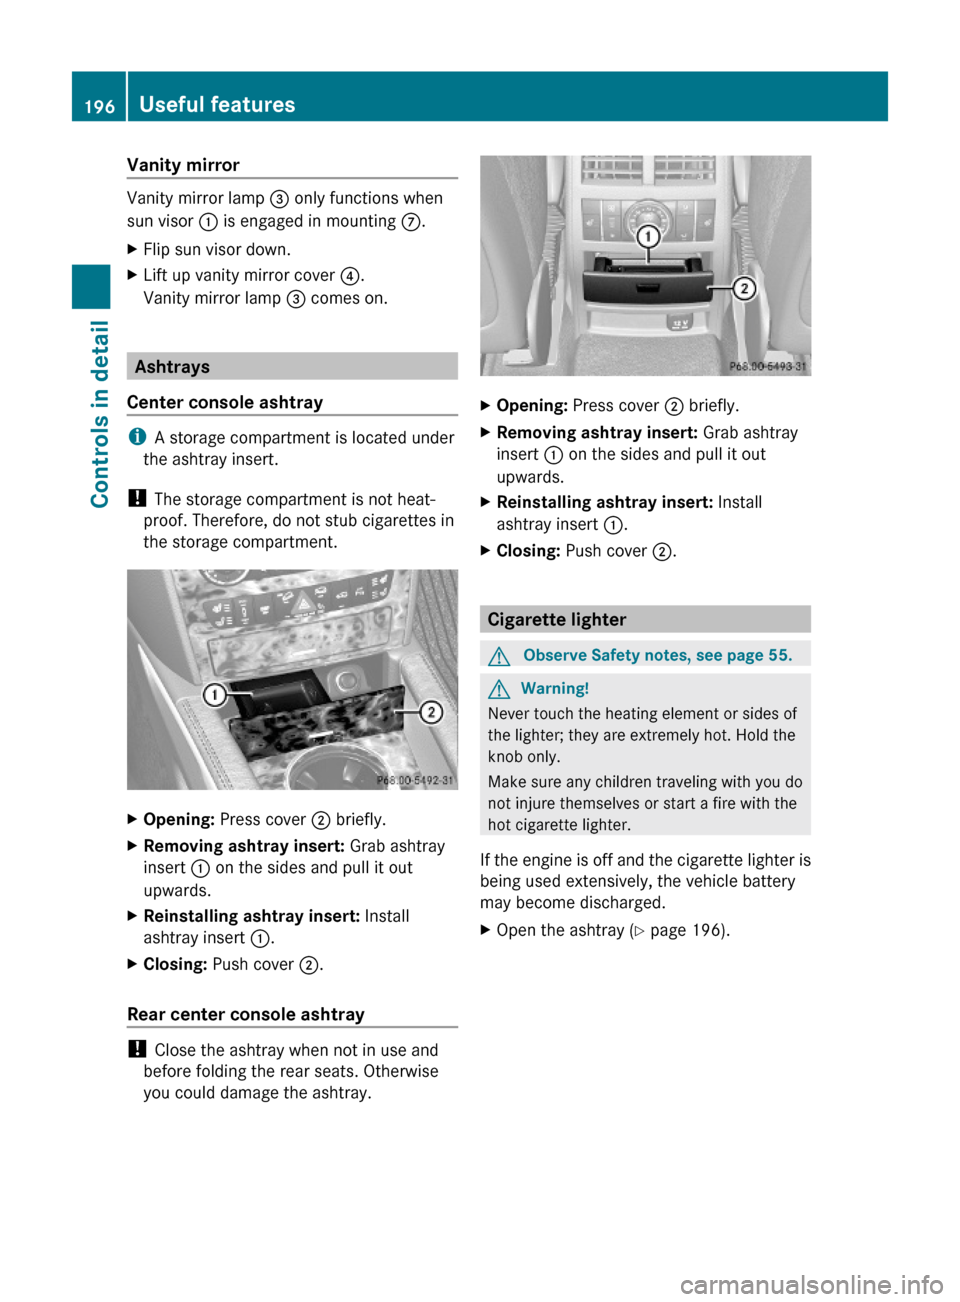
Rear center console ashtray
! Close the ashtray when not in use and
before folding the rear seats. Otherwise
you could damage the ashtray.
XOpening: Press cover ; briefly.XRemoving ashtray insert: Grab ashtray
insert : on the sides and pull it out
upwards.
XReinstalling ashtray insert: Install
ashtray insert :.
XClosing: Push cover ;.
Cigarette lighter
GObserve Safety notes, see page 55.GWarning!
Never touch the heating element or sides of
the lighter; they are extremely hot. Hold the
knob only.
Make sure any children traveling with you do
not injure themselves or start a fire with the
hot cigarette lighter.
If the engine is off and the cigarette lighter is
being used extensively, the vehicle battery
may become discharged.
XOpen the ashtray (Y page 196).196Useful featuresControls in detail
164_AKB; 7; 31, en-USd2ureepe,Version: 2.11.8.12009-09-11T12:07:36+02:00 - Seite 196