2010 MERCEDES-BENZ ML63AMG rims
[x] Cancel search: rimsPage 237 of 368

dimension front vs. rear), tire rotation is not
possible.
If applicable to your vehicle’s tire
configuration, tires can be rotated according
to the tire manufacturer’s recommended
intervals in the tire manufacturer’s warranty
pamphlet located in your vehicle literature
portfolio. If none is available, tires should be
rotated every 3 000 to 6 000 miles (5 000 to
10 000 km), or sooner if necessary, according
to the degree of tire wear. The same rotation
(spinning) direction must be maintained.
Rotate tires before the characteristic tire
wear pattern becomes visible (shoulder wear
on front tires and tread center wear on rear
tires).
Thoroughly clean the mounting face of wheels
and brake disks, i.e. the inner side of the
wheels/tires, during each rotation. Check for
and ensure proper tire inflation pressure.
For information on wheel change, see “Flat
tire” (Y page 319).
Tire labeling
Besides tire name (sales designation) and
manufacturer name, a number of markings
can be found on a tire.
Following are some explanations for the
markings on your vehicle’s tires:
:Uniform Tire Quality Grading Standards
(Y page 233)
;DOT, Tire Identification Number
(Y page 238)
=Maximum tire load (Y page 231)?Maximum tire inflation pressure
(Y page 226)
AManufacturerBTire ply material (Y page 239)CTire size designation, load and speed
rating (Y page 236)
DLoad identification (Y page 238)ETire name
iFor illustration purposes only. Actual data
on tires are specific to each vehicle and
may vary from data shown in above
illustration.
For more information, see “Rims and tires”
(Y page 352).
Tires and wheels235Operation164_AKB; 7; 31, en-USd2ureepe,Version: 2.11.8.12009-09-11T12:07:36+02:00 - Seite 235Z
Page 238 of 368

Tire size designation, load and speed
rating:Tire width;Aspect ratio in %=Radial tire code?Rim diameterALoad index BSpeed symbol
iFor illustration purposes only. Actual data
on tires are specific to each vehicle and
may vary from data shown in above
illustration.
General: Depending on the design standards
used, the tire size molded into the sidewall
may have no letter or a letter preceding the
tire size designation.
No letter preceding the size designation (as
illustrated above): Passenger car tire based
on European design standards.
Letter “P” preceding the size designation:
Passenger car tire based on U.S. design
standards.
Letter “LT” preceding the size designation:
Light Truck tire based on U.S. design
standards.
Letter “T” preceding the size designation:
Temporary spare tires which are high
pressure compact spares designed for
temporary emergency use only.
Tire width
Tire width : indicates the nominal tire width
in millimeters.
Aspect ratio
Aspect ratio ; is the dimensional
relationship between tire section height and
section width and is expressed in percentage.
The aspect ratio is arrived at by dividing
section height by section width.
Tire code
Tire code = indicates the tire construction
type. The “R” stands for radial tire type. Letter
“D” means diagonal or bias ply construction;
letter “B” means belted-bias ply construction.
At the tire manufacturer’s option, any tire
with a speed capability above 149 mph
(240 km/h) can include a “ZR” in the size
designation (for example: 245/40 ZR 18). For
additional information, see “Tire speed
rating” (Y page 237).
Rim diameter
Rim diameter ? is the diameter of the bead
seat, not the diameter of the rim edge. The
rim diameter is indicated in inches (in).
Load index
GWarning!
The tire load rating must always be at least
half of the GAWR of your vehicle. Otherwise,
tire failure may be the result which may cause
an accident and/or serious injury to you or
others.
Always replace rims and tires with the same
designation, manufacturer and type as shown
on the original part.
GWarning!
Do not overload the tires by exceeding the
specified load limit as indicated on the Tire
and Loading Information placard on the
driver’s door B-pillar. Overloading the tires
can overheat them, possibly causing a
blowout. Overloading the tires can also result
in handling or steering problems, or brake
failure.
Load index A is a numerical code associated
with the maximum load a tire can support.
236Tires and wheelsOperation
164_AKB; 7; 31, en-USd2ureepe,Version: 2.11.8.12009-09-11T12:07:36+02:00 - Seite 236
Page 251 of 368

! Observe the following during off-road
driving:
R Keep doors, tailgate, windows, and tilt/
sliding sunroof closed whenever driving
off-road.
R Adjust vehicle speed to condition of
terrain. The more uneven, rutty and
steeper the terrain, the lower the speed
should be. Drive through water slowly at
an even speed, avoiding a bow wave.
R Be especially careful when driving in
unknown territory. It may be necessary
to get out of the vehicle and scout the
path you intend to take.
R Watch out for obstacles, such as rocks,
holes, tree stumps and ruts.
R Before driving through water, determine
its depth.
R Do not stop vehicle while immersed in
water, and do not shut off the engine.
R In sandy soil, drive at a steady speed as
allowed by conditions. This helps
overcome the vehicle rolling resistance
and reduces the likelihood of the vehicle
sinking into the ground.
R Do not initiate jumps with the vehicle. It
interrupts the forward momentum of the
vehicle.
R Always drive onto slopes with the engine
running and the vehicle in gear.
R Do not shift automatic transmission into
neutral position N.GWarning!
Do not reduce the tire inflation pressure
before driving through sand. However, if you
do so, remember to correct the tire inflation
pressure before continuing your trip. Driving
with reduced tire inflation pressure increases
the risk of losing control of the vehicle and
rolling over.
Checklist before off-road driving
Engine oil level
R Check the engine oil level ( Y page 214).
Only with a proper oil level can the vehicle
obtain a trouble-free oil supply, even on
steep gradients.
! If the engine oil level warning lamp comes
on while driving, stop the vehicle in a safe
location or as soon at is safe to do so.
Check the engine oil level.
The engine oil level warnings should not be
ignored. Extended driving with the symbol
displayed could result in serious engine
damage that is not covered by the
Mercedes-Benz Limited Warranty.
Tires
R Check the tread depth and maintain
specified tire inflation pressure. A placard
with the recommended tire inflation
pressures is located on the driver’s door B-
pillar ( Y page 228).
R Check tires for possible damage and
remove foreign objects.
R Replace missing valve caps.
Rims
R Dented or bent rims can cause tire inflation
pressure loss and damage the tire beads.
For this reason, check and, if necessary,
change rims before driving off-road.
Vehicle tool kit
R Check if the jack ( Y page 270) is
functional.
R Always take the vehicle tool kit, a strong
tow rope, a shovel and a small plank (to put
under the jack on sandy soil) with you.
Driving instructions249Operation164_AKB; 7; 31, en-USd2ureepe,Version: 2.11.8.12009-09-11T12:07:36+02:00 - Seite 249Z
Page 266 of 368

! Do not clean the camera and the area
around the camera
R with a high-pressure cleaner
R with a dry cloth and strong pressure
R with aggressive cleaning agents
You could otherwise damage the camera.
Cleaning the windows and the wiper
blades
! Never open the hood when the wiper arms
are folded forward.
GWarning!
For safety reasons, switch off wipers and
remove SmartKey from starter switch before
cleaning the windshield and/or the wiper
blades. Vehicles with KEYLESS-GO: Make
sure the vehicle’s on-board electronics have
status 0. Otherwise, the wiper motor could
suddenly turn on and cause injury.
! Do not pull on the wiper blade inserts.
They could tear.
XFold the wiper arms forward until they snap
into place.XClean the windshield and the wiper blade
inserts with a clean cloth and mild
detergent solution.XUse a soft, clean cloth and a mild window
cleaning solution on all outside and inside
glass surfaces.
An automotive glass cleaner is
recommended.
! Fold the windshield wiper arms back onto
the windshield before turning the SmartKey
in the starter switch or pressing the
KEYLESS-GO start/stop button.
Hold on to the wiper when folding the wiper
arm back. If released, the force of the
impact from the tensioning spring could
crack the windshield.
! To clean the window interior, do not use
a dry cloth, abrasives, solvents or cleaners
containing solvents. Do not touch the
inside of the windows with hard objects
such as an ice scraper or ring. Doing so may
damage the windows.
Light alloy wheels
If possible, clean wheels once a week.
XUse Mercedes-Benz approved Wheel Care,
a soft bristle brush and a strong spray of
water for cleaning the light alloy wheels.
! Only use acid-free cleaning materials.
Acid may cause corrosion or damage the
clear coat.
! The vehicle should not be parked for an
extended period of time immediately after
it has been cleaned. This applies especially
after the wheel rims have been cleaned
with wheel rim cleaner. Wheel rim cleaners
can lead to increased corrosion of the
brake disks and brake pads. Non-approved
wheel cleaners may also damage the wheel
paint if the vehicle is not driven after
cleaning.
Therefore, the vehicle’s brake system
should always be warmed-up before it is
parked after cleaning. Drive your vehicle for
several minutes to allow the brakes to dry.
When applying Mercedes-Benz approved
Tire Care and Mercedes-Benz approved
Wheel Care products, take care not to
spray them on the brake disks.
Plastic and rubber parts
XUse a gentle dishwashing detergent or mild
detergent for delicate fabrics as a washing
solution.XWipe with a cloth moistened in a lukewarm
solution.
The surface may temporarily change color.
If this is the case, wait for it to dry.GWarning!
Do not use cleaners or cockpit care sprays
containing solvents to clean the cockpit or the
264Vehicle careOperation
164_AKB; 7; 31, en-USd2ureepe,Version: 2.11.8.12009-09-11T12:07:36+02:00 - Seite 264
Page 268 of 368

! To avoid damage to leather upholstery:
R Wipe with light pressure only.
R Do not clean with abrasive cleaning
agents such as scouring milk or powder.
R Do not soak the leather upholstery.
As leather is a natural product, it could
otherwise harden or become porous.
R Exercise particular care when cleaning
perforated leather as its underside
should not become wet.
MB Tex upholsteryXUse Mercedes-Benz approved Interior Care
onto a soft, lint-free cloth and apply with
light pressure for cleaning the upholstery.
Wood trims
XOnly use water and a damp cloth to clean
wood trims in your vehicle.
! Do not use solvents like tar remover or
wheel cleaner nor polishes or waxes as
these may be abrasive.
Chrome-plated exhaust tip
Regular cleaning and care of chrome-plated
exhaust tips will help to maintain their shine
and the classy appearance.
XUse Mercedes-Benz approved Chrome
Polishing Paste each time the vehicle has
been washed, especially during the winter.
! Do not use alkaline cleaners such as
wheel cleaners as they could cause
corrosion.
266Vehicle careOperation
164_AKB; 7; 31, en-USd2ureepe,Version: 2.11.8.12009-09-11T12:07:36+02:00 - Seite 266
Page 321 of 368

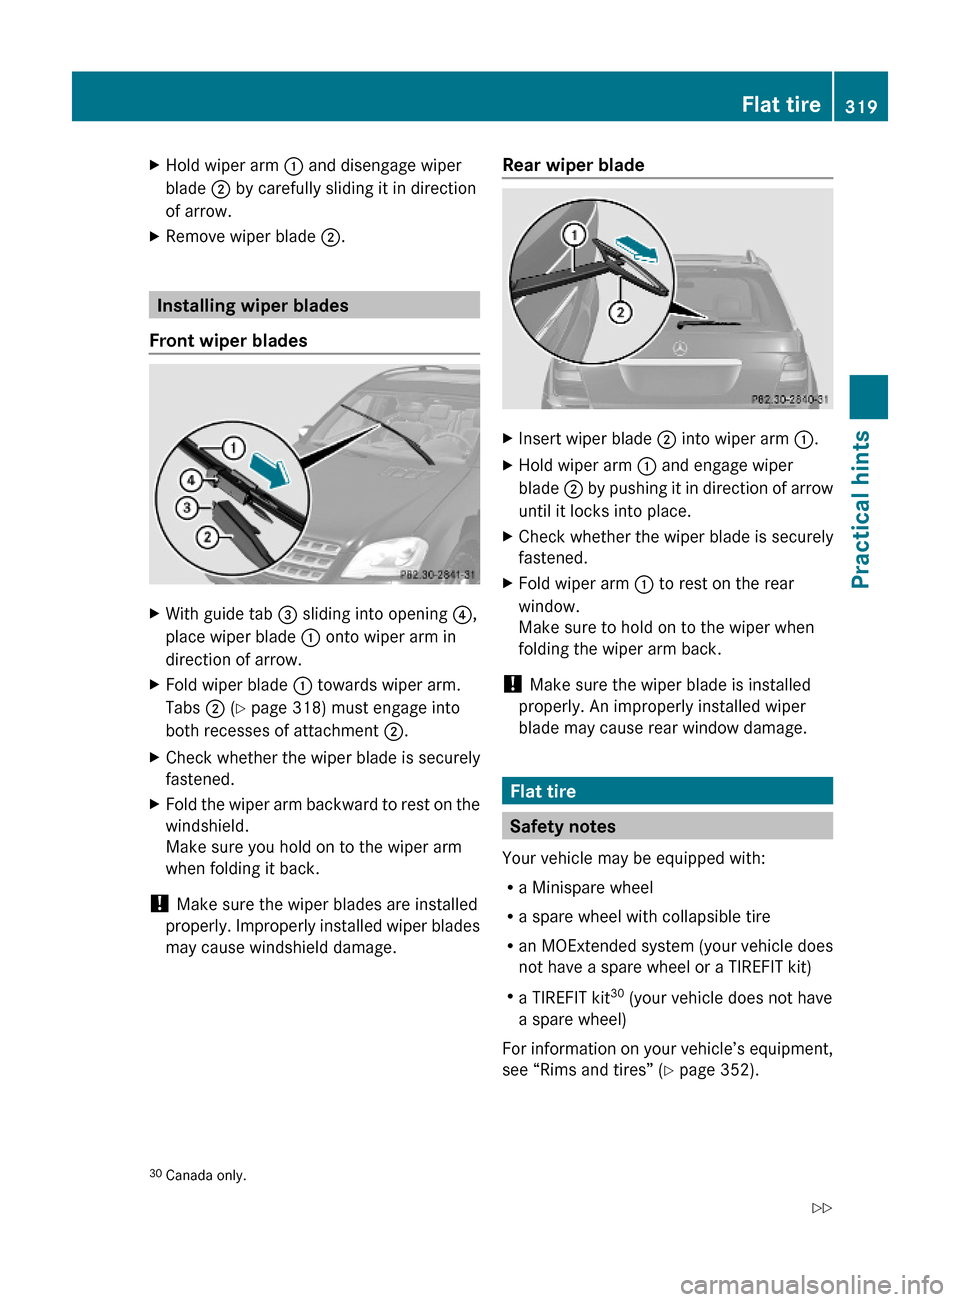
XHold wiper arm : and disengage wiper
blade ; by carefully sliding it in direction
of arrow.
XRemove wiper blade ;.
Installing wiper blades
Front wiper blades
XWith guide tab = sliding into opening ?,
place wiper blade : onto wiper arm in
direction of arrow.
XFold wiper blade : towards wiper arm.
Tabs ; (Y page 318) must engage into
both recesses of attachment ;.
XCheck whether the wiper blade is securely
fastened.
XFold the wiper arm backward to rest on the
windshield.
Make sure you hold on to the wiper arm
when folding it back.
! Make sure the wiper blades are installed
properly. Improperly installed wiper blades
may cause windshield damage.
Rear wiper bladeXInsert wiper blade ; into wiper arm :.XHold wiper arm : and engage wiper
blade ; by pushing it in direction of arrow
until it locks into place.
XCheck whether the wiper blade is securely
fastened.
XFold wiper arm : to rest on the rear
window.
Make sure to hold on to the wiper when
folding the wiper arm back.
! Make sure the wiper blade is installed
properly. An improperly installed wiper
blade may cause rear window damage.
Flat tire
Safety notes
Your vehicle may be equipped with:
Ra Minispare wheel
Ra spare wheel with collapsible tire
Ran MOExtended system (your vehicle does
not have a spare wheel or a TIREFIT kit)
Ra TIREFIT kit30 (your vehicle does not have
a spare wheel)
For information on your vehicle’s equipment,
see “Rims and tires” (Y page 352).
30Canada only.Flat tire319Practical hints164_AKB; 7; 31, en-USd2ureepe,Version: 2.11.8.12009-09-11T12:07:36+02:00 - Seite 319Z
Page 333 of 368

significantly shorter or, if the vehicle is driven
cautiously, somewhat longer.
Do not continue driving in emergency mode if
R you notice knocking sounds
R the vehicle starts to shake
R smoke develops and you smell rubber
R ESP ®
is intervening continuously
R you notice tears on the tire sidewalls
After driving in emergency mode, you must
have the rims inspected by an authorized
Mercedes-Benz Center to check if they are
suitable for further use. The failed tire must
be replaced in any case.
When replacing individual or all tires on the
vehicle, make sure only tires marked with
“MOExtended” are mounted in the size
specified for your vehicle ( Y page 352).
Bleeding the fuel system (diesel
engine only)
Driving the vehicle until the fuel tank is empty
is not recommended. Otherwise, air may be
sucked into the fuel system. If this happens,
the malfunction indicator lamp = (USA
only) or ; (Canada only) comes on and the
engine may not start immediately after
refueling the vehicle.
After refueling:
XMake sure the automatic transmission is in
park position P.
The transmission position indicator in the
multifunction display should be on P.XDo not depress the accelerator.XIf necessary, remove the KEYLESS-GO
start/stop button from the starter switch.XTurn the SmartKey in the starter switch to
position 2 for at least 10 seconds.XReturn the SmartKey in the starter switch
to position 0.XTurn the SmartKey in the starter switch to
position 3 and hold it there for a maximumof 10 seconds or until the engine runs
surge-free.
If the engine does not start:
XTurn the SmartKey in the starter switch
once more to position 2 for at least
10 seconds.XReturn the SmartKey in the starter switch
to position 0.XTurn the SmartKey in the starter switch
once more to position 3 and hold it there
for a maximum of 10 seconds or until the
engine runs surge-free.XIf necessary, repeat the above steps.
If the engine still does not start after
3 attempts:
Do not make any further attempts to start the
engine. Contact an authorized Mercedes-
Benz Center or call Roadside Assistance
( Y page 201).
i When the malfunction indicator lamp
= (USA only) or ; (Canada only) in
the instrument cluster has been illuminated
for the above condition, it will remain
illuminated until the engine was cycled on
and off four times in a row.
AdBlue ®
(diesel engine only)
The BlueTEC exhaust gas aftertreatment
system requires a reducing agent (AdBlue ®
)
in order to function properly. Refilling with
AdBlue ®
is part of the regular maintenance
service work. A tankful of AdBlue ®
should
suffice until the next maintenance service
under normal driving conditions.
When the AdBlue ®
tank is low, the message
Check Additive See Operator’s
Manual appears in the multifunction display.
When the AdBlue ®
level drops to the
minimum level, the message Remaining
Starts: 20 appears in the multifunction
display.
AdBlue ®
(diesel engine only)331Practical hints164_AKB; 7; 31, en-USd2ureepe,Version: 2.11.8.12009-09-11T12:07:36+02:00 - Seite 331Z
Page 347 of 368

Vehicle equipment ............................346
Parts service .....................................346
Warranty coverage ...........................346
Identification labels ..........................346
Vehicle specification ML 350 Blue-
TEC 4MATIC (164.125) .....................348
Vehicle specification ML 350
(164.156) ...........................................348
Vehicle specification ML 350
4MATIC (164.186) .............................349
Vehicle specification ML 550
4MATIC (164.172) .............................350
Vehicle specification ML 63 AMG
(164.177) ...........................................351
Rims and tires ...................................352
Fuels, coolants, lubricants, etc. ......356
345Technical data164_AKB; 7; 31, en-USd2ureepe,Version: 2.11.8.12009-09-11T12:07:36+02:00 - Seite 345