2010 MERCEDES-BENZ ML63AMG height
[x] Cancel search: heightPage 77 of 368

Locking and unlocking from the insideGObserve Safety notes, see page 55.
You can lock or unlock the vehicle from the
inside using the central locking switches. This
can be useful, for example, if you want to lock
the vehicle before starting to drive.
The central locking switches do not lock or
unlock the fuel filler flap.
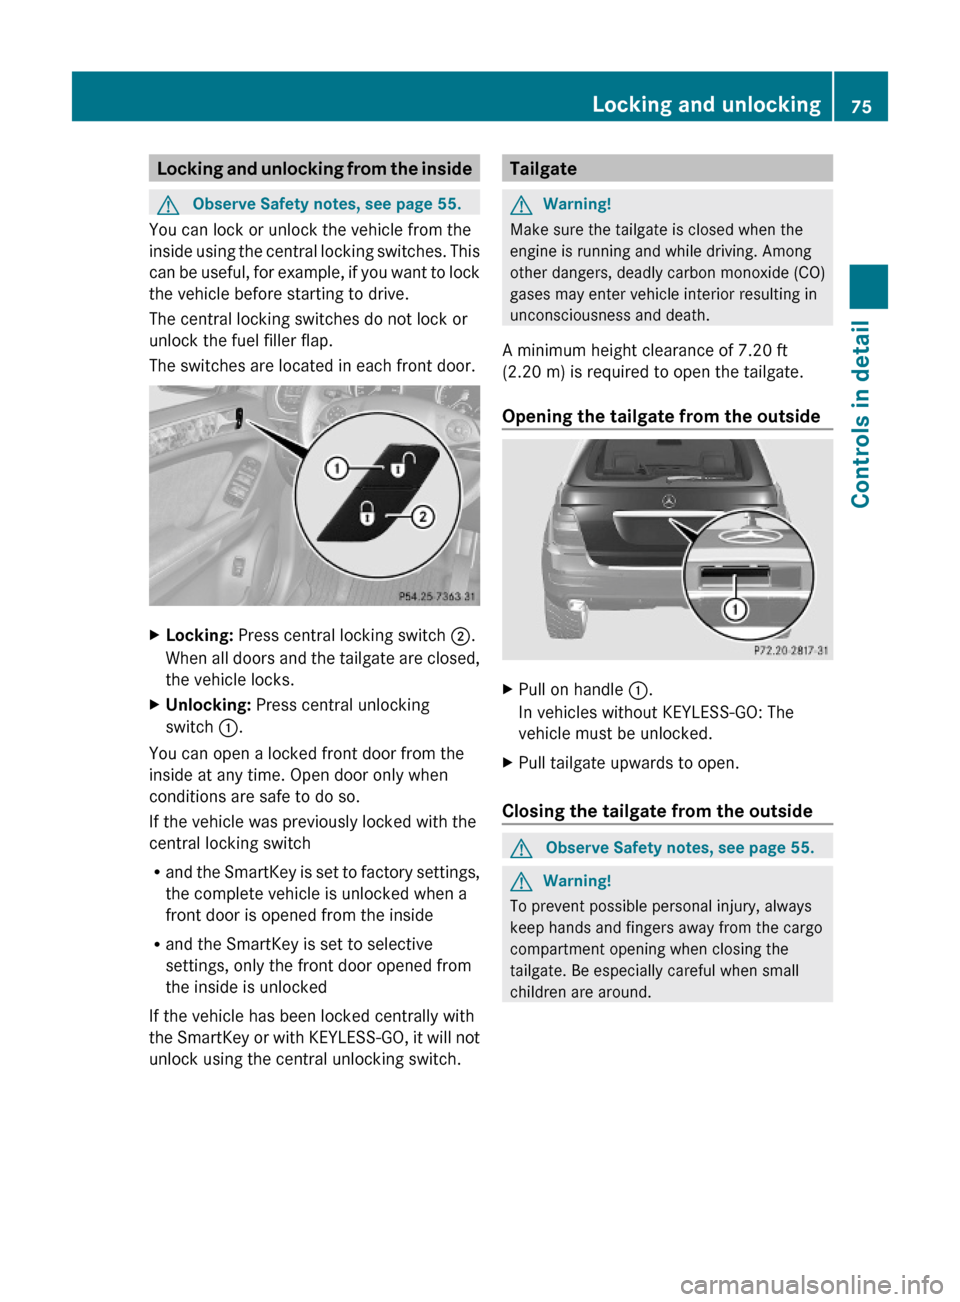
The switches are located in each front door.
XLocking: Press central locking switch ;.
When all doors and the tailgate are closed,
the vehicle locks.
XUnlocking: Press central unlocking
switch :.
You can open a locked front door from the
inside at any time. Open door only when
conditions are safe to do so.
If the vehicle was previously locked with the
central locking switch
Rand the SmartKey is set to factory settings,
the complete vehicle is unlocked when a
front door is opened from the inside
Rand the SmartKey is set to selective
settings, only the front door opened from
the inside is unlocked
If the vehicle has been locked centrally with
the SmartKey or with KEYLESS-GO, it will not
unlock using the central unlocking switch.
TailgateGWarning!
Make sure the tailgate is closed when the
engine is running and while driving. Among
other dangers, deadly carbon monoxide (CO)
gases may enter vehicle interior resulting in
unconsciousness and death.
A minimum height clearance of 7.20 ft
(2.20 m) is required to open the tailgate.
Opening the tailgate from the outside
XPull on handle :.
In vehicles without KEYLESS-GO: The
vehicle must be unlocked.
XPull tailgate upwards to open.
Closing the tailgate from the outside
GObserve Safety notes, see page 55.GWarning!
To prevent possible personal injury, always
keep hands and fingers away from the cargo
compartment opening when closing the
tailgate. Be especially careful when small
children are around.
Locking and unlocking75Controls in detail164_AKB; 7; 31, en-USd2ureepe,Version: 2.11.8.12009-09-11T12:07:36+02:00 - Seite 75Z
Page 78 of 368

XLower tailgate by pulling firmly on
handles :.
XClose tailgate with hands placed flat on it.
Once the tailgate touches the latch, the
tailgate will pull itself shut automatically.
Power tailgate
GWarning!
Make sure the tailgate is closed when the
engine is running and while driving. Among
other dangers, deadly carbon monoxide (CO)
gases may enter vehicle interior resulting in
unconsciousness and death.
! The tailgate swings open upwards
automatically. Always make sure there is
sufficient overhead clearance.
A minimum height clearance of 7.20 ft
(2.20 m) is required to open the tailgate.
In vehicles with power tailgate, you can
Ropen and close the tailgate from the inside
and the outside electrically
Rlimit the opening height of the tailgate
Rinterrupt the opening/closing procedure at
any time by
-pressing or pulling the door-mounted
remote tailgate opening/closing switch
-pulling the outside handle on the tailgate
-pressing the tailgate closing switch
-pressing the KEYLESS-GO locking/
closing switch
Notes for operating the tailgate with the
SmartKey:
You can also open, close, and stop the
tailgate by pressing button F on the
SmartKey.
The prerequisites for this are:RNo SmartKey is inserted in the starter
switch.
RKEYLESS-GO: The vehicle’s on-board
electronics must have status 0
(Y page 80).
Opening the tailgate from the outside
You can unlock and open the tailgate
simultaneously from the outside when the
vehicle is stationary.
XPress and hold button F on the
SmartKey until the tailgate unlocks and
begins to open.
While the tailgate is opening, an acoustic
warning sounds.
or
XVehicles with KEYLESS-GO: Pull on the
handle (Y page 75).
Closing the tailgate from the outside
GObserve Safety notes, see page 55.GWarning!
Monitor the closing procedure carefully to
make sure no one is in danger of being
injured. To prevent possible personal injury,
always keep hands and fingers away from the
cargo compartment opening when closing the
tailgate. Be especially careful when small
children are around. To stop the closing
procedure, do one of the following:
RPress or pull the remote tailgate opening/
closing switch on the driver’s door.
RPress the tailgate closing switch.
RPress the KEYLESS-GO locking/closing
switch.
76Locking and unlockingControls in detail
164_AKB; 7; 31, en-USd2ureepe,Version: 2.11.8.12009-09-11T12:07:36+02:00 - Seite 76
Page 81 of 368

Limiting opening height of tailgate
You can limit the opening height of the
tailgate in the upper opening range. This can
be useful, for example, when the space above
the tailgate is not sufficient.
Activating
XOpen the tailgate: Pull on handle
(Y page 75) or press and hold button
F on the SmartKey until the tailgate
opens.
XStop opening procedure: When the
tailgate is in the desired position, press
tailgate closing switch (Y page 77) or pull
on handle once more.
XYou can also press or pull the remote
tailgate opening/closing switch
(Y page 78) to stop the opening procedure.
XPress and hold the tailgate closing switch
in the tailgate (Y page 77) until you hear a
short acoustic signal.
The opening height of the tailgate is limited.
The tailgate will now stop at the stored
position when opened.
Deactivating
XPress and hold the tailgate closing switch
in the tailgate (Y page 77) until you hear
two short, consecutive acoustic signals.
Starter switch positions
SmartKey
GObserve Safety notes, see page 55.
Starter switch
gFor removing SmartKey1Power supply for some electrical
consumers, e.g. radio
2Ignition (power supply for all electrical
consumers) and driving position
3Starting position
When you switch on the ignition, all lamps
(except low-beam headlamp indicator lamp,
high-beam headlamp indicator lamp, and turn
signal indicator lamps unless activated) in the
instrument cluster come on. If a lamp in the
instrument cluster fails to come on when the
ignition is switched on, have it checked and
replaced if necessary. If a lamp in the
instrument cluster remains on after starting
the engine or comes on while driving, refer to
“Lamps in instrument cluster” (Y page 297).
XAlways remove the SmartKey from the
starter switch when the engine is not in
operation.
This will help to prevent accelerated vehicle
battery discharge or a completely
discharged vehicle battery.
If the SmartKey cannot be turned in the
starter switch, the vehicle battery may not be
sufficiently charged.
XCheck the vehicle battery and charge it if
necessary.
or
Starter switch positions79Controls in detail164_AKB; 7; 31, en-USd2ureepe,Version: 2.11.8.12009-09-11T12:07:36+02:00 - Seite 79Z
Page 84 of 368

vehicle could result in an accident and/or
serious personal injury.
GWarning!
According to accident statistics, children are
safer when properly restrained in the rear
seating positions than in the front seating
position. Thus, we strongly recommend that
children be placed in the rear seats whenever
possible. Regardless of seating position,
children 12 years old and under must be
seated and properly secured in an
appropriately sized infant restraint, toddler
restraint, or booster seat recommended for
the size and weight of the child. For additional
information, see “Children in the vehicle”.
A child’s risk of serious or fatal injuries is
significantly increased if the child restraints
are not properly secured in the vehicle and/
or the child is not properly secured in the child
restraint.
GWarning!
For your protection, drive only with properly
positioned head restraints.
Adjust the head restraint so that it is as close
to the head as possible and the center of the
head restraint supports the back of the head
at eye level. This will reduce the potential for
injury to the head and neck in the event of an
accident or similar situation.
Do not drive the vehicle without the seat head
restraints. Head restraints are intended to
help reduce injuries during an accident.
Seat adjustment
! When moving the seats, make sure there
are no items in the footwell or behind the
seats. Otherwise, you could damage the
seats and/or the items.
Power seats
! When the rear seats are folded forward,
e.g. for cargo volume expansion, the front
seats may not be moved to the rearmost
position. Otherwise you could damage the
front and rear seats.
! When adjusting the seat backrest tilt and
head restraint height, make sure the sun
visor is folded up. If the head restraint is in
the uppermost position, it could hit and
damage the sun visor.
iVehicles without memory function:
The seats can be adjusted within 5 minutes
after either front door has been opened.
The counter resets each time
Ryou open or close a front door
Ryou insert the SmartKey into the starter
switch
Ryou remove the SmartKey from the
starter switch
Ryou switch the ignition on or off
Just like in vehicles with memory function,
the power seats can be operated at any
time when the ignition is switched on.
iThe memory function (Y page 92) lets
you store the settings for the seat position
together with the settings for the steering
wheel (electrical) and exterior rear view
mirrors.
82SeatsControls in detail
164_AKB; 7; 31, en-USd2ureepe,Version: 2.11.8.12009-09-11T12:07:36+02:00 - Seite 82
Page 85 of 368

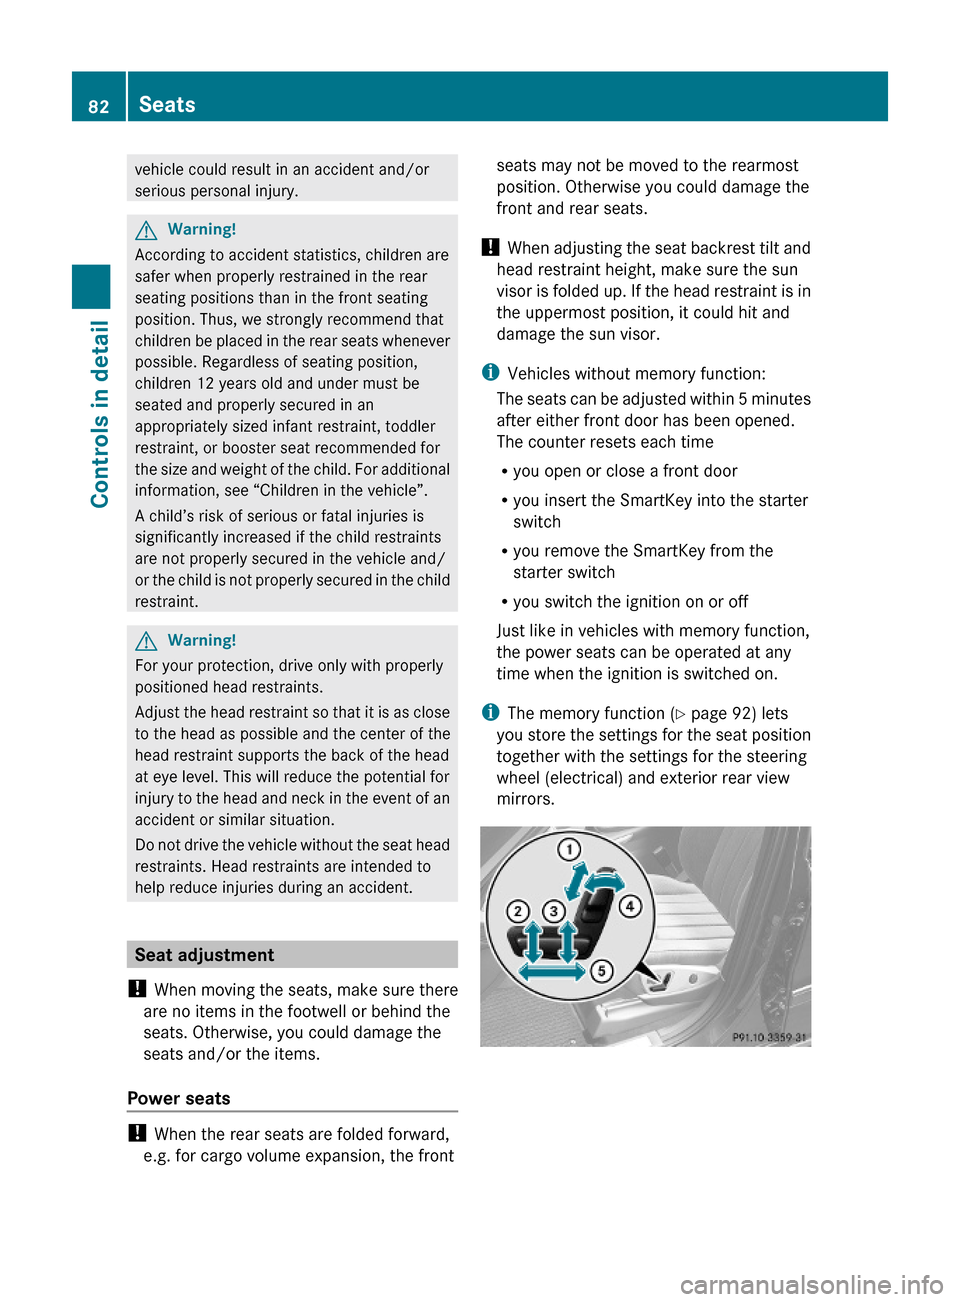
XSeat fore and aft adjustment: Press the
switch forward or backward in direction of
arrow A.
XSeat backrest tilt: Press the switch
forward or backward in direction of
arrow ?.
XSeat height: Press the switch up or down
in direction of arrow =.
XSeat cushion tilt: Press the switch up or
down in direction of arrow ; until your
upper legs are lightly supported.
XHead restraint height (vehicles with
memory function): Press the switch up or
down in direction of arrow :.
Head restraint height adjustment,
manual
This feature is only available in vehicles
without memory function.
GWarning!
For your protection, drive only with properly
positioned head restraints.
Adjust the head restraint so that it is as close
to the head as possible and the center of the
head restraint supports the back of the head
at eye level. This will reduce the potential for
injury to the head and neck in the event of an
accident or similar situation.
Do not drive the vehicle without the seat head
restraints. Head restraints are intended to
help reduce injuries during an accident.
With a rear seat occupied, make sure to move
the respective head restraint up from the
lowest non-use position and have the
occupant adjust the head restraint properly.
! Do not attempt to remove front seat head
restraints. They can only be removed by
qualified technicians. We recommend that
you have this work carried out by an
authorized Mercedes-Benz Center.
XRaising: Adjust the height of head
restraint : by pulling it upward.
If head restraint : is fully retracted, press
release button ; in direction of arrow and
pull head restraint : upward.
XLowering: Press release button ; in
direction of arrow and press down on head
restraint :.
Head restraint fore and aft adjustment
GWarning!
Vehicles with Rear Seat Entertainment
System: When adjusting the head restraint,
make sure your fingers do not become caught
between the head restraint cushion and the
monitor. Failing to do so may lead to injury.
XWhile seated, reach behind you with both
hands and find lower edge of the head
restraint.
XPush or pull on the lower edge of the head
restraint cushion to the desired position.
Seats83Controls in detail164_AKB; 7; 31, en-USd2ureepe,Version: 2.11.8.12009-09-11T12:07:36+02:00 - Seite 83Z
Page 86 of 368

Lumbar support
You can adjust the contour of the driver’s seat
lumbar support to help enhance support to
your spine.
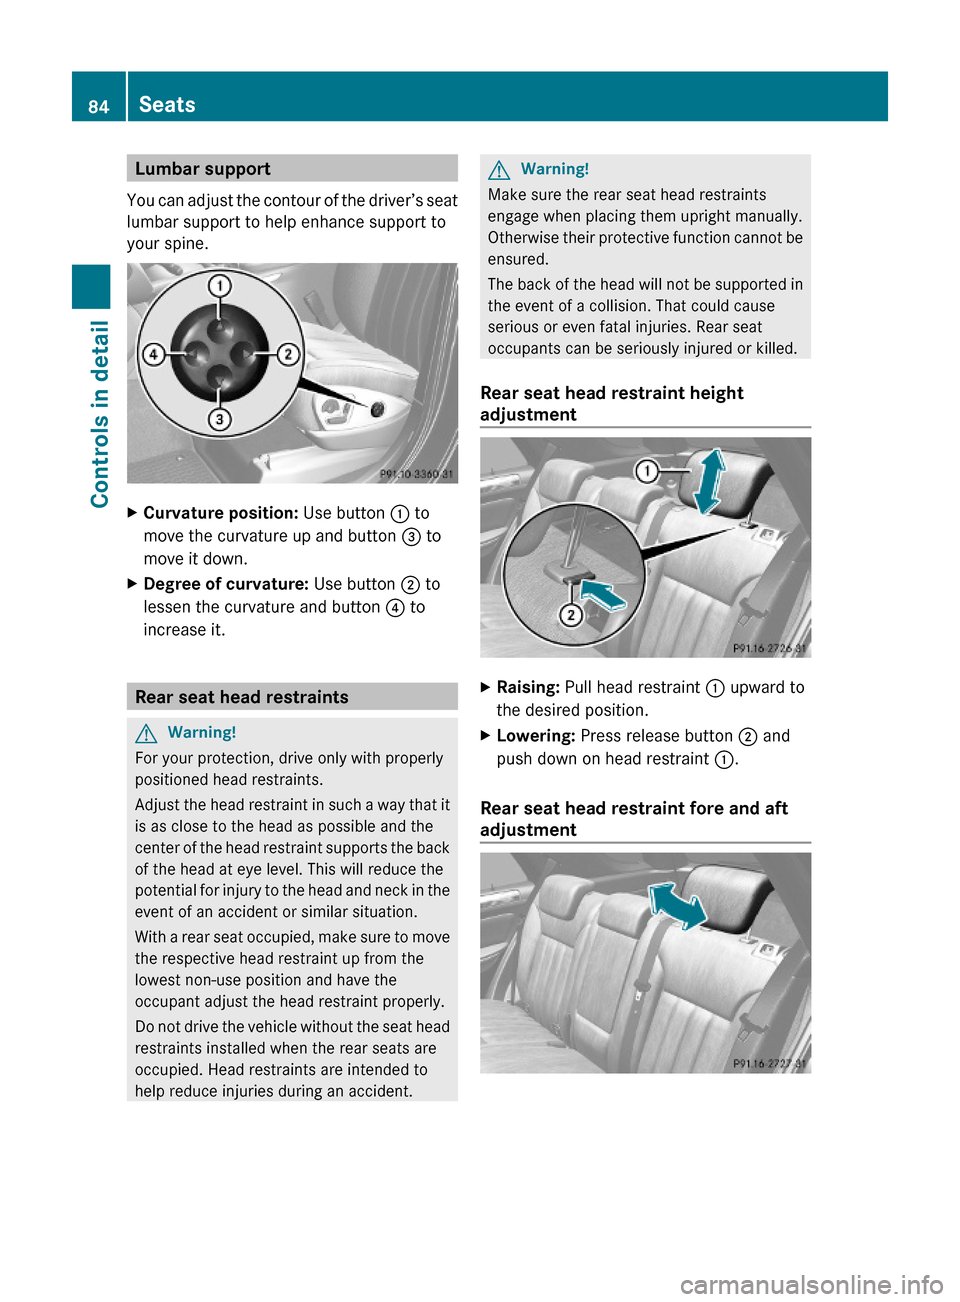
XCurvature position: Use button : to
move the curvature up and button = to
move it down.
XDegree of curvature: Use button ; to
lessen the curvature and button ? to
increase it.
Rear seat head restraints
GWarning!
For your protection, drive only with properly
positioned head restraints.
Adjust the head restraint in such a way that it
is as close to the head as possible and the
center of the head restraint supports the back
of the head at eye level. This will reduce the
potential for injury to the head and neck in the
event of an accident or similar situation.
With a rear seat occupied, make sure to move
the respective head restraint up from the
lowest non-use position and have the
occupant adjust the head restraint properly.
Do not drive the vehicle without the seat head
restraints installed when the rear seats are
occupied. Head restraints are intended to
help reduce injuries during an accident.
GWarning!
Make sure the rear seat head restraints
engage when placing them upright manually.
Otherwise their protective function cannot be
ensured.
The back of the head will not be supported in
the event of a collision. That could cause
serious or even fatal injuries. Rear seat
occupants can be seriously injured or killed.
Rear seat head restraint height
adjustment
XRaising: Pull head restraint : upward to
the desired position.
XLowering: Press release button ; and
push down on head restraint :.
Rear seat head restraint fore and aft
adjustment
84SeatsControls in detail
164_AKB; 7; 31, en-USd2ureepe,Version: 2.11.8.12009-09-11T12:07:36+02:00 - Seite 84
Page 157 of 368

Reduce set speed:XBriefly press the cruise control lever down
past the resistance point in direction of
arrow ;.
XRelease the cruise control lever.
The vehicle speed decreases in increments
of 5 mph (Canada: 10 km/h).
Each time the set speed is changed, DSR
will appear in the multifunction display and
the changed set speed is shown.
The new speed is set and the vehicle will
accelerate or decelerate. Keep in mind that
it may take a brief moment until the vehicle
has reached the new set speed.
The set speed is canceled when the DSR is
switched off. If the DSR is switched on again,
the DSR will use the programmed default
speed (Y page 138).
Off-road driving program
The off-road driving program is designed to
assist the driver when driving off-road in
terrain and crossing water. The off-road
driving program adjusts the engine power and
shifting of the automatic transmission to be
more suitable for the off-road use of the
vehicle. In addition, the ABS, ESP®, and 4-ETS
designed for off-road use are automatically
activated.
In the following situations you should switch
to the off-road driving program:
Rduring off-road driving
Rwhen crossing water (Y page 251)
Rwhen towing up or down on steep gradients
Example illustration: All models, exceptML 63 AMG
iIn AMG vehicles you can switch the Off-
road driving program on or off via the
control system (Y page 125).
XSwitching on: Press switch :.
Indicator lamp ; comes on. The symbol
Ç appears in the lower multifunction
display.
XSwitching off: Press switch : again.
Indicator lamp ; goes out. The symbol
Ç disappears.
Air suspension program
The system lets you select the chassis and
suspension setup. The chassis and
suspension setup adjusts the damping
behavior and the ride height for your vehicle.
The system consists of two components. The
Adaptive Damping System (ADS)
(Y page 156) and the vehicle level control
(Y page 156).
Driving systems155Controls in detail164_AKB; 7; 31, en-USd2ureepe,Version: 2.11.8.12009-09-11T12:07:36+02:00 - Seite 155Z
Page 158 of 368

ML 63 AMG
The air suspension program is part of the ML
63 AMG standard equipment range.
Due to the vehicle’s sportier suspension
tuning, in comparison with standard vehicles,
the level positions in the ADS settings as well
as the speed thresholds for raising and
lowering the vehicle have been modified.
From the highway/high-speed level, the
vehicle is lowered to the ADS SPORT level
approximately 20 seconds after it is locked.
From the raised level, the vehicle is not
lowered after it is locked. When the engine is
started, the previously selected setting, e.g.
ADS COMF, is selected again.
! Be sure to observe this vehicle’s differing
values for ground clearance and vehicle
height in comparison to standard vehicles.
You could otherwise damage the vehicle.
Observe the values for
Ropening the tailgate
Rdriving off-road
Rthe vehicle’s main dimensions in the
“Technical data” section
Adaptive Damping System (ADS)
The Adaptive Damping System (ADS) is
controlled electronically and operates
continuously. It adjusts the damping
characteristics to the current operating and
driving conditions. The damping is adjusted
individually for each wheel. Driving safety and
tire comfort are increased.
The fine tuning of the damping is dependent
on:
Ryour driving style
Rroad surface conditions
Ryour personal settings
The following settings are available:
RAUTO (for normal driving situations)
Indicator lamps ; and = are off.
RSPORT (for sporty driving)
Indicator lamp ; comes on.
With the ADS SPORT setting, the vehicle is
lowered approximately 0.6 in (15 mm).
ML63 AMG:
With the ADS SPORT setting, the vehicle is
lowered approximately 0.3 in (8 mm).
RCOMF (for comfort driving)
Indicator lamp = comes on.
ML63 AMG:
The vehicle is raised approximately 0.28 in
(7 mm).
XStart the engine.XPress ADS switch : repeatedly until the
desired suspension tuning is reached.
The setting remains stored when you turn off
the engine.
Vehicle level control
Your vehicle automatically adjusts its ride
height to increase vehicle safety and to
reduce fuel consumption.
Changes to the vehicle level should be made
while the vehicle is moving. The vehicle will
then reach the set level as fast as possible.
When you park the vehicle and the ambient
temperature changes, the vehicle level may
change visibly. When the temperature drops,
156Driving systemsControls in detail
164_AKB; 7; 31, en-USd2ureepe,Version: 2.11.8.12009-09-11T12:07:36+02:00 - Seite 156