2010 MERCEDES-BENZ ML350 Open Door
[x] Cancel search: Open DoorPage 110 of 368

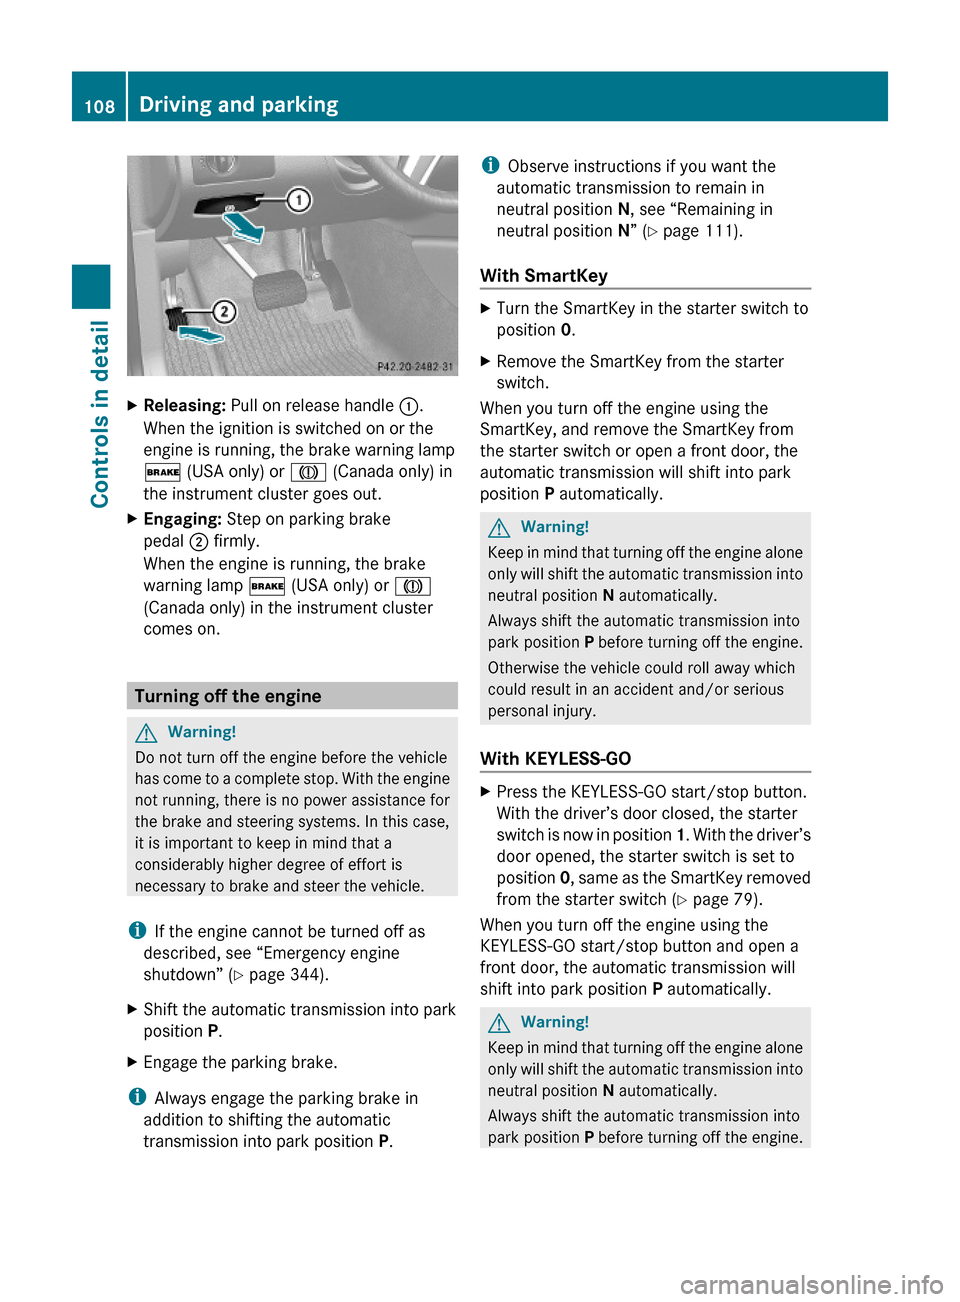
XReleasing: Pull on release handle :.
When the ignition is switched on or the
engine is running, the brake warning lamp
$ (USA only) or J (Canada only) in
the instrument cluster goes out.
XEngaging: Step on parking brake
pedal ; firmly.
When the engine is running, the brake
warning lamp $ (USA only) or J
(Canada only) in the instrument cluster
comes on.
Turning off the engine
GWarning!
Do not turn off the engine before the vehicle
has come to a complete stop. With the engine
not running, there is no power assistance for
the brake and steering systems. In this case,
it is important to keep in mind that a
considerably higher degree of effort is
necessary to brake and steer the vehicle.
iIf the engine cannot be turned off as
described, see “Emergency engine
shutdown” (Y page 344).
XShift the automatic transmission into park
position P.
XEngage the parking brake.
iAlways engage the parking brake in
addition to shifting the automatic
transmission into park position P.
iObserve instructions if you want the
automatic transmission to remain in
neutral position N, see “Remaining in
neutral position N” (Y page 111).
With SmartKey
XTurn the SmartKey in the starter switch to
position 0.
XRemove the SmartKey from the starter
switch.
When you turn off the engine using the
SmartKey, and remove the SmartKey from
the starter switch or open a front door, the
automatic transmission will shift into park
position P automatically.
GWarning!
Keep in mind that turning off the engine alone
only will shift the automatic transmission into
neutral position N automatically.
Always shift the automatic transmission into
park position P before turning off the engine.
Otherwise the vehicle could roll away which
could result in an accident and/or serious
personal injury.
With KEYLESS-GO
XPress the KEYLESS-GO start/stop button.
With the driver’s door closed, the starter
switch is now in position 1. With the driver’s
door opened, the starter switch is set to
position 0, same as the SmartKey removed
from the starter switch (Y page 79).
When you turn off the engine using the
KEYLESS-GO start/stop button and open a
front door, the automatic transmission will
shift into park position P automatically.
GWarning!
Keep in mind that turning off the engine alone
only will shift the automatic transmission into
neutral position N automatically.
Always shift the automatic transmission into
park position P before turning off the engine.
108Driving and parkingControls in detail
164_AKB; 7; 31, en-USd2ureepe,Version: 2.11.8.12009-09-11T12:07:36+02:00 - Seite 108
Page 112 of 368

something. Only shift into gear when the
engine is idling normally and when your right
foot is firmly on the brake pedal.
! The vehicle must be stopped when you
shift the automatic transmission
R directly between drive position D and
reverse gear R
R directly between reverse gear R and
drive position D
R directly into park position P
Otherwise the automatic transmission
could be damaged.
When trying to free a vehicle stuck in mud or
snow, see “Rocking the vehicle”
( Y page 113).
i Shifting the automatic transmission out of
park position P is only possible with the
brake pedal depressed.
Without the brake pedal depressed, the
gear selector lever can be moved up or
down, but the parking pawl remains
engaged, not allowing shifting to occur.
i Depending on vehicle production date:
The automatic transmission will shift into
park position P automatically when
R you open the driver’s door while driving
at low speed, and
R the automatic transmission is in drive
position D or reverse gear R
After the vehicle has engaged park position
P automatically, you can engage drive
position D or reverse gear R again to
override this locking feature purposely.
i The gear selector lever always returns to
its original position.
The current transmission position P, R , N ,
or D appears in the multifunction display
( Y page 112).Shifting into park position PXWith the vehicle at a standstill, press
button : on the gear selector lever.
SmartKey: When you turn off the engine using
the SmartKey, and remove the SmartKey
from the starter switch or open a front door,
the automatic transmission will shift into park
position P automatically.
KEYLESS-GO: When you turn off the engine
using the KEYLESS-GO start/stop button and
open a front door, the automatic transmission
will shift into park position P automatically.
GWarning!
Keep in mind that turning off the engine alone
only will shift the automatic transmission into
neutral position N automatically.
Always shift the automatic transmission into
park position P before turning off the engine.
Otherwise the vehicle could roll away which
could result in an accident and/or serious
personal injury.
i Moving the gear selector lever up or down
shifts the automatic transmission out of
park position P.
Shifting into neutral position N
XWith the vehicle at a standstill, depress the
brake pedal.XMove the gear selector lever up or down to
the resistance point to select neutral
position N.
When you turn off the engine, the automatic
transmission will shift into neutral position
N automatically.
SmartKey: Removing the SmartKey from the
starter switch or opening a front door after
turning off the engine will shift the automatic
transmission into park position P
automatically.
KEYLESS-GO: Opening a front door after
turning off the engine will shift the automatic
110Automatic transmissionControls in detail
164_AKB; 7; 31, en-USd2ureepe,Version: 2.11.8.12009-09-11T12:07:36+02:00 - Seite 110
Page 120 of 368

GWarning!
No messages will be displayed if either the
instrument cluster or the multifunction
display is inoperative.
As a result, you will not be able to see
information about your driving conditions,
such as
Rspeed
Routside temperature
Rwarning/indicator lamps
Rmalfunction/warning messages
Rfailure of any systems
Driving characteristics may be impaired.
If you must continue to drive, do so with added
caution. Contact an authorized Mercedes-
Benz Center as soon as possible.
GWarning!
HYBRID vehicles: It is imperative that you read
the HYBRID Supplemental Operating
Instructions included in your vehicle literature
portfolio. You may otherwise not recognize
potential danger.
:To dim instrument cluster illumination;Reset button =To brighten instrument cluster
illumination
For information on changing the instrument
cluster settings, e.g. the language, see
(Y page 130).
Activating the instrument cluster
The instrument cluster is activated when you
Ropen the driver’s door
Rswitch on the ignition
Rpress button :, ; or =
iOpening the driver’s door or pressing
button :, ; or = without switching on
the ignition activates the instrument
cluster illumination only for 30 seconds.
Adjusting the instrument cluster
illumination
XTo brighten illumination: Press and hold
button = until the desired level of
illumination is reached.
XTo dim illumination: Press and hold
button : until the desired level of
illumination is reached.
iThe instrument cluster illumination is
dimmed or brightened automatically to suit
ambient light conditions.
The instrument cluster illumination will also
be adjusted automatically when you switch
on the vehicle’s exterior lamps.
iWith the exterior lighting switched on, the
brightness of the switches in the center
console will also be adjusted when using
button : or =.
Resetting trip odometer
XMake sure you are viewing the standard
display (Y page 122) in the multifunction
display.
XPress and hold the reset button in the
instrument cluster (Y page 117) until the
trip odometer is reset.
118Instrument clusterControls in detail
164_AKB; 7; 31, en-USd2ureepe,Version: 2.11.8.12009-09-11T12:07:36+02:00 - Seite 118
Page 126 of 368

:Vehicle supply voltage indicator
RACETIMER
GWarning!
The RACETIMER feature is only for use on
roads and in conditions where high speed
driving is permitted. Racing on public roads is
prohibited under all circumstances. The driver
is and must always remain responsible for
following posted speed limits.
The RACETIMER allows you to time and save
driving stretches.
XPress button V or U repeatedly until
the AMG menu appears in the
multifunction display.
XPress button & repeatedly until the
RACETIMER appears in the multifunction
display.
:RACETIMER;Lap number
You can start the RACETIMER when the
engine is running or the starter switch is in
position 2 (Y page 79).
While the RACETIMER is being displayed, you
cannot adjust the audio volume using buttons
W or X.
XStarting: Press button W.XDisplaying intermediate time: Press
button X while the timer is running.
The intermediate time is shown for
5 seconds.
XStopping: Press button W.
When you stop the vehicle and turn the
SmartKey to position 1 (Y page 79) or, in
vehicles with KEYLESS-GO, turn off the
engine and do not open the driver’s door, the
RACETIMER stops timing. Timing is resumed
when you press button W after switching
the ignition back on or restarting the engine.
Saving lap time and starting a new lap
You can save up to nine laps.
XPress button X while the timer is
running.
The intermediate time will be shown for
5 seconds.
XPress button X within 5 seconds.
The intermediate time shown will be saved
as a lap time.
The RACETIMER begins timing the new lap.
The new lap begins to be timed as soon as
the intermediate time is called up.
:RACETIMER;Best lap time=Lap number
Resetting current lap
XPress button W while the timer is
running.
The timer stops.
XPress button X.
The lap time is reset to “0”.
124Control systemControls in detail
164_AKB; 7; 31, en-USd2ureepe,Version: 2.11.8.12009-09-11T12:07:36+02:00 - Seite 124
Page 131 of 368

Should the vehicle’s system record any
conditions while driving, the number of
messages will reappear in the multifunction
display when the SmartKey in the starter
switch is turned to position 0 or removed
from the starter switch. With KEYLESS-GO,
the number of messages will reappear when
you turn off the engine by pressing the
KEYLESS-GO start/stop button and open the
driver’s door.
Except for high-priority messages, the vehicle
status message memory will be cleared when
you switch off the ignition.
Settings menu
Introduction
In the Settings menu there are two
functions: The function To reset, press
reset button for 3 seconds, with which
you can reset all the settings to the original
factory settings and a collection of submenus
with which you can make individual settings
for your vehicle.
The following settings and submenus are
available in the Settings menu:
RResetting to factory settings
(Y page 129)
RSubmenus in the Settings menu
(Y page 130)
RInstrument cluster submenu
(Y page 130)
RTime/Date submenu (Y page 132)
RLighting submenu (Y page 133)
RVehicle submenu (Y page 135)
RComfort submenu (Y page 135)
Resetting to factory settings
You can reset the settings of all submenus to
the factory settings.
For safety reasons, the function Lamp
Circuit Headlamp in the Lighting
submenu cannot be reset while driving.
The following message appears in the
multifunction display:
Settings
Cannot be
completely reset
to factory settings
when engine is running.
XPress button V or U repeatedly until
the Settings menu appears in the
multifunction display.
XPress the reset button in the instrument
cluster (Y page 117) for approximately
3 seconds.
The request to press the reset button once
more to confirm appears in the
multifunction display.
XPress the reset button once more.
The settings you have changed will not be
reset unless you confirm the action by
pressing the reset button a second time. After
approximately 5 seconds, the Settings
menu reappears in the multifunction display.
Control system129Controls in detail164_AKB; 7; 31, en-USd2ureepe,Version: 2.11.8.12009-09-11T12:07:36+02:00 - Seite 129Z
Page 136 of 368

RLicense plate lamps
RSide marker lamps
RFront fog lamps
The locator lighting goes out when the driver’s
door is opened.
If you do not open the driver’s door after
unlocking the vehicle with the SmartKey, the
lamps will go out automatically after
approximately 40 seconds.
XPress button V or U repeatedly until
the Settings menu appears in the
multifunction display.
XPress button &.XMove the selection marker with button
W or X to the Lighting submenu.
XPress button & or * repeatedly until
the message Surround Lighting
Function appears in the multifunction
display.
The selection marker is on the current
setting.
XPress button W or X to switch the
locator lighting function On or Off.
XTurn the exterior lamp switch to position
à when exiting the vehicle.
The locator lighting feature is activated.
Switching night security illumination
(Headlamps delayed shut-off feature) on
or off
Use this function to set whether you would
like the exterior lamps to remain on for
15 seconds during darkness after exiting the
vehicle and closing all doors.
With the headlamps delayed shut-off feature
activated and the exterior lamp switch in
position à before the engine is turned off,
the following lamps will come on when the
engine is turned off:
RParking lamps
RTail lamps
RLicense plate lamps
RSide marker lamps
RFront fog lamps
If, after turning off the engine, you do not
open a door or do not close an opened door,
the lamps will automatically go out after
60 seconds.
XPress button V or U repeatedly until
the Settings menu appears in the
multifunction display.
XPress button &.XMove the selection marker with button
W or X to the Lighting submenu.
XPress button & or * repeatedly until
the message Headlamp Delayed Shut-
off appears in the multifunction display.
The selection marker is on the current
setting.
XPress button W or X to switch the
headlamps delayed shut-off feature On or
Off.
XTurn the exterior lamp switch to position
à before turning off the engine.
The headlamps delayed shut-off feature is
activated.
134Control systemControls in detail
164_AKB; 7; 31, en-USd2ureepe,Version: 2.11.8.12009-09-11T12:07:36+02:00 - Seite 134
Page 138 of 368

The following functions are available:
RActivating easy-entry/exit feature
(Y page 136)
RActivating/deactivating the seat belt
adjustment feature (Y page 136)
RSwitching fold-in function for exterior rear
view mirrors on or off (Y page 137)
Activating easy-entry/exit feature
Use this function to activate and deactivate
the easy-entry/exit feature (Y page 87).
GWarning!
You must make sure no one can become
trapped or injured by the moving steering
wheel when the easy-entry/exit feature is
activated.
To stop steering wheel movement do one of
the following:
RMove steering wheel adjustment stalk.
RPress one of the memory position buttons.
RPress memory button M.
Do not leave children unattended in the
vehicle, or with access to an unlocked vehicle.
Children could open the driver’s door and
unintentionally activate the easy-entry/exit
feature, which could result in an accident
and/or serious personal injury.
XPress button V or U repeatedly until
the Settings menu appears in the
multifunction display.
XPress button &.XMove the selection marker with button
W or X to the Comfort submenu.
XPress button & or * repeatedly until
the message Easy-entry Function
appears in the multifunction display.
The selection marker is on the current
setting.
XPress button W or X to activate (On)
or deactivate (Off) the easy-entry/exit
feature.
Activating/deactivating seat belt
adjustment feature
Use this feature to set the seat belts to be
adjusted automatically with the driver’s or
front passenger seat belt fastened and the
starter switch in position 2.
For more information on the seat belt
adjustment feature, see (Y page 51).
XPress button V or U repeatedly until
the Settings menu appears in the
multifunction display.
XPress button &.XMove the selection marker with button
W or X to the Comfort submenu.
XPress button & or * repeatedly until
the message Belt Adjustment appears in
the multifunction display.
The selection marker is on the current
setting.
XPress button W or X to active (On) or
deactivate (Off) the seat belt adjustment
feature.
136Control systemControls in detail
164_AKB; 7; 31, en-USd2ureepe,Version: 2.11.8.12009-09-11T12:07:36+02:00 - Seite 136
Page 159 of 368

the vehicle lowers. When the temperature
rises, the vehicle raises.
The vehicle automatically regulates its ride
height based on the set vehicle height and the
current speed:
RAs your driving speed increases, the vehicle
is lowered by increments until it reaches
highspeed level.
RVehicles with ADS: If you are driving with
the ADS setting COMF or AUTO, the
vehicle is raised back to highway level as
your driving speed decreases.
RVehicles with ADS: You can select the
highspeed level via the ADS setting
SPORT. In ADS SPORT, the vehicle is
lowered directly to highspeed level as your
driving speed increases.
The vehicle begins adjusting to the set vehicle
level as soon as the doors or tailgate are
unlocked or opened or closed with the vehicle
unlocked.
In order to operate the vehicle level control
switch (Y page 157), however, the engine
must be running.
GWarning!
Make sure no one is near the wheel housing
or under the vehicle when you lower the
vehicle while it is standing still. Limbs could
become wedged into or under the vehicle.
For safety reasons, the vehicle can only be
lowered with all doors and the tailgate closed.
Lowering is interrupted if a door or the tailgate
is opened and will continue after the door is
closed again.
GWarning!
Please be aware that by raising the vehicle
level, the center of gravity also rises.
Therefore, always ensure that the vehicle
level is as low as possible. With higher ride
height the ESP® may activate earlier in certain
situations.
Adapt your speed and driving to possible
changed driving behavior of the vehicle after
changing the vehicle level. The ESP® cannot
prevent accidents, including those resulting
from excessive speed. The ESP® cannot
prevent the natural laws of physics from
acting on the vehicle.
! Keep in mind that in rough or uneven
terrain, adjusting the vehicle to a lower
level may cause the vehicle underbody to
come in contact with the ground and result
in damage to the vehicle underbody.
Always make sure the vehicle has sufficient
ground clearance before adjusting it to a
lower level.
! Before jacking up the vehicle with
equipment that lifts one or more of the
wheels completely off of the ground,
remove the SmartKey from the starter
switch.
For information on off-road driving, see “Off-
road driving” (Y page 248).
Basic settings (except ML 63 AMG)
The following vehicle chassis ride heights can
be selected using vehicle level control
switch : in the center console:
Driving systems157Controls in detail164_AKB; 7; 31, en-USd2ureepe,Version: 2.11.8.12009-09-11T12:07:36+02:00 - Seite 157Z