2010 MERCEDES-BENZ ML350 Low rang
[x] Cancel search: Low rangPage 200 of 368

Cargo compartment
115V AC Socket
GWarning!
The 115V AC socket operates at high voltage.
Use the 115V AC socket in the vehicle with
the same caution and prudence that you
exercise when using power outlets at home.
Keep any fluids away from the 115V AC
socket. Do not clean the socket with fluids or
tapered objects. Keep the 115V AC socket
cover in the closed position, when not in use.
Otherwise, you could suffer an electric shock
and be seriously or even fatally injured.
GWarning!
A device that you connect must have a
suitable plug that complies with U.S.
standards. Never pull on the cable to unplug
a plug from the 115V AC socket. Do not use
a damaged connection cable. The 115V AC
socket may not be connected to another
115V AC power source. Do not use converters
to a grounding plug with the 115V AC socket.
This could cause serious personal injury to
you and/or others.
GWarning!
If the 115V AC socket is damaged or torn out
of the trim, do not use or touch the 115V AC
socket. Using a 115V AC socket that is
damaged or torn out of the trim could cause
serious personal injury to you and/or others.
The 115V AC socket : provides an
alternating current of 115 volts, which
enables you to connect small electrical
devices with a combined received power of
150 W at most. You can connect small
devices such as game consoles, mobile
phone chargers, laptops, etc.
Prerequisites for operation:
RThe 12V power outlets in the second-row
footwell and cargo compartment
(Y page 197) are operational.
RThe plug of the small device must be
inserted fully into 115V AC socket :.
RThe on-board voltage of the vehicle is within
the permissible voltage range.
RThe specified wattage of the small device
is identical or lower than the maximum
permissible wattage (150 W) of the 115V
AC socket :.
XOperation: Open cover =.XInsert the plug of the small device into
115V AC socket :.
LED ; comes on.
If LED ; does not come on, refer to the
section on possible nonoperation causes.
XSwitching off: Pull the plug out of 115V AC
socket :.
Do not pull on the cable.
XClose cover =.
Possible nonoperation causes:
RThe on-board voltage of the vehicle is not
within the permissible voltage range.
198Useful featuresControls in detail
164_AKB; 7; 31, en-USd2ureepe,Version: 2.11.8.12009-09-11T12:07:36+02:00 - Seite 198
Page 205 of 368
iIf the indicator lamp in Information
button : is flashing continuously and
there was no voice connection to the
Customer Assistance Center established,
then the Tele Aid system could not initiate
an Information call (e.g. the relevant
cellular phone network is not available).
The message Call Failed appears in the
multifunction display.XTerminating calls: Press button ~ on
the multifunction steering wheel.
or
XPress the respective button for ending a
telephone call on the COMAND system.
Call priority
If other service calls such as a Roadside
Assistance call or Information call are active,
an emergency call is still possible. In this
case, the emergency call will take priority and
override all other active calls.
The indicator lamp in the respective button
flashes until the call is concluded. Automatic
initiated emergency calls can only be
terminated by a Customer Assistance Center
representative. All other calls can be
terminated by pressing button ~ on the
multifunction steering wheel or the
respective button for ending a telephone call
on the COMAND system.
i When a Tele Aid call has been initiated,
the COMAND system audio is muted. The
mobile phone is no longer connected to the
COMAND system. If you must use this
phone, we recommend that you use it only
with the vehicle at a standstill in a safe
location.
Destination Download to the COMAND
system
i The components and operating principles
of the COMAND system can be found in the
separate COMAND system operating
instructions.
Destination Download allows you access to a
database of over 10 million points of interest
(POIs) that can be downloaded to your
vehicle’s navigation system. If you know the
destination, the address can be downloaded,
or can be provided with points of interests
near your location.
Route guidance
You will be prompted to confirm that route
guidance to the entered address is to be
started.XSelect Yes using button = or ; on
the COMAND system.XPress button 9 on the COMAND system
to confirm.
The system calculates the route and
subsequently starts the route guidance to the
defined address.
i If you select No, you can save the address
to your address book.
i The Destination Download feature is
available if the relevant mobile phone
network is available and data connection is
possible.
Search & Send
“Search & Send” is a navigation destination
address entry service. For more information
on “Search & Send”, refer to separate
COMAND system operating instructions.
Remote door unlock
In case you have locked your vehicle
unintentionally (e.g. SmartKey inside vehicle),
and the reserve SmartKey is not available:
XContact the Customer Assistance Center
at 1-800-FOR-MERCedes
(1-800-367-6372) (USA only) or
1-888-923-8367 (Canada only).
You will be asked to provide your password.XThen return to your vehicle at the time
arranged and pull the tailgate recessed
handle ( Y page 75) for a minimum ofUseful features203Controls in detail164_AKB; 7; 31, en-USd2ureepe,Version: 2.11.8.12009-09-11T12:07:36+02:00 - Seite 203Z
Page 212 of 368

Vehicle equipment
i This Operator’s Manual describes all
features, standard or optional, potentially
available for your vehicle at the time of
purchase. Please be aware that your
vehicle might not be equipped with all
features described in this manual.
The first 1000 miles (1500 km)
The more cautiously you treat your vehicle
during the break-in period, the more satisfied
you will be with its performance later on.
R Drive your vehicle during the first
1 000 miles (1 500 km) at varying but
moderate vehicle and engine speeds.
R During this period, avoid heavy loads (full
throttle driving) and excessive engine
speeds (no more than 2
/ 3 of maximum rpm
in each gear).
R Avoid accelerating by kickdown.
R Do not attempt to slow the vehicle down by
shifting to a lower gear using the gear
selector lever.
R Select gear ranges 3, 2 or 1 (Y page 113)
only when driving at moderate speeds (for
hill driving).
After 1 000 miles (1 500 km) you may
gradually increase vehicle and engine speeds
to the permissible maximum.
! Additional instructions for ML 63 AMG:
R During the first 1 000 miles (1 500 km),
do not exceed a speed of 85 mph
(140 km/h).
R During this period, avoid engine speeds
above 4 500 rpm in each gear.
R Shift gears in a timely manner.
R Select C as the preferred shift program
for the first 1 000 miles (1 500 km).
All of the above instructions, as may apply to
your vehicle type, also apply when driving the
first 1 000 miles (1 500 km) after the engine,
the transfer case, the front differential or the
rear differential have been replaced.
i Always obey applicable speed limits.
At the gas station
Refueling
GWarning!
Gasoline and diesel fuels are highly flammable
and poisonous. They burn violently and can
cause serious injury.
Never allow sparks, flames or smoking
materials near gasoline or diesel fuel!
Turn off the engine before refueling.
Whenever you are around gasoline or diesel
fuel, avoid inhaling fumes and any skin or
clothing contact. Extinguish all smoking
materials.
Direct skin contact with fuels and the
inhalation of fuel vapors are damaging your
health.
GWarning!
Overfilling of the fuel tank may create
pressure in the system which could cause a
gas discharge. This could cause the gas to
spray back out when removing the fuel pump
nozzle, which could cause personal injury.
GWarning!
Do not fill diesel tanks with gasoline. Do not
mix diesel fuel with gasoline. Otherwise the
fuel system and engine could be damaged. In
addition, the vehicle could catch fire.
GWarning!
HYBRID vehicles: It is imperative that you read
the HYBRID Supplemental Operating
Instructions included in your vehicle literature
portfolio. You may otherwise not receive all
necessary safety information and warning for
the operation of your vehicle.
210At the gas stationOperation
164_AKB; 7; 31, en-USd2ureepe,Version: 2.11.8.12009-09-11T12:07:36+02:00 - Seite 210
Page 228 of 368

The respective tire is indicated by a red
rectangle.
Restarting Advanced TPMSGWarning!
It is the driver’s responsibility to set the tire
inflation pressure to the recommended cold
tire inflation pressure. Underinflated tires
affect the ability to steer or brake the vehicle.
You might lose control over the vehicle.
When you restart the TPMS, the system sets
new reference values for each tire.
The TPMS must be restarted when you have
adjusted the tire inflation pressure to a new
level (e.g. because of different load or driving
conditions). The TPMS is then recalibrated to
the current tire inflation pressures.
Restart the TPMS after adjusting the tire
inflation pressure to the inflation pressure
recommended for the vehicle operating
condition. Tire pressure should only be
adjusted on cold tires. Observe the
recommended tire inflation pressure on the
Tire and Loading Information placard on the
driver’s door B-pillar. Some vehicles may have
supplemental tire pressure information for
driving at high speeds or for vehicle loads less
than the maximum loaded vehicle condition.
If such information is provided, it can be
found on the inside of the fuel filler flap.
XUsing the Tire and Loading Information
placard on the driver’s door B-pillar
( Y page 227) or the supplemental tire
inflation pressure information on the inside
of the fuel filler flap, make sure the tire
inflation pressure of all four tires is correct.XSwitch on the ignition.XPress button V or U on the
multifunction steering wheel repeatedly
until the standard display appears in the
multifunction display ( Y page 122).XPress button & or * repeatedly until
you see the current inflation pressures for
each tire appear in the display or the
following message appears in the
multifunction display: Tire pressure
displayed after
driving for
a few minutes.XPress the reset button ( Y page 117).
The following message will appear in the
multifunction display:
Restart tire
pressure monitor?XIf you wish to confirm: Press button
W .
The following message will appear in the
multifunction display:
Tire Pressure Monitor
Restarted
After driving a few minutes the system
verifies that the current tire inflation
pressures are within the system’s specified
range. Afterwards the current tire inflation
pressures are accepted as reference values
and then monitored.XIf you wish to cancel: Press button X.
i
When the wheel positions have been
changed, the inflation pressure of a tire
may be displayed for the wrong position
temporarily. After driving for a few minutes,
the inflation pressure will be shown for the
correct position.
Maximum tire inflation pressure
GWarning!
Never exceed the maximum tire inflation
pressure. Follow recommended tire inflation
pressures.
Do not underinflate tires. Underinflated tires
wear excessively and/or unevenly, adversely
affect handling and fuel economy, and are
more likely to fail from being overheated.
Do not overinflate tires. Overinflated tires can
adversely affect handling and ride comfort,
wear unevenly, increase stopping distance,
and result in sudden deflation (blowout)
because they are more likely to become
226Tires and wheelsOperation
164_AKB; 7; 31, en-USd2ureepe,Version: 2.11.8.12009-09-11T12:07:36+02:00 - Seite 226
Page 240 of 368

IndexSpeed ratingH M+S20up to 130 mph (210 km/h)V M+S20up to 149 mph (240 km/h)
iNot all M+S rated tires provide special
winter performance. Make sure the tires
you use show M+S and the mountain/
snowflakeimarking on the tire
sidewall. These tires meet specific snow
traction performance requirements of the
Rubber Manufacturers Association (RMA)
and the Rubber Association of Canada
(RAC) and have been designed specifically
for use in snow conditions.
An electronic speed limiter prevents your
vehicle from exceeding a speed of:
RAll models except ML 63 AMG:
130 mph (210 km/h)
RML 63 AMG:
155 mph (250 km/h)
RML 63 AMG with increased top speed:
171 mph (275 km/h)
The factory equipped tires on your vehicle
may have a tire speed rating above the
maximum speed permitted by the electronic
speed limiter.
Make sure your tires have the required tire
speed rating as specified for your vehicle in
the “Technical data” section (Y page 352),
for example when purchasing new tires.
If you are uncertain about the correct reading
of the information given on a tire’s sidewall,
any authorized Mercedes-Benz Center will be
glad to assist you.
Load identification
iFor illustration purposes only. Actual data
on tires are specific to each vehicle and
may vary from data shown in above
illustration.
In addition to the load index, special load
identification : may be molded into the tire
sidewall following the letter designating the
speed symbol B (Y page 236).
RNo specification given: absence of any text
(like in above example) indicates a
standard load (SL) tire.
RXL or Extra Load: designates an extra load
(or reinforced) tire.
RLight Load: designates a light load tire.
RC, D, E: designates load range associated
with the maximum load a tire can carry at
a specified pressure.
DOT, Tire Identification Number (TIN)
U.S. tire regulations require each new tire
manufacturer or tire retreader to mold a TIN
into or onto a sidewall of each tire produced.
20or M+Sifor winter tires238Tires and wheelsOperation
164_AKB; 7; 31, en-USd2ureepe,Version: 2.11.8.12009-09-11T12:07:36+02:00 - Seite 238
Page 246 of 368

position N. Try to keep the vehicle under
control by corrective steering action.
i For information on driving with snow
chains, see “Snow chains” ( Y page 243).
Road salts and chemicals can adversely
affect braking efficiency. Increased pedal
force may become necessary to produce the
normal brake effect.
Depressing the brake pedal periodically when
traveling at length on salt-strewn roads can
bring road-salt-impaired braking efficiency
back to normal.
If the vehicle is parked after being driven on
salt-treated roads, the braking efficiency
should be tested as soon as possible after
driving is resumed.GWarning!
Make sure not to endanger any other road
users when carrying out these braking
maneuvers.
Driving instructions
Drive sensibly – save fuel
To save fuel you should:
R Keep tires at the recommended inflation
pressures.
R Remove unnecessary loads.
R Remove carriers when not in use.
R Allow engine to warm up under low load
use.
R Avoid frequent acceleration and
deceleration.
R Have all maintenance work performed at
the intervals specified in the Maintenance
Booklet and as required by the
Maintenance system. Contact an
authorized Mercedes-Benz Center.
Fuel consumption is also increased by driving
in cold weather, in stop-and-go traffic, on
short trips and in mountainous areas.
Drinking and drivingGWarning!
Drinking and driving and/or taking drugs and
driving are very dangerous combinations.
Even a small amount of alcohol or drugs can
affect your reflexes, perceptions and
judgment.
The possibility of a serious or even fatal
accident are greatly increased when you drink
or take drugs and drive.
Do not drink or take drugs and drive or allow
anyone to drive who has been drinking or
taking drugs.
Pedals
GWarning!
Make sure absolutely no objects are
obstructing the pedals’ range of movement.
Keep the driver’s footwell clear of all
obstacles. If there are any floormats or
carpets in the footwell, make sure that the
pedals still have sufficient clearance.
During sudden driving or braking maneuvers,
the objects could get caught between the
pedals. You could then no longer brake or
accelerate. This could lead to accidents and
injury.
Power assistance
GWarning!
There is no power assistance for the steering
and the brake when the engine is not running.
Steering and braking requires significantly
more effort and you could lose control of the
vehicle and cause an accident as a result.
Do not turn off the engine while the vehicle is
in motion.
244Driving instructionsOperation
164_AKB; 7; 31, en-USd2ureepe,Version: 2.11.8.12009-09-11T12:07:36+02:00 - Seite 244
Page 252 of 368
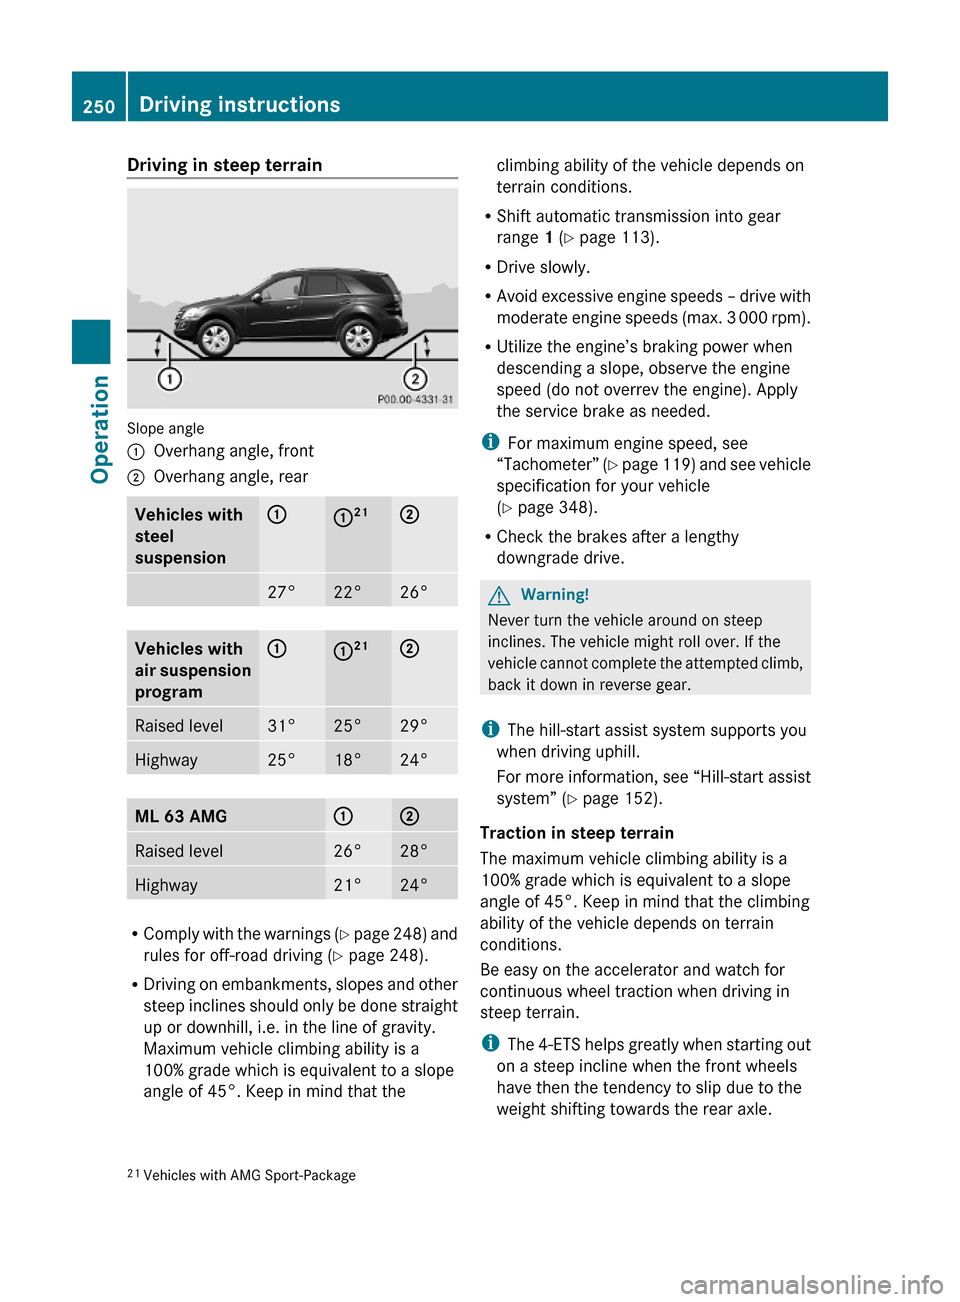
Driving in steep terrain
Slope angle
:Overhang angle, front;Overhang angle, rearVehicles with
steel
suspension
::21;27°22°26°Vehicles with
air suspension
program
::21;Raised level31°25°29°Highway25°18°24°ML 63 AMG:;Raised level26°28°Highway21°24°
RComply with the warnings (Y page 248) and
rules for off-road driving (Y page 248).
RDriving on embankments, slopes and other
steep inclines should only be done straight
up or downhill, i.e. in the line of gravity.
Maximum vehicle climbing ability is a
100% grade which is equivalent to a slope
angle of 45°. Keep in mind that the
climbing ability of the vehicle depends on
terrain conditions.
RShift automatic transmission into gear
range 1 (Y page 113).
RDrive slowly.
RAvoid excessive engine speeds – drive with
moderate engine speeds (max. 3 000 rpm).
RUtilize the engine’s braking power when
descending a slope, observe the engine
speed (do not overrev the engine). Apply
the service brake as needed.
iFor maximum engine speed, see
“Tachometer” (Y page 119) and see vehicle
specification for your vehicle
(Y page 348).
RCheck the brakes after a lengthy
downgrade drive.
GWarning!
Never turn the vehicle around on steep
inclines. The vehicle might roll over. If the
vehicle cannot complete the attempted climb,
back it down in reverse gear.
iThe hill-start assist system supports you
when driving uphill.
For more information, see “Hill-start assist
system” (Y page 152).
Traction in steep terrain
The maximum vehicle climbing ability is a
100% grade which is equivalent to a slope
angle of 45°. Keep in mind that the climbing
ability of the vehicle depends on terrain
conditions.
Be easy on the accelerator and watch for
continuous wheel traction when driving in
steep terrain.
iThe 4-ETS helps greatly when starting out
on a steep incline when the front wheels
have then the tendency to slip due to the
weight shifting towards the rear axle.
21Vehicles with AMG Sport-Package250Driving instructionsOperation
164_AKB; 7; 31, en-USd2ureepe,Version: 2.11.8.12009-09-11T12:07:36+02:00 - Seite 250
Page 253 of 368
The 4-ETS recognizes the situation and
limits the torque for the front wheels by
braking them.
Simultaneously the torque for the rear
wheels is increased.
Driving across a hilltop
Decelerate just ahead of a hilltop (do not shift
automatic transmission into neutral position
N), to prevent the vehicle from speeding up
too much after climbing a hill.
Use the momentum of the vehicle to drive
across the hilltop.
After climbing a hill, driving in this manner
prevents the vehicle from:
Rlosing ground contact when cresting hills
Rlosing its forward momentum
Rspeeding up too much after climbing the hill
Driving downhill
RDrive slowly.
RDo not drive at an angle to the incline. Steer
into the line of gravity and drive with the
front wheels pointing straight downhill.
Otherwise, the vehicle may slide sideways
off the path and roll over.
RShift automatic transmission into gear
range 1 (Y page 113).
ROn steep inclines, use the Downhill Speed
Regulation (Y page 152).
RUtilize the engine’s braking power to
reduce vehicle speed.
If this is insufficient, apply the brakes
gently. Make sure the vehicle is moving in
the line of gravity.
RCheck the brakes after a lengthy
downgrade drive.
iThe special Off-road ABS (Y page 63)
setting allows for precise and brief
(cyclical) blocking of the front wheels,
permitting them to dig into loose ground.
Remember that, when stopped, the front
wheels slide across a surface and thus lose
their ability to steer the vehicle.
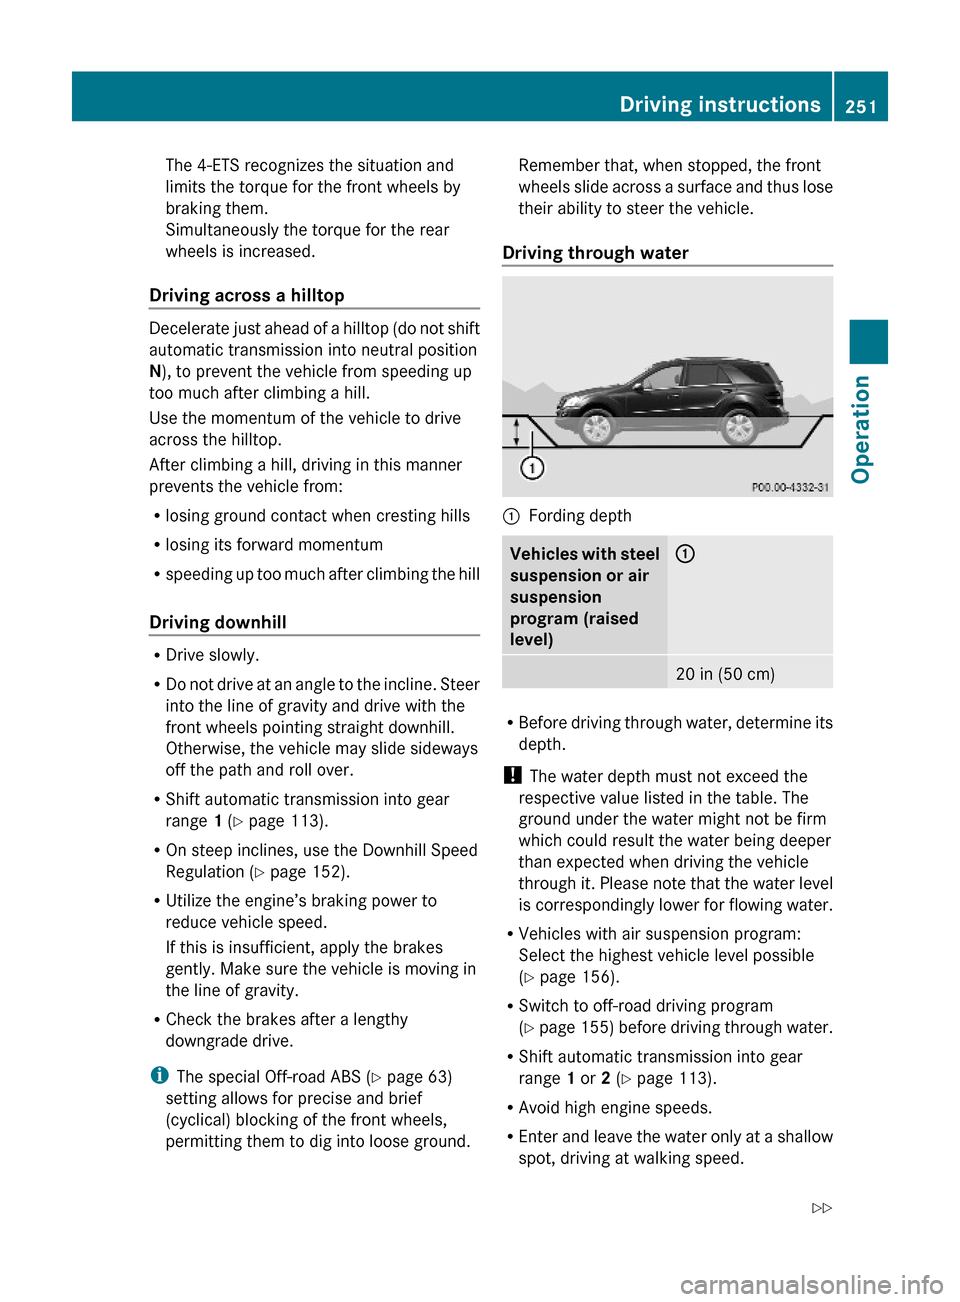
Driving through water
:Fording depthVehicles with steel
suspension or air
suspension
program (raised
level)
:20 in (50 cm)
RBefore driving through water, determine its
depth.
! The water depth must not exceed the
respective value listed in the table. The
ground under the water might not be firm
which could result the water being deeper
than expected when driving the vehicle
through it. Please note that the water level
is correspondingly lower for flowing water.
RVehicles with air suspension program:
Select the highest vehicle level possible
(Y page 156).
RSwitch to off-road driving program
(Y page 155) before driving through water.
RShift automatic transmission into gear
range 1 or 2 (Y page 113).
RAvoid high engine speeds.
REnter and leave the water only at a shallow
spot, driving at walking speed.
Driving instructions251Operation164_AKB; 7; 31, en-USd2ureepe,Version: 2.11.8.12009-09-11T12:07:36+02:00 - Seite 251Z