2010 MERCEDES-BENZ ML350 Los Range
[x] Cancel search: Los RangePage 16 of 368

OCS (Occupant Classification
System) ................................................ 42
Self-test ........................................... 45
Odometer ........................................... 121
Off-road driving ................................. 248
Checklist ............................... 249, 253
Crossing obstacles ........................252
Driving instructions ........................ 248
Driving on sand .............................. 252
Driving through water ....................251
Returning ....................................... 253
Ruts ............................................... 253
Steep terrain .................................. 250
Off-road driving program .................. 155
Off-road Mode menu ......................... 125
Oil, oil level see Engine oil
On-board computer
see Control system
One-touch gearshifting ..................... 115
Operating safety .................................. 23
Ornamental moldings, cleaning ....... 262
Outside temperature see Displays
Overhead control panel ...................... 32
P
Paintwork, cleaning .......................... 261
Paintwork code ................................. 347
Panic alarm .......................................... 61
Parcel nets ......................................... 188
Parking ............................................... 107
Parktronic system ..........................160
Parking brake ............................ 107, 247
Messages in the multifunction
display ........................................... 284
Parking position
Exterior rear view mirrors ................90
Transmission position ....................112
Parktronic system
Cleaning system sensors ...............263
Malfunction .................................... 163
Minimum distance .........................161
Sensor range ................................. 161
Switching on/off ........................... 162
System sensors ............................. 160
Warning indicators ...................27, 161
Parts service ...................................... 346
PASS AIR BAG OFF indicator lamp
(Canada only) see Front passenger front air bag
off indicator lamp (Canada only)
PASS AIR BAG OFF indicator lamp
(USA only) see Front passenger front air bag
off indicator lamp (USA only)
Passenger safety
see Occupant safety
Pedals ................................................. 244
Phone see Telephone
Plastic parts, cleaning ...................... 264
Power assistance .............................. 244
Power outlets .................................... 197
Power seats see Seats
Power tailgate
Closing ............................................. 76
Messages in the multifunction
display ........................................... 286
Opening ........................................... 76
Power tilt/sliding sunroof
Operation ....................................... 184
Synchronizing ................................ 186
Power washer .................................... 261
Power windows ................................. 100
Cleaning ......................................... 264
Operation ....................................... 100
Rear door window, override
switch .............................................. 60
Synchronizing ................................ 102
Practical hints ................................... 268
Preglow indicator lamp .............. 29, 104
PRE-SAFE ®
............................................ 52
Messages in the multifunction
display ........................................... 274
Problems
While driving .................................. 106
With vehicle ..................................... 23
With wipers .................................... 100
Product information ............................ 20
Production options weight ............... 24114Index164_AKB; 7; 31, en-USd2ureepe,Version: 2.11.8.12009-09-11T12:07:36+02:00 - Seite 14
Page 18 of 368

Securing cargo
Cargo tie-down rings ...................... 188
Selective setting
see Key, SmartKey
Selector lever
see Gear selector lever
Self-test
BabySmart™ .................................... 47
OCS (Occupant Classification
System) ........................................... 45
Tele Aid .......................................... 199
Service
see Maintenance
Service, parts .................................... 346
Service and warranty information ..... 20
Service intervals see Maintenance System, Service
indicator message
Service life (tires) .............................. 232
Settings
Factory setting (KEYLESS-GO) .........72
Factory setting (SmartKey) ..............71
Memory function .............................. 92
Menu ............................................. 129
Selective setting (KEYLESS-GO) .......73
Selective setting (SmartKey) ............71
Side impact air bags ........................... 40
Side marker lamps
Cleaning lenses ............................. 263
Messages in the multifunction
display ........................................... 293
Sidewall (tires) .................................. 241
SmartKey see Key, SmartKey
SmartKey with KEYLESS-GO
see Key, SmartKey
Snow chains ...................................... 243
Snow tires see Winter tires
Spare wheel ....................................... 352
Mounting ....................................... 324
Storage location ............................ 271
Speedometer ............................... 28, 146
Speed settings
Cruise control ................................ 142
Distronic ........................................ 148
Resume function ...................143, 149Sport Utility Vehicle
see SUV
SRS
Indicator lamp ...................29, 36, 301
Messages in the multifunction
display ........................................... 285
Standing water, driving through ...... 247
Starter switch positions
KEYLESS-GO .................................... 80
SmartKey ......................................... 79
Starting difficulties (engine) ............ 105
Starting the engine ........................... 103
Steering column see Multifunction steering wheel,
Adjustment
Steering wheel
see Multifunction steering wheel
Steering wheel gearshift control ..... 115
Stolen Vehicle Recovery Services ... 204
Storage compartments ..................... 192
Storing tires ....................................... 233
Stranded vehicle ............................... 342
Sunroof see Power tilt/sliding sunroof
Sun visors .......................................... 195
Suspension tuning see Air suspension program
SUV (Sport Utility Vehicle) ................. 22
T
Tachometer .................................. 29, 119
Overspeed range ........................... 119
Tailgate
Closing ............................................. 75
Messages in the multifunction
display ........................................... 286
Opening ........................................... 75
Power tailgate .................................. 76
Unlocking manually .......................307
Tail lamps ........................................... 312
Cleaning lenses ............................. 263
Messages in the multifunction
display ........................................... 295
Tar stains ........................................... 261
Technical data
Air conditioning refrigerant ............359
Brake fluid ..................................... 359
16Index164_AKB; 7; 31, en-USd2ureepe,Version: 2.11.8.12009-09-11T12:07:36+02:00 - Seite 16
Page 75 of 368

Unless you open a door or the tailgate within
approximately 40 seconds after unlocking
the vehicle:
RThe vehicle will be locked again.
RThe antitheft alarm system will be rearmed.
XGlobal locking: Press lock button : on an
outside door handle.
Selective setting
If you frequently travel alone, you may wish
to reprogram the SmartKey. Grasping the
driver’s outside door handle will then only
unlock the driver’s door and the fuel filler flap.
XSwitching on/off: Press and hold buttons
% and & simultaneously for
approximately 6 seconds until the battery
check lamp (Y page 73) flashes twice.
The SmartKey will then function as follows:
XUnlocking driver’s door and fuel filler
flap: Grasp the driver’s outside door
handle.
XGlobal unlocking: Grasp any outside door
handle other than the driver’s outside door
handle.
XGlobal locking: Press lock button : on an
outside door handle.Checking SmartKey batteries
Example illustration: SmartKey with KEYLESS-GO
XPress button & or % on the
SmartKey.
Battery check lamp : comes on briefly to
indicate that the SmartKey batteries are in
order.
If the battery check lamp does not come on
briefly during check, the SmartKey batteries
are discharged.
XReplace the batteries (Y page 309).
iYou can obtain the required batteries at
any authorized Mercedes-Benz Center.
iIf the batteries are checked within signal
range of the vehicle, pressing button
& or % will lock or unlock the vehicle
accordingly.
Loss of the SmartKey
If you lose your SmartKey or mechanical key,
you should do the following:
XHave the SmartKey deactivated by an
authorized Mercedes-Benz Center.
XReport the loss of the SmartKey or the
mechanical key to your car insurance
company immediately.
XHave the mechanical lock replaced if
necessary.
Any authorized Mercedes-Benz Center will be
glad to supply you with a replacement. For
Locking and unlocking73Controls in detail164_AKB; 7; 31, en-USd2ureepe,Version: 2.11.8.12009-09-11T12:07:36+02:00 - Seite 73Z
Page 81 of 368

Limiting opening height of tailgate
You can limit the opening height of the
tailgate in the upper opening range. This can
be useful, for example, when the space above
the tailgate is not sufficient.
Activating
XOpen the tailgate: Pull on handle
(Y page 75) or press and hold button
F on the SmartKey until the tailgate
opens.
XStop opening procedure: When the
tailgate is in the desired position, press
tailgate closing switch (Y page 77) or pull
on handle once more.
XYou can also press or pull the remote
tailgate opening/closing switch
(Y page 78) to stop the opening procedure.
XPress and hold the tailgate closing switch
in the tailgate (Y page 77) until you hear a
short acoustic signal.
The opening height of the tailgate is limited.
The tailgate will now stop at the stored
position when opened.
Deactivating
XPress and hold the tailgate closing switch
in the tailgate (Y page 77) until you hear
two short, consecutive acoustic signals.
Starter switch positions
SmartKey
GObserve Safety notes, see page 55.
Starter switch
gFor removing SmartKey1Power supply for some electrical
consumers, e.g. radio
2Ignition (power supply for all electrical
consumers) and driving position
3Starting position
When you switch on the ignition, all lamps
(except low-beam headlamp indicator lamp,
high-beam headlamp indicator lamp, and turn
signal indicator lamps unless activated) in the
instrument cluster come on. If a lamp in the
instrument cluster fails to come on when the
ignition is switched on, have it checked and
replaced if necessary. If a lamp in the
instrument cluster remains on after starting
the engine or comes on while driving, refer to
“Lamps in instrument cluster” (Y page 297).
XAlways remove the SmartKey from the
starter switch when the engine is not in
operation.
This will help to prevent accelerated vehicle
battery discharge or a completely
discharged vehicle battery.
If the SmartKey cannot be turned in the
starter switch, the vehicle battery may not be
sufficiently charged.
XCheck the vehicle battery and charge it if
necessary.
or
Starter switch positions79Controls in detail164_AKB; 7; 31, en-USd2ureepe,Version: 2.11.8.12009-09-11T12:07:36+02:00 - Seite 79Z
Page 105 of 368

of anyone being harmed by the closing
procedure.
If potential danger exists, proceed as follows:
R Release button & to stop the closing
procedure. To open, press and hold button
% . To continue the closing procedure
after making sure that there is no danger of
anyone being harmed by the closing
procedure, press and hold button &.
Vehicles with KEYLESS-GO:
R Release the lock button on the outside door
handle to stop the closing procedure.
R Immediately pull on the same outside door
handle and hold firmly. The door windows
and the tilt/sliding sunroof will open for as
long as the door handle is held but the door
not opened.
With SmartKey
The SmartKey must be in close proximity to
the driver’s outside door handle.
XAim transmitter eye of the SmartKey at the
driver’s outside door handle.XPress and hold button & on the
SmartKey until the door windows and the
tilt/sliding sunroof are closed completely.XRelease button & on the SmartKey to
interrupt the closing procedure.
With KEYLESS-GO
The SmartKey with KEYLESS-GO must be
located outside the vehicle within
approximately 3 ft (1 m) of a door.
XClose all doors.XPress and hold the lock button on an
outside door handle ( Y page 73) until the
door windows and the tilt/sliding sunroof
are closed completely.XRelease the lock button on the outside door
handle to interrupt the closing procedure.Driving and parking
Safety notes
GWarning!
Make sure absolutely no objects are
obstructing the pedals’ range of movement.
Keep the driver’s footwell clear of all
obstacles. If there are any floormats or
carpets in the footwell, make sure the pedals
still have sufficient clearance.
During sudden driving or braking maneuvers
the objects could get caught between the
pedals. You could then no longer brake or
accelerate. This could lead to accidents and
injury.
GWarning!
With the engine not running, there is no power
assistance for the brake and steering
systems. In this case, it is important to keep
in mind that a considerably higher degree of
effort is necessary to brake and steer the
vehicle. Adapt your driving accordingly.
GWarning!
HYBRID vehicles: It is imperative that you read
the HYBRID Supplemental Operating
Instructions included in your vehicle literature
portfolio. You may otherwise not recognize
potential danger.
Starting the engine
GWarning!
Inhalation of exhaust gas is hazardous to your
health. All exhaust gas contains carbon
monoxide (CO), and inhaling it can cause
unconsciousness and possible death.
Do not run the engine in confined areas (such
as a garage) which are not properly ventilated.
If you think that exhaust gas fumes are
entering the vehicle while driving, have the
cause determined and corrected
immediately. If you must drive under these
Driving and parking103Controls in detail164_AKB; 7; 31, en-USd2ureepe,Version: 2.11.8.12009-09-11T12:07:36+02:00 - Seite 103Z
Page 111 of 368

Otherwise the vehicle could roll away which
could result in an accident and/or serious
personal injury.
iIn an emergency you can turn off the
engine while driving by pressing and
holding the KEYLESS-GO start/stop button
for approximately 3 seconds.
If you have started the engine with the
KEYLESS-GO start/stop button and cannot
turn it off as described above:
XRemove the KEYLESS-GO start/stop
button from the starter switch.
XInsert the SmartKey into the starter switch.
The engine turns off. The starter switch is
in position 0 (Y page 79).
Automatic transmission
Introduction
For information on driving with an automatic
transmission, see “Driving and parking”
(Y page 103).
GWarning!
Make sure absolutely no objects are
obstructing the pedals’ range of movement.
Keep the driver’s footwell clear of all
obstacles. If there are any floormats or
carpets in the footwell, make sure the pedals
still have sufficient clearance.
During sudden driving or braking maneuvers
the objects could get caught between the
pedals. You could then no longer brake or
accelerate. This could lead to accidents and
injury.
GWarning!
HYBRID vehicles: It is imperative that you read
the HYBRID Supplemental Operating
Instructions included in your vehicle literature
portfolio. You may otherwise not recognize
potential danger.
! Allow the engine to warm up under low
load use. Do not place full load on the
engine until the operating temperature has
been reached.
Avoid spinning of a drive wheel for an
extended period when driving off on
slippery road surfaces.
This may cause serious damage to the
engine and the drivetrain which is not
covered by the Mercedes-Benz Limited
Warranty.
iDuring the brief warm-up, transmission
upshifting is delayed. This allows the
catalytic converter (gasoline engine) or
oxidation catalyst (diesel engine) to heat up
more quickly to operating temperature.
Gear selector lever
Gearshift pattern for automatic transmission
:Button for selecting park position PjPark positionkReverse geariNeutral positionhDrive positionGWarning!
It is dangerous to shift the automatic
transmission out of park position P or neutral
position N if the engine speed is higher than
idle speed. If your foot is not firmly on the
brake pedal, the vehicle could accelerate
quickly forward or in reverse. You could lose
control of the vehicle and hit someone or
Automatic transmission109Controls in detail164_AKB; 7; 31, en-USd2ureepe,Version: 2.11.8.12009-09-11T12:07:36+02:00 - Seite 109Z
Page 117 of 368

One-touch gearshifting
With the automatic transmission in drive
position D, you can limit or extend the gear
range using the steering wheel gearshift
control.
ML 63 AMG: You only can limit or extend the
gear range when driving in automatic
program mode C or S. For information on
using the steering wheel gearshift control in
manual program mode M, see “Manual shift
program” (Y page 115).
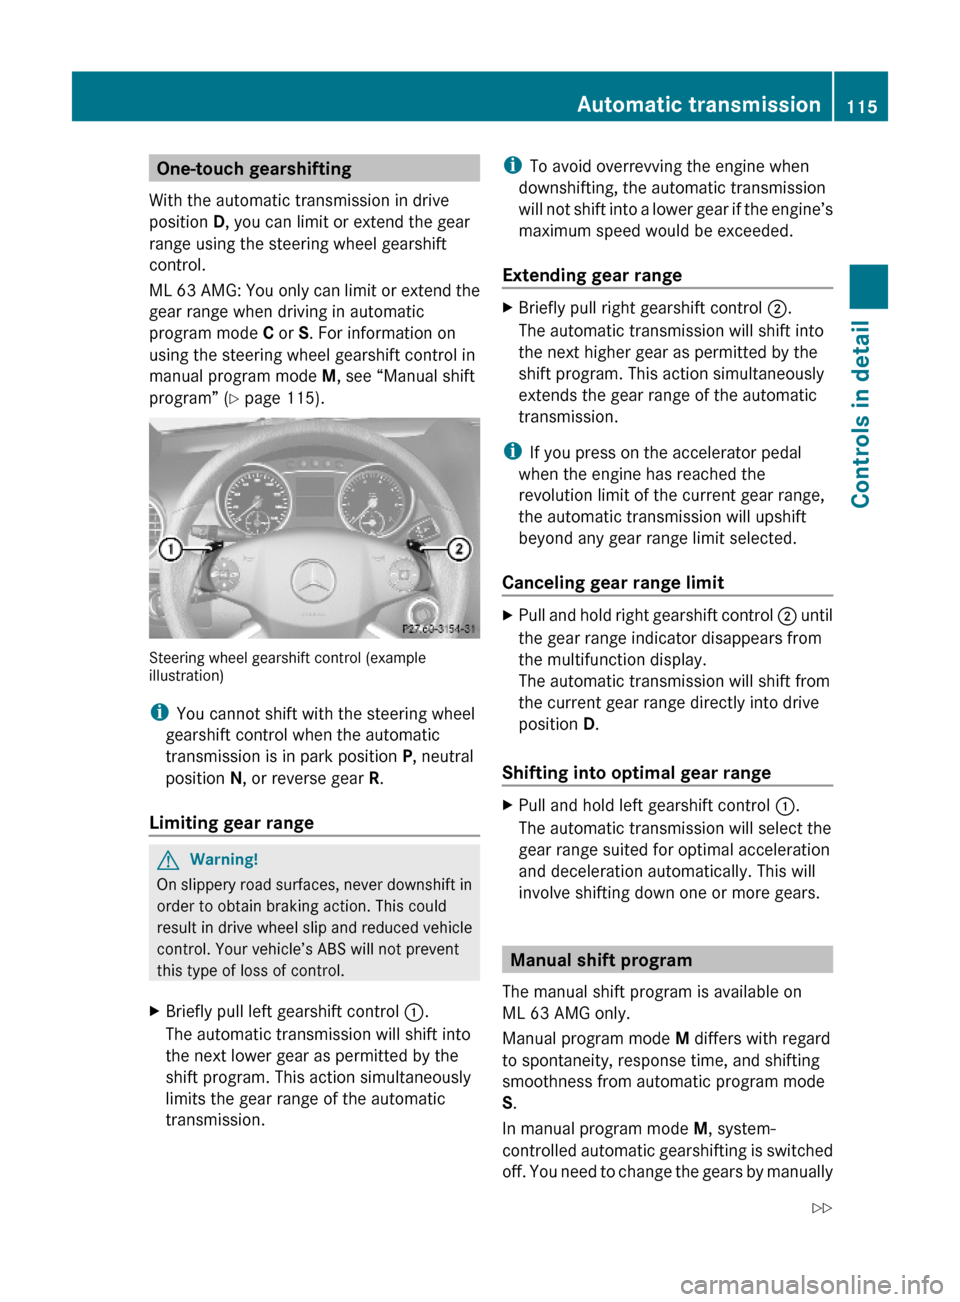
Steering wheel gearshift control (exampleillustration)
iYou cannot shift with the steering wheel
gearshift control when the automatic
transmission is in park position P, neutral
position N, or reverse gear R.
Limiting gear range
GWarning!
On slippery road surfaces, never downshift in
order to obtain braking action. This could
result in drive wheel slip and reduced vehicle
control. Your vehicle’s ABS will not prevent
this type of loss of control.
XBriefly pull left gearshift control :.
The automatic transmission will shift into
the next lower gear as permitted by the
shift program. This action simultaneously
limits the gear range of the automatic
transmission.
iTo avoid overrevving the engine when
downshifting, the automatic transmission
will not shift into a lower gear if the engine’s
maximum speed would be exceeded.
Extending gear range
XBriefly pull right gearshift control ;.
The automatic transmission will shift into
the next higher gear as permitted by the
shift program. This action simultaneously
extends the gear range of the automatic
transmission.
iIf you press on the accelerator pedal
when the engine has reached the
revolution limit of the current gear range,
the automatic transmission will upshift
beyond any gear range limit selected.
Canceling gear range limit
XPull and hold right gearshift control ; until
the gear range indicator disappears from
the multifunction display.
The automatic transmission will shift from
the current gear range directly into drive
position D.
Shifting into optimal gear range
XPull and hold left gearshift control :.
The automatic transmission will select the
gear range suited for optimal acceleration
and deceleration automatically. This will
involve shifting down one or more gears.
Manual shift program
The manual shift program is available on
ML 63 AMG only.
Manual program mode M differs with regard
to spontaneity, response time, and shifting
smoothness from automatic program mode
S.
In manual program mode M, system-
controlled automatic gearshifting is switched
off. You need to change the gears by manually
Automatic transmission115Controls in detail164_AKB; 7; 31, en-USd2ureepe,Version: 2.11.8.12009-09-11T12:07:36+02:00 - Seite 115Z
Page 118 of 368

upshifting or downshifting using the steering
wheel gearshift control.
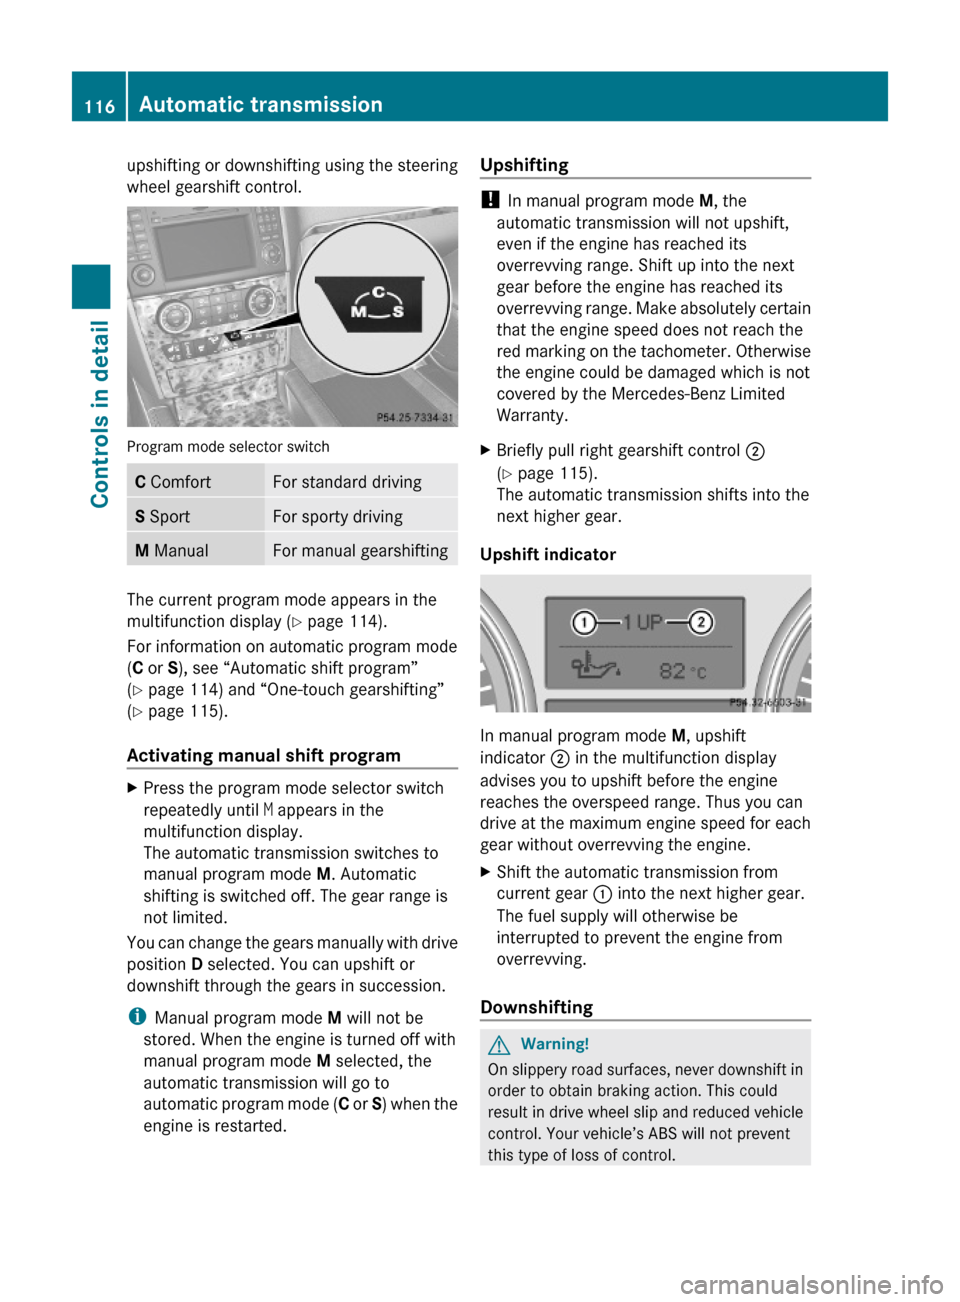
Program mode selector switch
C ComfortFor standard drivingS SportFor sporty drivingM ManualFor manual gearshifting
The current program mode appears in the
multifunction display (Y page 114).
For information on automatic program mode
(C or S), see “Automatic shift program”
(Y page 114) and “One-touch gearshifting”
(Y page 115).
Activating manual shift program
XPress the program mode selector switch
repeatedly until M appears in the
multifunction display.
The automatic transmission switches to
manual program mode M. Automatic
shifting is switched off. The gear range is
not limited.
You can change the gears manually with drive
position D selected. You can upshift or
downshift through the gears in succession.
iManual program mode M will not be
stored. When the engine is turned off with
manual program mode M selected, the
automatic transmission will go to
automatic program mode (C or S) when the
engine is restarted.
Upshifting
! In manual program mode M, the
automatic transmission will not upshift,
even if the engine has reached its
overrevving range. Shift up into the next
gear before the engine has reached its
overrevving range. Make absolutely certain
that the engine speed does not reach the
red marking on the tachometer. Otherwise
the engine could be damaged which is not
covered by the Mercedes-Benz Limited
Warranty.
XBriefly pull right gearshift control ;
(Y page 115).
The automatic transmission shifts into the
next higher gear.
Upshift indicator
In manual program mode M, upshift
indicator ; in the multifunction display
advises you to upshift before the engine
reaches the overspeed range. Thus you can
drive at the maximum engine speed for each
gear without overrevving the engine.
XShift the automatic transmission from
current gear : into the next higher gear.
The fuel supply will otherwise be
interrupted to prevent the engine from
overrevving.
Downshifting
GWarning!
On slippery road surfaces, never downshift in
order to obtain braking action. This could
result in drive wheel slip and reduced vehicle
control. Your vehicle’s ABS will not prevent
this type of loss of control.
116Automatic transmissionControls in detail
164_AKB; 7; 31, en-USd2ureepe,Version: 2.11.8.12009-09-11T12:07:36+02:00 - Seite 116